Workspace Admin access is required to create OAuth2 applications in Linear.

Create an OAuth2 application

Register an OAuth2 application in Linear to obtain a Client ID and Client secret.

1

Sign in to Linear

Sign in to your Linear account.

  • Click your avatar in the top-left corner and select Settings.
2

Open the API settings

In the left sidebar under Administration, click API.

  • In the OAuth applications section, click the + (New OAuth application) button.
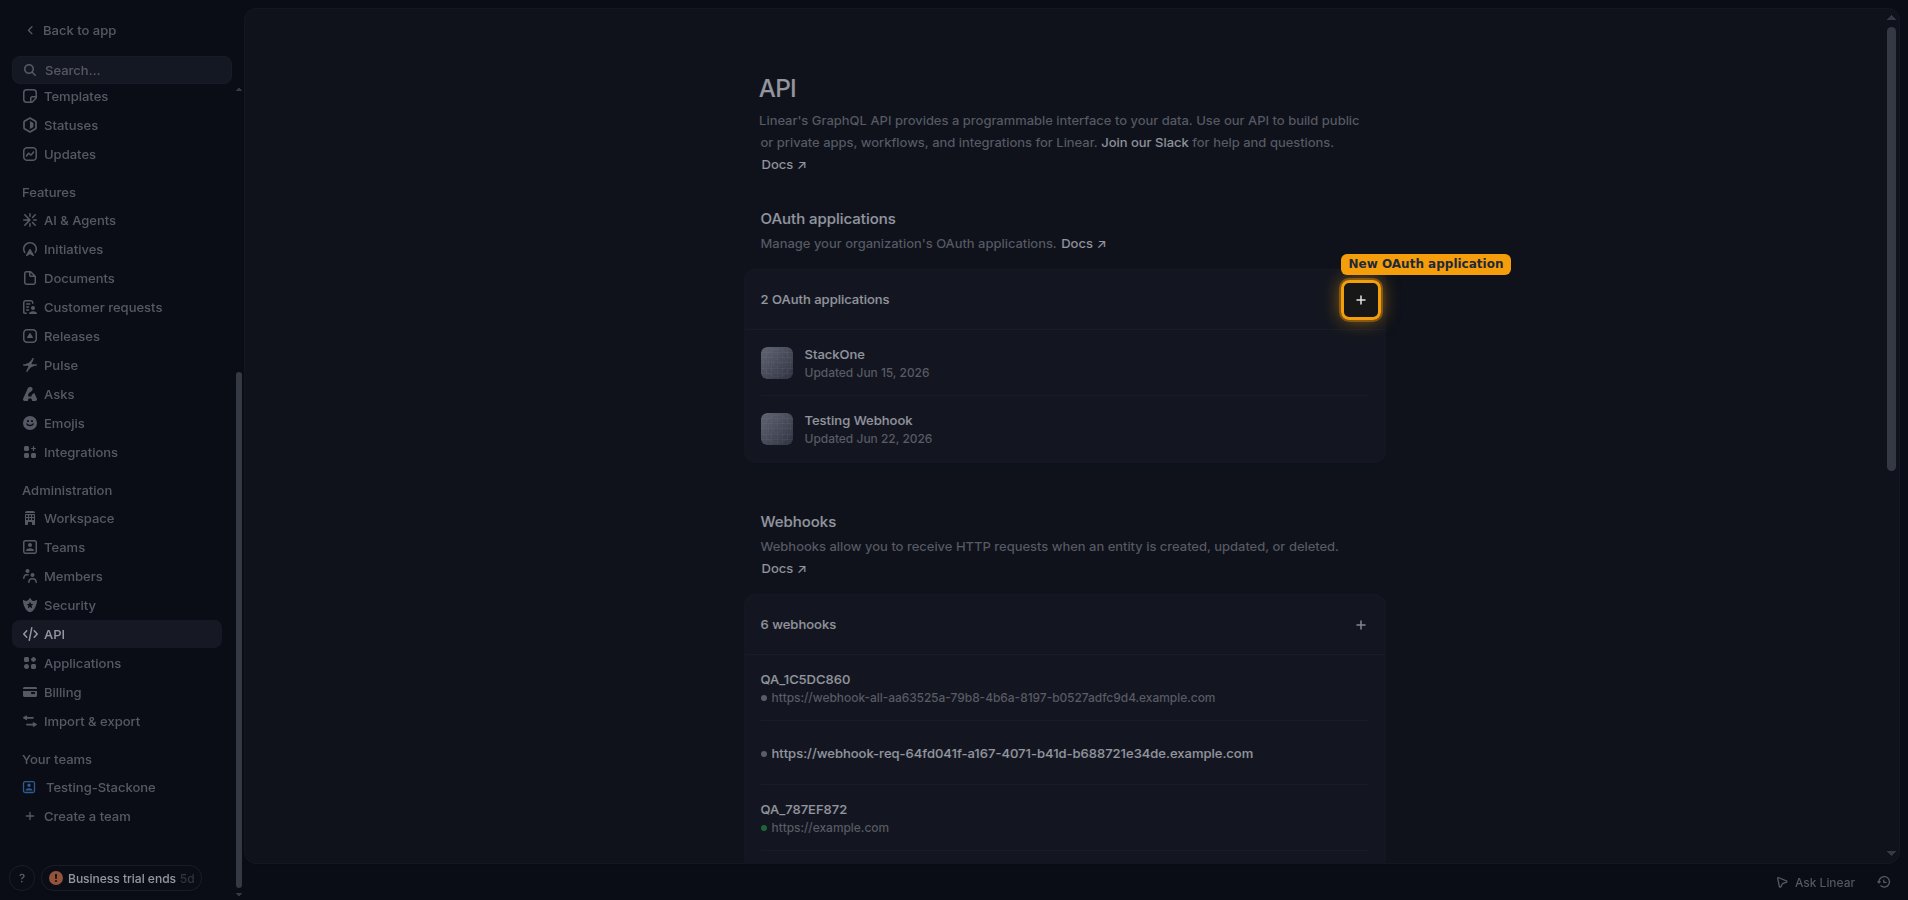
The API settings page with the New OAuth application button highlighted in the OAuth applications section.
3

Fill in the application details

Complete the Create new application form.

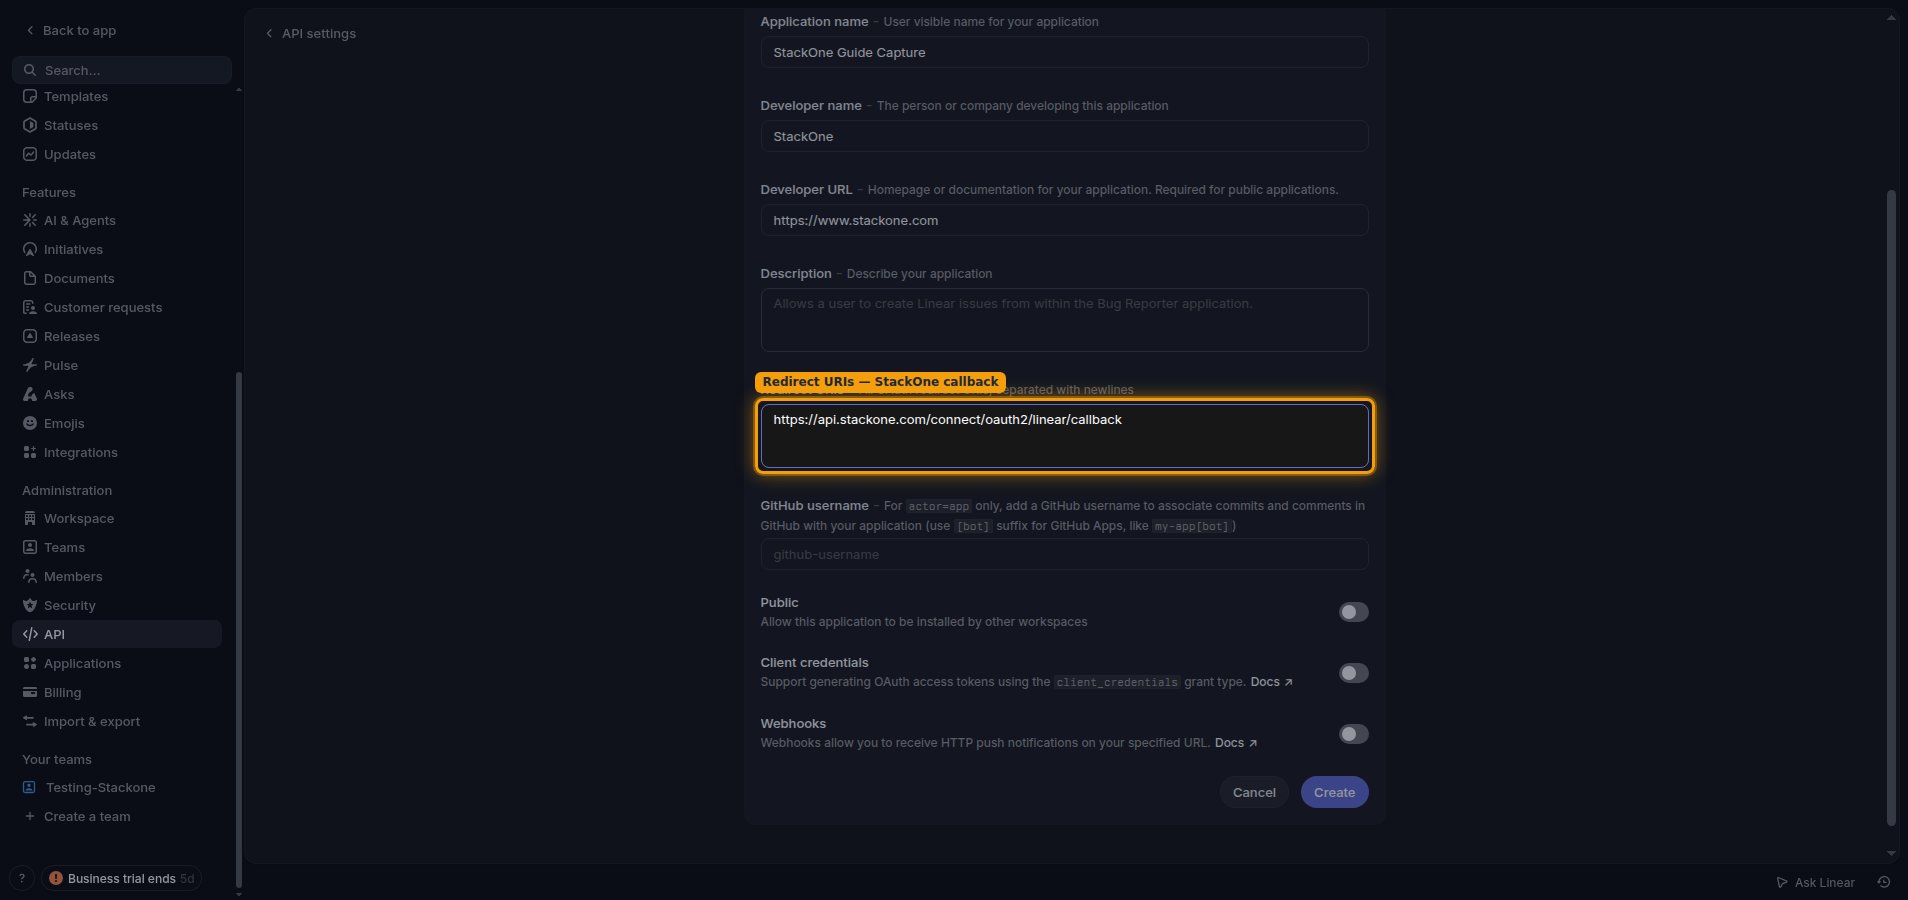
  • Application name: a user-visible name for your application, for example StackOne.
  • Developer name: the person or company developing this application.
  • Developer URL: your homepage or documentation URL, for example https://yourcompany.com.
  • In Redirect URIs, enter https://api.stackone.com/connect/oauth2/linear/callback.
  • Optionally add a Description.
  • Leave GitHub username blank and the Public, Client credentials, and Webhooks toggles off unless your integration specifically requires them.
  • Click Create.
The Create new application form with the Redirect URIs field populated with the StackOne callback URL.
4

Copy the Client ID and Client secret

After creating the application, open the OAuth credentials section and copy the values. Paste them into the Client ID and Client Secret fields in the StackOne Connector profile.

  • Use the Copy to clipboard button next to Client ID and Client secret.
  • Store the Client secret securely — it is only shown here and must never be shared publicly.
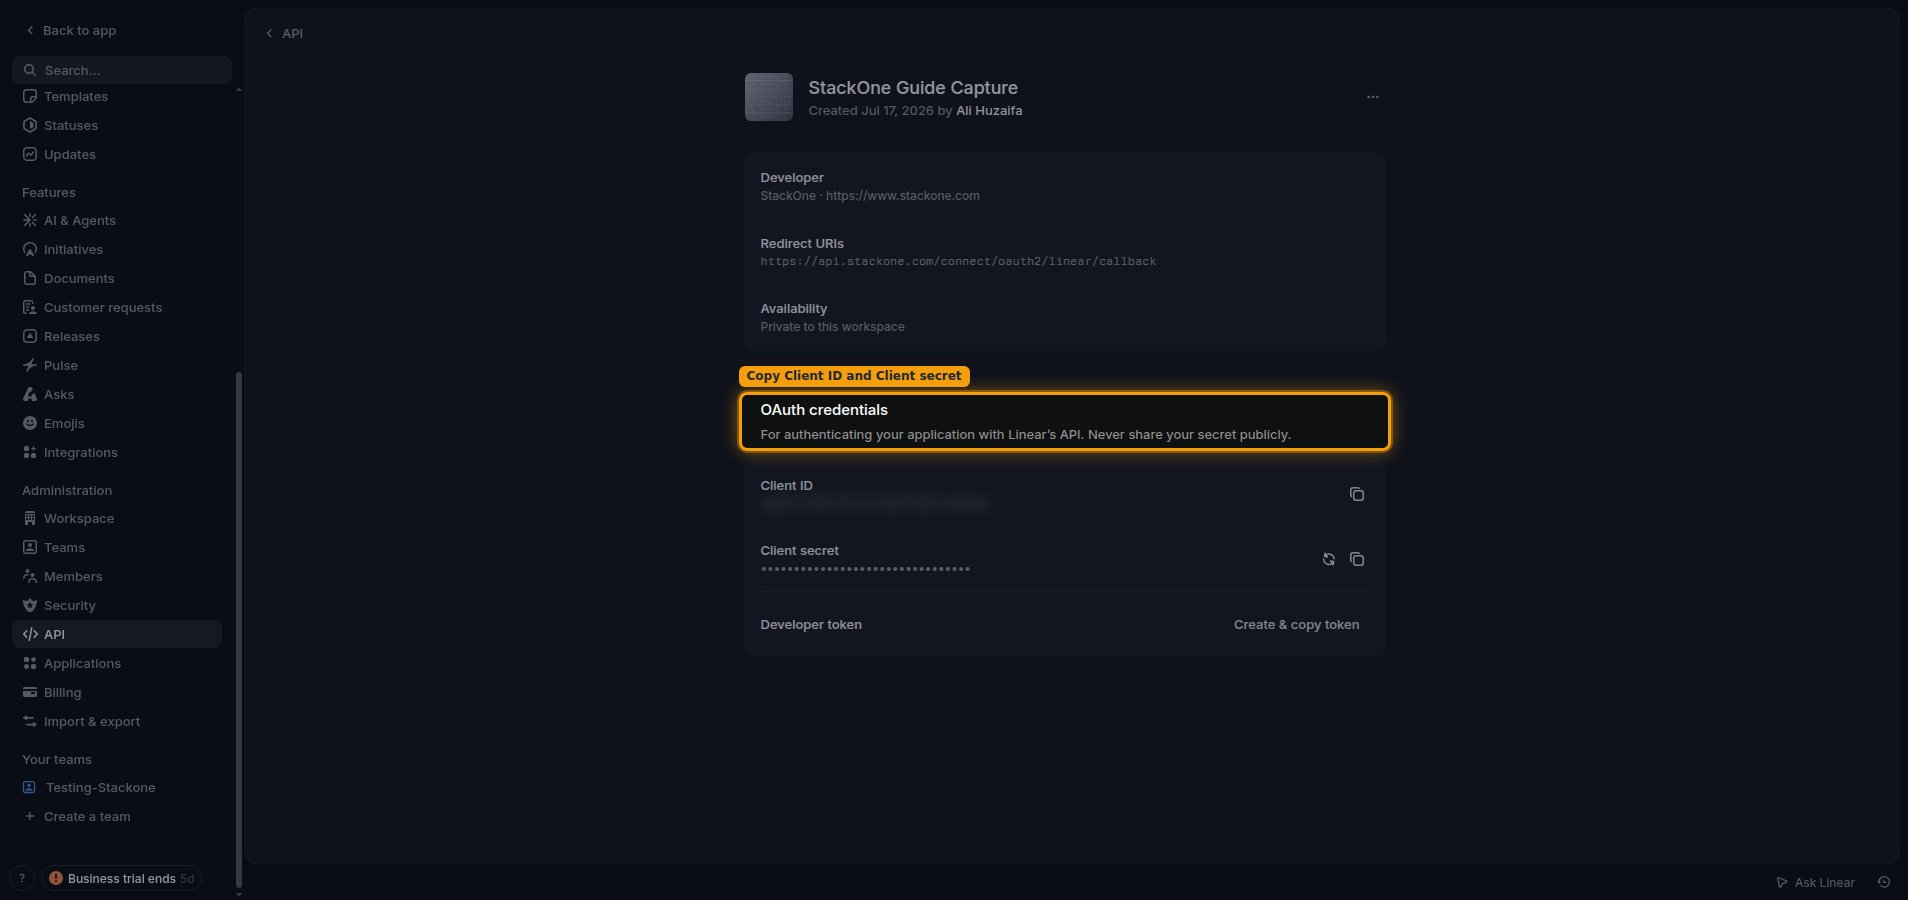
The OAuth credentials section showing the Client ID and Client secret each with a copy-to-clipboard button.
5

Choose the scopes to request

Enables actions: Archive Cycle, Archive Initiative, Archive Issue, Archive Project, Archive Project Status, Batch Create Issues, Batch Update Issues, Complete Release, Create Attachment, Create Comment, Create Custom View, Create Customer, Create Customer Need, Create Customer Status, Create Customer Tier, Create Cycle, Create Document, Create Favorite, Create Initiative, Create Initiative To Project Link, Create Initiative Update, Create Issue, Create Issue Label, Create Issue Relation, Create Notification Subscription, Create Organization Invite, Create Project, Create Project Label, Create Project Milestone, Create Project Status, Create Project Update, Create Reaction, Create Release, Create Team, Create Team Membership, Create Template, Create Webhook, Create Workflow State, Delete Attachment, Delete Comment, Delete Custom View, Delete Customer, Delete Customer Need, Delete Customer Status, Delete Customer Tier, Delete Document, Delete Favorite, Delete Initiative, Delete Initiative To Project Link, Delete Issue, Delete Issue Label, Delete Issue Relation, Delete Project, Delete Project Label, Delete Project Milestone, Delete Reaction, Delete Release, Delete Team, Delete Team Membership, Delete Template, Delete Webhook, File Upload, Get Agent Session, Get Application Info, Get Comment, Get Customer, Get Customer Need, Get Customer Status, Get Customer Tier, Get Cycle, Get Document, Get External User, Get Initiative, Get Issue, Get Issue Label, Get Project, Get Project Label, Get Project Milestone, Get Project Status, Get Team, Get Unified Credentials, Get User, Get Viewer, Get Webhook, Get Workflow State, Issue Filter Suggestion, List Agent Sessions, List Comments, List Customer Needs, List Customer Statuses, List Customer Tiers, List Customers, List Cycles, List Documents, List External Users, List Favorites, List Initiatives, List Issue Labels, List Issues, List Project Labels, List Project Milestones, List Project Statuses, List Projects, List Team Memberships, List Teams, List Users, List Webhooks, List Workflow States, Resolve Comment, Rotate Webhook Secret, Search Issues, Suspend User, Unarchive Issue, Unresolve Comment, Update Attachment, Update Comment, Update Custom View, Update Customer, Update Customer Need, Update Customer Status, Update Customer Tier, Update Cycle, Update Document, Update Initiative, Update Issue, Update Issue Label, Update Organization, Update Project, Update Project Label, Update Project Milestone, Update Project Status, Update Release, Update Team, Update Template, Update User, Update Webhook, Update Workflow State, Upsert Customer

In the Scopes field of the StackOne Connector profile, enter the comma-separated scopes this integration needs, or leave it blank to request the default read,write,admin. read grants read access to the account and is always present; write grants write access to create and update Linear resources; issues:create allows creating new issues and their attachments; comments:create allows creating new issue comments; and admin grants full access to admin-level endpoints. The admin scope is required for webhook management, updating workspace/organization settings, and creating or modifying customer statuses, customer tiers, and project statuses — these actions fail with an “admin required” error without it, even for workspace admins, because Linear treats admin as a separate token grant from the user’s role. Leave admin in place to enable the full connector; remove it only if your integration never uses those admin-gated actions.

Creating the StackOne Connector Profile

To create the Connector Profile in StackOne for Linear:
1

Navigate to Connector Profiles

Login to StackOne and navigate to Connector Profiles
2

Create New Connector Profile

  • Click + Connector Profile
  • Search for and select Linear
  • Select Type as OAuth 2.0
  • Fill out the fields using details retrieved from your provider:
    • Client ID
    • Client Secret
    • Scopes (Optional)
  • (Optional) Select Actions to be enabled for this Connector Profile
  • Click Create profile
Congratulations! The new Connector Profile will now show up in your project ready to be used. You can now continue to Link Accounts for Linear.