

Prerequisites
The connector should already be set up, with a Connector Profile and a Linked Account. See Getting Started on the Freshdesk connector page.Retrieve StackOne Native Webhook URL
The Native Webhook URL is shown in the Freshdesk connection form in StackOne Hub, below Domain and API Key. Freshdesk posts every event to this URL, so copy it before you finish linking the account.
- Open the Freshdesk connection form in StackOne Hub — either while linking a new account, or by reopening an account you have already linked.
- Copy the read-only Native Webhook URL value.
- The URL carries a secure key that authenticates every delivery, so treat it like a password — anyone holding it can post events to this connection.
Configure the Ticket Creation rule
Freshdesk delivers webhooks from an automation rule, not from a webhook settings page. Create one rule on ticket creation so StackOne receives an event whenever a ticket is raised.
Open the Workflows settings
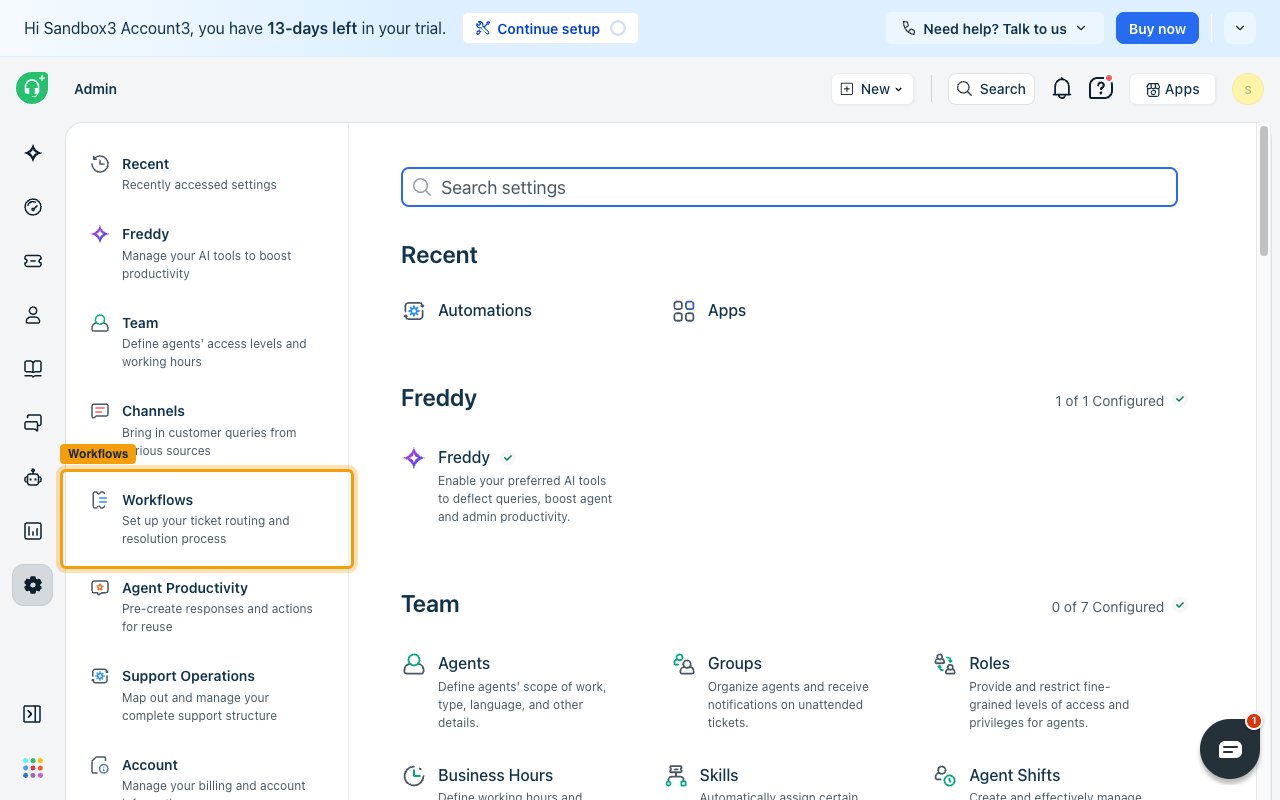
Sign in to your Freshdesk account as an admin, then open Admin.
- Click Workflows in the left menu to jump to the ticket routing and resolution settings.
Open Automations
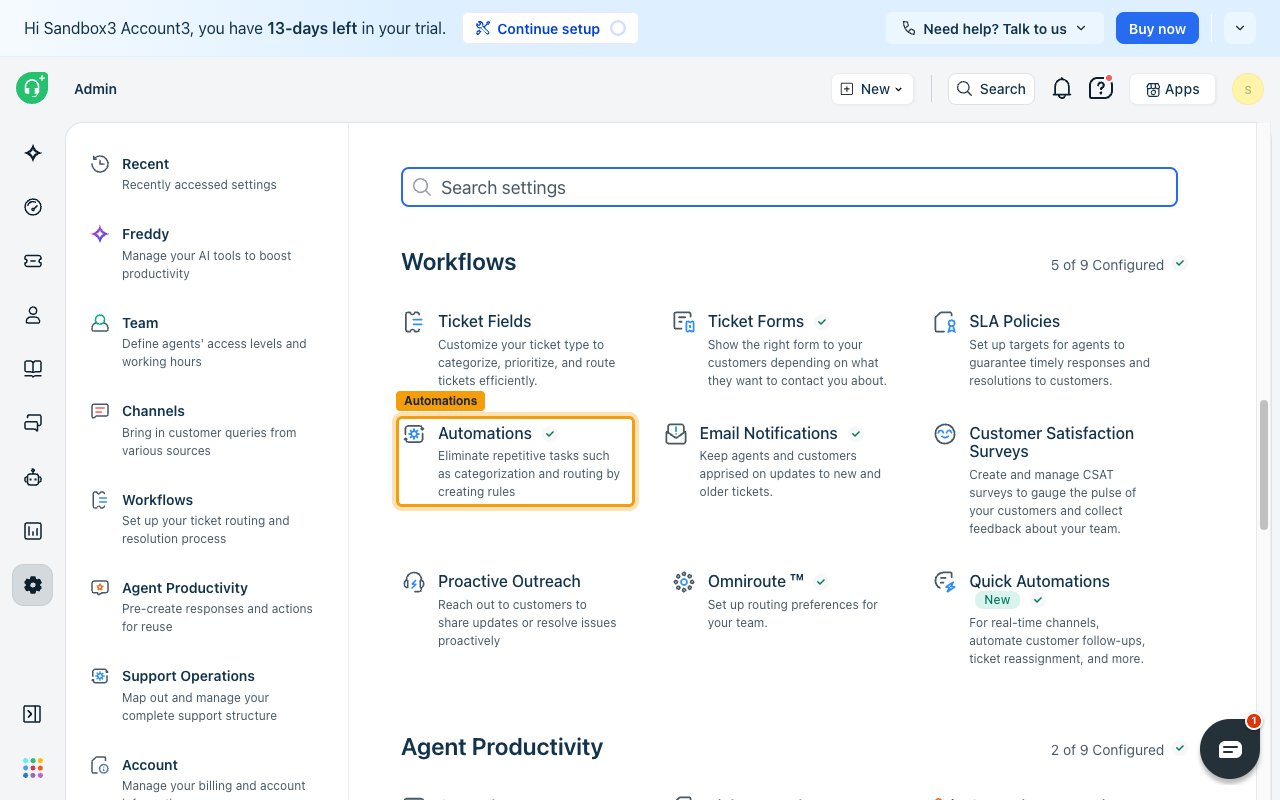
In the Workflows group, click Automations — the card described as “Eliminate repetitive tasks such as categorization and routing by creating rules”.
Create a rule on ticket creation
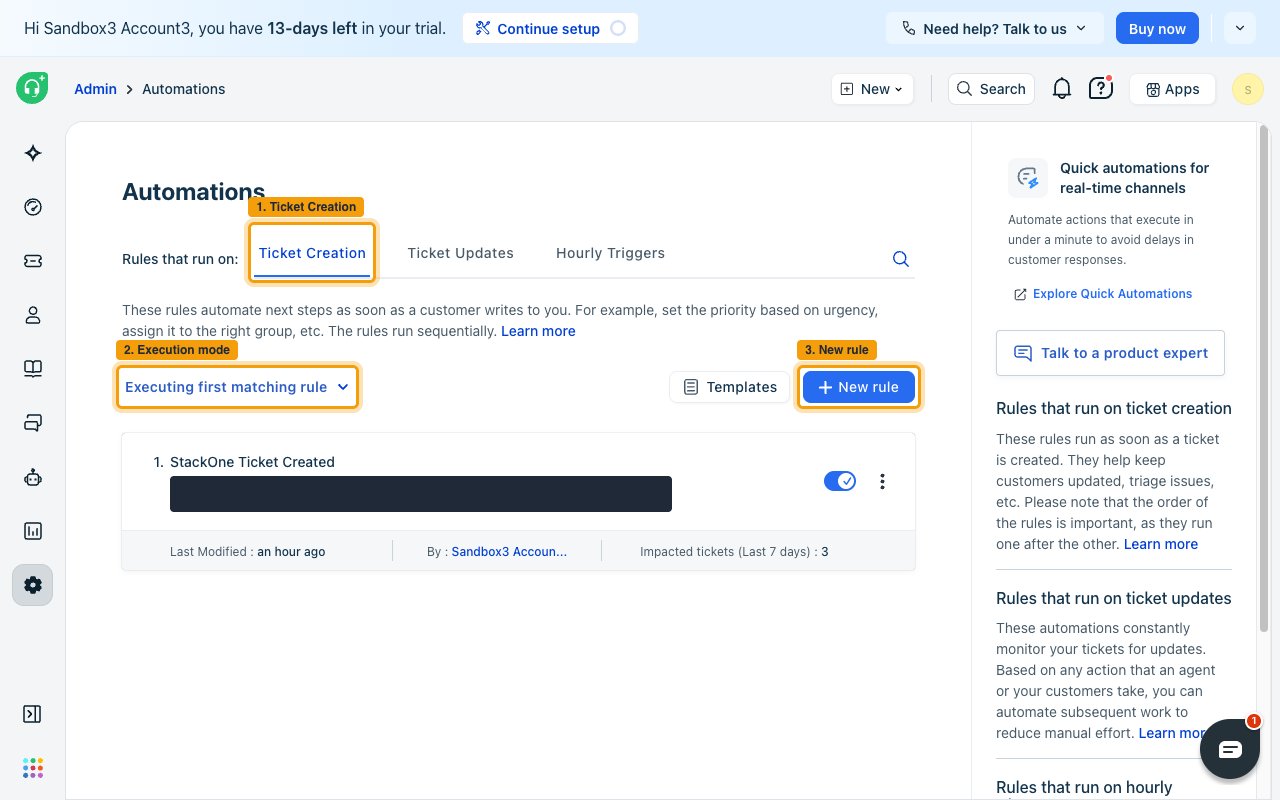
On the Automations page, select the Ticket Creation tab and click New rule. Give the rule a name such as StackOne Ticket Created.
- Note: check the execution mode shown above the rule list. When it reads Executing first matching rule, only the first matching rule runs — place this rule first, or an earlier rule will stop it from firing.
Set the condition
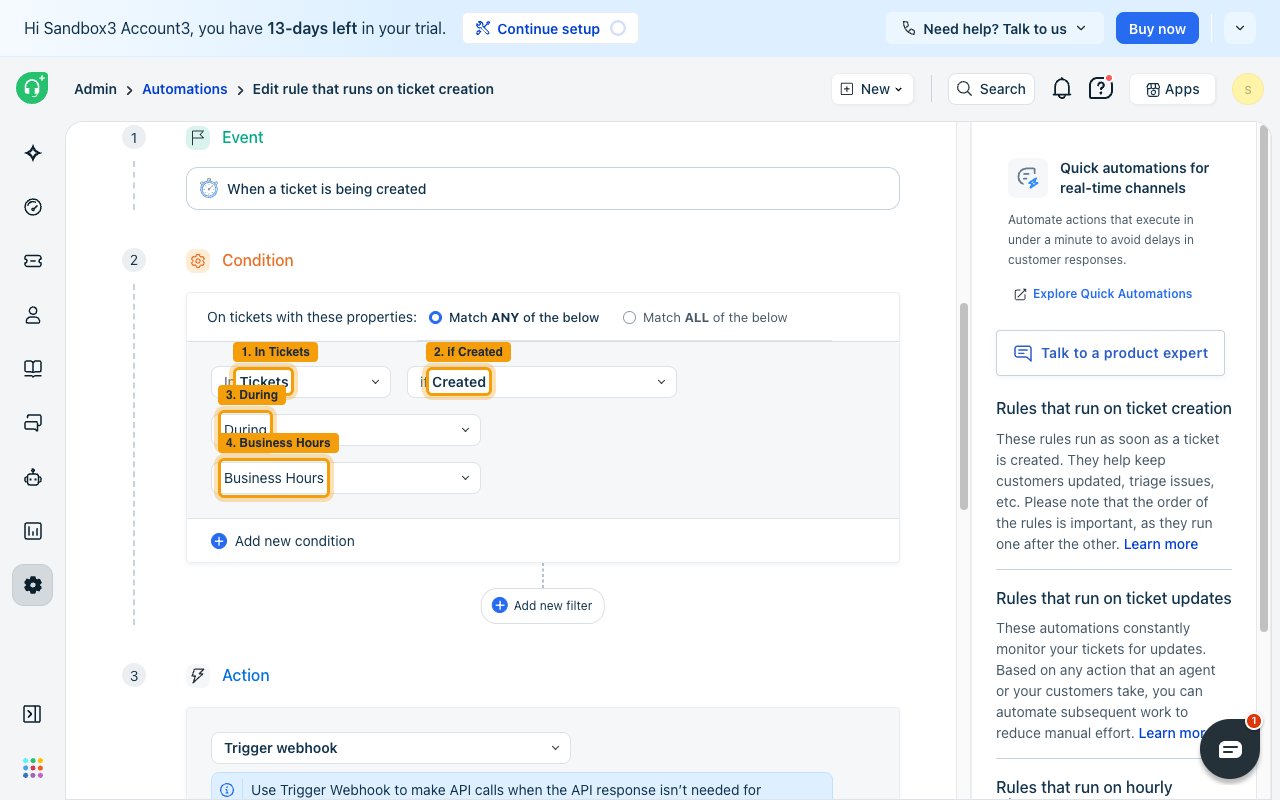
Under Condition, set one row to In Tickets > if Created > During > Business Hours and leave Match ANY of the below selected. A ticket creation rule cannot be saved without at least one condition.
- Tickets raised outside your business hours do not match this condition, so no event is sent for those. Business hours are set under Admin > Business Hours.
- To deliver every ticket instead, use a condition every ticket satisfies — for example Priority with all four values Low, Medium, High, and Urgent selected.
Add the Trigger webhook action
Under Action, open Choose action.
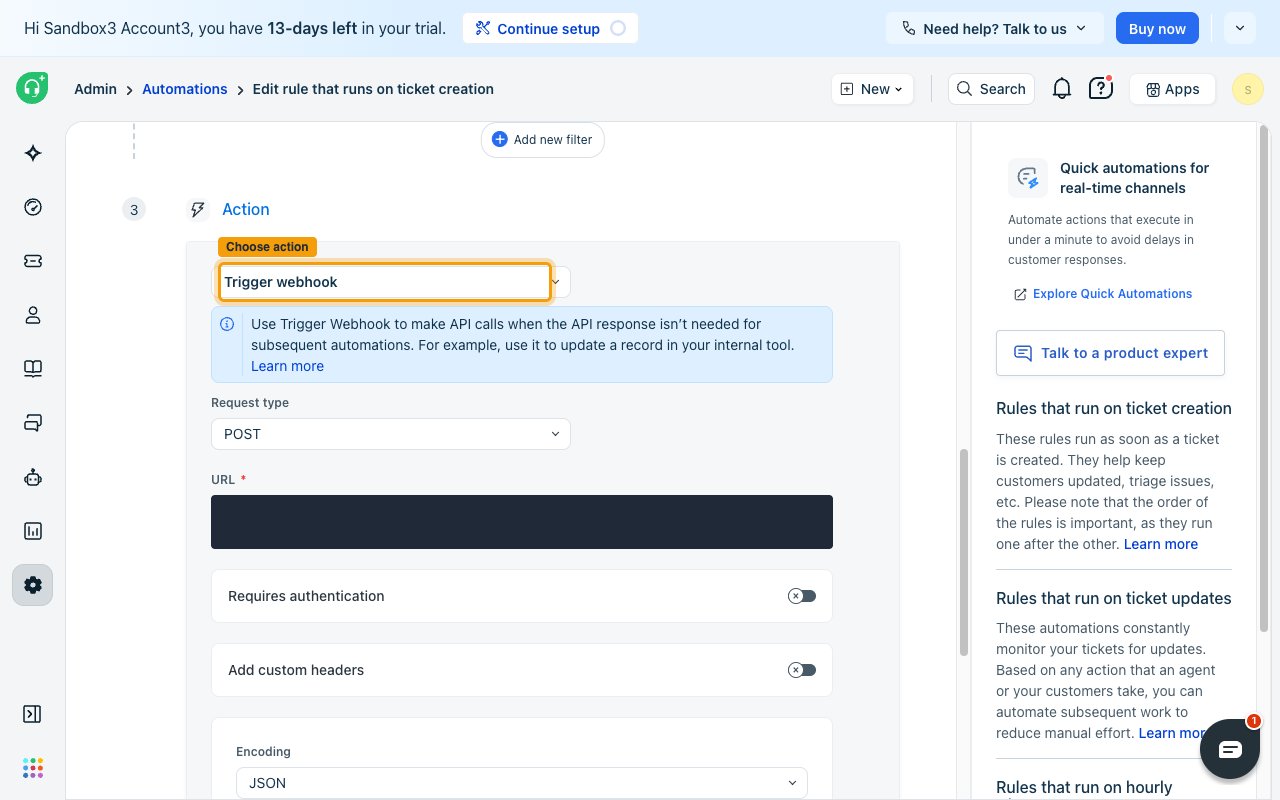
Select Trigger webhook
Select Trigger webhook from the action list. Typing Trigger filters the list, which holds 22 actions.
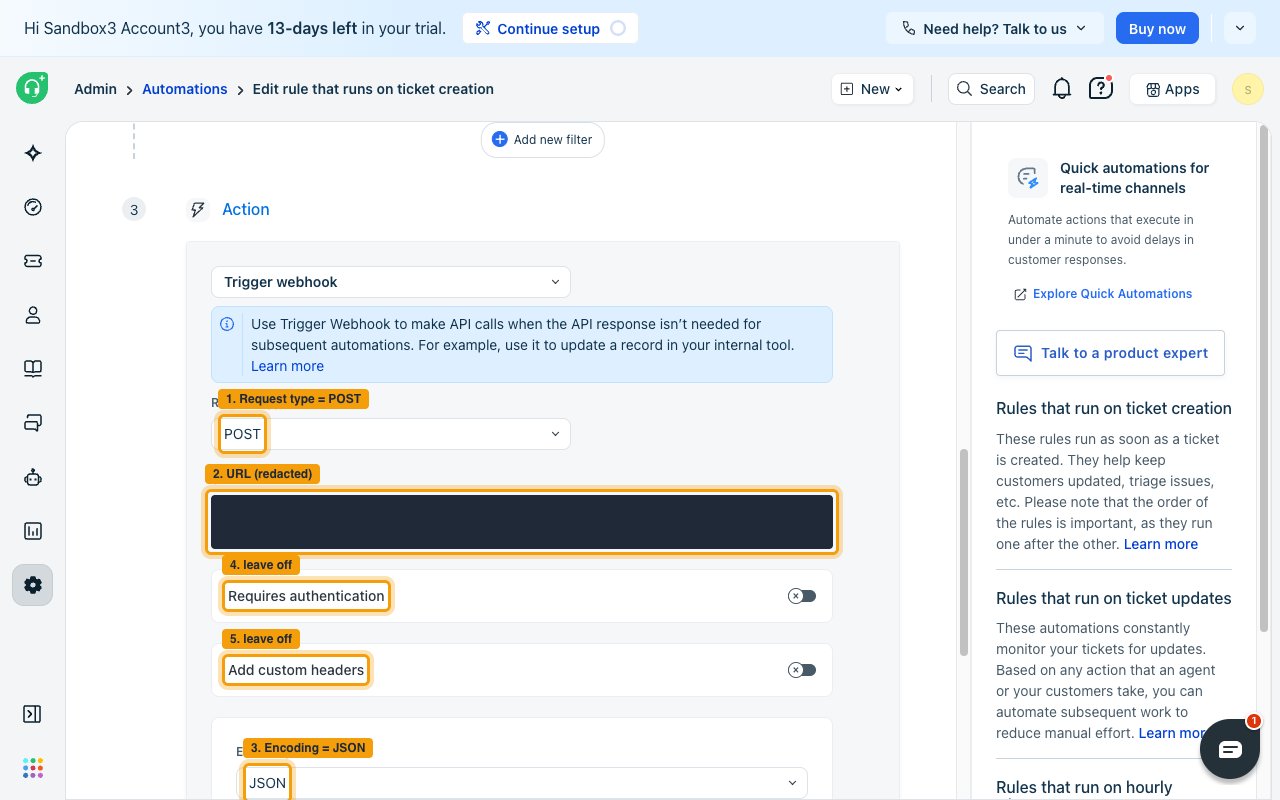
Paste the Native Webhook URL
Paste the Native Webhook URL you copied earlier into URL, and leave Encoding set to JSON.
- Leave Requires authentication off — the secure key in the URL authenticates the delivery.
- Leave Add custom headers off.
Select the ticket properties to send
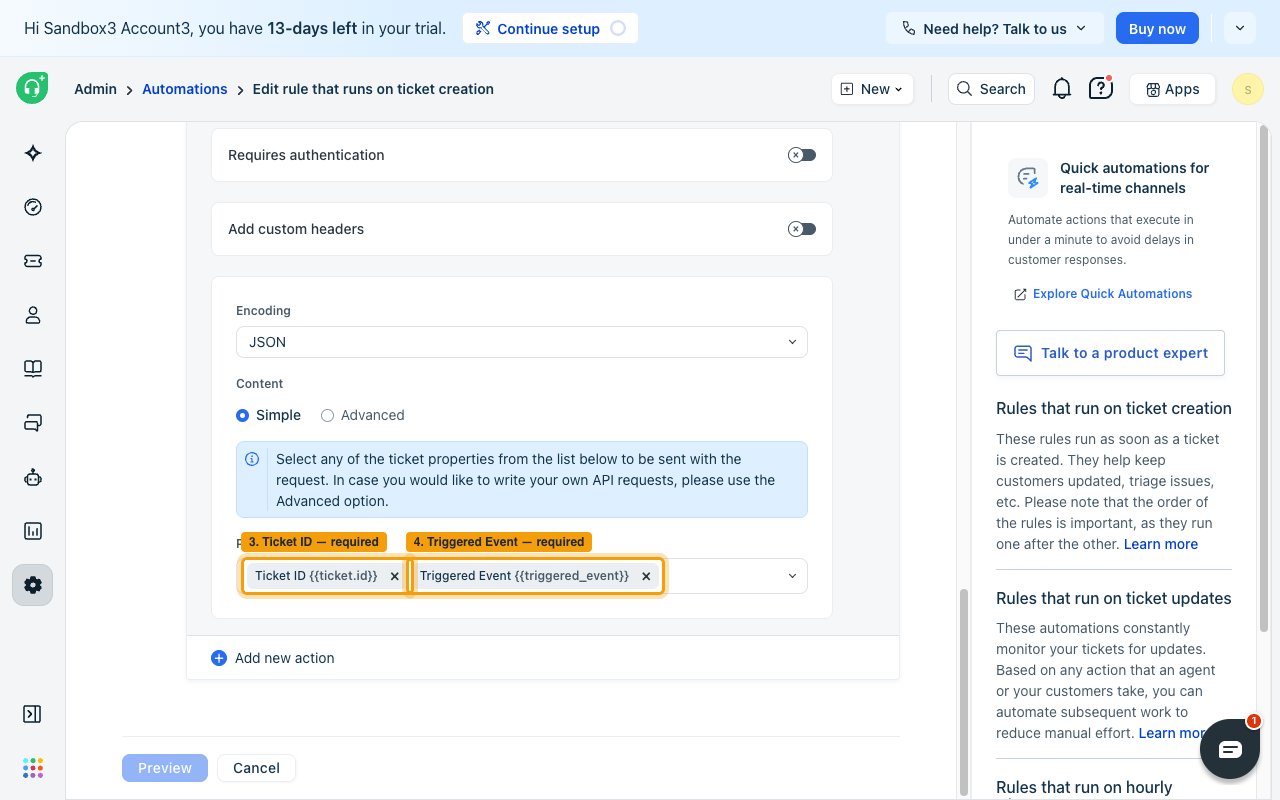
Leave Content set to Simple, then open Placeholders. Ticket ID and Triggered Event are required — select both. Every other property in the list is optional; add any you also want on the event.
- Neither required property has a fallback. Ticket ID becomes the event’s record id, and Triggered Event becomes the event type and decides whether the delivery is handled as a created or an updated ticket.
- Without Triggered Event, the delivery matches no event handler and is not emitted at all. Without Ticket ID, the event is emitted with an empty record id and consumers cannot tell which ticket it refers to.
- Add any other properties you want included in the event payload.
Save and enable the rule
Click Preview, check the summary, then click Save and enable.
Configure the Ticket Updates rule
Create a second rule on ticket updates so StackOne receives an event whenever a ticket changes. The webhook action is configured exactly as it was on the creation rule — only the Event block differs, because an update rule has to be told which changes to watch.
Create a rule on ticket updates
On the Automations page, select the Ticket Updates tab and click New rule. Name it something like StackOne Ticket Updated.
Choose who performs the change
Under Action performed by, choose who has to make the change for the rule to fire. This is your decision — it decides which updates reach StackOne.
- Agent — changes made by an agent in Freshdesk
- AI Agent — changes made by Freddy AI
- Requester — changes made by the customer, such as a reply
- Agent or requester — either of the two above, the widest human coverage
- System — changes Freshdesk makes automatically, such as an SLA escalation
- Collaborator — changes made by a collaborator on the ticket
- Only the performers you select here produce events. If you pick Agent alone, a customer reply that changes the ticket will not be delivered.
Choose which changes fire the webhook
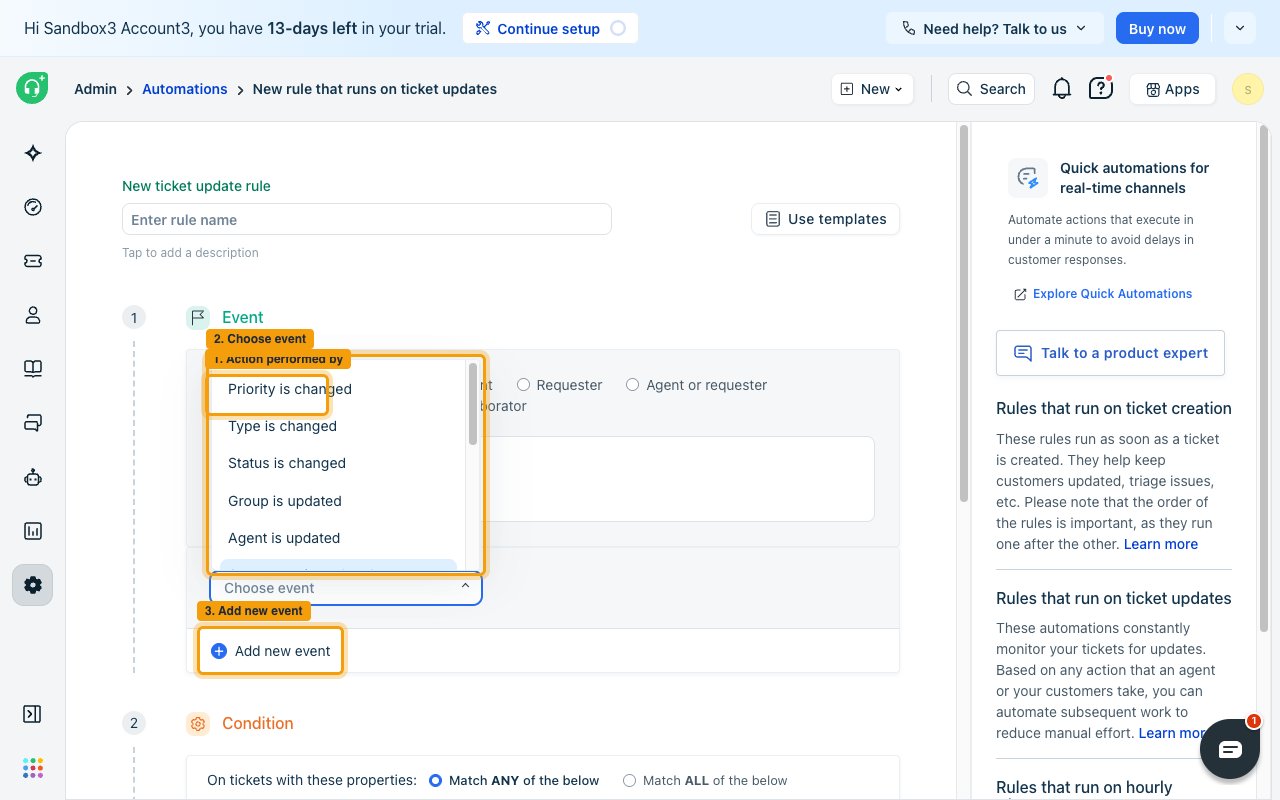
Under Event, open Choose event and select a change to watch. Click Add new event to watch more than one.
- A ticket update rule fires only on the changes you select here — a rule watching Priority is changed does not fire when the status changes.
- Available changes include Priority is changed, Status is changed, Type is changed, Group is updated, Agent is updated, Note is added, Reply is sent, and Due date is changed.
Leave the condition empty
Unlike a ticket creation rule, an update rule saves with an empty Condition block — you are not forced to add one. Leave it empty to receive every change you selected above, and add conditions only when you want to narrow which tickets qualify.
Add and configure the Trigger webhook action
Configure the action exactly as you did on the Ticket Creation rule, using the same Native Webhook URL. Nothing here differs between the two rules.
- Under Action, open Choose action and select Trigger webhook.
- Set Request type to
POST. - Paste the same Native Webhook URL into URL.
- Leave Encoding set to
JSON, and leave Requires authentication and Add custom headers off. - Leave Content on Simple and select both Ticket ID and Triggered Event — the same two required properties, plus any optional ones you want.
Save and enable the rule
Click Preview, check the summary, then click Save and enable.
Available webhook events
Freshdesk has no predefined list of webhook events. What you receive is decided entirely by the automation rules you build — the rule type sets when it fires, and its conditions narrow which tickets qualify.
Ticket events
Two kinds of delivery are possible, one per rule type.
- Ticket Created — sent by a ticket creation rule when a newly raised ticket matches its conditions.
- Ticket Updated — sent by a ticket updates rule when a ticket change matches the events and conditions it watches.
Read the event type on a delivered event
The event type on each delivered event is the Triggered Event value exactly as Freshdesk produced it.
- A created ticket delivers the event type
{ticket_action:created} - A ticket change delivers a change descriptor naming the changed property with its old and new values, for example
{priority:{from:1,to:3}}or{status:{from:2,to:3}} - Because an update value carries the values that changed, it differs on every delivery — match on the event’s record id or the handler that produced it rather than on the event type.
Delivery format
Details of how Freshdesk delivers events to StackOne.
One event per request
Freshdesk sends one POST per matching ticket, with content-type: application/json. Deliveries are not batched. The ticket properties you selected arrive inside a freshdesk_webhook object.
- The selected properties are passed through to the event unchanged, so any extra property you tick is available on the event as well.
- Freshdesk sends no signature header and performs no verification handshake — the secure key inside the Native Webhook URL is what authenticates the delivery.
Note the fields Freshdesk cannot send
Freshdesk offers no placeholder for a ticket’s created or updated timestamp, so neither can appear in the payload. Fetch the ticket by its id if you need those values.
Retries and limits
A failed delivery is retried every 30 minutes for up to 48 attempts. Freshdesk allows a maximum of 1000 webhook calls per hour per account, shared across every automation rule.
Unsupported rule types
Only ticket creation and ticket updates rules can send a webhook. Hourly Triggers rules cannot, so time-based events such as SLA breaches and ticket ageing cannot be delivered.