Register Your Application in Microsoft Entra ID
Register an application in Microsoft Entra ID to obtain OAuth 2.0 credentials. A single App ID and Secret is used for both Graph API and Bot Framework.
Sign in to Microsoft Entra Admin Center
Sign in to the Microsoft Entra admin center as at least an Application Developer. If you have access to multiple tenants, click the Settings (gear) icon in the top-right corner, then select the desired tenant from the list under Directory + subscription.
Create a New App Registration
Navigate to App registrations by searching from the top search bar and click on New registration.
- Enter a meaningful Name for your app (e.g., StackOne Microsoft Teams Bot Integration).
- Under Supported account types, select Single tenant if only your organization will use this integration, or Multitenant if you need to support users from multiple Azure AD tenants.
- Leave the Redirect URI blank for now — you will configure it in the next section.
- Select Register to create the app registration.
Copy the Application (Client) ID
After registration, you’ll be directed to the application’s Overview page. Copy the Application (client) ID value and store it securely. You will need this value for the Client ID field during the StackOne connector profile setup.
Copy the Directory (Tenant) ID
From the same Overview page, copy the Directory (tenant) ID value and store it securely. You will need this value for the Tenant ID field during the StackOne connector profile setup.
Configure Redirect URI
Set up the OAuth 2.0 callback URL to enable authentication flow between StackOne and Microsoft Teams.
Navigate to Authentication Settings
From your app’s Overview page, select Authentication (Preview) from the left menu under Manage.
Add Platform Configuration
Click Add Redirect URI, then select Web.
Set the Redirect URI
In the Redirect URIs field, enter the StackOne OAuth callback URL (https://api.stackone.com/connect/oauth2/microsoftteams/callback) and click Configure.
Configure API Permissions
Grant your application the necessary Microsoft Graph API permissions including bot installation permissions.
Open API Permissions
From the left menu under Manage, select API permissions.
Add Microsoft Graph Permissions
Click Add a permission, then select Microsoft Graph. Select Delegated permissions and add the scopes required for your use case, then click Add permissions to save.
Add Bot Installation Permission (Required)
The TeamsAppInstallation.ReadWriteSelfForUser permission is mandatory. It allows the app to automatically install the bot for users during the OAuth connection flow.
Grant Admin Consent
Click Grant admin consent for [tenant name] and select Yes to consent on behalf of all users in your tenant. After granting, verify that Granted for [tenant name] appears under the Status column.
Generate Client Secret
Create a client secret that will be used to authenticate your application with Microsoft Teams.
Navigate to Certificates & Secrets
From the left menu under Manage, select Certificates & secrets.
Create a New Client Secret
Under the Client secrets tab, click New client secret.
- Add a Description (e.g., StackOne Bot Integration Secret).
- Select an expiration period.
- Click Add.
Copy the Client Secret Value
Immediately copy the Value of the newly created client secret and store it securely. This value will only be shown once and cannot be retrieved again. You will need this value for the Client Secret field during the StackOne connector profile setup.
Create Azure Bot Resource
Create an Azure Bot resource linked to the same App Registration. This registers your app as a bot in the Bot Framework.
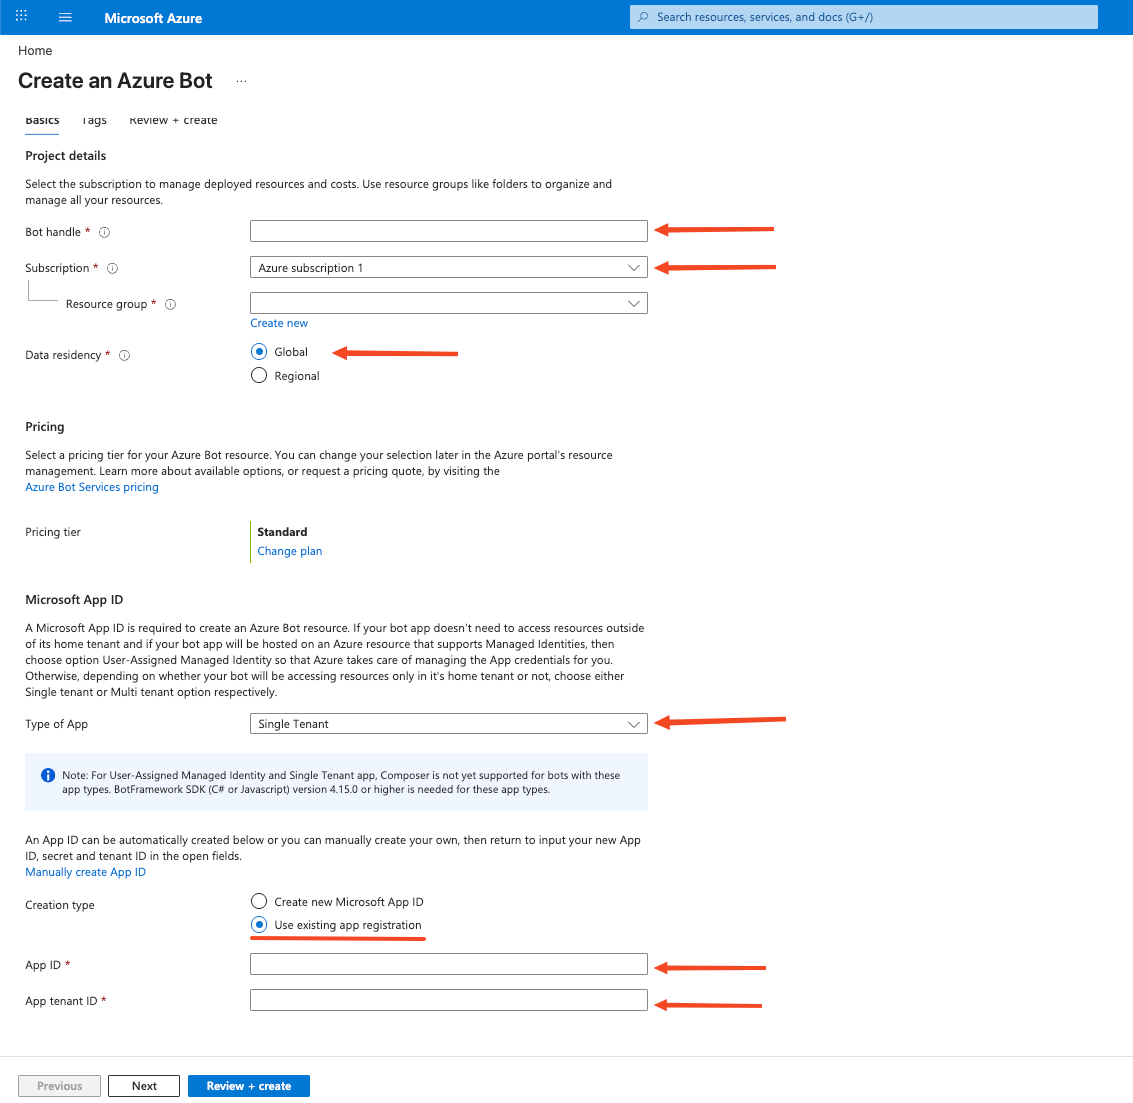
Create Azure Bot
In Azure Portal, search for Azure Bot in the top search bar and click Azure Bot under Marketplace. This opens the Create an Azure Bot page directly.
- Enter a Bot handle (e.g., stackone-teams-bot).
- Select a Resource group or create a new one.
- Under Data residency, select Global (or Regional based on your requirements).
- Click Change plan under Pricing and select Free (F0) for testing or Standard for production.
- Under Type of App, select Multi Tenant (or Single Tenant based on your requirements).
- Under Creation type, select Use existing app registration and paste your Application (client) ID (same as Client ID).
- Click Review + create > Create.
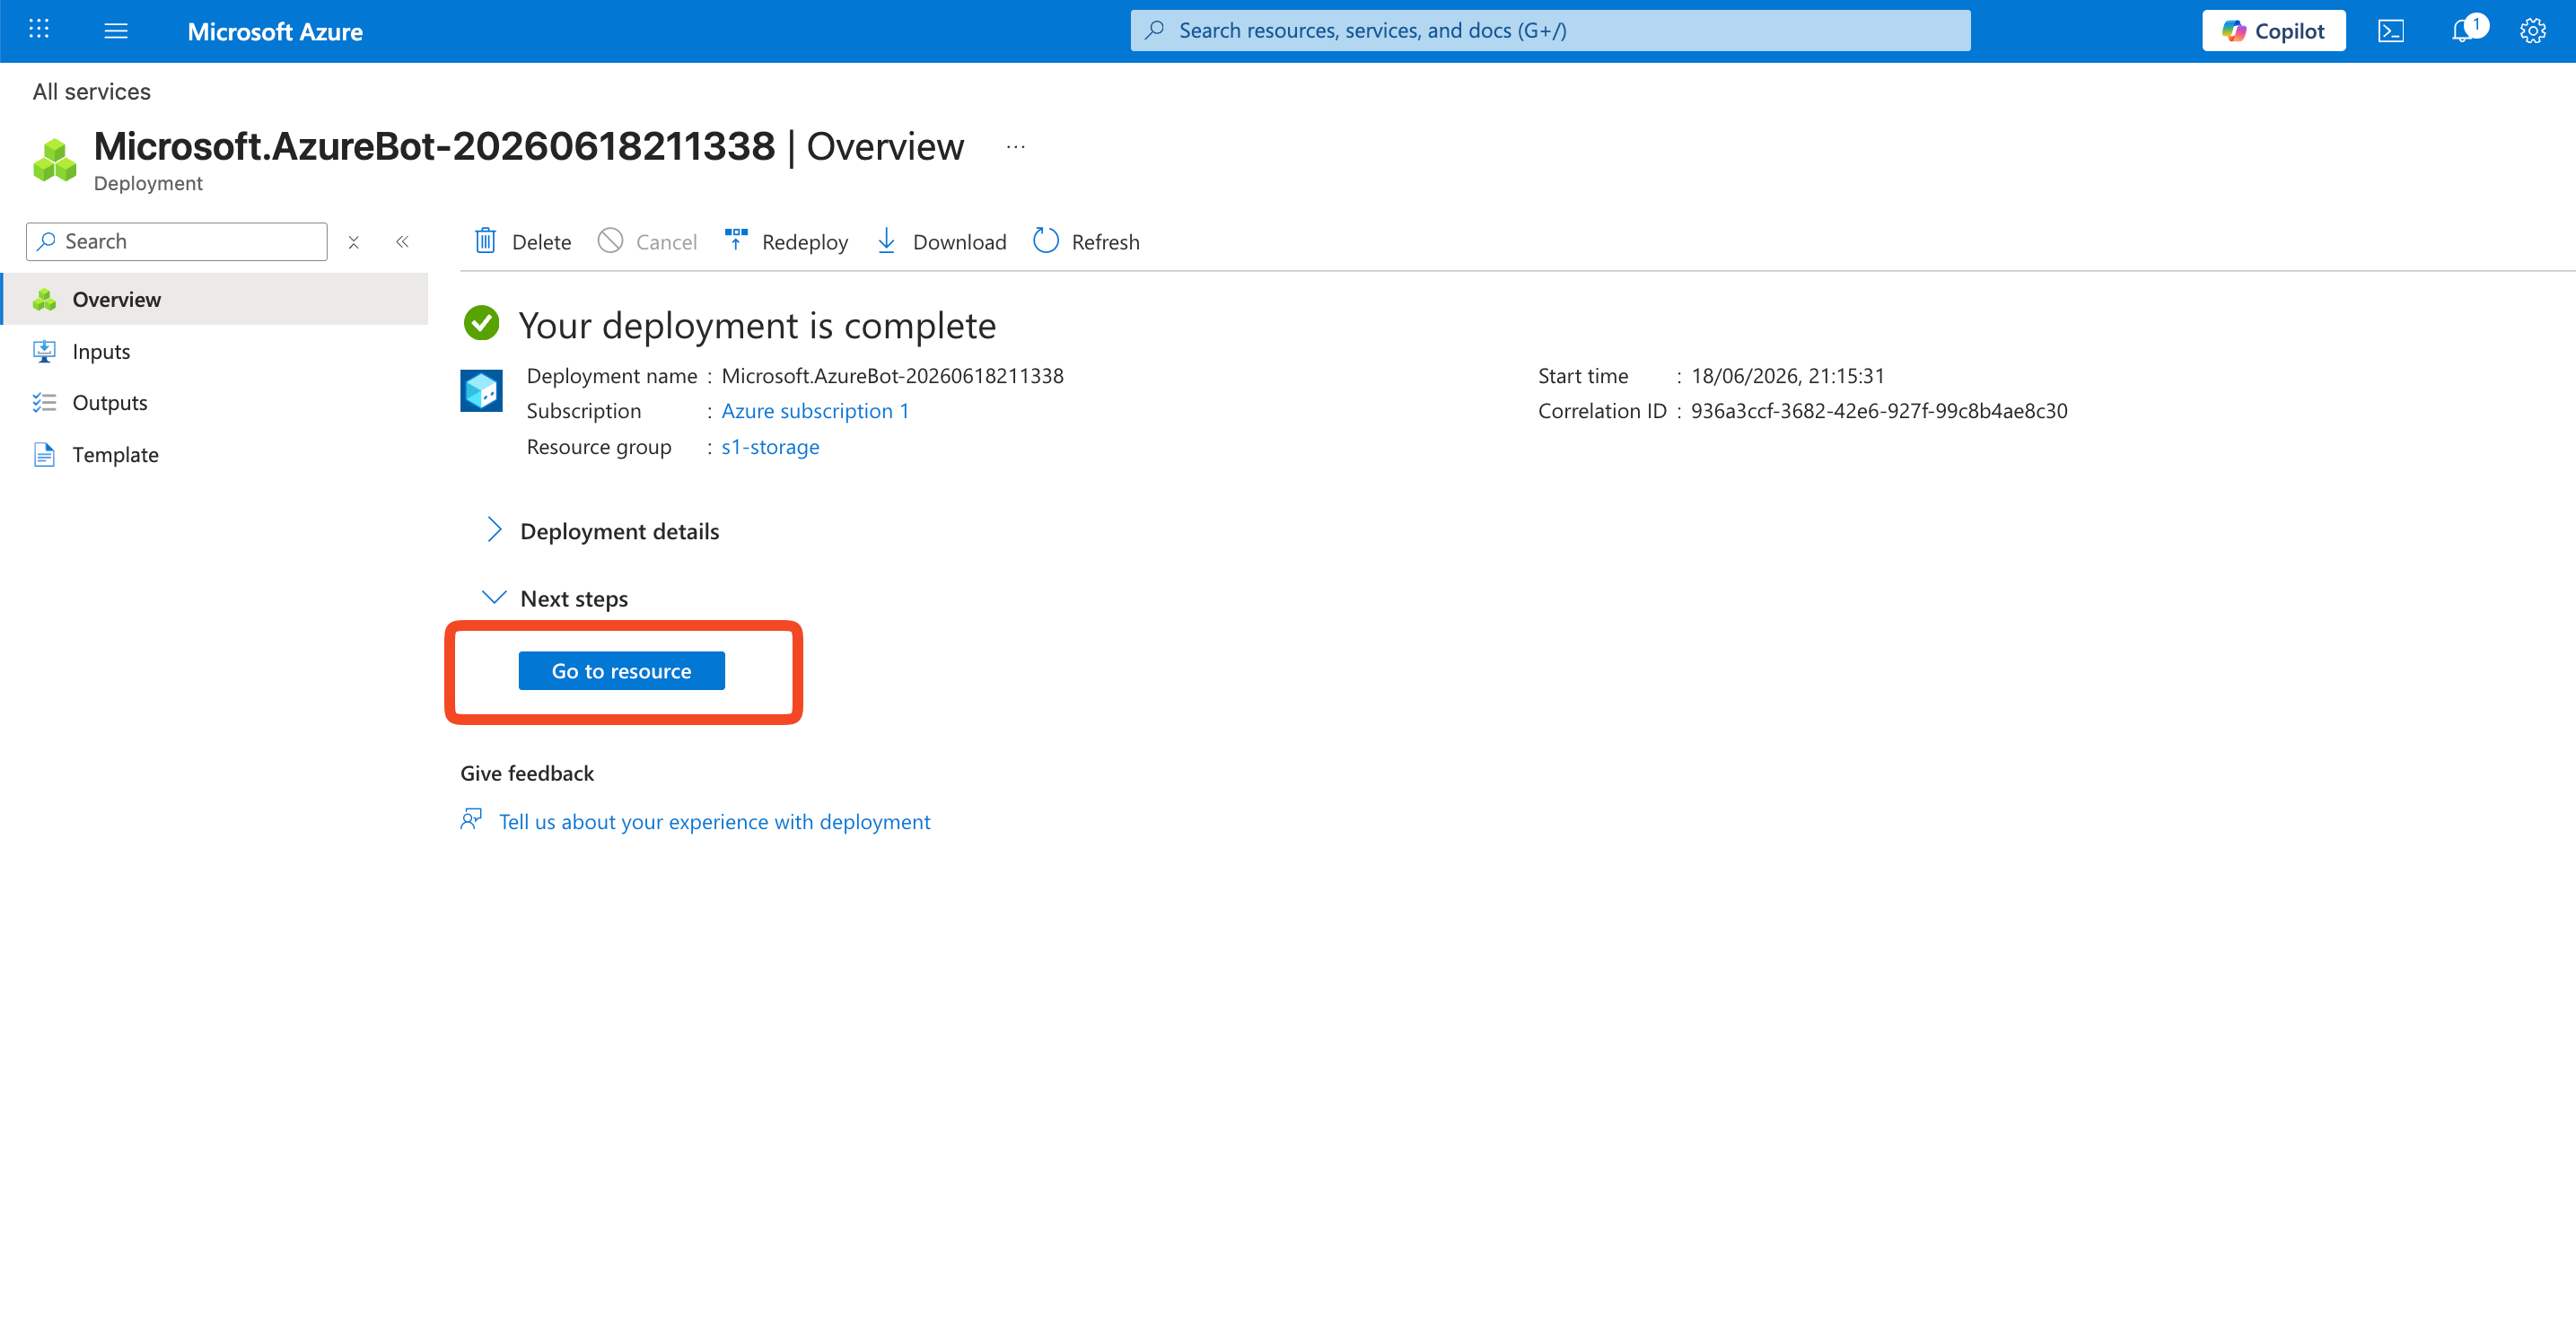
Go to the Bot Resource
Once deployment completes, click Go to resource to open the Azure Bot resource.
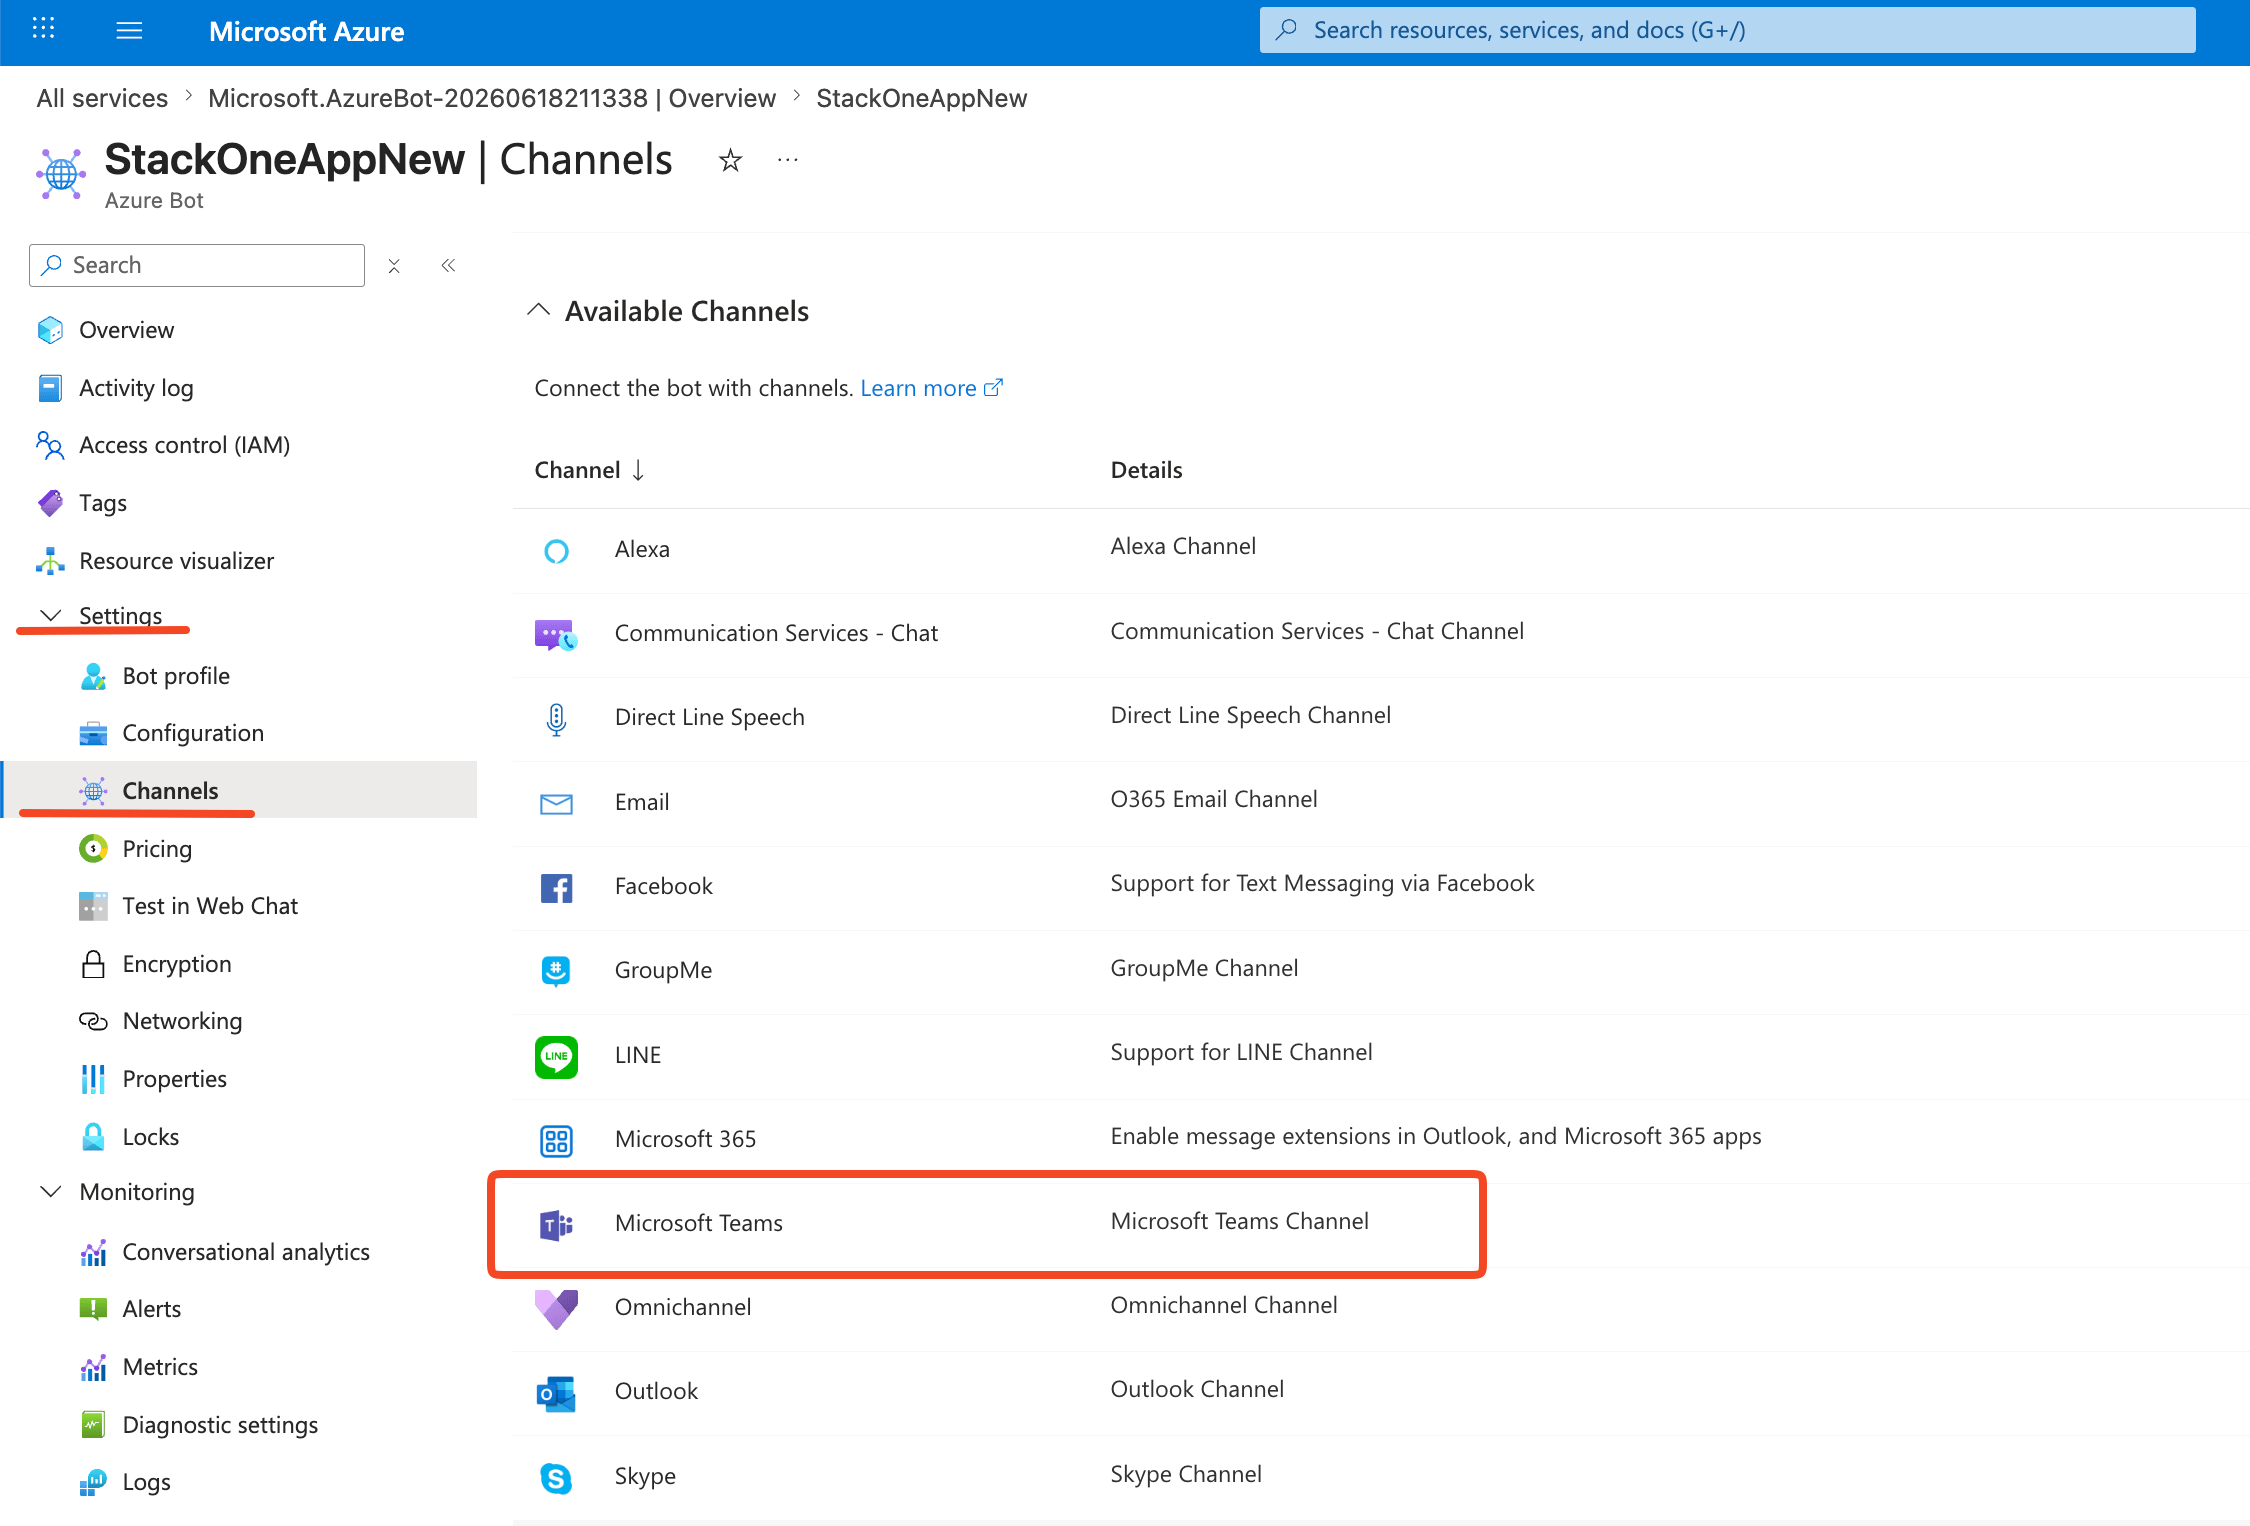
Enable Teams Channel
In the Azure Bot resource, expand Settings in the left sidebar, then click Channels.
- Click Microsoft Teams from the available channels list.
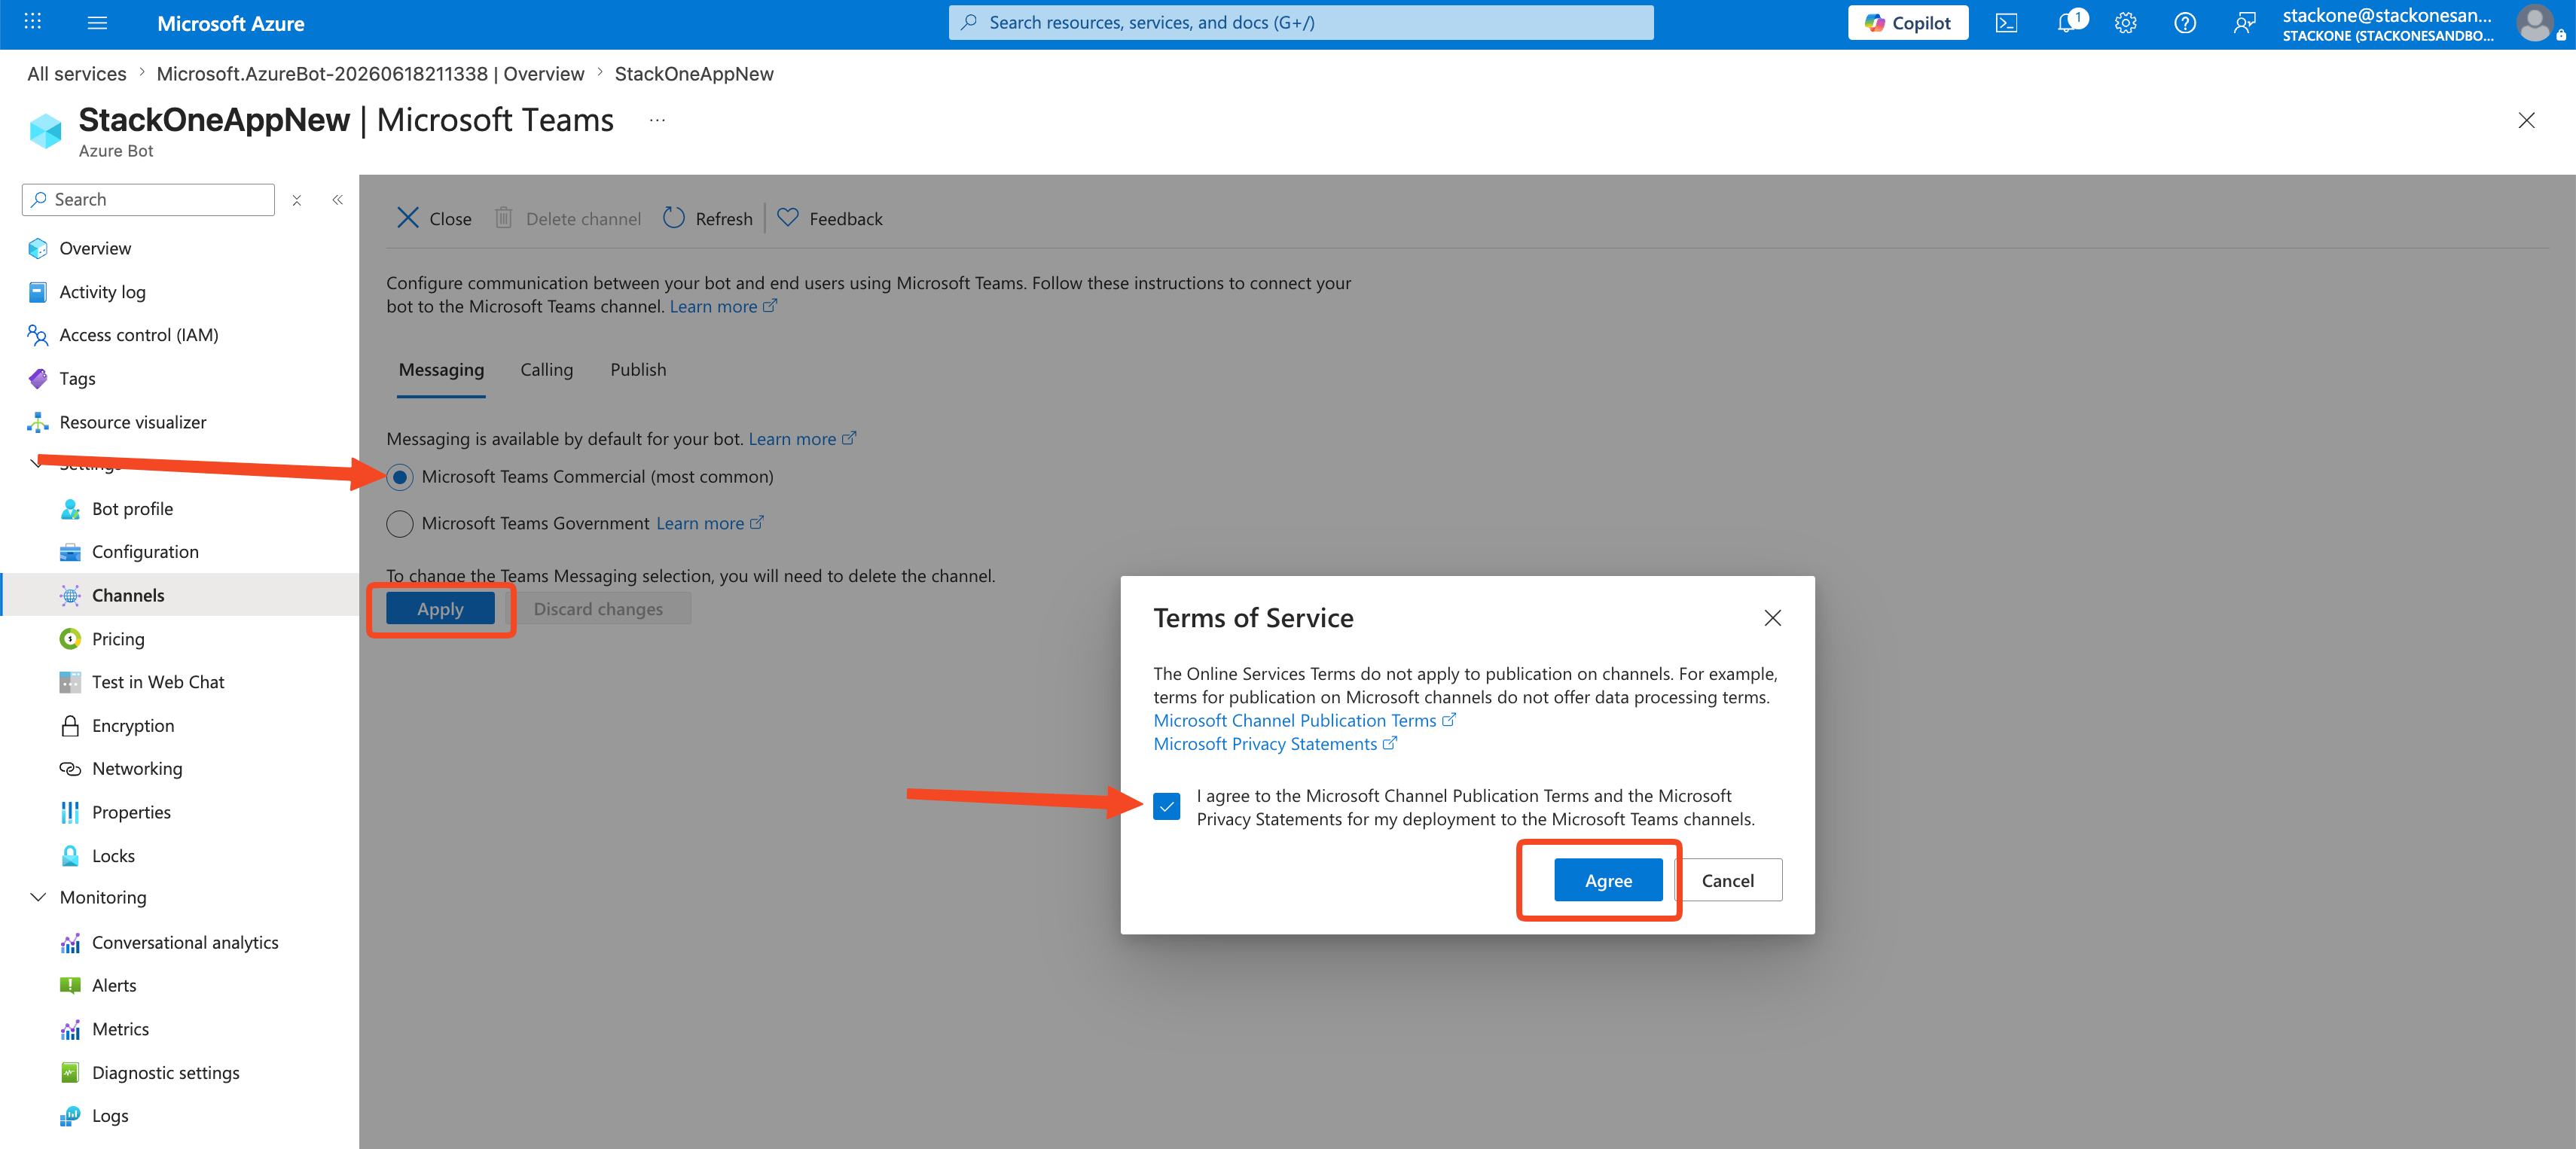
Configure Teams Channel
After adding the Teams channel, a configuration page appears with Messaging, Calling, and Publish tabs.
- Accept the Terms of Service if prompted.
- Select Microsoft Teams Commercial under Messaging.
- Click Apply to save the channel configuration.
Create Bot Manifest
Create a Teams app manifest that registers the bot for personal, team, and group chat scopes.
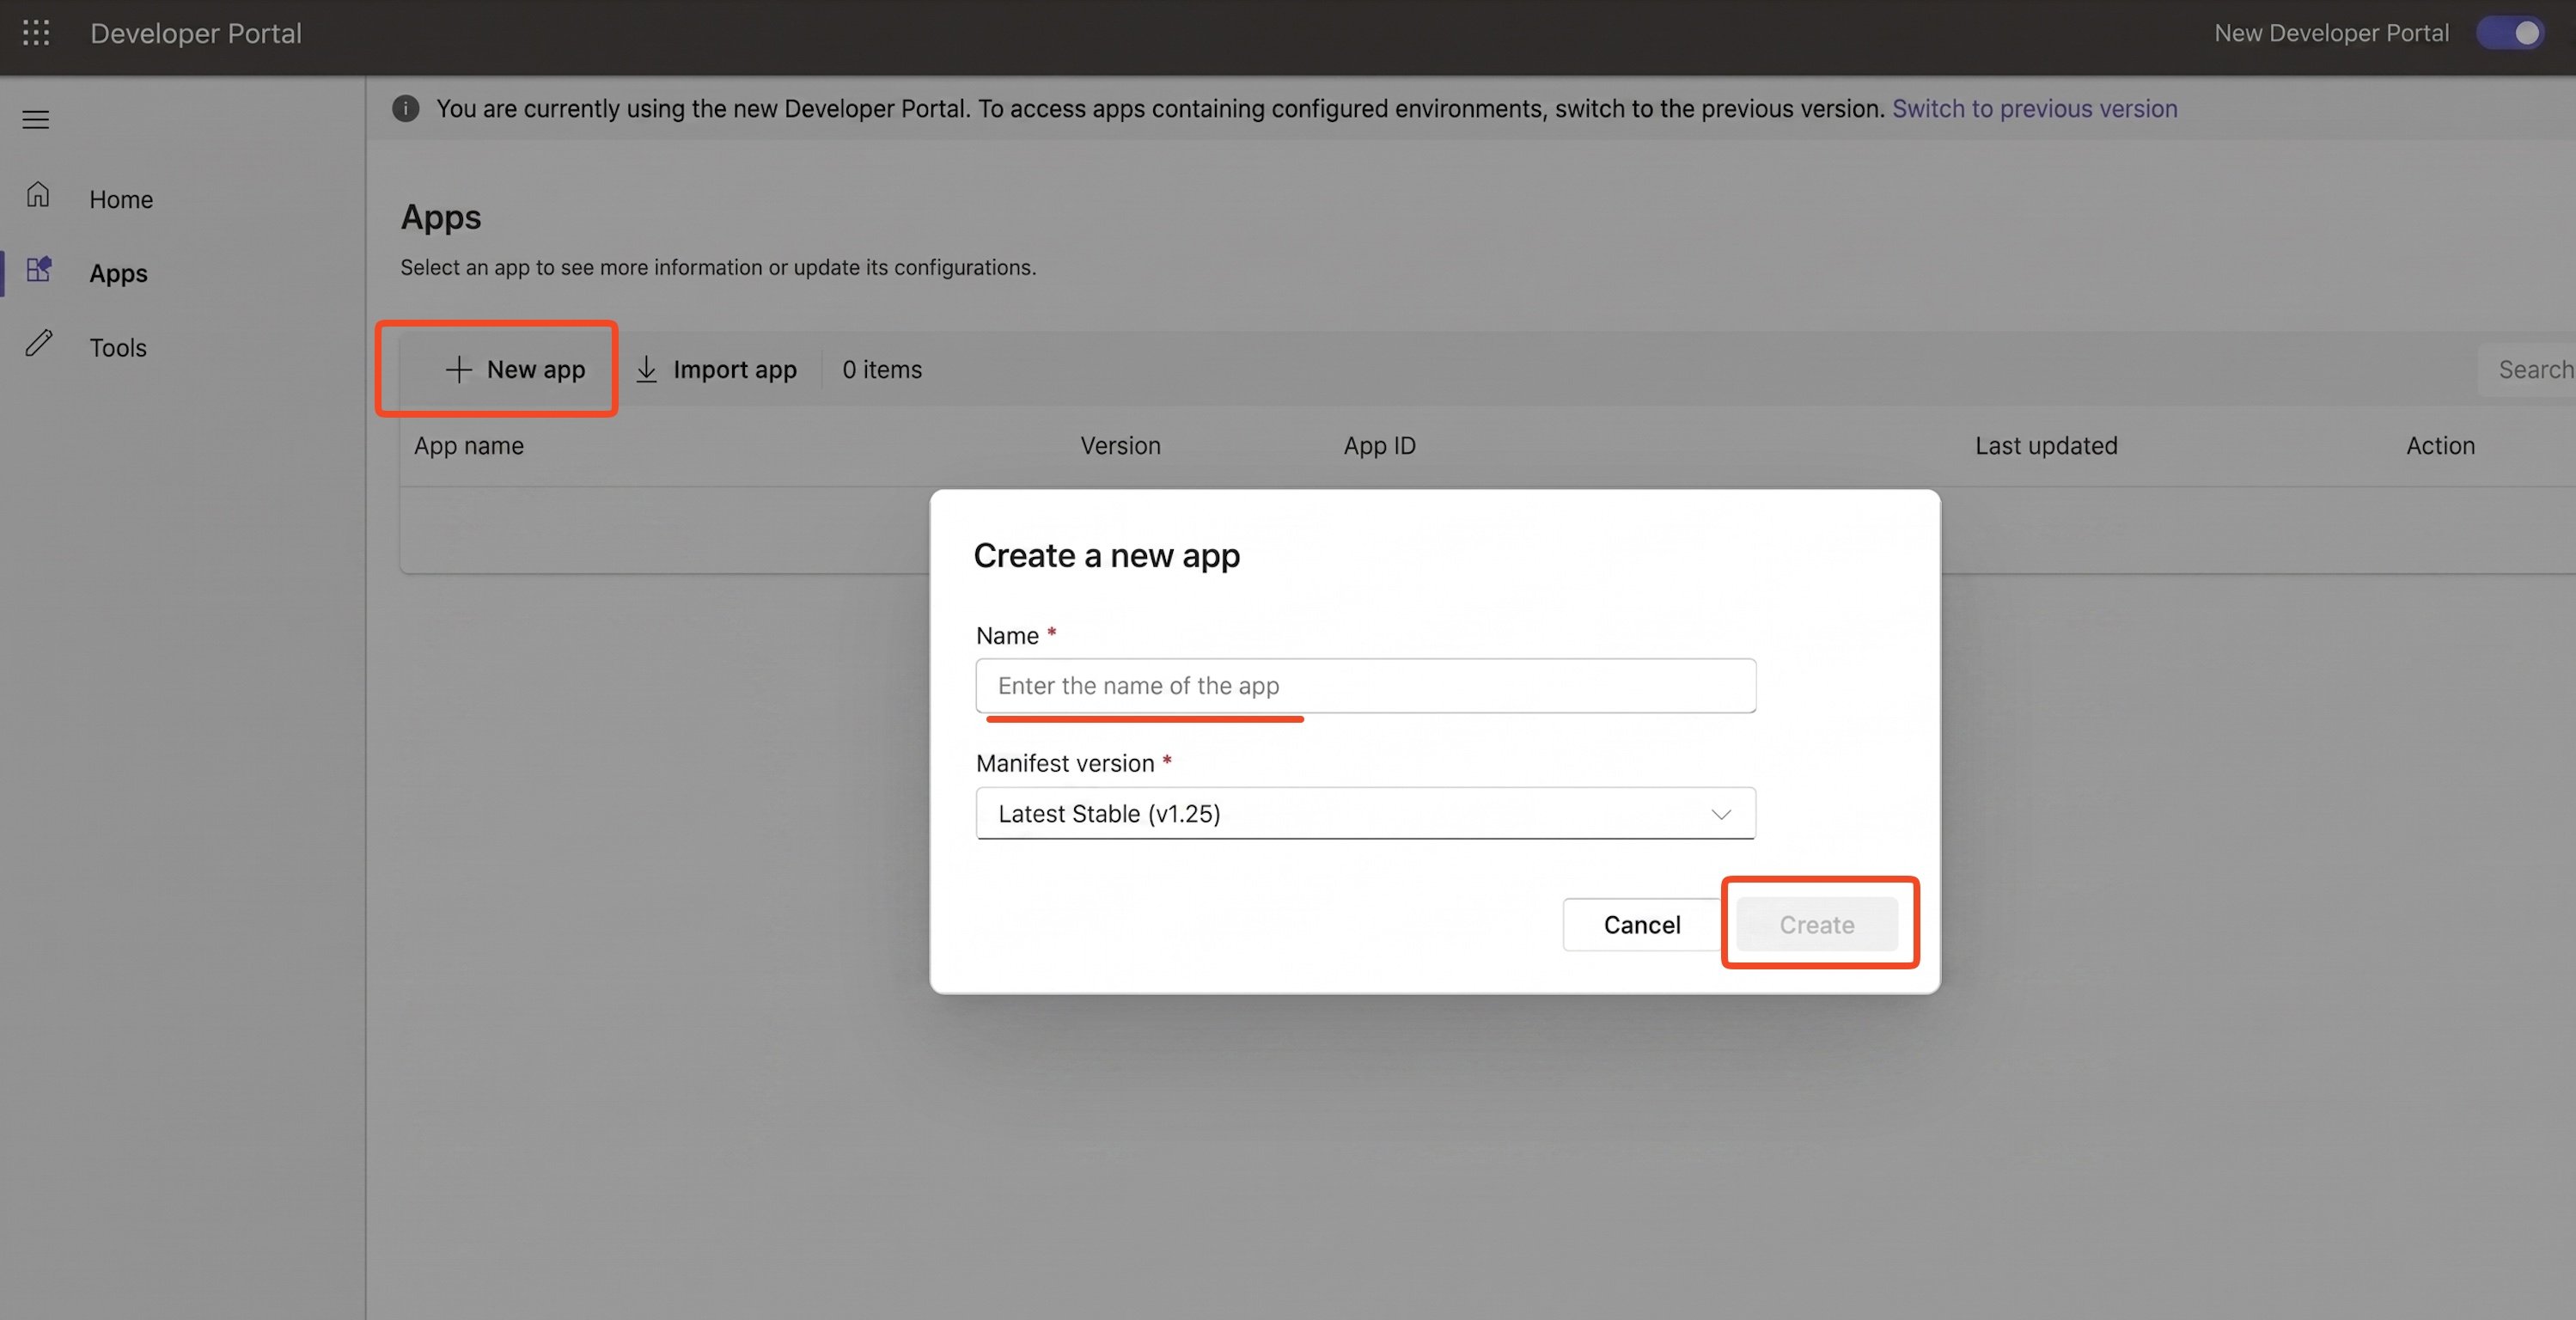
Create App in Teams Developer Portal
Go to Teams Developer Portal and click New app. If you already have an app, select it from the Apps list instead of clicking New app.
- A Create a new app popup appears. Enter the app Name and select the Manifest version (e.g., Latest Stable v1.25), then click Create.
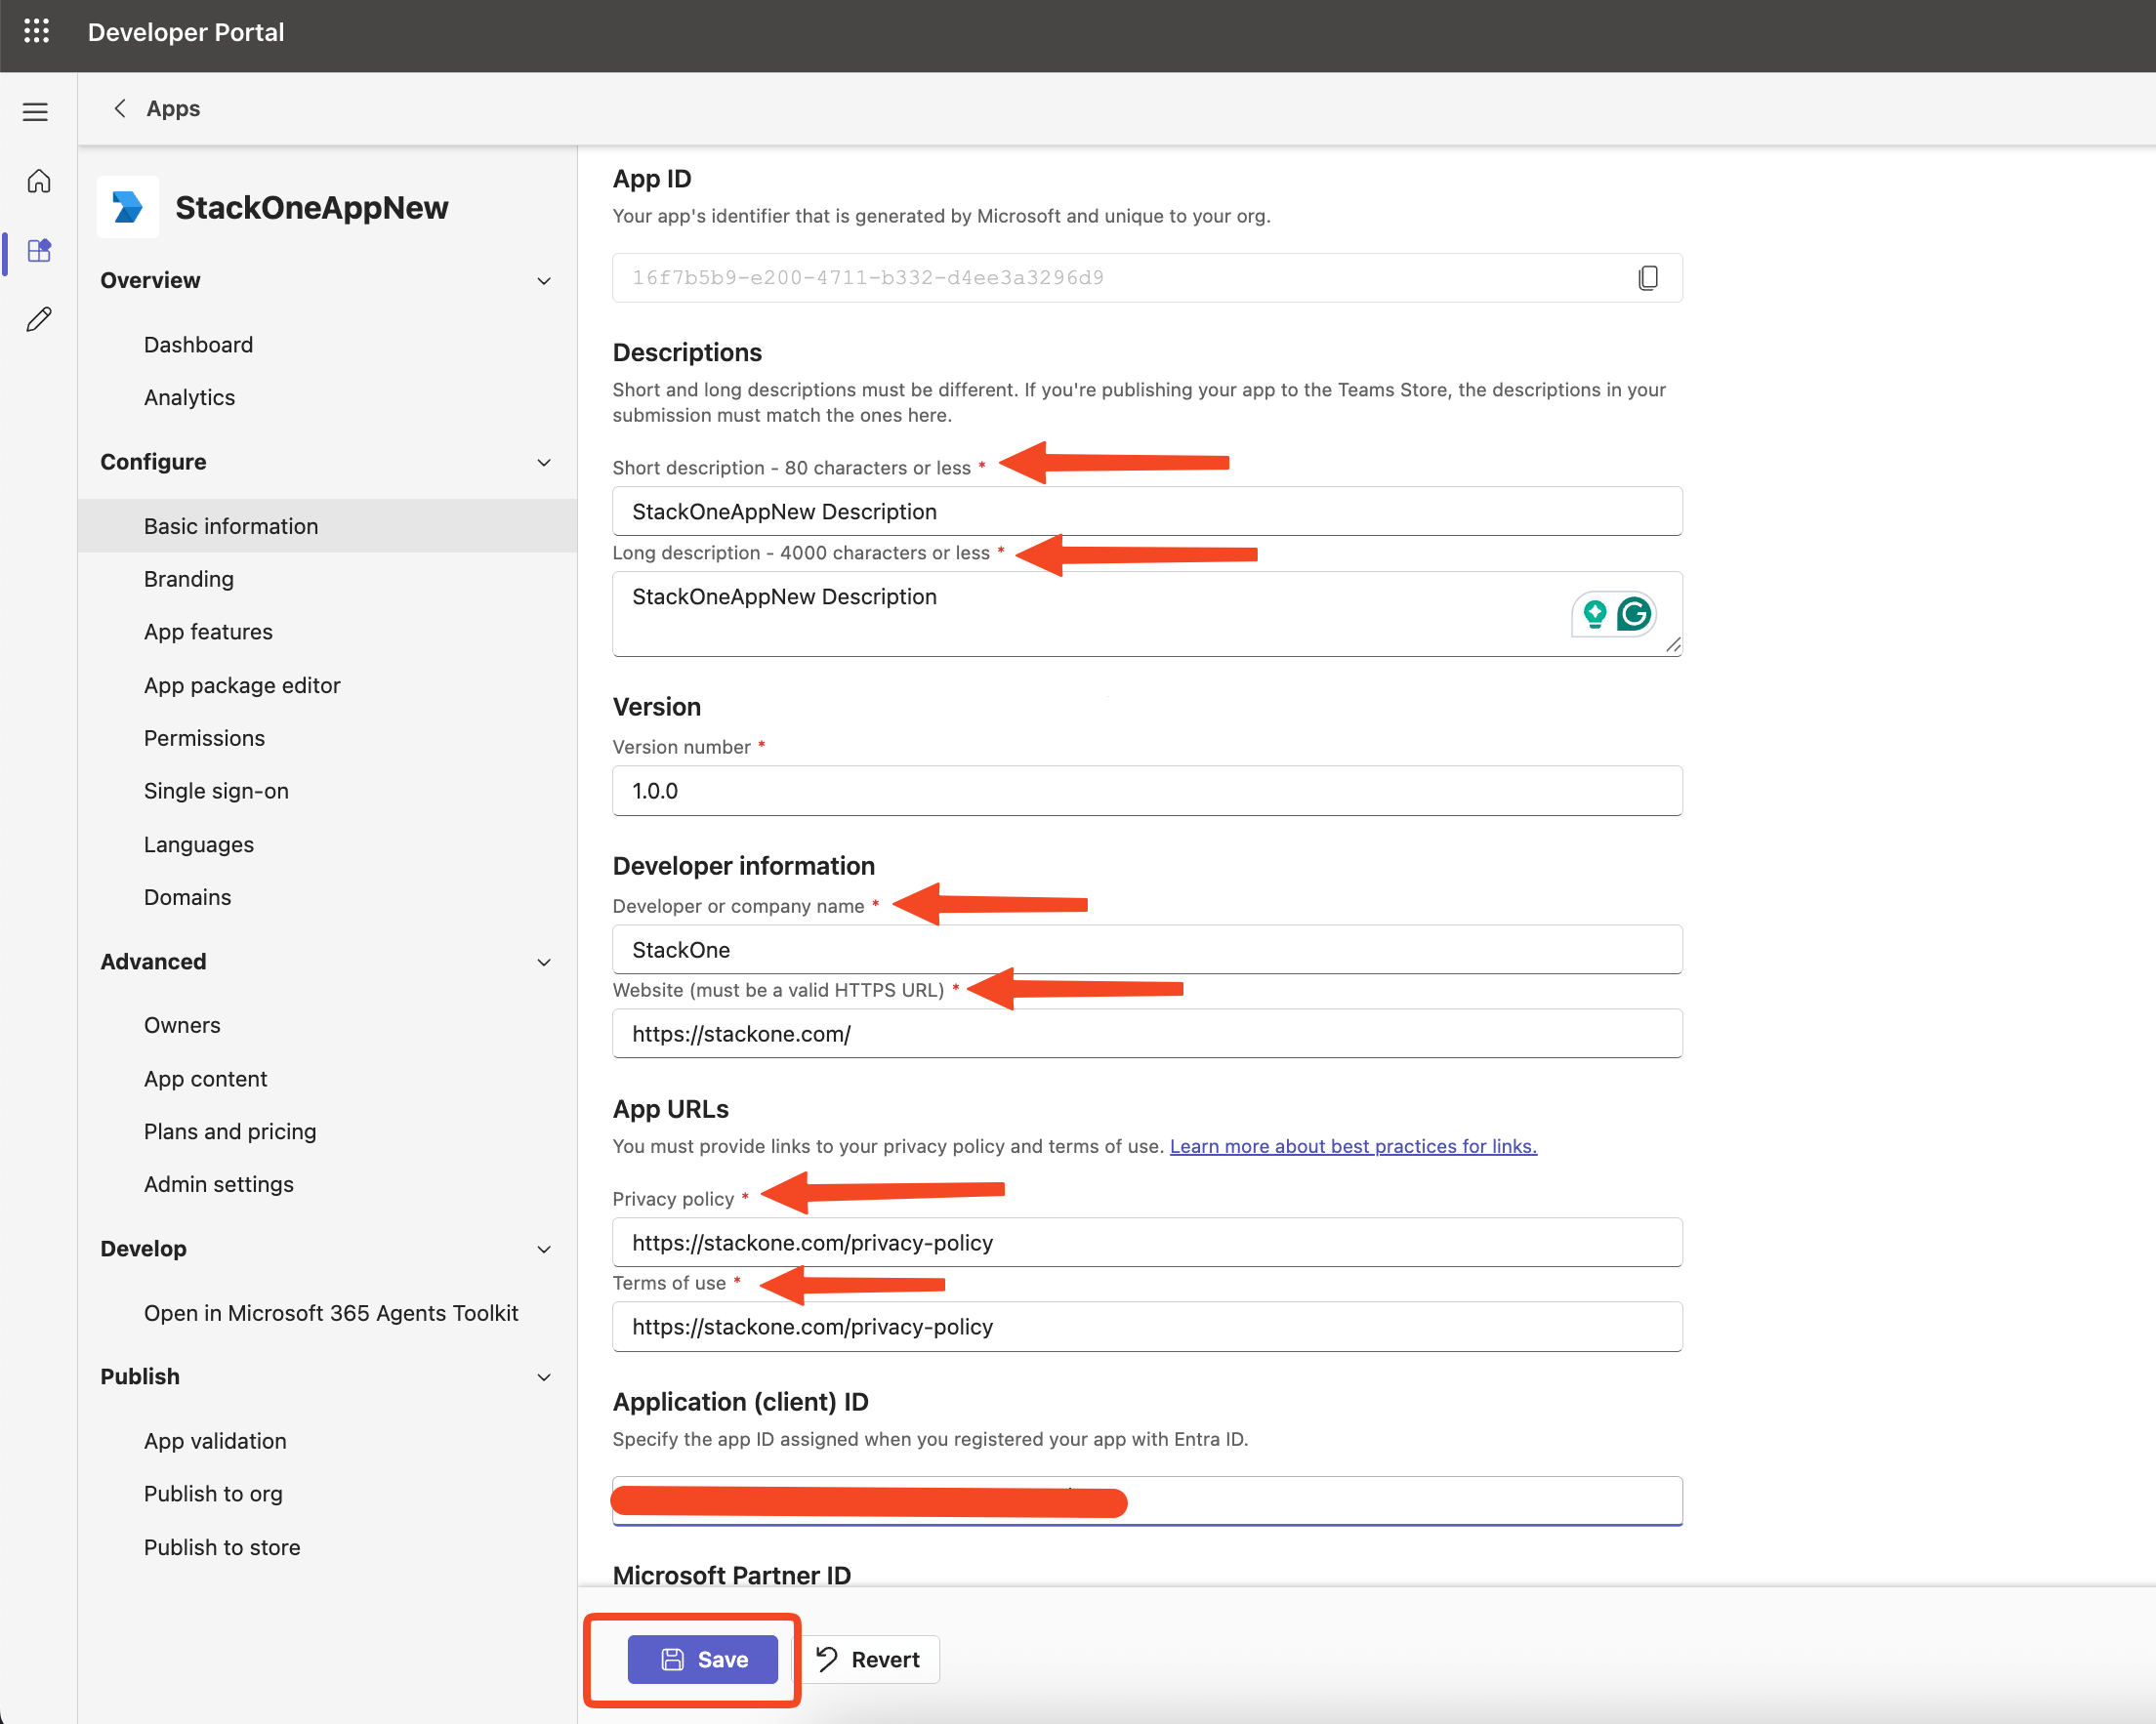
Fill in App Details
After clicking Create, you will be taken to the app Dashboard. Navigate to Basic information under Configure in the left sidebar. Fill in the following fields:
- Short description — A brief summary of your app (80 characters or less, e.g.,
StackOneAppNew Description). - Long description — A detailed description of your app (4000 characters or less, e.g.,
StackOneAppNew Description). - Version — The version number of your app (e.g.,
1.0.0). - Developer Information — Enter the Developer or company name (e.g.,
StackOne) and Website (must be a valid HTTPS URL, e.g.,https://stackone.com/). - App URLs — Enter the Privacy policy URL (e.g.,
https://stackone.com/privacy-policy) and Terms of use URL (e.g.,https://stackone.com/privacy-policy). - Application (client) ID — Paste the Application (client) ID from your Azure app registration.
- Microsoft Partner ID — (Optional) Leave blank unless you have a Microsoft Partner Network ID.
- Click Save to save your changes.
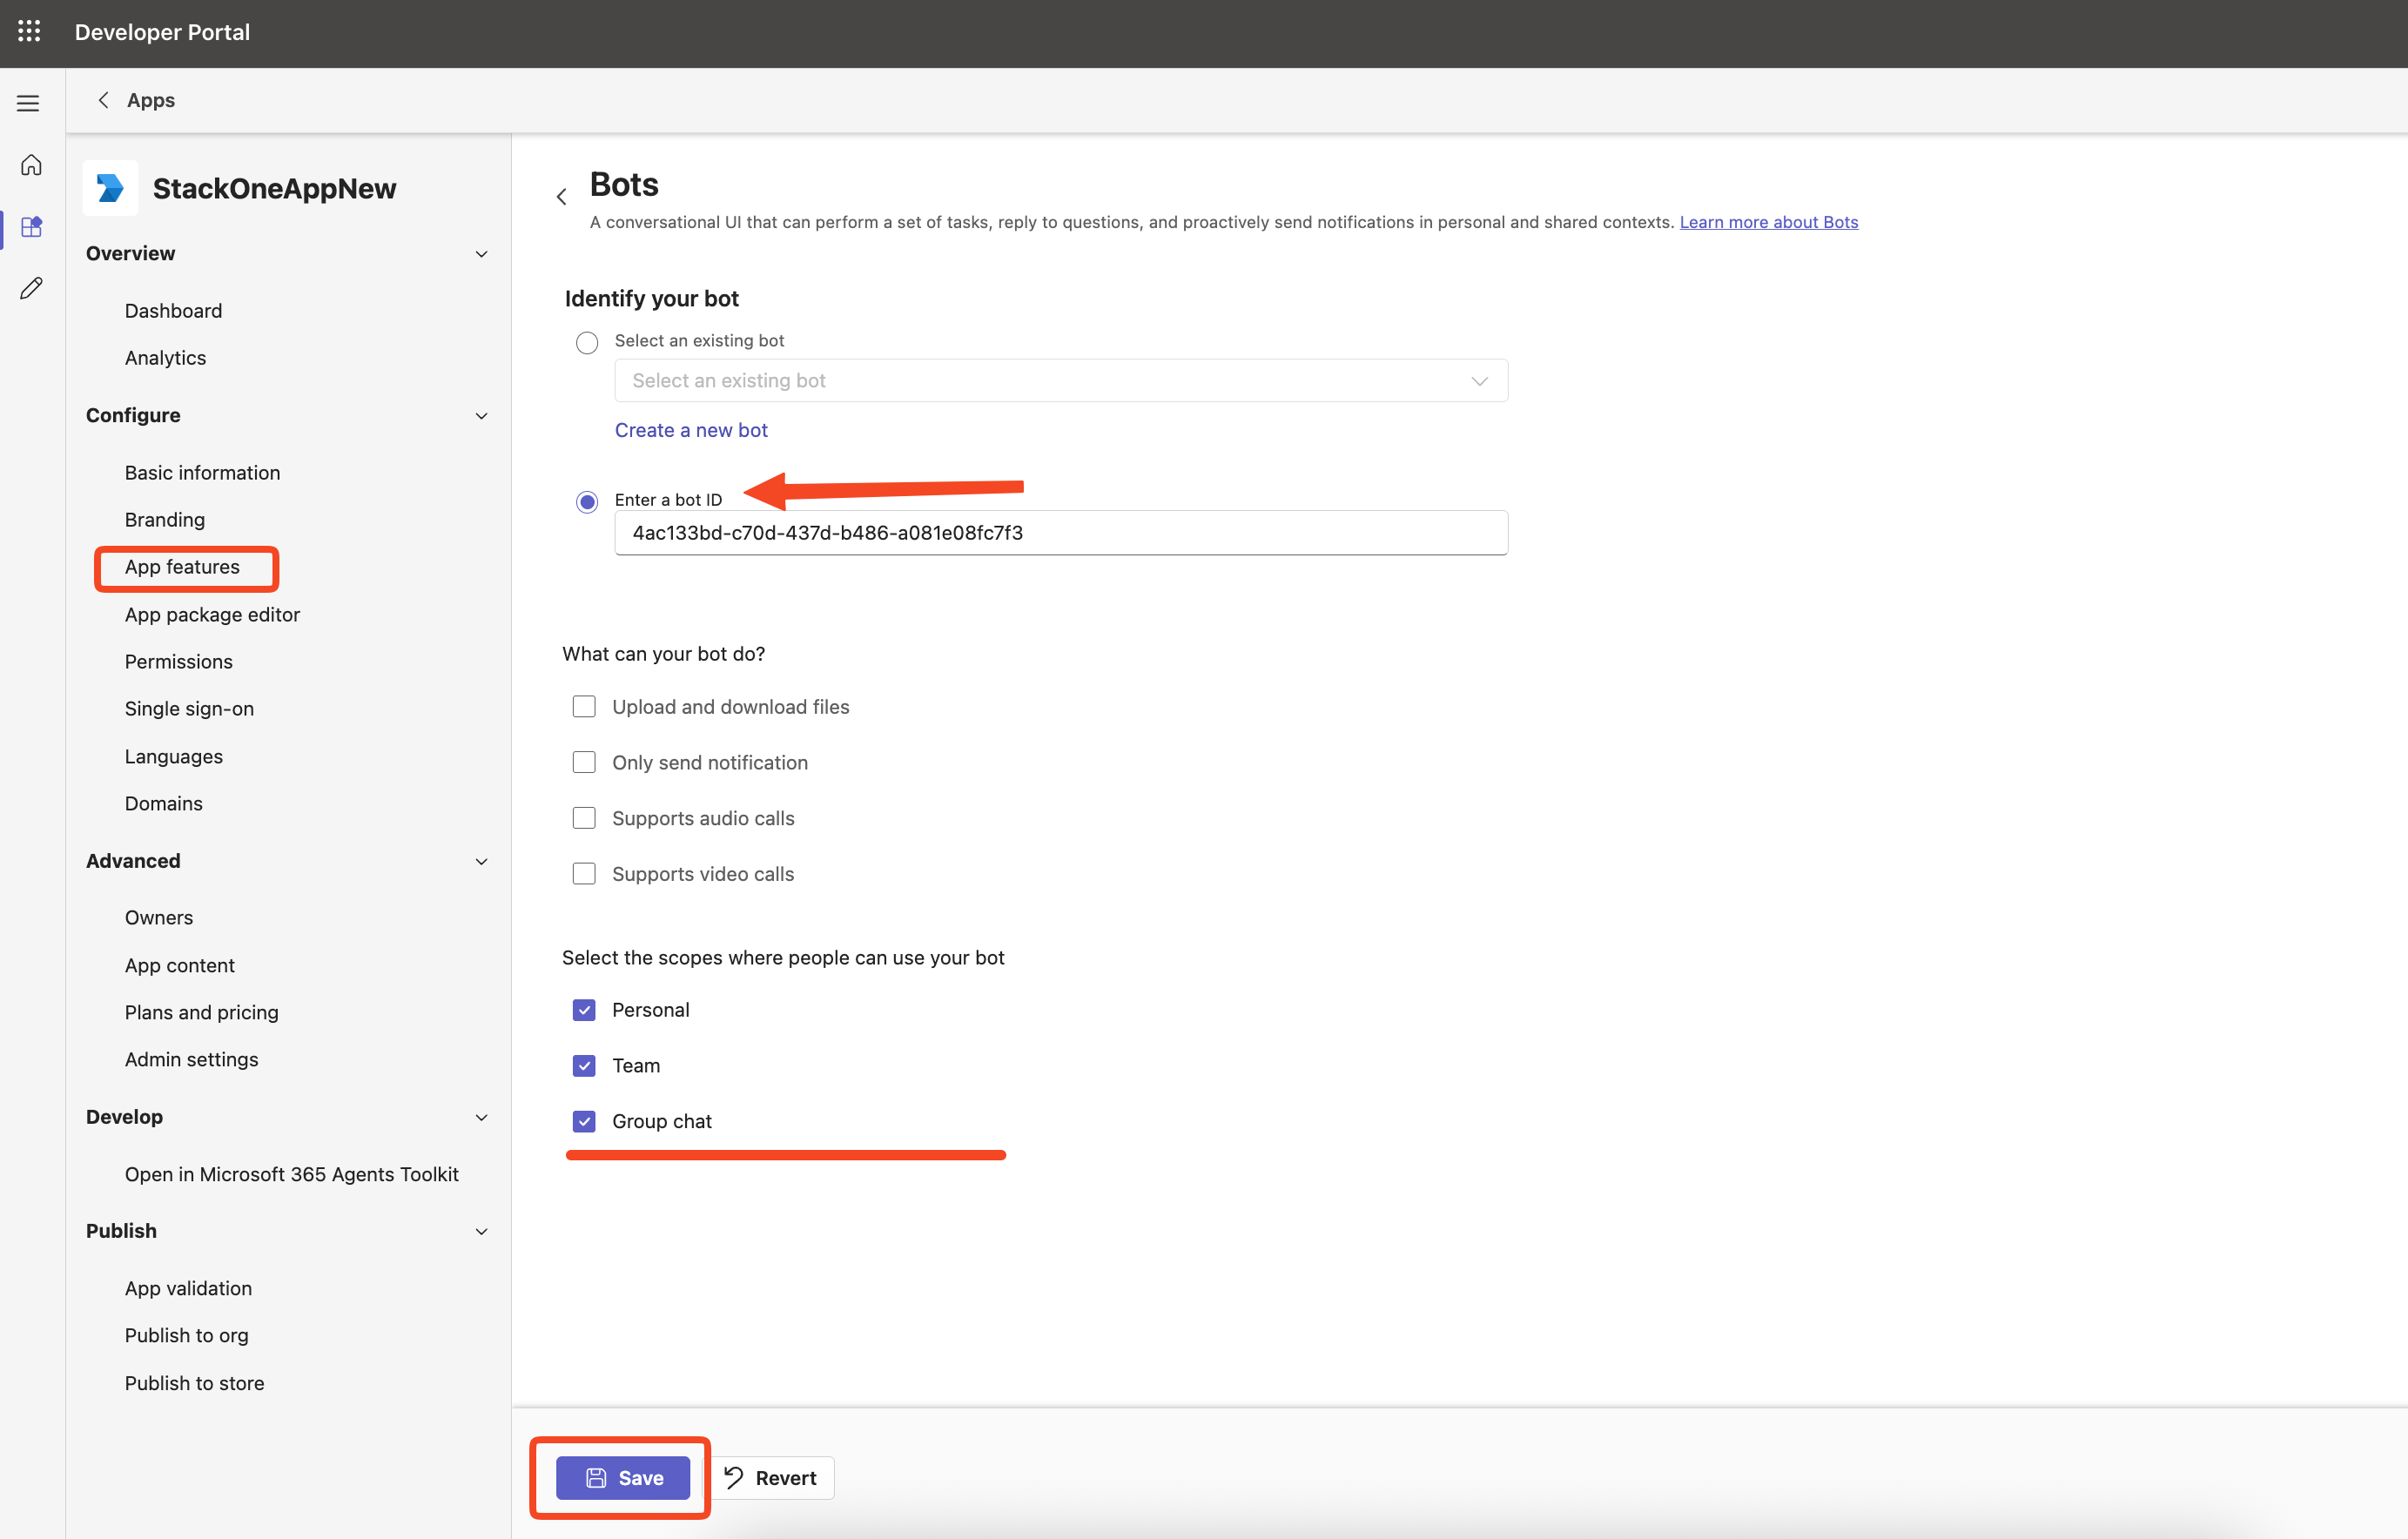
Configure Bot Feature
In the left sidebar, go to App features > Bot. Under Identify your bot, select Enter a bot ID.
- Paste your Application (client) ID in the bot ID field.
- Uncheck all other options (Upload files, Notification only, Calling, Video).
- Set scopes to Personal, Team, and Group Chat.
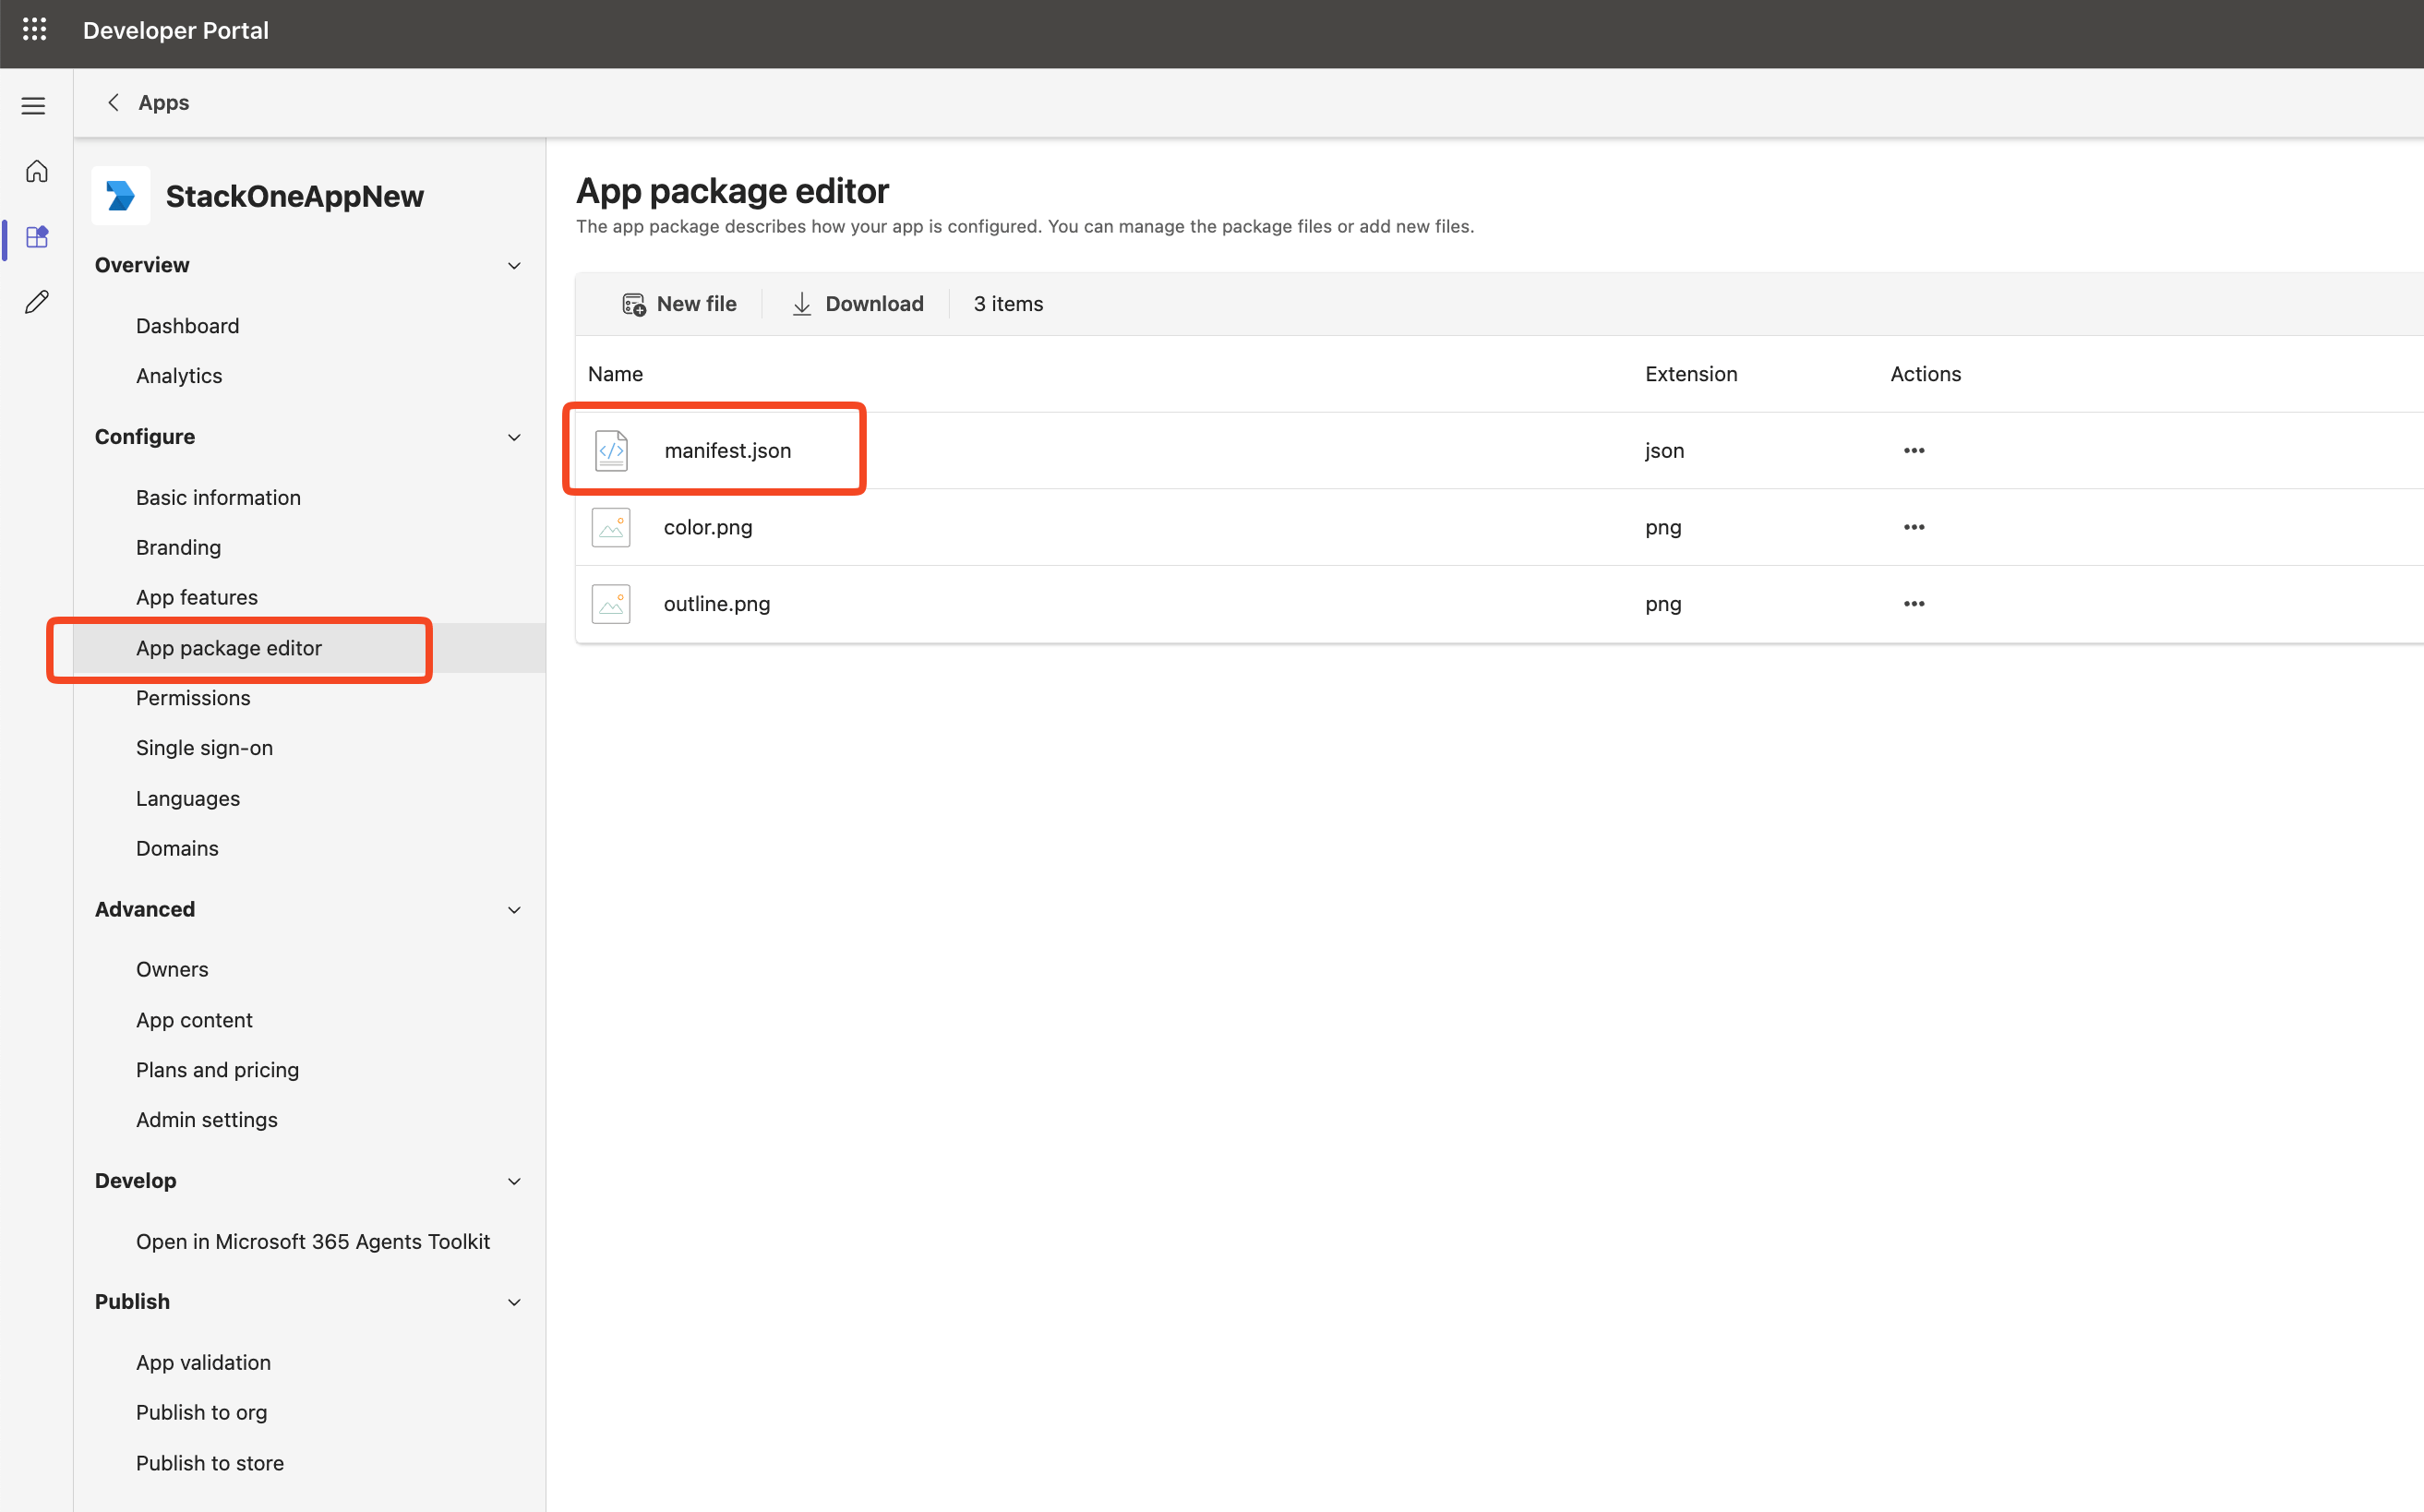
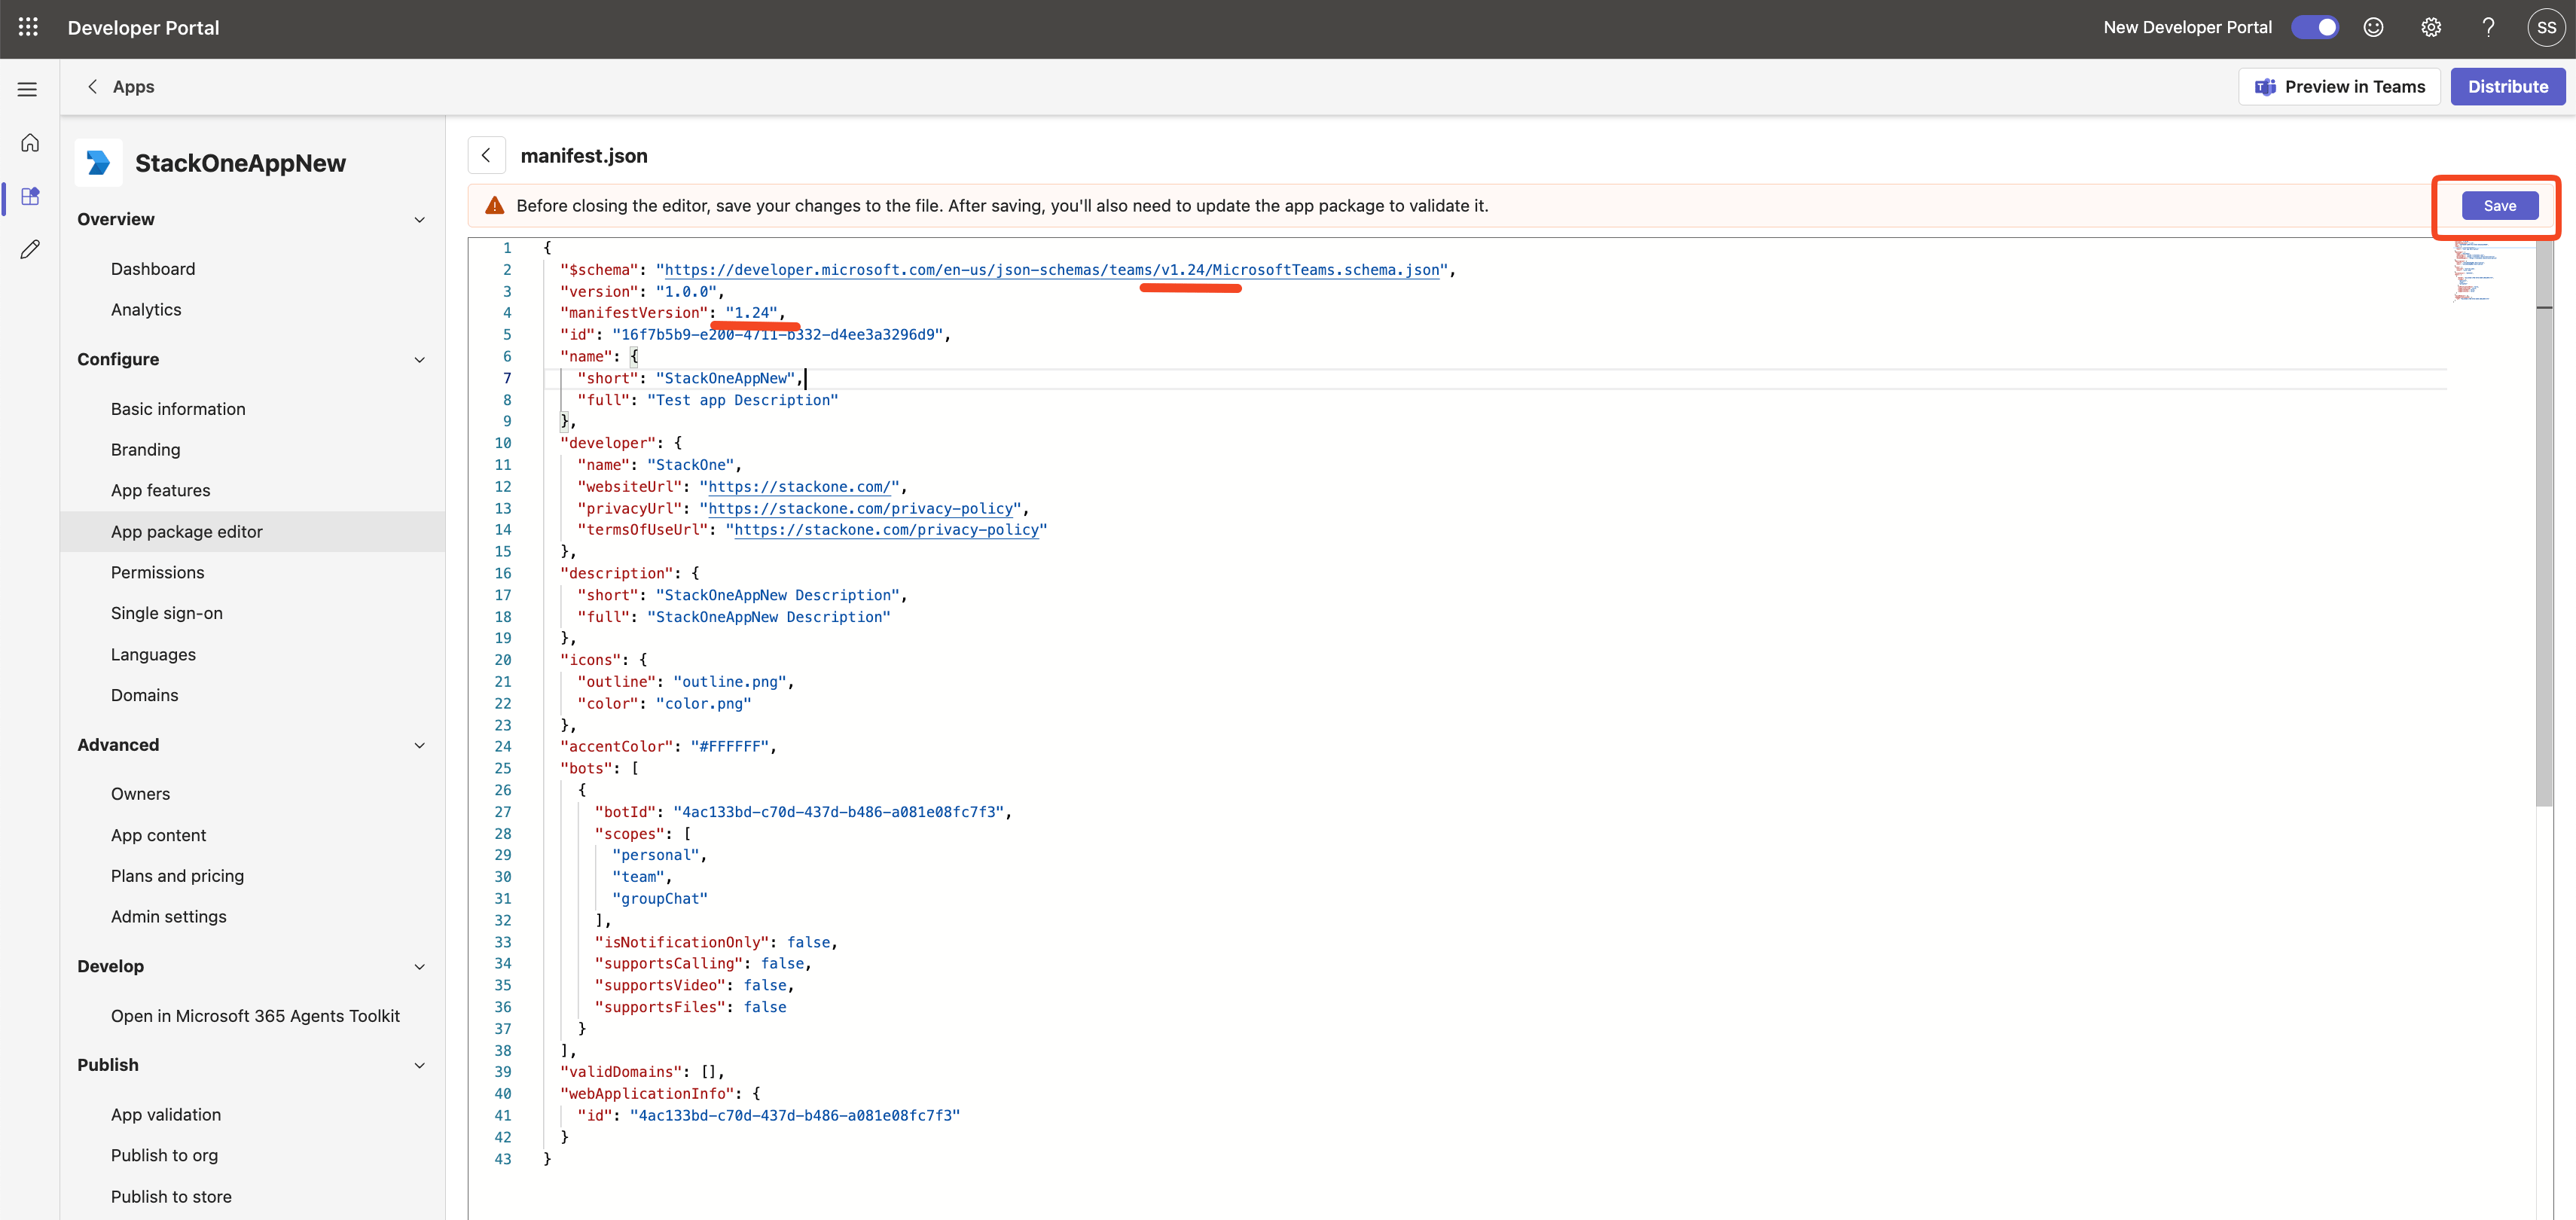
Open the App Manifest
In the left sidebar, go to App package editor and click manifest.json. Manifest v1.25 requires the supportsChannelFeatures property for the Team scope, but the schema does not allow it. Downgrading to v1.24 avoids this issue while keeping the Team scope.
Edit and Save the Manifest
Update the following fields in the manifest JSON and save:
- Change
manifestVersionto"1.24". - Change
$schemaURL fromv1.25tov1.24. - Save the changes.
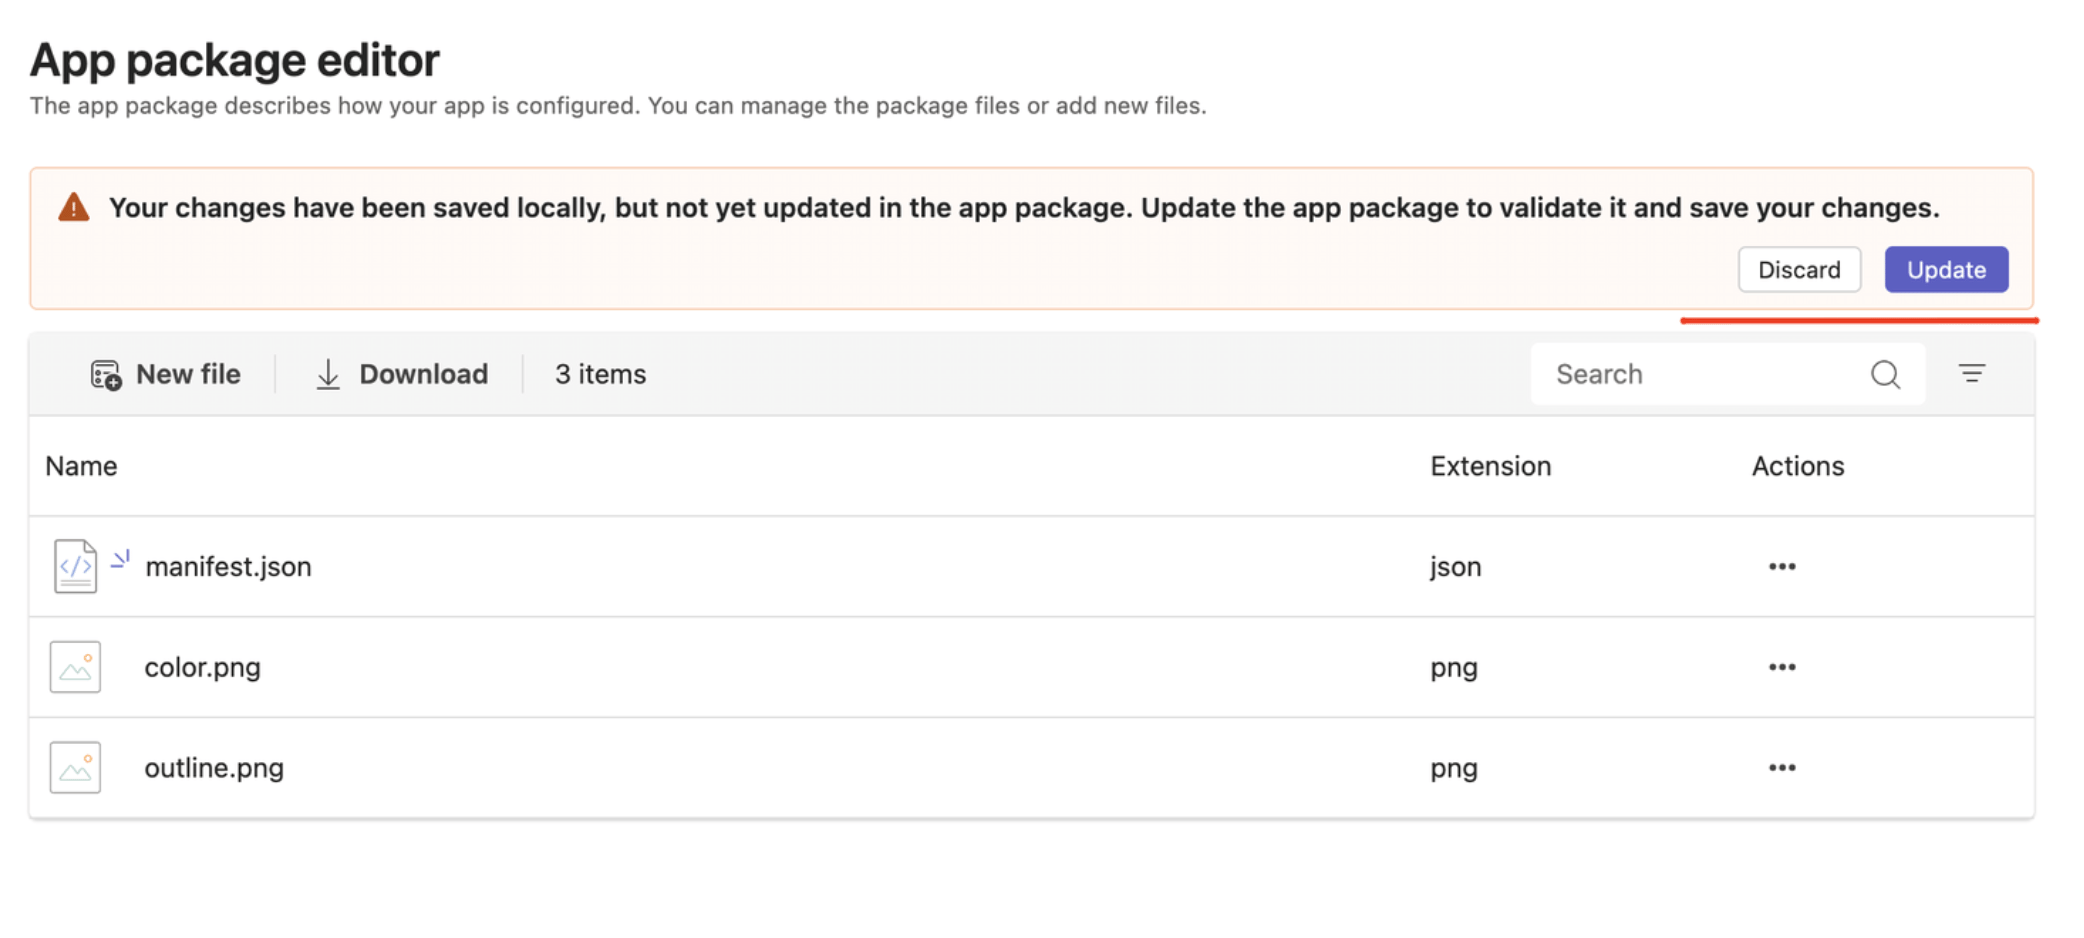
Update App Icons (Optional)
The App package editor also contains color.png and outline.png icon files. These are default app icons used in the Teams app catalog and app bar.
- color.png — (Optional) A 192x192 pixel full-color icon displayed in the Teams app catalog. Replace with your custom brand icon if desired.
- outline.png — (Optional) A 32x32 pixel transparent outline icon displayed in the Teams app bar. Replace with your custom outline icon if desired.
- If you do not need custom branding, leave the default icons as-is.
Update App Package
After saving all changes, an Update button appears in the App package editor with a warning that changes have been saved locally but not yet updated in the app package. Click Update to validate and apply your changes.
Publish Bot App
Choose a distribution method based on your use case. Option A for testing or single-tenant use, Option B for production multi-tenant deployment.
Option A - Publish to Your Org (Testing / Single Tenant)
For testing or when bot users are in the same tenant as the app registration.
- In the Developer Portal, expand Publish in the left sidebar and click Publish to org.
- The Publish to your org page appears — click Get started.
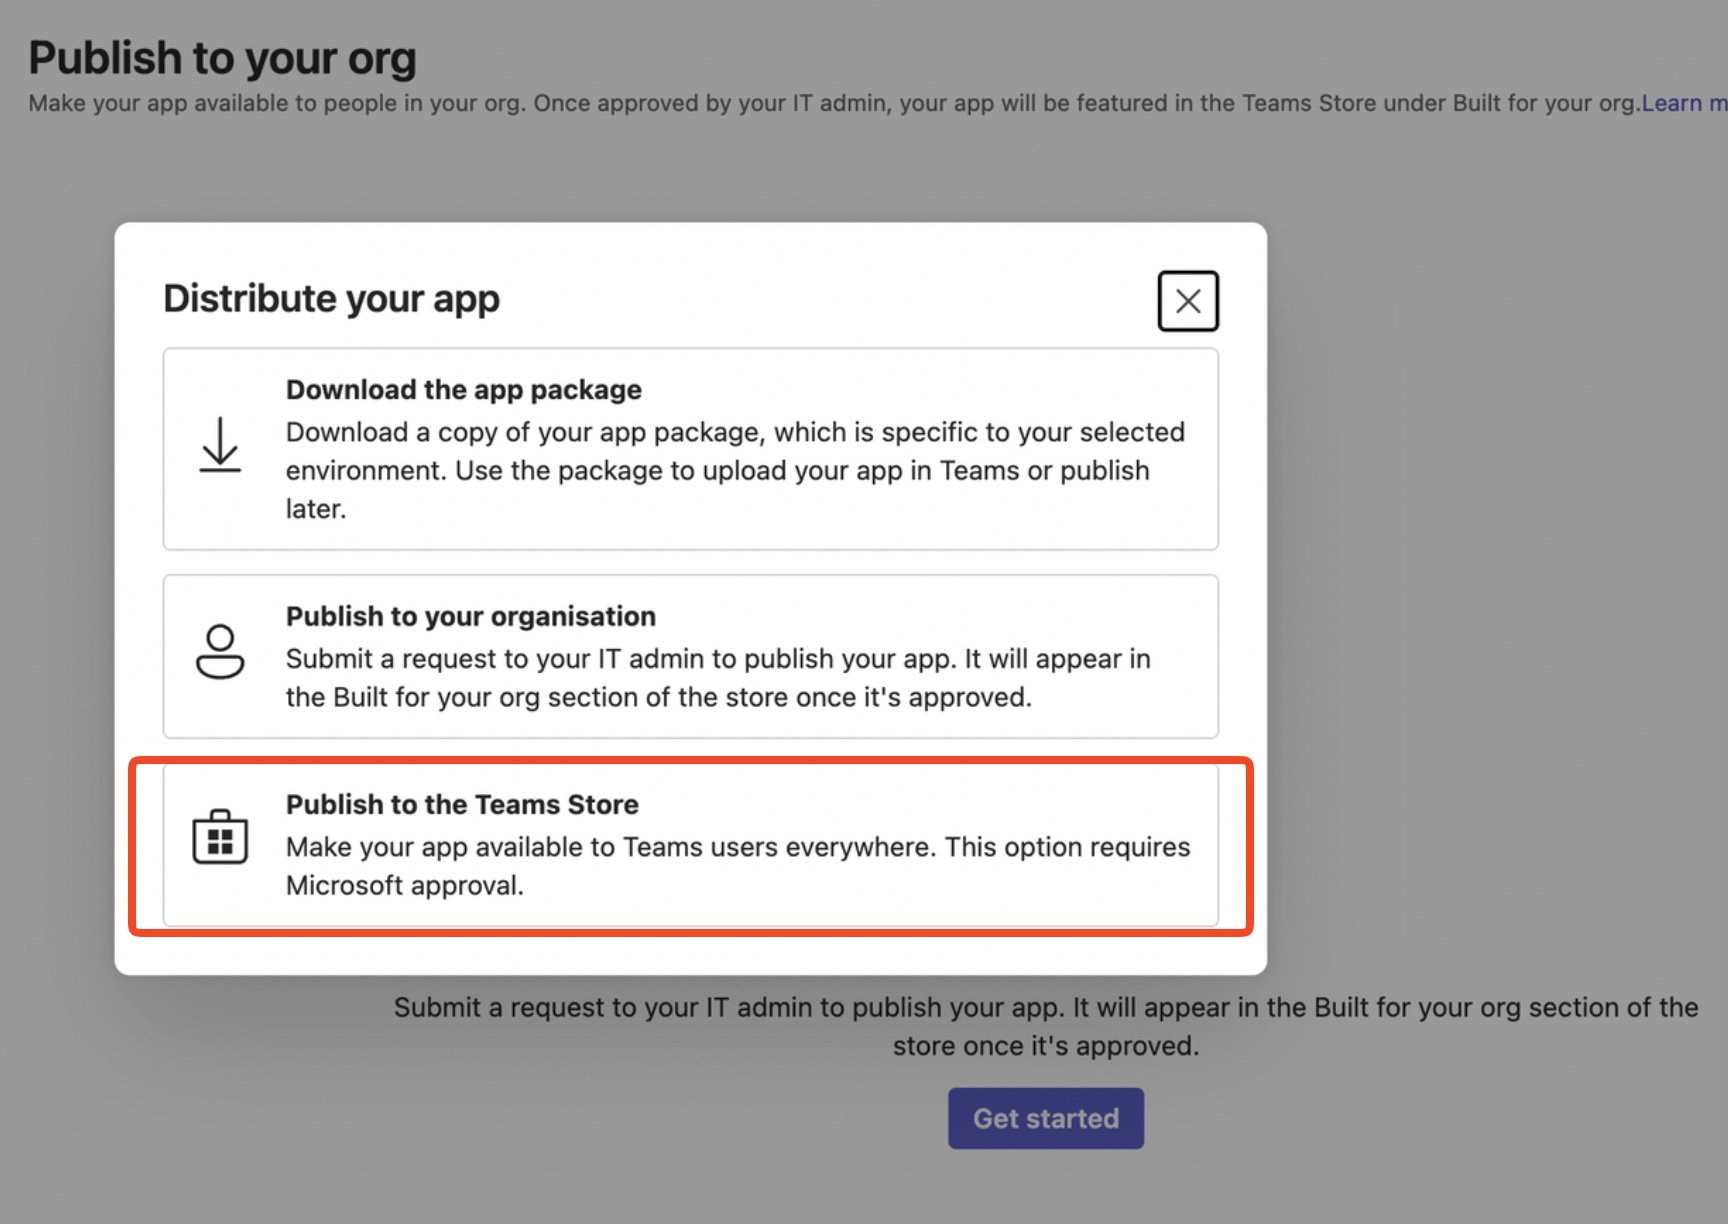
- A Distribute your app popup appears with three options. Select Publish to your organisation.

Option A - Approve and Copy App ID
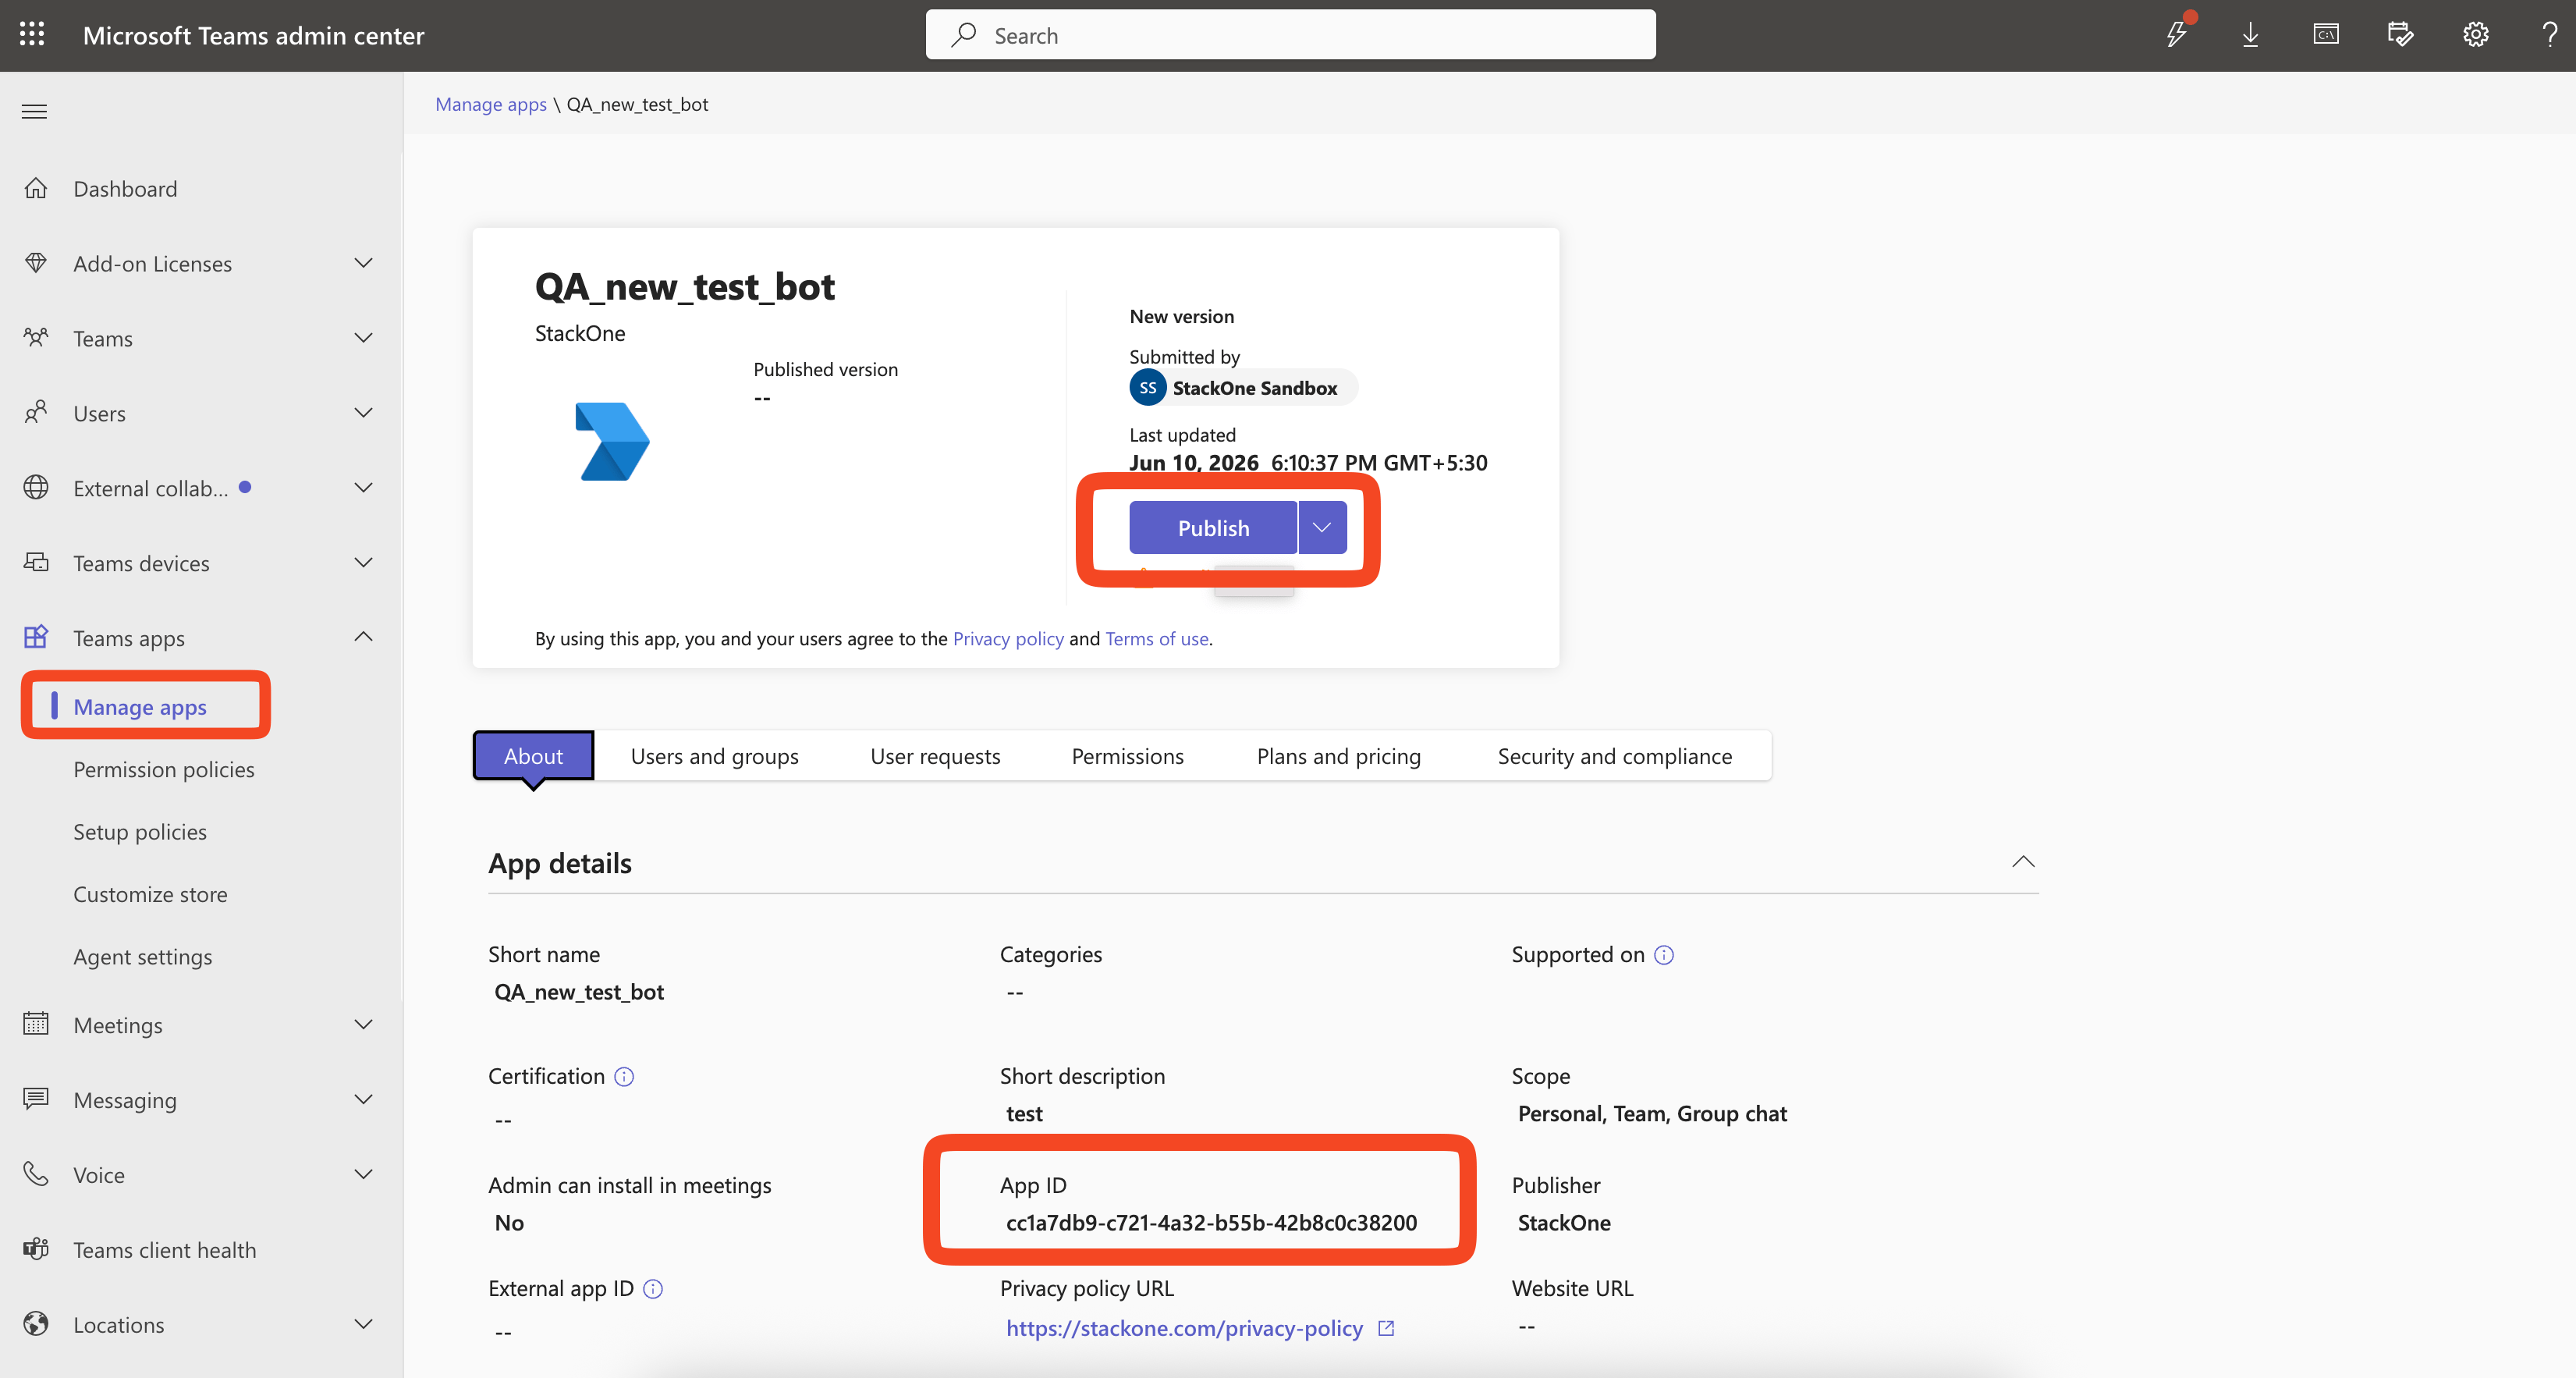
After publishing, approve the app in the Teams Admin Center and copy the App ID.
- Go to Teams Admin Center. In the left sidebar, expand Teams apps and click Manage apps.
- Find and approve the published app.
- Copy the App ID shown in the Admin Center — this is the Teams App Catalog ID. Save this value for later use in the Teams App Catalog ID field during the StackOne connector profile setup.
Option B - Publish to Teams Store (Production / Multi-Tenant)
For production use when bot users are in different tenants. The bot becomes globally available without any manual setup by end customers.
- In the Developer Portal, click Publish > Publish to the Teams Store.
- Complete the App submission checklist and submit for Microsoft review.
- After approval, the app is available in every tenant’s app catalog automatically.
- The App ID in Teams Admin Center (under Teams apps > Manage apps) becomes the global Teams App Catalog ID that works across all tenants. Save this value for later use in the Teams App Catalog ID field during the StackOne connector profile setup.
Find Your Bot Service URL
The Bot Service URL is the endpoint your bot uses to send messages to Teams. It varies by region.
Determine Your Service URL
The Bot Service URL is typically the same for most regions but can differ for government or sovereign clouds.
- Bot Service URL — Typically
https://smba.trafficmanager.net/teamsfor most regions. See Microsoft docs for global URLs. You will need this value for the Bot Service URL field during the StackOne connector profile setup. - If unsure, use
https://smba.trafficmanager.net/teams— this works for most commercial tenants.
Creating the StackOne Connector Profile
To create the Connector Profile in StackOne for Microsoft Teams:Navigate to Connector Profiles
Create New Connector Profile
- Click + Connector Profile
- Search for and select Microsoft Teams
- Select Type as OAuth 2.0 (with Bot Framework)
- Fill out the fields using details retrieved from your provider:
- Client ID
- Client Secret
- Teams App Catalog ID
- Bot Service URL
- Scopes (Optional)
- (Optional) Select Actions to be enabled for this Connector Profile
- Click Create profile