You need permission to register applications in your Microsoft Entra ID tenant, and administrator rights to grant admin consent. Note: end users cannot grant consent to newly registered multitenant apps without verified publishers.

Register a Microsoft Entra ID application

Create an app registration in Microsoft Entra ID to enable OAuth 2.0 authentication with Azure DevOps.

1

Sign in to the Microsoft Entra admin center

Open the Microsoft Entra admin center and sign in with your Microsoft work account.
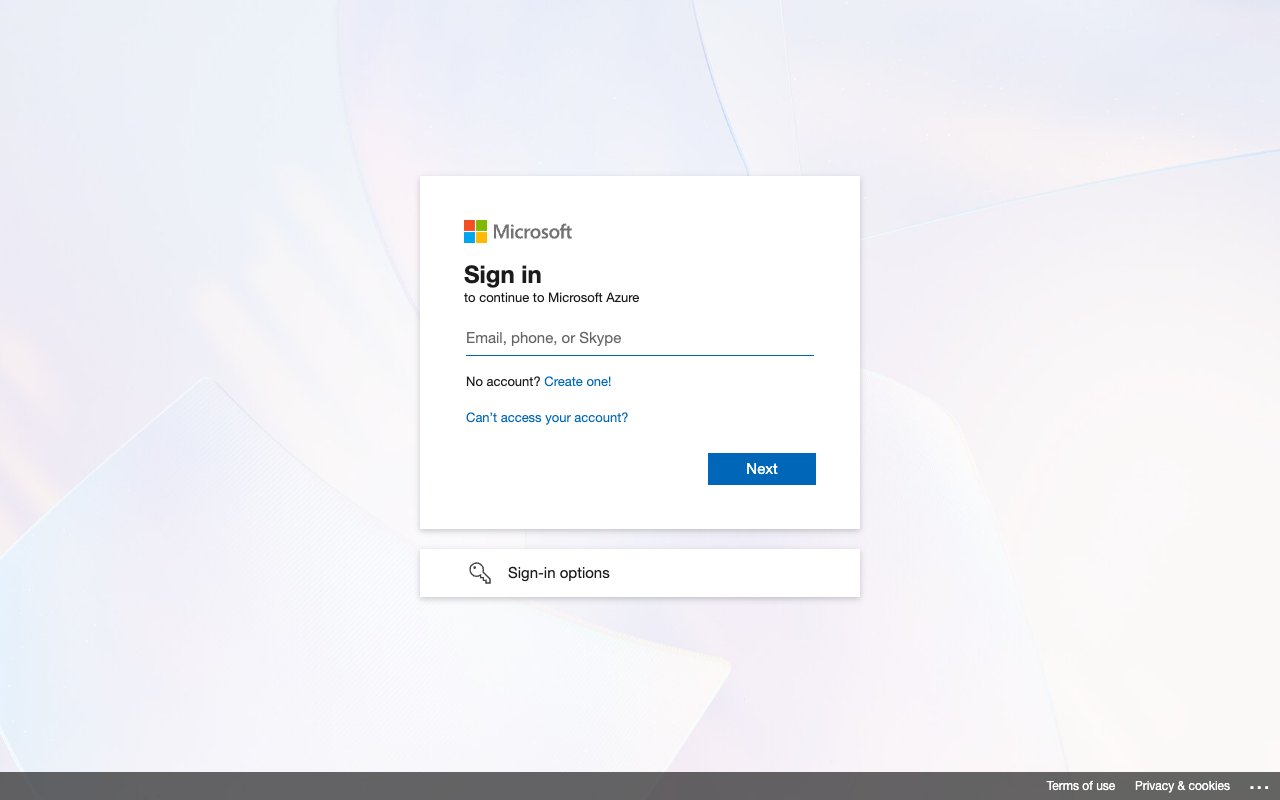
Microsoft sign in page with the Email, phone, or Skype field and Next button
2

Open App registrations

In the left sidebar under Entra ID, click App registrations, then click + New registration in the toolbar.
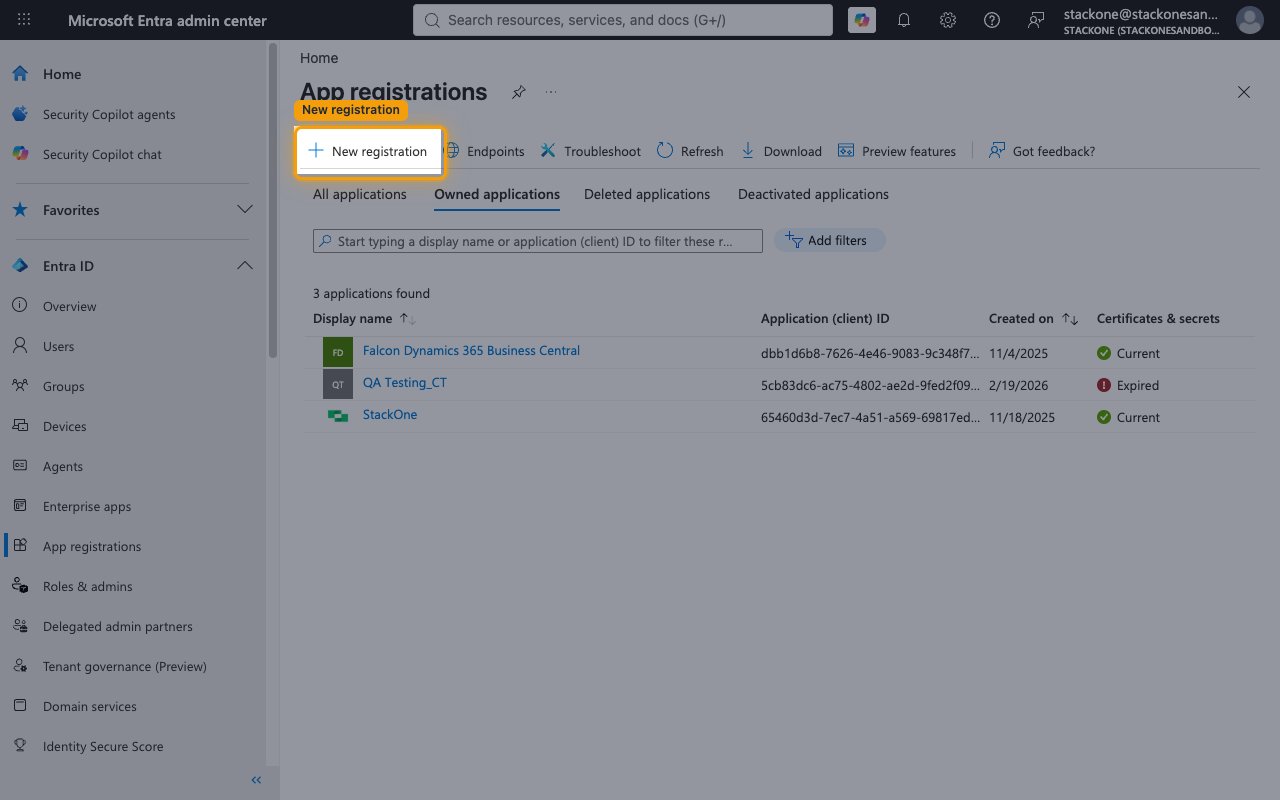
App registrations list with the New registration button highlighted
3

Choose the supported account types

On the Register an application screen, enter a Name (e.g., StackOne Azure DevOps Integration). Under Supported account types, open the dropdown and select Multiple Entra ID tenants (shown as Accounts in any organizational directory (Any Microsoft Entra ID tenant - Multitenant)).

  • After selecting it, two options appear — select Allow all tenants (the default, Allow only certain tenants (Preview), requires listing every tenant explicitly).
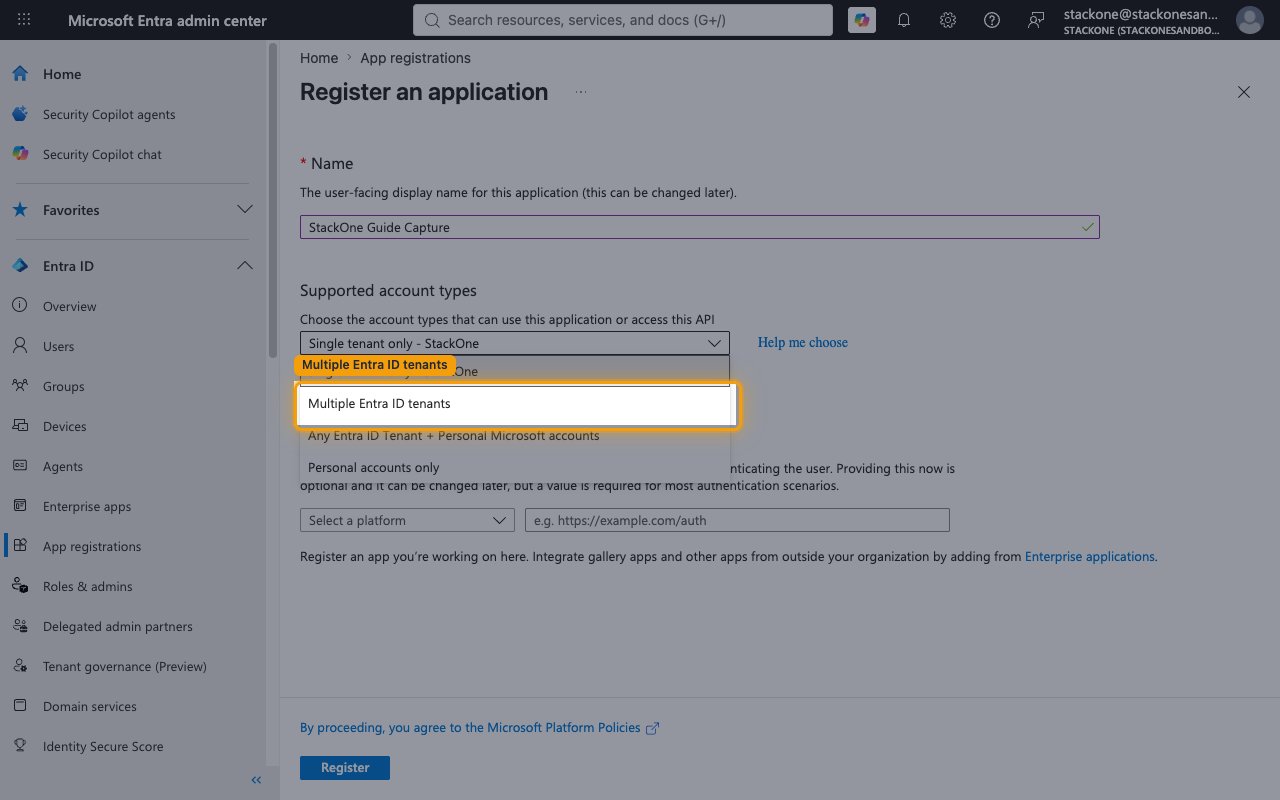
Supported account types dropdown open with Multiple Entra ID tenants highlighted
4

Set the Redirect URI and register

Under Redirect URI (optional), select the Web platform and paste StackOne’s callback URL, then click Register.

  • Redirect URI: https://api.stackone.com/connect/oauth2/azuredevops/callback
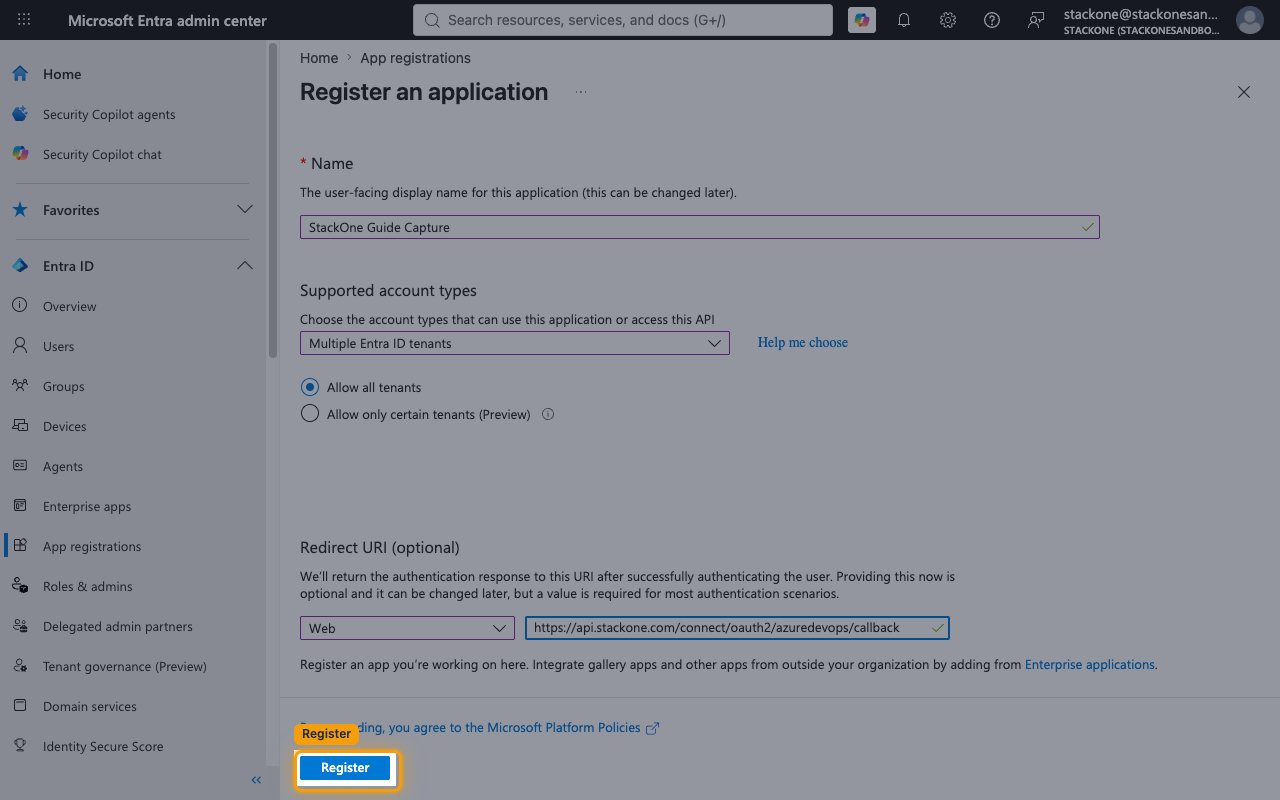
Completed Register an application form with the Register button highlighted

Configure API permissions

Grant the application delegated access to the Azure DevOps REST API.

1

Open API permissions

In the app’s left menu under Manage, click API permissions, then click + Add a permission in the Configured permissions section.
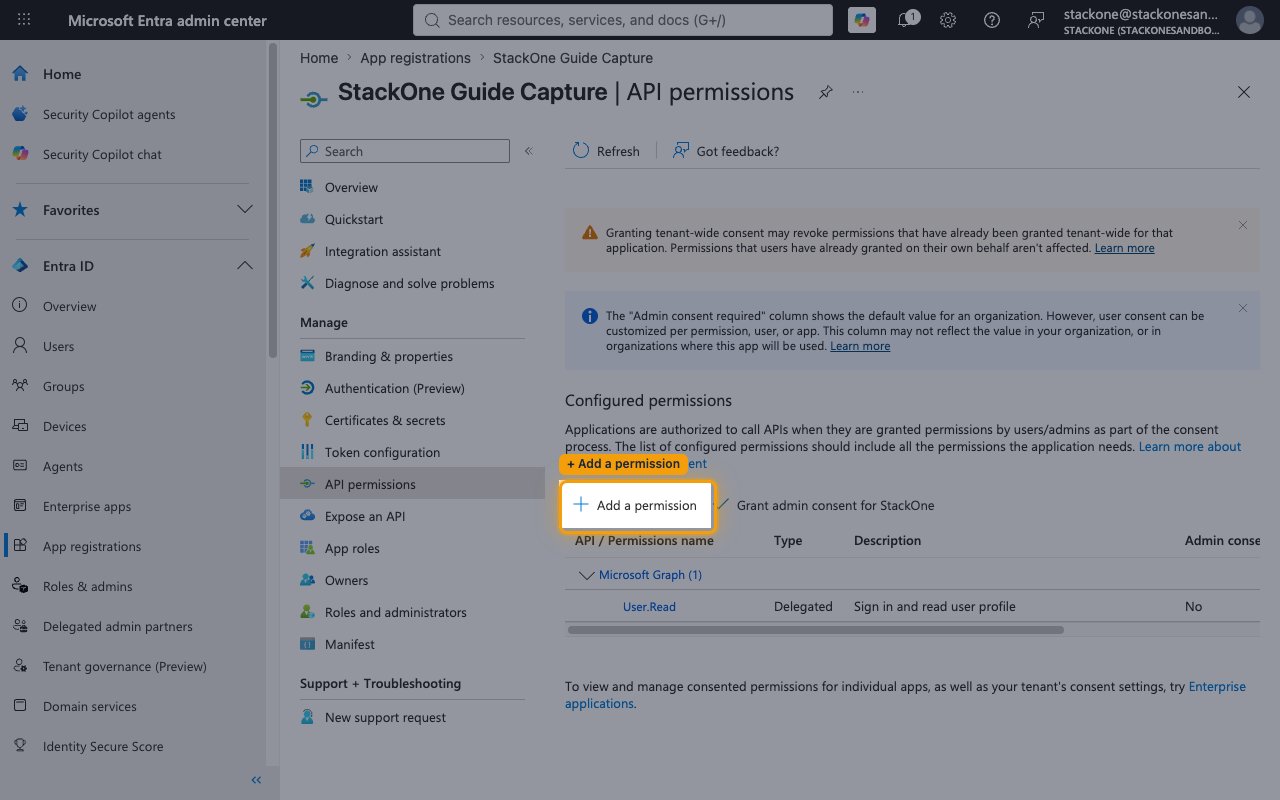
API permissions blade with the Add a permission button highlighted
2

Select the Azure DevOps API

In the Request API permissions panel, on the Microsoft APIs tab, select the Azure DevOps tile (“Integrate with Azure DevOps and Azure DevOps server”).
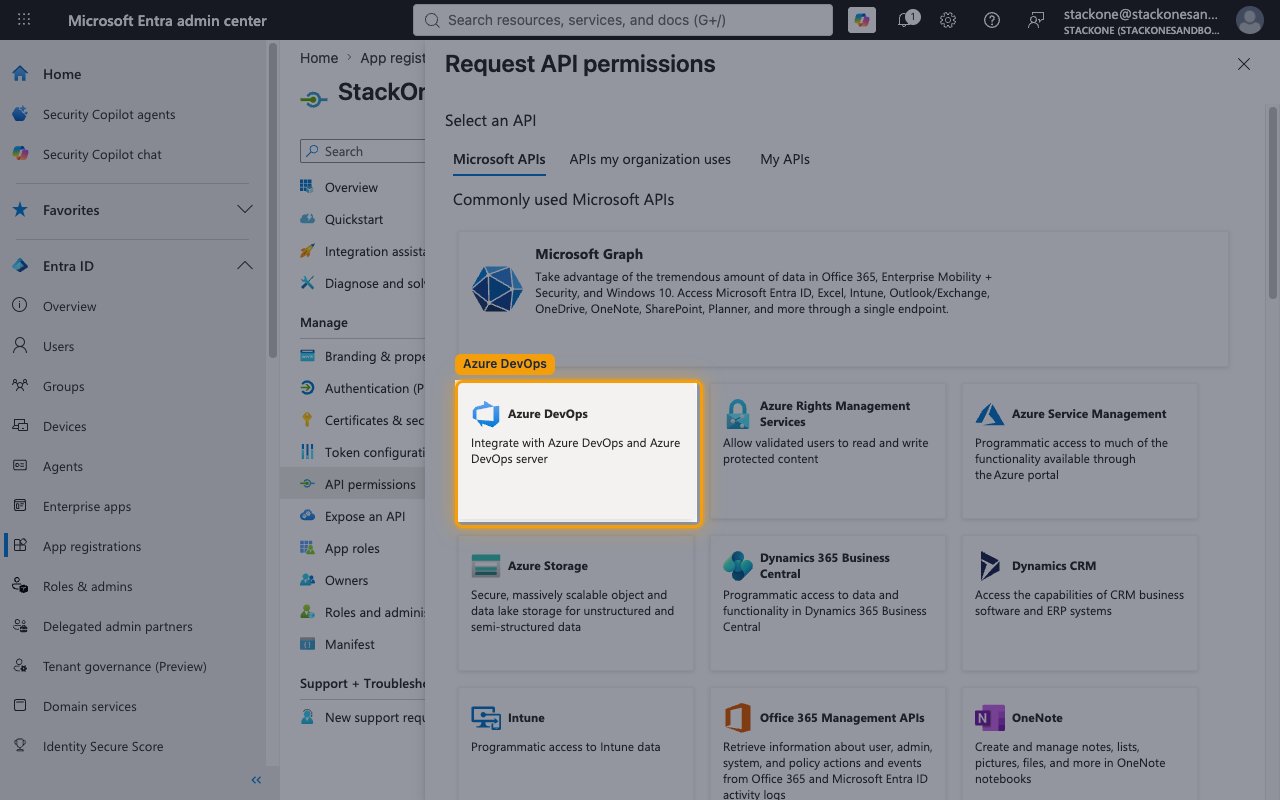
Request API permissions panel with the Azure DevOps tile highlighted
3

Add the user_impersonation permission

Enables actions: Add Build Tag, Add Membership, Add Pull Request Label, Add User Entitlement, Add Work Item Comment, Create Build Definition, Create Classification Node, Create Dashboard Widget, Create Environment, Create Feed, Create Or Update Wiki Page, Create Pipeline, Create Policy Configuration, Create Project, Create Pull Request, Create Pull Request Reviewer, Create Pull Request Status, Create Pull Request Thread, Create Push, Create Query, Create Release, Create Release Definition, Create Repository, Create Service Endpoint, Create Service Hook, Create Team, Create Variable Group, Create Wiki, Create Work Item, Delete Classification Node, Delete Environment, Delete Policy Configuration, Delete Project, Delete Pull Request Reviewer, Delete Query, Delete Repository, Delete Service Endpoint, Delete Service Hook, Delete Team, Delete User Entitlement, Delete Variable Group, Delete Wiki, Delete Wiki Page, Delete Work Item, Delete Work Item Comment, Delete Work Item Tag, Download Attachment, Get Agent Pool, Get Backlog, Get Build, Get Build Changes, Get Build Definition, Get Build Log, Get Build Logs, Get Build Timeline, Get Build Work Items, Get Classification Nodes, Get Commit, Get Dashboard, Get Environment, Get Feed, Get Feed Permissions, Get Item, Get Iteration, Get Pipeline, Get Pipeline Artifact, Get Pipeline Log, Get Pipeline Run, Get Policy Configuration, Get Project, Get Project Properties, Get Pull Request, Get Pull Requests By Project, Get Query, Get Release, Get Repository, Get Service Endpoint, Get Subscription, Get Team, Get Tree, Get User, Get User Entitlement, Get Variable Group, Get Wiki, Get Wiki Page, Get Work Item, Get Work Item Comment, Get Work Item Tag, Get Work Item Type, List Agent Pools, List Agents, List Approvals, List Backlogs, List Boards, List Branch Statistics, List Build Artifacts, List Build Definitions, List Build Tags, List Builds, List Commits, List Dashboards, List Deployments, List Environment Deployment Records, List Environments, List Feeds, List Fields, List Forks, List Groups, List Items, List Iteration Work Items, List Iterations, List Memberships, List Merge Bases, List Pipeline Logs, List Pipeline Runs, List Pipelines, List Policy Configurations, List Policy Evaluations, List Projects, List Pull Request Commits, List Pull Request Iterations, List Pull Request Labels, List Pull Request Reviewers, List Pull Request Statuses, List Pull Request Threads, List Pull Request Work Items, List Pull Requests, List Pushes, List Queries, List Refs, List Release Definitions, List Releases, List Repositories, List Service Endpoints, List Service Hook Notifications, List Service Hooks, List Team Members, List Teams, List Test Plans, List Test Results, List Test Runs, List User Entitlements, List Users, List Variable Groups, List Widgets, List Wikis, List Work Item Comments, List Work Item Relation Types, List Work Item Revisions, List Work Item Tags, List Work Item Type Fields, List Work Item Types, List Work Item Updates, List Work Items By IDs, Preview Pipeline, Query Work Items (WIQL), Queue Build, Replace Service Hook, Run Pipeline, Search Code, Search Queries, Search Work Items, Set Feed Permissions, Set Project Properties, Update Approval, Update Classification Node, Update Environment, Update Feed, Update Policy Configuration, Update Project, Update Pull Request, Update Pull Request Reviewer, Update Pull Request Thread, Update Query, Update Refs, Update Repository, Update Service Endpoint, Update Team, Update User Entitlement, Update Variable Group, Update Wiki, Update Work Item, Update Work Item Comment, Update Work Item Tag, Upload Attachment

Under Delegated permissions, check user_impersonation (“Have full access to Visual Studio Team Services REST APIs”), then click Add permissions. This single permission covers every Azure DevOps scope the connector uses:

  • The vso group in the same panel lists granular scopes, but the Service Hooks scopes (vso.hooks, vso.hooks_write) needed for webhook events are not individually selectable there — user_impersonation is the permission that covers them.
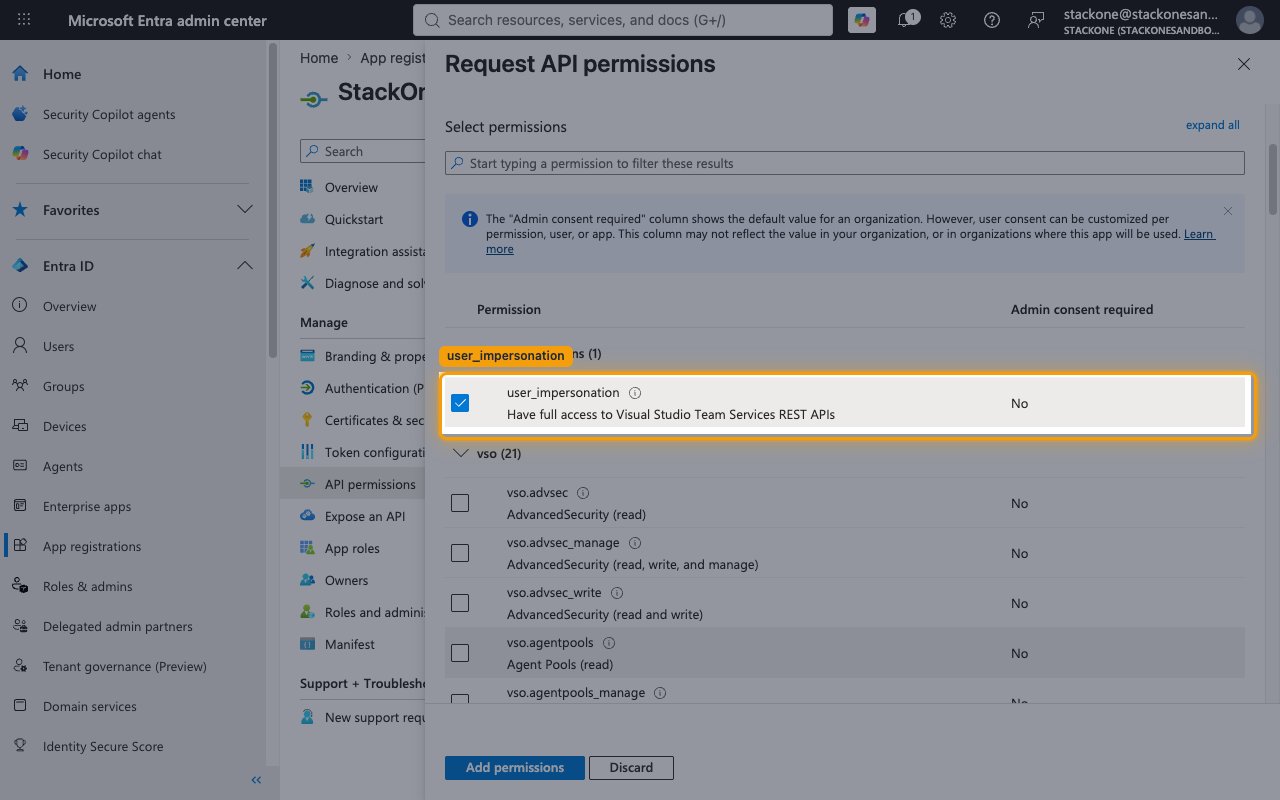
Delegated permissions list with user_impersonation checked and highlighted
4

Grant admin consent

Back on Configured permissions, click Grant admin consent for [your tenant] and confirm with Yes, so users don’t hit the unverified-publisher consent block.
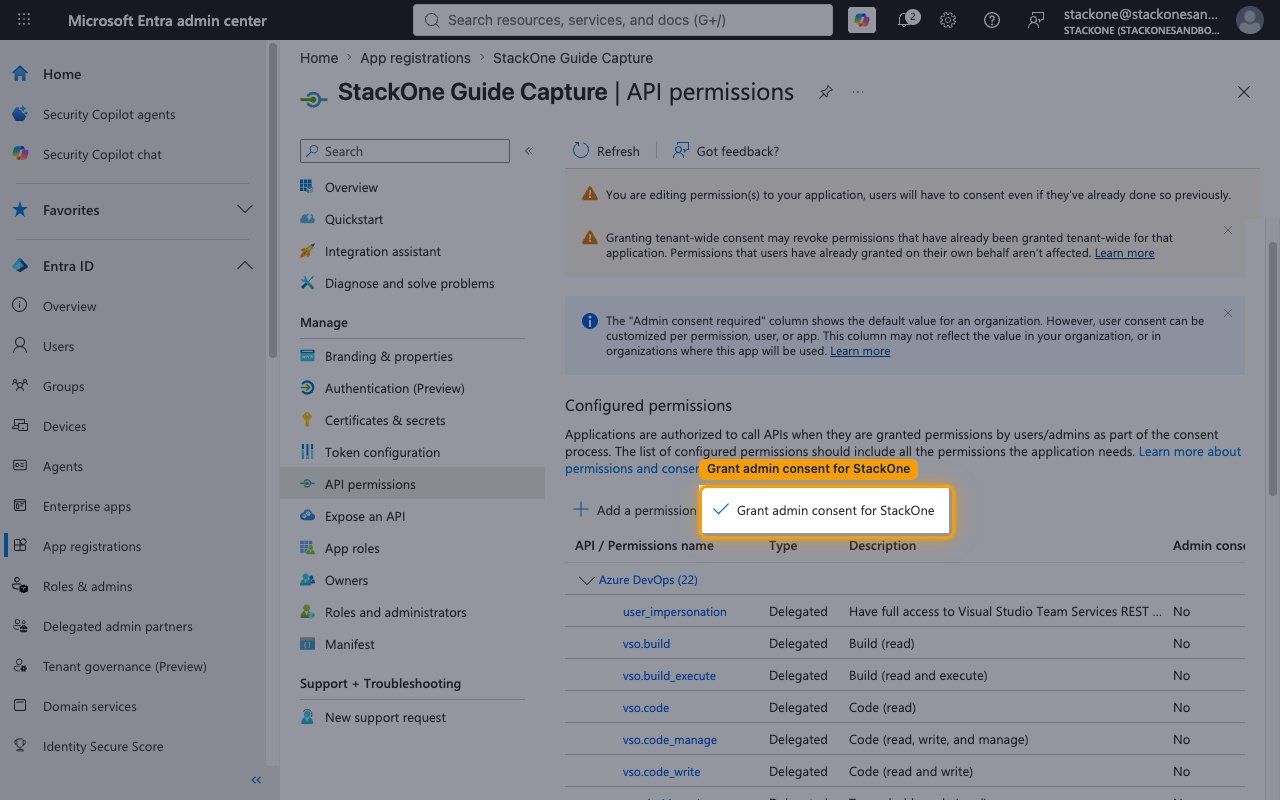
Configured permissions with the Grant admin consent button highlighted

Create and copy your credentials

Copy the client ID and generate a client secret for the StackOne connection.

1

Copy the Application (client) ID

On the app’s Overview page, in the Essentials panel, copy the Application (client) ID — this is the public identifier of your app. Paste it into the Client ID field in the StackOne Connector profile.
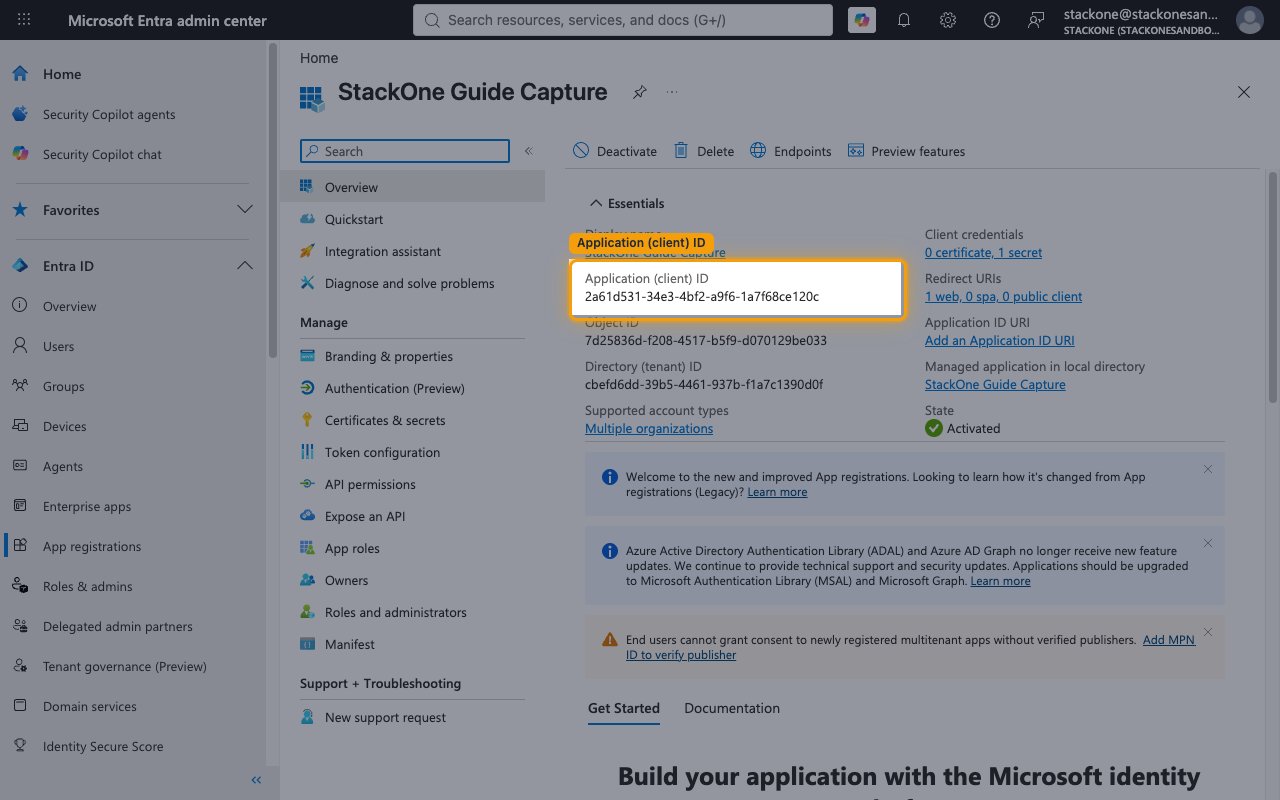
App Overview Essentials panel with the Application (client) ID highlighted
2

Create a client secret

In the left menu under Manage, click Certificates & secrets. On the Client secrets tab, click + New client secret.
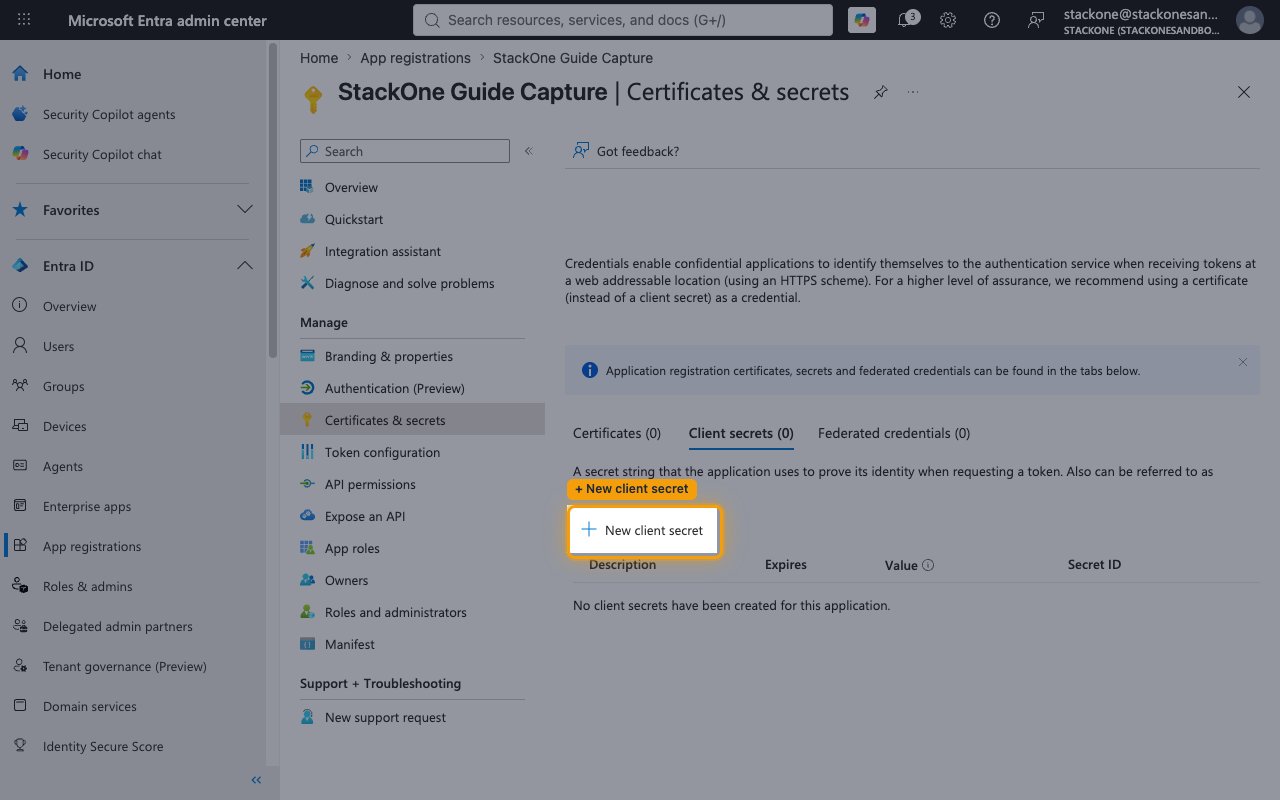
Certificates and secrets page with the New client secret button highlighted
3

Add the client secret

In the Add a client secret panel, enter a Description, choose an expiry under Expires (default Recommended: 180 days (6 months)), and click Add.

  • Track the expiry date — the connection stops working when the secret expires and you will need to create a new one.
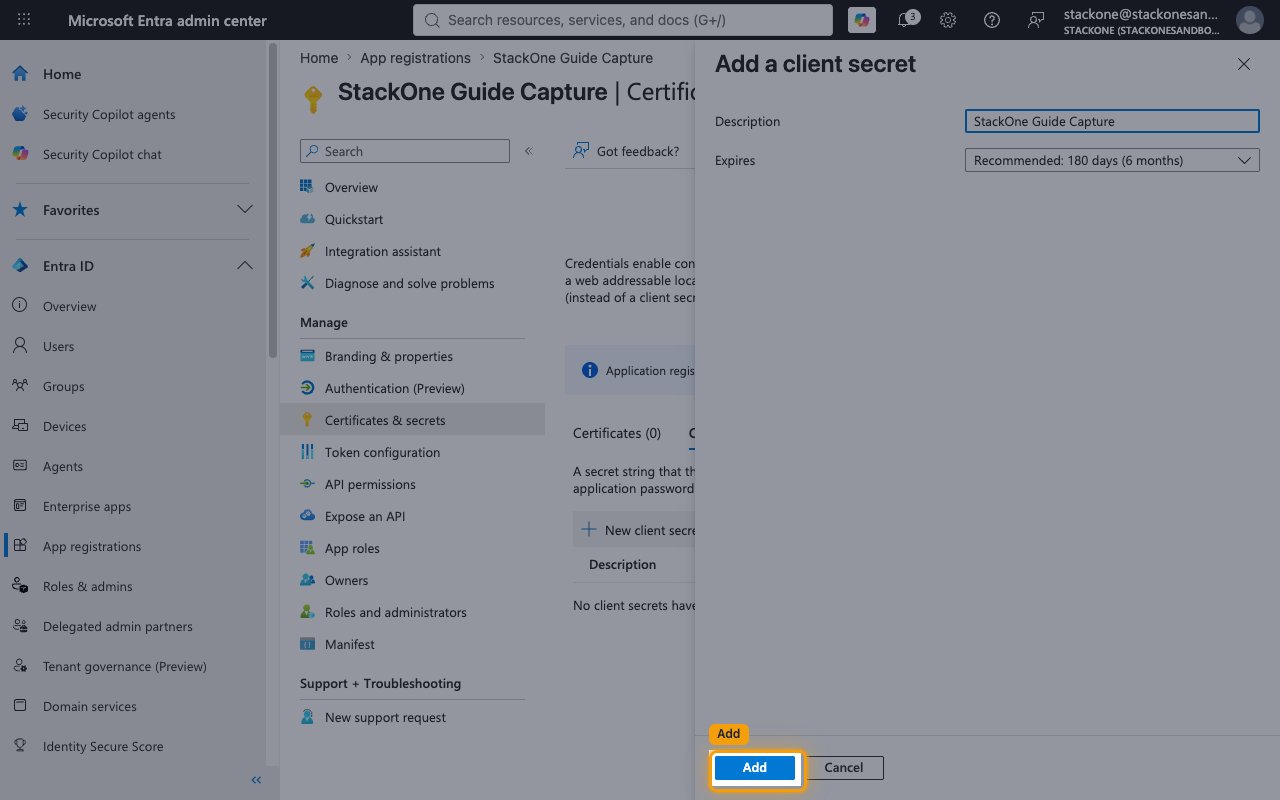
Add a client secret panel with Description and Expires fields and the Add button highlighted
4

Copy the secret Value

Copy the new secret’s Value column (not the Secret ID) and paste it into the Client Secret field in the StackOne Connector profile.

  • The secret Value is only displayed once and cannot be retrieved later — copy it before leaving the page.
  • Per the on-screen notice: “Client secret values cannot be viewed, except for immediately after creation. Be sure to save the secret when created before leaving the page.”
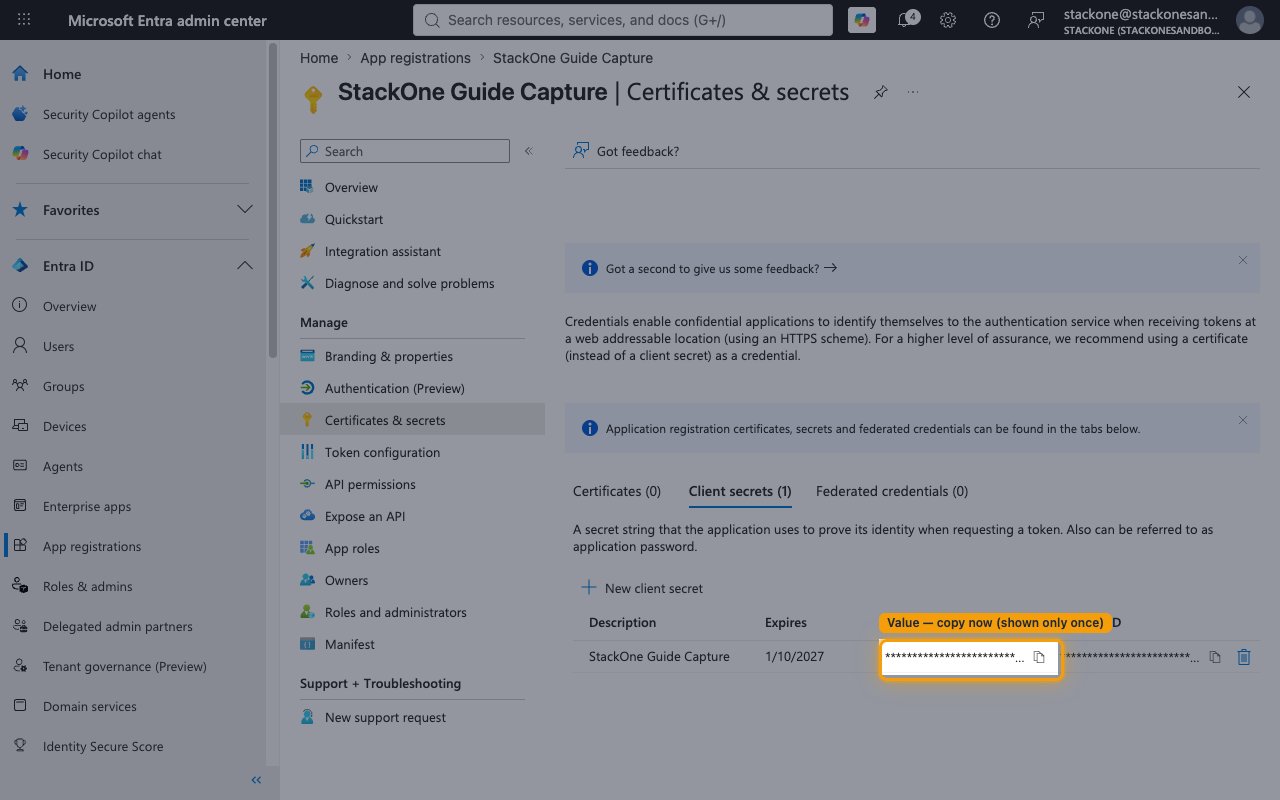
Client secrets tab with the one-time secret Value highlighted and redacted
5

Set the Scopes field (optional)

The Scopes field in the StackOne Connector profile is a space-separated list of Azure DevOps scopes to request. Leave it blank to use the default, which works with the user_impersonation permission configured above.

  • Default: https://app.vssps.visualstudio.com/.default

Creating the StackOne Connector Profile

To create the Connector Profile in StackOne for Azure DevOps:
1

Navigate to Connector Profiles

Login to StackOne and navigate to Connector Profiles
2

Create New Connector Profile

  • Click + Connector Profile
  • Search for and select Azure DevOps
  • Select Type as OAuth 2.0 (Microsoft Entra ID)
  • Fill out the fields using details retrieved from your provider:
    • Client ID
    • Client Secret
    • Scopes (Optional)
  • (Optional) Select Actions to be enabled for this Connector Profile
  • Click Create profile
Congratulations! The new Connector Profile will now show up in your project ready to be used. You can now continue to Link Accounts for Azure DevOps.