Overview
This document outlines the procedure for configuring a third-party assessment vendor within SAP SuccessFactors and integrating it with StackOne. The guide details adding a vendor, uploading assessment packages, and customising job requisition templates to include assessment fields. Finally, it explains how to set up external event notifications to trigger assessments and utilise the StackOne Unified API to return the results to SAP SuccessFactors.Partner Requirements
There are no formal partnership requirements for assessment vendor integration with SAP SuccessFactors. You must have access to the Provisioning Account to create an integration user and grant the necessary permissions.Required Permissions for Vendor Assessment in SAP SuccessFactors
Recruiting Assessment Permissions
Recruiting Assessment Permissions
- SFAPI Retrieve Assessment Order Permission
- SFAPI Update Assessment Report Permission
Permissions Required for Assessment Configurations
Permissions Required for Assessment Configurations
- Ensure recruiting users are granted the Manage Assessment Vendors permission.
- In Provisioning > Company Settings, enable the following options:
- Enable Assessment Integration
- SFAPI
- Enable SFAPI Web Services
- Grant the following permissions to the SFAPI integration user:
- Access to Event Notification Subscription
- Retrieve Assessment Order
- Update Assessment Report
- Enable Assessment Integration (which requires Candidate Workbench) from the Provisioning Account.
Provider Side Setup
Add the integration user to the SAP SuccessFactors API login exceptions list
Navigate to Admin Center > Tools > Password & Login Policy Settings > Set API Login Exceptions, then Add the following information:- Username: Select the SFAPI integration user.
- Maximum Password Age (days): Set to -1.
- IP Address Restrictions: Specify the designated IP addresses or address range for the integration.
Add your vendor and upload the assessment vendor packages
Add a Vendor for Assessment
Export to download the CSV file. Add your vendor with a unique clientId and mark it as active by entering Y in the active column.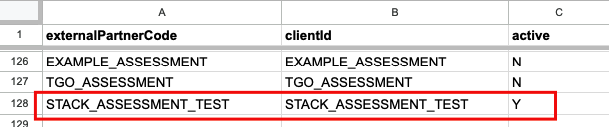
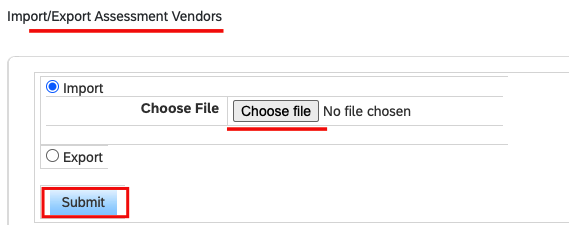
Upload the assessment vendor packages
- vendorId: Identifies the assessment vendor (must be the same as the
clientId). - packageCode: Identifies an assessment package for the order.
- shortName: A shortened name for the package, for use on the candidate summary page.
- Label: The language in which the assessment is displayed.

Create a subscriber and set up an external event
Create a subscriber
Subscriber Id and Client Id.
Note that your clientId must match the one uploaded with your vendor’s name in the previous step.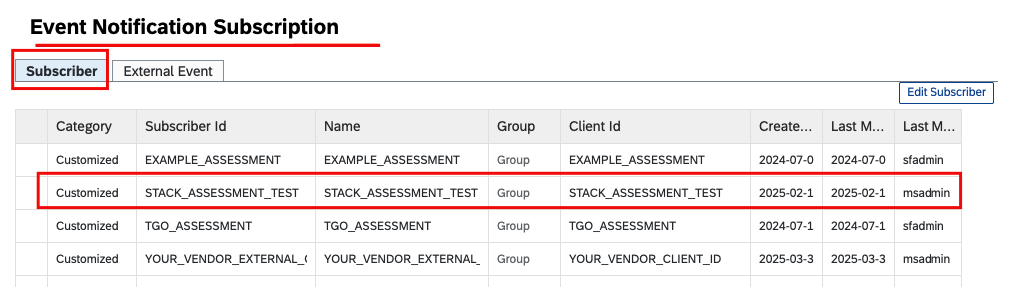
client_id, an error will occur when sending the assessment notification.Set up an external event to receive notifications
+ Add New to add a new external event.
- Event Type: Select
rcm_assessment_alert_v2. - Subscriber: Select the subscriber you created in the previous step.
- Protocol: Select
SOAP_OVER_HTTP_HTTPS. - Endpoint URL: Enter the endpoint URL, including the
externalTriggerTokenquery parameter, which will be used to receive assessment order requests.
externalTriggerToken, which you will receive from the StackOne Connection Hub. This token verifies requests from SAP SuccessFactors for that specific vendor.- Authentication: Select
NO.
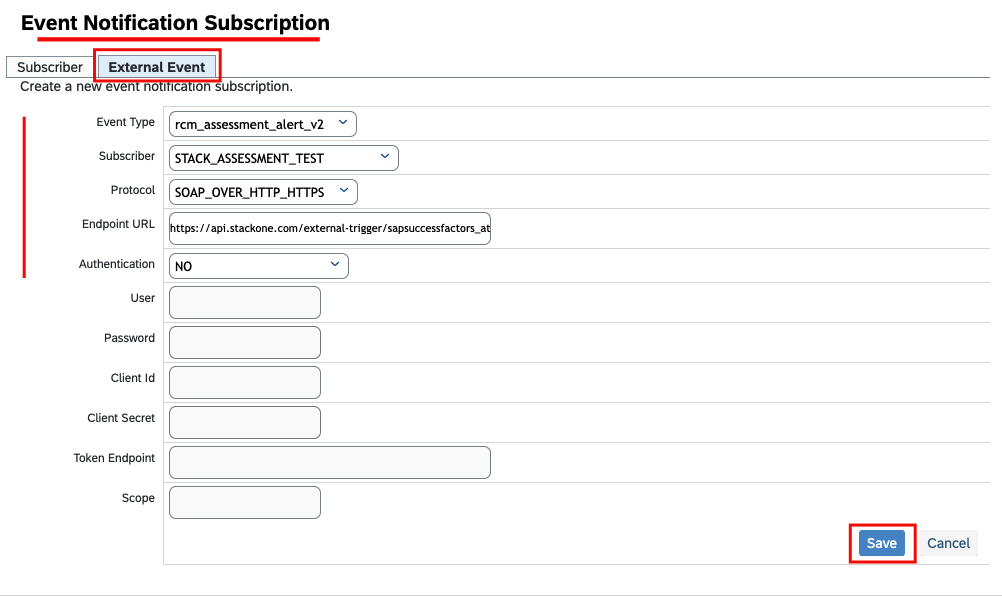
Save to save the configuration for the external event.Manage fields for the Job Requisition template
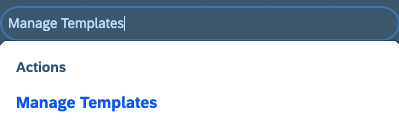
Go to Manage Templates
Standard Job Requisition.How to Locate the Job Requisition Template Name
How to Locate the Job Requisition Template Name

i icon to view the Job Requisition Template.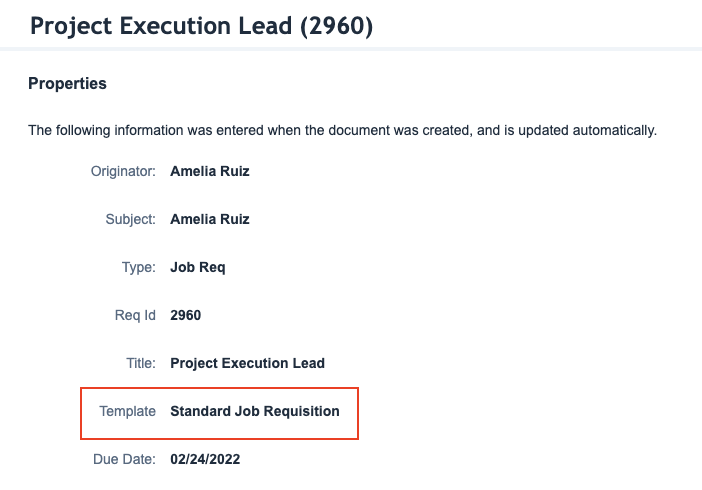

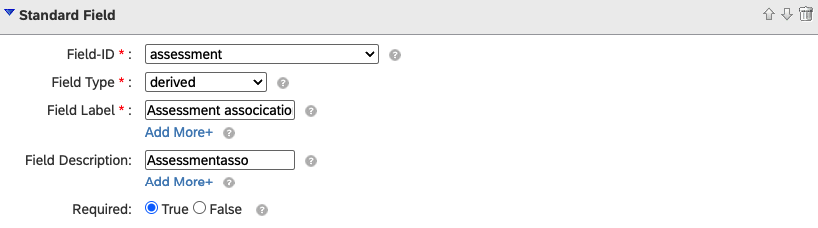
Add assessment field in template
Fields Defined, and then click Add Standard Field.- Field-ID: Select
assessment. - Field Type: Select
Derived. - Field Label: Enter a relevant label, such as
Assessment association. - Field Description: Enter a relevant description, such as
Assessmentasso. - Required: Select the checkbox to make this field mandatory, as per your requirement.
You can also specify the standard `assessment` field using the Job Requisition XML.
You can also specify the standard `assessment` field using the Job Requisition XML.
assessment field enables the user to select a specific assessment to associate with the job requisition.Manage the permissions for the assessment feature
Go to Manage Templates
Feature Permissions Defined, and then click Add Feature Permission.- Feature Permission Description: Enter a relevant description.
- Feature Permission Type: Select
assessmentIntegration. - Feature Permission Role Name: Select
All. - Feature Permission Status: Select the talent pipeline stage at which you want to initiate the assessment.
assessmentIntegration for a specific talent pipeline stage.You can also specify the feature permissions for `assessmentIntegration` using the Job Requisition XML.
You can also specify the feature permissions for `assessmentIntegration` using the Job Requisition XML.
Done, and then click Publish to save your changes.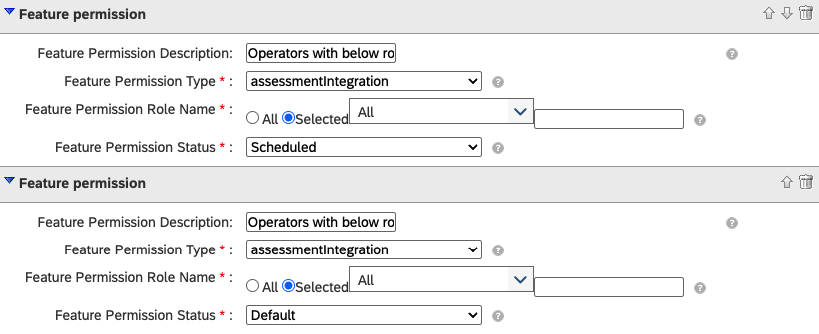
Assessment fields under Job Requisition
Go to Job Requisition
View or Edit Requisition.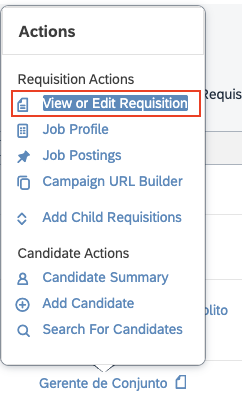
Add More Assessments link and select the details below.
- Status: Select the stage where you have set up the assessment integration feature, as described in the previous step.
- Vendor: Select the vendor, for example,
STACK_ASSESSMENT_TEST. - Assessment: Select the specific assessment package to be sent to the candidate.
- Email Template: Select the email template to be sent to the candidate once the assessment is triggered.
If the fields are not visible after you have added them and set the permissions in the previous steps
If the fields are not visible after you have added them and set the permissions in the previous steps
OData API Metadata Refresh and Export.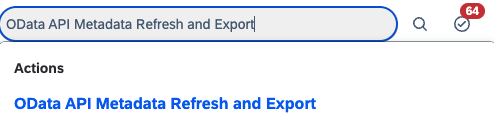
Refresh button next to Cache.
StackOne Configuration
Enable SAP SuccessFactors in StackOne
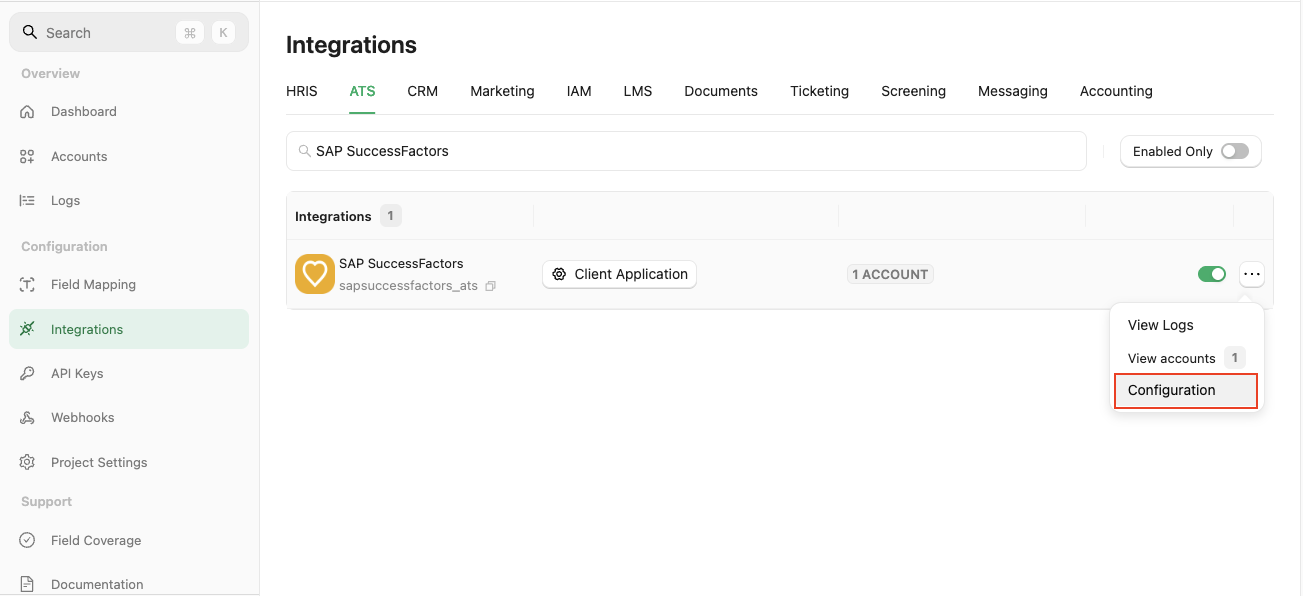
Complete the configuration form
- Authentication Type - Select
Client Application. - Integration Category - Select
Assessments.
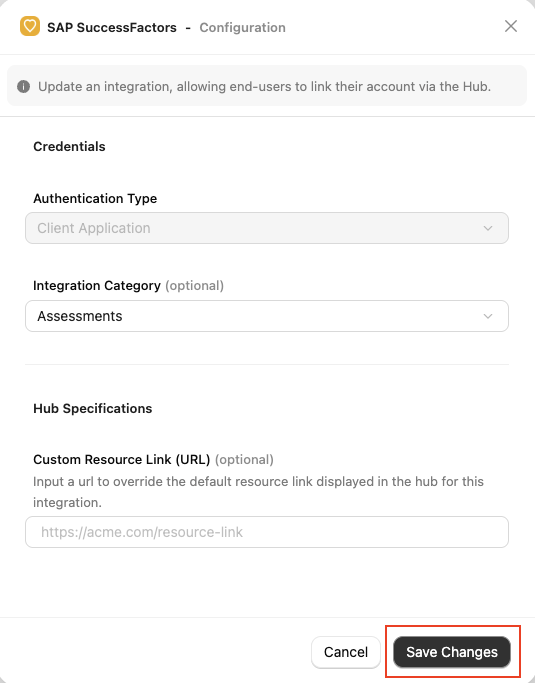
Confirm or Save Changes to enable the SAP SuccessFactors integration, allowing end-users to link their accounts via the StackOne Connector Hub.Add a Webhook
Add webhook, and complete the form:- Name: Enter a recognisable name for your webhook.
- URL: Enter the URL where the webhook will send notifications of enable events.
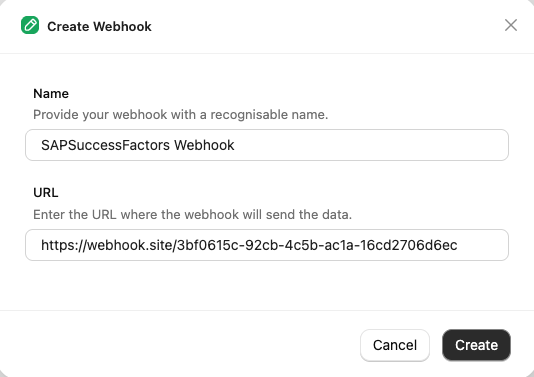
Events tab for Assessment, such as Assessment Order.
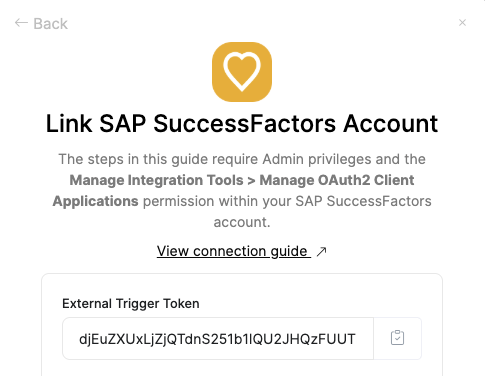
ATS User Enablement
externalTriggerToken in the query parameter of the endpoint URL. Please refer to these steps.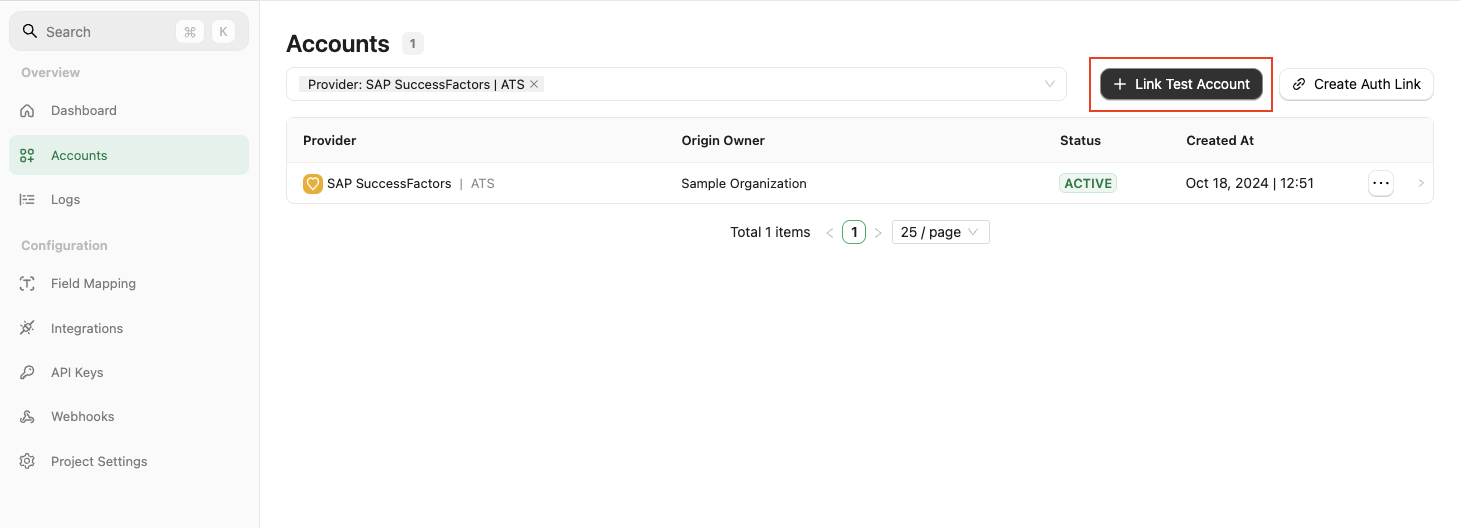
External Trigger Token, which must be passed as a query parameter with the endpoint URL when setting up the external event in SAP SuccessFactors, as outlined in the previous steps.
ATS User Experience
Go to Job Requisition
View or Edit Requisition.Add More Assessments, users can select the details.- Status: Select the stage where you have set up the assessment integration feature, as described in the previous step.
- Vendor: Select the vendor, for example,
STACK_ASSESSMENT_TEST. - Assessment: Select the specific assessment package to be sent to the candidate.
- Email Template: Select the email template to be sent to the candidate once the assessment is triggered.
If fields are not visible after adding them and setting permissions in the above steps
If fields are not visible after adding them and setting permissions in the above steps
OData API Metadata Refresh and Export.Refresh button next to Cache.Move candidate to the assessment-configured stage
Candidates tab located within the Job Requisition section.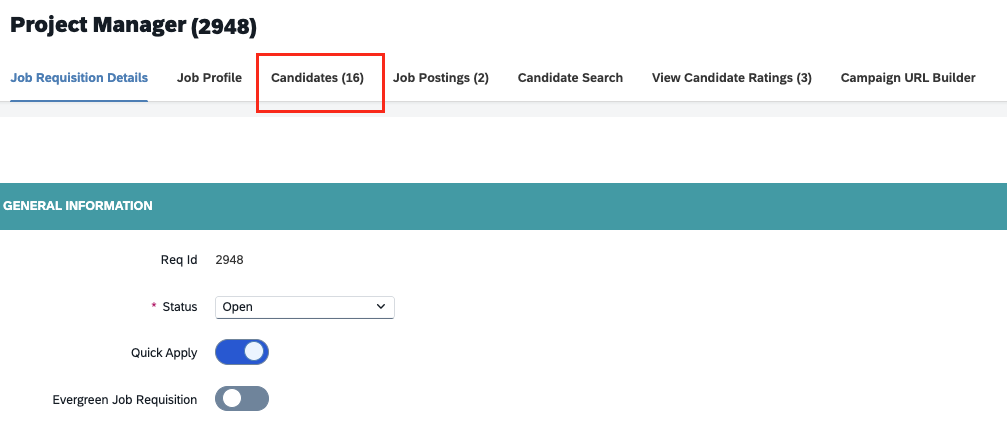
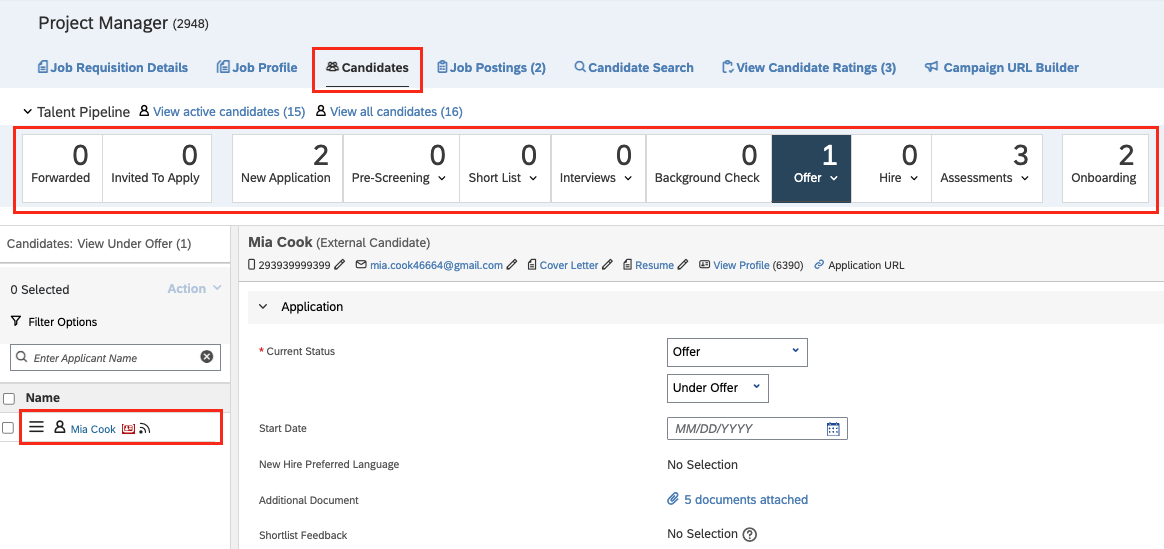
Visibility of the Initiate Assessment option
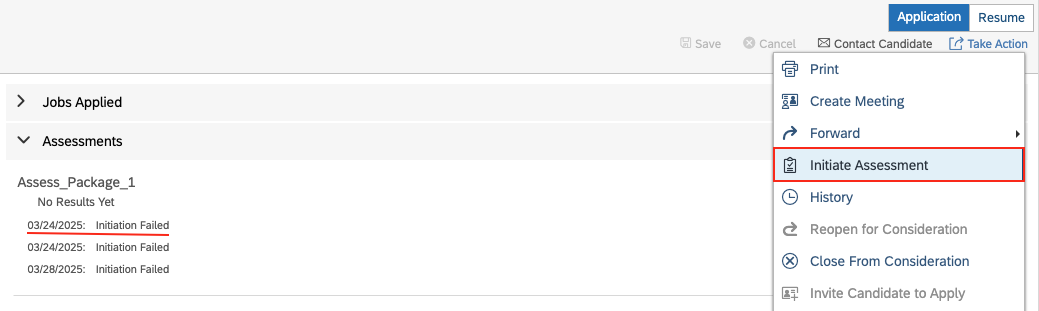
Initiate Assessment option under the Take Actions menu will only be visible if the assessment fails to send, allowing it to be re-initiated.Send the test to the candidate from SAP SuccessFactors
Test your integration with StackOne using your SAP SuccessFactors Sandbox
User experience after the assessment has been sent
When an assessment is sent to the candidate, the user will see theInitiated status along with the Assessment Package in the Assessment Portlet on the candidate’s application.

ATS User Experience Customisation
Update the result via Unified API
- Connector Meta Information with the provider key
sapsuccessfactors_atsfor theassessments/results.updatemodel.
User sees the updated results with different conditions of the assessment in SAP SuccessFactors
When the result is completed with all details 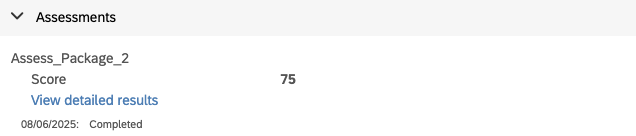 |
When the result is completed without other details 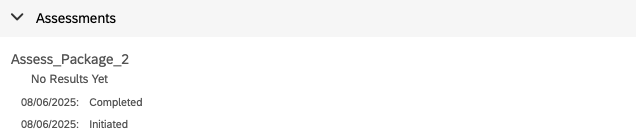 |
When the result does not include a Result URL  |
Testing Checklist
✅ Provider Setup:- You have all the necessary permissions mentioned in the Partner Requirements section.
- A vendor for Assessment with a unique
clientIdhas been added with an activeYstatus. - The vendor’s assessment packages have been uploaded with a valid
vendorId. - A subscriber has been created with a unique
Subscriber Idand a validClient Id(same asvendorId). - An external event has been created with the correct and valid endpoint URL, including a valid
externaltriggerTokenin the query parameter. - The
assessmentfield has been added to the Job Requisition template with the necessary permissions. - The feature permission for
assessmentIntegrationhas been granted to the job requisition template. - The
Add More Assessmentslink and Assessment fields are visible to users during the creation/editing of the Job Requisition, as mentioned in this step.
- The integration category
Assessmentsis selected.
- A valid
externalTriggerTokenis provided in the query parameter along with the endpoint URL.
- A webhook for SAP SuccessFactors has been added and enabled with the
Assessment Orderevent. - A valid webhook URL has been added to receive assessment notifications.
- The
Assessmentstage is visible in the talent pipeline for the job requisition. - The
Add More Assessmentslink and Assessment fields are visible to users during the creation/editing of the Job Requisition, as mentioned in this step. - After sending the assessment to a candidate, the user can see the
Initiatedstatus along with the Assessment Package in the Assessment Portlet on the candidate’s application.
- A success response is received from the update result endpoint.
- The updated result details are visible in the SAP SuccessFactors UI.