Introduction & Overview
StackOne’s webhook system enables real-time event notifications between your application and integrated services. Instead of constantly polling for updates, webhooks provide an efficient way to receive immediate notifications when important events occur.What are Webhooks?
are automated HTTP callbacks that allow real-time communication between systems:- Your application exposes an HTTPS endpoint to receive event notifications
- StackOne sends HTTP POST requests with event data to your endpoint
- Your application processes these events and responds accordingly
Benefits of Using Webhooks
- Real-time Updates: Receive instant notifications about changes
- Reduced API Load: Eliminate the need for constant polling
- Efficient Processing: Handle events as they happen
- Automated Workflows: Trigger actions based on events
- Resource Optimization: Save resources by avoiding unnecessary API calls
Getting Started with Webhooks
Quick Start Guide
- Navigate to StackOne Webhooks Dashboard
- Click “Add Webhook”
- Enter your endpoint URL
- Select desired events
- Save and copy your signing secret
- Implement signature verification in your application
- Start receiving events!
Webhook Dashboard Overview
The webhook dashboard at https://app.stackone.com/webhooks lets you manage all your webhooks:- View & Configure: Manage webhook settings and configurations
- Monitor Health: Track webhook delivery status and performance
- Security: Access signing secrets for request verification
- Event Management: Add or modify event subscriptions
Prerequisites
Before setting up webhooks, ensure you have:- A publicly accessible HTTPS endpoint to receive webhooks
- Ability to verify webhook signatures (recommended)
- Proper error handling for webhook payloads
- Rate limiting consideration for high-volume events

Setting up a new webhook
-
After selecting a StackOne project, you will see the
Webhookssection in the left-hand-side menu. -
Create and configure a new webhook by clicking the
Add Webhookbutton -
Input in the
Webhook URLfield a valid URL that StackOne should send a request to whenever one of the previously selected event occurs. - Select the events that your webhook should be triggered on, programmatic native, manual native, or synthetic events, the availability of which depends on the provider you’re connecting to.
- Programmatic native events: are events generated by the underlying provider which are then mapped to StackOne unified resource events. Once subscribed to a provider’s programmatic native event, our system will programmatically create an event subscription in the provider’s system for each currently linked account for that provider, and to any future linked account of that provider.
- Manual native events: are events generated by the underlying provider which are then mapped to StackOne unified resource events. Unlike the programmatic events, manual events are not automatically subscribed to by our system. You will need to manually create an event subscription for each currently linked account for that provider, and to any future linked account of that provider. We’ll provide you with a link to the URL the provider will send the event to, as well as a secret to authenticate the request.
- Synthetic Events: For these events, StackOne periodically polls the underlying provider’s records every hour and compares the stored hashes against the hashes of the mapped records received from the provider. Thanks to the hashing process, no PII is stored. The polling time can be configured based on your needs.
-
Finally, click on the
Save Webhookbutton. You should now see your newly configured Webhook on thewebhookspage. -
Take note of the webhook secret displayed in the webhook listing page as it will allow you to verify the authenticity of events coming from StackOne, we’ll use this secret to sign the webhook request based on the payload of the event.
- As a relatively less secure but simpler alternative, you can also verify events sent by StackOne by adding a custom query parameter to your webhook URL eg
?token=unique_secret_tokenand verify this parameter’s presence when receiving the request.
- As a relatively less secure but simpler alternative, you can also verify events sent by StackOne by adding a custom query parameter to your webhook URL eg
Overview Tab
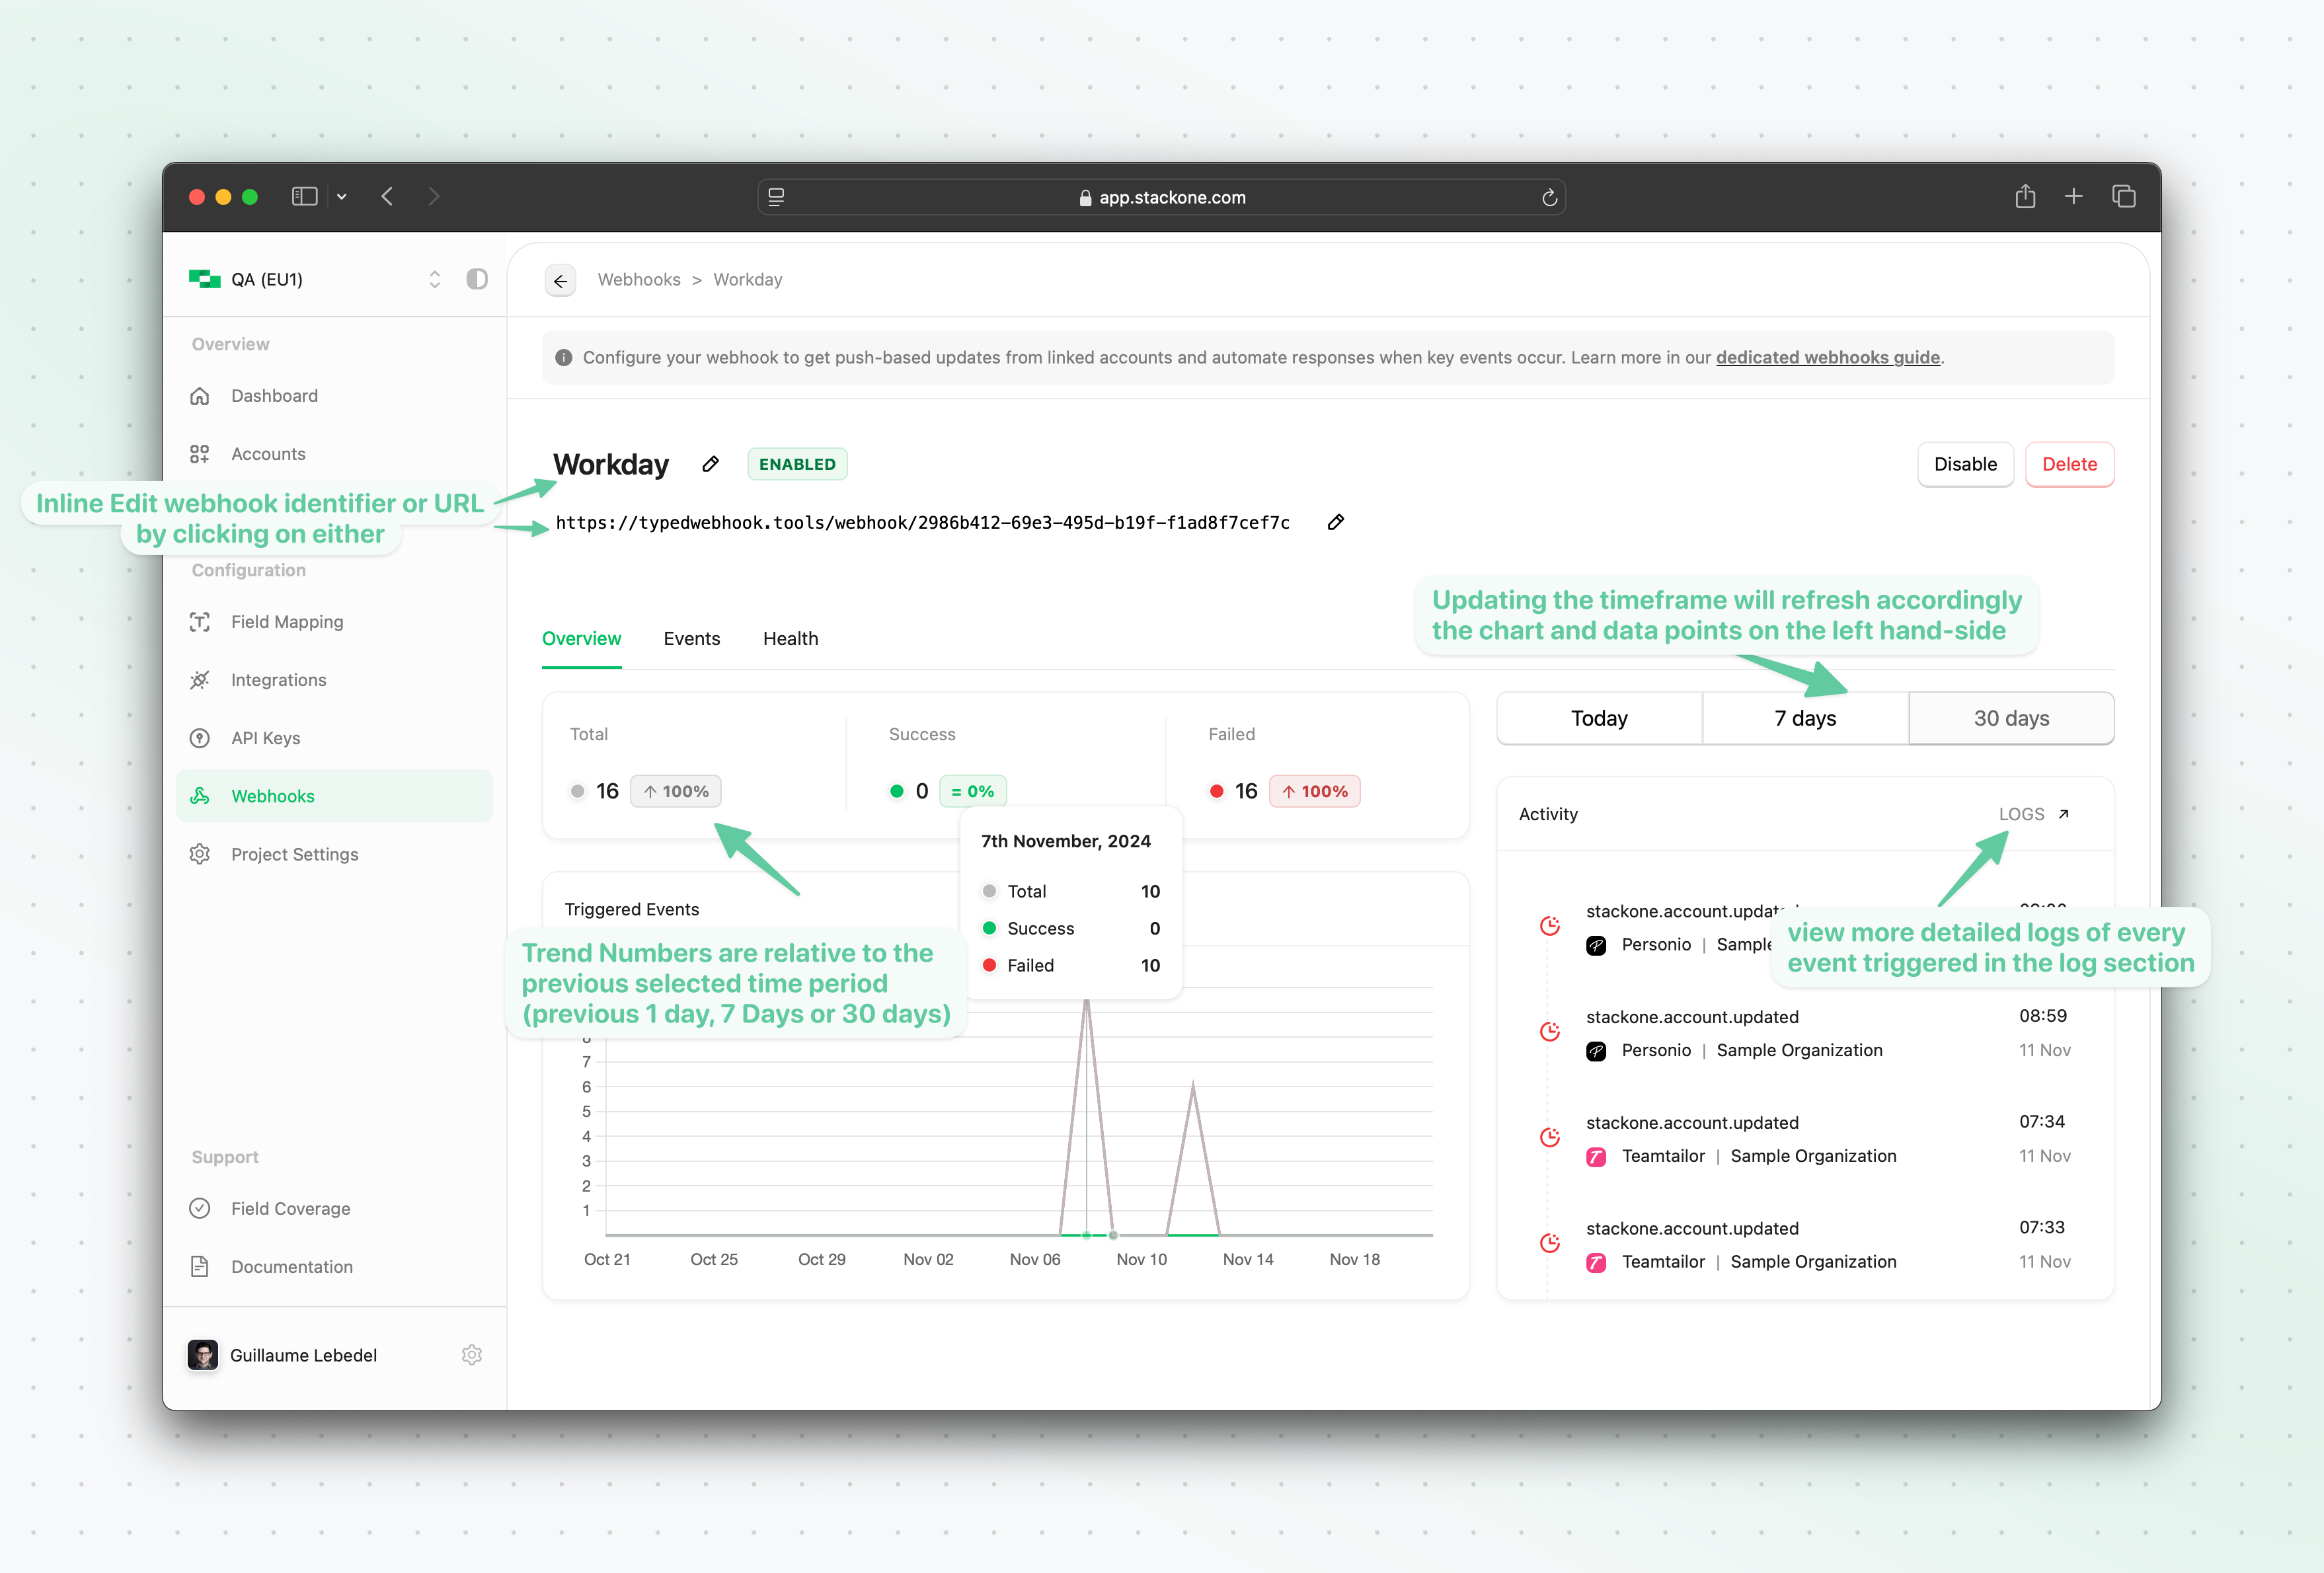
The overview tab shows you at a glance the number of events sent to the configured webhook URL within the timeframe selected on the right-hand side (whether these events were successfully sent or if the request to the configured webhook URL failed)
Events Tab
Account Events
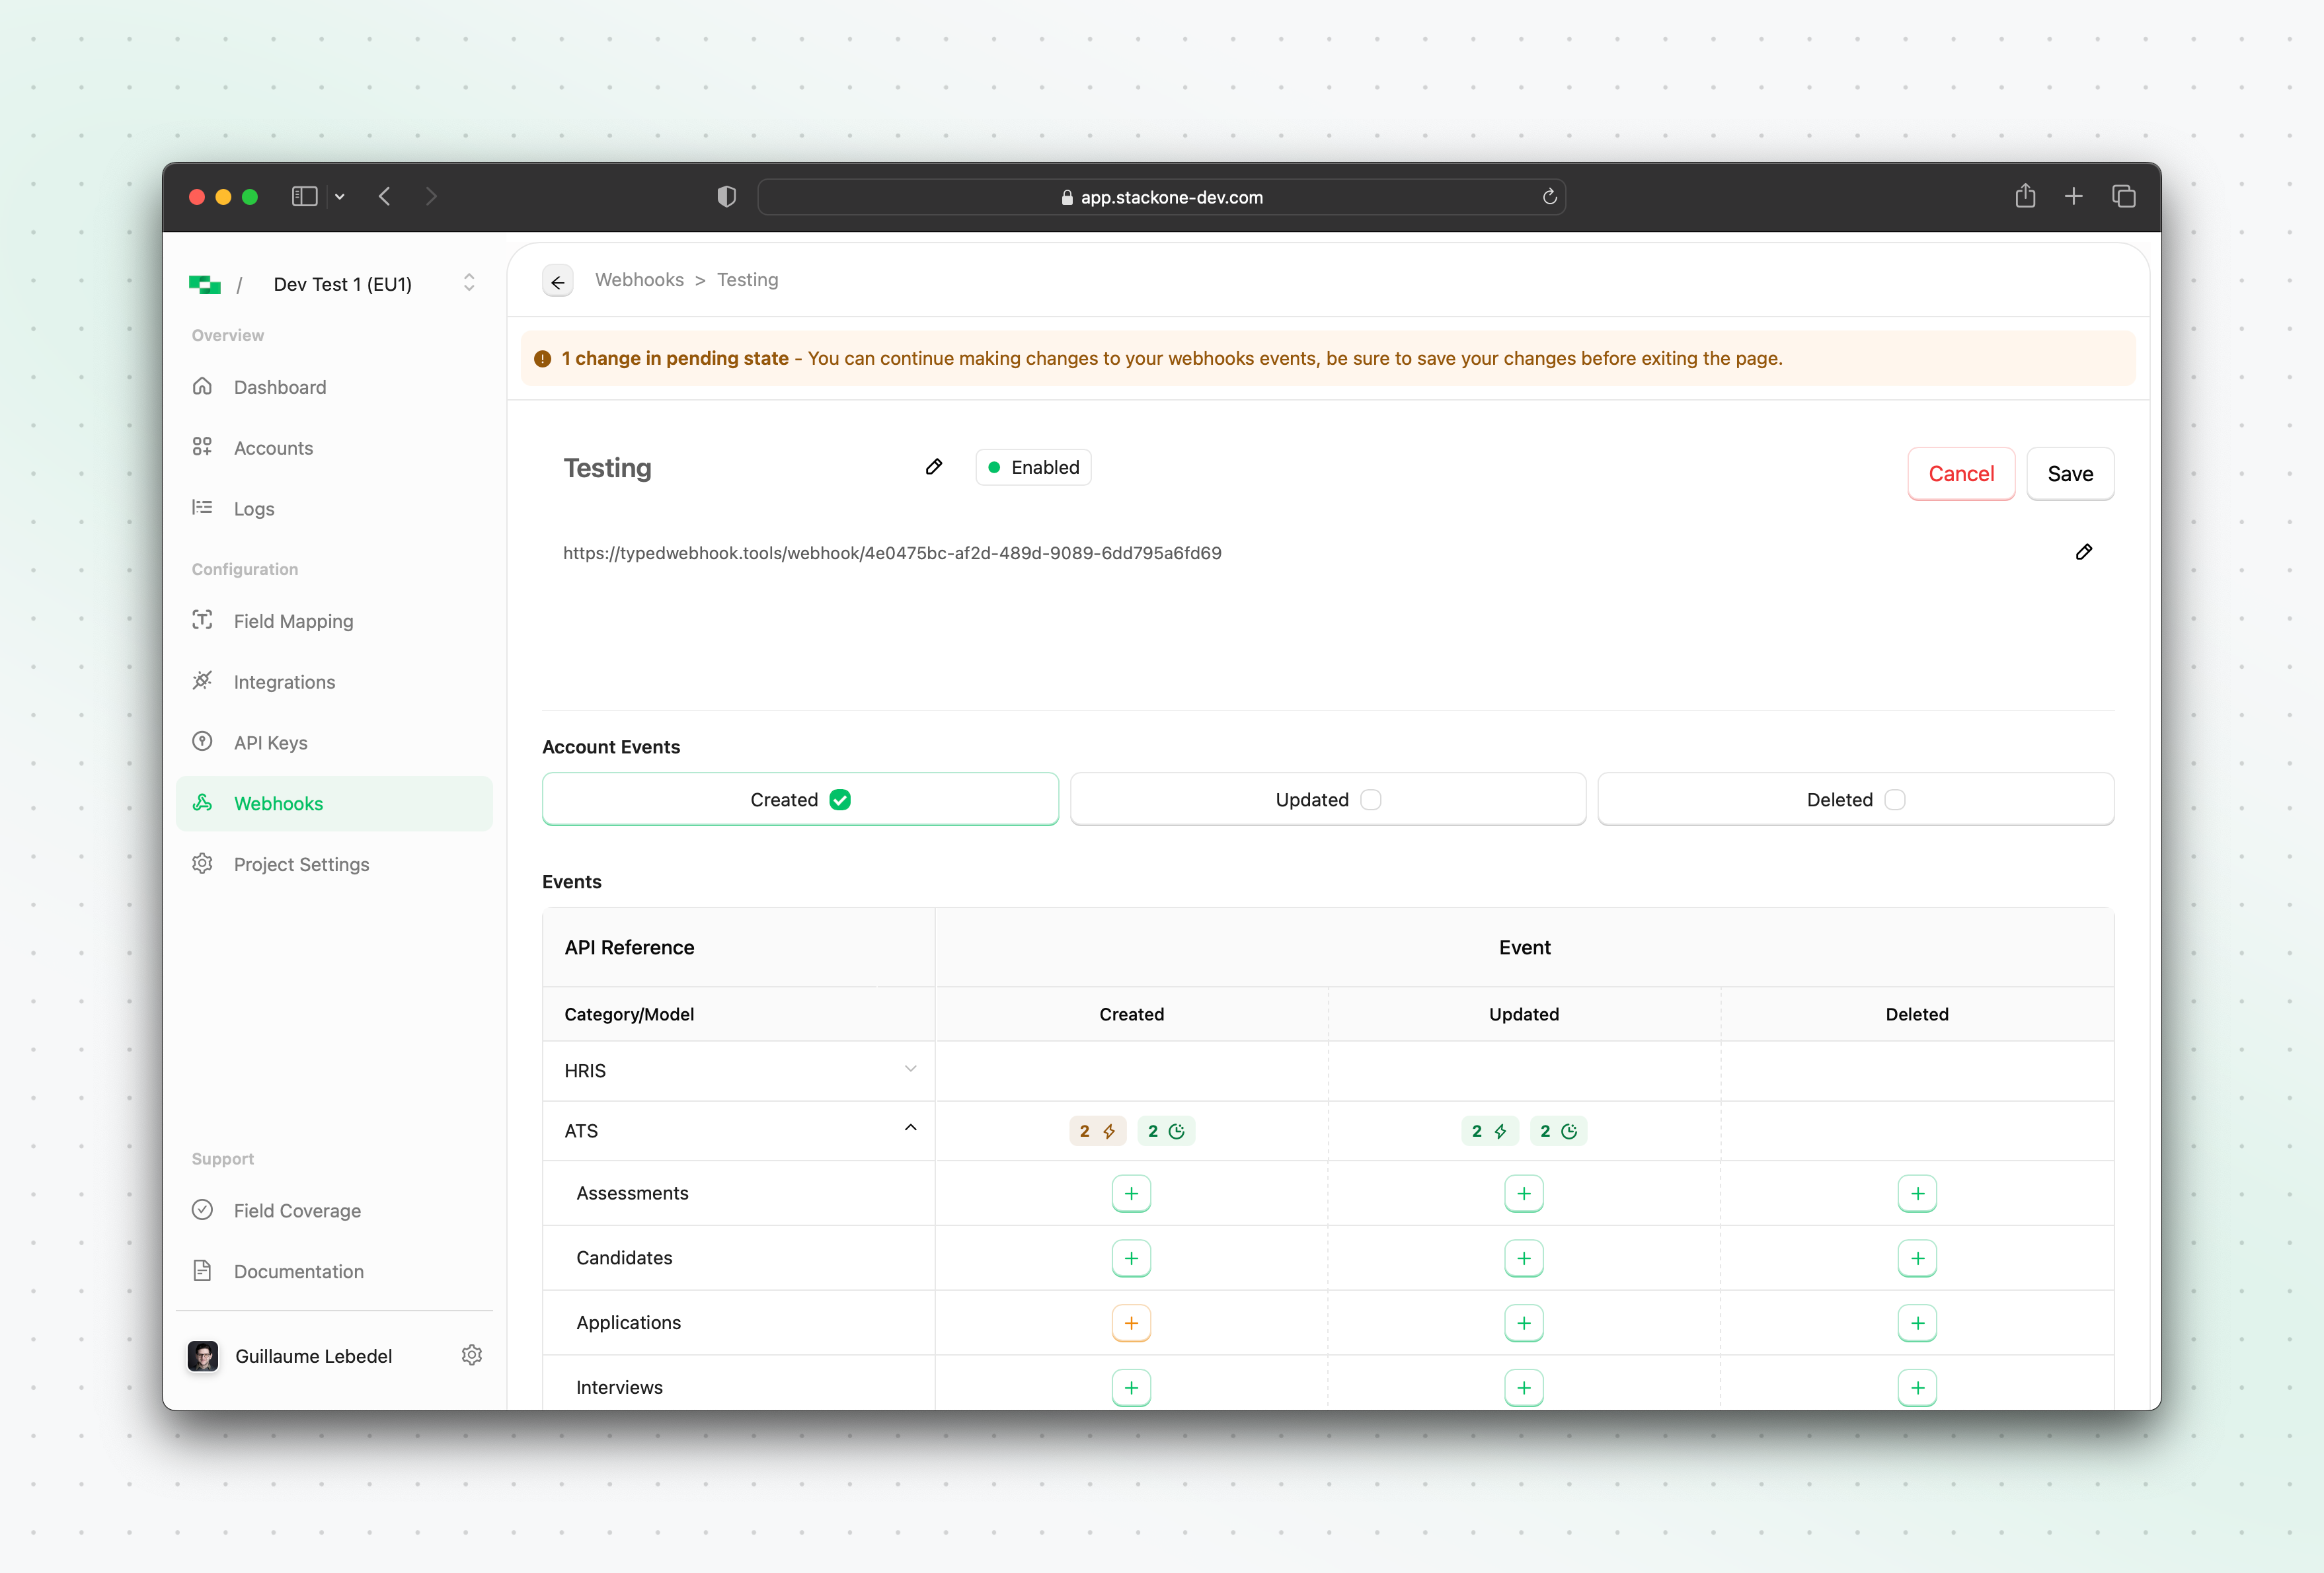
Account Events are events originating from StackOne related to a linked account connection and not to any underlying resource (eg: employee or candidates). Account events can be useful for your application/server to be notified of any new Accounts being linked (account.created event) or updated (account.updated) allowing you to trigger relevant workflow on your end (eg. syncing data from the underlying tenant).
Unified Events
The Events tab of the webhook configuration allows you to view and update the unified events this webhook is subscribed to. Any “green” in the table indicates that the webhook is currently subscribed to a programmatic native, manual native, or synthetic event for one or more providers. Anything in orange represents an event subscription that has been modified but not yet saved.
Health Tab
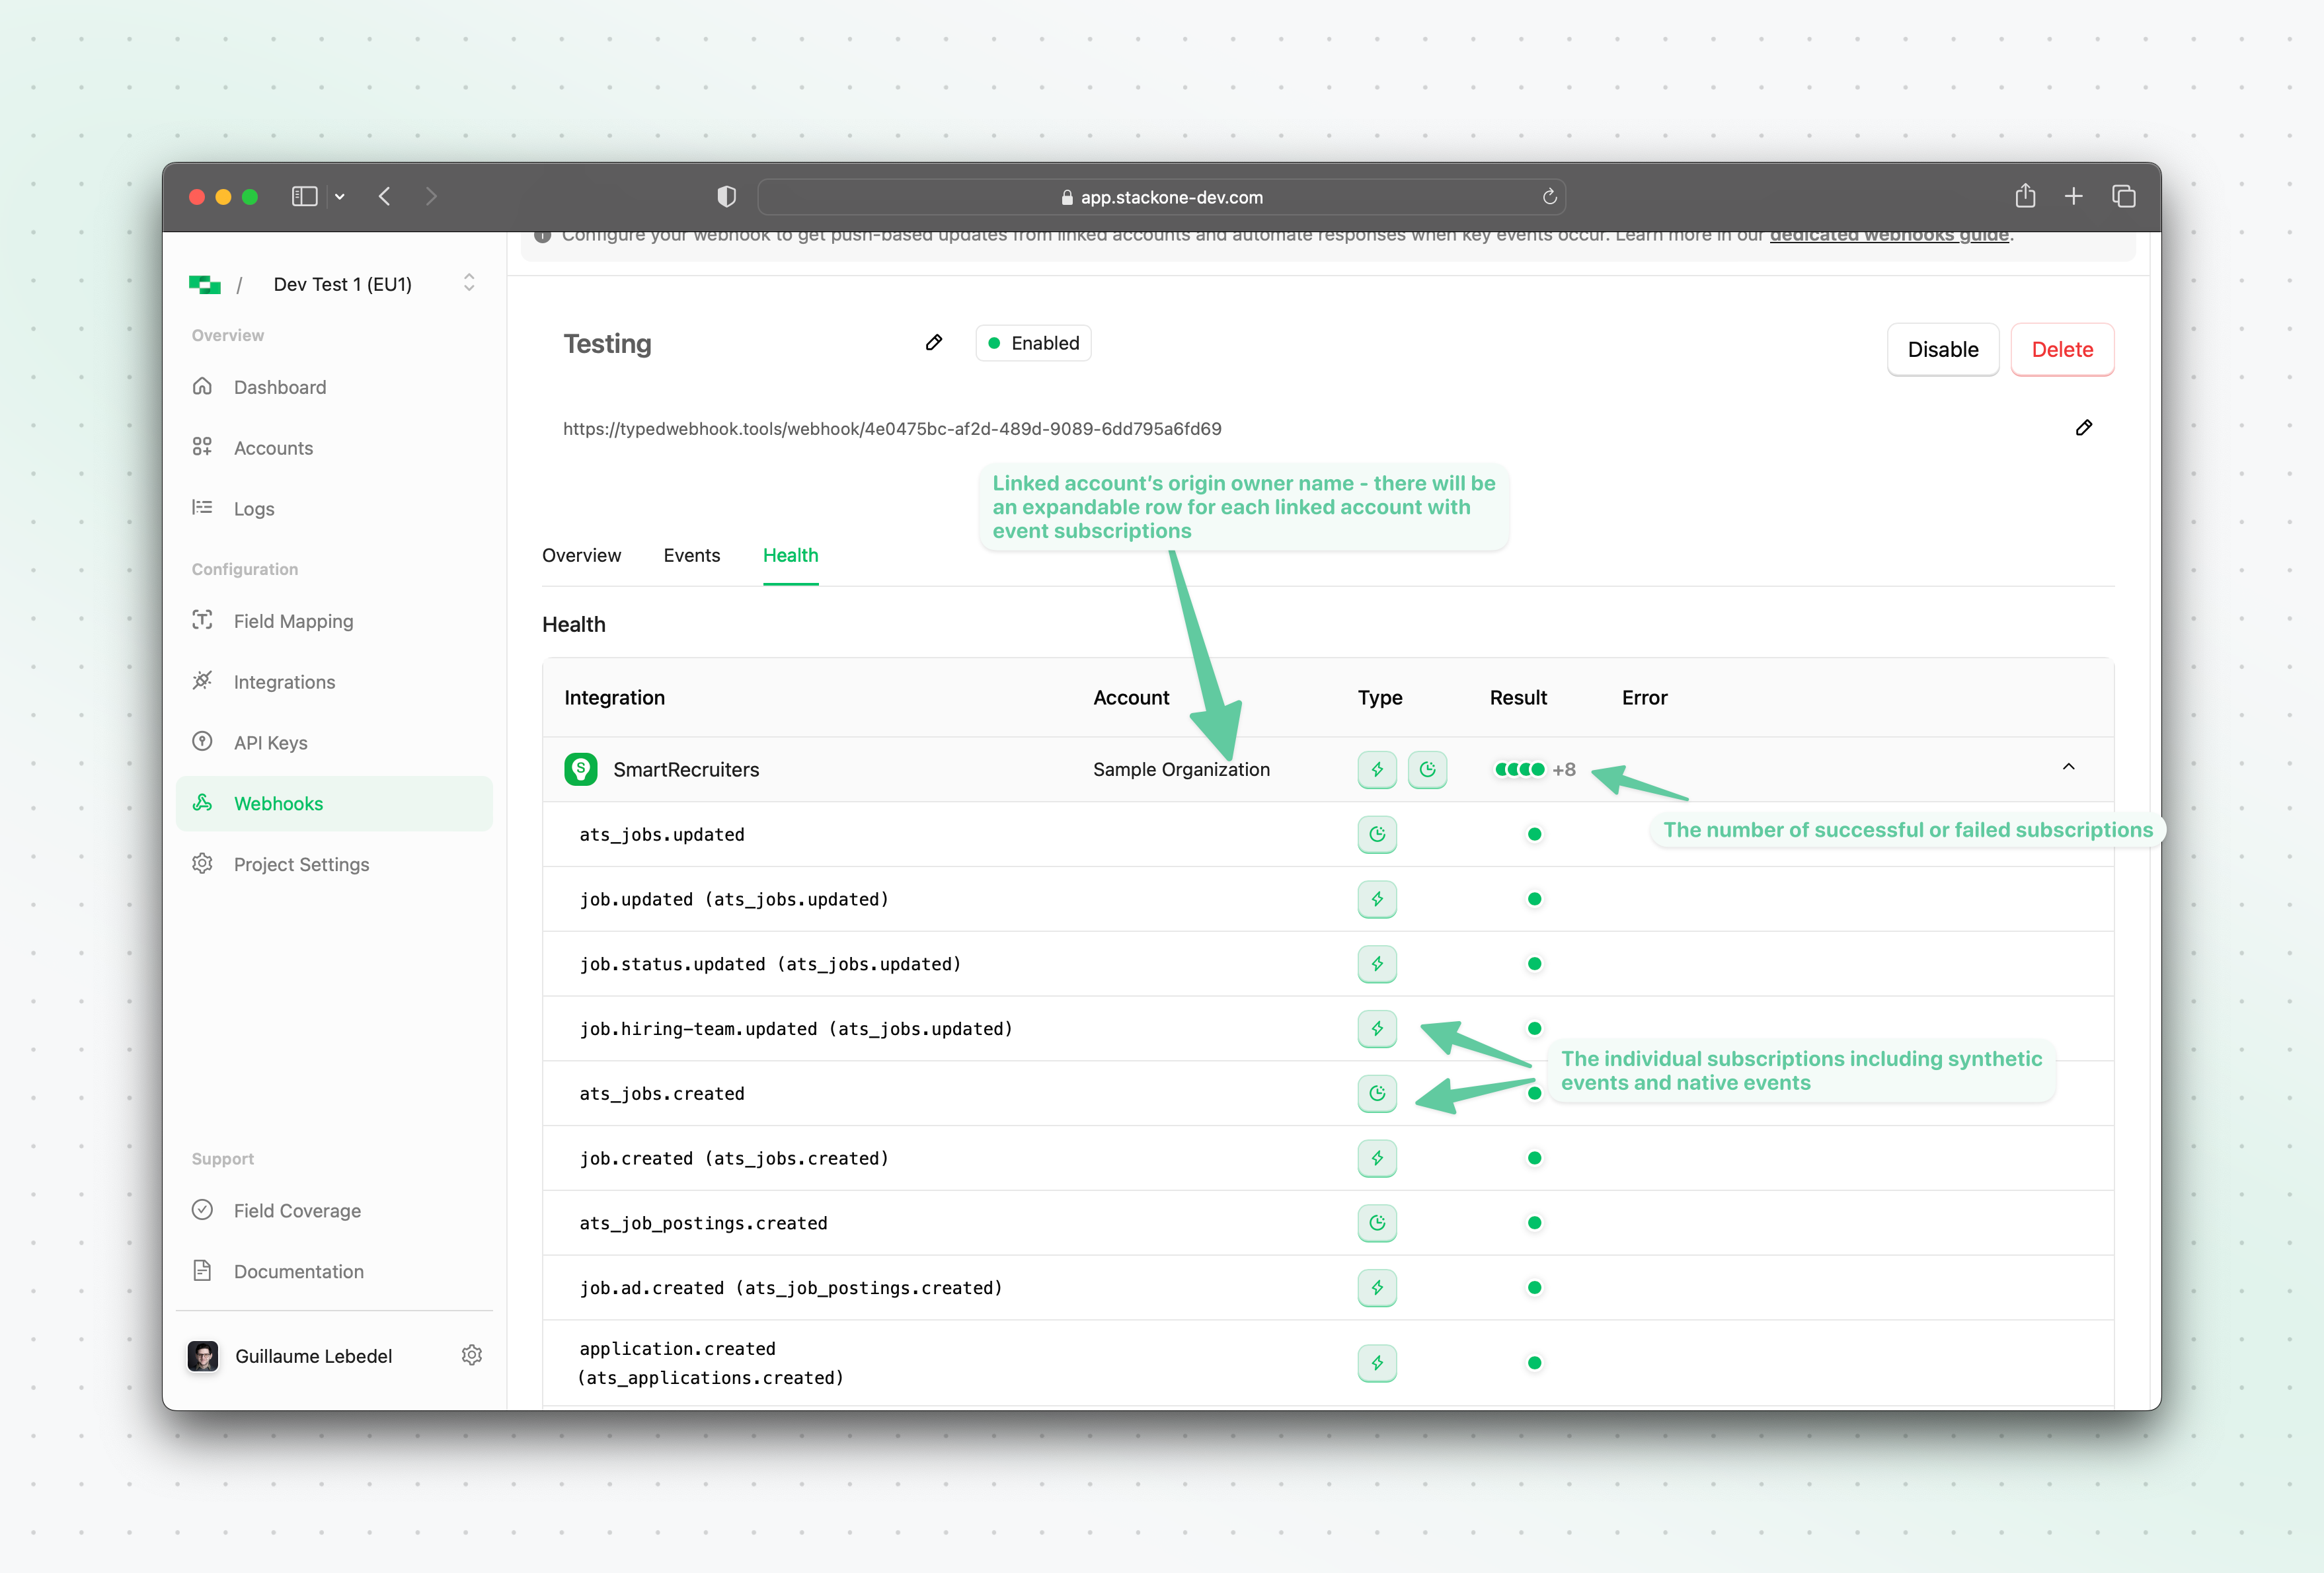
The health tab of the new webhook allows you to see at a glance the status of each underlying programmatic native webhook subscription for each linked account, as well as the status of the synthetic events execution.Disabling a webhook
You can disable a webhook by clicking theDisable button in the webhook listing page. This will stop the emission of events to the webhook URL.
Enabling a webhook
You can enable a disabled webhook by clicking theEnable button in the webhook listing page. This will resume the emission of events to the webhook URL
Deleting a webhook
You can delete a webhook by clicking theDelete button in the webhook listing page. This will remove the webhook from the webhook listing page and stop the emission of events to the webhook URL. This will also clean up the relevant programmatically created subscriptions for the linked accounts in the underlying provider’s system.
How StackOne Synthetic Webhooks Work
How Synthetic Webhooks Work - Privacy-First Design
How Synthetic Webhooks Work - Privacy-First Design
Synthetic webhooks provide event notifications through intelligent polling and cryptographic change detection. Unlike real-time webhooks, synthetic webhooks poll for changes with a default interval of 1 hour, which can be reduced to as low as 5 minutes based on resource availability and time filter support.
Key Privacy Features
No PII Storage
StackOne does not store any personally identifiable information (PII) when detecting changes
Cryptographic Hashing
We use secure hashing algorithms to create unique fingerprints of resource states
Change Detection
By comparing hashes of current and previous states, we can detect changes without storing the actual data
Ephemeral Processing
Resource data is processed in memory and immediately discarded after hash generation
How It Works
1
Polling
StackOne polls the provider for resource updates (default: every 1 hour, configurable down to 5 minutes)
2
Hashing
When data is retrieved, we generate a cryptographic hash of the resource state
3
Comparison
The new hash is compared with the previously stored hash (not the data itself)
4
Event Generation
If hashes differ, a change is detected and a webhook event is generated
5
Delivery
The webhook event is sent to your application with the resource identifier
6
Data Retrieval
Your application can then fetch the full resource data via API when needed
Privacy Guarantees:
- Your data privacy is maintained at all times
- StackOne can detect changes efficiently without storing sensitive information
- You receive timely notifications about resource changes
- The system remains compliant with data protection regulations
How StackOne Native Webhooks Work
Event subscriptions lifecycle details
- When a webhook is created, StackOne will programmatically create an event subscription in the underlying provider’s system for each currently linked account for that provider, and to any future linked account of that provider.
- When a webhook is deleted, StackOne will clean up the relevant programmatically created subscriptions for the linked accounts in the underlying provider’s system.
- When a webhook is disabled, StackOne will stop the emission of events to the webhook URL, but the event subscriptions in the underlying provider’s system will remain active.
- When a webhook is enabled, StackOne will resume the emission of events to the webhook URL, and the event subscriptions in the underlying provider’s system will remain active.

event list and associated record_type
| Category | Resource | Events |
|---|---|---|
| Accounts | Accounts | account.created, account.updated, account.deleted |
| HRIS | Employees | hris_employees.created, hris_employees.updated, hris_employees.deleted |
| Employments | hris_employments.created, hris_employments.updated, hris_employments.deleted | |
| ATS | Assessments | ats_assessments.created, ats_assessments.updated, ats_assessments.deleted |
| Candidates | ats_candidates.created, ats_candidates.updated, ats_candidates.deleted | |
| Applications | ats_applications.created, ats_applications.updated, ats_applications.deleted | |
| Interviews | ats_interviews.created, ats_interviews.updated, ats_interviews.deleted | |
| Jobs | ats_jobs.created, ats_jobs.updated, ats_jobs.deleted | |
| Job Postings | ats_job_postings.created, ats_job_postings.updated, ats_job_postings.deleted | |
| Lists | ats_lists.created, ats_lists.updated, ats_lists.deleted | |
| Users | ats_users.created, ats_users.updated, ats_users.deleted | |
| CRM | Accounts | crm_accounts.created, crm_accounts.updated, crm_accounts.deleted |
| Contacts | crm_contacts.created, crm_contacts.updated, crm_contacts.deleted | |
| LMS | Assignments | lms_assignments.created, lms_assignments.updated, lms_assignments.deleted |
| Completions | lms_completions.created, lms_completions.updated, lms_completions.deleted | |
| Content | lms_content.created, lms_content.updated, lms_content.deleted | |
| Courses | lms_courses.created, lms_courses.updated, lms_courses.deleted | |
| Users | lms_users.created, lms_users.updated, lms_users.deleted | |
| Documents | Files | documents_files.created, documents_files.updated, documents_files.deleted |
| Folders | documents_folders.created, documents_folders.updated, documents_folders.deleted |
The webhook settings such as
You can also delete the webhook if it’s no longer needed (irreversible action).
URL and Events can be updated at any point after creating the webhook by returning to the Webhooks page and clicking on the webhook you would like to update.You can also delete the webhook if it’s no longer needed (irreversible action).
Event payload
Account Events
Accounts-based webhooks will follow the following interface:Account updated event account.updated example
Unified Events
Unified events are events for a unified resource type, such as an employee, a job, a candidate, etc. Synthetic events will not contain theraw_event field due to the nature of the hashing process.
Synthetic event example
Native event example
Webhook signature verification
We’ll use the signature secret we mentioned in the previous section to verify the authenticity of the webhook request. To do so we’ll send ax-stackone-signature header. This header will contain an hmac sha256 hash of the given payload using the Signature Secret previously given as a secret key during hashing.
Understanding Webhook Payloads
What information is included in webhook event payloads?
Webhook event payloads follow a consistent structure across all providers and resource types. The payload includes metadata about the event but does not contain the actual data changes. Standard webhook payload fields:project_id: The StackOne project identifieraccount_id: The connected account identifierevent: The type of event (e.g.,hris_employees.updated,ats_candidates.created)event_date: ISO timestamp when the event occurredrecord_type: The resource type affected (e.g.,employees,candidates)record_id: The unique identifier of the affected recordsent_at: ISO timestamp when the webhook was sentprovider: The provider name
How do I determine what specific fields were updated in a webhook event?
Webhook payloads do not include field-level change information or data diffs. To identify what specific fields were updated:- Use the webhook payload identifiers: Extract the
record_idandaccount_idfrom the webhook payload - Make a follow-up API call: Use these identifiers to retrieve the current state of the record via the appropriate StackOne API endpoint
- Compare with your stored data: Compare the retrieved record with your previously stored version to identify changes
Why don’t webhook payloads include the actual data changes?
StackOne uses data hashing for change detection rather than field-level tracking. This approach:- Protects data privacy: Sensitive information is not included in webhook payloads
- Ensures consistency: All providers follow the same webhook payload structure
- Provides flexibility: Allows you to retrieve only the current record state when needed
- Prevents unnecessary requests: You may not be interested in every webhook event or individual resources (e.g., you only care about webhooks related to specific File IDs, or for specific Candidates etc.), avoiding unnecessary data retrieval from the underlying provider
Troubleshooting Webhook Delivery Issues
Common troubleshooting steps:-
Verify webhook configuration:
- Check that your webhook URL is accessible and returns HTTP 200
- Ensure the webhook is configured for the correct events
- Verify the webhook is active in your StackOne project
-
Check webhook signature validation (optional step that adds complexity):
- Ensure your endpoint validates the
x-stackone-signatureheader if implementing signature verification - Verify you’re using the correct signing secret
- Confirm your HMAC SHA256 validation logic is correct
- Note: For most use cases, signature verification may not be necessary
- Ensure your endpoint validates the
-
Review webhook logs:
- Check the main webhook view/logs in the StackOne dashboard
- Look for failed delivery attempts or error responses (these appear in webhook logs, not the health tab)
- Verify underlying provider webhook subscriptions are active
-
Test connectivity:
- Use tools like ngrok for local development testing
- Ensure your webhook endpoint is publicly accessible
- Check for any firewall or network restrictions
Triggering a webhook event manually for testing purposes
In case you want to verify that your webhook is working as expected, you can trigger a webhook event manually by using an API key from the API keys section of the project you’re working on, getting the webhook ID from the webhook details URL, and calling the webhook events endpoint like so:Sample Webhook consumer code
An example of a webhook consumer code in Node.js with signature verification can be found below:Signing Secret Rotation
You can rotate the webhook signing secret by following this process-
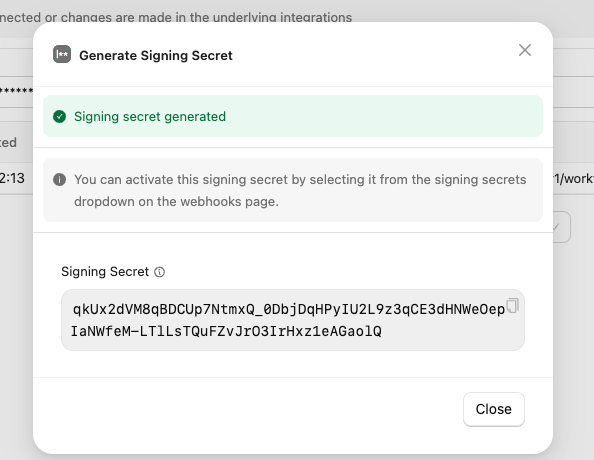
Create a new signing secret by clicking on the existing secret to view and click with the
Add Signing SecretbuttonThe new signing secret will be flagged as inactive and requests sent to your webhook URL will only be signed with the active signing secret

-
In StackOne: Copy this new (currently inactive) signing secret value

- In your own codebase:update the verification logic to verify the request with both the current secret and the new one copied in the previous step.
- In StackOne: Activate the new webhook signing secret by clicking on it and confirming the activation. Once activated all requests sent to your webhook URL by StackOne will be signed using this new secret.
- In StackOne: Once you’ve verified that new requests are being verified as expected, you may delete the old secret. You will not be able to retrieve it or activate it again once deleted.
- In your own codebase: remove the logic responsible for verifying the request with the now inactive / deleted signing secret
Troubleshooting & Monitoring
Common Issues and Solutions
-
Webhook Not Receiving Events
- Verify webhook is enabled in dashboard
- Check endpoint URL is accessible
- Review event subscriptions
- Inspect webhook health tab
-
Signature Verification Failures
- Confirm correct signing secret usage
- Check for payload modifications
- Verify signature calculation method
- Ensure correct encoding (base64url)
-
Missing Events
- Check webhook health metrics
- Review retry status
- Verify event subscriptions
- Consider synthetic events for reliability
- Add logging to your webhook consumer code when an event is received in your application
-
Performance Issues
- Implement async processing
- Optimize response time
- Consider rate limiting
- Monitor resource usage
Production Checklist
- Implement proper error handling
- Set up monitoring and alerting
- Configure retry policies
- Document recovery procedures
- Test failure scenarios
- Monitor resource usage
- Regular security reviews
Keep your webhook endpoints efficient and reliable:
- Process events asynchronously
- Implement proper error handling
- Monitor webhook health regularly
- Maintain security best practices

