

@acme.com address sign in through Entra with SAML 2.0. Each organization has one SSO connection, and StackOne activates it only after you verify the email domain by DNS.
Prerequisites
- The Org Admin role in your StackOne organization.
- Access to the Microsoft Entra admin center with permission to create enterprise applications, such as the Application Administrator or Cloud Application Administrator role.
- The ability to add a DNS TXT record for your email domain (
acme.com).
The SSO tab and this setup wizard are enabled per organization. If you don’t see Organization > Security > SSO, or the Get started wizard, even as an Org Admin, contact StackOne support to turn it on.
Configure SSO in StackOne
Open Organization > Security > SSO and select Get started to open the Set up SSO wizard. On the Which identity provider are you using? step, select Microsoft Entra ID.1
Enter the connection details
On the Connection details step, enter a name and the email domain your members sign in with. StackOne generates the connection’s unique ID from the name automatically.
- Connection name:
Acme Entra. - Domain:
acme.com.
2
Copy the service provider values
On the Configure your identity provider step, StackOne shows the values that identify it to Entra under Configure SAML settings, each labeled with its Entra name so you know where it belongs: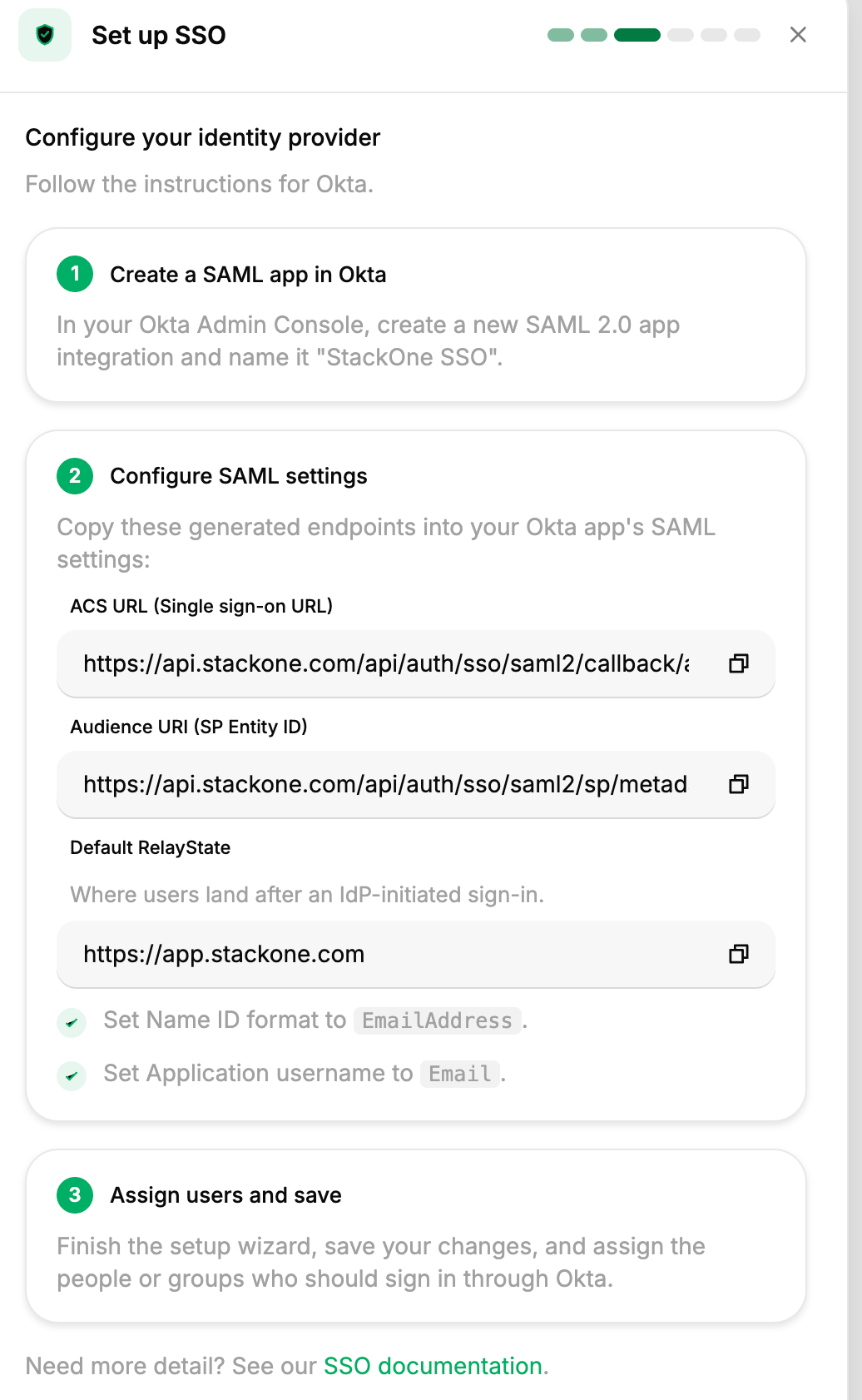
- Reply URL (ACS URL): the endpoint Entra posts the SAML assertion to.
- Identifier (Entity ID): the URL that identifies StackOne as the service provider.
Set up a SAML application in Microsoft Entra
Create an enterprise application in Entra and point it at StackOne. Values move in both directions during setup, and Entra labels the fields differently from Okta, the In Okta columns map the equivalents if you configured the Okta connection first. First, copy these StackOne service provider values into Entra’s Basic SAML Configuration:
Then, after you create the app, copy these Entra identity provider values back into StackOne’s Register your SSO provider step:
The Name ID is an attribute mapping rather than a copied value. You set it in the Set the Name ID to the user’s email step below.
1
Create an enterprise application
In the Microsoft Entra admin center, go to Identity > Applications > Enterprise applications and select New application > Create your own application. Name it
Acme Entra, choose Integrate any other application you don’t find in the gallery (Non-gallery), and create it.2
Start SAML single sign-on
Open the new application, go to Single sign-on, and select SAML. Entra shows the SAML setup laid out in numbered sections.
3
Enter the Basic SAML Configuration
In Basic SAML Configuration, select Edit and paste the values you copied from StackOne: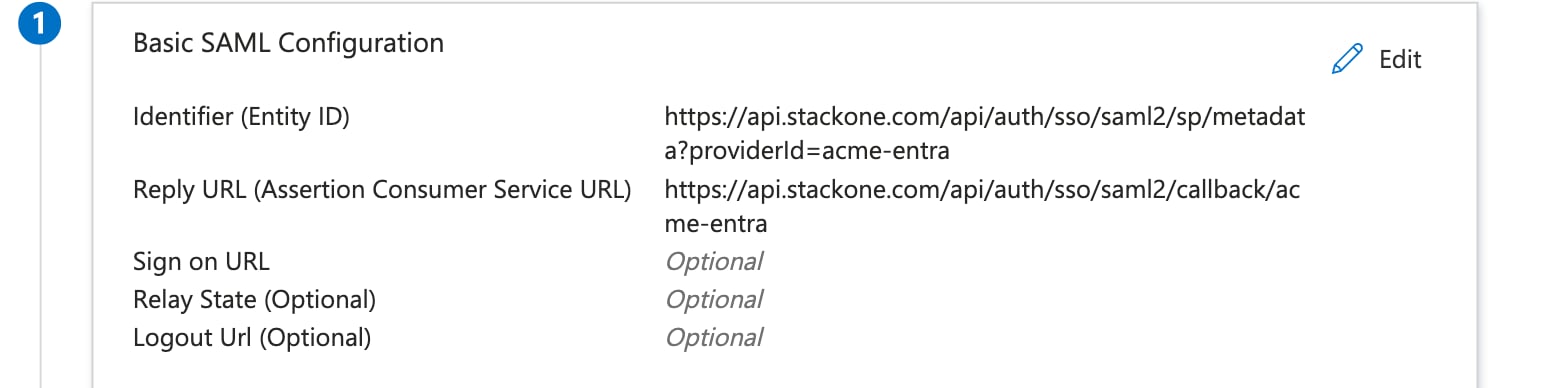
- Identifier (Entity ID): the StackOne SP Entity ID.
- Reply URL (Assertion Consumer Service URL): the StackOne ACS URL.
- Relay State (Optional): the Default RelayState value you copied from StackOne.
4
Set the Name ID to the user's email
StackOne matches each member to their account by email, so the assertion must carry the email as its Name ID. In Attributes & Claims, select Edit, open Unique User Identifier (Name ID), and set the source attribute to 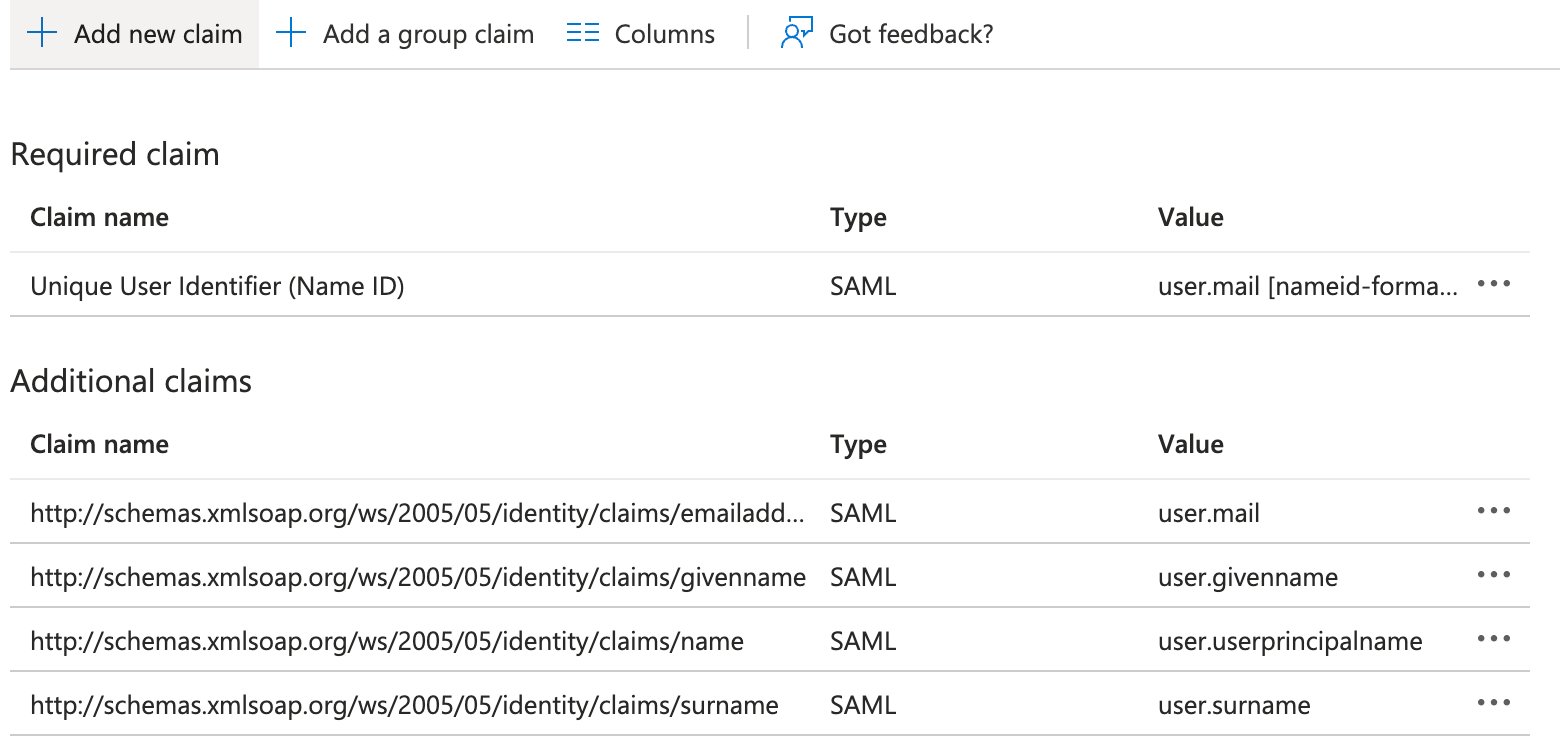
user.mail with the Email address name identifier format. Save the claim.Because the assertion identifies members by their Name ID, a member’s name can initially appear as their email address in StackOne until their profile name is set.5
Get the IdP metadata and certificate
StackOne needs Entra’s issuer, login URL, and signing certificate. Choose one of two paths: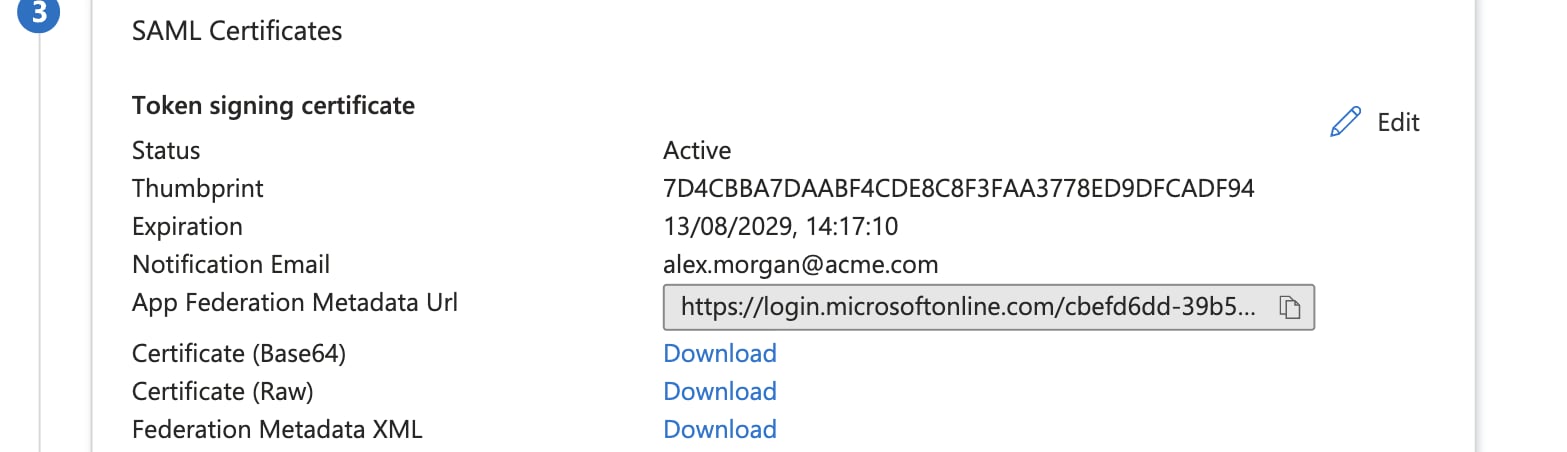
- In SAML Certificates, download the Federation Metadata XML. This single file carries all three values, and StackOne reads them for you.
- Or copy them individually: from Set up [App name], take the Login URL and the Microsoft Entra Identifier, then download the Certificate (Base64) from SAML Certificates.
6
Assign users and groups
Go to Users and groups, select Add user/group, and assign the people or groups who should sign in to StackOne through Entra. Only assigned users can complete SSO.
Complete the SSO registration in StackOne
Return to the StackOne wizard’s Register your SSO provider step and provide what you collected from Entra.1
Provide the identity provider values
Select Upload SAML metadata file and choose the Federation Metadata XML you downloaded. StackOne reads the issuer, entry point, and certificate from it. To enter them by hand instead, fill each field: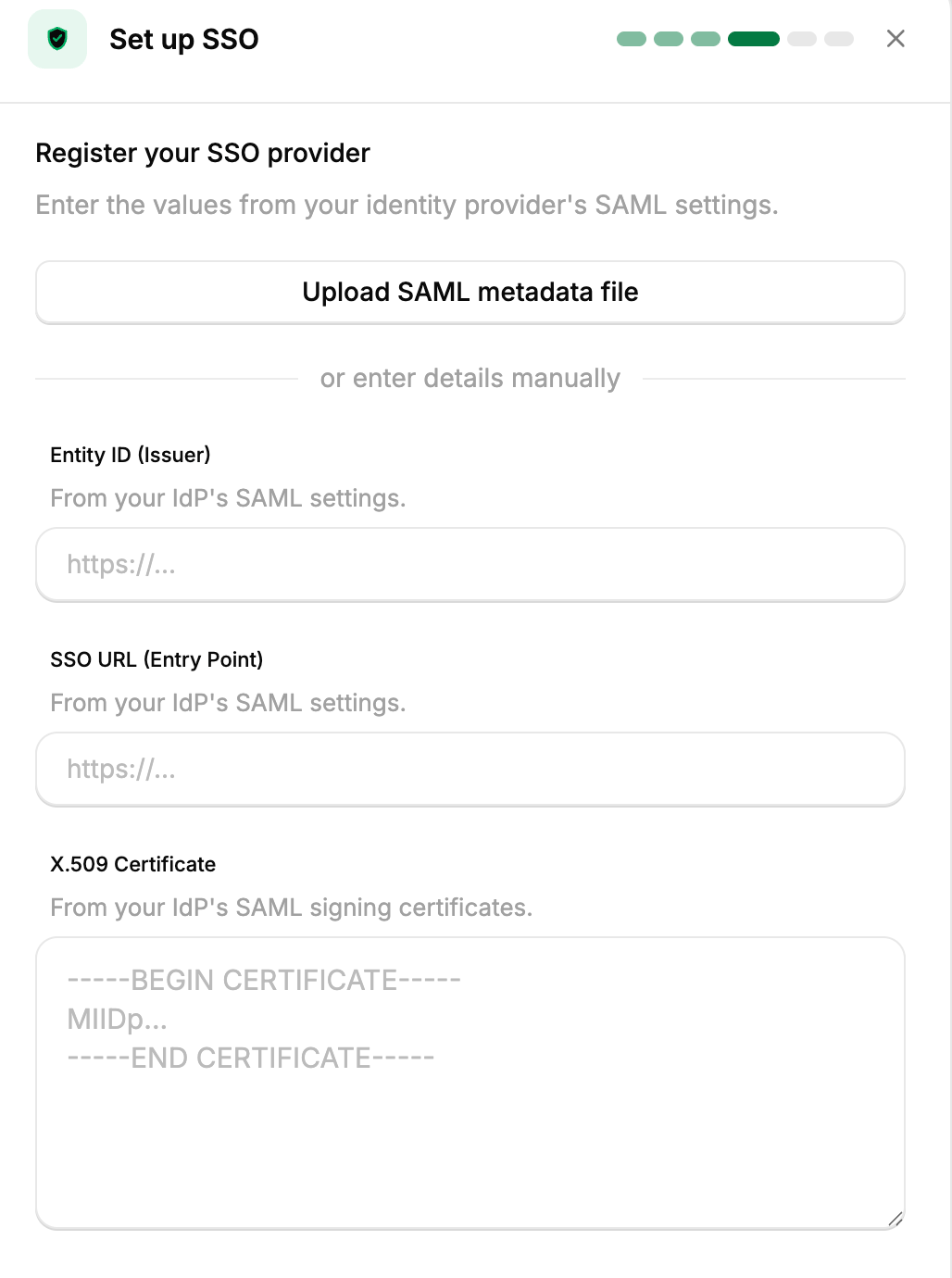
- Entity ID (Issuer): the Microsoft Entra Identifier.
- SSO URL (Entry Point): the Login URL.
- X.509 Certificate: the Certificate (Base64) contents.
2
Register the connection
Review the values and select Continue. StackOne saves the connection and moves to the Verify your domain step with the domain verification record.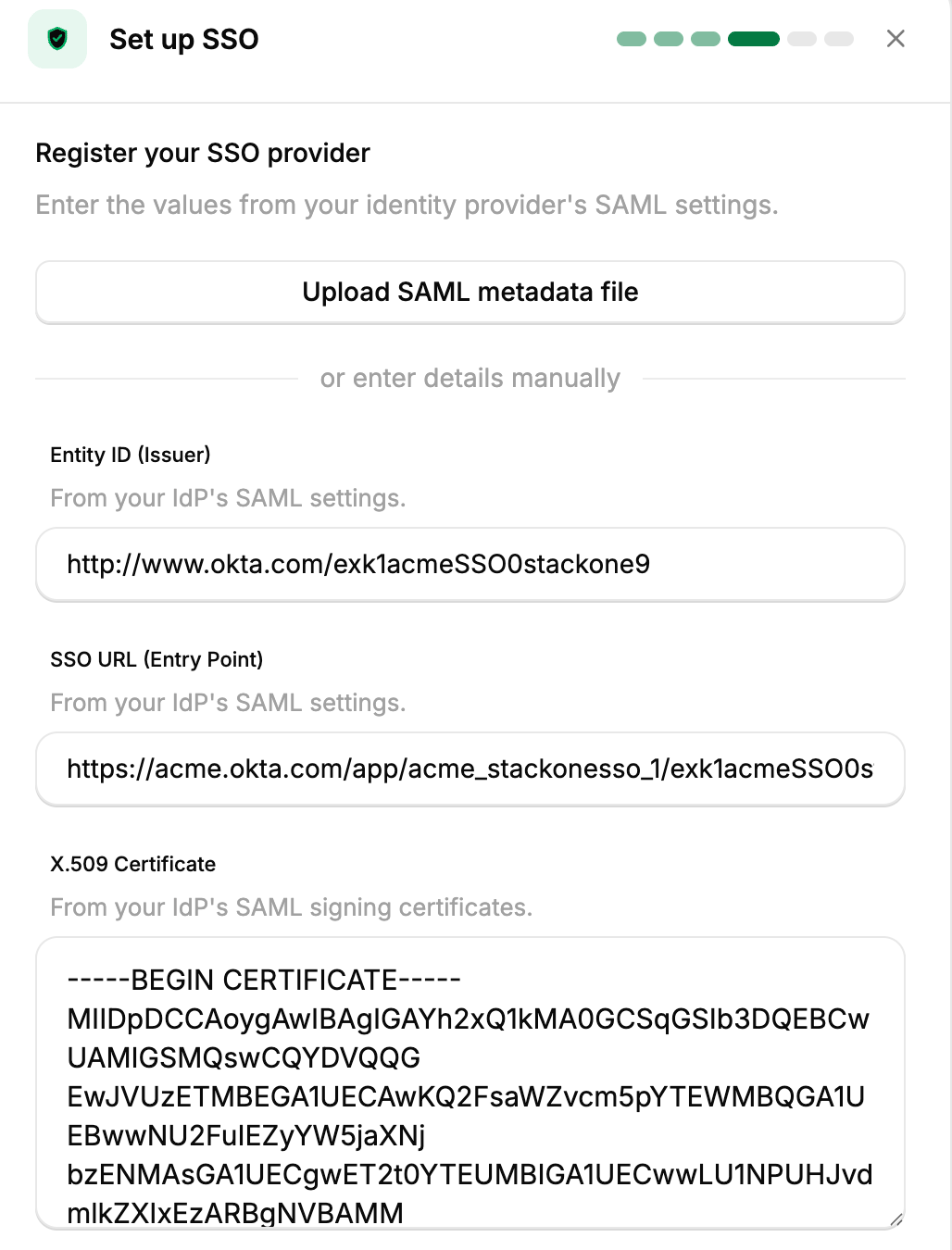
Verify your domain
StackOne activates the connection only after you prove you ownacme.com. Verification also lets StackOne link Entra sign-ins to existing members by email.
1
Copy the DNS TXT record
On the Verify your domain step, StackOne shows the record as two copyable fields, Name and Value. The Value has this form, with your connection’s ID and token filled in: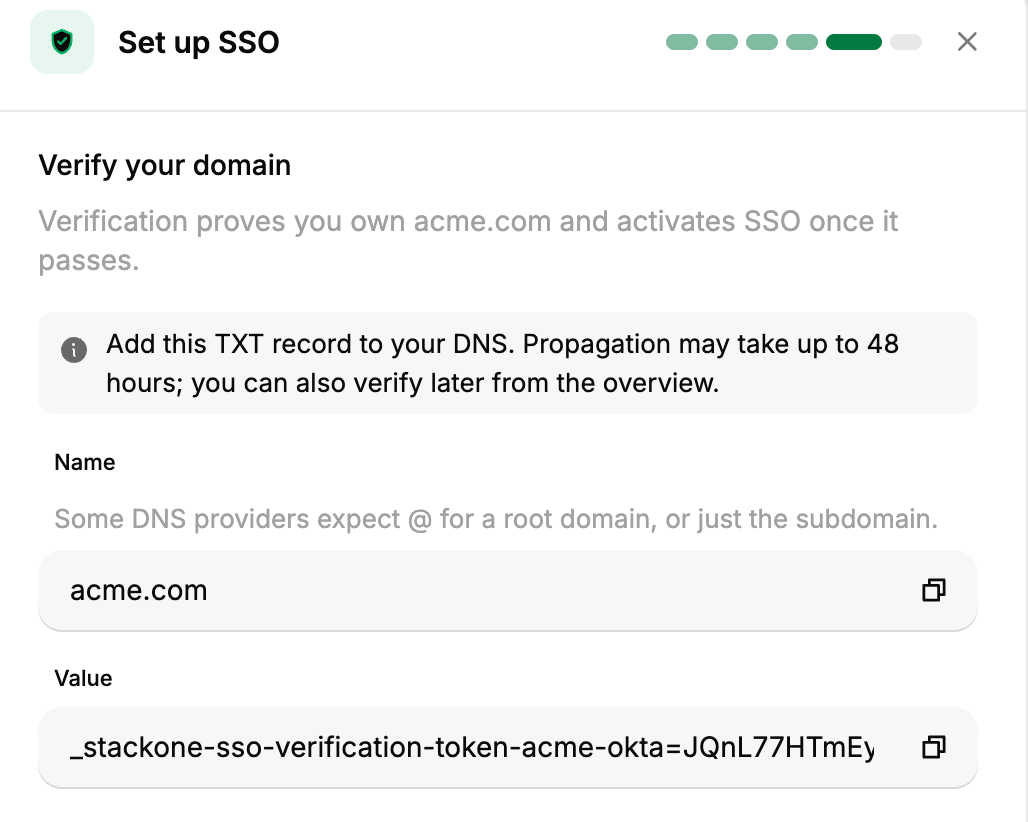
2
Add the record to your DNS
In your domain’s DNS panel, add a TXT record:
- Name/Host: your registered domain, which is
@for the root ofacme.com, or the subdomain label if the email domain is a subdomain. This matches the Name field StackOne shows. - Value: the full Value record from the previous step.
DNS propagation can take up to 48 hours, though it often completes within minutes. Check what is publicly visible with Google Admin Toolbox Dig.
3
Verify in StackOne
Back in StackOne, select Verify. Once the record resolves, the connection is active and members with
@acme.com addresses are redirected to Entra at sign-in. If you would rather finish later, select Verify Later and run verification from the connection overview once DNS has propagated.Manage the connection
The connection is listed on the SSO tab under Organization > Security > SSO. Open it to see the connection overview. The General tab is where you maintain the connection after setup:- Select Edit SAML to update the identity provider values, either by re-uploading the Federation Metadata XML or by editing the Entity ID (Issuer), SSO URL (Entry Point), and X.509 Certificate directly.
- Select Edit Domain to change the trusted domain. Changing it resets verification, so members stop being redirected until you re-verify, and you can’t change it while SSO is enforced (turn off enforcement on the Authentication tab first). Select Verify while the domain is still unverified.
- Settings edits the Connection name. The Provider ID is generated at setup and can’t be changed.
- Delete removes the SSO connection. It’s disabled while SSO is enforced, so turn off enforcement on the Authentication tab first. Deleting also removes any Directory Sync (SCIM) linked to this connection.
Troubleshooting
Next steps
SSO Overview
See how SSO, domain verification, and Directory Sync fit together.
Okta SSO
Set up the same SAML connection with Okta instead of Entra.
Generic SAML
Connect any other identity provider that supports SAML 2.0.