Allow your users to connect to work systems with StackOne.
Make the StackOne connector available to everyone in your ChatGPT Business, Enterprise or Edu workspace. Each person then signs in with their own StackOne login and reaches only the systems they’ve been given access to in StackOne.
Before you start
In ChatGPT, a workspace policy may need to allow custom MCP servers for your role first.You sign in to StackOne yourself during setup, so ChatGPT can discover the tools. In StackOne:
Enter a name and description, for example StackOne.
Under Connection, enter the MCP server URL:
https://mcp.stackone.com/mcp
Set authentication to OAuth and leave Advanced OAuth settings as discovered. ChatGPT discovers the endpoints and registers itself, so there is no client ID or secret to enter. No mcp-remote wrapper needed. If ChatGPT asks you to confirm that the provider issues refresh tokens, confirm it.
Review the risk warning and select I understand and want to continue.
Select Create as a plugin.
Select Connect StackOne to start the sign-in.
If Add custom MCP server is missing from the menu, a workspace policy is blocking it for your role.
2
Approve the consent screen
ChatGPT opens StackOne in your browser.Sign in, pick the project and the linked accounts the connector should reach, then Authorize.
Walk through the consent screen
Sign in to StackOne. If you are already signed in to the dashboard you skip straight to the next step.
Check where the connection returns. The line under the client’s logo shows where it goes after you approve. If it names localhost or an app on this device, only continue if you started the connection from that client.
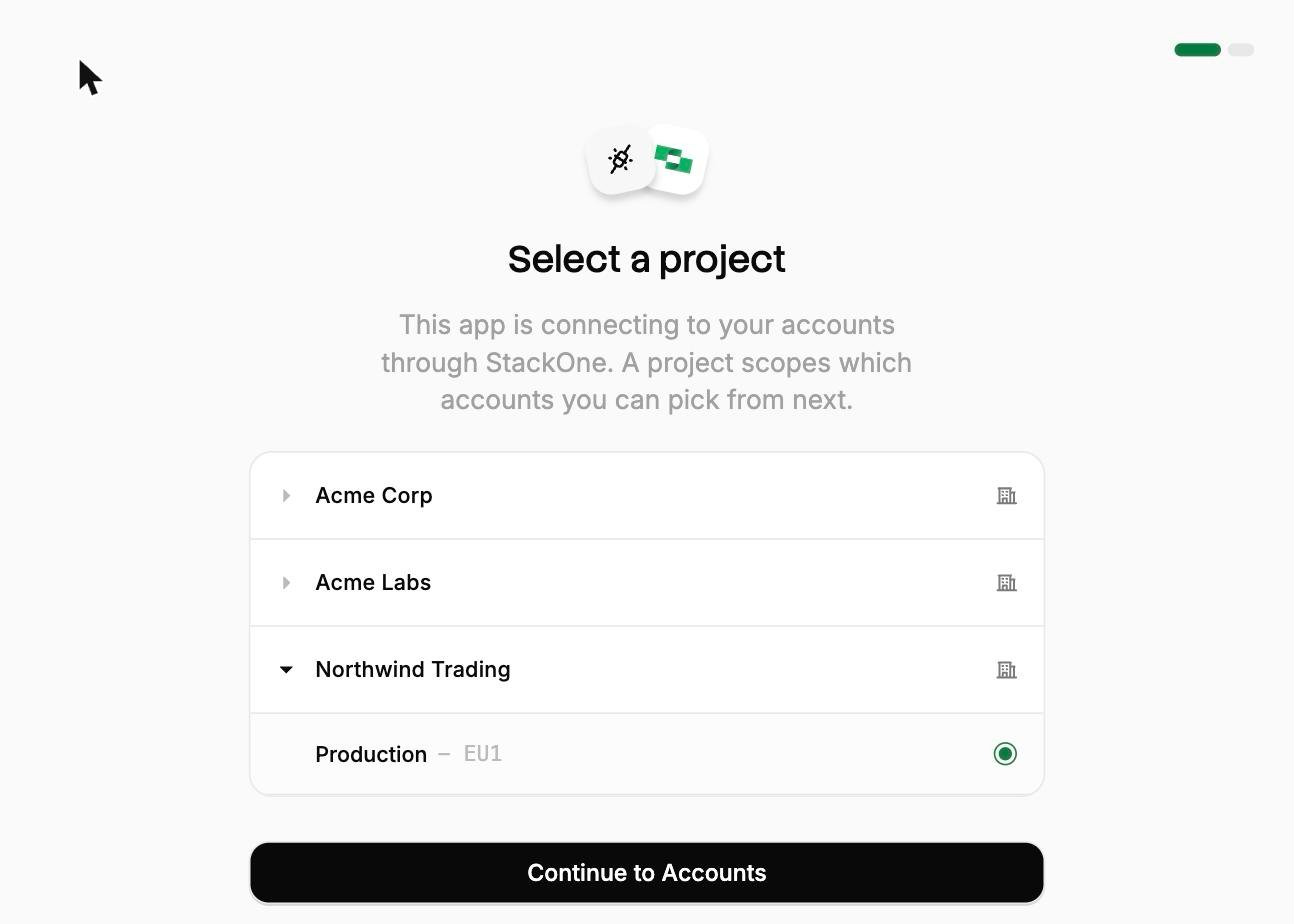
Select a project. Select the project you would like to associate the connection with. If you belong to one project, this step is skipped.
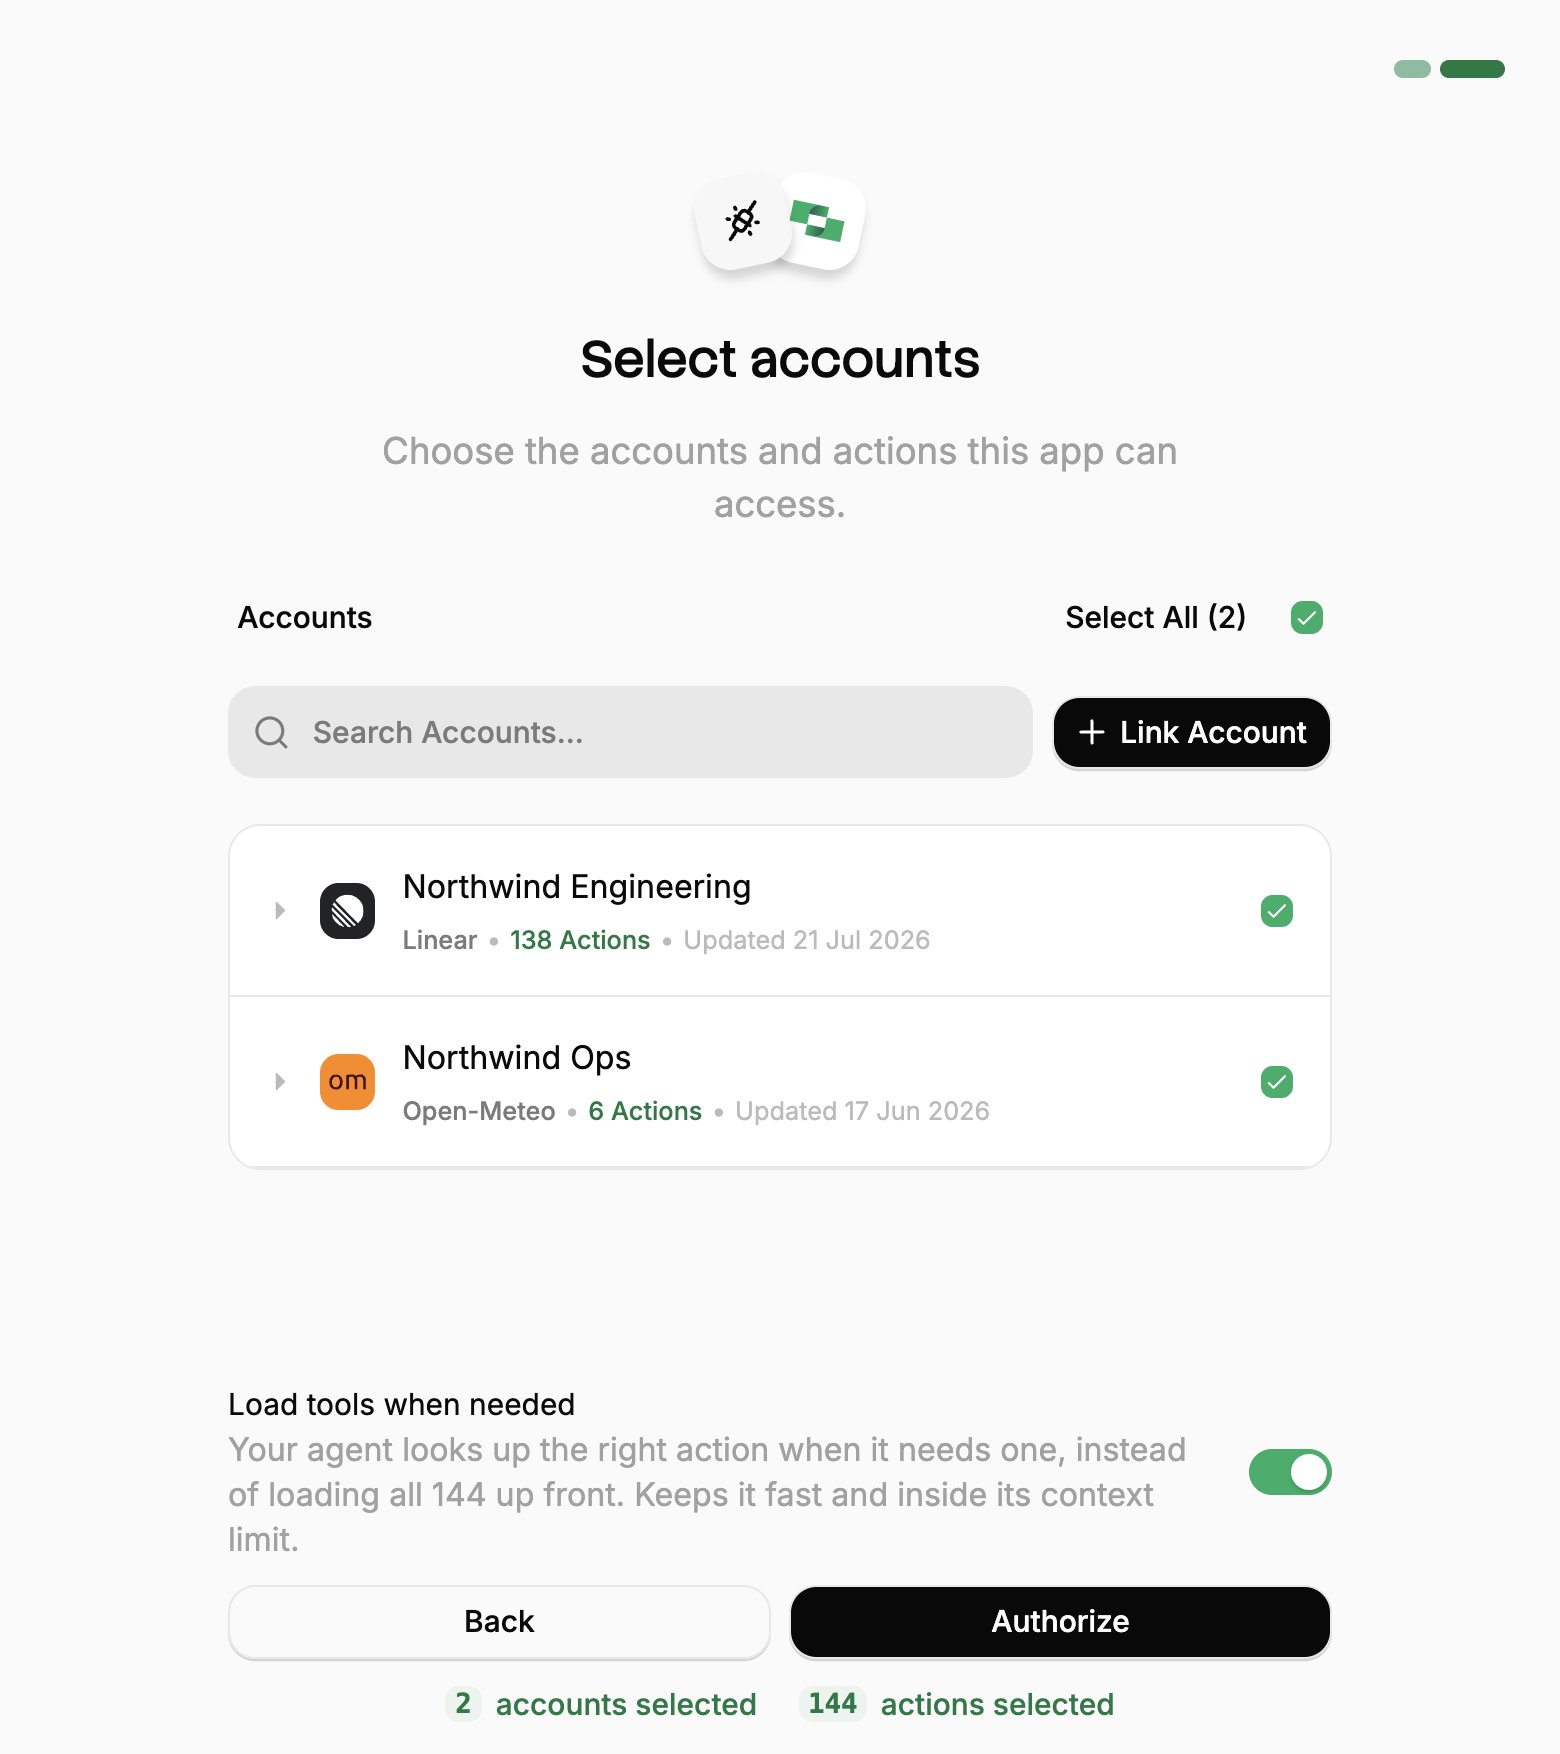
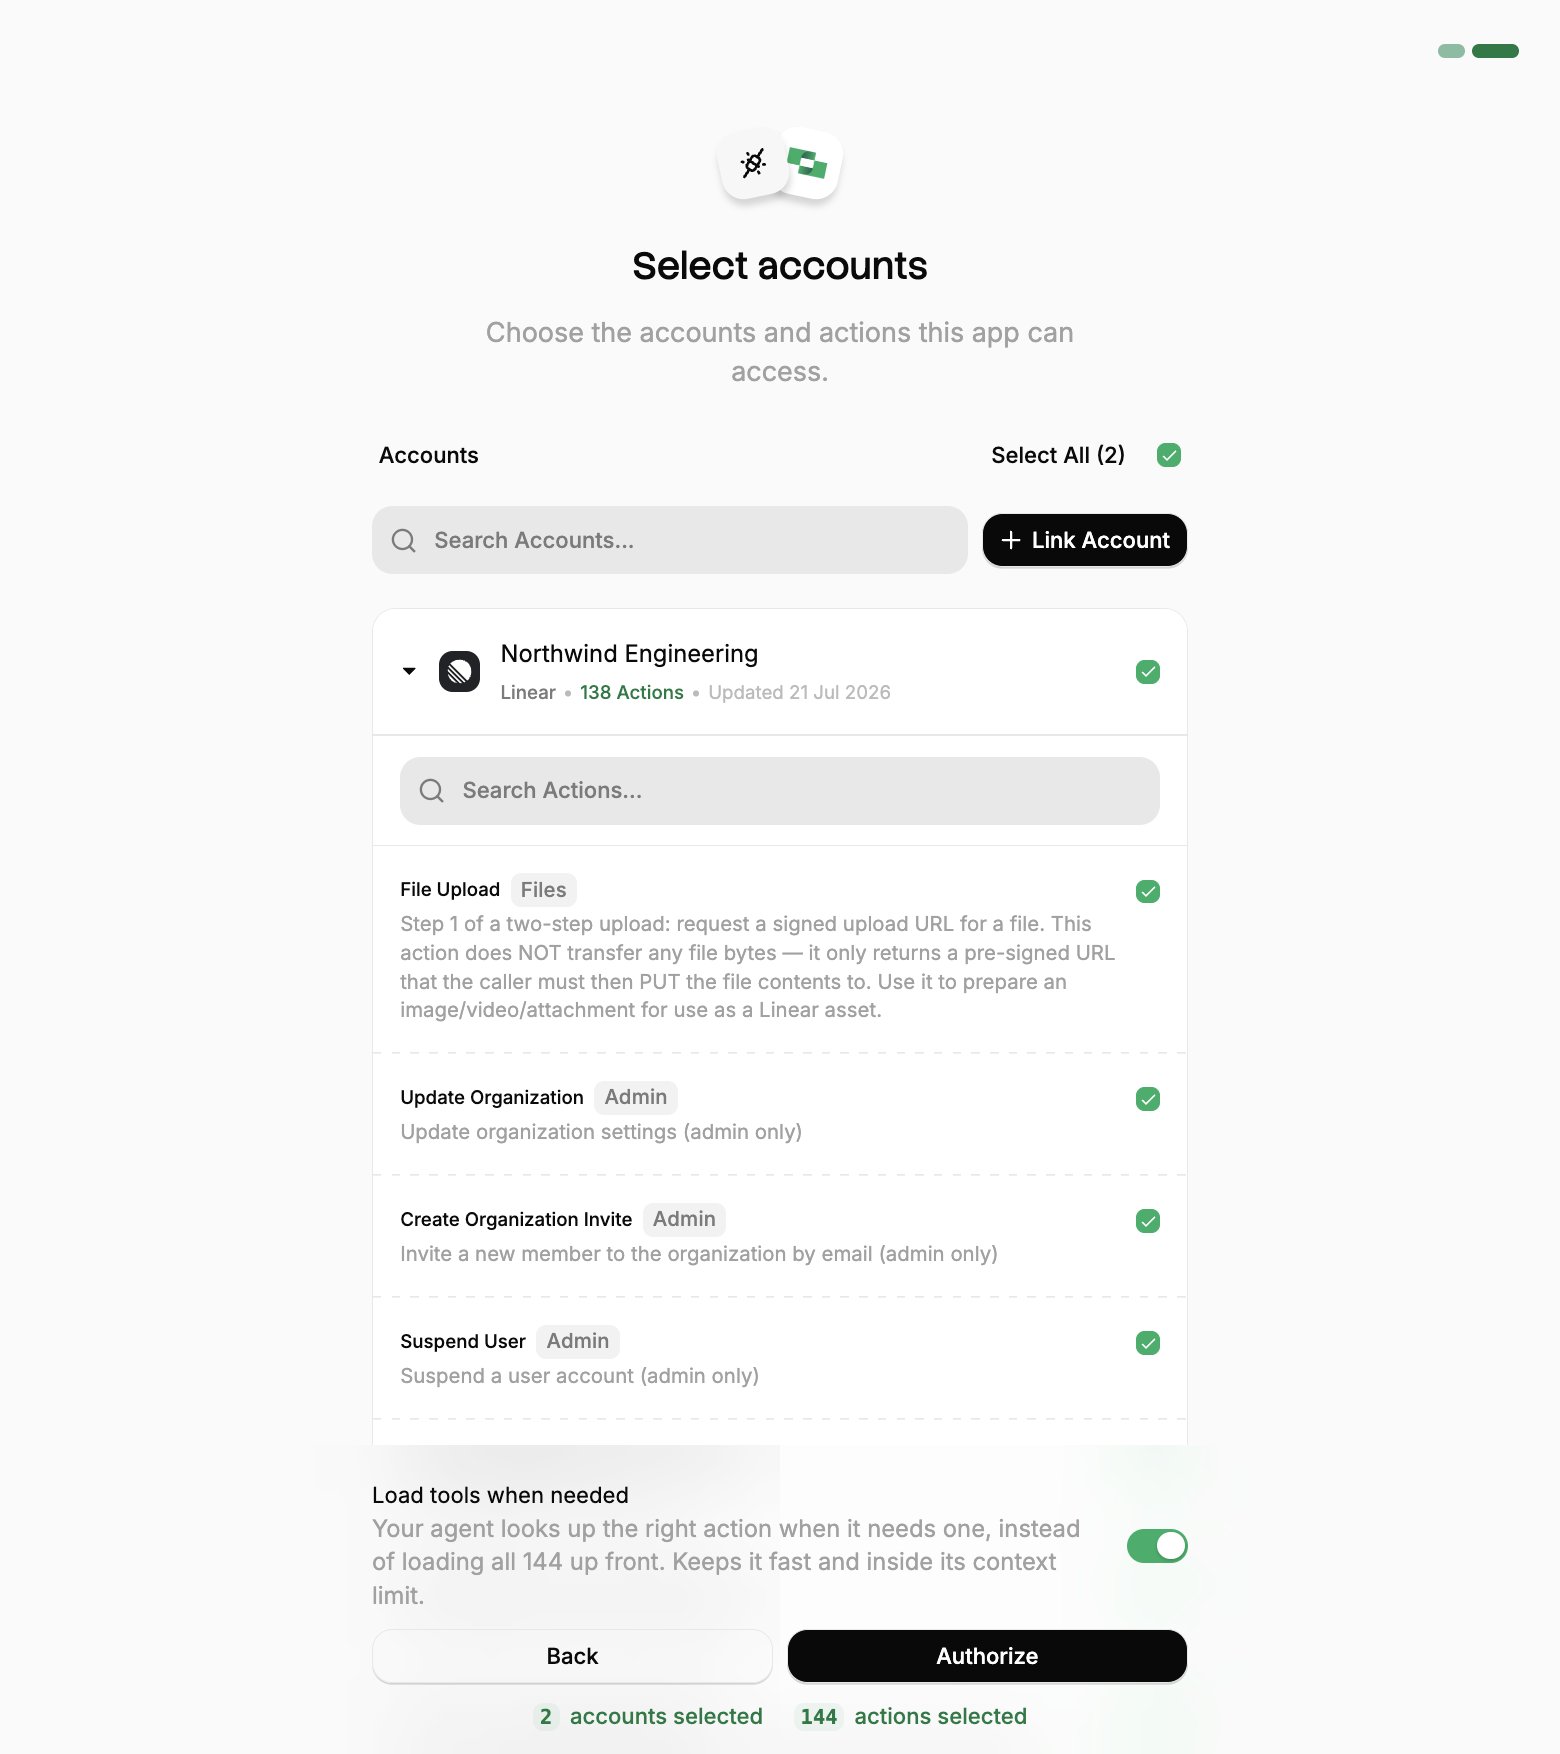
Select accounts and actions. Existing linked accounts are shown. New accounts can be linked by clicking + Link Account. You can either select the whole account (all actions will be granted) or refine by toggling individual actions.
(Optional) Load tools when needed. On by default, and the toggle that puts the connection into Advanced Tool Search. Leave it on for large action sets. Turn it off to hand the agent every selected action up front.
Authorize. Completes the connection; you can return to your client.
Select a project
Select accounts
Toggle actions
If you see a sentence where the Load tools when needed toggle should be, an admin has already settled it for the whole project. See project settings.
Back in ChatGPT, review the tools it discovered, then install the plugin.
3
Publish it to the workspace
The plugin is yours as soon as it is installed. Publishing makes it available to everyone else.
Business
Enterprise and Edu
Open Workspace Settings → Apps → Drafts and click Publish, reviewing the safety warnings for any write actions.Published apps show in the workspace’s approved connectors list, labeled custom. They cannot be edited afterwards, so changing the tools or metadata means creating and publishing the app again.
Open Workspace Settings → Apps → Drafts and click Publish.In the dialog that follows, Configure Actions selects which actions the app may run, and Configure Access limits it to specific groups. Both stay editable after publishing, from the ellipsis menu next to the app under Workspace Settings → Apps.
Roll it out
StackOne is now available for your users in ChatGPT. Make sure the following is ready before rolling out:
Add users. Invite or provision users via SSO/SCIM. See Manage Team.
Create groups. Organize teams into groups to control which systems each team reaches.
Set up connectors. Define Connector Profiles to scope provider actions for specific functions.
Link accounts. Link shared company accounts, or let users link their own accounts. See Linking Accounts.
Then send users this guide:
ChatGPT Organization User Setup
For people in your workspace connecting StackOne in ChatGPT.
Keep the published tool list current
A published app works from a snapshot of the tools StackOne exposed when it was added. To pick up changes, refresh it from the ellipsis menu next to the app under Workspace Settings → Apps, turn on any new actions, and publish it again.Advanced Tool Search avoids refreshes. It replaces the per-action tool list with two stable tools, Search and Execute, so any changes to the available actions are respected without a refresh.
Was this page helpful?
{"docsConfig":{"theme":"mint","$schema":"https://mintlify.com/docs.json","name":"Stackone","colors":{"primary":"#068F56","light":"#00AF66","dark":"#068F56"},"logo":{"light":"https://mintcdn.com/stackone-60/WsmKpuoeBZmio9QO/images/logo/logo-light-mode.svg?fit=max\u0026auto=format\u0026n=WsmKpuoeBZmio9QO\u0026q=85\u0026s=f08be9c0a142cb1e7fcaa23910c4bf7f","dark":"https://mintcdn.com/stackone-60/WsmKpuoeBZmio9QO/images/logo/logo-dark-mode.svg?fit=max\u0026auto=format\u0026n=WsmKpuoeBZmio9QO\u0026q=85\u0026s=b57d63594c13dee65c06a2d578927466","href":"/introduction"},"favicon":"https://mintcdn.com/stackone-60/EZ7nWzE-JJzhmP-C/images/logo/favicon.png?fit=max\u0026auto=format\u0026n=EZ7nWzE-JJzhmP-C\u0026q=85\u0026s=9012a8ae6ce9a80698406b611be47925","appearance":{"default":"light"},"background":{"image":{"light":"https://mintcdn.com/stackone-60/knwbcGlYFJSeLObv/images/background/light.svg?fit=max\u0026auto=format\u0026n=knwbcGlYFJSeLObv\u0026q=85\u0026s=112166d244e990ebc0146ff96958757c","dark":"https://mintcdn.com/stackone-60/knwbcGlYFJSeLObv/images/background/dark.svg?fit=max\u0026auto=format\u0026n=knwbcGlYFJSeLObv\u0026q=85\u0026s=50ec5e23eeb91f55e78a0da97dcaeb7b"},"color":{"dark":"#1a1a1a"}},"navbar":{"links":[{"icon":"circle-question","href":"/support","label":"Support"},{"href":"https://app.stackone.com","label":"Login"},{"href":"https://www.stackone.com/demo/","label":"Book a demo"}],"primary":{"type":"button","label":"Start Free","href":"https://app.stackone.com/sign_up"}},"footer":{"socials":{"linkedin":"https://www.linkedin.com/company/stackonehq","twitter":"https://twitter.com/StackOneHQ"}},"seo":{"metatags":{"canonical":"https://docs.stackone.com","google-site-verification":"gYj1x4gkdSwpCGVLFVXNVOPQ_wVrePW37ZKJt3HEqys"}},"fonts":{"heading":{"family":"Sf Pro Display","source":"https://fonts.gstatic.com/s/inter/v18/UcC73FwrK3iLTeHuS_nVMrMxCp50SjIa1ZL7W0Q5nw.woff2","format":"woff2"},"body":{"family":"Inter","source":"https://fonts.gstatic.com/s/inter/v18/UcC73FwrK3iLTeHuS_nVMrMxCp50SjIa1ZL7W0Q5nw.woff2","format":"woff2"}},"styling":{"eyebrows":"breadcrumbs","latex":true},"integrations":{"gtm":{"tagId":"GTM-NZNK37TL"}},"contextual":{"options":["copy","view","chatgpt","claude","perplexity"],"display":"header"},"navigation":{"pages":[]}},"deployment":{"deploymentMetadataValue":{"subdomain":"stackone-60","hasAudioNarration":false,"actualSubdomain":"stackone-60","customDomains":["docs.stackone.com"],"gitSource":{"type":"github","owner":"stackonehq","repo":"docs","deployBranch":"main","contentDirectory":"","isPrivate":false,"mountPath":"","label":""},"feedback":{"thumbs":true,"edits":false,"issues":false,"agentFeedback":true},"entitlements":{"AI_CHAT":{"status":"ENABLED"},"WEB_MCP":{"status":"ENABLED"},"NARRATION":{"status":"ENABLED"}},"buildId":"6af75b436a0f9955d4dc6176","clientVersion":"0.0.4131","searchFilterCounts":[{"language":"default","tag":"Connectors","count":6741},{"language":"default","tag":"Connector Catalog","count":3349},{"language":"default","tag":"Embed","count":84},{"language":"default","tag":"Platform API","count":65},{"language":"default","tag":"Features","count":48},{"language":"default","tag":"Connector Building","count":42},{"language":"default","tag":"AI Platforms","count":39},{"language":"default","tag":"Unified Actions","count":39},{"language":"default","tag":"Gateway","count":38},{"language":"default","tag":"Embed StackOne","count":36}],"searchSettings":{"isFiltersEnabled":true}},"assistantConfig":{"enableStarterQuestions":false,"deflection":{"enabled":true,"email":"support@stackone.com"}},"basePath":"","hasChatPermissions":true,"hasWebMcpPermissions":true,"toggles":[{"name":"kill-isr","enabled":true,"variant":{"name":"disabled","enabled":false,"feature_enabled":true},"impressionData":false},{"name":"custom-rbac-roles","enabled":true,"variant":{"name":"disabled","enabled":false,"feature_enabled":true},"impressionData":false},{"name":"agent-mintlify-slack","enabled":true,"variant":{"name":"disabled","enabled":false,"feature_enabled":true},"impressionData":false},{"name":"agent-integrations-settings","enabled":true,"variant":{"name":"disabled","enabled":false,"feature_enabled":true},"impressionData":false},{"name":"rbac-expansion","enabled":true,"variant":{"name":"disabled","enabled":false,"feature_enabled":true},"impressionData":false},{"name":"automations-pr-grouping","enabled":true,"variant":{"name":"disabled","enabled":false,"feature_enabled":true},"impressionData":false},{"name":"custom-prefix","enabled":true,"variant":{"name":"disabled","enabled":false,"feature_enabled":true},"impressionData":false},{"name":"analytics-v7","enabled":true,"variant":{"name":"disabled","enabled":false,"feature_enabled":true},"impressionData":false},{"name":"user-flows-analytics","enabled":true,"variant":{"name":"disabled","enabled":false,"feature_enabled":true},"impressionData":false},{"name":"no-publish-flow","enabled":true,"variant":{"name":"disabled","enabled":false,"feature_enabled":true},"impressionData":false},{"name":"workos-onboarding","enabled":true,"variant":{"name":"disabled","enabled":false,"feature_enabled":true},"impressionData":false},{"name":"snapshot-serving-live","enabled":true,"variant":{"name":"disabled","enabled":false,"feature_enabled":true},"impressionData":false},{"name":"stripTemperatureMiddleware","enabled":true,"variant":{"name":"disabled","enabled":false,"feature_enabled":true},"impressionData":false},{"name":"support-platform-pylon-zendesk","enabled":true,"variant":{"name":"disabled","enabled":false,"feature_enabled":true},"impressionData":false},{"name":"snapshot-serving","enabled":true,"variant":{"name":"disabled","enabled":false,"feature_enabled":true},"impressionData":false},{"name":"instant-rollback","enabled":true,"variant":{"name":"disabled","enabled":false,"feature_enabled":true},"impressionData":false},{"name":"granular-notifications-server","enabled":true,"variant":{"name":"disabled","enabled":false,"feature_enabled":true},"impressionData":false},{"name":"granular-notifications","enabled":true,"variant":{"name":"disabled","enabled":false,"feature_enabled":true},"impressionData":false},{"name":"automations-fable","enabled":true,"variant":{"name":"disabled","enabled":false,"feature_enabled":true},"impressionData":false},{"name":"fixed-ai-action-pricing","enabled":true,"variant":{"name":"disabled","enabled":false,"feature_enabled":true},"impressionData":false},{"name":"automation-resolve-merge-conflict","enabled":true,"variant":{"name":"disabled","enabled":false,"feature_enabled":true},"impressionData":false},{"name":"scoped-publishing","enabled":true,"variant":{"name":"disabled","enabled":false,"feature_enabled":true},"impressionData":false},{"name":"mintql","enabled":true,"variant":{"name":"disabled","enabled":false,"feature_enabled":true},"impressionData":false},{"name":"page-level-analytics","enabled":true,"variant":{"name":"disabled","enabled":false,"feature_enabled":true},"impressionData":false},{"name":"editor-version-history-v2","enabled":true,"variant":{"name":"disabled","enabled":false,"feature_enabled":true},"impressionData":false},{"name":"billing-page-v2","enabled":true,"variant":{"name":"disabled","enabled":false,"feature_enabled":true},"impressionData":false},{"name":"full-page-search","enabled":true,"variant":{"name":"disabled","enabled":false,"feature_enabled":true},"impressionData":false},{"name":"workspace-projects","enabled":true,"variant":{"name":"disabled","enabled":false,"feature_enabled":true},"impressionData":false},{"name":"assistant-v5","enabled":true,"variant":{"name":"disabled","enabled":false,"feature_enabled":true},"impressionData":false},{"name":"fork-pr-previews","enabled":true,"variant":{"name":"disabled","enabled":false,"feature_enabled":true},"impressionData":false},{"name":"revalidation-jwt","enabled":true,"variant":{"name":"disabled","enabled":false,"feature_enabled":true},"impressionData":false},{"name":"workos-sso-scim","enabled":true,"variant":{"name":"disabled","enabled":false,"feature_enabled":true},"impressionData":false},{"name":"hobby-abuse-scan","enabled":true,"variant":{"name":"disabled","enabled":false,"feature_enabled":true},"impressionData":false},{"name":"dashboard-inbox","enabled":true,"variant":{"name":"disabled","enabled":false,"feature_enabled":true},"impressionData":false},{"name":"workos-signup","enabled":true,"variant":{"name":"disabled","enabled":false,"feature_enabled":true},"impressionData":false},{"name":"turbopuffer-dual-write","enabled":true,"variant":{"name":"disabled","enabled":false,"feature_enabled":true},"impressionData":false},{"name":"workos-enabled","enabled":true,"variant":{"name":"disabled","enabled":false,"feature_enabled":true},"impressionData":false},{"name":"approve-review-flow","enabled":true,"variant":{"name":"disabled","enabled":false,"feature_enabled":true},"impressionData":false},{"name":"editor-metadata","enabled":true,"variant":{"name":"disabled","enabled":false,"feature_enabled":true},"impressionData":false},{"name":"sso-setup-deadline-banner","enabled":true,"variant":{"name":"disabled","enabled":false,"feature_enabled":true},"impressionData":false},{"name":"turbopuffer-serve","enabled":true,"variant":{"name":"disabled","enabled":false,"feature_enabled":true},"impressionData":false},{"name":"live-agents","enabled":true,"variant":{"name":"disabled","enabled":false,"feature_enabled":true},"impressionData":false},{"name":"llms-txt-v2","enabled":true,"variant":{"name":"disabled","enabled":false,"feature_enabled":true},"impressionData":false}],"googleFontsInlined":false},"customCss":[{"filePath":"style.css","href":"/_mintlify/custom/stackone-60/1689b391b56fc5fb/style.css"}],"page":{"pagePath":"ai-platforms/openai/chatgpt/organization-admin-setup","slug":"/ai-platforms/openai/chatgpt/organization-admin-setup","pageMetadata":{"title":"ChatGPT - Make StackOne Available","sidebarTitle":"Organization Admin Setup","description":"Allow your users to connect to work systems with StackOne.","keywords":["ChatGPT","ChatGPT Business","ChatGPT Enterprise","ChatGPT Edu","custom MCP server","plugin","workspace","publish app"],"href":"/ai-platforms/openai/chatgpt/organization-admin-setup"},"description":{"compiledSource":"\"use strict\";\nconst {jsx: _jsx} = arguments[0];\nconst {useMDXComponents: _provideComponents} = arguments[0];\nfunction _createMdxContent(props) {\n const _components = {\n p: \"p\",\n ..._provideComponents(),\n ...props.components\n };\n return _jsx(_components.p, {\n children: \"Allow your users to connect to work systems with StackOne.\"\n });\n}\nfunction MDXContent(props = {}) {\n const {wrapper: MDXLayout} = {\n ..._provideComponents(),\n ...props.components\n };\n return MDXLayout ? _jsx(MDXLayout, {\n ...props,\n children: _jsx(_createMdxContent, {\n ...props\n })\n }) : _createMdxContent(props);\n}\nreturn {\n default: MDXContent\n};\n","frontmatter":{},"scope":{}},"pageType":"default","mdx":{"mdxSource":{"compiledSource":"\"use strict\";const{Fragment:_Fragment,jsx:_jsx,jsxs:_jsxs}=arguments[0];const{useMDXComponents:_provideComponents}=arguments[0];const platform_0=`ChatGPT`;function _createMdxContent(props){const _components={a:`a`,code:`code`,li:`li`,ol:`ol`,p:`p`,pre:`pre`,span:`span`,strong:`strong`,ul:`ul`,..._provideComponents(),...props.components},{Accordion,Card,CodeBlock,Columns,Frame,Heading,Note,OptimizedImage,Step,Steps,Tab,Tabs}=_components;if(!Accordion)_missingMdxReference(`Accordion`,true);if(!Card)_missingMdxReference(`Card`,true);if(!CodeBlock)_missingMdxReference(`CodeBlock`,true);if(!Columns)_missingMdxReference(`Columns`,true);if(!Frame)_missingMdxReference(`Frame`,true);if(!Heading)_missingMdxReference(`Heading`,true);if(!Note)_missingMdxReference(`Note`,true);if(!OptimizedImage)_missingMdxReference(`OptimizedImage`,true);if(!Step)_missingMdxReference(`Step`,true);if(!Steps)_missingMdxReference(`Steps`,true);if(!Tab)_missingMdxReference(`Tab`,true);if(!Tabs)_missingMdxReference(`Tabs`,true);return _jsxs(_Fragment,{children:[_jsx(Frame,{children:_jsx(OptimizedImage,{src:`https://mintcdn.com/stackone-60/RgaE_4ZxFuvAQ6gS/images/ai-platforms/openai/admin-setup.svg?fit=max\u0026auto=format\u0026n=RgaE_4ZxFuvAQ6gS\u0026q=85\u0026s=9369b1fdbcbf1105622e8c25896c5af8`,alt:`An IT admin adds StackOne to the ChatGPT workspace, bringing Linked Accounts from many providers. Each user then connects with their own accounts: an HR manager uses ChatGPT with Workday, Greenhouse and BambooHR, and a sales manager uses ChatGPT with Salesforce, HubSpot and Gmail.`,\"data-og-width\":`2276`,width:`2276`,\"data-og-height\":`1168`,height:`1168`,\"data-path\":`images/ai-platforms/openai/admin-setup.svg`,\"data-optimize\":`true`,\"data-opv\":`3`,srcset:`https://mintcdn.com/stackone-60/RgaE_4ZxFuvAQ6gS/images/ai-platforms/openai/admin-setup.svg?w=280\u0026fit=max\u0026auto=format\u0026n=RgaE_4ZxFuvAQ6gS\u0026q=85\u0026s=8f29eed955d91d236d73c845bb1f6368 280w, https://mintcdn.com/stackone-60/RgaE_4ZxFuvAQ6gS/images/ai-platforms/openai/admin-setup.svg?w=560\u0026fit=max\u0026auto=format\u0026n=RgaE_4ZxFuvAQ6gS\u0026q=85\u0026s=b2d5afedf264d2163893df546aac6cf2 560w, https://mintcdn.com/stackone-60/RgaE_4ZxFuvAQ6gS/images/ai-platforms/openai/admin-setup.svg?w=840\u0026fit=max\u0026auto=format\u0026n=RgaE_4ZxFuvAQ6gS\u0026q=85\u0026s=5ad13e386db67f21c3c356f595a55574 840w, https://mintcdn.com/stackone-60/RgaE_4ZxFuvAQ6gS/images/ai-platforms/openai/admin-setup.svg?w=1100\u0026fit=max\u0026auto=format\u0026n=RgaE_4ZxFuvAQ6gS\u0026q=85\u0026s=6d3a4fc9bd9a7e4035fcb4442c1e2f2c 1100w, https://mintcdn.com/stackone-60/RgaE_4ZxFuvAQ6gS/images/ai-platforms/openai/admin-setup.svg?w=1650\u0026fit=max\u0026auto=format\u0026n=RgaE_4ZxFuvAQ6gS\u0026q=85\u0026s=a94893a5fdaea455aadbd03e31cf4247 1650w, https://mintcdn.com/stackone-60/RgaE_4ZxFuvAQ6gS/images/ai-platforms/openai/admin-setup.svg?w=2500\u0026fit=max\u0026auto=format\u0026n=RgaE_4ZxFuvAQ6gS\u0026q=85\u0026s=a2eab8c1402919f6d716443e70aa7b41 2500w`})}),`\n`,_jsx(_components.p,{children:`Make the StackOne connector available to everyone in your ChatGPT Business, Enterprise or Edu workspace. Each person then signs in with their own StackOne login and reaches only the systems they’ve been given access to in StackOne.`}),`\n`,_jsx(Heading,{level:`2`,id:`before-you-start`,children:`Before you start`}),`\n`,_jsx(_components.p,{children:`In ChatGPT, a workspace policy may need to allow custom MCP servers for your role first.`}),`\n`,_jsx(_components.p,{children:`You sign in to StackOne yourself during setup, so ChatGPT can discover the tools. In StackOne:`}),`\n`,_jsxs(_components.ul,{children:[`\n`,_jsxs(_components.li,{children:[`A StackOne `,_jsx(_components.a,{href:`/gateway/concepts/organizations-and-projects`,children:`project`}),` you are a member of.`]}),`\n`,_jsxs(_components.li,{children:[`A `,_jsx(_components.a,{href:`/connect/managing-connectors/connector-profiles`,children:`connector profile`}),` in the project for each provider the client should reach, with the actions you want exposed enabled.`]}),`\n`,_jsxs(_components.li,{children:[`(Optional) A `,_jsx(_components.a,{href:`/connect/managing-connectors/linking-accounts`,children:`linked account`}),` for each provider. Accounts can also be linked during the consent flow.`]}),`\n`]}),`\n`,_jsx(Heading,{level:`2`,id:`add-stackone-to-your-workspace`,children:`Add StackOne to your workspace`}),`\n`,_jsxs(Steps,{children:[_jsxs(Step,{title:`Add the custom MCP server`,children:[_jsx(_components.p,{children:`Add the server in a browser. The desktop app picks it up from there once it exists.`}),_jsxs(_components.ol,{children:[`\n`,_jsxs(_components.li,{children:[`\n`,_jsxs(_components.p,{children:[`Go to `,_jsx(_components.a,{href:`https://chatgpt.com/plugins`,children:`ChatGPT Plugins`}),`.`]}),`\n`]}),`\n`,_jsxs(_components.li,{children:[`\n`,_jsxs(_components.p,{children:[`Select `,_jsx(_components.strong,{children:`Add`}),`, then `,_jsx(_components.strong,{children:`Add custom MCP server`}),`.`]}),`\n`]}),`\n`,_jsxs(_components.li,{children:[`\n`,_jsxs(_components.p,{children:[`Enter a name and description, for example `,_jsx(_components.code,{children:`StackOne`}),`.`]}),`\n`]}),`\n`,_jsxs(_components.li,{children:[`\n`,_jsxs(_components.p,{children:[`Under `,_jsx(_components.strong,{children:`Connection`}),`, enter the MCP server URL:`]}),`\n`,_jsx(CodeBlock,{filename:``,numberOfLines:`2`,language:`text`,children:_jsx(_components.pre,{className:`shiki shiki-themes github-light-default dark-plus`,style:{backgroundColor:`#ffffff`,\"--shiki-dark-bg\":`#0B0C0E`,color:`#1f2328`,\"--shiki-dark\":`#D4D4D4`},language:`text`,children:_jsxs(_components.code,{language:`text`,numberOfLines:`2`,children:[_jsx(_components.span,{className:`line`,children:_jsx(_components.span,{children:`https://mcp.stackone.com/mcp`})}),`\n`,_jsx(_components.span,{className:`line`,children:_jsx(_components.span,{})})]})})}),`\n`]}),`\n`,_jsxs(_components.li,{children:[`\n`,_jsxs(_components.p,{children:[`Set authentication to `,_jsx(_components.strong,{children:`OAuth`}),` and leave `,_jsx(_components.strong,{children:`Advanced OAuth settings`}),` as discovered. ChatGPT discovers the endpoints and registers itself, so there is no client ID or secret to enter. No `,_jsx(_components.code,{children:`mcp-remote`}),` wrapper needed. If ChatGPT asks you to confirm that the provider issues refresh tokens, confirm it.`]}),`\n`]}),`\n`,_jsxs(_components.li,{children:[`\n`,_jsxs(_components.p,{children:[`Review the risk warning and select `,_jsx(_components.strong,{children:`I understand and want to continue`}),`.`]}),`\n`]}),`\n`,_jsxs(_components.li,{children:[`\n`,_jsxs(_components.p,{children:[`Select `,_jsx(_components.strong,{children:`Create as a plugin`}),`.`]}),`\n`]}),`\n`,_jsxs(_components.li,{children:[`\n`,_jsxs(_components.p,{children:[`Select `,_jsx(_components.strong,{children:`Connect StackOne`}),` to start the sign-in.`]}),`\n`]}),`\n`]}),_jsxs(_components.p,{children:[`If `,_jsx(_components.strong,{children:`Add custom MCP server`}),` is missing from the menu, a workspace policy is blocking it for your role.`]})]}),_jsxs(Step,{title:`Approve the consent screen`,children:[_jsx(_components.p,{children:`ChatGPT opens StackOne in your browser.`}),_jsxs(_components.p,{children:[`Sign in, pick the project and the `,_jsx(_components.a,{href:`/connect/managing-connectors/linking-accounts`,children:`linked accounts`}),` the connector should reach, then `,_jsx(_components.strong,{children:`Authorize`}),`.`]}),_jsxs(Accordion,{title:`Walk through the consent screen`,id:`walk-through-the-consent-screen`,children:[_jsxs(_components.ol,{children:[`\n`,_jsxs(_components.li,{children:[_jsx(_components.strong,{children:`Sign in to StackOne.`}),` If you are already signed in to the dashboard you skip straight to the next step.`]}),`\n`,_jsxs(_components.li,{children:[_jsx(_components.strong,{children:`Check where the connection returns.`}),` The line under the client’s logo shows where it goes after you approve. If it names localhost or an app on this device, only continue if you started the connection from that client.`]}),`\n`,_jsxs(_components.li,{children:[_jsx(_components.strong,{children:`Select a project.`}),` Select the project you would like to associate the connection with. If you belong to one project, this step is skipped.`]}),`\n`,_jsxs(_components.li,{children:[_jsx(_components.strong,{children:`Select accounts and actions.`}),` Existing linked accounts are shown. New accounts can be linked by clicking `,_jsx(_components.strong,{children:`+ Link Account`}),`. You can either select the whole account (all actions will be granted) or refine by toggling individual actions.`]}),`\n`,_jsxs(_components.li,{children:[_jsx(_components.strong,{children:`(Optional) Load tools when needed.`}),` On by default, and the toggle that puts the connection into `,_jsx(_components.a,{href:`/optimize/advanced-tool-search`,children:`Advanced Tool Search`}),`. Leave it on for large action sets. Turn it off to hand the agent every selected action up front.`]}),`\n`,_jsxs(_components.li,{children:[_jsx(_components.strong,{children:`Authorize.`}),` Completes the connection; you can return to your client.`]}),`\n`]}),_jsxs(Columns,{cols:3,children:[_jsx(Frame,{caption:`Select a project`,children:_jsx(OptimizedImage,{src:`https://mintcdn.com/stackone-60/RgaE_4ZxFuvAQ6gS/images/ai-platforms/oauth-consent-select-project.png?fit=max\u0026auto=format\u0026n=RgaE_4ZxFuvAQ6gS\u0026q=85\u0026s=69d4694c8ea854c52ec62fc1bbe0825a`,alt:`StackOne authorization screen listing organizations, with a project selected inside one of them`,style:{width:`100%`,aspectRatio:`780 / 877`,objectFit:`cover`},\"data-og-width\":`1294`,width:`1294`,\"data-og-height\":`924`,height:`924`,\"data-path\":`images/ai-platforms/oauth-consent-select-project.png`,\"data-optimize\":`true`,\"data-opv\":`3`,srcset:`https://mintcdn.com/stackone-60/RgaE_4ZxFuvAQ6gS/images/ai-platforms/oauth-consent-select-project.png?w=280\u0026fit=max\u0026auto=format\u0026n=RgaE_4ZxFuvAQ6gS\u0026q=85\u0026s=53f6f08c5bdac63b52a7677e532c24eb 280w, https://mintcdn.com/stackone-60/RgaE_4ZxFuvAQ6gS/images/ai-platforms/oauth-consent-select-project.png?w=560\u0026fit=max\u0026auto=format\u0026n=RgaE_4ZxFuvAQ6gS\u0026q=85\u0026s=7e43214c74ac14d66f90bd9fba40569e 560w, https://mintcdn.com/stackone-60/RgaE_4ZxFuvAQ6gS/images/ai-platforms/oauth-consent-select-project.png?w=840\u0026fit=max\u0026auto=format\u0026n=RgaE_4ZxFuvAQ6gS\u0026q=85\u0026s=b3cdb8aa6236da251708f4a40ace56ba 840w, https://mintcdn.com/stackone-60/RgaE_4ZxFuvAQ6gS/images/ai-platforms/oauth-consent-select-project.png?w=1100\u0026fit=max\u0026auto=format\u0026n=RgaE_4ZxFuvAQ6gS\u0026q=85\u0026s=ccaf970cdfea31e279eb2155a0bbab5c 1100w, https://mintcdn.com/stackone-60/RgaE_4ZxFuvAQ6gS/images/ai-platforms/oauth-consent-select-project.png?w=1650\u0026fit=max\u0026auto=format\u0026n=RgaE_4ZxFuvAQ6gS\u0026q=85\u0026s=97e0ea42b686dc209aa7212dc05e1ac7 1650w, https://mintcdn.com/stackone-60/RgaE_4ZxFuvAQ6gS/images/ai-platforms/oauth-consent-select-project.png?w=2500\u0026fit=max\u0026auto=format\u0026n=RgaE_4ZxFuvAQ6gS\u0026q=85\u0026s=701fb024fccda033b45b5f879ea255c2 2500w`})}),_jsx(Frame,{caption:`Select accounts`,children:_jsx(OptimizedImage,{src:`https://mintcdn.com/stackone-60/RgaE_4ZxFuvAQ6gS/images/ai-platforms/oauth-consent-select-accounts.png?fit=max\u0026auto=format\u0026n=RgaE_4ZxFuvAQ6gS\u0026q=85\u0026s=66ef4eb4d8bf6e5246e5f01ec959c187`,alt:`StackOne authorization screen showing two linked accounts, Linear and Open-Meteo, both selected, above the Load tools when needed toggle`,\"data-og-width\":`1560`,width:`1560`,\"data-og-height\":`1754`,height:`1754`,\"data-path\":`images/ai-platforms/oauth-consent-select-accounts.png`,\"data-optimize\":`true`,\"data-opv\":`3`,srcset:`https://mintcdn.com/stackone-60/RgaE_4ZxFuvAQ6gS/images/ai-platforms/oauth-consent-select-accounts.png?w=280\u0026fit=max\u0026auto=format\u0026n=RgaE_4ZxFuvAQ6gS\u0026q=85\u0026s=90614d95c215e07f909c8020bcf714bc 280w, https://mintcdn.com/stackone-60/RgaE_4ZxFuvAQ6gS/images/ai-platforms/oauth-consent-select-accounts.png?w=560\u0026fit=max\u0026auto=format\u0026n=RgaE_4ZxFuvAQ6gS\u0026q=85\u0026s=7f33457e6769f7c99f8159a746a9f329 560w, https://mintcdn.com/stackone-60/RgaE_4ZxFuvAQ6gS/images/ai-platforms/oauth-consent-select-accounts.png?w=840\u0026fit=max\u0026auto=format\u0026n=RgaE_4ZxFuvAQ6gS\u0026q=85\u0026s=333b72308a94d893e4de5c653d054234 840w, https://mintcdn.com/stackone-60/RgaE_4ZxFuvAQ6gS/images/ai-platforms/oauth-consent-select-accounts.png?w=1100\u0026fit=max\u0026auto=format\u0026n=RgaE_4ZxFuvAQ6gS\u0026q=85\u0026s=127d30ce81527582bd7a9fe2966f392a 1100w, https://mintcdn.com/stackone-60/RgaE_4ZxFuvAQ6gS/images/ai-platforms/oauth-consent-select-accounts.png?w=1650\u0026fit=max\u0026auto=format\u0026n=RgaE_4ZxFuvAQ6gS\u0026q=85\u0026s=b69637962ca207ffd39aa033abc6499c 1650w, https://mintcdn.com/stackone-60/RgaE_4ZxFuvAQ6gS/images/ai-platforms/oauth-consent-select-accounts.png?w=2500\u0026fit=max\u0026auto=format\u0026n=RgaE_4ZxFuvAQ6gS\u0026q=85\u0026s=84df4eb9bf3e5642276f2e49becb447a 2500w`})}),_jsx(Frame,{caption:`Toggle actions`,children:_jsx(OptimizedImage,{src:`https://mintcdn.com/stackone-60/RgaE_4ZxFuvAQ6gS/images/ai-platforms/oauth-consent-select-actions.png?fit=max\u0026auto=format\u0026n=RgaE_4ZxFuvAQ6gS\u0026q=85\u0026s=c86b615e0f55cd43236e38142c1ebca5`,alt:`An expanded linked account showing individual actions with toggles, descriptions, and category tags`,\"data-og-width\":`1560`,width:`1560`,\"data-og-height\":`1754`,height:`1754`,\"data-path\":`images/ai-platforms/oauth-consent-select-actions.png`,\"data-optimize\":`true`,\"data-opv\":`3`,srcset:`https://mintcdn.com/stackone-60/RgaE_4ZxFuvAQ6gS/images/ai-platforms/oauth-consent-select-actions.png?w=280\u0026fit=max\u0026auto=format\u0026n=RgaE_4ZxFuvAQ6gS\u0026q=85\u0026s=793029c3a0d002c9a1c38dfafd643bd5 280w, https://mintcdn.com/stackone-60/RgaE_4ZxFuvAQ6gS/images/ai-platforms/oauth-consent-select-actions.png?w=560\u0026fit=max\u0026auto=format\u0026n=RgaE_4ZxFuvAQ6gS\u0026q=85\u0026s=530e356eaab6a97203a890b472dee801 560w, https://mintcdn.com/stackone-60/RgaE_4ZxFuvAQ6gS/images/ai-platforms/oauth-consent-select-actions.png?w=840\u0026fit=max\u0026auto=format\u0026n=RgaE_4ZxFuvAQ6gS\u0026q=85\u0026s=0b341781bf99cc4b898e21cc1b32021e 840w, https://mintcdn.com/stackone-60/RgaE_4ZxFuvAQ6gS/images/ai-platforms/oauth-consent-select-actions.png?w=1100\u0026fit=max\u0026auto=format\u0026n=RgaE_4ZxFuvAQ6gS\u0026q=85\u0026s=bdcd838f40d6b4ae659dd3911f5403cf 1100w, https://mintcdn.com/stackone-60/RgaE_4ZxFuvAQ6gS/images/ai-platforms/oauth-consent-select-actions.png?w=1650\u0026fit=max\u0026auto=format\u0026n=RgaE_4ZxFuvAQ6gS\u0026q=85\u0026s=4ca0ad52432ef80511ae57ca44be4fea 1650w, https://mintcdn.com/stackone-60/RgaE_4ZxFuvAQ6gS/images/ai-platforms/oauth-consent-select-actions.png?w=2500\u0026fit=max\u0026auto=format\u0026n=RgaE_4ZxFuvAQ6gS\u0026q=85\u0026s=51527433b979a9f72dad9f654c075b93 2500w`})})]}),_jsx(Note,{children:_jsxs(_components.p,{children:[`If you see a sentence where the `,_jsx(_components.strong,{children:`Load tools when needed`}),` toggle should be, an admin has already settled it for the whole project. See `,_jsx(_components.a,{href:`/optimize/advanced-tool-search#setting-it-for-a-whole-project`,children:`project settings`}),`.`]})})]}),_jsx(_components.p,{children:`Back in ChatGPT, review the tools it discovered, then install the plugin.`})]}),_jsxs(Step,{title:`Publish it to the workspace`,children:[_jsx(_components.p,{children:`The plugin is yours as soon as it is installed. Publishing makes it available to everyone else.`}),_jsxs(Tabs,{children:[_jsxs(Tab,{title:`Business`,id:`business`,children:[_jsxs(_components.p,{children:[`Open `,_jsx(_components.strong,{children:`Workspace Settings → Apps → Drafts`}),` and click `,_jsx(_components.strong,{children:`Publish`}),`, reviewing the safety warnings for any write actions.`]}),_jsxs(_components.p,{children:[`Published apps show in the workspace’s approved connectors list, labeled `,_jsx(_components.strong,{children:`custom`}),`. They cannot be edited afterwards, so changing the tools or metadata means creating and publishing the app again.`]})]}),_jsxs(Tab,{title:`Enterprise and Edu`,id:`enterprise-and-edu`,children:[_jsxs(_components.p,{children:[`Open `,_jsx(_components.strong,{children:`Workspace Settings → Apps → Drafts`}),` and click `,_jsx(_components.strong,{children:`Publish`}),`.`]}),_jsxs(_components.p,{children:[`In the dialog that follows, `,_jsx(_components.strong,{children:`Configure Actions`}),` selects which actions the app may run, and `,_jsx(_components.strong,{children:`Configure Access`}),` limits it to specific groups. Both stay editable after publishing, from the ellipsis menu next to the app under `,_jsx(_components.strong,{children:`Workspace Settings → Apps`}),`.`]})]})]})]})]}),`\n`,_jsx(Heading,{level:`2`,id:`roll-it-out`,children:`Roll it out`}),`\n`,_jsxs(_components.p,{children:[`StackOne is now available for your users in `,platform_0,`. Make sure the following is ready before rolling out:`]}),`\n`,_jsxs(_components.ul,{children:[`\n`,_jsxs(_components.li,{children:[_jsx(_components.strong,{children:`Add users.`}),` Invite or provision users via SSO/SCIM. See `,_jsx(_components.a,{href:`/secure/identity-and-access/manage-team/overview`,children:`Manage Team`}),`.`]}),`\n`,_jsxs(_components.li,{children:[_jsx(_components.strong,{children:`Create groups.`}),` Organize teams into `,_jsx(_components.a,{href:`/secure/identity-and-access/roles-and-groups/groups`,children:`groups`}),` to control which systems each team reaches.`]}),`\n`,_jsxs(_components.li,{children:[_jsx(_components.strong,{children:`Set up connectors.`}),` Define `,_jsx(_components.a,{href:`/connect/managing-connectors/connector-profiles`,children:`Connector Profiles`}),` to scope provider actions for specific functions.`]}),`\n`,_jsxs(_components.li,{children:[_jsx(_components.strong,{children:`Link accounts.`}),` Link shared company accounts, or let users link their own accounts. See `,_jsx(_components.a,{href:`/connect/managing-connectors/linking-accounts`,children:`Linking Accounts`}),`.`]}),`\n`]}),`\n`,_jsx(_components.p,{children:`Then send users this guide:`}),`\n`,_jsx(Card,{title:`ChatGPT Organization User Setup`,icon:`message`,href:`/ai-platforms/openai/chatgpt/organization-user-setup`,children:_jsx(_components.p,{children:`For people in your workspace connecting StackOne in ChatGPT.`})}),`\n`,_jsx(Heading,{level:`2`,id:`keep-the-published-tool-list-current`,children:`Keep the published tool list current`}),`\n`,_jsxs(_components.p,{children:[`A published app works from a snapshot of the tools StackOne exposed when it was added. To pick up changes, refresh it from the ellipsis menu next to the app under `,_jsx(_components.strong,{children:`Workspace Settings → Apps`}),`, turn on any new actions, and publish it again.`]}),`\n`,_jsxs(_components.p,{children:[_jsx(_components.a,{href:`/optimize/advanced-tool-search`,children:`Advanced Tool Search`}),` avoids refreshes. It replaces the per-action tool list with two stable tools, Search and Execute, so any changes to the available actions are respected without a refresh.`]})]})}function MDXContent(props={}){const{wrapper:MDXLayout}={..._provideComponents(),...props.components};return MDXLayout?_jsx(MDXLayout,{...props,children:_jsx(_createMdxContent,{...props})}):_createMdxContent(props)}return{platform_0,default:MDXContent};function _missingMdxReference(id,component){throw new Error(`Expected `+(component?`component`:`object`)+\" `\"+id+\"` to be defined: you likely forgot to import, pass, or provide it.\")}","frontmatter":{},"scope":{"config":{},"pageMetadata":{"title":"ChatGPT - Make StackOne Available","sidebarTitle":"Organization Admin Setup","description":"Allow your users to connect to work systems with StackOne.","keywords":["ChatGPT","ChatGPT Business","ChatGPT Enterprise","ChatGPT Edu","custom MCP server","plugin","workspace","publish app"],"href":"/ai-platforms/openai/chatgpt/organization-admin-setup"}}},"mdxSourceWithNoJs":null,"noJsSplices":[[16421,16442,"`ChatGPT`,`. Make su"]]},"mdxExtracts":{"tableOfContents":[{"title":"Before you start","slug":"before-you-start","depth":2,"children":[]},{"title":"Add StackOne to your workspace","slug":"add-stackone-to-your-workspace","depth":2,"children":[]},{"title":"Roll it out","slug":"roll-it-out","depth":2,"children":[]},{"title":"Keep the published tool list current","slug":"keep-the-published-tool-list-current","depth":2,"children":[]}],"codeExamples":{}},"jsLinks":["/_mintlify/custom/stackone-60/072d59ca3ea476f6/status-indicator.js","/_mintlify/custom/stackone-60/108e4b0e256a9ba7/connectors.js","/_mintlify/custom/stackone-60/af28b3fbb0435529/hubspot-form.js","/_mintlify/custom/stackone-60/965ecce887247b53/end-users.js"],"subdomain":"stackone-60","siteName":"Stackone","title":"ChatGPT - Make StackOne Available - Stackone","navMaps":{"firstHrefInVersion":{},"firstHrefInLanguage":{}},"lastModified":"2026-11-13T18:47:57.196Z","originalFileLocation":"ai-platforms/openai/chatgpt/organization-admin-setup.mdx"},"headHtml":"\u003cscript data-mint-head>(function(){var d=document.documentElement,p=null;if(!p){try{p=localStorage.getItem(\"isDarkMode\")}catch(e){}if(p==='true')p='dark';else if(p==='false')p='light';if(p!=='light'\u0026\u0026p!=='dark'\u0026\u0026p!=='system')p=\"light\"}var r=p==='system'?(matchMedia(\"(prefers-color-scheme: dark)\").matches?'dark':'light'):p;d.classList.remove(r==='dark'?'light':'dark');d.classList.add(r);d.setAttribute(\"data-theme-preference\",p)})();\u003c/script>\u003cmeta data-mint-head name=\"description\" content=\"Allow your users to connect to work systems with StackOne.\">\u003cmeta data-mint-head name=\"application-name\" content=\"Stackone\">\u003cmeta data-mint-head name=\"generator\" content=\"Mintlify\">\u003clink data-mint-head rel=\"icon\" type=\"image/png\" sizes=\"192x192\" href=\"/mintlify-assets/_mintlify/favicons/stackone-60/vUkZo0TYnLvO23Z1/_generated/favicon/android-chrome-192x192.png\" media=\"(prefers-color-scheme: light)\">\u003clink data-mint-head rel=\"apple-touch-icon\" type=\"image/png\" sizes=\"180x180\" href=\"/mintlify-assets/_mintlify/favicons/stackone-60/vUkZo0TYnLvO23Z1/_generated/favicon/apple-touch-icon.png\">\u003clink data-mint-head rel=\"icon\" type=\"image/png\" sizes=\"16x16\" href=\"/mintlify-assets/_mintlify/favicons/stackone-60/vUkZo0TYnLvO23Z1/_generated/favicon/favicon-16x16.png\" media=\"(prefers-color-scheme: light)\">\u003clink data-mint-head rel=\"icon\" type=\"image/png\" sizes=\"32x32\" href=\"/mintlify-assets/_mintlify/favicons/stackone-60/vUkZo0TYnLvO23Z1/_generated/favicon/favicon-32x32.png\" media=\"(prefers-color-scheme: light)\">\u003clink data-mint-head rel=\"shortcut icon\" type=\"image/x-icon\" href=\"/mintlify-assets/_mintlify/favicons/stackone-60/vUkZo0TYnLvO23Z1/_generated/favicon/favicon.ico\" media=\"(prefers-color-scheme: light)\">\u003clink data-mint-head rel=\"icon\" type=\"image/png\" sizes=\"192x192\" href=\"/mintlify-assets/_mintlify/favicons/stackone-60/vUkZo0TYnLvO23Z1/_generated/favicon-dark/android-chrome-192x192.png\" media=\"(prefers-color-scheme: dark)\">\u003clink data-mint-head rel=\"icon\" type=\"image/png\" sizes=\"16x16\" href=\"/mintlify-assets/_mintlify/favicons/stackone-60/vUkZo0TYnLvO23Z1/_generated/favicon-dark/favicon-16x16.png\" media=\"(prefers-color-scheme: dark)\">\u003clink data-mint-head rel=\"icon\" type=\"image/png\" sizes=\"32x32\" href=\"/mintlify-assets/_mintlify/favicons/stackone-60/vUkZo0TYnLvO23Z1/_generated/favicon-dark/favicon-32x32.png\" media=\"(prefers-color-scheme: dark)\">\u003clink data-mint-head rel=\"shortcut icon\" type=\"image/x-icon\" href=\"/mintlify-assets/_mintlify/favicons/stackone-60/vUkZo0TYnLvO23Z1/_generated/favicon-dark/favicon.ico\" media=\"(prefers-color-scheme: dark)\">\u003cmeta data-mint-head property=\"og:title\" content=\"ChatGPT - Make StackOne Available - Stackone\">\u003cmeta data-mint-head property=\"og:description\" content=\"Allow your users to connect to work systems with StackOne.\">\u003cmeta data-mint-head property=\"og:site_name\" content=\"Stackone\">\u003cmeta data-mint-head property=\"og:url\" content=\"https://docs.stackone.com/ai-platforms/openai/chatgpt/organization-admin-setup\">\u003cmeta data-mint-head property=\"og:type\" content=\"website\">\u003cmeta data-mint-head property=\"og:image\" content=\"https://stackone-60.mintlify.site/_mintlify/api/og/v2?division=ChatGPT\u0026amp;title=ChatGPT+-+Make+StackOne+Available\u0026amp;description=Allow+your+users+to+connect+to+work+systems+with+StackOne.\u0026amp;theme=26a0c4b0d3b33d43a09092cd\u0026amp;signature=bb177b7dee3288f72b692c4478a3885aa29d63af23f4e029b77514e98056f0c1\">\u003cmeta data-mint-head property=\"og:image:width\" content=\"1200\">\u003cmeta data-mint-head property=\"og:image:height\" content=\"630\">\u003cmeta data-mint-head name=\"twitter:card\" content=\"summary_large_image\">\u003cmeta data-mint-head name=\"twitter:title\" content=\"ChatGPT - Make StackOne Available - Stackone\">\u003cmeta data-mint-head name=\"twitter:description\" content=\"Allow your users to connect to work systems with StackOne.\">\u003cmeta data-mint-head name=\"twitter:image\" content=\"https://stackone-60.mintlify.site/_mintlify/api/og/v2?division=ChatGPT\u0026amp;title=ChatGPT+-+Make+StackOne+Available\u0026amp;description=Allow+your+users+to+connect+to+work+systems+with+StackOne.\u0026amp;theme=26a0c4b0d3b33d43a09092cd\u0026amp;signature=bb177b7dee3288f72b692c4478a3885aa29d63af23f4e029b77514e98056f0c1\">\u003cmeta data-mint-head name=\"twitter:image:width\" content=\"1200\">\u003cmeta data-mint-head name=\"twitter:image:height\" content=\"630\">\u003cmeta data-mint-head name=\"msapplication-config\" content=\"/mintlify-assets/_mintlify/favicons/stackone-60/vUkZo0TYnLvO23Z1/_generated/favicon/browserconfig.xml\">\u003cmeta data-mint-head name=\"apple-mobile-web-app-title\" content=\"Stackone\">\u003cmeta data-mint-head name=\"msapplication-TileColor\" content=\"#068F56\">\u003cmeta data-mint-head name=\"google-site-verification\" content=\"gYj1x4gkdSwpCGVLFVXNVOPQ_wVrePW37ZKJt3HEqys\">\u003clink data-mint-head rel=\"canonical\" href=\"https://docs.stackone.com/ai-platforms/openai/chatgpt/organization-admin-setup\">\u003clink data-mint-head rel=\"alternate\" type=\"application/xml\" href=\"/sitemap.xml\">\u003clink data-mint-head rel=\"alternate\" type=\"text/markdown\" href=\"/ai-platforms/openai/chatgpt/organization-admin-setup.md\">\u003cscript data-mint-head type=\"application/ld+json\">{\"@context\":\"https://schema.org\",\"@graph\":[{\"@type\":\"Organization\",\"@id\":\"https://docs.stackone.com/#organization\",\"name\":\"Stackone\",\"url\":\"https://docs.stackone.com\",\"logo\":{\"@type\":\"ImageObject\",\"url\":\"https://mintcdn.com/stackone-60/WsmKpuoeBZmio9QO/images/logo/logo-light-mode.svg?fit=max\u0026auto=format\u0026n=WsmKpuoeBZmio9QO\u0026q=85\u0026s=f08be9c0a142cb1e7fcaa23910c4bf7f\"}},{\"@type\":\"WebSite\",\"@id\":\"https://docs.stackone.com#website\",\"name\":\"Stackone\",\"url\":\"https://docs.stackone.com\",\"publisher\":{\"@id\":\"https://docs.stackone.com/#organization\"}},{\"@type\":\"WebPage\",\"@id\":\"https://docs.stackone.com/ai-platforms/openai/chatgpt/organization-admin-setup#webpage\",\"url\":\"https://docs.stackone.com/ai-platforms/openai/chatgpt/organization-admin-setup\",\"name\":\"ChatGPT - Make StackOne Available\",\"description\":\"Allow your users to connect to work systems with StackOne.\",\"dateModified\":\"2026-11-13T18:47:57.196Z\",\"isPartOf\":{\"@id\":\"https://docs.stackone.com#website\"},\"breadcrumb\":{\"@id\":\"https://docs.stackone.com/ai-platforms/openai/chatgpt/organization-admin-setup#breadcrumb\"}},{\"@type\":\"BreadcrumbList\",\"@id\":\"https://docs.stackone.com/ai-platforms/openai/chatgpt/organization-admin-setup#breadcrumb\",\"itemListElement\":[{\"@type\":\"ListItem\",\"position\":1,\"name\":\"Stackone\",\"item\":\"https://docs.stackone.com\"},{\"@type\":\"ListItem\",\"position\":2,\"name\":\"ChatGPT - Make StackOne Available\",\"item\":\"https://docs.stackone.com/ai-platforms/openai/chatgpt/organization-admin-setup\"}]},{\"@type\":[\"Article\",\"TechArticle\"],\"@id\":\"https://docs.stackone.com/ai-platforms/openai/chatgpt/organization-admin-setup#article\",\"headline\":\"ChatGPT - Make StackOne Available\",\"name\":\"ChatGPT - Make StackOne Available\",\"description\":\"Allow your users to connect to work systems with StackOne.\",\"url\":\"https://docs.stackone.com/ai-platforms/openai/chatgpt/organization-admin-setup\",\"mainEntityOfPage\":{\"@id\":\"https://docs.stackone.com/ai-platforms/openai/chatgpt/organization-admin-setup#webpage\"},\"dateModified\":\"2026-11-13T18:47:57.196Z\",\"keywords\":\"ChatGPT, ChatGPT Business, ChatGPT Enterprise, ChatGPT Edu, custom MCP server, plugin, workspace, publish app\",\"publisher\":{\"@id\":\"https://docs.stackone.com/#organization\"},\"isPartOf\":{\"@id\":\"https://docs.stackone.com#website\"}}]}\u003c/script>\u003cscript data-mint-head type=\"application/ld+json\">{\"@context\":\"https://schema.org\",\"@type\":\"WebSite\",\"name\":\"Stackone\",\"publisher\":{\"@type\":\"Organization\",\"name\":\"Stackone\"},\"provider\":{\"@type\":\"Organization\",\"name\":\"Mintlify\",\"url\":\"https://mintlify.com\"}}\u003c/script>","agentPointerHref":"/ai-platforms/openai/chatgpt/organization-admin-setup.md","siteName":"Stackone","nav":{"global":null,"tabs":[{"tab":"Gateway","icon":"rocket","pages":[{"title":"Gateway","href":"/introduction"}]},{"tab":"AI Platforms","icon":"robot","dropdowns":[{"dropdown":"All platforms","icon":"server","description":"Connect any MCP client","groups":[{"group":"Get Started","pages":[{"title":"AI Platforms","sidebarTitle":"Overview","href":"/ai-platforms/overview"},{"title":"StackOne MCP Server","sidebarTitle":"How the MCP Server Works","href":"/ai-platforms/mcp-server"}]}]},{"dropdown":"Anthropic (Claude)","icon":"https://mintlify.s3.us-west-1.amazonaws.com/stackone-60/images/mcp/logos/claude.svg","description":"Claude Chat, Cowork and Claude Code","groups":[{"group":"Anthropic (Claude)","pages":[{"title":"Anthropic (Claude)","sidebarTitle":"Overview","href":"/ai-platforms/anthropic/overview"},{"title":"Claude - Make StackOne Available","sidebarTitle":"Organization Admin Setup","href":"/ai-platforms/anthropic/organization-admin-setup"},{"group":"Claude Chat \u0026 Cowork","expanded":true,"pages":[{"title":"Claude Chat \u0026 Cowork - Connect StackOne","sidebarTitle":"Organization User Setup","href":"/ai-platforms/anthropic/claude-chat-cowork/organization-user-setup"},{"title":"Claude Chat \u0026 Cowork - Connect StackOne","sidebarTitle":"Personal Setup","href":"/ai-platforms/anthropic/claude-chat-cowork/personal-setup"}]},{"group":"Claude Code","expanded":true,"pages":[{"title":"Claude Code - Connect StackOne","sidebarTitle":"Organization User Setup","href":"/ai-platforms/anthropic/claude-code/organization-user-setup"},{"title":"Claude Code - Connect StackOne","sidebarTitle":"Personal Setup","href":"/ai-platforms/anthropic/claude-code/personal-setup"}]}]}]},{"dropdown":"AWS","icon":"aws","description":"Amazon Quick","groups":[{"group":"AWS","pages":[{"title":"AWS","sidebarTitle":"Overview","href":"/ai-platforms/aws/overview"}]},{"group":"Amazon Quick","pages":[{"title":"Amazon Quick - Make StackOne Available","sidebarTitle":"Organization Admin Setup","href":"/ai-platforms/aws/amazon-quick/organization-admin-setup"},{"title":"Amazon Quick - Connect StackOne","sidebarTitle":"Organization User Setup","href":"/ai-platforms/aws/amazon-quick/organization-user-setup"},{"title":"Amazon Quick - Connect StackOne","sidebarTitle":"Personal Setup","href":"/ai-platforms/aws/amazon-quick/personal-setup"}]}]},{"dropdown":"Cursor","icon":"arrow-pointer","description":"Cursor editor","groups":[{"group":"Cursor","pages":[{"title":"Cursor","sidebarTitle":"Overview","href":"/ai-platforms/cursor/overview"},{"title":"Cursor - Connect StackOne","sidebarTitle":"Organization User Setup","href":"/ai-platforms/cursor/organization-user-setup"},{"title":"Cursor - Connect StackOne","sidebarTitle":"Personal Setup","href":"/ai-platforms/cursor/personal-setup"}]}]},{"dropdown":"Dust","icon":"https://mintlify.s3.us-west-1.amazonaws.com/stackone-60/images/mcp/logos/dust.png","description":"Dust assistants and agents","groups":[{"group":"Dust","pages":[{"title":"Dust","sidebarTitle":"Overview","href":"/ai-platforms/dust/overview"},{"title":"Dust - Connect StackOne","sidebarTitle":"Organization User Setup","href":"/ai-platforms/dust/connect-stackone"}]}]},{"dropdown":"Glean","icon":"https://mintlify.s3.us-west-1.amazonaws.com/stackone-60/images/mcp/logos/glean.png","description":"Glean Agents and Glean Assistant","groups":[{"group":"Glean","pages":[{"title":"Glean","sidebarTitle":"Overview","href":"/ai-platforms/glean/overview"},{"title":"Glean - Make StackOne Available","sidebarTitle":"Organization Admin Setup","href":"/ai-platforms/glean/organization-admin-setup"},{"group":"Glean Agents","expanded":true,"pages":[{"title":"Glean Agents - Connect StackOne","sidebarTitle":"Agent Builder Setup","href":"/ai-platforms/glean/glean-agents/agent-builder-setup"}]},{"group":"Glean Assistant","expanded":true,"pages":[{"title":"Glean Assistant - Connect StackOne","sidebarTitle":"Organization User Setup","href":"/ai-platforms/glean/glean-assistant/organization-user-setup"}]}]}]},{"dropdown":"Google","icon":"google","description":"Gemini CLI and Gemini Enterprise","groups":[{"group":"Google","pages":[{"title":"Google","sidebarTitle":"Overview","href":"/ai-platforms/google/overview"}]},{"group":"Gemini CLI","pages":[{"title":"Gemini CLI - Connect StackOne","sidebarTitle":"Personal Setup","href":"/ai-platforms/google/gemini-cli/connect-stackone"}]},{"group":"Gemini Enterprise","pages":[{"title":"Gemini Enterprise - Connect StackOne","sidebarTitle":"Organization User Setup","href":"/ai-platforms/google/gemini-enterprise/connect-stackone"}]}]},{"dropdown":"Goose","icon":"https://mintlify.s3.us-west-1.amazonaws.com/stackone-60/images/mcp/logos/goose.png","description":"Goose CLI and Desktop","groups":[{"group":"Goose","pages":[{"title":"Goose","sidebarTitle":"Overview","href":"/ai-platforms/goose/overview"},{"title":"Goose - Connect StackOne","sidebarTitle":"Personal Setup","href":"/ai-platforms/goose/connect-stackone"}]}]},{"dropdown":"LangChain","icon":"https://mintlify.s3.us-west-1.amazonaws.com/stackone-60/images/mcp/logos/langchain.svg","description":"LangSmith Fleet","groups":[{"group":"LangChain","pages":[{"title":"LangChain","sidebarTitle":"Overview","href":"/ai-platforms/langchain/overview"}]},{"group":"LangSmith Fleet","pages":[{"title":"LangSmith Fleet - Connect StackOne","sidebarTitle":"User Setup","href":"/ai-platforms/langchain/langsmith-fleet/user-setup"}]}]},{"dropdown":"Microsoft","icon":"microsoft","description":"GitHub Copilot and Microsoft 365 Copilot","groups":[{"group":"Microsoft","pages":[{"title":"Microsoft","sidebarTitle":"Overview","href":"/ai-platforms/microsoft/overview"}]},{"group":"GitHub Copilot","pages":[{"title":"GitHub Copilot CLI - Connect StackOne","sidebarTitle":"Copilot CLI User Setup","href":"/ai-platforms/microsoft/github-copilot/copilot-cli"},{"title":"GitHub Copilot in VS Code - Connect StackOne","sidebarTitle":"VS Code User Setup","href":"/ai-platforms/microsoft/github-copilot/vs-code"}]},{"group":"Microsoft 365 Copilot","pages":[{"title":"Microsoft 365 Copilot - Connect StackOne","sidebarTitle":"Organization User Setup","href":"/ai-platforms/microsoft/microsoft-365-copilot/connect-stackone"}]}]},{"dropdown":"n8n","icon":"https://mintlify.s3.us-west-1.amazonaws.com/stackone-60/images/mcp/logos/n8n.png","description":"n8n workflows","groups":[{"group":"n8n","pages":[{"title":"n8n","sidebarTitle":"Overview","href":"/ai-platforms/n8n/overview"},{"title":"n8n - Connect StackOne","sidebarTitle":"Personal Setup","href":"/ai-platforms/n8n/connect-stackone"}]}]},{"dropdown":"OpenAI","icon":"https://mintlify.s3.us-west-1.amazonaws.com/stackone-60/images/agents/openai-logo.svg","description":"ChatGPT and Codex","groups":[{"group":"OpenAI","pages":[{"title":"OpenAI","sidebarTitle":"Overview","description":"Connect your work systems to OpenAI's ecosystem with StackOne.","href":"/ai-platforms/openai/overview"}]},{"group":"ChatGPT","pages":[{"title":"ChatGPT - Make StackOne Available","sidebarTitle":"Organization Admin Setup","href":"/ai-platforms/openai/chatgpt/organization-admin-setup"},{"title":"ChatGPT - Connect StackOne","sidebarTitle":"Organization User Setup","description":"Use the StackOne plugin to connect your work systems to ChatGPT.","href":"/ai-platforms/openai/chatgpt/organization-user-setup"},{"title":"ChatGPT - Connect StackOne","sidebarTitle":"Personal Setup","href":"/ai-platforms/openai/chatgpt/personal-setup"}]},{"group":"Codex","pages":[{"title":"Codex - Connect StackOne","sidebarTitle":"Personal Setup","href":"/ai-platforms/openai/codex/connect-stackone"}]}]}]},{"tab":"Connectors","icon":"plug","pages":[{"title":"Connectors","href":"/connectors/introduction"}]},{"tab":"Embed","icon":"cube","pages":[{"title":"Embed","href":"/embed/overview"}]},{"tab":"Platform API","icon":"code","pages":[{"title":"Platform API","href":"/platform-api/overview"}]}]},"basePath":"","title":"ChatGPT - Make StackOne Available - Stackone","buildId":"dpl_5joLUXmnJgwqjrHAS4dxZrQTdxgh","deploymentId":"dpl_5joLUXmnJgwqjrHAS4dxZrQTdxgh","dynamics":["07c022d89b","a74be98ba7"],"chunks":["Frame-B_503rGq.js","DynamicMarkdown-BfddVCX7.js","zoom-image-lightbox-B3yYlvdS.js","lightbox-handle-r17bVUz3.js"]}