> ## Documentation Index
> Fetch the complete documentation index at: https://docs.stackone.com/llms.txt
> Use this file to discover all available pages before exploring further.
# Getting Started with StackOne
> Configure your first connector and connect it to your agent in 5 minutes
 On first login, you'll be prompted to create an organization and project. Once that's done, continue below to start using a connector.
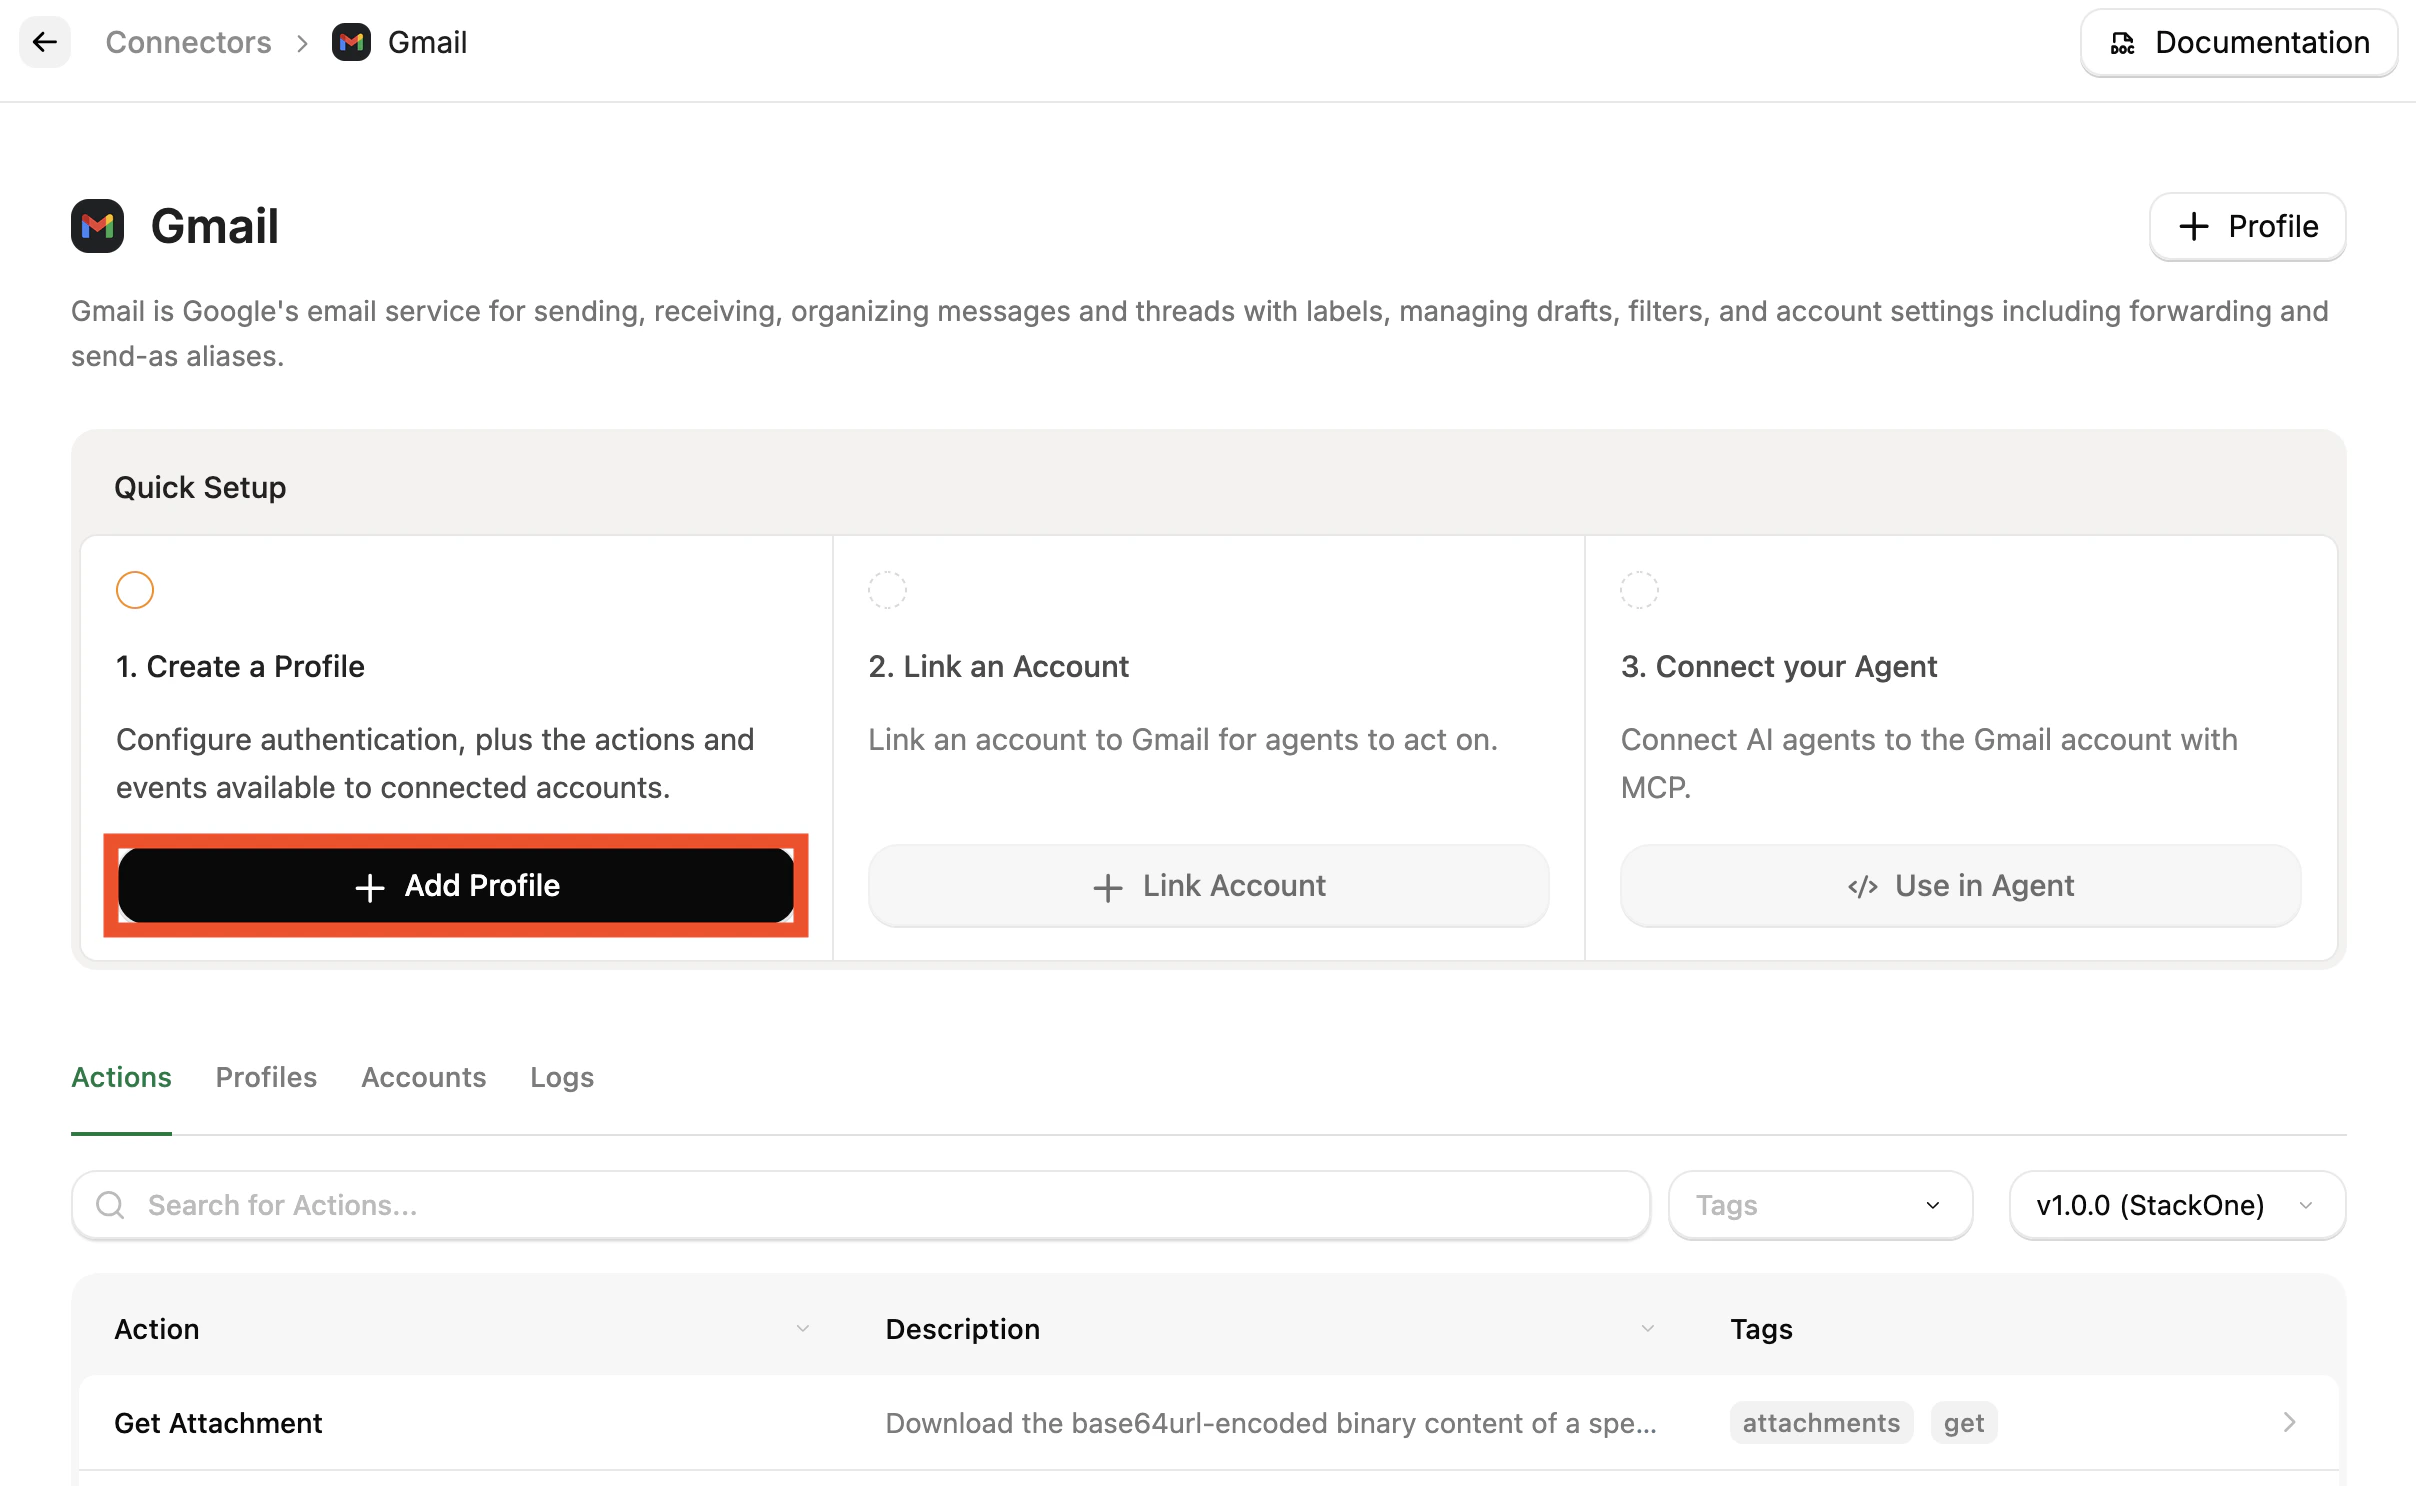
## Configure Connector and Link an Account
Before linking an account, you need to enable and configure a **Connector Profile**. This is used to set up authentication and the actions and/or events you are looking to use.
1. In the [StackOne dashboard](https://app.stackone.com/) sidebar, open **Connectors**
2. Search for a connector you are interested in using (e.g. Zendesk, Gmail, Salesforce) and select it. This will open the **Connector page**.
3. Following the **Quick Setup**, click **Add Profile**. This will open a side panel to configure the profile.
On first login, you'll be prompted to create an organization and project. Once that's done, continue below to start using a connector.
## Configure Connector and Link an Account
Before linking an account, you need to enable and configure a **Connector Profile**. This is used to set up authentication and the actions and/or events you are looking to use.
1. In the [StackOne dashboard](https://app.stackone.com/) sidebar, open **Connectors**
2. Search for a connector you are interested in using (e.g. Zendesk, Gmail, Salesforce) and select it. This will open the **Connector page**.
3. Following the **Quick Setup**, click **Add Profile**. This will open a side panel to configure the profile.
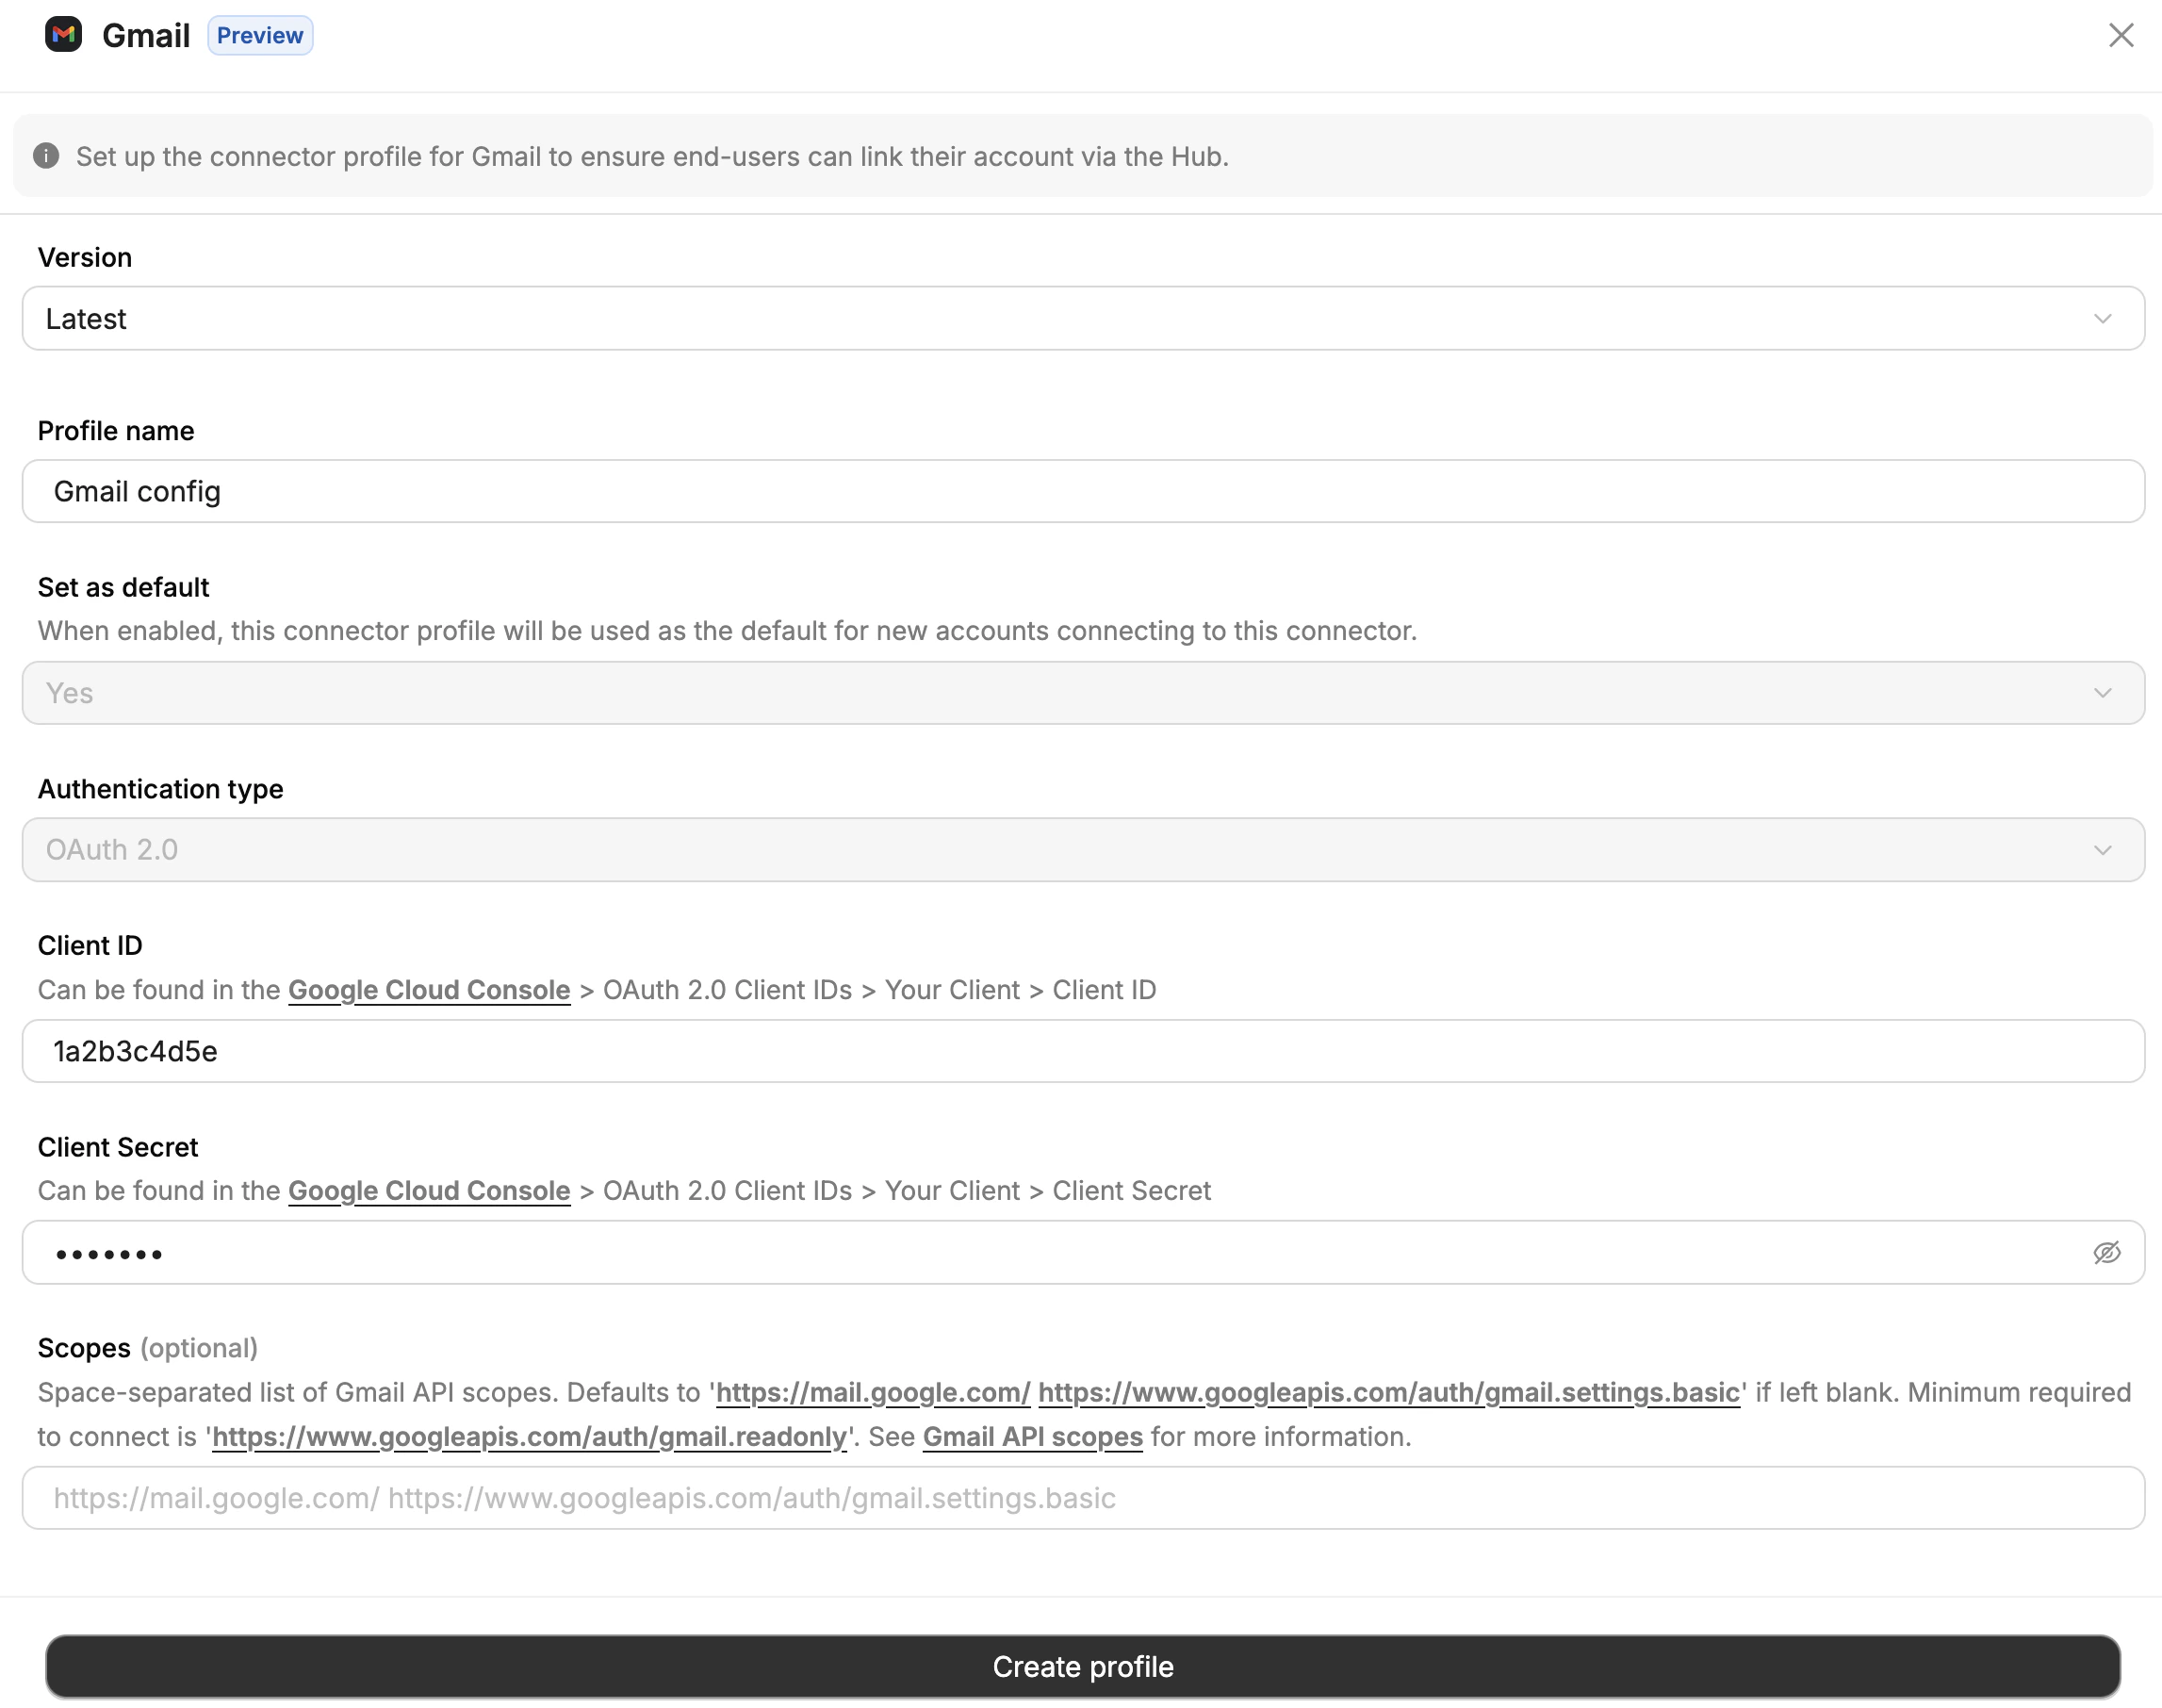
 1. Leave the **Version** at **Latest**.
2. Leave the **Profile name** as the default value.
3. If multiple options exist, choose the **Authentication type** you wish to use.
Depending on the Connector, there may be additional fields to complete (e.g. Client ID, Client Secret, API Key etc.) and/or additional configuration on the provider system. Check the [Connector Guides](/connectors) and follow the relevant Connector Profile guide.
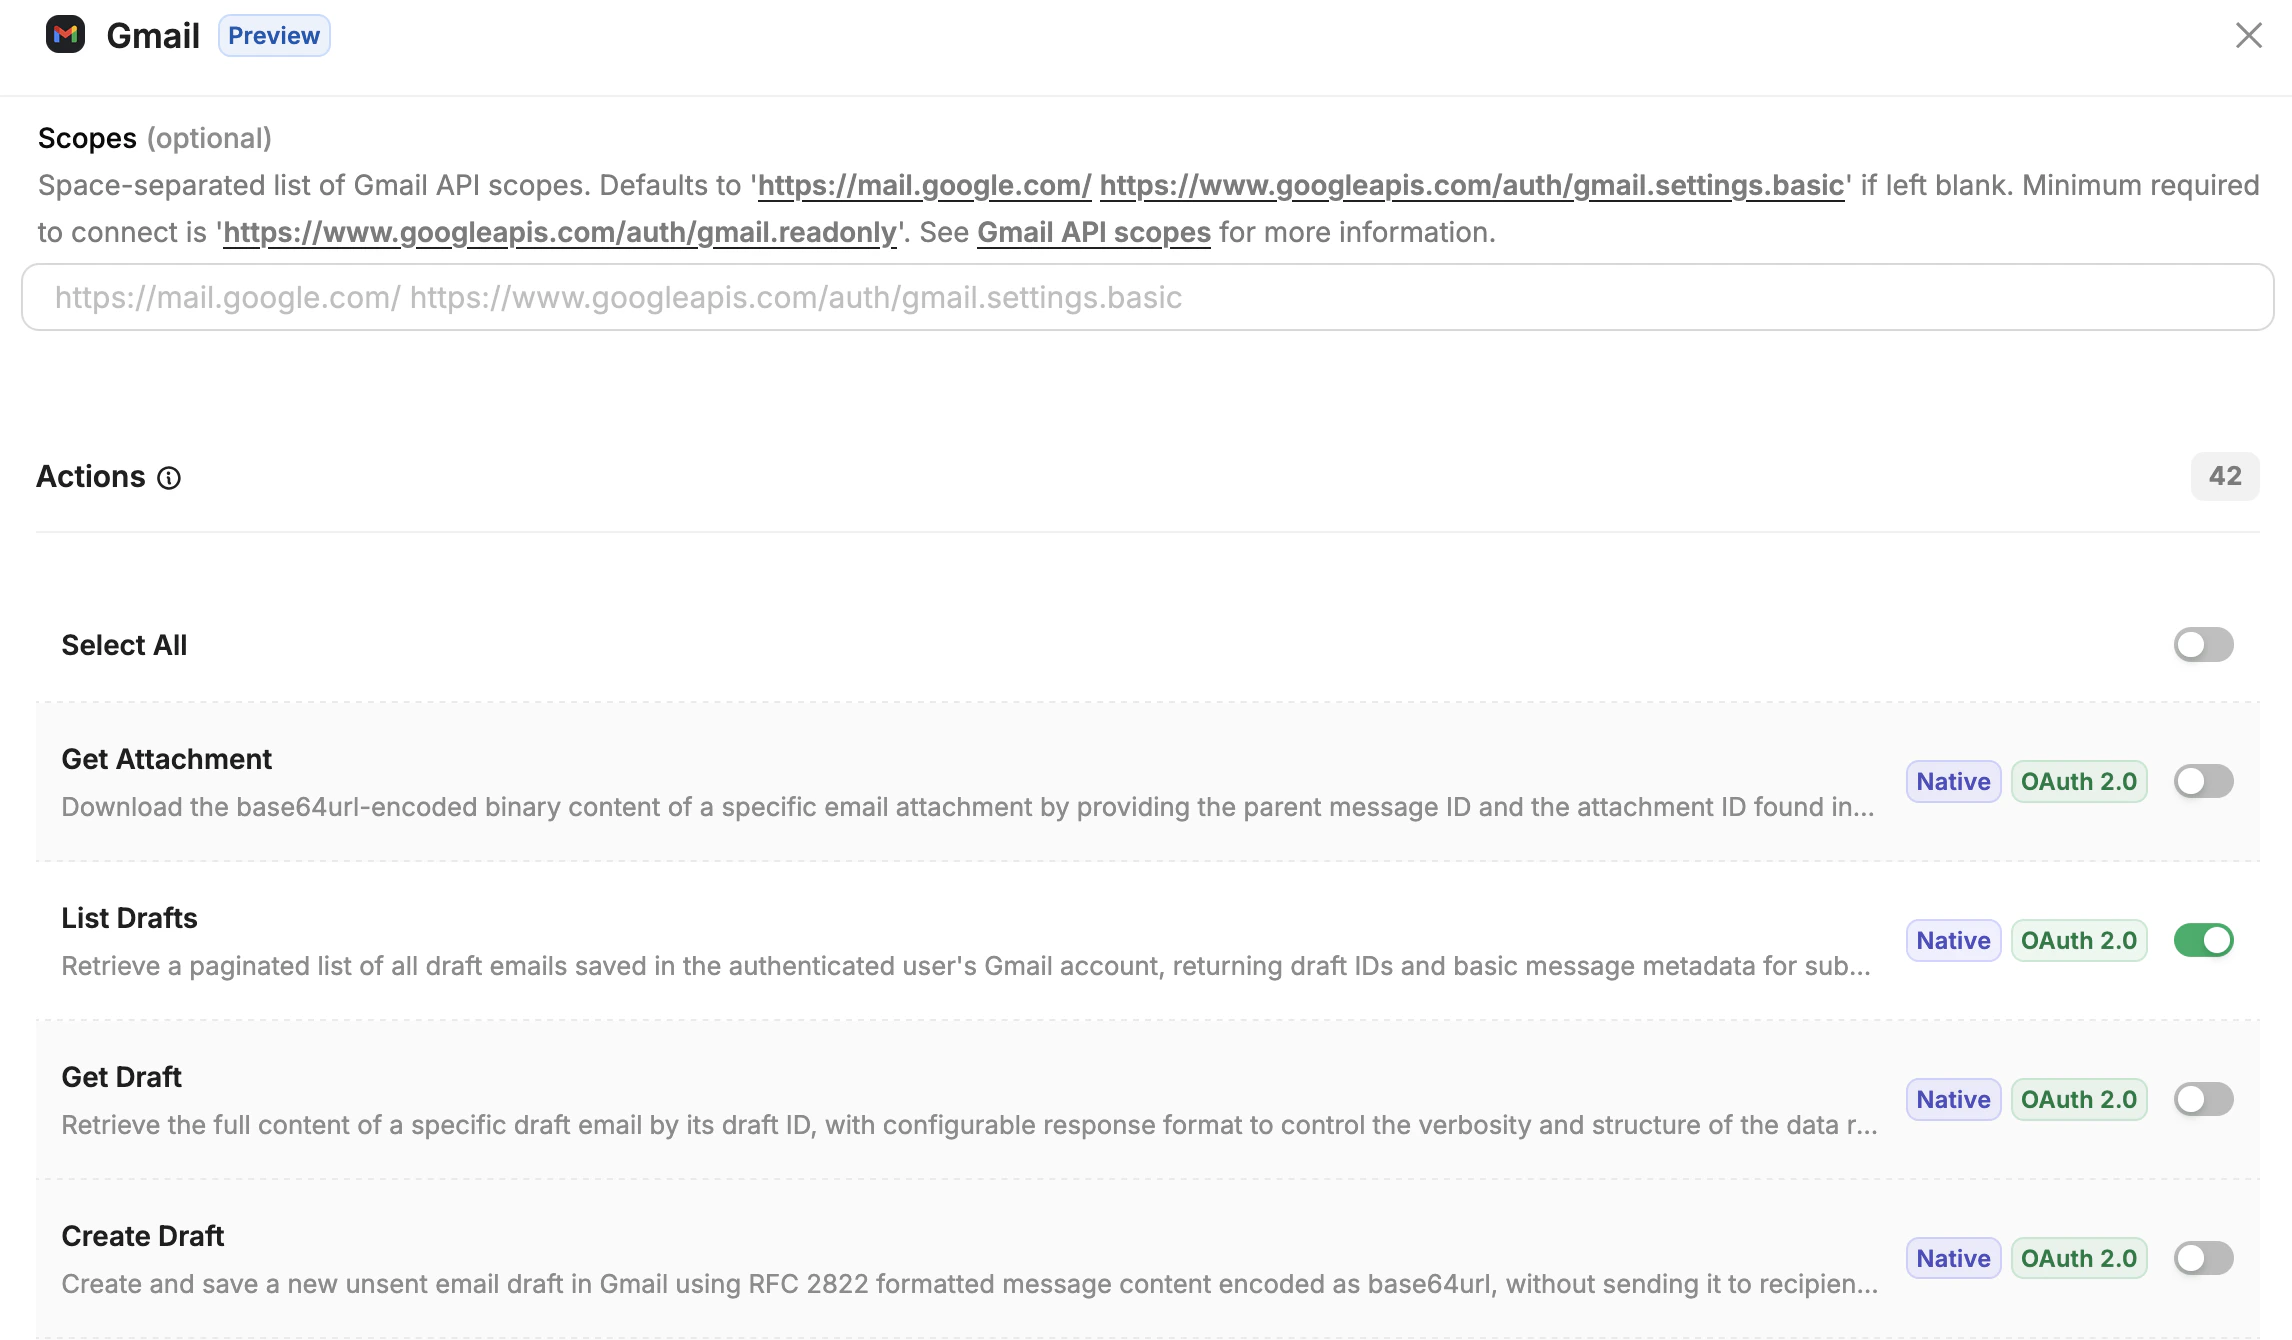
4. For getting started, we recommend deselecting all **Actions** and manually selecting a few read actions to test.
5. Click **Create Profile**. The Connector Profile is now ready to use.
1. Leave the **Version** at **Latest**.
2. Leave the **Profile name** as the default value.
3. If multiple options exist, choose the **Authentication type** you wish to use.
Depending on the Connector, there may be additional fields to complete (e.g. Client ID, Client Secret, API Key etc.) and/or additional configuration on the provider system. Check the [Connector Guides](/connectors) and follow the relevant Connector Profile guide.
4. For getting started, we recommend deselecting all **Actions** and manually selecting a few read actions to test.
5. Click **Create Profile**. The Connector Profile is now ready to use.
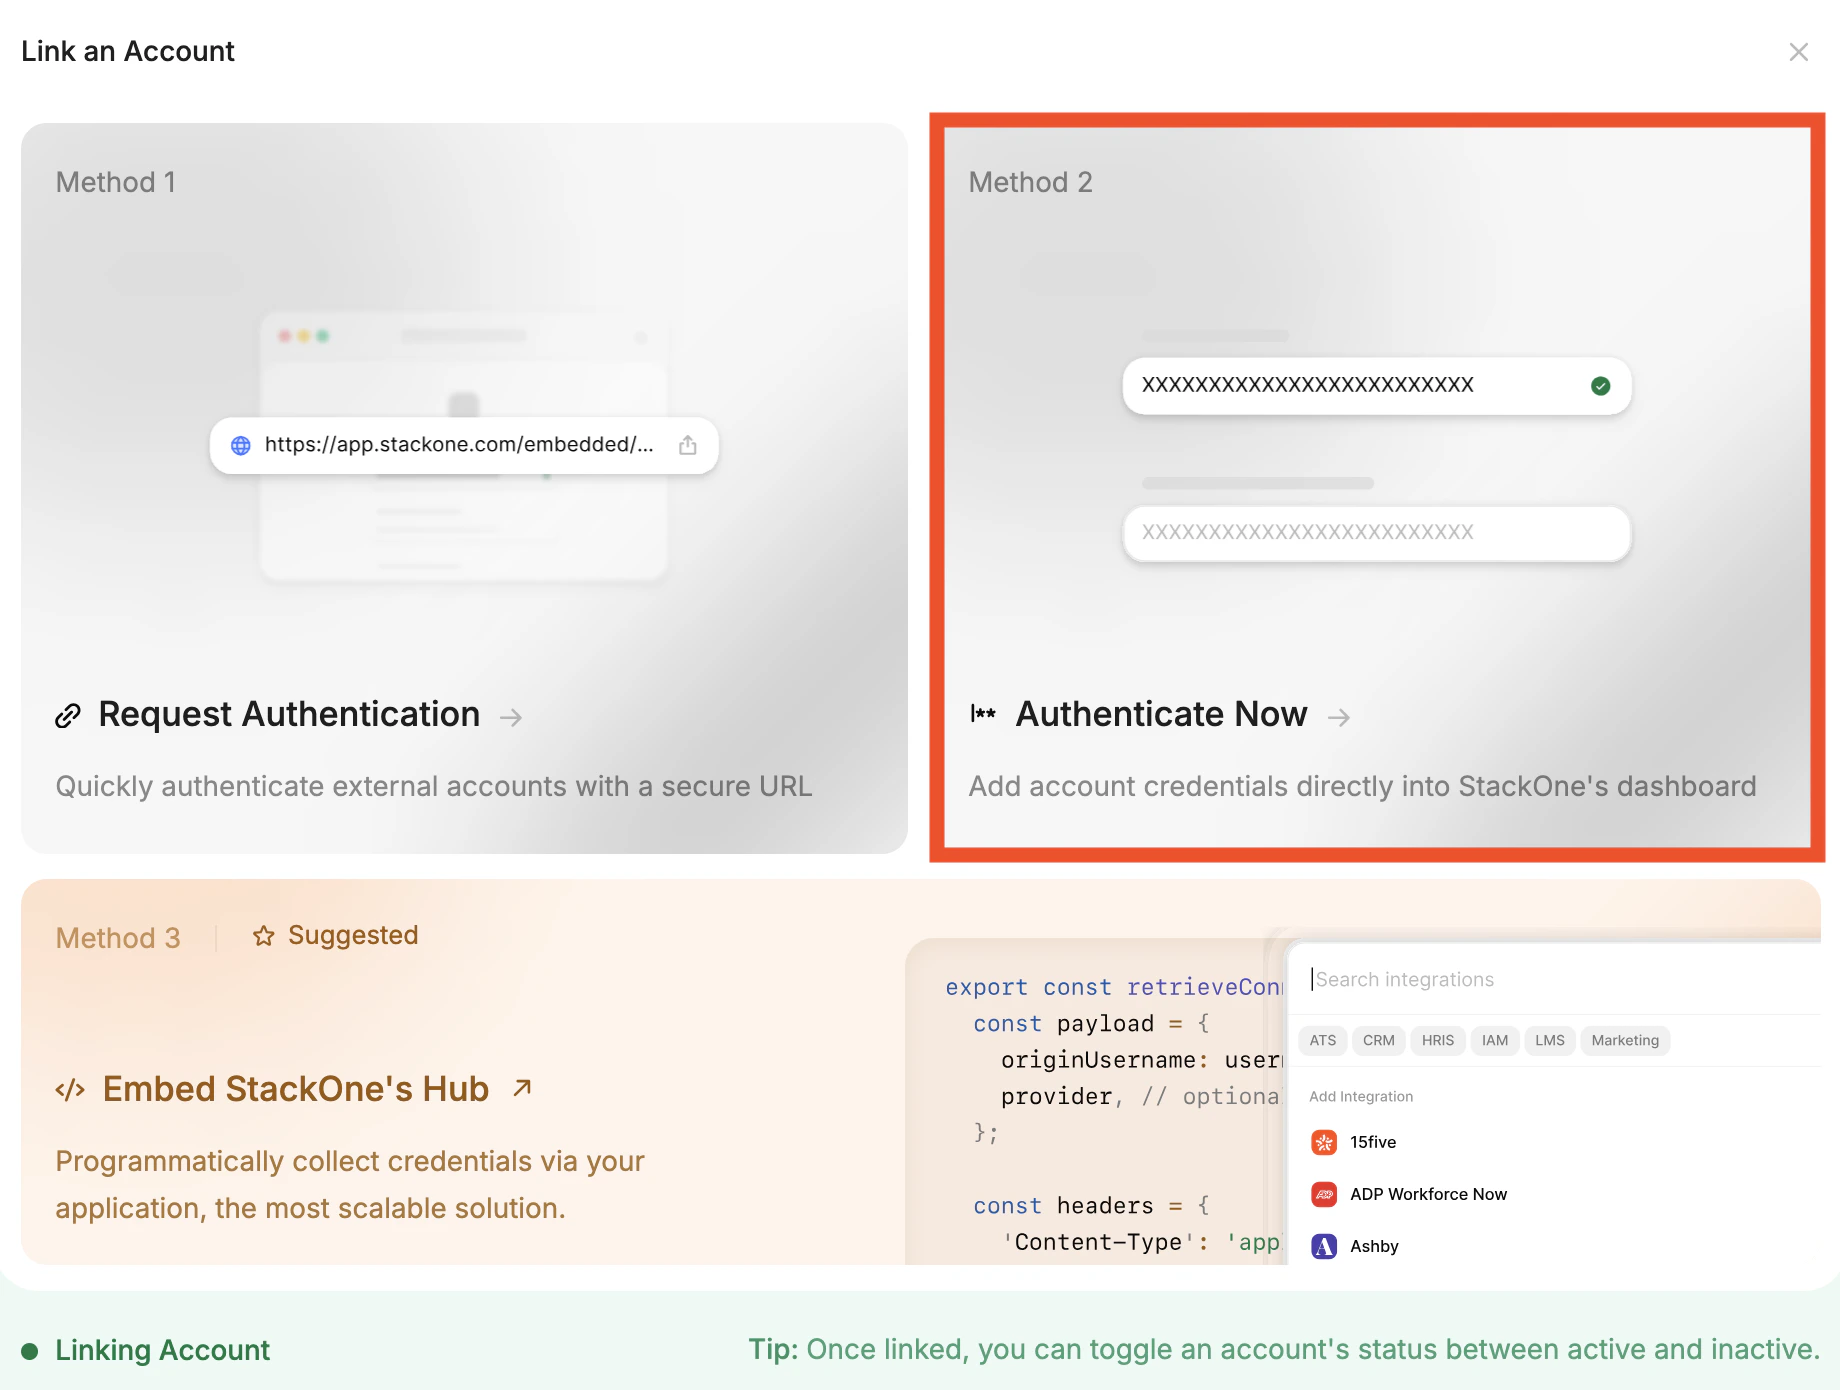
 There are multiple methods for linking an account. In this guide, we'll link one directly through the StackOne dashboard.
1. Following the **Quick Setup**, click the now enabled **Link Account** button. This will open the **Link an Account** popup.
2. Select **Method 2 - Authenticate Now**.
There are multiple methods for linking an account. In this guide, we'll link one directly through the StackOne dashboard.
1. Following the **Quick Setup**, click the now enabled **Link Account** button. This will open the **Link an Account** popup.
2. Select **Method 2 - Authenticate Now**.
 3. On **Enter Origin Owner Details**, leave all as default values and click **Next**.
4. On **Integration Hub Preferences**, confirm the Connector Profile you configured earlier is selected, then click **Next**.
Depending on the Connector there may be additional fields to complete and/or additional configuration on the provider system. Click **Connection Guide** in the top right for more details if needed.
5. Click **Connect**.
6. You may need to complete authentication with the provider (e.g. via OAuth). In this case a new window will pop up prompting you to sign in as needed.
Once authorization is complete, your **Account** will now be linked in StackOne.
## Use the Connector
With a linked account in place, you can now use this Connector in the Agent of your choice. We recommend connecting it to your preferred agent client via **MCP**. You can also call StackOne directly from a TypeScript or Python agent, or an A2A orchestrator. If you just want to sanity-check the connector first, the **Playground** lets you test it without wiring up an agent.
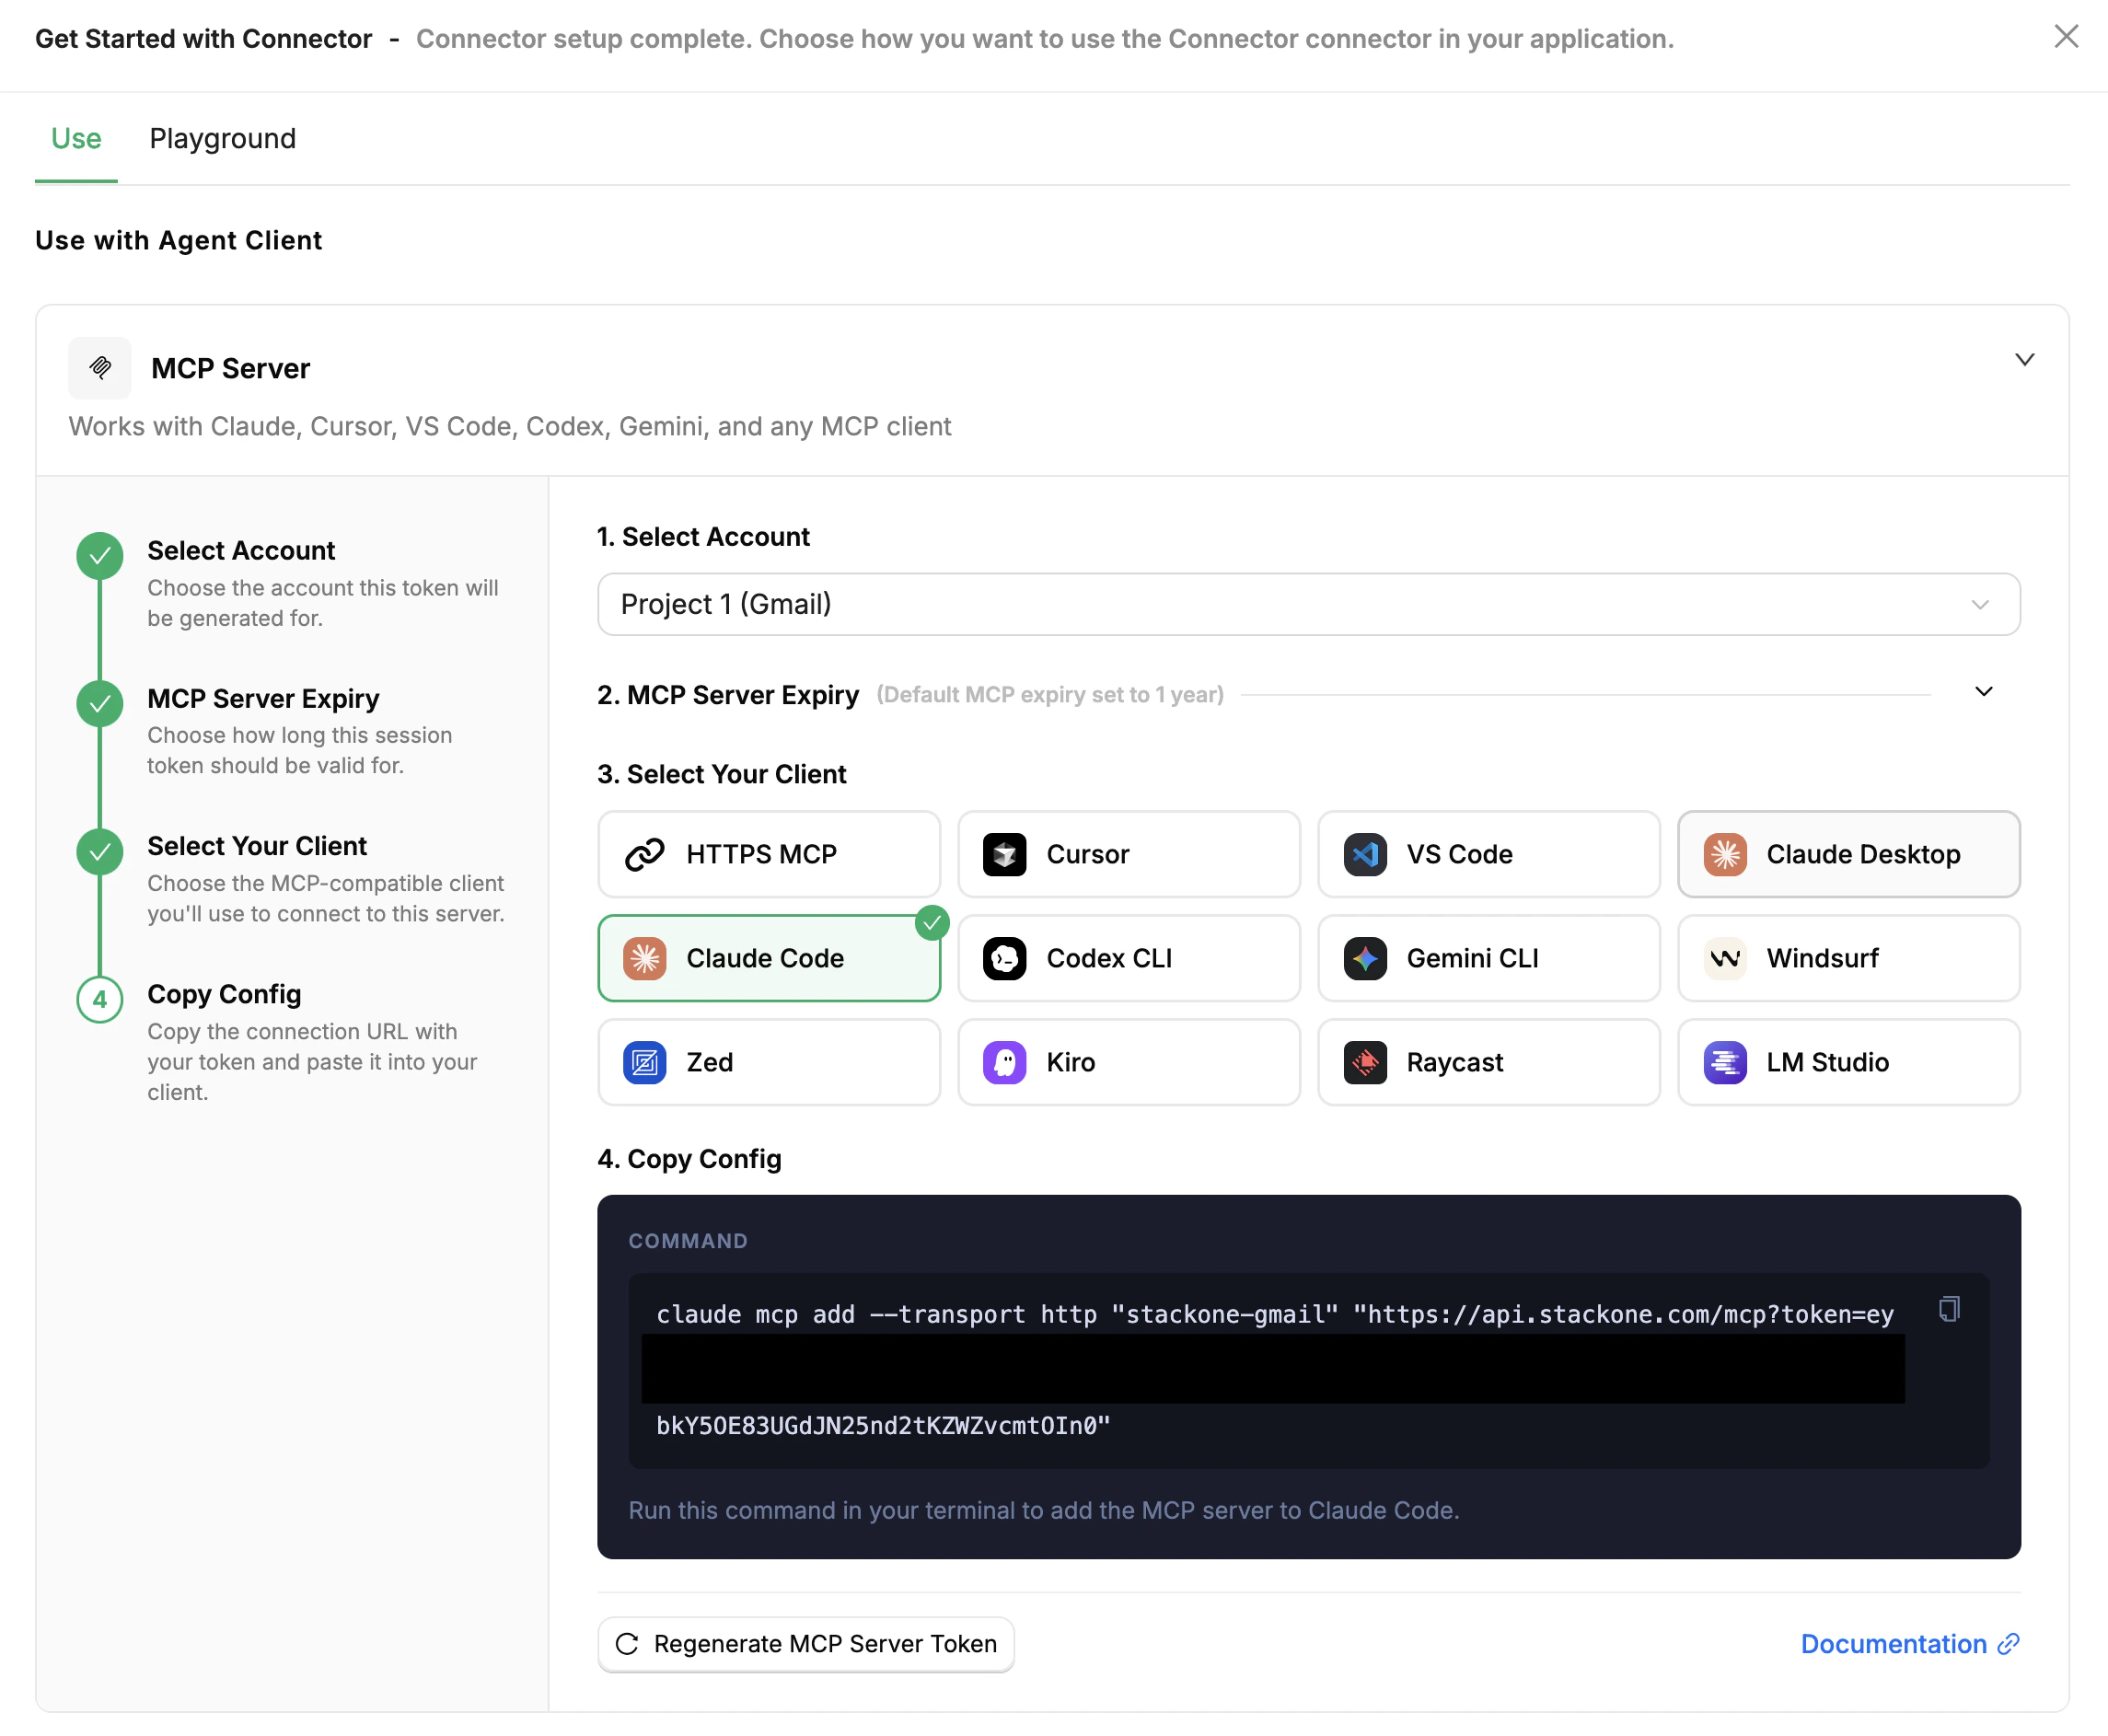
The dashboard generates a ready-to-use MCP server for your linked account.
Following the **Quick Setup**, click the now enabled **Use in Agent** button. This will open the **Use with Agent Client** side panel.
Under **MCP Server** > **Select Account**, choose the account you configured above.
(Optional) Set the MCP Server Expiry. Default is 1 year.
Select the agent client you want to be able to use this Connector.
Further instructions are provided for most major platforms, otherwise the **HTTPS MCP** option reveals the URL that can be used in other MCP-compatible clients that support Streamable HTTP.
Once the agent client confirms the connection, try a prompt like `"What tools can I use?"` or `"List the latest 5 records"` to verify the Connector is working.
3. On **Enter Origin Owner Details**, leave all as default values and click **Next**.
4. On **Integration Hub Preferences**, confirm the Connector Profile you configured earlier is selected, then click **Next**.
Depending on the Connector there may be additional fields to complete and/or additional configuration on the provider system. Click **Connection Guide** in the top right for more details if needed.
5. Click **Connect**.
6. You may need to complete authentication with the provider (e.g. via OAuth). In this case a new window will pop up prompting you to sign in as needed.
Once authorization is complete, your **Account** will now be linked in StackOne.
## Use the Connector
With a linked account in place, you can now use this Connector in the Agent of your choice. We recommend connecting it to your preferred agent client via **MCP**. You can also call StackOne directly from a TypeScript or Python agent, or an A2A orchestrator. If you just want to sanity-check the connector first, the **Playground** lets you test it without wiring up an agent.
The dashboard generates a ready-to-use MCP server for your linked account.
Following the **Quick Setup**, click the now enabled **Use in Agent** button. This will open the **Use with Agent Client** side panel.
Under **MCP Server** > **Select Account**, choose the account you configured above.
(Optional) Set the MCP Server Expiry. Default is 1 year.
Select the agent client you want to be able to use this Connector.
Further instructions are provided for most major platforms, otherwise the **HTTPS MCP** option reveals the URL that can be used in other MCP-compatible clients that support Streamable HTTP.
Once the agent client confirms the connection, try a prompt like `"What tools can I use?"` or `"List the latest 5 records"` to verify the Connector is working.
 Client-specific setup for Claude, Cursor, n8n, Vercel AI, and more
For OpenAI Agents SDK, Vercel AI SDK, or a custom TypeScript agent.
In the dashboard sidebar, open **Project Settings → API Keys**, click **Create API Key**, give it a name (e.g. `local-dev`), and copy the key — it's only shown once.
The StackOne API key authenticates your application against StackOne and is separate from any provider credentials in the Connector Profile.
Or start with [Installation](/agents/typescript/installation) and [Basic Usage](/agents/typescript/basic-usage) for a custom setup.
For LangChain, LangGraph, CrewAI, OpenAI Agents SDK, Pydantic AI, or a custom Python agent.
In the dashboard sidebar, open **Project Settings → API Keys**, click **Create API Key**, give it a name (e.g. `local-dev`), and copy the key — it's only shown once.
The StackOne API key authenticates your application against StackOne and is separate from any provider credentials in the Connector Profile.
Or start with [Installation](/agents/python/installation) and [Basic Usage](/agents/python/basic-usage) for a custom setup.
For Google ADK, AG2, BeeAI, or any other A2A-aware orchestrator over the Agent-to-Agent protocol.
In the dashboard sidebar, open **Project Settings → API Keys**, click **Create API Key**, give it a name (e.g. `local-dev`), and copy the key — it's only shown once.
The StackOne API key authenticates your application against StackOne and is separate from any provider credentials in the Connector Profile.
Or see the [A2A Quickstart](/a2a/quickstart) for the agent card URL, message format, and headers.
The [AI Playground](/guides/playground) lets you test actions with natural language directly in the dashboard without having your own agent client.
In the dashboard sidebar, open **Playground**.
1. In the **Configure** panel, click **Manage Action Sources**.
2. Select the Account you previously linked.
3. Click **Done**.
Try a prompt like `"What tools can I use?"` or `"List the latest 5 records"`.
You should be able to see the tool calls and responses from the agent, and provide follow-up prompts.
Available models, debugging tool calls, and Playground limits
Side-by-side comparison of MCP, SDKs, and A2A with worked examples.
***
## What's Next?
Understand projects, connectors, actions, and accounts
Let end-users connect their accounts
Monitor linked accounts and connection health
See all 200+ supported providers
Client-specific setup for Claude, Cursor, n8n, Vercel AI, and more
For OpenAI Agents SDK, Vercel AI SDK, or a custom TypeScript agent.
In the dashboard sidebar, open **Project Settings → API Keys**, click **Create API Key**, give it a name (e.g. `local-dev`), and copy the key — it's only shown once.
The StackOne API key authenticates your application against StackOne and is separate from any provider credentials in the Connector Profile.
Or start with [Installation](/agents/typescript/installation) and [Basic Usage](/agents/typescript/basic-usage) for a custom setup.
For LangChain, LangGraph, CrewAI, OpenAI Agents SDK, Pydantic AI, or a custom Python agent.
In the dashboard sidebar, open **Project Settings → API Keys**, click **Create API Key**, give it a name (e.g. `local-dev`), and copy the key — it's only shown once.
The StackOne API key authenticates your application against StackOne and is separate from any provider credentials in the Connector Profile.
Or start with [Installation](/agents/python/installation) and [Basic Usage](/agents/python/basic-usage) for a custom setup.
For Google ADK, AG2, BeeAI, or any other A2A-aware orchestrator over the Agent-to-Agent protocol.
In the dashboard sidebar, open **Project Settings → API Keys**, click **Create API Key**, give it a name (e.g. `local-dev`), and copy the key — it's only shown once.
The StackOne API key authenticates your application against StackOne and is separate from any provider credentials in the Connector Profile.
Or see the [A2A Quickstart](/a2a/quickstart) for the agent card URL, message format, and headers.
The [AI Playground](/guides/playground) lets you test actions with natural language directly in the dashboard without having your own agent client.
In the dashboard sidebar, open **Playground**.
1. In the **Configure** panel, click **Manage Action Sources**.
2. Select the Account you previously linked.
3. Click **Done**.
Try a prompt like `"What tools can I use?"` or `"List the latest 5 records"`.
You should be able to see the tool calls and responses from the agent, and provide follow-up prompts.
Available models, debugging tool calls, and Playground limits
Side-by-side comparison of MCP, SDKs, and A2A with worked examples.
***
## What's Next?
Understand projects, connectors, actions, and accounts
Let end-users connect their accounts
Monitor linked accounts and connection health
See all 200+ supported providers