> ## Documentation Index
> Fetch the complete documentation index at: https://docs.stackone.com/llms.txt
> Use this file to discover all available pages before exploring further.

# Wistia Webhook Setup Guide

> Configure Wistia to deliver events to StackOne.

## Prerequisites

Before continuing, you should have already completed the following for this connector:

<Steps>
  <Step title="Configure the Connector">
    Enable the connector and set up its connector profile in your project. See <a href="/guides/explore-connectors">Managing Connectors</a>.

    <Columns cols={2}>
      <Card title="Connector Profile" href="/connectors/wistia/guides/connector-profile/oauth-2-0" icon="https://stackone-logos.com/api/wistia/filled/png" horizontal>
        Wistia - OAuth 2.0
      </Card>

      <Card title="Connector Profile" href="/connectors/wistia/guides/connector-profile/api-token" icon="https://stackone-logos.com/api/wistia/filled/png" horizontal>
        Wistia - API Token
      </Card>
    </Columns>
  </Step>

  <Step title="Link an Account">
    Connect an account using <a href="/guides/embedding-stackone-hub">StackOne Hub</a> or <a href="/guides/auth-link">Auth Link</a>.

    <Columns cols={2}>
      <Card title="Link Account" href="/connectors/wistia/guides/link-account/oauth-2-0" icon="https://stackone-logos.com/api/wistia/filled/png" horizontal>
        Wistia - OAuth 2.0
      </Card>

      <Card title="Link Account" href="/connectors/wistia/guides/link-account/api-token" icon="https://stackone-logos.com/api/wistia/filled/png" horizontal>
        Wistia - API Token
      </Card>
    </Columns>
  </Step>
</Steps>

<section data-guide-section data-guide-scopes="">
  <h2>Copy your Native Webhook URL</h2>

  <p>The Native Webhook URL is the endpoint Wistia sends events to. It is generated per connection and shown on the connected account.</p>

  <ul>
    <li>Open the connected Wistia account in StackOne Hub.</li>
    <li>Copy the read-only <strong>Native Webhook URL</strong> value.</li>
    <li>Note: This URL is only available after the account has been connected.</li>
  </ul>
</section>

<section data-guide-section data-guide-scopes="">
  <h2>Open Webhooks in Wistia</h2>

  <p>Wistia webhooks are managed under your account settings.</p>

  <Steps>
    <Step title="Sign in to Wistia">
      <div data-guide-step data-guide-scopes="" data-guide-display-scopes-list="">
        <p>Sign in to your <a href="https://wistia.com" target="_blank" rel="noopener noreferrer">Wistia account</a>.</p>
      </div>
    </Step>

    <Step title="Open the Webhooks settings">
      <div data-guide-step data-guide-scopes="" data-guide-display-scopes-list="">
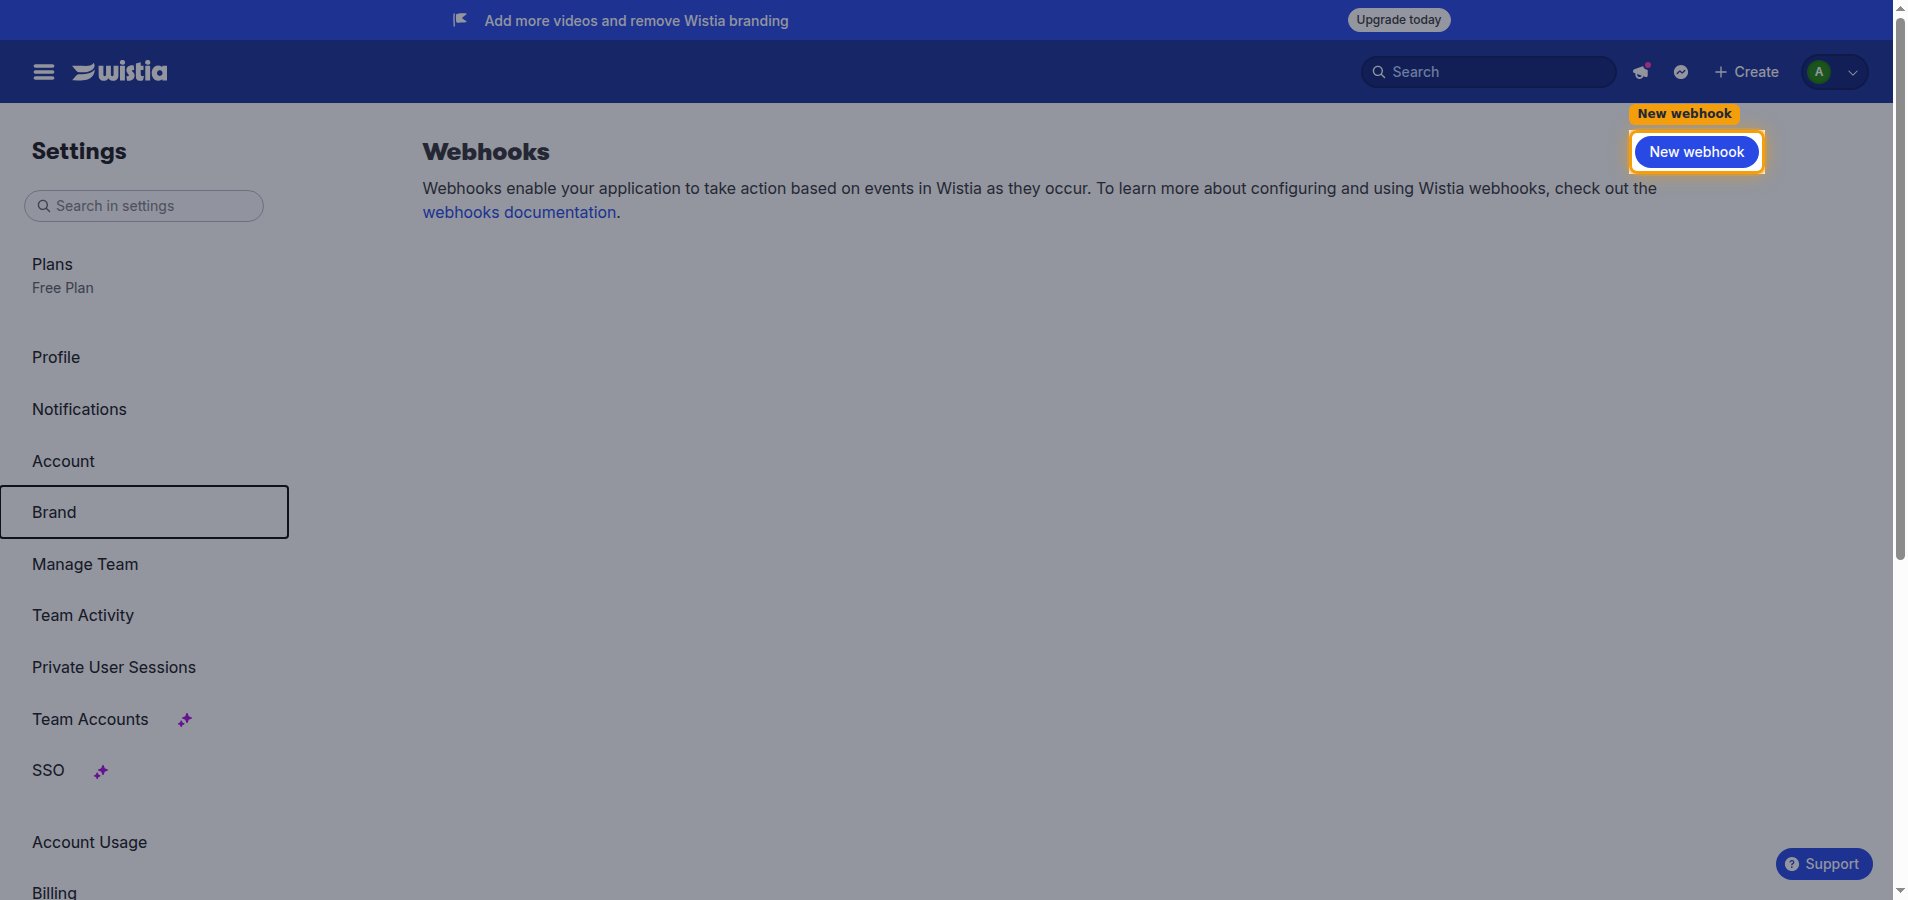
        <p>Click your account avatar in the top-right corner and select <strong>Settings</strong>, then in the left <strong>Settings</strong> sidebar click <strong>Webhooks</strong> (listed below <strong>API Home</strong>).</p>

        <ul>
          <li>You can also go straight to the page at `https://<your-account>.wistia.com/account/webhooks`.</li>
        </ul>

        <img src="https://mintcdn.com/stackone-60/YpgnCYsJe-oUn9mO/connectors/wistia/images/events-webhooks-page.png?fit=max&auto=format&n=YpgnCYsJe-oUn9mO&q=85&s=0adc671fd4d0603bf04e3f6da9059bae" alt="The Wistia Settings sidebar and Webhooks page with the New webhook button." width="1908" height="900" data-path="connectors/wistia/images/events-webhooks-page.png" />
      </div>
    </Step>

    <Step title="Create a new webhook">
      <div data-guide-step data-guide-scopes="" data-guide-display-scopes-list="">
        <p>Click <strong>New webhook</strong> to open the webhook configuration form.</p>

        <img src="https://mintcdn.com/stackone-60/YpgnCYsJe-oUn9mO/connectors/wistia/images/events-webhooks-page.png?fit=max&auto=format&n=YpgnCYsJe-oUn9mO&q=85&s=0adc671fd4d0603bf04e3f6da9059bae" alt="The Webhooks page with the New webhook button highlighted." width="1908" height="900" data-path="connectors/wistia/images/events-webhooks-page.png" />
      </div>
    </Step>
  </Steps>
</section>

<section data-guide-section data-guide-scopes="">
  <h2>Configure and save the webhook</h2>

  <p>Enter the StackOne endpoint, set a secret, and choose which events to receive.</p>

  <Steps>
    <Step title="Paste the Native Webhook URL">
      <div data-guide-step data-guide-scopes="" data-guide-display-scopes-list="">
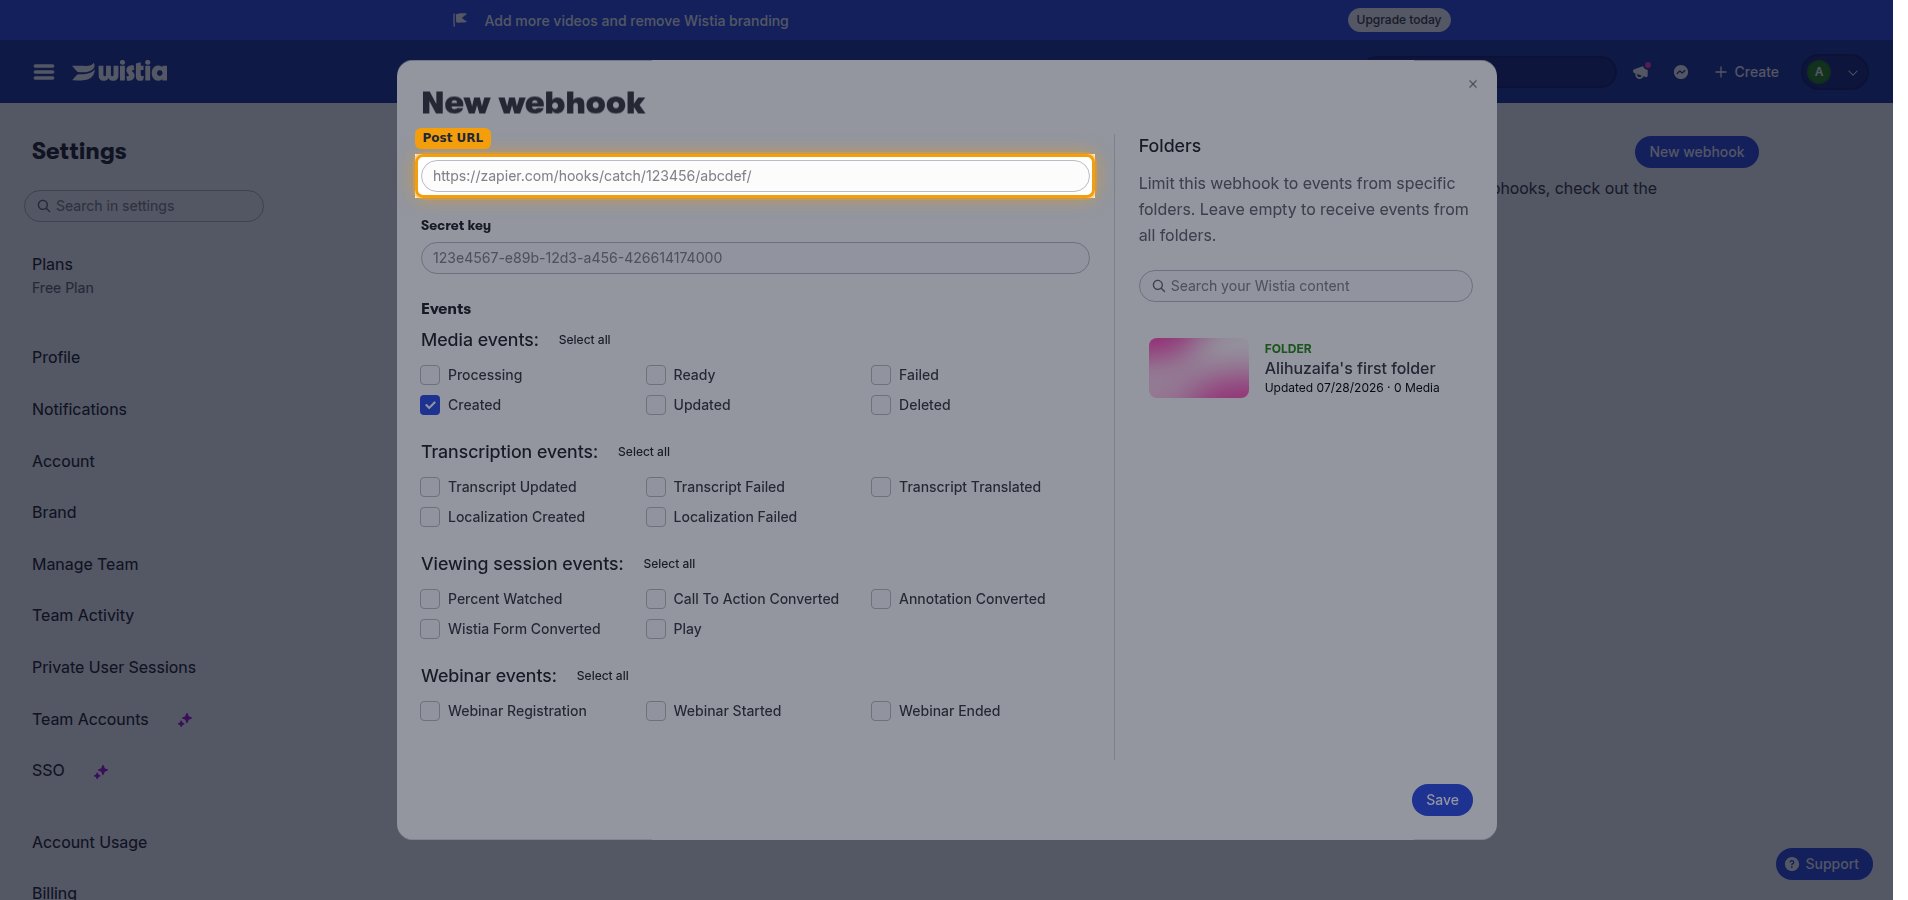
        <p>In the <strong>Post URL</strong> field, paste the <strong>Native Webhook URL</strong> you copied from StackOne.</p>

        <img src="https://mintcdn.com/stackone-60/YpgnCYsJe-oUn9mO/connectors/wistia/images/events-new-webhook-form.png?fit=max&auto=format&n=YpgnCYsJe-oUn9mO&q=85&s=c07bebeb1218c2f3d70e92d9af67c51d" alt="The New webhook form showing the Post URL and Secret key fields and the event checkboxes." width="1908" height="900" data-path="connectors/wistia/images/events-new-webhook-form.png" />
      </div>
    </Step>

    <Step title="Set the Secret key">
      <div data-guide-step data-guide-scopes="" data-guide-display-scopes-list="">
        <p>In the <strong>Secret key</strong> field, enter a secret value of your choice. Wistia uses it to sign every delivery (HMAC-SHA256 hex) in the <strong>X-Wistia-Signature</strong> header so the payloads can be verified as authentic.</p>

        <ul>
          <li>Choose a strong, random value — for example a UUID like `123e4567-e89b-12d3-a456-426614174000`.</li>
          <li>Paste the same value into the <strong>Webhook Secret Key</strong> field on the connected Wistia account in StackOne Hub and save, so the key is stored and available for verifying delivery authenticity.</li>
        </ul>
      </div>
    </Step>

    <Step title="Select the events to receive">
      <div data-guide-step data-guide-scopes="" data-guide-display-scopes-list="">
        <p>Under <strong>Events</strong>, tick the checkboxes for the events you want delivered. Use <strong>Select all</strong> on a group to enable every event in that group.</p>

        <ul>
          <li><strong>Media events:</strong> <strong>Processing</strong>, <strong>Ready</strong>, <strong>Failed</strong>, <strong>Created</strong>, <strong>Updated</strong>, <strong>Deleted</strong>.</li>
          <li><strong>Transcription events:</strong> <strong>Transcript Updated</strong>, <strong>Transcript Failed</strong>, <strong>Transcript Translated</strong>, <strong>Localization Created</strong>, <strong>Localization Failed</strong>.</li>
          <li><strong>Viewing session events:</strong> <strong>Percent Watched</strong>, <strong>Call To Action Converted</strong>, <strong>Annotation Converted</strong>, <strong>Wistia Form Converted</strong>, <strong>Play</strong>.</li>
          <li><strong>Webinar events:</strong> <strong>Webinar Registration</strong>, <strong>Webinar Started</strong>, <strong>Webinar Ended</strong>.</li>
          <li>Optional: under <strong>Folders</strong>, limit the webhook to specific folders. Leave empty to receive events from all folders.</li>
        </ul>

        <img src="https://mintcdn.com/stackone-60/YpgnCYsJe-oUn9mO/connectors/wistia/images/events-new-webhook-form.png?fit=max&auto=format&n=YpgnCYsJe-oUn9mO&q=85&s=c07bebeb1218c2f3d70e92d9af67c51d" alt="The New webhook form event groups (Media, Transcription, Viewing session, Webinar) each with a Select all control." width="1908" height="900" data-path="connectors/wistia/images/events-new-webhook-form.png" />
      </div>
    </Step>

    <Step title="Save the webhook">
      <div data-guide-step data-guide-scopes="" data-guide-display-scopes-list="">
        <p>Click <strong>Save</strong>. Wistia begins delivering the selected events to your Native Webhook URL, signed with your Secret key.</p>
      </div>
    </Step>
  </Steps>
</section>

## Verify

Your Connector should now be able to receive and process events. Try triggering an event and you should see an Event appear in the Connector logs.