> ## Documentation Index
> Fetch the complete documentation index at: https://docs.stackone.com/llms.txt
> Use this file to discover all available pages before exploring further.

# OpenAI Webhook Setup Guide

> Configure OpenAI to deliver events to StackOne.

## Prerequisites

Before continuing, you should have already completed the following for this connector:

<Steps>
  <Step title="Configure the Connector">
    Enable the connector and set up its connector profile in your project. See <a href="/connect/managing-connectors/overview">Managing Connectors</a>.

    <Columns cols={2}>
      <Card title="Connector Profile" href="/connectors/openai/guides/connector-profile/api-key-admin-user" icon="https://stackone-logos.com/api/openai/filled/png" horizontal>
        OpenAI - API Key (Admin + User)
      </Card>

      <Card title="Connector Profile" href="/connectors/openai/guides/connector-profile/user-api-key" icon="https://stackone-logos.com/api/openai/filled/png" horizontal>
        OpenAI - User API Key
      </Card>

      <Card title="Connector Profile" href="/connectors/openai/guides/connector-profile/admin-api-key" icon="https://stackone-logos.com/api/openai/filled/png" horizontal>
        OpenAI - Admin API Key
      </Card>
    </Columns>
  </Step>

  <Step title="Link an Account">
    Connect an account using <a href="/embed/account-linking/overview">StackOne Hub</a> or <a href="/embed/account-linking/auth-link">Auth Link</a>.

    <Columns cols={2}>
      <Card title="Link Account" href="/connectors/openai/guides/link-account/api-key-admin-user" icon="https://stackone-logos.com/api/openai/filled/png" horizontal>
        OpenAI - API Key (Admin + User)
      </Card>

      <Card title="Link Account" href="/connectors/openai/guides/link-account/user-api-key" icon="https://stackone-logos.com/api/openai/filled/png" horizontal>
        OpenAI - User API Key
      </Card>

      <Card title="Link Account" href="/connectors/openai/guides/link-account/admin-api-key" icon="https://stackone-logos.com/api/openai/filled/png" horizontal>
        OpenAI - Admin API Key
      </Card>
    </Columns>
  </Step>
</Steps>

<section data-guide-section data-guide-scopes="">
  <h2>Register the StackOne webhook in OpenAI</h2>

  <p>This connector uses <strong>Manual Webhooks</strong>. OpenAI does not expose an API to create webhook endpoints, so you register the StackOne callback URL yourself in the OpenAI dashboard and paste the signing secret back into StackOne. OpenAI begins delivering events immediately after the endpoint is created — there is no verification ping.</p>

  <Steps>
    <Step title="Copy the Native Webhook URL from StackOne">
      <div data-guide-step data-guide-scopes="" data-guide-display-scopes-list="">
        <p>After connecting your OpenAI account in StackOne, open the connected account and copy the value of the <strong>Native Webhook URL</strong> field. This is the endpoint OpenAI will deliver events to. It is only available after the account has been connected.</p>

        <ul>
          <li>The <strong>Native Webhook URL</strong> is read-only and generated by StackOne — copy it exactly.</li>
        </ul>
      </div>
    </Step>

    <Step title="Open the project Webhooks settings">
      <div data-guide-step data-guide-scopes="" data-guide-display-scopes-list="">
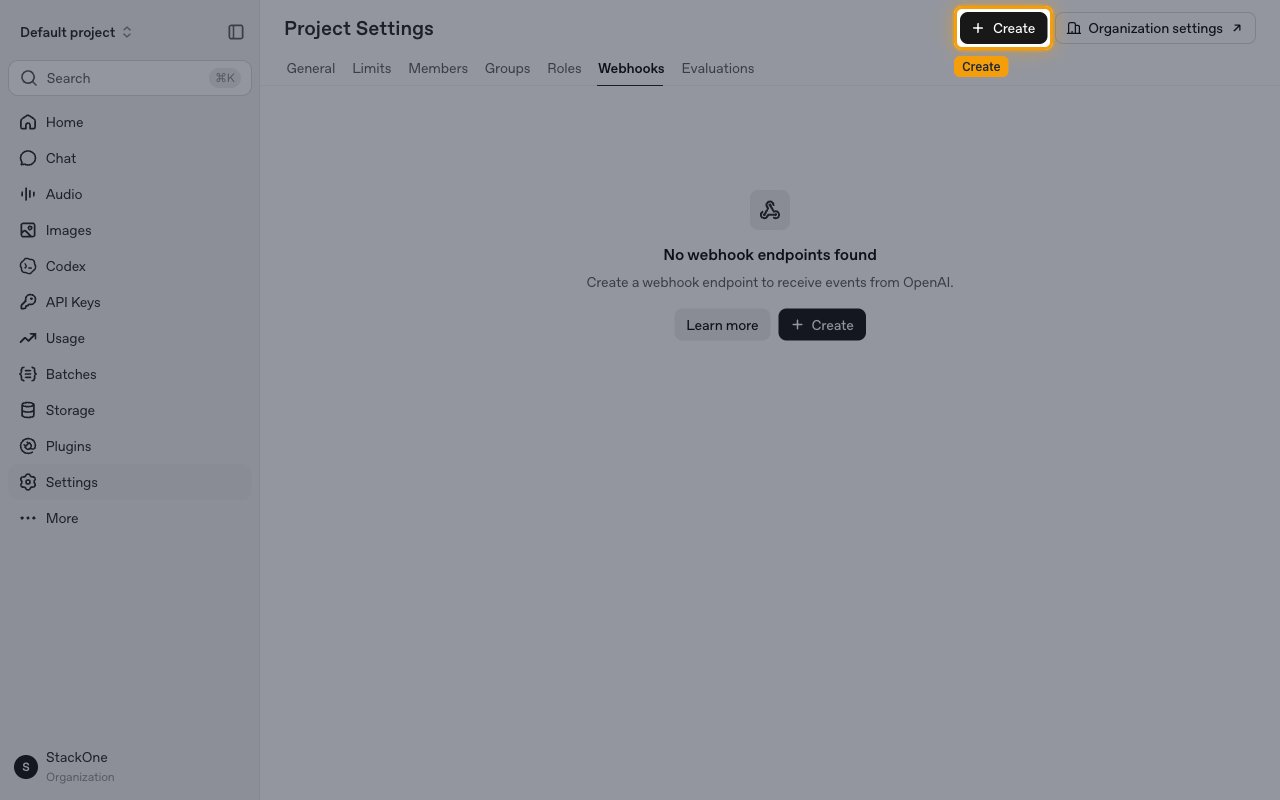
        <p>Sign in to the <a href="https://platform.openai.com" target="_blank" rel="noopener noreferrer">OpenAI dashboard</a> and open the project's webhook settings. In the left sidebar click <strong>Settings</strong>, then open the <strong>Webhooks</strong> tab (or go directly to the <a href="https://platform.openai.com/settings/project/webhooks" target="_blank" rel="noopener noreferrer">project Webhooks page</a>). Click <strong>Create</strong> to add a new webhook endpoint.</p>

        <img src="https://mintcdn.com/stackone-60/y2jo3WptkQYbmkCX/connectors/openai/images/events-open-webhooks.png?fit=max&auto=format&n=y2jo3WptkQYbmkCX&q=85&s=c981250d31ee164e322afa53b88bd11f" alt="The project Settings Webhooks tab with the Create button highlighted" width="1280" height="800" data-path="connectors/openai/images/events-open-webhooks.png" />
      </div>
    </Step>

    <Step title="Enter the endpoint URL">
      <div data-guide-step data-guide-scopes="" data-guide-display-scopes-list="">
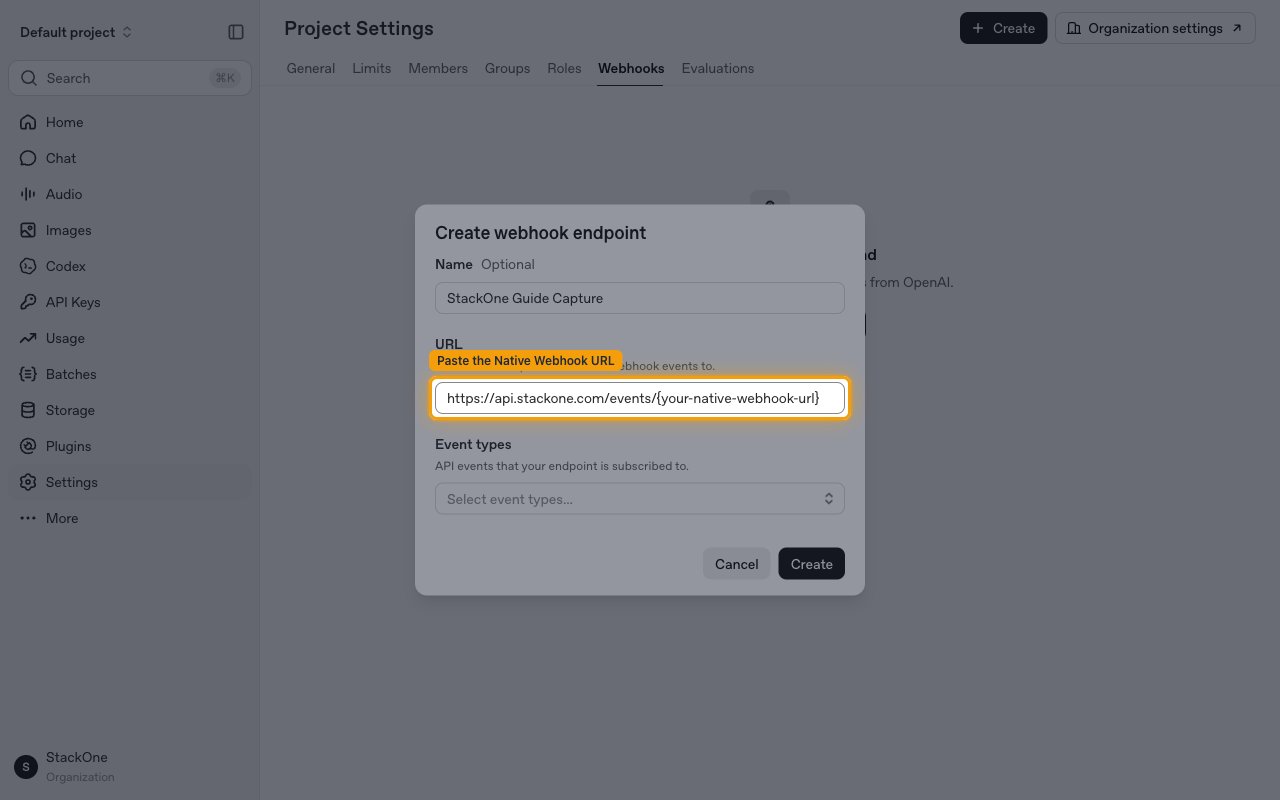
        <p>In the <strong>Create webhook endpoint</strong> dialog, optionally set a <strong>Name</strong> (this is for your reference only), then paste the StackOne <strong>Native Webhook URL</strong> into the <strong>URL</strong> field — labelled *The URL that OpenAI will POST webhook events to.*</p>

        <img src="https://mintcdn.com/stackone-60/y2jo3WptkQYbmkCX/connectors/openai/images/events-create-endpoint.png?fit=max&auto=format&n=y2jo3WptkQYbmkCX&q=85&s=d6b43d1f3429456c401063f120559165" alt="The Create webhook endpoint dialog with the URL field highlighted" width="1280" height="800" data-path="connectors/openai/images/events-create-endpoint.png" />
      </div>
    </Step>

    <Step title="Select the event types to deliver">
      <div data-guide-step data-guide-scopes="" data-guide-display-scopes-list="">
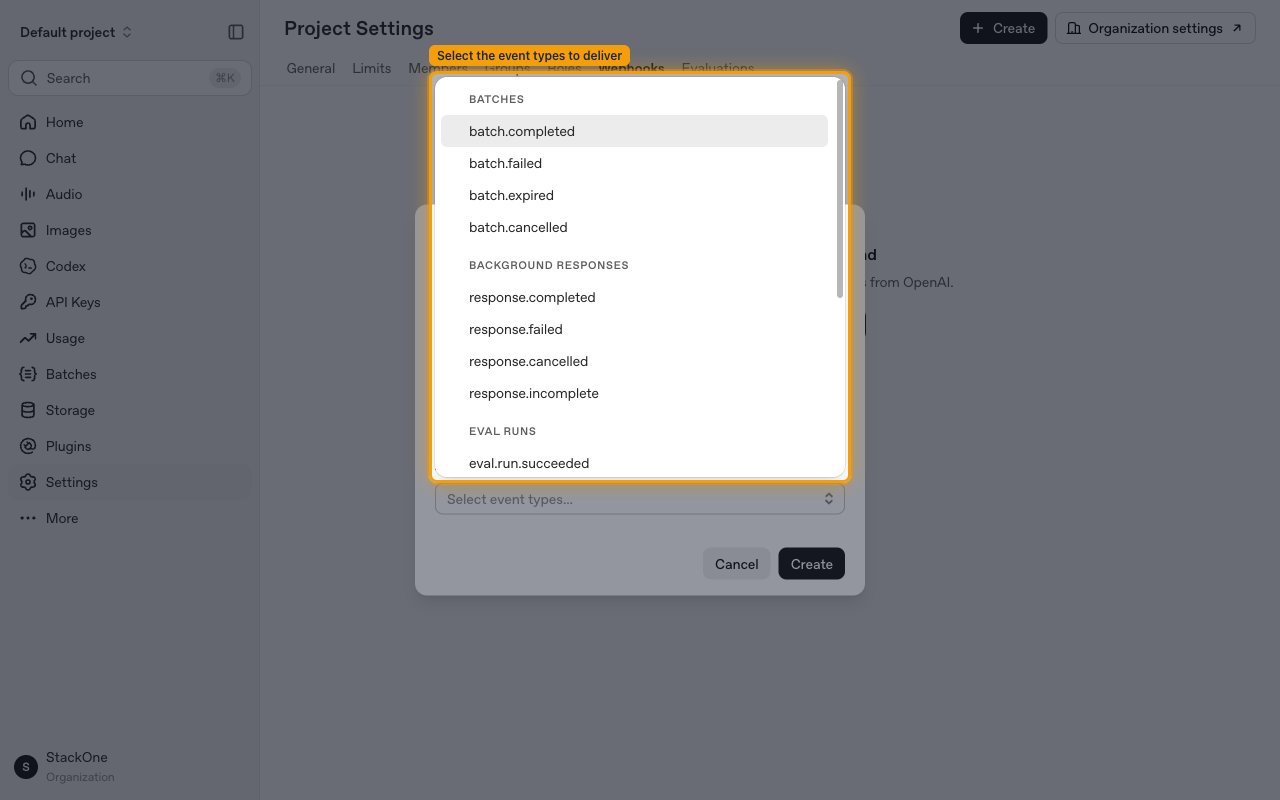
        <p>Click <strong>Select event types...</strong> under <strong>Event types</strong> and tick every event you want delivered to StackOne. The events are grouped as <strong>Batches</strong>, <strong>Background Responses</strong>, <strong>Eval Runs</strong>, <strong>Realtime API</strong>, <strong>Videos</strong>, and <strong>Other</strong> — see <strong>Available webhook events</strong> below for the full list. Then click <strong>Create</strong>.</p>

        <ul>
          <li>Only the event types you select here are delivered — OpenAI does not send events you did not subscribe to.</li>
        </ul>

        <img src="https://mintcdn.com/stackone-60/y2jo3WptkQYbmkCX/connectors/openai/images/events-select-events.png?fit=max&auto=format&n=y2jo3WptkQYbmkCX&q=85&s=18560507b97b9aa79f7abfc3509abd58" alt="The event types picker showing the Batches, Background Responses and Eval Runs groups" width="1280" height="800" data-path="connectors/openai/images/events-select-events.png" />
      </div>
    </Step>

    <Step title="Save the signing secret">
      <div data-guide-step data-guide-scopes="" data-guide-display-scopes-list="">
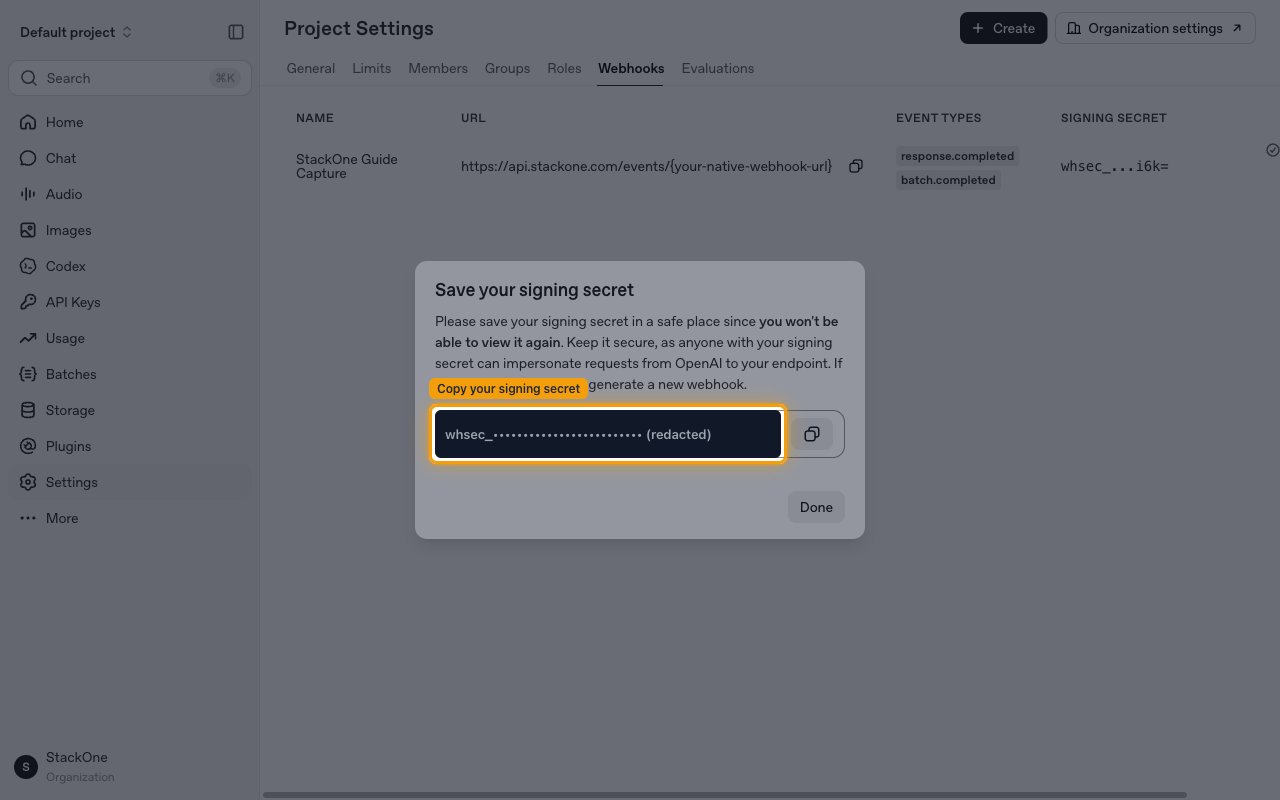
        <p>After you click <strong>Create</strong>, OpenAI shows the <strong>Save your signing secret</strong> dialog with a `whsec_` secret. <strong>You won't be able to view it again</strong>, so copy it now and store it securely — anyone with the signing secret can impersonate requests from OpenAI to your endpoint. Then click <strong>Done</strong>.</p>

        <ul>
          <li>The signing secret is only displayed once and cannot be retrieved later. If you lose it, rotate the secret or recreate the webhook.</li>
          <li>OpenAI signs each delivery using the Standard Webhooks scheme (`webhook-id`, `webhook-timestamp`, `webhook-signature`) so downstream consumers can verify authenticity with this secret.</li>
        </ul>

        <img src="https://mintcdn.com/stackone-60/y2jo3WptkQYbmkCX/connectors/openai/images/events-signing-secret.png?fit=max&auto=format&n=y2jo3WptkQYbmkCX&q=85&s=9741509d485b425823bb132c685a5b85" alt="The Save your signing secret dialog with the secret value redacted" width="1280" height="800" data-path="connectors/openai/images/events-signing-secret.png" />
      </div>
    </Step>

    <Step title="Remove the webhook to stop deliveries">
      <div data-guide-step data-guide-scopes="" data-guide-display-scopes-list="">
        <p>To stop deliveries later, open the <strong>Webhooks</strong> tab in the OpenAI dashboard and use <strong>Delete webhook</strong> on the endpoint. Disconnecting the account in StackOne does <strong>not</strong> remove the endpoint from OpenAI, because OpenAI provides no API for StackOne to manage it.</p>
      </div>
    </Step>
  </Steps>
</section>

<section data-guide-section data-guide-scopes="">
  <h2>Available webhook events</h2>

  <p>The following OpenAI events can be enabled when you create the webhook endpoint. Only events you select in the OpenAI dashboard are delivered. Each event's payload `data` is a thin reference (usually just an `id`) — retrieve the resource via its API to get the full result. StackOne routes each delivery by its `type` and passes the exact type through as the event type.</p>

  <Steps>
    <Step title="Batches">
      <div data-guide-step data-guide-scopes="" data-guide-display-scopes-list="">
        <p>Fired when a Batch API job reaches a terminal state. Retrieve the batch via its id to read the output or error file.</p>

        <ul>
          <li><strong>Batch Completed</strong> (`batch.completed`) — Fired when a batch job completes.</li>
          <li><strong>Batch Failed</strong> (`batch.failed`) — Fired when a batch job fails.</li>
          <li><strong>Batch Expired</strong> (`batch.expired`) — Fired when a batch job expires before finishing its completion window.</li>
          <li><strong>Batch Cancelled</strong> (`batch.cancelled`) — Fired when a batch job is cancelled.</li>
        </ul>
      </div>
    </Step>

    <Step title="Background Responses">
      <div data-guide-step data-guide-scopes="" data-guide-display-scopes-list="">
        <p>Fired when a background Response (a request created with `background: true`) reaches a terminal state. Fetch the response by its id to read the generated output.</p>

        <ul>
          <li><strong>Response Completed</strong> (`response.completed`) — Fired when a background response finishes successfully.</li>
          <li><strong>Response Failed</strong> (`response.failed`) — Fired when a background response fails.</li>
          <li><strong>Response Cancelled</strong> (`response.cancelled`) — Fired when a background response is cancelled.</li>
          <li><strong>Response Incomplete</strong> (`response.incomplete`) — Fired when a background response is interrupted or ends incomplete.</li>
        </ul>
      </div>
    </Step>

    <Step title="Eval Runs">
      <div data-guide-step data-guide-scopes="" data-guide-display-scopes-list="">
        <p>Fired when an eval run reaches a terminal state.</p>

        <ul>
          <li><strong>Eval Run Succeeded</strong> (`eval.run.succeeded`) — Fired when an eval run succeeds.</li>
          <li><strong>Eval Run Failed</strong> (`eval.run.failed`) — Fired when an eval run fails.</li>
          <li><strong>Eval Run Canceled</strong> (`eval.run.canceled`) — Fired when an eval run is canceled.</li>
        </ul>
      </div>
    </Step>

    <Step title="Realtime API">
      <div data-guide-step data-guide-scopes="" data-guide-display-scopes-list="">
        <p>Fired for inbound Realtime API calls.</p>

        <ul>
          <li><strong>Realtime Call Incoming</strong> (`realtime.call.incoming`) — Fired when an inbound SIP call arrives and is awaiting acceptance via the Realtime API. The payload carries the call id and SIP headers.</li>
        </ul>
      </div>
    </Step>

    <Step title="Videos">
      <div data-guide-step data-guide-scopes="" data-guide-display-scopes-list="">
        <p>Fired when a video generation job reaches a terminal state.</p>

        <ul>
          <li><strong>Video Completed</strong> (`video.completed`) — Fired when a video generation job completes.</li>
          <li><strong>Video Failed</strong> (`video.failed`) — Fired when a video generation job fails.</li>
        </ul>
      </div>
    </Step>

    <Step title="Other">
      <div data-guide-step data-guide-scopes="" data-guide-display-scopes-list="">
        <p>Additional inbound-call events.</p>

        <ul>
          <li><strong>Live Call Incoming</strong> (`live.call.incoming`) — Fired when an inbound SIP call arrives and is awaiting acceptance via the Live API. The payload carries the call id and SIP headers.</li>
        </ul>
      </div>
    </Step>
  </Steps>
</section>

<section data-guide-section data-guide-scopes="">
  <h2>Delivery format</h2>

  <p>Details of how OpenAI delivers events to StackOne.</p>

  <Steps>
    <Step title="JSON payloads, one event per request">
      <div data-guide-step data-guide-scopes="" data-guide-display-scopes-list="">
        <p>OpenAI delivers each event as an HTTP POST with `Content-Type: application/json`. Events are <strong>not</strong> batched — there is one webhook call per event. The envelope is `{ object: "event", id: "evt_…", type, created_at, data: { id } }`.</p>
      </div>
    </Step>

    <Step title="Signatures, retries and ordering">
      <div data-guide-step data-guide-scopes="" data-guide-display-scopes-list="">
        <p>Deliveries follow the Standard Webhooks (Svix) specification.</p>

        <ul>
          <li>Every delivery carries `webhook-id`, `webhook-timestamp`, and `webhook-signature` (`v1,<base64 HMAC-SHA256>`) headers; verify against the `whsec_` signing secret with a 5-minute timestamp tolerance.</li>
          <li>Delivery is at-least-once with retries (exponential backoff for up to 72 hours) — dedupe on `webhook-id`.</li>
          <li>Event ordering is <strong>not</strong> guaranteed — do not assume a `completed` event arrives after earlier lifecycle events.</li>
        </ul>
      </div>
    </Step>
  </Steps>
</section>

## Verify

Your Connector should now be able to receive and process events. Try triggering an event and you should see an Event appear in the Connector logs.