> ## Documentation Index
> Fetch the complete documentation index at: https://docs.stackone.com/llms.txt
> Use this file to discover all available pages before exploring further.

# Freshservice Webhook Setup Guide

> Configure Freshservice to deliver events to StackOne.

## Prerequisites

Before continuing, you should have already completed the following for this connector:

<Steps>
  <Step title="Configure the Connector">
    Enable the connector and set up its connector profile in your project. See <a href="/connect/managing-connectors/overview">Managing Connectors</a>.

    <Columns cols={2}>
      <Card title="Connector Profile" href="/connectors/freshservice/guides/connector-profile/api-key" icon="https://stackone-logos.com/api/freshdesk/filled/svg" horizontal>
        Freshservice - API Key
      </Card>
    </Columns>
  </Step>

  <Step title="Link an Account">
    Connect an account using <a href="/embed/account-linking/overview">StackOne Hub</a> or <a href="/embed/account-linking/auth-link">Auth Link</a>.

    <Columns cols={2}>
      <Card title="Link Account" href="/connectors/freshservice/guides/link-account/api-key" icon="https://stackone-logos.com/api/freshdesk/filled/svg" horizontal>
        Freshservice - API Key
      </Card>
    </Columns>
  </Step>
</Steps>

<section data-guide-section data-guide-scopes="">
  <h2>Send Freshservice events to StackOne via a Workflow Automator webhook</h2>

  <p>Copy the <strong>Native Webhook URL</strong> from this StackOne connection and use it as the <strong>Callback URL</strong> of a <strong>Trigger Webhook</strong> action in a Freshservice Workflow Automator, so Freshservice posts data to StackOne when the workflow's conditions are met.</p>

  <Steps>
    <Step title="Copy the Native Webhook URL from StackOne">
      <div data-guide-step data-guide-scopes="" data-guide-display-scopes-list="">
        <p>On this connection in StackOne, copy the read-only <strong>Native Webhook URL</strong>. It contains a secure per-connection key, so treat it like a secret — you will paste it into Freshservice in a later step.</p>
      </div>
    </Step>

    <Step title="Open the Admin area">
      <div data-guide-step data-guide-scopes="" data-guide-display-scopes-list="">
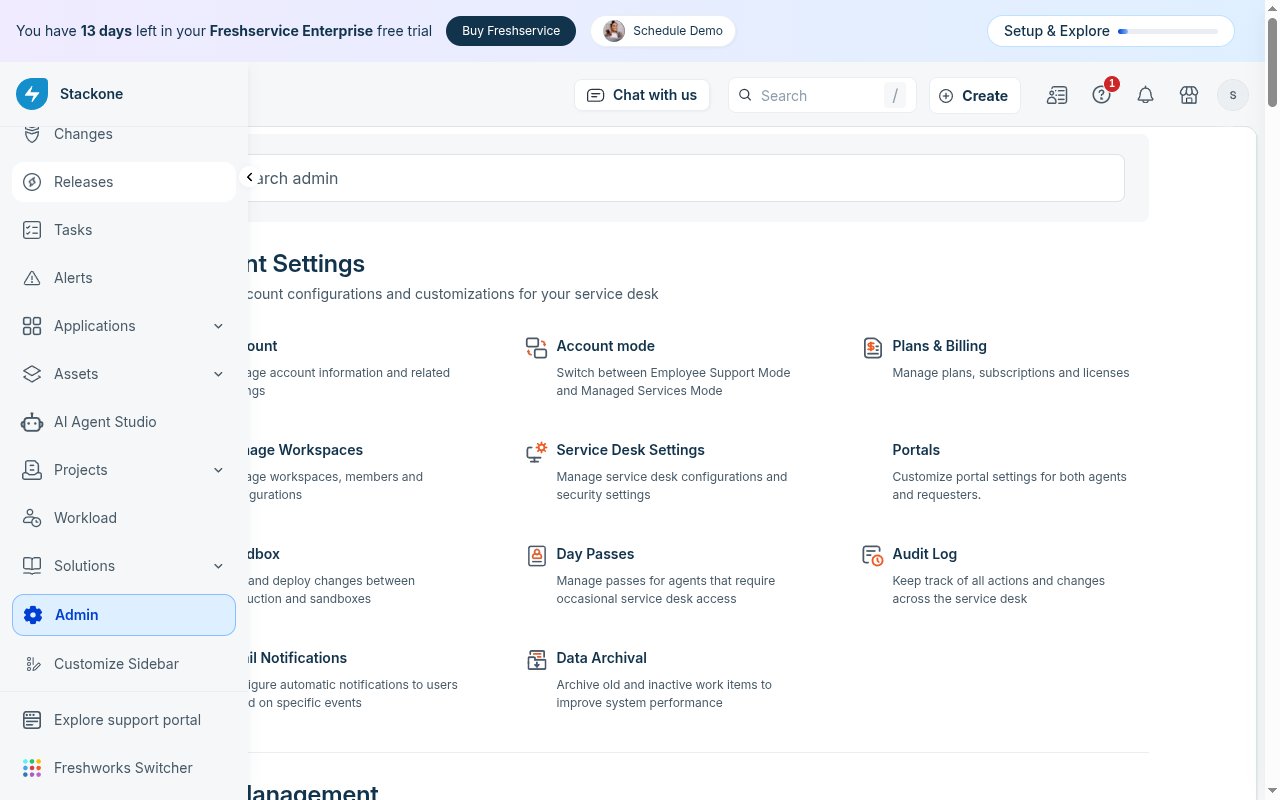
        <p>Sign in to Freshservice as an Admin. In the left sidebar, expand it and click <strong>Admin</strong> (the gear icon at the bottom) to open the admin settings.</p>

        <img src="https://mintcdn.com/stackone-60/LqZnqqYiHncizs5W/connectors/freshservice/images/events-open-admin.png?fit=max&auto=format&n=LqZnqqYiHncizs5W&q=85&s=960168039b2cbaca146f500266ba1153" alt="Freshservice left sidebar expanded with the Admin entry highlighted at the bottom" width="1280" height="800" data-path="connectors/freshservice/images/events-open-admin.png" />
      </div>
    </Step>

    <Step title="Open the Workflow Automator">
      <div data-guide-step data-guide-scopes="" data-guide-display-scopes-list="">
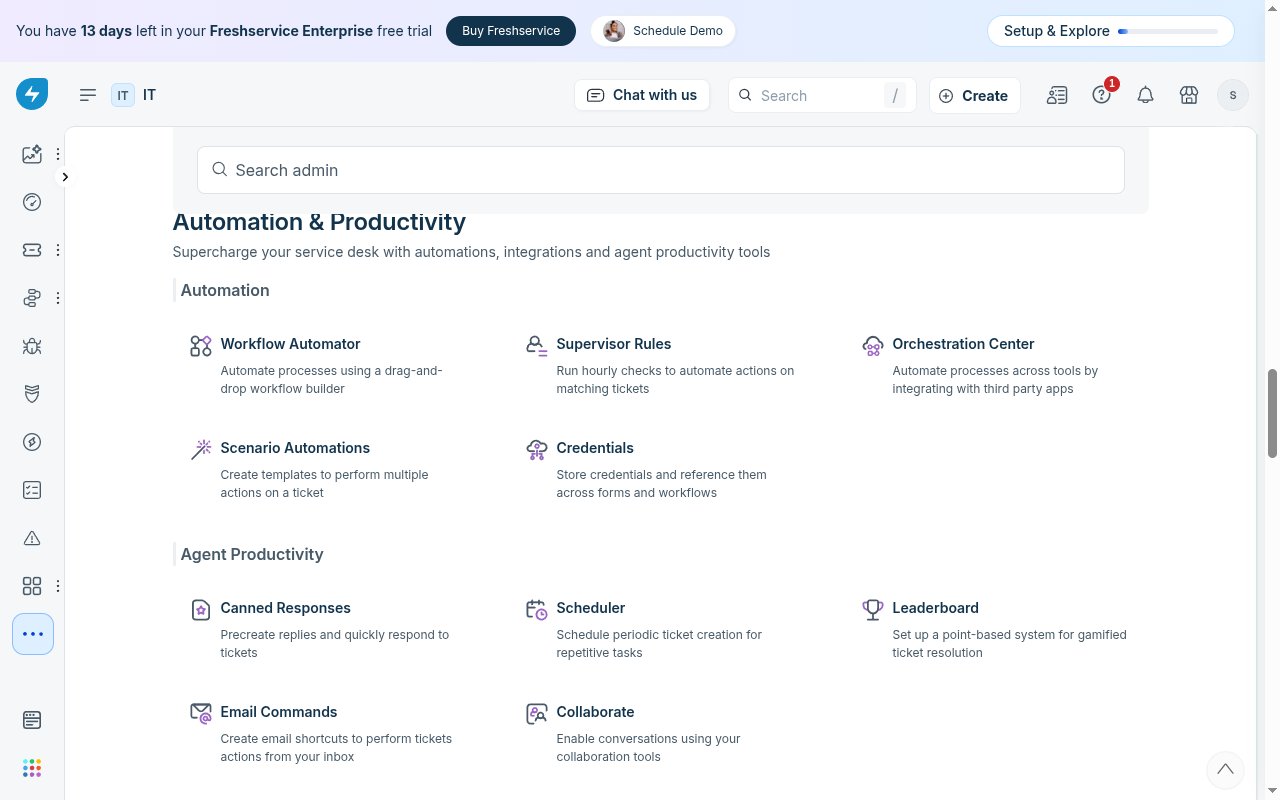
        <p>On the <strong>Admin</strong> page, scroll to the <strong>Automation & Productivity</strong> area and, under <strong>Automation</strong>, click <strong>Workflow Automator</strong> ("Automate processes using a drag-and-drop workflow builder"). You can also type "Workflow Automator" in the <strong>Search admin</strong> box.</p>

        <img src="https://mintcdn.com/stackone-60/WA2oIobXRYfoXBV_/connectors/freshservice/images/events-workflow-automator-nav.png?fit=max&auto=format&n=WA2oIobXRYfoXBV_&q=85&s=bb33dd5553180349e56025cddbedc502" alt="Freshservice Admin Automation & Productivity section with the Workflow Automator card under Automation" width="1280" height="800" data-path="connectors/freshservice/images/events-workflow-automator-nav.png" />
      </div>
    </Step>

    <Step title="Create a workflow for the module you want">
      <div data-guide-step data-guide-scopes="" data-guide-display-scopes-list="">
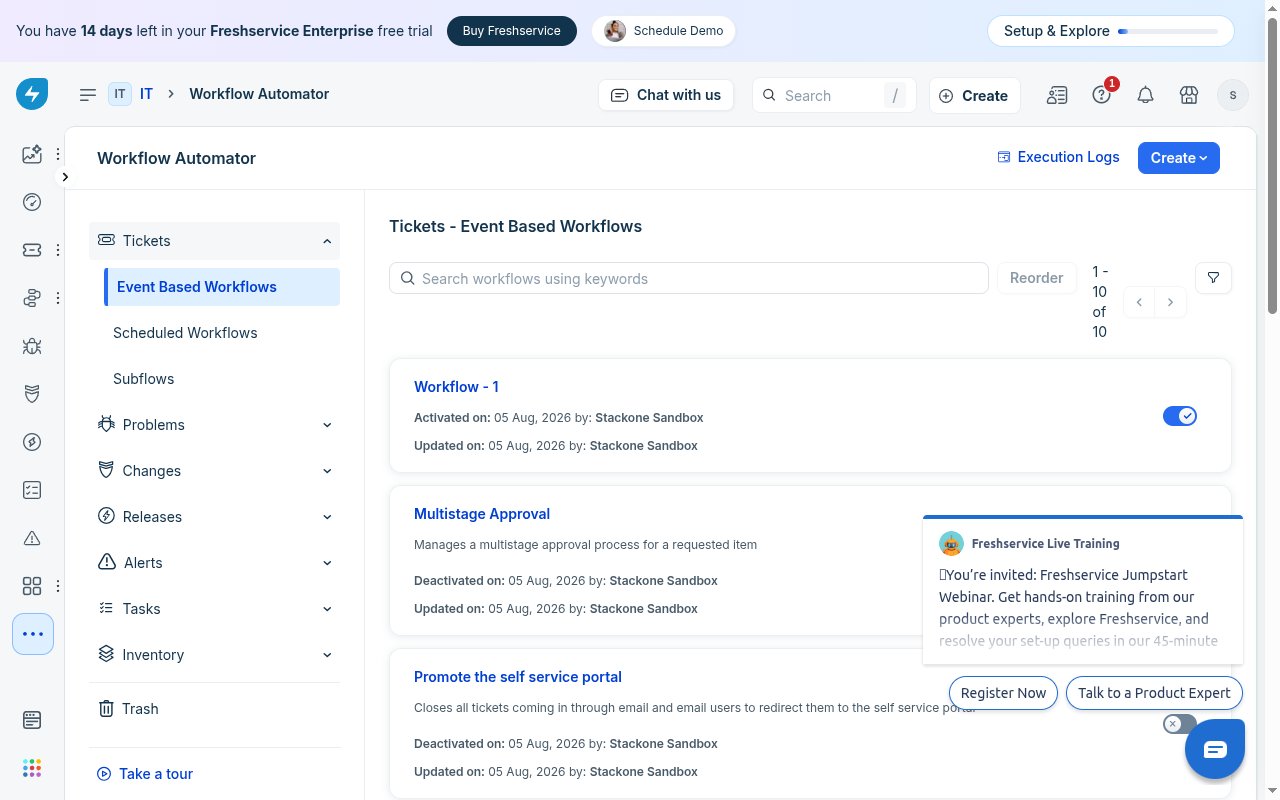
        <p>Choose the module in the left panel — <strong>Tickets</strong>, <strong>Problems</strong>, <strong>Changes</strong>, <strong>Releases</strong>, etc. — open <strong>Event Based Workflows</strong>, then click <strong>Create</strong> to start a new workflow.</p>

        <img src="https://mintcdn.com/stackone-60/LqZnqqYiHncizs5W/connectors/freshservice/images/events-automators-list.png?fit=max&auto=format&n=LqZnqqYiHncizs5W&q=85&s=58866aae8bb7a51d577a8f0b4dd7027c" alt="Freshservice Workflow Automator showing Event Based Workflows and the Create button" width="1280" height="800" data-path="connectors/freshservice/images/events-automators-list.png" />
      </div>
    </Step>

    <Step title="Set the Event, a condition, and add the Trigger Webhook action">
      <div data-guide-step data-guide-scopes="" data-guide-display-scopes-list="">
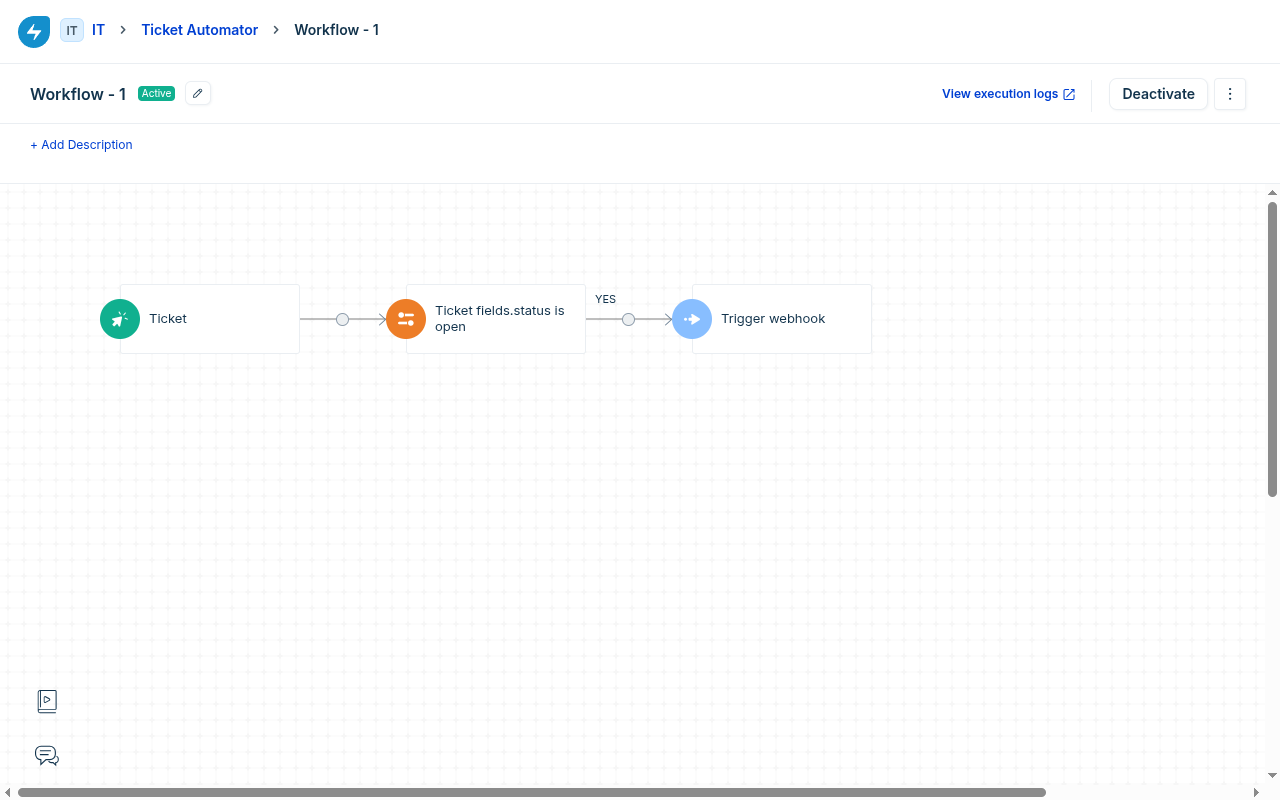
        <p>The workflow is a drag-and-drop canvas: it starts with an <strong>Event</strong> node (for example, a ticket being raised). Configure the Event first — this is what unlocks the next steps. To add the webhook, click the plus (＋) on the connector after the Event (or after a condition node) and choose an <strong>Action</strong>, then select <strong>Trigger Webhook</strong>. (The Action option stays disabled until the Event node is configured.)</p>

        <img src="https://mintcdn.com/stackone-60/WA2oIobXRYfoXBV_/connectors/freshservice/images/events-workflow-canvas.png?fit=max&auto=format&n=WA2oIobXRYfoXBV_&q=85&s=a4631e4563b107d178ec2e2ed74a9fa6" alt="Freshservice workflow canvas showing the Ticket event, a condition, and the Trigger webhook action" width="1280" height="800" data-path="connectors/freshservice/images/events-workflow-canvas.png" />
      </div>
    </Step>

    <Step title="Configure the webhook Action">
      <div data-guide-step data-guide-scopes="" data-guide-display-scopes-list="">
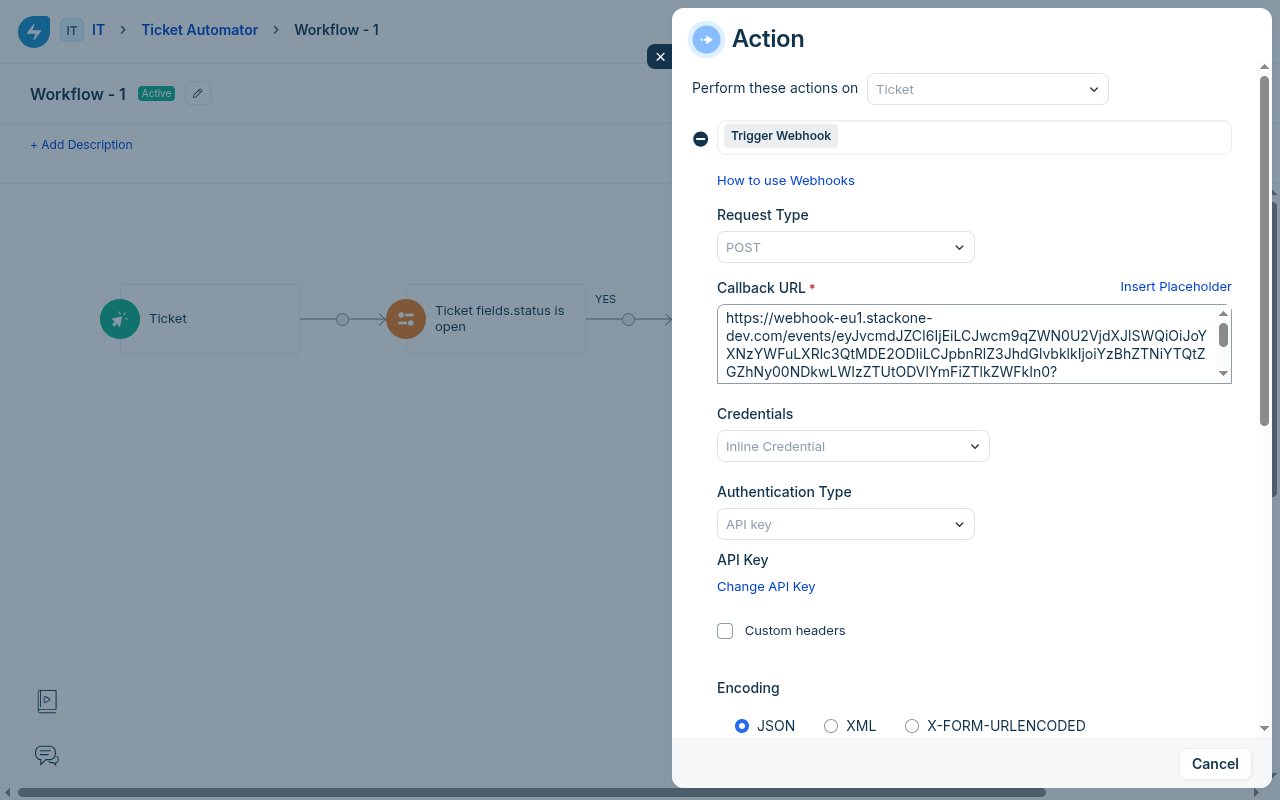
        <p>In the <strong>Action</strong> panel, keep <strong>Trigger Webhook</strong> selected and complete the fields below.</p>

        <ul>
          <li><strong>Request Type</strong> — select <strong>POST</strong>.</li>
          <li><strong>Callback URL</strong> — paste the <strong>Native Webhook URL</strong> you copied from this StackOne connection.</li>
          <li><strong>Authentication Type</strong> — you can leave this at the default; the secure key in the Callback URL is what authenticates the delivery to StackOne, so no separate credential is required.</li>
          <li><strong>Encoding</strong> — select <strong>JSON</strong>.</li>
        </ul>

        <img src="https://mintcdn.com/stackone-60/LqZnqqYiHncizs5W/connectors/freshservice/images/events-webhook-action.png?fit=max&auto=format&n=LqZnqqYiHncizs5W&q=85&s=f83c5c5f9c5e3e772ae168059a1e8e7b" alt="Freshservice Trigger Webhook action panel with Request Type POST, Callback URL, and Encoding JSON" width="1280" height="800" data-path="connectors/freshservice/images/events-webhook-action.png" />
      </div>
    </Step>

    <Step title="Choose the content, test, and activate">
      <div data-guide-step data-guide-scopes="" data-guide-display-scopes-list="">
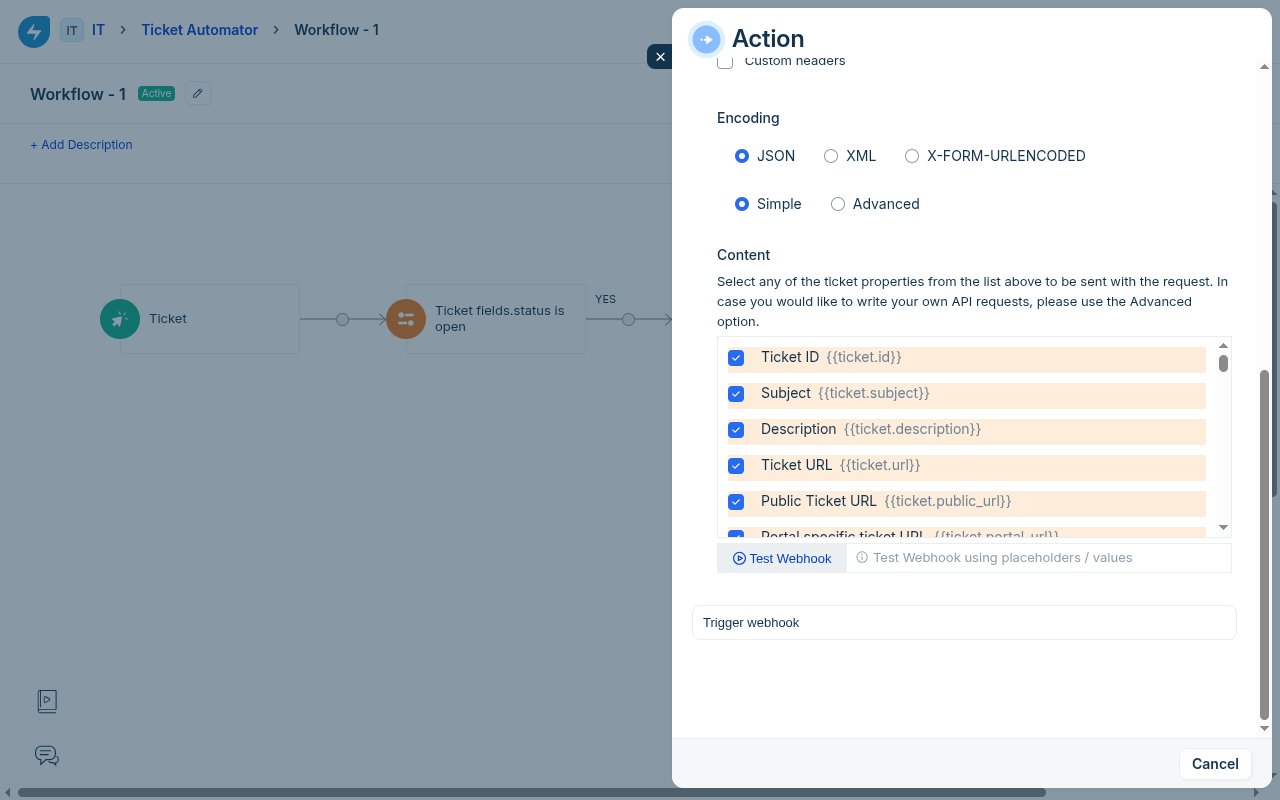
        <p>Under the encoding, choose <strong>Simple</strong> and tick the fields to send in <strong>Content</strong> — make sure <strong>Ticket ID</strong> (`{{ticket.id}}`) is selected so StackOne can set the record id (use <strong>Advanced</strong> if you want to hand-write the JSON body). Click <strong>Test Webhook</strong> to confirm StackOne accepts it (a successful test returns 200), then save the action and <strong>Activate</strong> the workflow.</p>

        <img src="https://mintcdn.com/stackone-60/LqZnqqYiHncizs5W/connectors/freshservice/images/events-webhook-content.png?fit=max&auto=format&n=LqZnqqYiHncizs5W&q=85&s=86245ffb6ae3538aa888debcb934653c" alt="Freshservice webhook Content section with Simple selected, Ticket ID field ticked, and the Test Webhook button" width="1280" height="800" data-path="connectors/freshservice/images/events-webhook-content.png" />
      </div>
    </Step>
  </Steps>
</section>

<section data-guide-section data-guide-scopes="">
  <h2>Available webhook events</h2>

  <p>A Freshservice Workflow Automator can send events from any of these modules — build one workflow per module and event you want to receive. Only the fields you tick in the workflow's Content are delivered.</p>

  <ul>
    <li><strong>Tickets</strong> — a ticket is raised (created) or updated (including status changes).</li>
    <li><strong>Problems</strong> — a problem is created or updated.</li>
    <li><strong>Changes</strong> — a change is created or updated.</li>
    <li><strong>Releases</strong> — a release is created or updated.</li>
    <li><strong>Assets</strong> — an asset is created or updated.</li>
  </ul>
</section>

<section data-guide-section data-guide-scopes="">
  <h2>Delivery format</h2>

  <p>Freshservice sends each event as a single HTTPS POST. The default (Simple) payload is wrapped under a top-level `freshdesk_webhook` object with placeholder-named fields — for a ticket, `ticket_id` (the display id, e.g. "INC-2"), `id_numeric` (the numeric id), `ticket_subject`, `ticket_status`, and so on. StackOne passes the full payload through as the event data and sets the record id from `freshdesk_webhook.id_numeric` (falling back to `ticket_id` and other id fields for custom payloads). There is no verification handshake, and the secure key in the Callback URL authenticates the delivery.</p>
</section>

## Verify

Your Connector should now be able to receive and process events. Try triggering an event and you should see an Event appear in the Connector logs.