> ## Documentation Index
> Fetch the complete documentation index at: https://docs.stackone.com/llms.txt
> Use this file to discover all available pages before exploring further.

# Freshsales Webhook Setup Guide

> Configure Freshsales to deliver events to StackOne.

## Prerequisites

Before continuing, you should have already completed the following for this connector:

<Steps>
  <Step title="Configure the Connector">
    Enable the connector and set up its connector profile in your project. See <a href="/connect/managing-connectors/overview">Managing Connectors</a>.

    <Columns cols={2}>
      <Card title="Connector Profile" href="/connectors/freshsales/guides/connector-profile/api-key" icon="https://stackone-logos.com/api/freshsales/filled/svg" horizontal>
        Freshsales - API Key
      </Card>
    </Columns>
  </Step>

  <Step title="Link an Account">
    Connect an account using <a href="/embed/account-linking/overview">StackOne Hub</a> or <a href="/embed/account-linking/auth-link">Auth Link</a>.

    <Columns cols={2}>
      <Card title="Link Account" href="/connectors/freshsales/guides/link-account/api-key" icon="https://stackone-logos.com/api/freshsales/filled/svg" horizontal>
        Freshsales - API Key
      </Card>
    </Columns>
  </Step>
</Steps>

<section data-guide-section data-guide-scopes="">
  <h2>Send Freshsales events to StackOne via a Workflow webhook</h2>

  <p>Copy the <strong>Native Webhook URL</strong> from this StackOne connection and use it as the <strong>Enter callback URL</strong> value of a <strong>Trigger webhook</strong> action in a Freshsales Workflow, so Freshsales posts data to StackOne when the workflow's conditions are met.</p>

  <Steps>
    <Step title="Copy the Native Webhook URL from StackOne">
      <div data-guide-step data-guide-scopes="" data-guide-display-scopes-list="">
        <p>On this connection in StackOne, copy the read-only <strong>Native Webhook URL</strong>. It contains a secure per-connection key, so treat it like a secret — you will paste it into Freshsales in a later step.</p>
      </div>
    </Step>

    <Step title="Open Workflows in Freshsales">
      <div data-guide-step data-guide-scopes="" data-guide-display-scopes-list="">
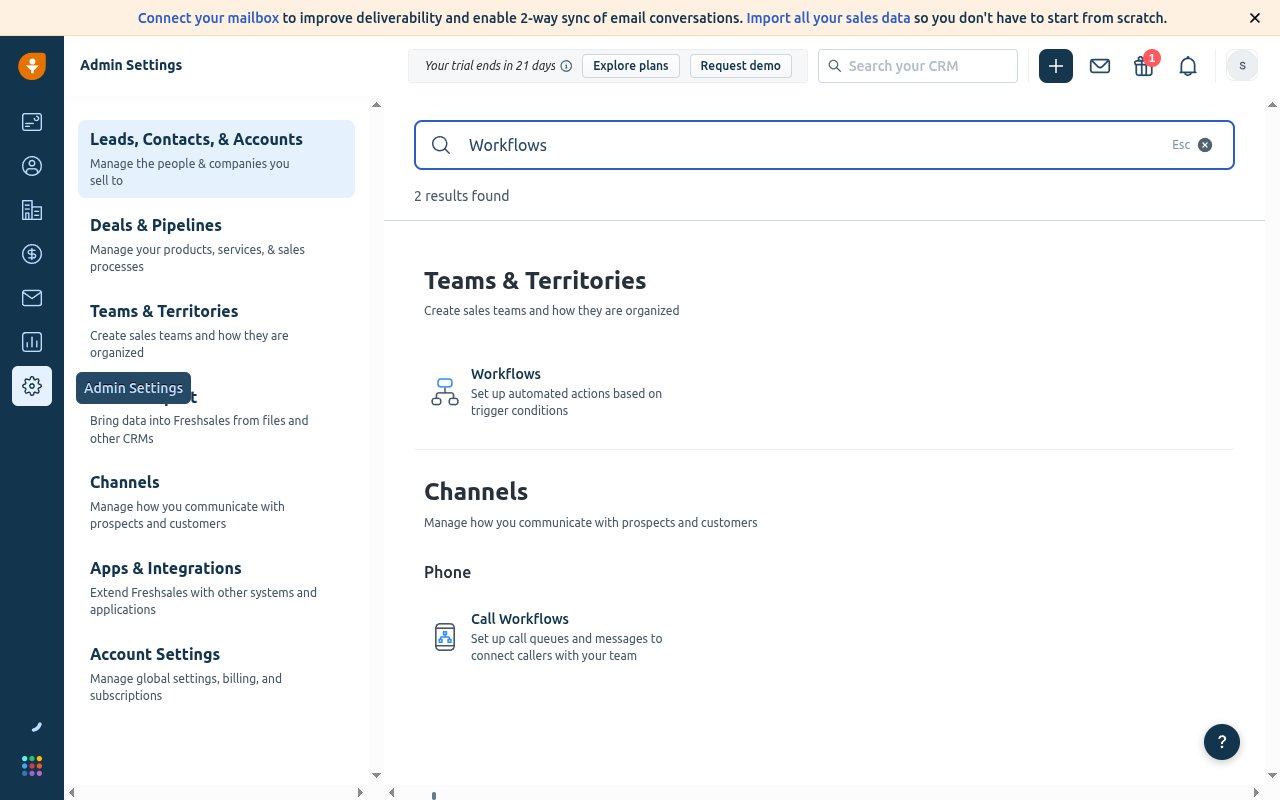
        <p>Sign in to Freshsales as an Admin and open <strong>Admin Settings</strong>. Search settings for <strong>Workflows</strong> and open <strong>Set up automated actions based on trigger conditions</strong>.</p>

        <img src="https://mintcdn.com/stackone-60/LqZnqqYiHncizs5W/connectors/freshsales/images/events-workflows-nav.png?fit=max&auto=format&n=LqZnqqYiHncizs5W&q=85&s=5414a45c8a2e4eee968584d740ba20b5" alt="Freshsales Admin Settings with the Workflows (Set up automated actions based on trigger conditions) result" width="1280" height="800" data-path="connectors/freshsales/images/events-workflows-nav.png" />
      </div>
    </Step>

    <Step title="Create a workflow">
      <div data-guide-step data-guide-scopes="" data-guide-display-scopes-list="">
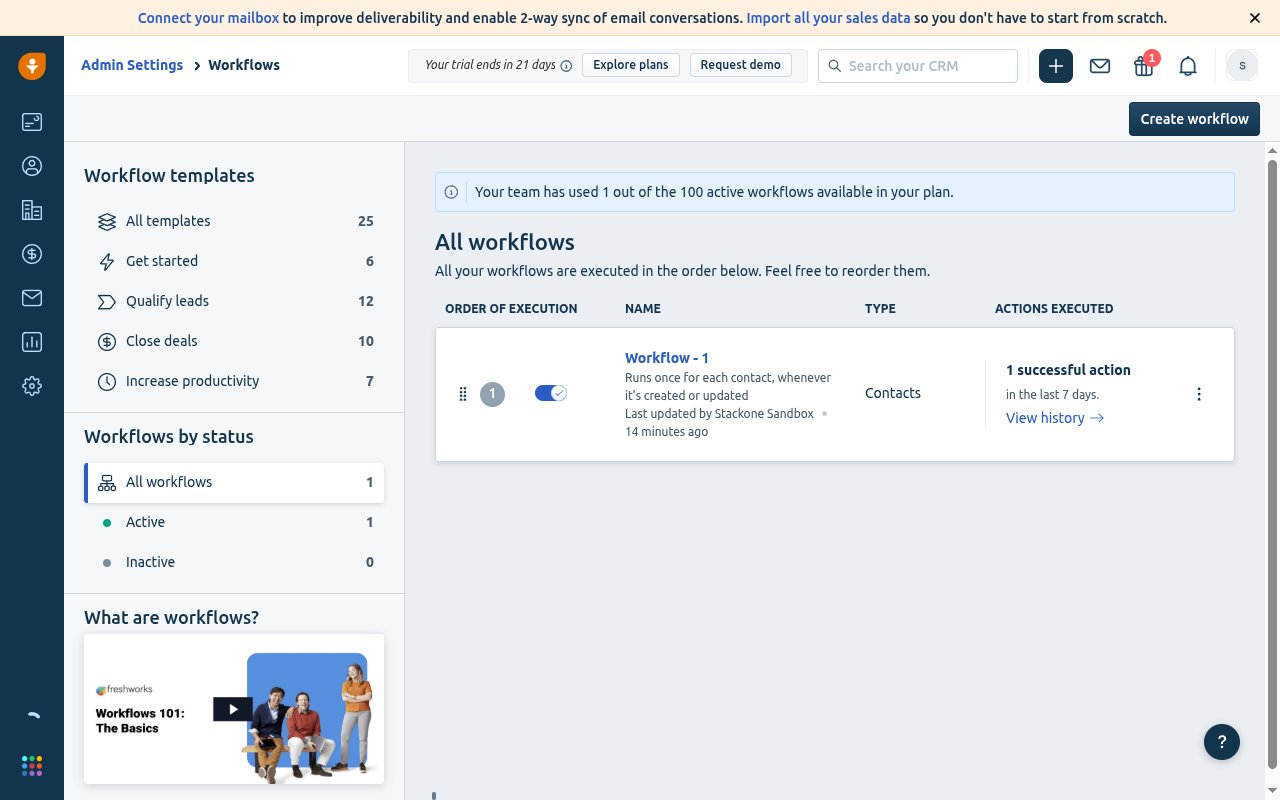
        <p>On the <strong>Workflows</strong> page, click <strong>Create workflow</strong>.</p>

        <img src="https://mintcdn.com/stackone-60/LqZnqqYiHncizs5W/connectors/freshsales/images/events-create-workflow.png?fit=max&auto=format&n=LqZnqqYiHncizs5W&q=85&s=2a33cb3474e2858c1c79a29edcce2b9a" alt="Freshsales Workflows page with the Create workflow button" width="1280" height="800" data-path="connectors/freshsales/images/events-create-workflow.png" />
      </div>
    </Step>

    <Step title="Choose the module, trigger, and conditions">
      <div data-guide-step data-guide-scopes="" data-guide-display-scopes-list="">
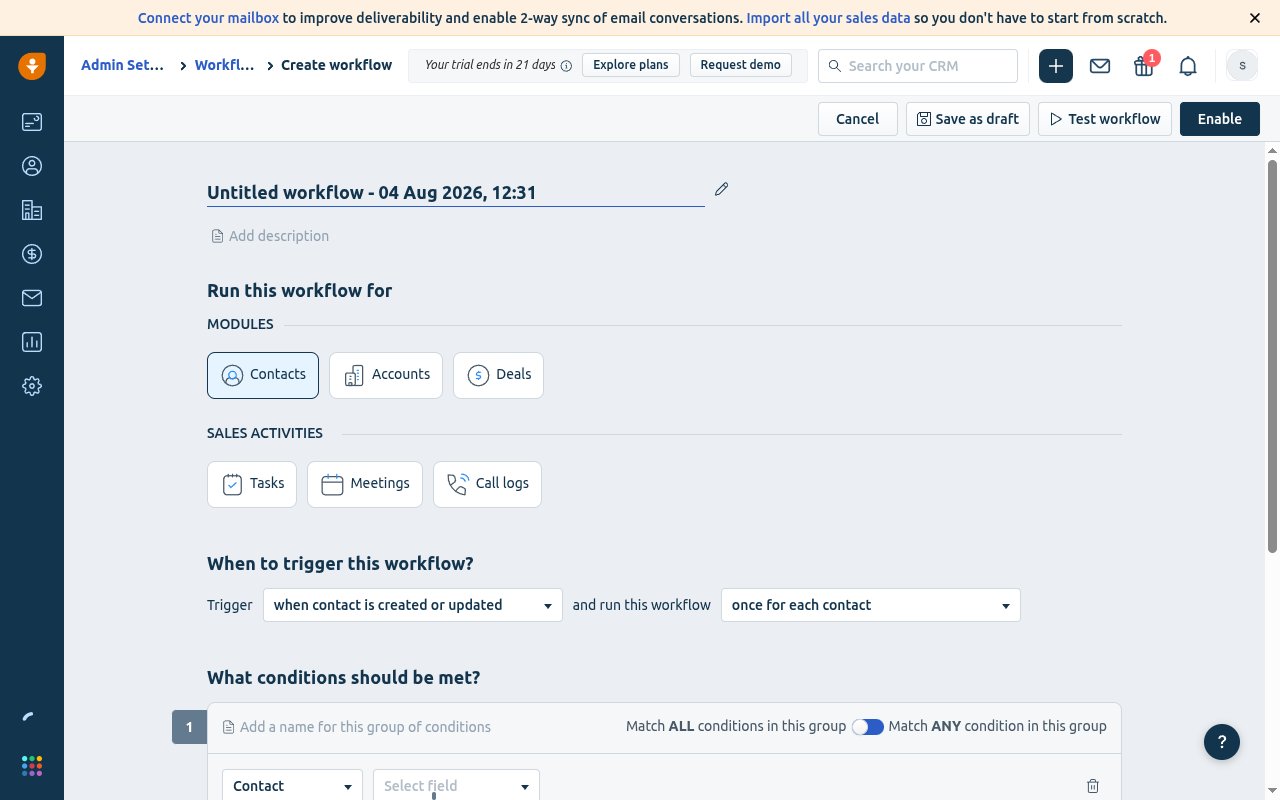
        <p>Under <strong>Run this workflow for</strong>, pick the <strong>Module</strong> the events should come from — <strong>Contacts</strong>, <strong>Accounts</strong>, <strong>Deals</strong>, or a <strong>Sales activities</strong> type (<strong>Tasks</strong>, <strong>Meetings</strong>, <strong>Call logs</strong>). Under <strong>When to trigger this workflow?</strong> set the <strong>Trigger</strong> (for example, *when contact is created or updated*), and optionally add conditions under <strong>What conditions should be met?</strong></p>

        <img src="https://mintcdn.com/stackone-60/LqZnqqYiHncizs5W/connectors/freshsales/images/events-workflow-trigger.png?fit=max&auto=format&n=LqZnqqYiHncizs5W&q=85&s=64494549971bca4b77a48ae38b2483cc" alt="Freshsales workflow builder showing Run this workflow for (Modules), When to trigger this workflow, and What actions should be executed" width="1280" height="800" data-path="connectors/freshsales/images/events-workflow-trigger.png" />
      </div>
    </Step>

    <Step title="Add a Trigger webhook action">
      <div data-guide-step data-guide-scopes="" data-guide-display-scopes-list="">
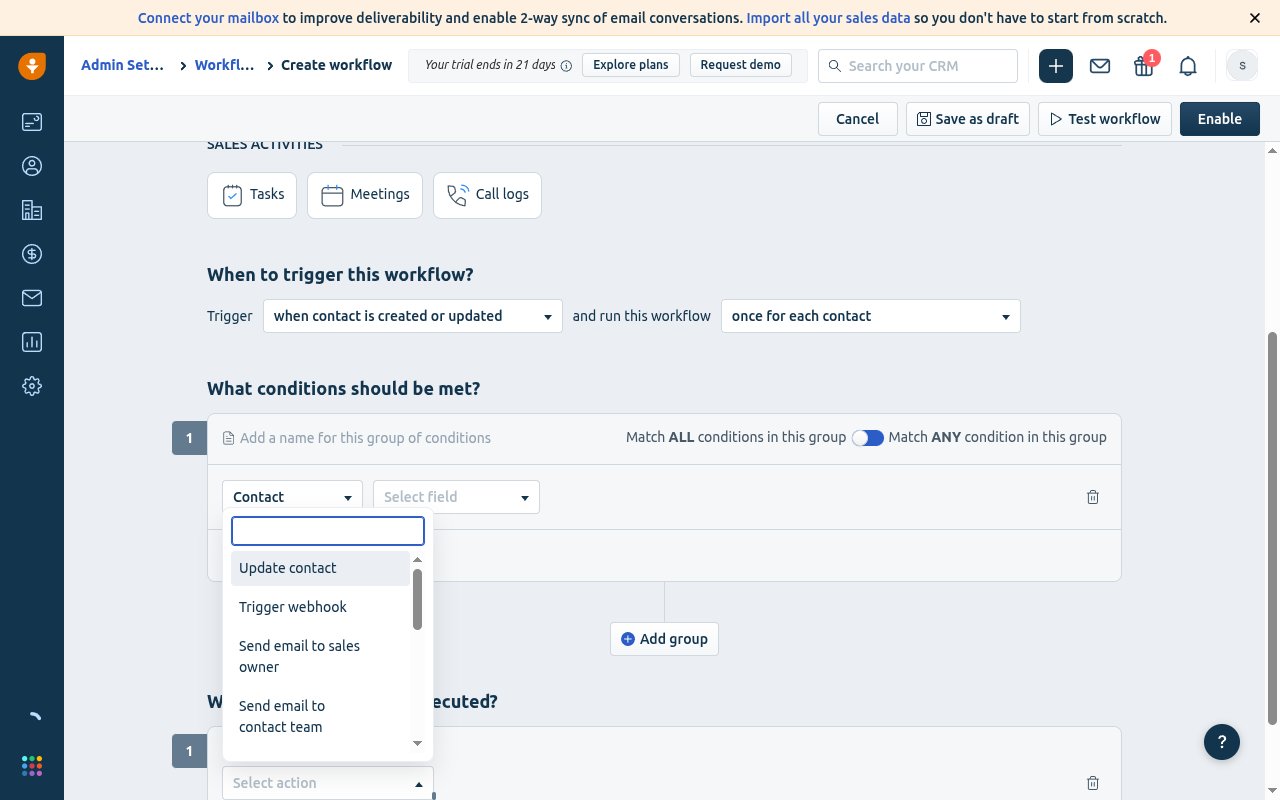
        <p>Under <strong>What actions should be executed?</strong>, click <strong>Add action</strong>, open <strong>Select action</strong>, and choose <strong>Trigger webhook</strong>. Then click <strong>Edit webhook settings</strong>.</p>

        <img src="https://mintcdn.com/stackone-60/LqZnqqYiHncizs5W/connectors/freshsales/images/events-select-webhook-action.png?fit=max&auto=format&n=LqZnqqYiHncizs5W&q=85&s=cc27613e3a5c718613272127f6a8f940" alt="Freshsales workflow action list with the Trigger webhook option selected" width="1280" height="800" data-path="connectors/freshsales/images/events-select-webhook-action.png" />
      </div>
    </Step>

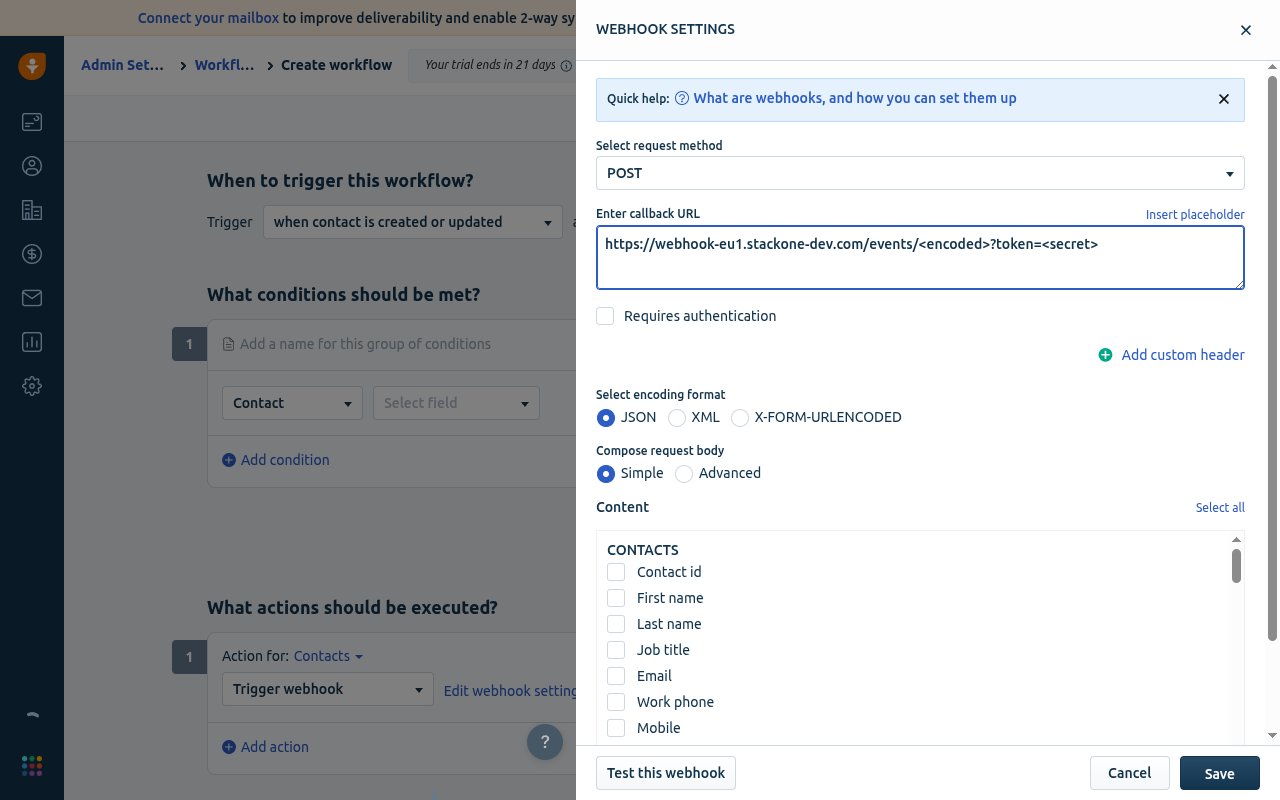
    <Step title="Configure the Webhook Settings">
      <div data-guide-step data-guide-scopes="" data-guide-display-scopes-list="">
        <p>In the <strong>Webhook Settings</strong> panel, complete the fields below, then click <strong>Save</strong>.</p>

        <ul>
          <li><strong>Select request method</strong> — choose <strong>POST</strong>.</li>
          <li><strong>Enter callback URL</strong> — paste the <strong>Native Webhook URL</strong> you copied from this StackOne connection.</li>
          <li><strong>Select encoding format</strong> — choose <strong>JSON</strong>.</li>
          <li><strong>Compose request body</strong> — choose <strong>Simple</strong>, then under <strong>Content</strong> select the record's <strong>Contact id</strong> (StackOne uses it as the record id) plus any other fields you want to send. You can use <strong>Select all</strong>.</li>
          <li>Leave <strong>Requires authentication</strong> off — the secure key in the Native Webhook URL is the security gate.</li>
          <li>Optionally click <strong>Test this webhook</strong> to confirm StackOne accepts it, then <strong>Save</strong>.</li>
        </ul>

        <img src="https://mintcdn.com/stackone-60/LqZnqqYiHncizs5W/connectors/freshsales/images/events-webhook-settings.png?fit=max&auto=format&n=LqZnqqYiHncizs5W&q=85&s=5afeeee64c3dccfce2e365ecd1d0c081" alt="Freshsales Webhook Settings panel with Select request method POST, Enter callback URL, Select encoding format JSON, Compose request body Simple, Content field checkboxes, and Save" width="1280" height="800" data-path="connectors/freshsales/images/events-webhook-settings.png" />
      </div>
    </Step>

    <Step title="Save the webhook, then enable the workflow">
      <div data-guide-step data-guide-scopes="" data-guide-display-scopes-list="">
        <p>Click <strong>Save</strong> in the <strong>Webhook Settings</strong> panel to return to the workflow builder. In the builder's toolbar at the top of the page you'll see <strong>Save as draft</strong>, <strong>Test workflow</strong>, and <strong>Enable</strong>. Click <strong>Test workflow</strong> first if you want to send a one-off test delivery, then click <strong>Enable</strong> to switch the workflow on. Once enabled, Freshsales POSTs the payload to the callback URL every time the trigger fires and the conditions are met.</p>

        <img src="https://mintcdn.com/stackone-60/LqZnqqYiHncizs5W/connectors/freshsales/images/events-workflow-trigger.png?fit=max&auto=format&n=LqZnqqYiHncizs5W&q=85&s=64494549971bca4b77a48ae38b2483cc" alt="Freshsales workflow builder toolbar showing the Save as draft, Test workflow, and Enable buttons" width="1280" height="800" data-path="connectors/freshsales/images/events-workflow-trigger.png" />
      </div>
    </Step>
  </Steps>
</section>

<section data-guide-section data-guide-scopes="">
  <h2>Available webhook events</h2>

  <p>A Freshsales Workflow can send events from any of these modules — build one workflow per module and trigger you want to receive. Only the fields you select in the workflow's Content are delivered.</p>

  <ul>
    <li><strong>Contacts</strong> — a contact is created or updated (or field-specific triggers you choose).</li>
    <li><strong>Accounts</strong> — an account is created or updated.</li>
    <li><strong>Deals</strong> — a deal is created or updated (including stage changes).</li>
    <li><strong>Tasks</strong> — a task is created, updated, or completed.</li>
    <li><strong>Meetings</strong> — a meeting/appointment is created or updated.</li>
    <li><strong>Call logs</strong> — a call log is created or updated.</li>
  </ul>
</section>

<section data-guide-section data-guide-scopes="">
  <h2>Delivery format</h2>

  <p>Freshsales sends each event as a single HTTPS POST with the JSON body you composed in the workflow (the selected <strong>Content</strong> fields, flat and prefixed by record type — e.g. `contact_id`, `contact_email`). Because the body is admin-defined, StackOne passes the full payload through as the event data and derives the record id from the record's id field (e.g. `contact_id`). There is no verification handshake, and the secure key in the callback URL authenticates the delivery.</p>
</section>

## Verify

Your Connector should now be able to receive and process events. Try triggering an event and you should see an Event appear in the Connector logs.