> ## Documentation Index
> Fetch the complete documentation index at: https://docs.stackone.com/llms.txt
> Use this file to discover all available pages before exploring further.
# Groups
> Give the same roles to many people at once, and change them in one place.
A group with roles applied gives the same access to people who do the same job, such as a team or department. People who join or leave the group gain or lose that access automatically.
Groups can be managed either:
* [**Manual groups**](#manual-groups) (see below).
* **Synced from the identity provider**, through [SCIM Groups](/secure/identity-and-access/manage-team/scim/groups).
## Manual groups
These are the groups created in StackOne. Groups from the identity provider are managed there instead.
### Create a group
Only **Organization Admins** can create groups, manage their members, and delete them.
Go to [**Organization > Manage Team**](https://app.stackone.com/organization/manage_team) and select the **Groups** tab.
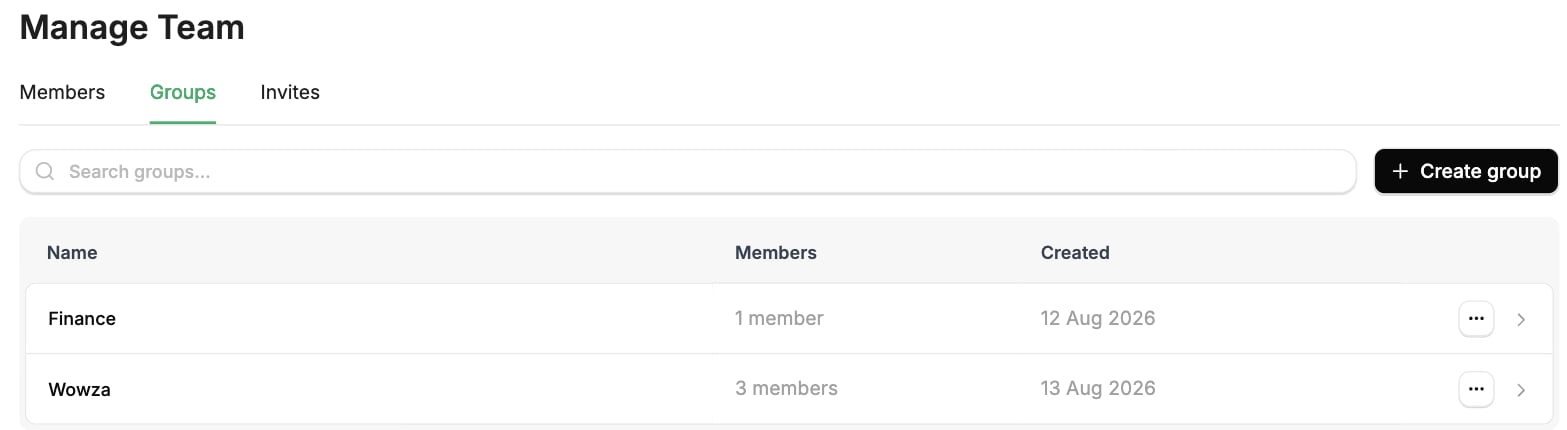 1. Click **Create group** to open the panel.
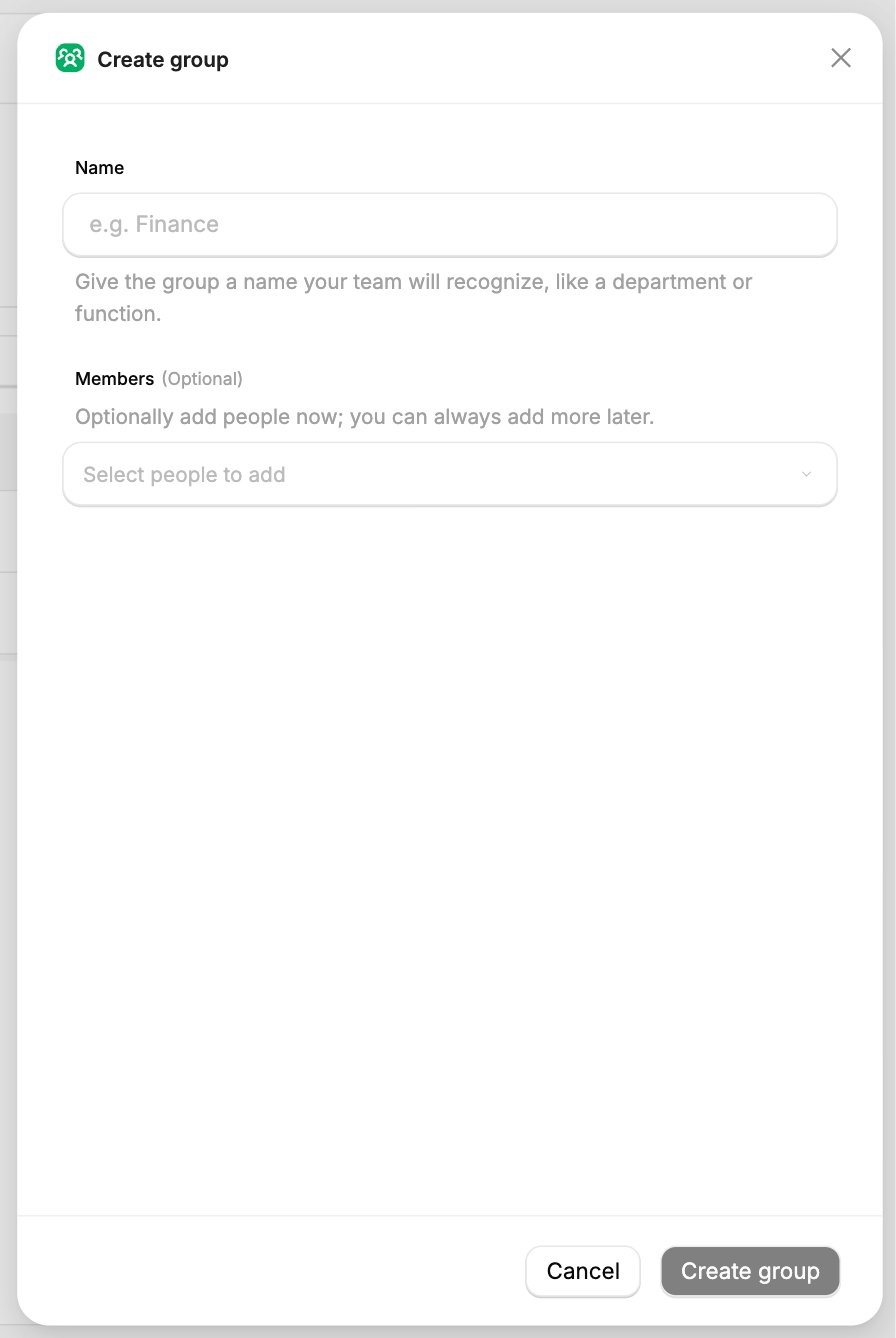
2. Enter a **Name**, for example a department, team or function. You can rename the group later with **Edit Details**.
3. Optionally, add **Members** from the organization. You can add more later.
4. Click **Create group** to finish.
1. Click **Create group** to open the panel.
2. Enter a **Name**, for example a department, team or function. You can rename the group later with **Edit Details**.
3. Optionally, add **Members** from the organization. You can add more later.
4. Click **Create group** to finish.
 ### Manage group membership
Open the group from the **Groups** tab.
### Manage group membership
Open the group from the **Groups** tab.
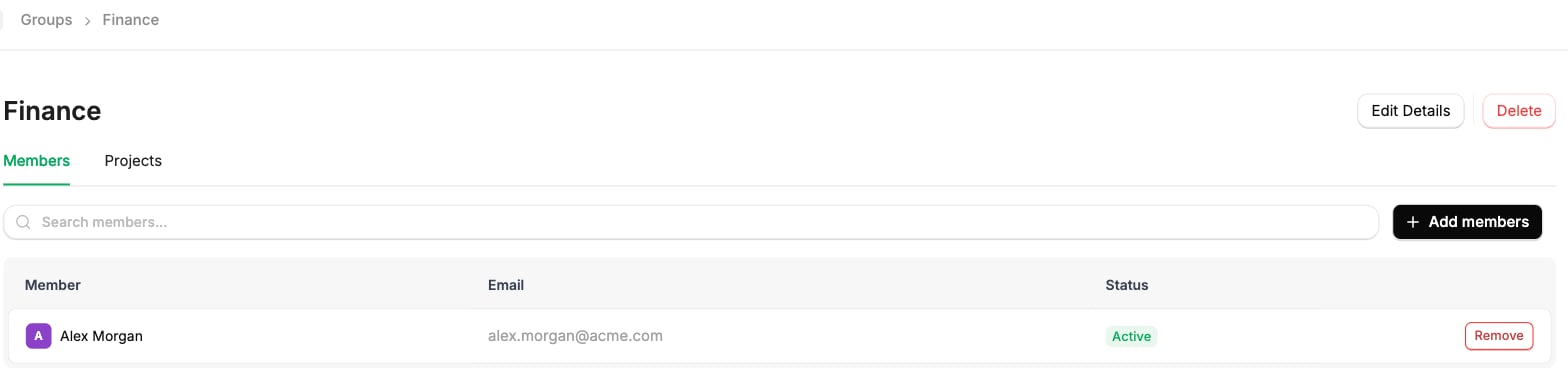 * To add people, click **Add members**, select them, and confirm.
* To remove someone, click **Remove** on their row and confirm. They lose any access the group gave them.
### Delete a group
1. Open the group from the **Groups** tab and click **Delete**.
2. Type the group's name, then click **Delete** to confirm.
This can't be undone, and the group's members lose any access it gave them.
## Assign a group to a project
Assigning a group to a project needs **Organization Admin** or **Project Admin**.
Start from the project to add several groups to it at once, or from the group to add it to several projects:
1. Go to [**Project Settings > Access**](https://app.stackone.com/settings/members).
2. Switch the view from **Members** to **Groups**.
* To add people, click **Add members**, select them, and confirm.
* To remove someone, click **Remove** on their row and confirm. They lose any access the group gave them.
### Delete a group
1. Open the group from the **Groups** tab and click **Delete**.
2. Type the group's name, then click **Delete** to confirm.
This can't be undone, and the group's members lose any access it gave them.
## Assign a group to a project
Assigning a group to a project needs **Organization Admin** or **Project Admin**.
Start from the project to add several groups to it at once, or from the group to add it to several projects:
1. Go to [**Project Settings > Access**](https://app.stackone.com/settings/members).
2. Switch the view from **Members** to **Groups**.
 1. Click **Add Groups**.
2. Select one or more groups.
3. Choose a **Role**. It defaults to **Project Member**. See [Project Roles](/secure/identity-and-access/roles-and-groups/project-roles) for what each role allows.
1. Click **Add Groups**.
2. Select one or more groups.
3. Choose a **Role**. It defaults to **Project Member**. See [Project Roles](/secure/identity-and-access/roles-and-groups/project-roles) for what each role allows.
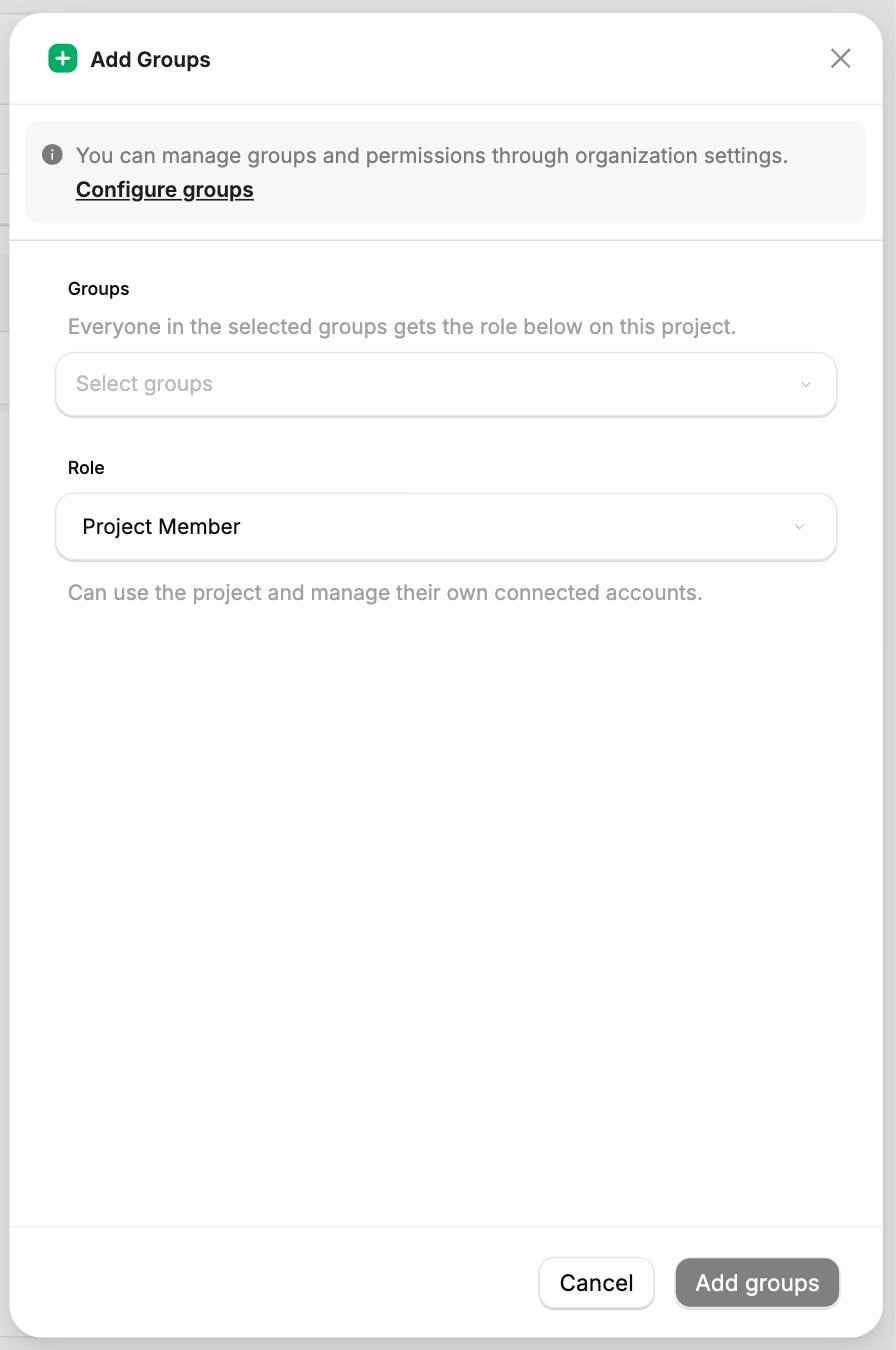 Confirm the selection to add the groups. Every member of each selected group gains the chosen role on the project.
1. Open the group and select its **Projects** tab.
2. Click **Add project**, then select a **Project** and a **Role**. The role defaults to **Project Member**.
3. Click **Add project** to confirm.
## Assign a group to an account
Before assigning a group to an account:
* You need **Account Admin** on that account.
* The group must already be assigned to the account's project. See [Assign a group to a project](#assign-a-group-to-a-project).
Organization Admins and Project Admins are **Account Admin** on every account by default, unless [explicit account access](/secure/identity-and-access/roles-and-groups/overview#explicit-account-access) is enabled.
1. Go to [**Accounts**](https://app.stackone.com/accounts) and open the account.
2. Select its **Access** tab.
3. Switch the view to **Groups**.
1. Click **Add Groups**.
2. Select one or more groups.
3. Choose **Account Admin** or **Account Member**. It defaults to **Account Member**. See [Shared Accounts](/secure/identity-and-access/roles-and-groups/shared-accounts) for what each role allows.
Confirm the selection to add the groups. Every member of each selected group gains the chosen role on the account.
## Change or remove a group's access
Open the **Groups** view on the project or account, then:
* To change the group's role, pick a new role on its row.
* To remove the group's access, click **Revoke** on its row and confirm.
Access a group gets through the project isn't listed on the account. Change or revoke it on the project instead.
Revoking a group from a project also revokes it from every account in that project.
To stop you locking yourself out, you can't revoke a group that is your only access to a project. **Organization Admins** can, because they always have access to every project.
This documentation is built and hosted on [Mintlify](https://mintlify.com), a developer documentation platform.
Confirm the selection to add the groups. Every member of each selected group gains the chosen role on the project.
1. Open the group and select its **Projects** tab.
2. Click **Add project**, then select a **Project** and a **Role**. The role defaults to **Project Member**.
3. Click **Add project** to confirm.
## Assign a group to an account
Before assigning a group to an account:
* You need **Account Admin** on that account.
* The group must already be assigned to the account's project. See [Assign a group to a project](#assign-a-group-to-a-project).
Organization Admins and Project Admins are **Account Admin** on every account by default, unless [explicit account access](/secure/identity-and-access/roles-and-groups/overview#explicit-account-access) is enabled.
1. Go to [**Accounts**](https://app.stackone.com/accounts) and open the account.
2. Select its **Access** tab.
3. Switch the view to **Groups**.
1. Click **Add Groups**.
2. Select one or more groups.
3. Choose **Account Admin** or **Account Member**. It defaults to **Account Member**. See [Shared Accounts](/secure/identity-and-access/roles-and-groups/shared-accounts) for what each role allows.
Confirm the selection to add the groups. Every member of each selected group gains the chosen role on the account.
## Change or remove a group's access
Open the **Groups** view on the project or account, then:
* To change the group's role, pick a new role on its row.
* To remove the group's access, click **Revoke** on its row and confirm.
Access a group gets through the project isn't listed on the account. Change or revoke it on the project instead.
Revoking a group from a project also revokes it from every account in that project.
To stop you locking yourself out, you can't revoke a group that is your only access to a project. **Organization Admins** can, because they always have access to every project.
This documentation is built and hosted on [Mintlify](https://mintlify.com), a developer documentation platform.