> ## Documentation Index
> Fetch the complete documentation index at: https://docs.stackone.com/llms.txt
> Use this file to discover all available pages before exploring further.

# Workday Background Check

> Learn how to configure and integrate Workday Background Checks with StackOne.

## Overview

This guide provides step-by-step instructions for configuring and integrating Workday Background Checks with StackOne.
By following these steps, you will enable background checks for candidates, ensuring that all required statuses, packages,
and business processes are correctly set up in Workday. The integration automates the workflow and ensures consistent status updates.

## Partner Requirements

There are no formal partnership requirements to configure and utilise the background check feature with Workday; however, you must have administrative privileges for your Workday account.

## Provider Side Setup

### Create Background Check Statuses in Workday

<Steps>
  <Step title="Create background check statuses">
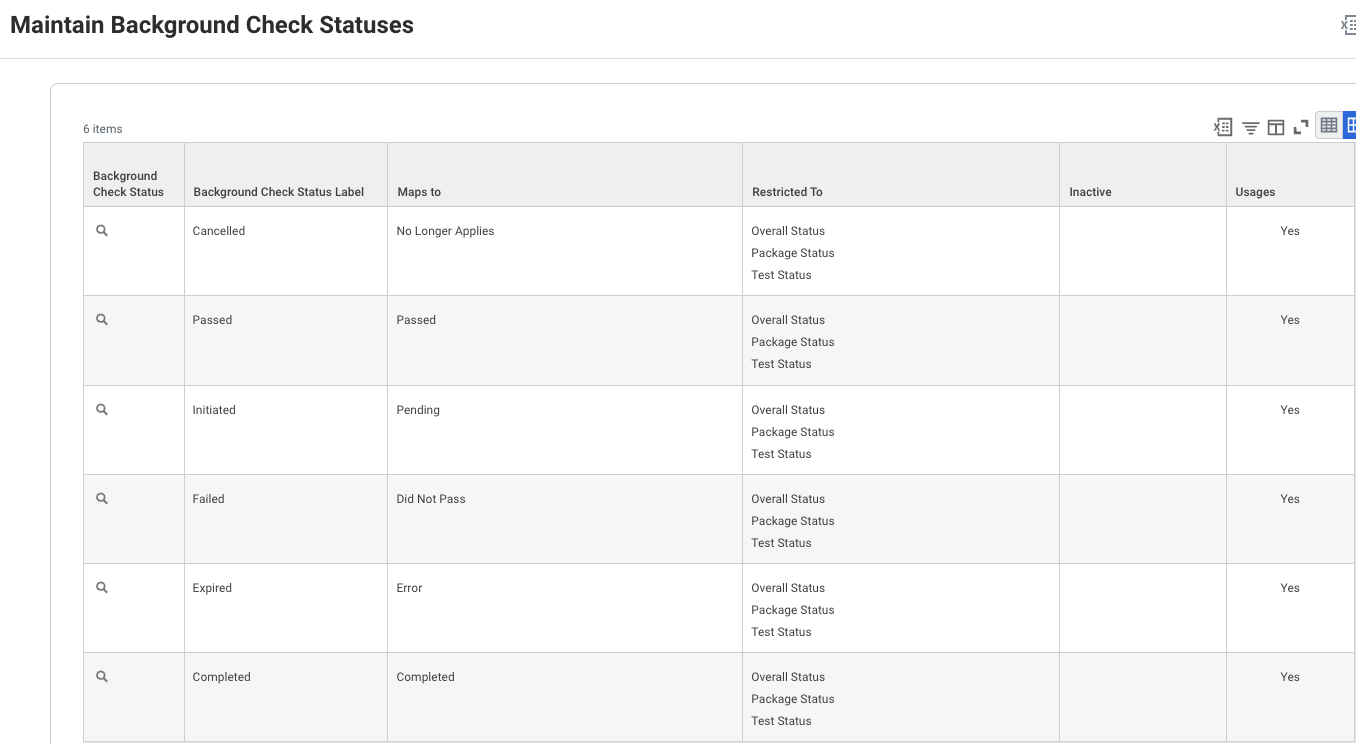
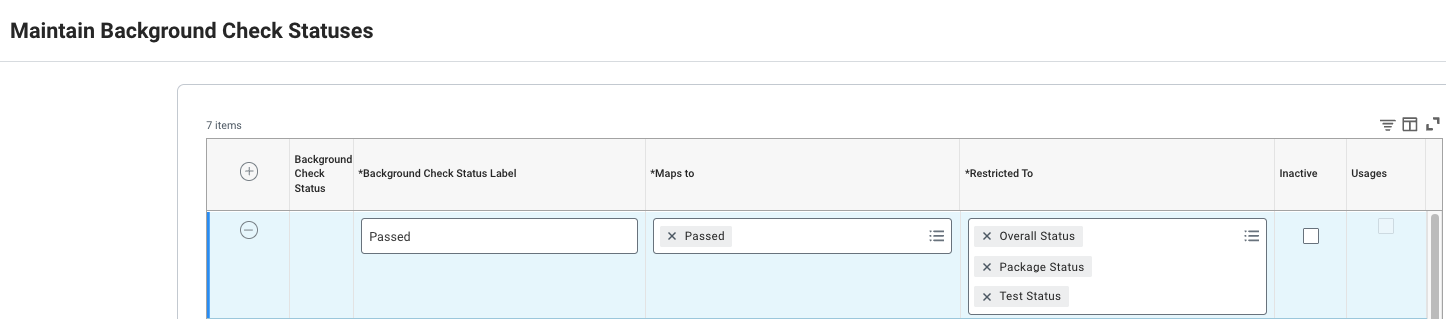
    Navigate to the <i>Maintain Background Check Statuses</i> page, add new statuses, and map each one to the appropriate existing value in the <i>Maps to</i> dropdown.
    Click `OK` to save and `Done` to confirm.

    <Frame>
      <img className="rounded-md" style={{ margin: '0 auto', border: '1px solid #efefef' }} alt="Maintain Background Check Statuses" src="https://mintcdn.com/stackone-60/ViF-UKmjNwrKRKbc/images/workday/background-check/workday_bc_maintian_bc_statuses_1.png?fit=max&auto=format&n=ViF-UKmjNwrKRKbc&q=85&s=d4fbf2647f9fd7c7357694635e1bce56" width="1446" height="319" data-path="images/workday/background-check/workday_bc_maintian_bc_statuses_1.png" />
    </Frame>

    <Info>
      The background check statuses will be used to update the result of the background check.
    </Info>

    Use the following mapping when creating statuses:

    | Background Check Status Label | Maps to           |
    | ----------------------------- | ----------------- |
    | Completed                     | Completed         |
    | Passed                        | Passed            |
    | Initiated                     | Pending           |
    | Failed                        | Did Not Pass      |
    | Expired                       | Error             |
    | Cancelled                     | No Longer Applies |

    <Frame>
      <img className="rounded-md" style={{ margin: '0 auto', border: '1px solid #efefef' }} alt="Maintain Background Check Statuses" src="https://mintcdn.com/stackone-60/H7SrZL_oPi_8cYn9/images/workday/background-check/workday_bc_maintain_bc_add_this_statuses_2.png?fit=max&auto=format&n=H7SrZL_oPi_8cYn9&q=85&s=d3a810decb6cb469e56f4bd7b52f55ae" width="1356" height="744" data-path="images/workday/background-check/workday_bc_maintain_bc_add_this_statuses_2.png" />
    </Frame>
  </Step>

  <Step title="Edit reference IDs for the background check statuses">
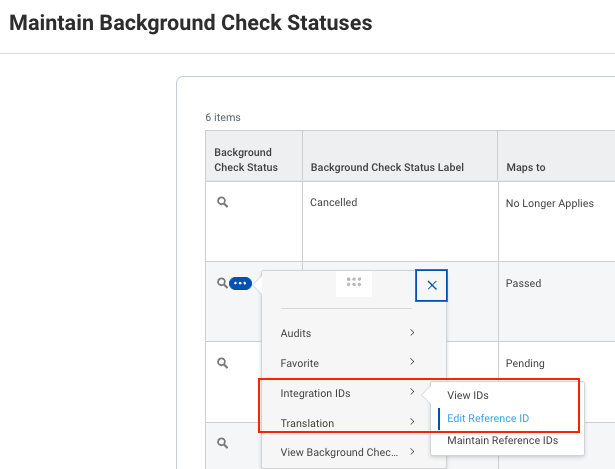
    From the 3-dot menu, select <i>Edit Reference ID</i> to modify the `Background_Check_Status_ID`.

    <Frame>
      <img className="rounded-md" style={{ margin: '0 auto', border: '1px solid #efefef' }} alt="Maintain Background Check Statuses" src="https://mintcdn.com/stackone-60/VRhyjT0vVkjtKR56/images/workday/background-check/workday_bc_maintain_bc_edit_reference_id_3.png?fit=max&auto=format&n=VRhyjT0vVkjtKR56&q=85&s=544b1681397984e2c0683bac5e34492e" width="615" height="469" data-path="images/workday/background-check/workday_bc_maintain_bc_edit_reference_id_3.png" />
    </Frame>

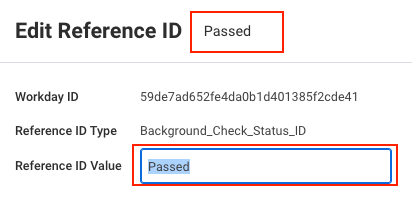
    Set the Reference ID to exactly match each status label.

    <Frame>
      <img className="rounded-md" style={{ margin: '0 auto', border: '1px solid #efefef' }} alt="Maintain Background Check Statuses" src="https://mintcdn.com/stackone-60/VRhyjT0vVkjtKR56/images/workday/background-check/workday_bc_maintain_bc_statuses_edited_reference_id_4.png?fit=max&auto=format&n=VRhyjT0vVkjtKR56&q=85&s=7d1b478d8bb29427cb693ae345e3ad99" width="412" height="203" data-path="images/workday/background-check/workday_bc_maintain_bc_statuses_edited_reference_id_4.png" />
    </Frame>
  </Step>
</Steps>

### Create Background Check Packages in Workday

<Steps>
  <Step title="Create background check packages">
    Navigate to the <i>Maintain Background Check Packages</i> page and add background check packages, or utilise the <a href="https://docs.stackone.com/ats/api-reference/background-checks/packages/create-background-check-package" target="_blank">Create Background Check Package</a> endpoint.

    <Info>
      These background check packages will be available during the background check submission for candidates.
    </Info>

    <Frame>
      <img className="rounded-md" style={{ margin: '0 auto', border: '1px solid #efefef' }} alt="Maintain Assessment Tests" src="https://mintcdn.com/stackone-60/VRhyjT0vVkjtKR56/images/workday/background-check/workday_bc_maintain_bc_add_packages_5.png?fit=max&auto=format&n=VRhyjT0vVkjtKR56&q=85&s=7b8ac19f95a1221acfa5fd88e1edbe99" width="1822" height="335" data-path="images/workday/background-check/workday_bc_maintain_bc_add_packages_5.png" />
    </Frame>

    Click `OK` to save and `Done` to confirm.
  </Step>
</Steps>

### Job Requisitions within the Supervisory Organisation in Workday

<Warning>
  These steps assume you already have a Supervisory Organisation in your Workday account. If not, please contact your administrator to create one.
</Warning>

<Info>
  It is essential to create the Job Requisition under the Supervisory Organisation that will provide the system with the required security and team authority to manage
  the entire hiring workflow, ensuring that essential business processes (such as automatically triggering background checks) are executed properly.
</Info>

<Steps>
  <Step title="Listed Job Requisitions">
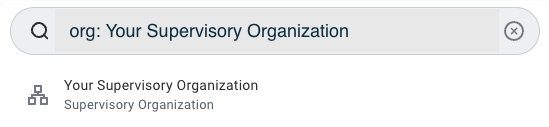
    Navigate to your <i>Supervisory Organisation</i> page via global search (e.g. `org: <your-org-name>`),

    <Frame>
      <img className="rounded-md" style={{ margin: '0 auto', border: '1px solid #efefef' }} alt="View Supervisory Organisation" src="https://mintcdn.com/stackone-60/tTwkdrKgXtf1Xy54/images/workday/background-check/workday_bc_org_search.png?fit=max&auto=format&n=tTwkdrKgXtf1Xy54&q=85&s=cb1ff7f36566499cc74296bb8bdf8fe6" width="549" height="127" data-path="images/workday/background-check/workday_bc_org_search.png" />
    </Frame>

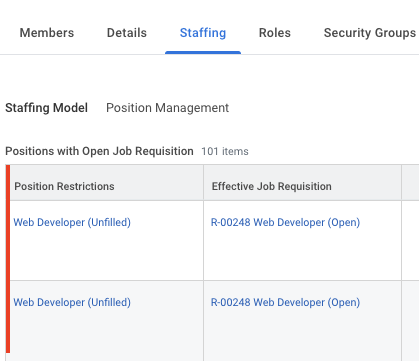
    Go to the `Staffing` tab.

    <Info>
      Ensure the Supervisory Organisation's Staffing Model is `Position Management`.
    </Info>

    <Frame>
      <img className="rounded-md" style={{ margin: '0 auto', border: '1px solid #efefef' }} alt="SO for JR" src="https://mintcdn.com/stackone-60/ViF-UKmjNwrKRKbc/images/workday/background-check/workday_bc_super_org_staffing_position_6.png?fit=max&auto=format&n=ViF-UKmjNwrKRKbc&q=85&s=c980d16ad786181feea71ac6a1f22a29" width="419" height="361" data-path="images/workday/background-check/workday_bc_super_org_staffing_position_6.png" />
    </Frame>

    Under the `Positions with Open Job Requisition` grid, you will find the list of job requisitions that support sending notifications for the background check via the Integration System.
  </Step>

  <Step title="No listed Job Requisitions">
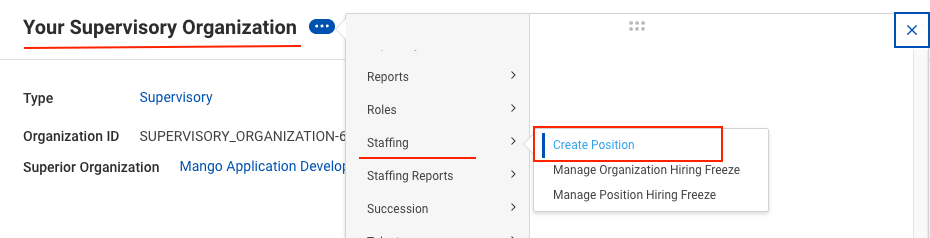
    If there are no jobs listed under `Positions with Open Job Requisition`, choose `Create Position` under the `Staffing` tab from the 3-dot menu.

    <Frame>
      <img className="rounded-md" style={{ margin: '0 auto', border: '1px solid #efefef' }} alt="Create Job Position" src="https://mintcdn.com/stackone-60/ViF-UKmjNwrKRKbc/images/workday/background-check/workday_bc_super_org_create_position_7.png?fit=max&auto=format&n=ViF-UKmjNwrKRKbc&q=85&s=19e78203b30a1f20a7519097bcea5820" width="930" height="238" data-path="images/workday/background-check/workday_bc_super_org_create_position_7.png" />
    </Frame>

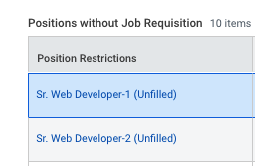
    Complete the required fields to create a position; it will then appear in the `Positions without Job Requisition` grid.

    <Frame>
      <img className="rounded-md" style={{ margin: '0 auto', border: '1px solid #efefef' }} alt="Created Job Position" src="https://mintcdn.com/stackone-60/ViF-UKmjNwrKRKbc/images/workday/background-check/workday_bc_super_org_new_position_8.png?fit=max&auto=format&n=ViF-UKmjNwrKRKbc&q=85&s=2f1df39fd25b5af70647a73f9e6473d9" width="255" height="166" data-path="images/workday/background-check/workday_bc_super_org_new_position_8.png" />
    </Frame>

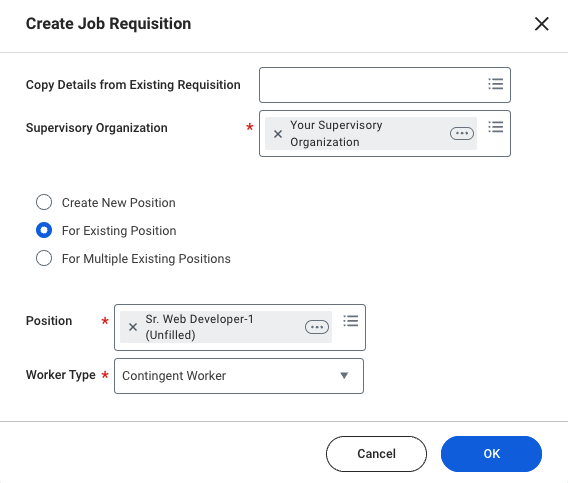
    Navigate to `Create Job Requisition`, select your Supervisory Organisation and position, click `OK`, complete the form, then `Submit` it.

    <Frame>
      <img className="rounded-md" style={{ margin: '0 auto', border: '1px solid #efefef' }} alt="Add in Position in Job Req" src="https://mintcdn.com/stackone-60/ViF-UKmjNwrKRKbc/images/workday/background-check/workday_bc_super_org_new_job_req_9.png?fit=max&auto=format&n=ViF-UKmjNwrKRKbc&q=85&s=cf8d465be19a12388a7d8d0941a29542" width="568" height="483" data-path="images/workday/background-check/workday_bc_super_org_new_job_req_9.png" />
    </Frame>

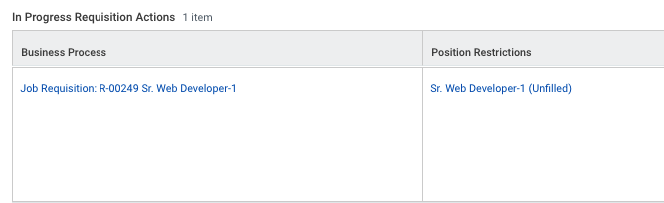
    The position will now appear in the `In Progress Requisition Actions` grid.

    <Frame>
      <img className="rounded-md" style={{ margin: '0 auto', border: '1px solid #efefef' }} alt="Added in Position in Job Req" src="https://mintcdn.com/stackone-60/ViF-UKmjNwrKRKbc/images/workday/background-check/workday_bc_super_org_assign_to_job_10.png?fit=max&auto=format&n=ViF-UKmjNwrKRKbc&q=85&s=e671b9c9509c0e3eb26e3dc15b4d8f13" width="664" height="203" data-path="images/workday/background-check/workday_bc_super_org_assign_to_job_10.png" />
    </Frame>

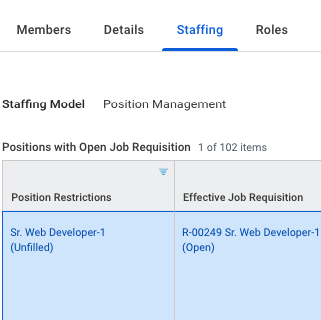
    Once the job requisition is approved, it appears in the `Positions with Open Job Requisition` grid. The recruiter can then assign candidates to this job requisition, which includes Background Check as a stage.

    <Frame>
      <img className="rounded-md" style={{ margin: '0 auto', border: '1px solid #efefef' }} alt="Approved Job Req" src="https://mintcdn.com/stackone-60/ViF-UKmjNwrKRKbc/images/workday/background-check/workday_bc_super_org_position_added_11.png?fit=max&auto=format&n=ViF-UKmjNwrKRKbc&q=85&s=6bf830eed550d61d171b41206803fc19" width="321" height="320" data-path="images/workday/background-check/workday_bc_super_org_position_added_11.png" />
    </Frame>
  </Step>
</Steps>

### Business Process for Background Check in Workday

<Steps>
  <Step title="Create the Business Process for Background Check">
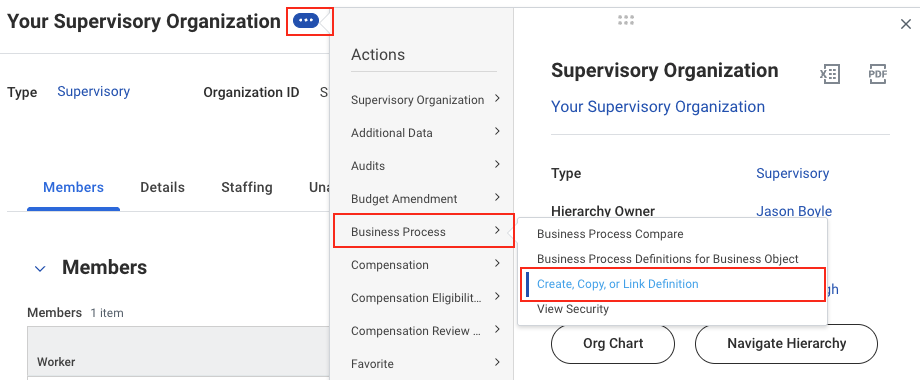
    To create a Background Check Business Process, open the 3‑dot menu beside the Supervisory Organisation name, then click `Create Business Process` under the Business Process menu.

    <Frame>
      <img className="rounded-md" style={{ margin: '0 auto', border: '1px solid #efefef' }} alt="Initiate Business Process" src="https://mintcdn.com/stackone-60/uThnYQIRRji7eaOb/images/workday/background-check/workday_bc_init_bg_check_bp.png?fit=max&auto=format&n=uThnYQIRRji7eaOb&q=85&s=4855e8e1229f7c44dac7a739007d0bb9" width="920" height="380" data-path="images/workday/background-check/workday_bc_init_bg_check_bp.png" />
    </Frame>

    Select `Background Check` from the Business Process Type dropdown, then choose one of the following options: <br />

    * `Copy existing Definition` (to copy and create a new one from an existing or previously configured definition),
    * `Link existing Definition` (if one already exists), or
    * `None of the above` (which will prompt you to create a new one), <br />
      then click `OK`.

    <Frame>
      <img className="rounded-md" style={{ margin: '0 auto', border: '1px solid #efefef' }} alt="Initiate Business Process 2" src="https://mintcdn.com/stackone-60/uThnYQIRRji7eaOb/images/workday/background-check/workday_bc_bp_init_2.png?fit=max&auto=format&n=uThnYQIRRji7eaOb&q=85&s=2292c2d8add52b9065024591d178dcb7" width="730" height="532" data-path="images/workday/background-check/workday_bc_bp_init_2.png" />
    </Frame>

    <Warning>
      If the expected **Business Process Type**, such as `Background Check`, is not visible in the dropdown, it means that the Business Process has already been created for this Supervisory Organisation with the specified type.
    </Warning>

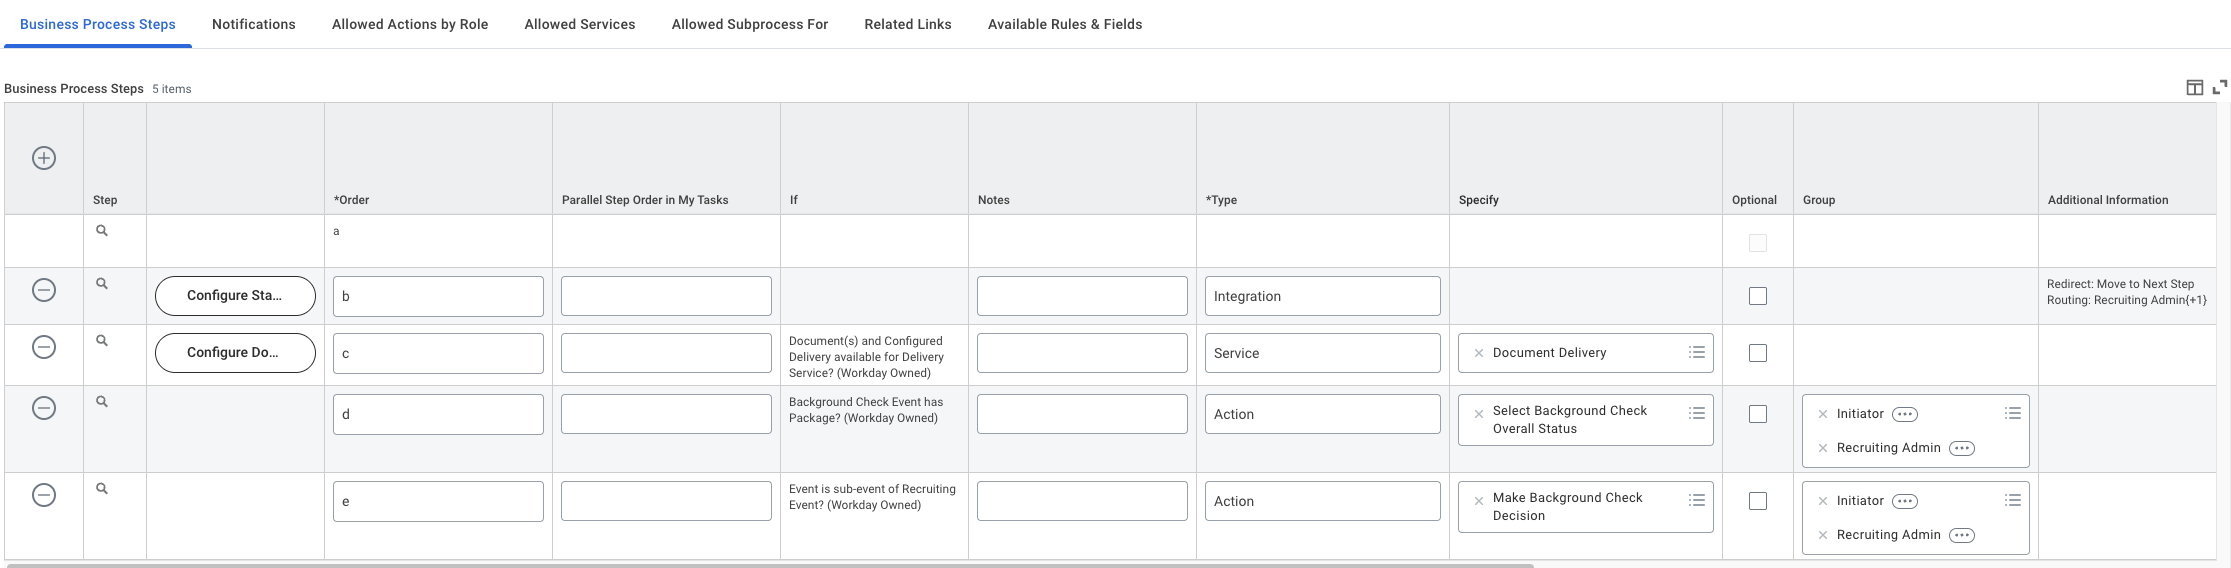
    Enter the required details, then go to the `Business Process Steps` tab to configure the steps for the Background Check.

    | Order | If                                                     | Type        | Specify                                | Optional | Group                                                                                        |
    | ----- | ------------------------------------------------------ | ----------- | -------------------------------------- | -------- | -------------------------------------------------------------------------------------------- |
    | a     |                                                        | Initiation  |                                        | No       |                                                                                              |
    | b     |                                                        | Integration |                                        | No       |                                                                                              |
    | c     |                                                        | Service     | Document Delivery                      | No       |                                                                                              |
    | d     | Background Check Event has Package? (Workday Owned)    | Action      | Select Background Check Overall Status | No       | HR Administrator • Manager • Manager (Unconstrained) • Recruiter • Recruiter (Unconstrained) |
    | e     | Event is subevent of Recruiting Event? (Workday Owned) | Action      | Make Background Check Decision         | No       | HR Administrator • Manager • Manager (Unconstrained) • Recruiter • Recruiter (Unconstrained) |

    <Note>
      You may not have the same `Group` values mentioned in the table above or in the image below. Please select the appropriate `Group` values according to your Workday account's security group configurations.
    </Note>

    <Frame>
      <img className="rounded-md" style={{ margin: '0 auto', border: '1px solid #efefef' }} alt="Setup the Business Process Steps" src="https://mintcdn.com/stackone-60/tTwkdrKgXtf1Xy54/images/workday/background-check/workday_bp_bc_create_bp_steps.png?fit=max&auto=format&n=tTwkdrKgXtf1Xy54&q=85&s=a23a2b8387c1bd1a4e9f4b87c75e4eea" width="2231" height="568" data-path="images/workday/background-check/workday_bp_bc_create_bp_steps.png" />
    </Frame>

    Click `Save`, then `Done` to confirm creation of the business process.
  </Step>

  <Step title="Configure the Integration System step">
    <Note>
      To create an Integration System, refer to the section <a href="#integration-system-in-workday">Integration System in Workday</a>.
    </Note>

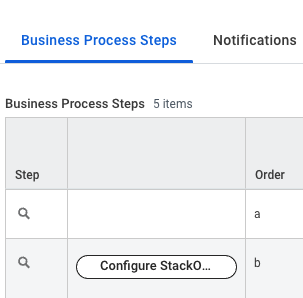
    Navigate to the <i>Background Check Business Process</i> page and click `Configure Integration System`.

    <Frame>
      <img className="rounded-md" style={{ margin: '0 auto', border: '1px solid #efefef' }} alt="BP Config IS" src="https://mintcdn.com/stackone-60/VRhyjT0vVkjtKR56/images/workday/background-check/workday_bc_IS_business_process_step_b_12.png?fit=max&auto=format&n=VRhyjT0vVkjtKR56&q=85&s=cb154096e6cdff57ef399f3c42bf23ed" width="303" height="298" data-path="images/workday/background-check/workday_bc_IS_business_process_step_b_12.png" />
    </Frame>

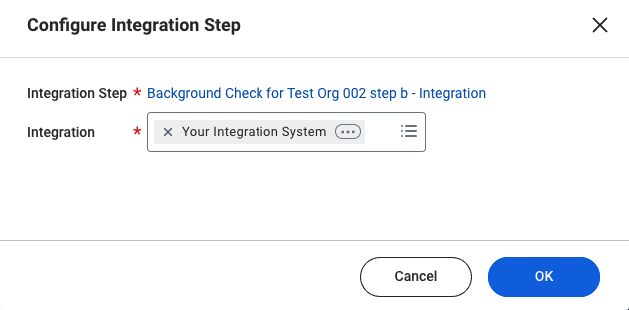
    Select your Integration System and click `OK`.

    <Frame>
      <img className="rounded-md" style={{ margin: '0 auto', border: '1px solid #efefef' }} alt="Select IS on Popup" src="https://mintcdn.com/stackone-60/VRhyjT0vVkjtKR56/images/workday/background-check/workday_bc_IS_select_IS_13.png?fit=max&auto=format&n=VRhyjT0vVkjtKR56&q=85&s=03d3bc8a803cb6e4893c27a213823f01" width="629" height="310" data-path="images/workday/background-check/workday_bc_IS_select_IS_13.png" />
    </Frame>
  </Step>

  <Step title="Edit payload attribute values">
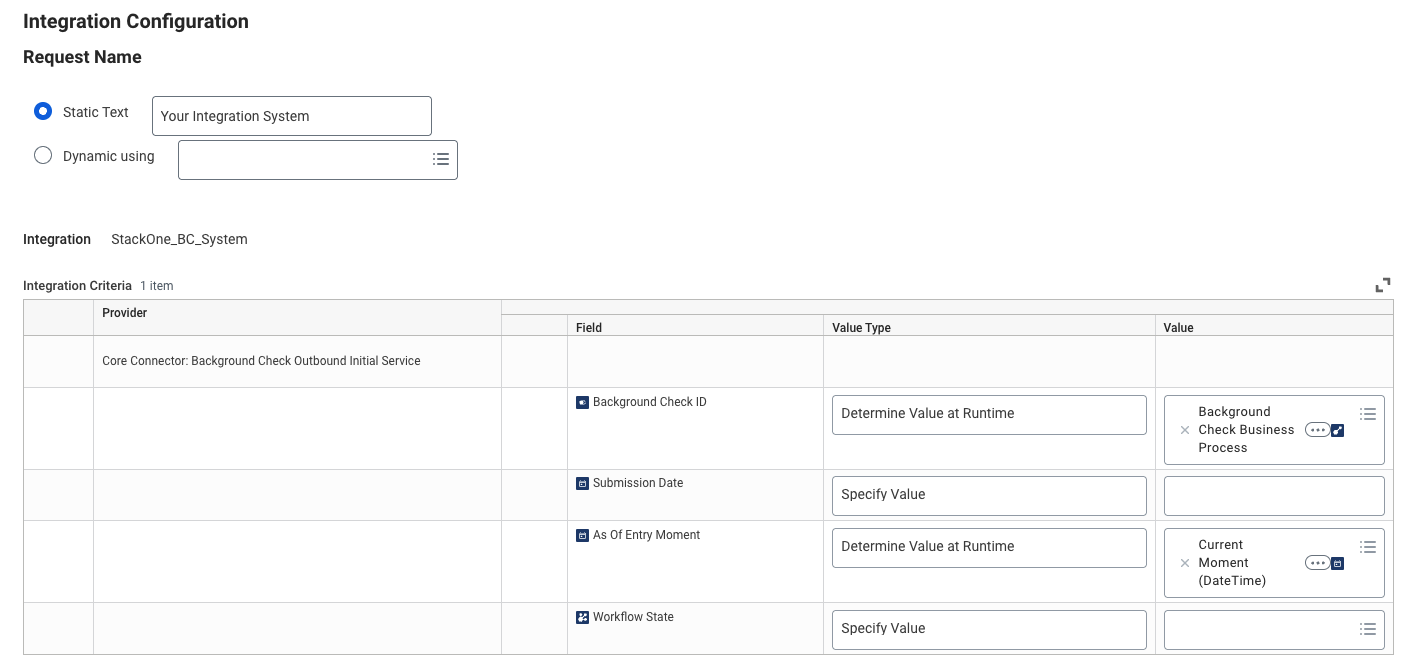
    A pop-up appears allowing you to select the field values to be included in the payload when the `Background Check` event is triggered from Workday.

    <Frame>
      <img className="rounded-md" style={{ margin: '0 auto', border: '1px solid #efefef' }} alt="Set Values for Fields" src="https://mintcdn.com/stackone-60/VRhyjT0vVkjtKR56/images/workday/background-check/workday_bc_IS_step_b_14.png?fit=max&auto=format&n=VRhyjT0vVkjtKR56&q=85&s=a01a4c0503dce9c43680ab8c64a91f06" width="1401" height="660" data-path="images/workday/background-check/workday_bc_IS_step_b_14.png" />
    </Frame>

    **Fill out the following information:**

    * **Background Check ID:** \[Background Check Business Process]
    * **As Of Entry Moment:** \[Current Moment (DateTime)]

    <Note>
      `Submission Date` and `Workflow State` should be left empty.
    </Note>

    Click `OK` to save your configuration.
  </Step>

  <Step title="Configure Maintain Redirect for the Integration step">
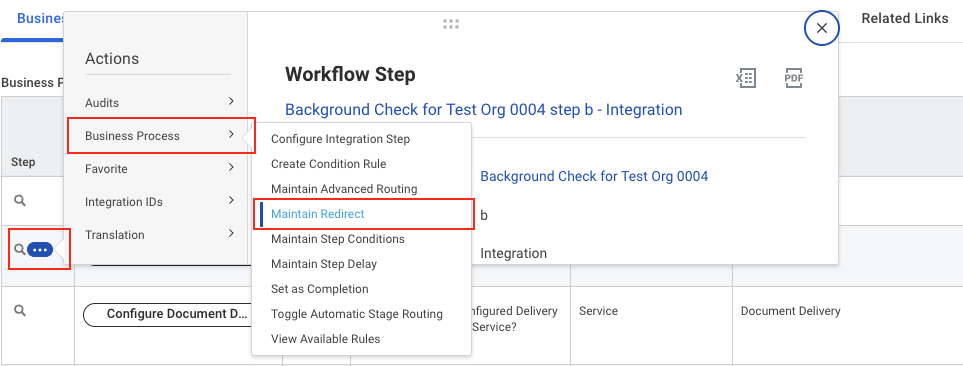
    Open the 3-dot menu on the `integration step` (step b) and click `Maintain Redirect`.

    <Frame>
      <img className="rounded-md" style={{ margin: '0 auto', border: '1px solid #efefef' }} alt="Maintain Redirect" src="https://mintcdn.com/stackone-60/uThnYQIRRji7eaOb/images/workday/background-check/workday_bc_bp_step_b_maintain_redirect_navigation.png?fit=max&auto=format&n=uThnYQIRRji7eaOb&q=85&s=c7223e7b60514a1ce42af84f52c288a6" width="963" height="366" data-path="images/workday/background-check/workday_bc_bp_step_b_maintain_redirect_navigation.png" />
    </Frame>

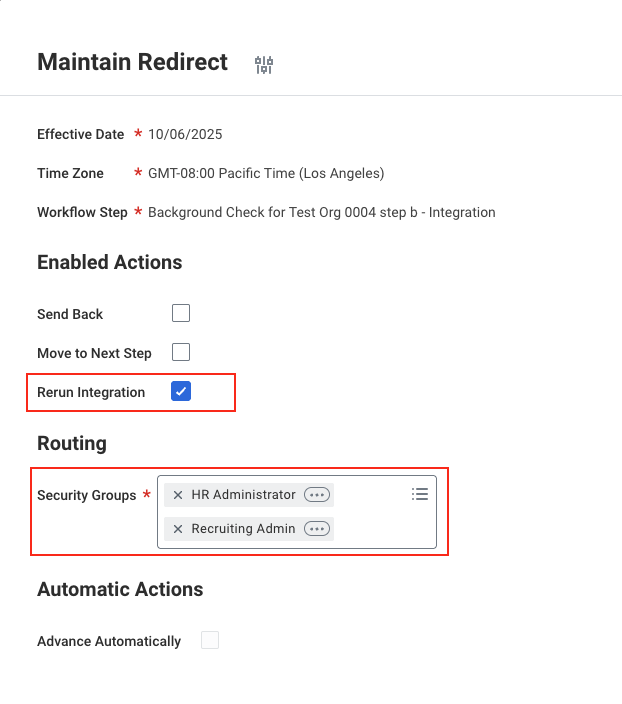
    Enable the necessary actions, select the appropriate security groups, then click `OK` to save.

    <Note>
      You might have different Security Groups configurations on your Workday account.
    </Note>

    <Frame>
      <img className="rounded-md" style={{ margin: '0 auto', border: '1px solid #efefef' }} alt="Maintain Redirect Page" src="https://mintcdn.com/stackone-60/tTwkdrKgXtf1Xy54/images/workday/background-check/workday_bc_maintain_redirect.png?fit=max&auto=format&n=tTwkdrKgXtf1Xy54&q=85&s=bd19fd3acc632922e94eaf3fac25dfad" width="622" height="704" data-path="images/workday/background-check/workday_bc_maintain_redirect.png" />
    </Frame>
  </Step>

  <Step title="Configure the Document Delivery step">
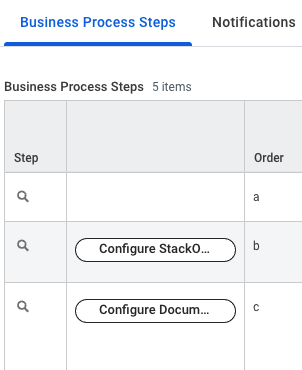
    For the next Business Process step (step c), click `Configure Document Delivery`.

    <Frame>
      <img className="rounded-md" style={{ margin: '0 auto', border: '1px solid #efefef' }} alt="BP Config IS" src="https://mintcdn.com/stackone-60/VRhyjT0vVkjtKR56/images/workday/background-check/workday_bc_IS_document_delivery_15.png?fit=max&auto=format&n=VRhyjT0vVkjtKR56&q=85&s=9b46d9f08b2c0e30e379dbb6b7523f27" width="302" height="370" data-path="images/workday/background-check/workday_bc_IS_document_delivery_15.png" />
    </Frame>
  </Step>

  <Step title="Add values in required fields">
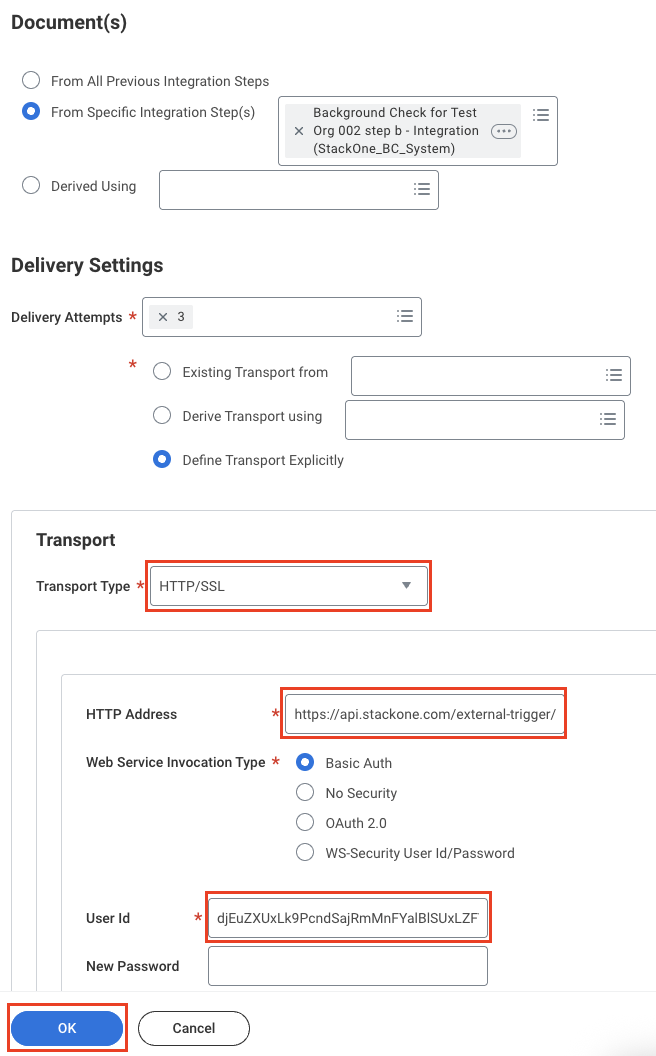
    A pop-up appears allowing you to configure the fields, including `Endpoint URL` (HTTP Address) and `External Trigger Token` (User ID).

    <Frame>
      <img className="rounded-md" style={{ margin: '0 auto', border: '1px solid #efefef' }} alt="Set Values for Fields" src="https://mintcdn.com/stackone-60/VRhyjT0vVkjtKR56/images/workday/background-check/workday_bc_IS_document_delivery_http_token_16.png?fit=max&auto=format&n=VRhyjT0vVkjtKR56&q=85&s=fcf0e80ca843061f645519d4df547bf9" width="656" height="1056" data-path="images/workday/background-check/workday_bc_IS_document_delivery_http_token_16.png" />
    </Frame>

    **Fill out the following information:**

    * **From Specific Integration Step(s):** \[Your Integration System]

    * **Transport Type:** \[HTTP/SSL]

    * **HTTP Address:** \[Endpoint URL]
      ```plaintext theme={null}
      https://api.stackone.com/external-trigger/workdayats
      ```

    * **Web Service Invocation Type:** \[Basic Auth]

    * **User ID:** The `External Trigger Token` that you will receive from the StackOne Connector Hub during connection setup.

          <Note>
            To obtain the <b>External Trigger Token</b>, see:
            <br />• <a href="#stackone-configuration">StackOne Configuration</a>
            <br />• <a href="#ats-user-enablement">ATS User Enablement</a>
          </Note>

    * **New Password / Verify Password:** Enter any temporary text (Workday requires a value, but it isn’t used).

    Click the `OK` button to save your configuration.
  </Step>
</Steps>

### Integration System in Workday

<Steps>
  <Step title="Create Integration System">
    <Note>
      The integration system is crucial for the Background Check process as it automates the secure transfer of candidate data to the external vendor and returns the final background check status to Workday.
    </Note>

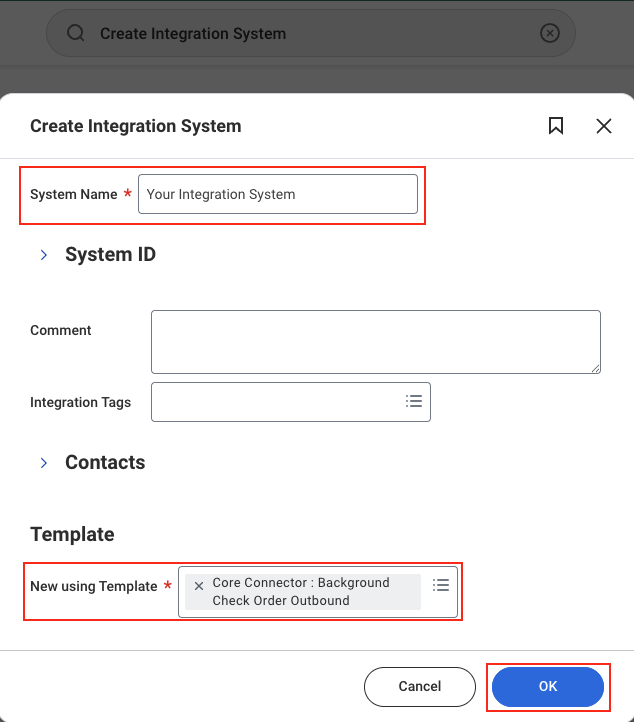
    Search for `Create Integration System` in the global search bar. Enter the `System Name` and select the integration template `Core Connector: Background Check Order Outbound` from the dropdown.

    <Frame>
      <img className="rounded-md" style={{ margin: '0 auto', border: '1px solid #efefef' }} alt="Create Integration System" src="https://mintcdn.com/stackone-60/tTwkdrKgXtf1Xy54/images/workday/background-check/workday_create_IS_core_connector_BG_check.png?fit=max&auto=format&n=tTwkdrKgXtf1Xy54&q=85&s=f174b36e3fdb589451718503bcf34559" width="634" height="722" data-path="images/workday/background-check/workday_create_IS_core_connector_BG_check.png" />
    </Frame>

    Click `OK` to create the Integration System.
  </Step>

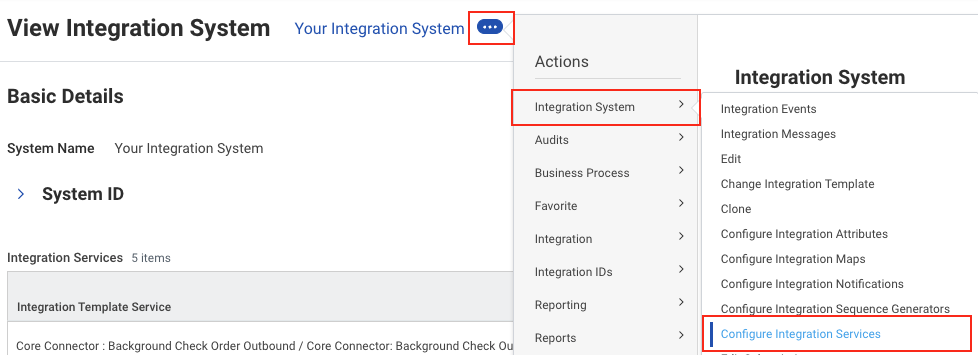
  <Step title="Configure Integration Services">
    Navigate to `Configure Integration Services` from the 3-dot menu to enable the necessary services for the Background Check Order Integration.

    <Frame>
      <img className="rounded-md" style={{ margin: '0 auto', border: '1px solid #efefef' }} alt="Configure Integration Services" src="https://mintcdn.com/stackone-60/tTwkdrKgXtf1Xy54/images/workday/background-check/workday_bc_integration_service_navigation.png?fit=max&auto=format&n=tTwkdrKgXtf1Xy54&q=85&s=33621e3eb3c6fba2e26c51b1c276f8f8" width="978" height="355" data-path="images/workday/background-check/workday_bc_integration_service_navigation.png" />
    </Frame>

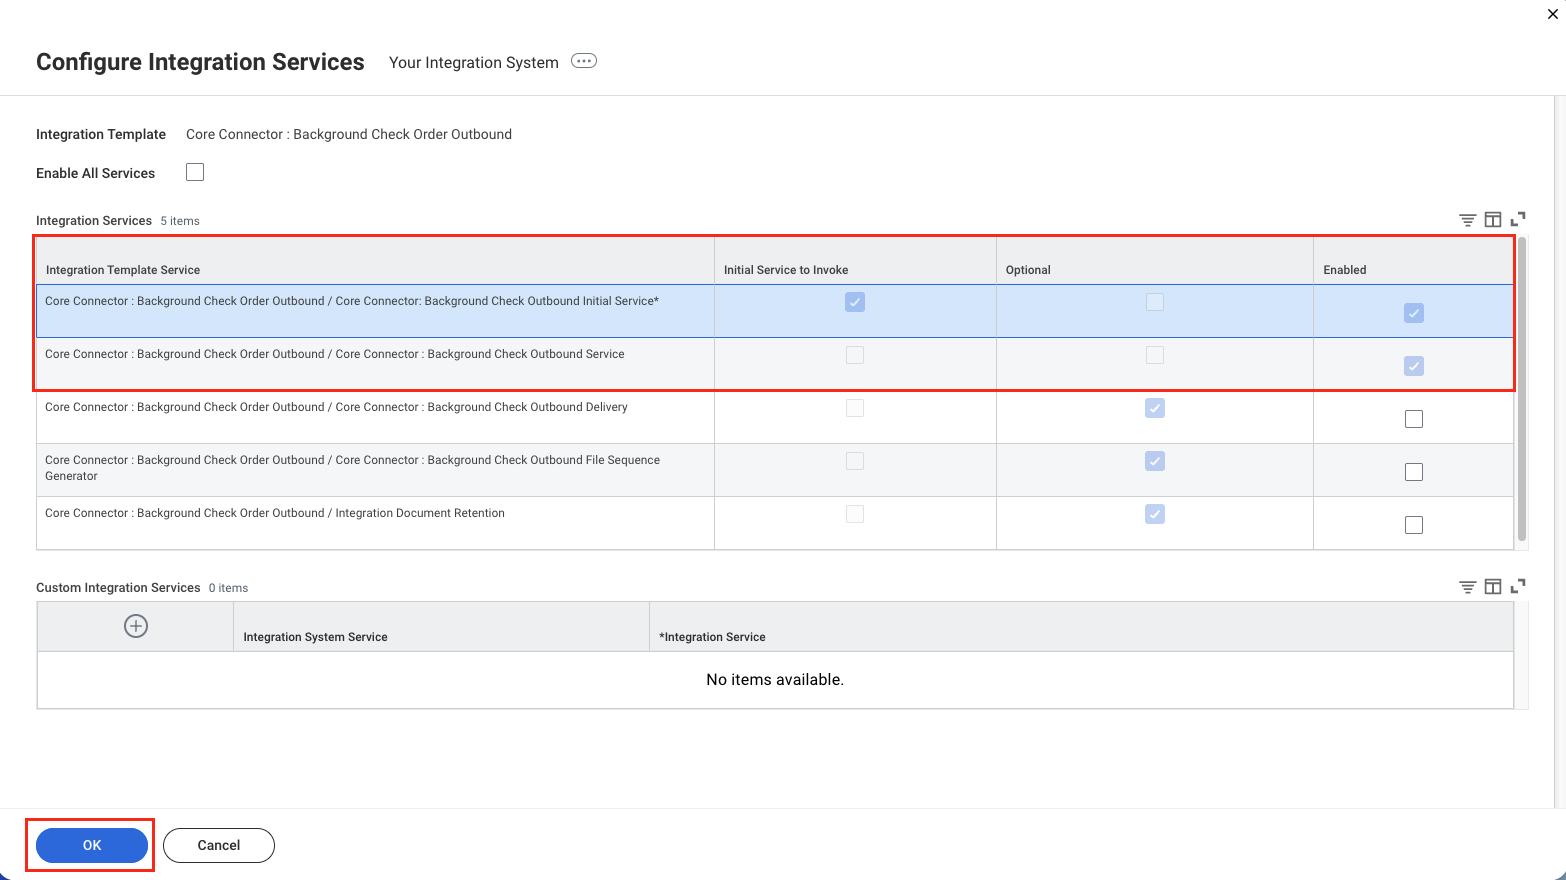
    The following required services will be enabled by default:

    * Core Connector : Background Check Order Outbound / Core Connector: Background Check Outbound Initial Service\*
    * Core Connector : Background Check Order Outbound / Core Connector : Background Check Outbound Service

    <Frame>
      <img className="rounded-md" style={{ margin: '0 auto', border: '1px solid #efefef' }} alt="Add Integration Services" src="https://mintcdn.com/stackone-60/bXJpIbQQ5AKJpdvH/images/workday/background-check/workday_bc_enable_services.png?fit=max&auto=format&n=bXJpIbQQ5AKJpdvH&q=85&s=7d9693f0005fe36be42e1b5ca6c7d837" width="1566" height="880" data-path="images/workday/background-check/workday_bc_enable_services.png" />
    </Frame>

    Click `OK` to save.
  </Step>

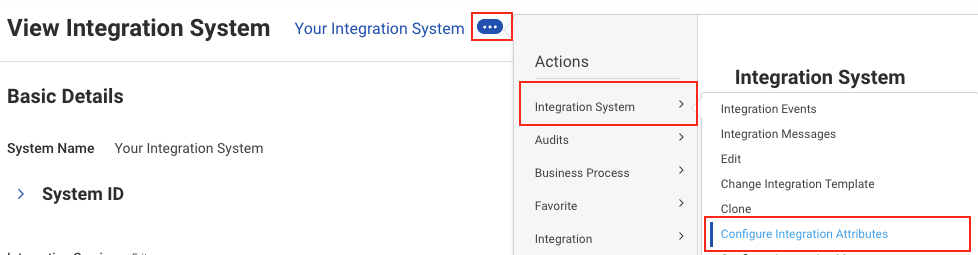
  <Step title="Configure Integration Attributes">
    Navigate to `Configure Integration Attributes` from the 3-dot menu to add the required attribute values.

    <Frame>
      <img className="rounded-md" style={{ margin: '0 auto', border: '1px solid #efefef' }} alt="Configure Integration Attributes" src="https://mintcdn.com/stackone-60/tTwkdrKgXtf1Xy54/images/workday/background-check/workday_bc_is_system_attribute_navigation.png?fit=max&auto=format&n=tTwkdrKgXtf1Xy54&q=85&s=22e5b259b426e8bef8a24b9560d70d87" width="978" height="255" data-path="images/workday/background-check/workday_bc_is_system_attribute_navigation.png" />
    </Frame>

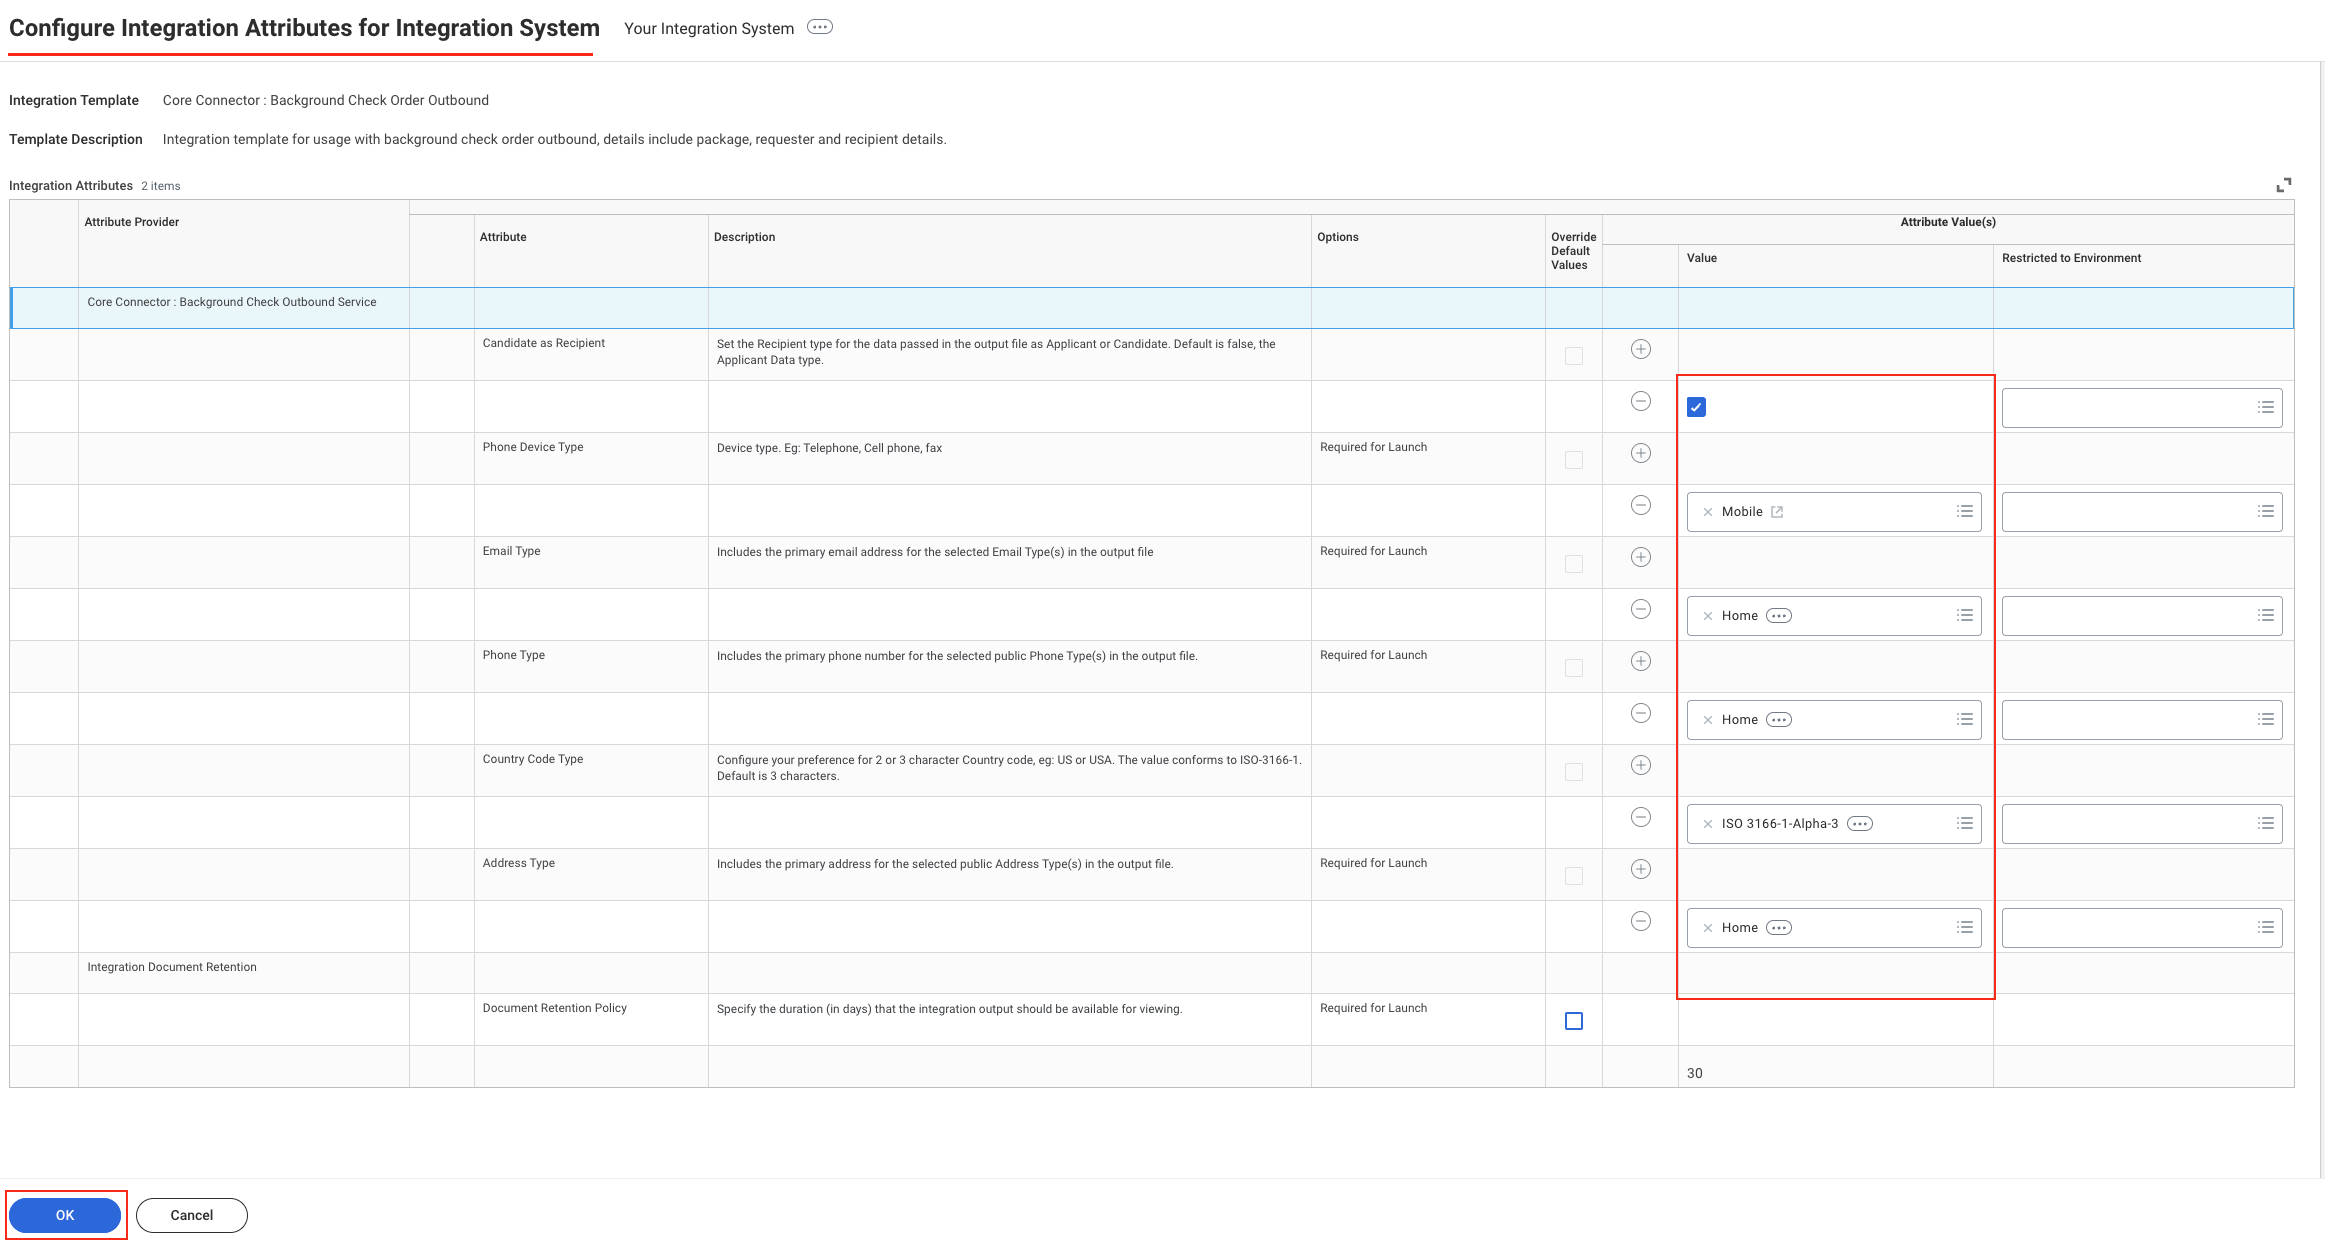
    Select the values for the attributes as shown in the image.

    <Frame>
      <img className="rounded-md" style={{ margin: '0 auto', border: '1px solid #efefef' }} alt="Add Integration Attributes" src="https://mintcdn.com/stackone-60/tTwkdrKgXtf1Xy54/images/workday/background-check/workday_bc_integration_attributes.png?fit=max&auto=format&n=tTwkdrKgXtf1Xy54&q=85&s=8efb0db2e0218cfa13fea11c9190d7d9" width="2325" height="1245" data-path="images/workday/background-check/workday_bc_integration_attributes.png" />
    </Frame>

    Click `OK` to save.<br /><br />

    You have successfully created the Integration System for Background Check in Workday. <br />
    You can now use this Integration System in the business process described under the `Configure the Integration System step` in
    <a href="#business-process-for-background-check-in-workday">Business Process for Background Check in Workday</a>.
  </Step>
</Steps>

## StackOne Configuration

<Steps>
  <Step title="Enable Workday in StackOne">
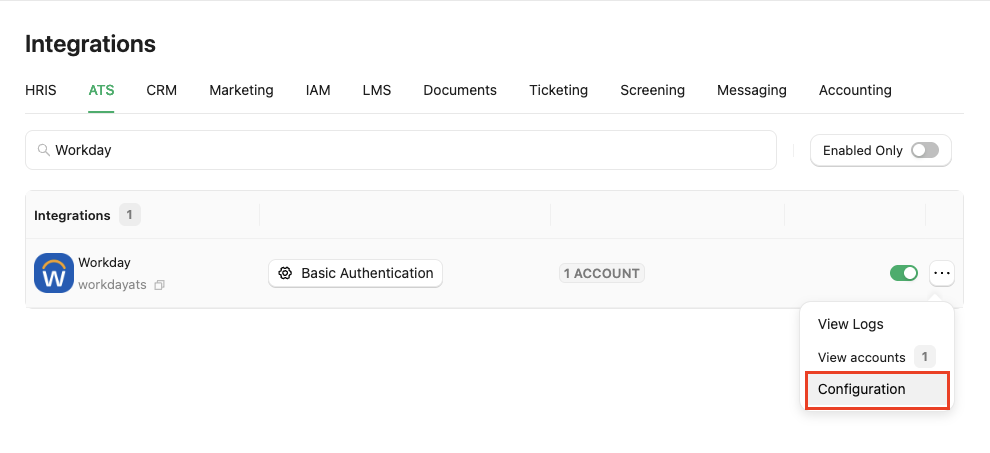
    Go to the ATS category on the <i>Integrations</i> page and enable Workday.

    <Frame>
      <img className="rounded-md" style={{ margin: '0 auto', border: '1px solid #efefef' }} alt="Activate Workday" src="https://mintcdn.com/stackone-60/ViF-UKmjNwrKRKbc/images/workday/background-check/workday_bgc_int_config_enable.png?fit=max&auto=format&n=ViF-UKmjNwrKRKbc&q=85&s=f6758f36e0a3f4c918090fd7d544f364" width="990" height="453" data-path="images/workday/background-check/workday_bgc_int_config_enable.png" />
    </Frame>
  </Step>

  <Step title="Complete the configuration form">
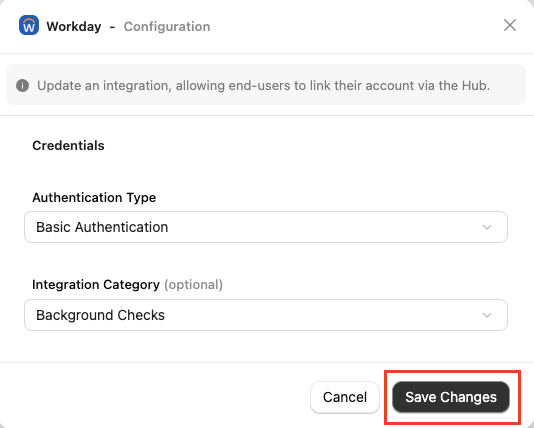
    Complete the required fields in the <b>Workday – Configuration</b> modal:

    * **Authentication Type** - Select one of the authentication types, e.g. `Basic Authentication`.
    * **Integration Category** - Select `Background Checks`.

          <Frame>
            <img className="rounded-md" style={{ margin: '0 auto', border: '1px solid #efefef' }} alt="Activate Workday" src="https://mintcdn.com/stackone-60/ViF-UKmjNwrKRKbc/images/workday/background-check/workday_bgc_config_setup.png?fit=max&auto=format&n=ViF-UKmjNwrKRKbc&q=85&s=ab180596da5bd2de7e04b4a5816c0f09" width="534" height="428" data-path="images/workday/background-check/workday_bgc_config_setup.png" />
          </Frame>

    Click `Confirm` or `Save Changes` to enable the Workday integration. This allows end users to link their accounts via the StackOne Connector Hub.
  </Step>

  <Step title="Create a webhook">
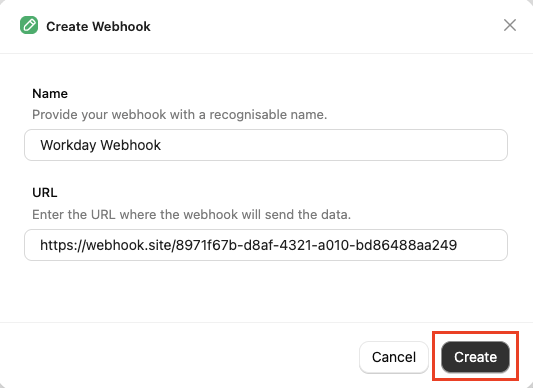
    Navigate to the *Webhooks* page and click the `+ Add Webhook` button to add a webhook for Workday.

    <Frame>
      <img className="rounded-md" style={{ margin: '0 auto', border: '1px solid #efefef' }} alt="Create Webhook" src="https://mintcdn.com/stackone-60/VRhyjT0vVkjtKR56/images/workday/background-check/stackone_add_webhook.png?fit=max&auto=format&n=VRhyjT0vVkjtKR56&q=85&s=0517c6f4df22e4115c5dc006c93ddf8d" width="533" height="388" data-path="images/workday/background-check/stackone_add_webhook.png" />
    </Frame>
  </Step>

  <Step title="Select webhook event">
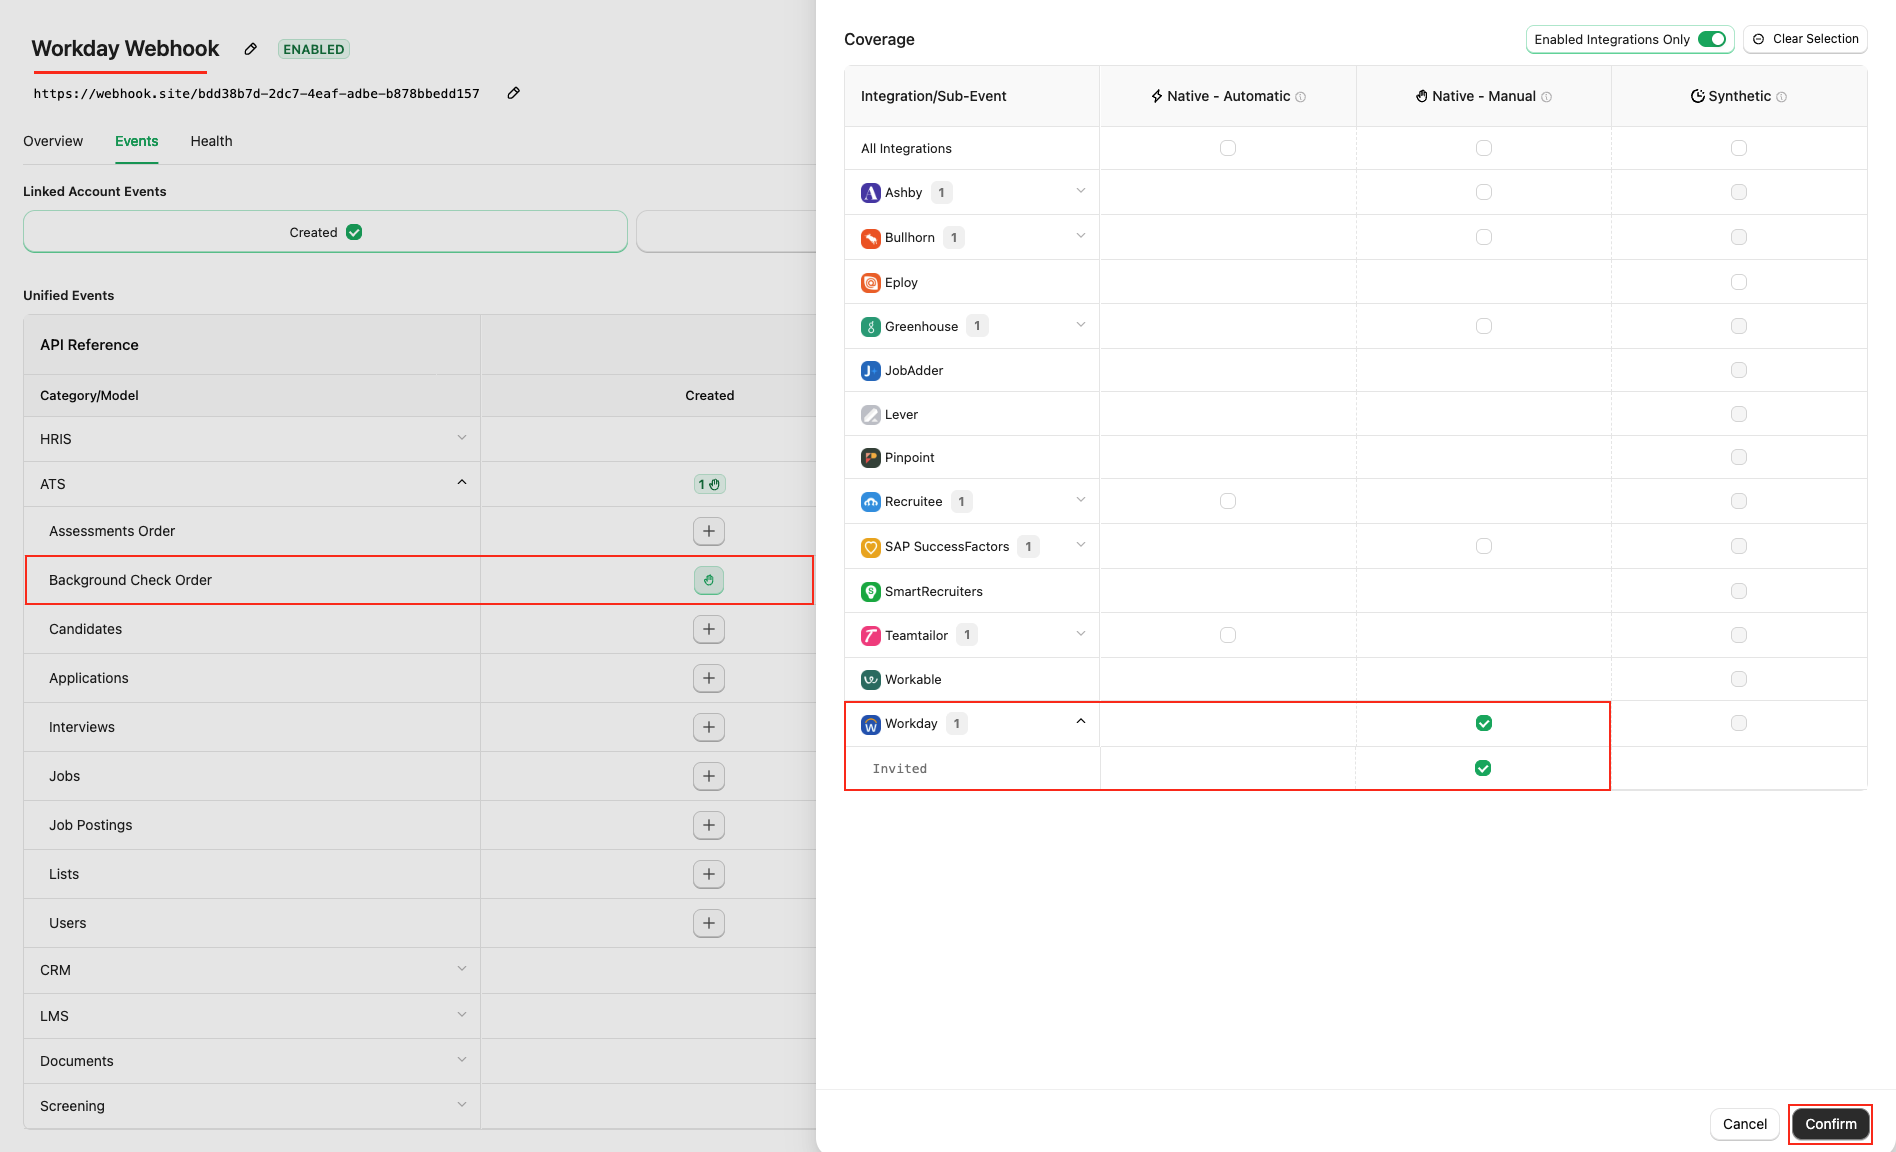
    Navigate to the <i>Events</i> tab and enable the `Background Check Order` event.

    <Frame>
      <img className="rounded-md" style={{ margin: '0 auto', border: '1px solid #efefef' }} alt="Select Webhook Event" src="https://mintcdn.com/stackone-60/VRhyjT0vVkjtKR56/images/workday/background-check/stackone_add_webhook_events.png?fit=max&auto=format&n=VRhyjT0vVkjtKR56&q=85&s=f9398207c1562e5d5996e8d4f769cd20" width="1896" height="1152" data-path="images/workday/background-check/stackone_add_webhook_events.png" />
    </Frame>

    Click the `Save` button to save the webhook.

    <Note>
      To test the background check webhook with your Workday Sandbox account, see the <a href="#ats-user-enablement">ATS User Enablement</a> section.
    </Note>
  </Step>
</Steps>

## ATS User Enablement

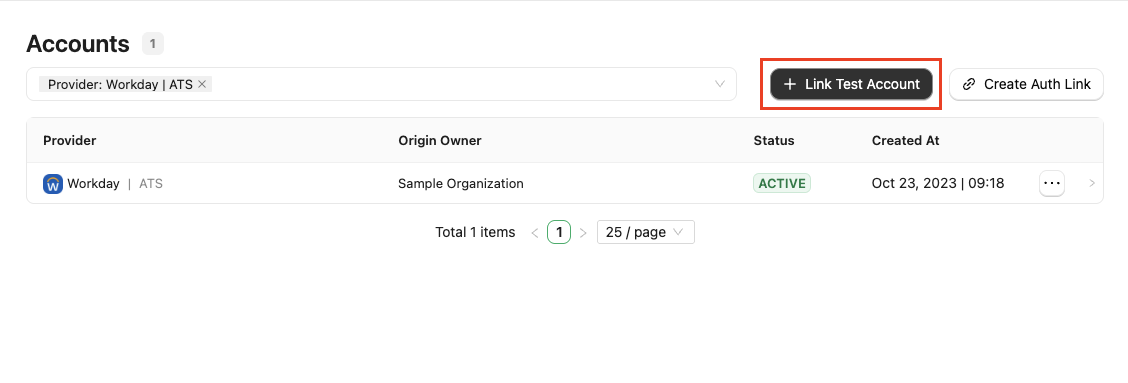
Navigate to the *Accounts* page to link your Workday account with StackOne.

<Frame>
  <img className="rounded-md" style={{ margin: '0 auto', border: '1px solid #efefef' }} alt="Link Workday account" src="https://mintcdn.com/stackone-60/ViF-UKmjNwrKRKbc/images/workday/background-check/workday_bgc_link_account.png?fit=max&auto=format&n=ViF-UKmjNwrKRKbc&q=85&s=7c304920667d66d17f66158c306e96d3" width="1128" height="383" data-path="images/workday/background-check/workday_bgc_link_account.png" />
</Frame>

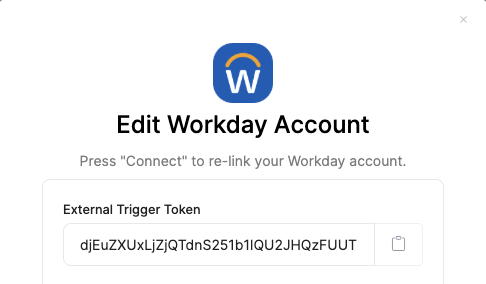
You will receive the `External Trigger Token`, which must be entered as the User ID during the `Configure Document Delivery` step in <a href="#business-process-for-background-check-in-workday">Business Process for Background Check in Workday</a>.

<Frame>
  <img className="rounded-md" style={{ margin: '0 auto', border: '1px solid #efefef' }} alt="External Trigger Token" src="https://mintcdn.com/stackone-60/ViF-UKmjNwrKRKbc/images/workday/background-check/workday_bgc_external_trigger_token.png?fit=max&auto=format&n=ViF-UKmjNwrKRKbc&q=85&s=a488dc99c5c2bba3902da06a7807bbc5" width="486" height="284" data-path="images/workday/background-check/workday_bgc_external_trigger_token.png" />
</Frame>

## ATS User Experience

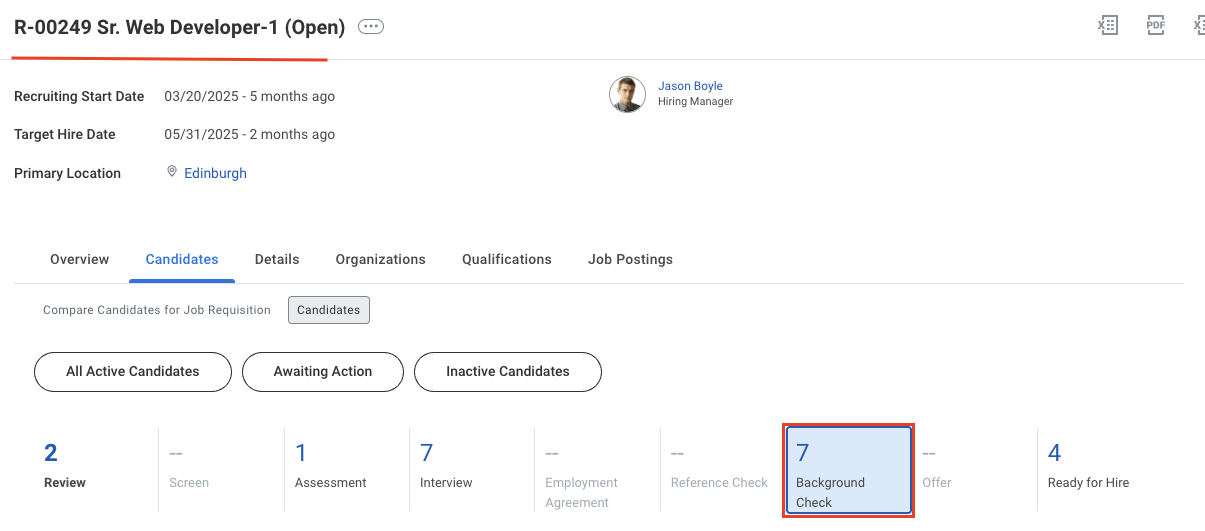
After completing configuration, users will see **Background Check** as a stage in the Job Requisition workflow within the Supervisory Organisation.

<Frame>
  <img className="rounded-md" style={{ margin: '0 auto', border: '1px solid #efefef' }} alt="Background Check Stage" src="https://mintcdn.com/stackone-60/ViF-UKmjNwrKRKbc/images/workday/background-check/workday_jr_stages.png?fit=max&auto=format&n=ViF-UKmjNwrKRKbc&q=85&s=20019c01c03aca63ecead3c94462b52d" width="1205" height="531" data-path="images/workday/background-check/workday_jr_stages.png" />
</Frame>

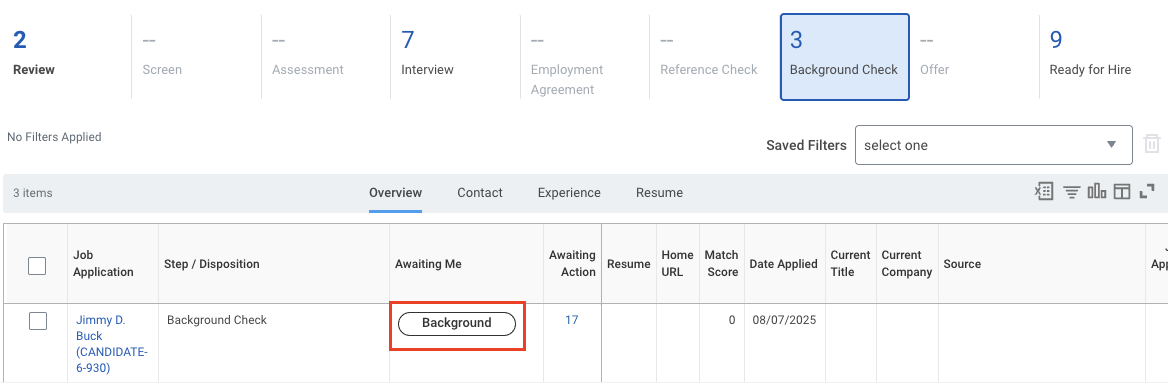
When a candidate is moved to the **Background Check** stage, a `Background Check` button appears next to their name. Users can use this to send the background check request to the candidate.

<Frame>
  <img className="rounded-md" style={{ margin: '0 auto', border: '1px solid #efefef' }} alt="Background Button" src="https://mintcdn.com/stackone-60/ViF-UKmjNwrKRKbc/images/workday/background-check/workday_bgc_send_button_background.png?fit=max&auto=format&n=ViF-UKmjNwrKRKbc&q=85&s=ffc88e81b3a039373130dafe7d1696d3" width="1168" height="384" data-path="images/workday/background-check/workday_bgc_send_button_background.png" />
</Frame>

### Send the background check request from Workday

#### Move the candidate to the Background Check stage

<Steps>
  <Step title="Open the Job Requisition">
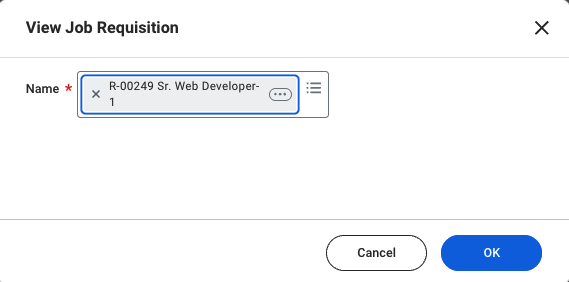
    Navigate to the <i>Job Requisitions</i> page and select the job requisition the candidate applied to.

    <Frame>
      <img className="rounded-md" style={{ margin: '0 auto', border: '1px solid #efefef' }} alt="View JR" src="https://mintcdn.com/stackone-60/ViF-UKmjNwrKRKbc/images/workday/background-check/workday_bc_view_JR_19.png?fit=max&auto=format&n=ViF-UKmjNwrKRKbc&q=85&s=2f77175344d6354d2dba30c9fdf2d66b" width="569" height="282" data-path="images/workday/background-check/workday_bc_view_JR_19.png" />
    </Frame>

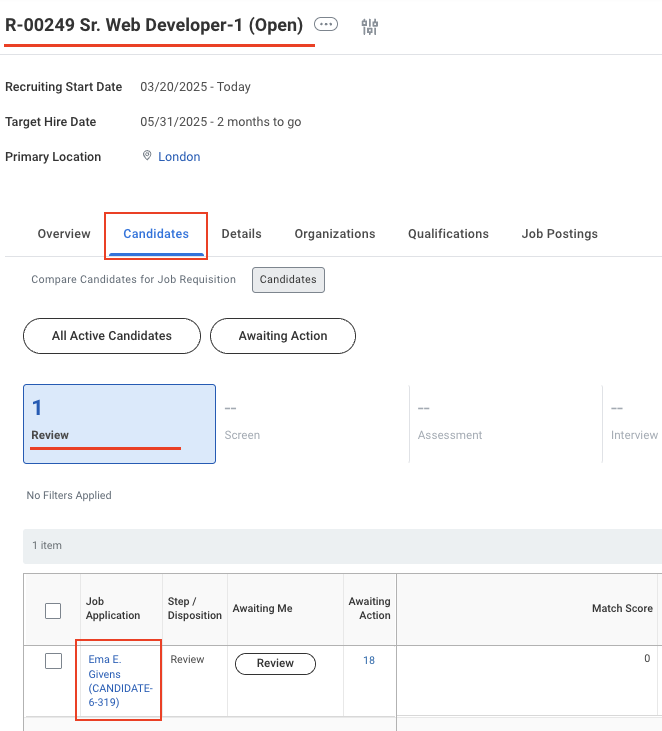
    Go to the `Candidate` tab, then the `Review` sub-tab, where the candidate appears in the grid.

    <Frame>
      <img className="rounded-md" style={{ margin: '0 auto', border: '1px solid #efefef' }} alt="Candidate Job Apply" src="https://mintcdn.com/stackone-60/VRhyjT0vVkjtKR56/images/workday/background-check/workday_bc_JR_20.png?fit=max&auto=format&n=VRhyjT0vVkjtKR56&q=85&s=15f3bd5a271fed2ae9ed764dad9c127d" width="662" height="731" data-path="images/workday/background-check/workday_bc_JR_20.png" />
    </Frame>
  </Step>

  <Step title="Move candidate from Review to Background Check">
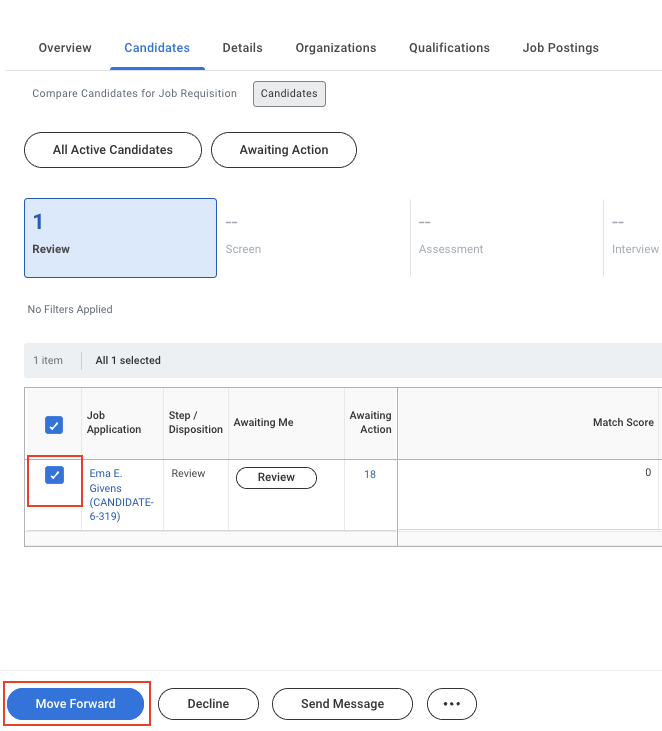
    Select the candidate in the grid and click `Move Forward`.

    <Frame>
      <img className="rounded-md" style={{ margin: '0 auto', border: '1px solid #efefef' }} alt="View JR" src="https://mintcdn.com/stackone-60/VRhyjT0vVkjtKR56/images/workday/background-check/workday_bc_jr_move_button_21.png?fit=max&auto=format&n=VRhyjT0vVkjtKR56&q=85&s=37450eba7dd7218a847038c3d18703f9" width="662" height="731" data-path="images/workday/background-check/workday_bc_jr_move_button_21.png" />
    </Frame>
  </Step>

  <Step title="Select Background Check from the dropdown">
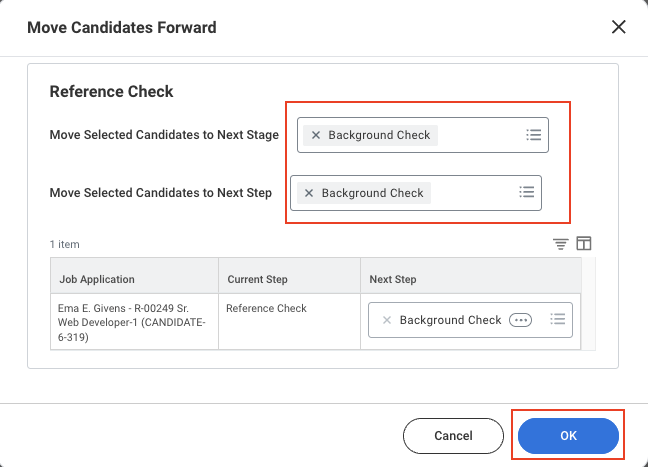
    In the pop-up, select the next stage (you may need to advance sequentially). For the Background Check stage, choose `Background Check` in both dropdown menus.

    <Frame>
      <img className="rounded-md" style={{ margin: '0 auto', border: '1px solid #efefef' }} alt="Candidate Job Apply" src="https://mintcdn.com/stackone-60/VRhyjT0vVkjtKR56/images/workday/background-check/workday_bc_jr_moved_to_bc_stage_22.png?fit=max&auto=format&n=VRhyjT0vVkjtKR56&q=85&s=dbbb98591b9f09a9bd9f745c6fe7aefb" width="648" height="467" data-path="images/workday/background-check/workday_bc_jr_moved_to_bc_stage_22.png" />
    </Frame>

    Click the `OK` button to move.
  </Step>

  <Step title="Candidate moved to the Background Check stage">
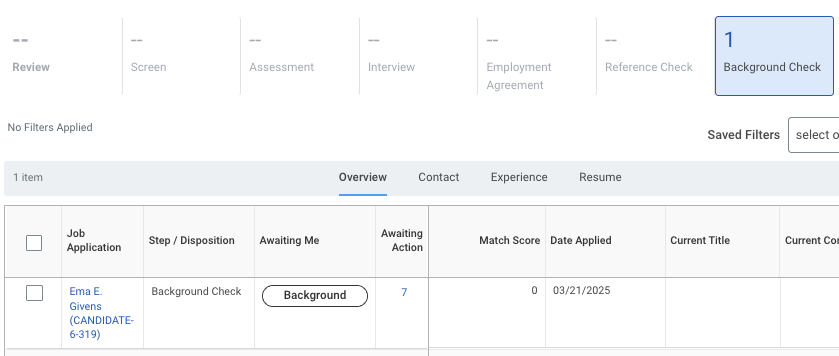
    In the `Background Check` tab, the candidate now appears in the Background Check stage.

    <Frame>
      <img className="rounded-md" style={{ margin: '0 auto', border: '1px solid #efefef' }} alt="View JR" src="https://mintcdn.com/stackone-60/VRhyjT0vVkjtKR56/images/workday/background-check/workday_bc_jr_bc_satge_success_23.png?fit=max&auto=format&n=VRhyjT0vVkjtKR56&q=85&s=18f34a10093a57486f26b7610ea7152b" width="839" height="356" data-path="images/workday/background-check/workday_bc_jr_bc_satge_success_23.png" />
    </Frame>
  </Step>
</Steps>

#### Send the background check invitation to the candidate

<Steps>
  <Step title="Submit background check as a recruiter">
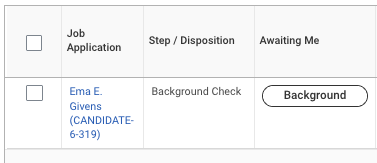
    If you are the recruiter, the `Background Check` button appears next to the candidate's name.

    <Frame>
      <img className="rounded-md" style={{ margin: '0 auto', border: '1px solid #efefef' }} alt="Sending Invite" src="https://mintcdn.com/stackone-60/VRhyjT0vVkjtKR56/images/workday/background-check/workday_bc_jr_bc_stage_button_to_submit_24.png?fit=max&auto=format&n=VRhyjT0vVkjtKR56&q=85&s=b2c1f02e734e7c64d0e852f14d0cfad1" width="377" height="163" data-path="images/workday/background-check/workday_bc_jr_bc_stage_button_to_submit_24.png" />
    </Frame>
  </Step>

  <Step title="Send the Background Check invitation">
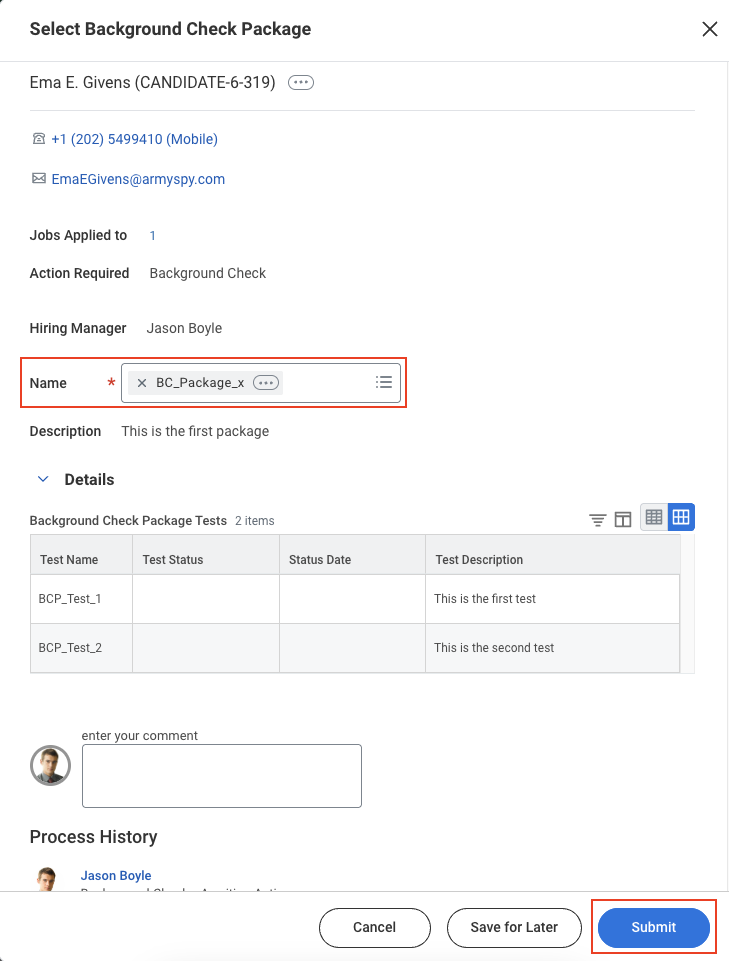
    Select the background check package you created (see <a href="#create-background-check-packages-in-workday">Create background check packages</a>) from the dropdown.

    <Frame>
      <img className="rounded-md" style={{ margin: '0 auto', border: '1px solid #efefef' }} alt="Send Invite" src="https://mintcdn.com/stackone-60/VRhyjT0vVkjtKR56/images/workday/background-check/workday_bc_jr_bc_submission_25.png?fit=max&auto=format&n=VRhyjT0vVkjtKR56&q=85&s=6dc54b7f344d4478b41cf985d049320a" width="729" height="961" data-path="images/workday/background-check/workday_bc_jr_bc_submission_25.png" />
    </Frame>

    Click `Submit` to trigger the webhook notification from Workday.
  </Step>
</Steps>

#### See the background check integration logs

<Steps>
  <Step title="Go to the Process Monitor">
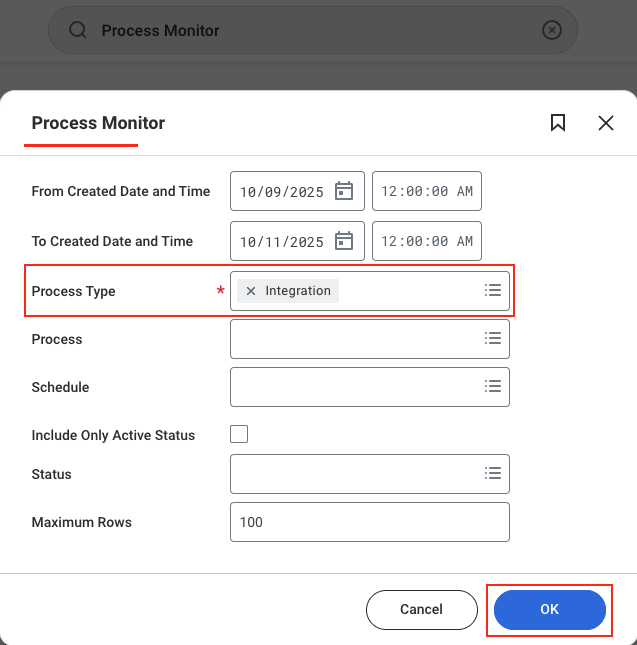
    Access the <i>Process Monitor</i> page using the global search. Set the Process Type to `Integration` and click `OK` to view all logs related to integrations.

    <Frame>
      <img className="rounded-md" style={{ margin: '0 auto', border: '1px solid #efefef' }} alt="Sending Invite" src="https://mintcdn.com/stackone-60/uThnYQIRRji7eaOb/images/workday/background-check/workday_bc_go_to_process_monitor_1.png?fit=max&auto=format&n=uThnYQIRRji7eaOb&q=85&s=6addcafb088250e2c238069cda48e648" width="637" height="645" data-path="images/workday/background-check/workday_bc_go_to_process_monitor_1.png" />
    </Frame>

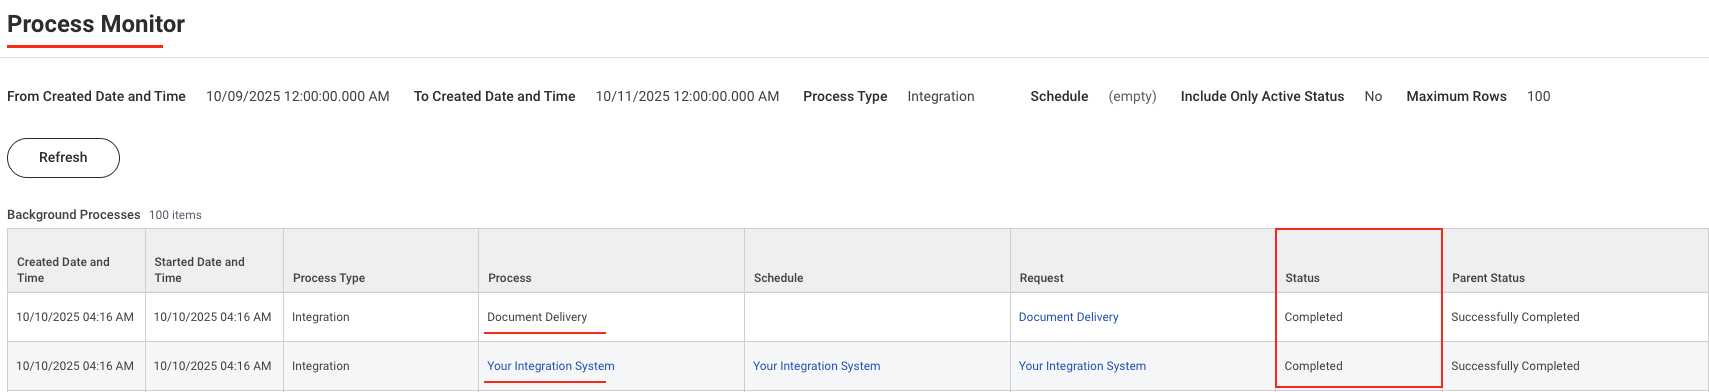
    If you have just sent the background check request, you can view the latest logs at the top of the grid. Look for entries with a `Completed` status that correspond to your integration system name and Document Delivery requests.

    <Frame>
      <img className="rounded-md" style={{ margin: '0 auto', border: '1px solid #efefef' }} alt="Send Invite" src="https://mintcdn.com/stackone-60/tTwkdrKgXtf1Xy54/images/workday/background-check/workday_bc_process_monitor_logs_2.png?fit=max&auto=format&n=tTwkdrKgXtf1Xy54&q=85&s=0d86bddc2116309a90a563c3049f0a33" width="1709" height="392" data-path="images/workday/background-check/workday_bc_process_monitor_logs_2.png" />
    </Frame>

    If the status is marked as completed without any errors, it means the webhook notification has been successfully sent.
  </Step>
</Steps>

### What the user sees after sending the request

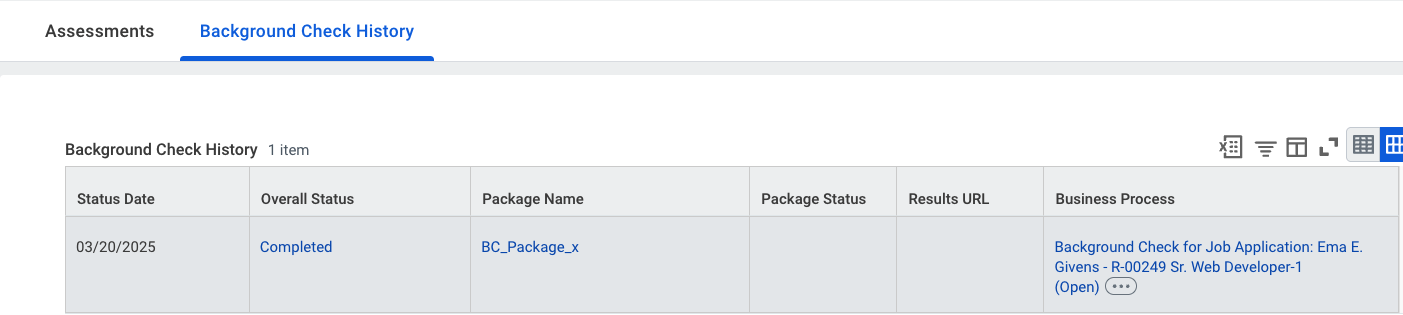
In the <i>Application > Screening</i> tab, under the `Background Check History` sub‑tab, the user can view details of the background check that was sent to the candidate.

<Frame>
  <img className="rounded-md" style={{ margin: '0 auto', border: '1px solid #efefef' }} alt="Background Check Details" src="https://mintcdn.com/stackone-60/VRhyjT0vVkjtKR56/images/workday/background-check/workday_bc_job_application_submitted_bc_26.png?fit=max&auto=format&n=VRhyjT0vVkjtKR56&q=85&s=65033a6e77679495ea4c124455ef21ee" width="1395" height="270" data-path="images/workday/background-check/workday_bc_job_application_submitted_bc_26.png" />
</Frame>

## ATS User Experience Customisation

<Steps>
  <Step title="Update the result via the Unified API">
    Use the following endpoint to update results:

    * <a href="https://docs.stackone.com/ats/api-reference/background-checks/results/update-background-check-result" target="_blank">Background Check: Update Result</a>

    Use the following endpoint to get metadata to update the result of the background check:

    * [Connector Meta Information](https://docs.stackone.com/platform/api-reference/connectors/get-connector-meta-information) with the provider key `workdayats` for model `background_checks/results.update`

    <div className="field-table-col-3">
      | Fields (when provided) | User sees in Workday                                                       | Comment                                       |
      | ---------------------- | -------------------------------------------------------------------------- | --------------------------------------------- |
      | Result                 | Result will be displayed within the grid's **Overall Status** column       | Result enum values from Meta API result field |
      | Submission Date        | Submission date will be displayed within the grid's **Status Date** column |                                               |
      | Result URL             | Result URL will be displayed within the grid's **Results URL** column      |                                               |
    </div>
  </Step>

  <Step title="How results appear in Workday">
    When a user opens a candidate's application, they can navigate to the `Background Check History` sub‑tab to view background check details and results.

    <Frame>
      <img src="https://mintcdn.com/stackone-60/VRhyjT0vVkjtKR56/images/workday/background-check/workday_bc_job_application_result_updated_27.png?fit=max&auto=format&n=VRhyjT0vVkjtKR56&q=85&s=748756aa552a03cd5dd3139a83284246" alt="Updated Result" width="1403" height="315" data-path="images/workday/background-check/workday_bc_job_application_result_updated_27.png" />
    </Frame>
  </Step>
</Steps>

## Testing Checklist

✅ **Provider Setup:**

* Logged in with an Admin account.
* Added background check status mappings as mentioned <a href="#create-background-check-statuses-in-workday">above</a>.
* Added background check packages as mentioned <a href="#create-background-check-packages-in-workday">here</a>.
* Job Requisitions exist within the Supervisory Organisation whose Staffing Model is `Position Management`.
* Configured the `Background Check` business process with the Integration System created.
* Added order payload attribute values correctly as mentioned in the <a href="#business-process-for-background-check-in-workday">Business Process for Background Check</a> step.
* Configured the Document Delivery step with the correct `Endpoint URL` and `External Trigger Token` (User ID). See <a href="#business-process-for-background-check-in-workday">Business process steps</a>.

✅ **StackOne Configuration:**

* Selected `Background Checks` as the Integration Category.

✅ **ATS User Activation:**

* Configured the Integration step in the Background Check business process by selecting the correct Integration System.
* Added a valid `Endpoint URL` and `External Trigger Token` (User ID) under the Document Delivery step.

✅ **Create a Webhook:**

* Added a webhook for Workday and enabled the `Background Check Order` event.
* Valid webhook URL to receive background check notifications.

✅ **ATS User Experience:**

* Background Check stage is available in the Job Requisition workflow.
* In the *Application > Screening* tab, under the `Background Check` sub-tab, the sent background check details will be available.

✅ **Update Result:**

* Success response from the update result endpoint.
* Updated result details visible in Workday's UI.

## Troubleshooting

<div className="troubleshooting-table">
  | Symptom                                                                                 | Likely cause                                                                                                                                                                                                                                                                                                                                                         | Fix                                                                                                                                                                                                                                                                                                                                                                                                                                                                                                                                                                                                                                                             |
  | --------------------------------------------------------------------------------------- | -------------------------------------------------------------------------------------------------------------------------------------------------------------------------------------------------------------------------------------------------------------------------------------------------------------------------------------------------------------------- | --------------------------------------------------------------------------------------------------------------------------------------------------------------------------------------------------------------------------------------------------------------------------------------------------------------------------------------------------------------------------------------------------------------------------------------------------------------------------------------------------------------------------------------------------------------------------------------------------------------------------------------------------------------- |
  | Unable to access Supervisory Organisation and Business Process.                         | Logged-in account is not an admin account.                                                                                                                                                                                                                                                                                                                           | Log in with an admin account.                                                                                                                                                                                                                                                                                                                                                                                                                                                                                                                                                                                                                                   |
  | Unable to get `Background Check` Business Process Type to create a Business Process     | A Business Process of the `Background Check` type has already been created for this Supervisory Organization.                                                                                                                                                                                                                                                        | Use the global search to find the existing Business Process (e.g., `bp: <your-bp-name>`) and edit the existing Business Process as mentioned in <a href="#business-process-for-background-check-in-workday">Business Process for Background Check</a> step.                                                                                                                                                                                                                                                                                                                                                                                                     |
  | Unable to search/navigate the above-mentioned navigations.                              | **•** Logged-in account is not an admin account. <br /><br /> **•** Missing permissions.                                                                                                                                                                                                                                                                             | **•** Log in with an admin account. <br /><br /> **•** Contact your Workday administrator to grant the required permissions.                                                                                                                                                                                                                                                                                                                                                                                                                                                                                                                                    |
  | `Background` button is not visible next to the candidate's name in the job requisition. | Logged-in user is not the recruiter or hiring manager for that job requisition.                                                                                                                                                                                                                                                                                      | Log in as the recruiter or hiring manager associated with the job requisition.                                                                                                                                                                                                                                                                                                                                                                                                                                                                                                                                                                                  |
  | Webhook notification not received.                                                      | **•** Invalid webhook configuration in StackOne. <br /><br /> **•** Supervisory Organisation staffing model not set to `Position Management`. <br /><br /> **•** Job requisition not listed under the Supervisory Organisation. <br /><br /> **•** `Invited` status (or matching Reference ID) not created. <br /><br /> **•** Document Delivery step misconfigured. | **•** Validate webhook URL and enabled events (see <a href="#stackone-configuration">StackOne Configuration</a>). <br /><br /> **•** Ensure staffing model is `Position Management`. <br /><br /> **•** Ensure job requisition appears under the Supervisory Organisation (see <a href="#job-requisitions-within-the-supervisory-organisation-in-workday">Job Requisitions section</a>). <br /><br /> **•** Create `Invited` status (see <a href="#create-background-check-statuses-in-workday">Statuses section</a>). <br /><br /> **•** Reconfigure Document Delivery (see <a href="#business-process-for-background-check-in-workday">Business Process</a>). |
  | List of packages not available.                                                         | No background check packages added.                                                                                                                                                                                                                                                                                                                                  | Add background check packages (see <a href="#create-background-check-packages-in-workday">Packages section</a>).                                                                                                                                                                                                                                                                                                                                                                                                                                                                                                                                                |
  | Result URL shows an error.                                                              | Result URL has expired or is not publicly accessible.                                                                                                                                                                                                                                                                                                                | Use a public or signed URL; verify CORS configuration and expiry time.                                                                                                                                                                                                                                                                                                                                                                                                                                                                                                                                                                                          |
</div>

For persistent issues, contact StackOne support with detailed error logs and configuration information.