> ## Documentation Index
> Fetch the complete documentation index at: https://docs.stackone.com/llms.txt
> Use this file to discover all available pages before exploring further.

# SAP SuccessFactors Background Check Integration

> Learn how to set up and configure the Background Check integration in SAP SuccessFactors to integrate with StackOne.

## Overview

This document provides a comprehensive, step-by-step guide for integrating SAP SuccessFactors with StackOne for background checks.
It covers enabling the `Background Check Vendor` option, configuring integration templates in SAP SuccessFactors, mapping the required
fields, and setting up permissions and picklists. The guide also details how to activate the integration in StackOne, obtain the necessary
tokens, and ensure users can initiate and view background checks directly within the SAP SuccessFactors user interface.

## Partner Requirements

There is no formal or explicit partnership requirement with SAP SuccessFactors for this integration. However, you must have administrative privileges with the necessary permissions to access various features in SAP SuccessFactors.

You will need the following mandatory permissions to access and utilise the **Integration Center** for modelling and executing the integration:

* **Admin access to MDF OData API**
* **Access to Integration Center**
* **Access to non-Secured Objects**

## Provider Side Setup

### Enable the Other Background Check Vendor option

<Steps>
  <Step title="Background Check Central Configuration">
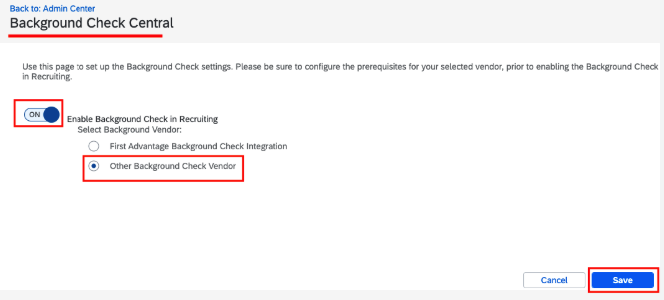
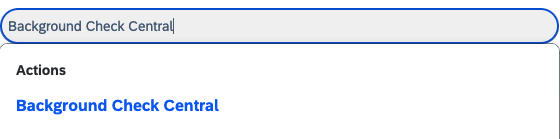
    Go to the *Admin Center* and search for *Background Check Central*

    <Frame>
      <img className="rounded-md" style={{ margin: '0 auto', border: '1px solid #efefef' }} alt="Search for BC Central" src="https://mintcdn.com/stackone-60/pRlim8VKjA70QbLx/images/sapsuccessfactors/background-check/sap_sf_bc_search_1.png?fit=max&auto=format&n=pRlim8VKjA70QbLx&q=85&s=25b9173e5ea5ec1b1d728b4cbca7cf2a" width="560" height="139" data-path="images/sapsuccessfactors/background-check/sap_sf_bc_search_1.png" />
    </Frame>

    Enable Background Check in Recruiting and choose `Other Background Check Vendor`.

    <Frame>
      <img className="rounded-md" style={{ margin: '0 auto', border: '1px solid #efefef' }} alt="Enable Background Check in Recruiting" src="https://mintcdn.com/stackone-60/ofhWfuymbZe62HPb/images/sapsuccessfactors/background-check/sap_sf_bc_enable_2.png?fit=max&auto=format&n=ofhWfuymbZe62HPb&q=85&s=f61c8828b8fac65e8e2bea3637f452f5" width="664" height="300" data-path="images/sapsuccessfactors/background-check/sap_sf_bc_enable_2.png" />
    </Frame>
  </Step>
</Steps>

### Select the type of integration template for the external background check

<Steps>
  <Step title="Go to Integration Center">
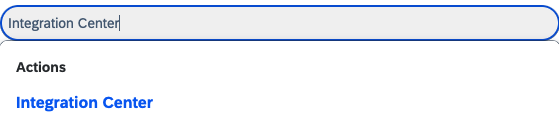
    Navigate to the *Admin Center* and search for *Integration Center*.

    <Frame>
      <img className="rounded-md" style={{ margin: '0 auto', border: '1px solid #efefef' }} alt="Go to Integration Center" src="https://mintcdn.com/stackone-60/pRlim8VKjA70QbLx/images/sapsuccessfactors/background-check/sap_sf_bc_integration_center_search_3.png?fit=max&auto=format&n=pRlim8VKjA70QbLx&q=85&s=2620ad3d2c4f31ba602fa8cfdb2f5d38" width="559" height="126" data-path="images/sapsuccessfactors/background-check/sap_sf_bc_integration_center_search_3.png" />
    </Frame>

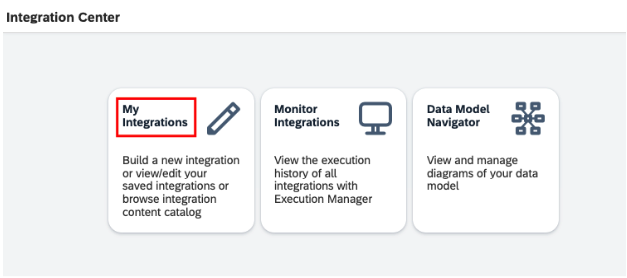
    To view the list of available integrations, click on `My Integrations`.

    <Frame>
      <img className="rounded-md" style={{ margin: '0 auto', border: '1px solid #efefef' }} alt="My Integrations" src="https://mintcdn.com/stackone-60/ofhWfuymbZe62HPb/images/sapsuccessfactors/background-check/sap_sf_bc_integration_center_4.png?fit=max&auto=format&n=ofhWfuymbZe62HPb&q=85&s=0fb3c09d1845709bcb7d9b50e9d705a9" width="627" height="278" data-path="images/sapsuccessfactors/background-check/sap_sf_bc_integration_center_4.png" />
    </Frame>
  </Step>

  <Step title="Select the Type of Integration Center Template">
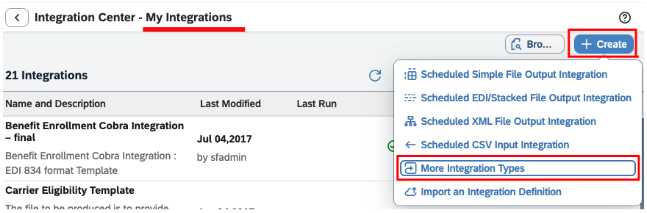
    Click the `+ Create` button and select *More Integration Types* to access the list of available integration types.

    <Frame>
      <img className="rounded-md" style={{ margin: '0 auto', border: '1px solid #efefef' }} alt="Select More Integration Types" src="https://mintcdn.com/stackone-60/ofhWfuymbZe62HPb/images/sapsuccessfactors/background-check/sap_sf_bc_integration_center_access_integration_types_5.png?fit=max&auto=format&n=ofhWfuymbZe62HPb&q=85&s=1ba666f4eb8229b5900433cec86e066e" width="647" height="213" data-path="images/sapsuccessfactors/background-check/sap_sf_bc_integration_center_access_integration_types_5.png" />
    </Frame>

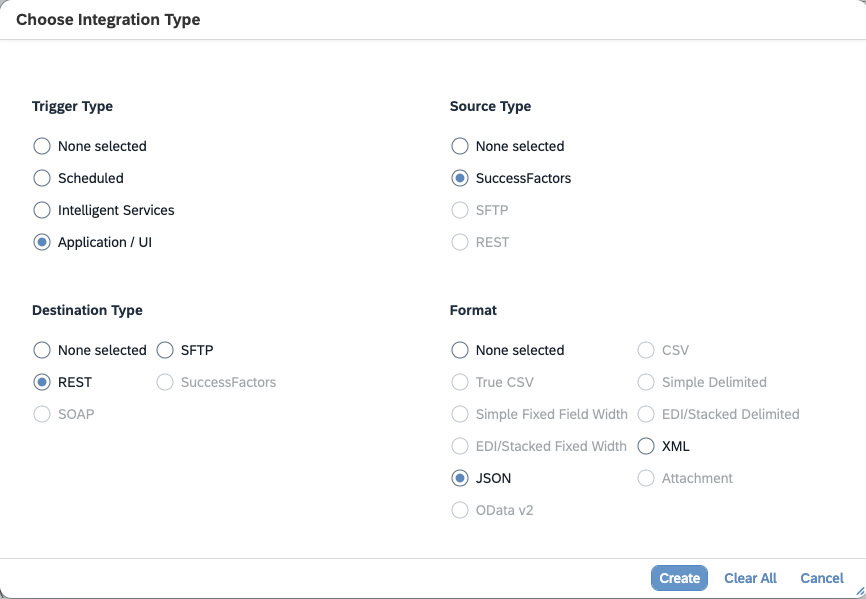
    Select the following values from the modal:

    * **Application/UI** for **Trigger Type**
    * **SuccessFactors** for **Source Type**
    * **REST** for **Destination Type**
    * **JSON** for **Format**

    Click the `Create` button.

    <Frame>
      <img className="rounded-md" style={{ margin: '0 auto', border: '1px solid #efefef' }} alt="Select correct values from the Modal" src="https://mintcdn.com/stackone-60/ofhWfuymbZe62HPb/images/sapsuccessfactors/background-check/sap_sf_bc_integration_center_click_create_6.png?fit=max&auto=format&n=ofhWfuymbZe62HPb&q=85&s=3520c4d227d9696aa3425b716dc7b805" width="866" height="599" data-path="images/sapsuccessfactors/background-check/sap_sf_bc_integration_center_click_create_6.png" />
    </Frame>

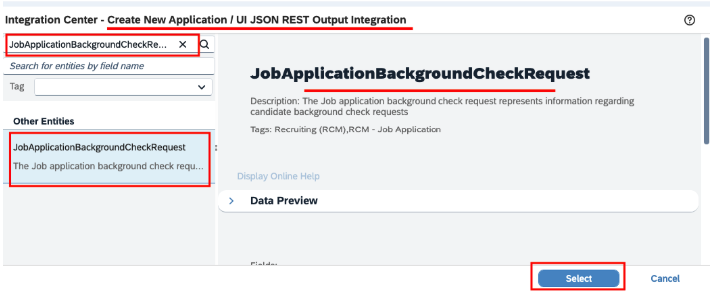
    Use the search box to find the entity called `JobApplicationBackgroundCheckRequest`, and then select it from the search results.

    <Frame>
      <img className="rounded-md" style={{ margin: '0 auto', border: '1px solid #efefef' }} alt="Search for JobApplicationBackgroundCheckRequest" src="https://mintcdn.com/stackone-60/pRlim8VKjA70QbLx/images/sapsuccessfactors/background-check/sap_sf_bc_integration_center_search_job_entity_7.png?fit=max&auto=format&n=pRlim8VKjA70QbLx&q=85&s=b64628c64ef627cc3bc1f55380f060d4" width="710" height="295" data-path="images/sapsuccessfactors/background-check/sap_sf_bc_integration_center_search_job_entity_7.png" />
    </Frame>
  </Step>
</Steps>

### Create and configure an integration template for background checks

<Steps>
  <Step title="Options Step">
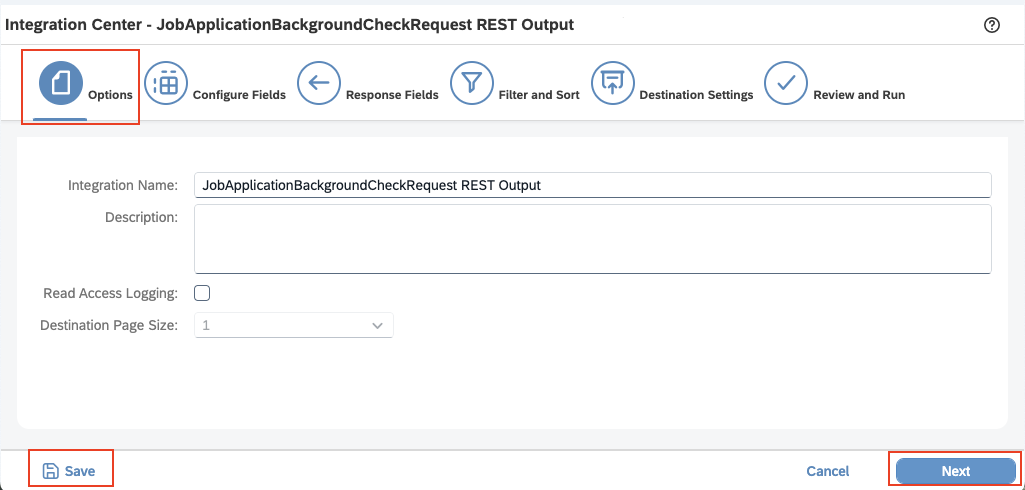
    Enter the name of the integration, then click the `Next` button to proceed with further configuration steps. You may also click the `Save` button to save the current step's configuration.

    <Frame>
      <img className="rounded-md" style={{ margin: '0 auto', border: '1px solid #efefef' }} alt="Select More Integration Types" src="https://mintcdn.com/stackone-60/ofhWfuymbZe62HPb/images/sapsuccessfactors/background-check/sap_sf_bc_integration_center_options_8.png?fit=max&auto=format&n=ofhWfuymbZe62HPb&q=85&s=bf0aea7b6fdfcdb3aba7ceadabe6fbba" width="1025" height="490" data-path="images/sapsuccessfactors/background-check/sap_sf_bc_integration_center_options_8.png" />
    </Frame>
  </Step>

  <Step title="Configure Fields Step">
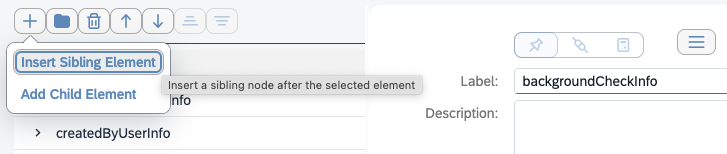
    Click the `+` button > *Insert Sibling Element*, then click on the inserted element to open a prompt where you can enter the name of the element.

    <Info>
      Please refer to the mapping listed <a href="#please-follow-the-mapping-below-to-receive-the-correct-order-notification">here</a>.
    </Info>

    <Frame>
      <img className="rounded-md" style={{ margin: '0 auto', border: '1px solid #efefef' }} alt="Select option to map fields" src="https://mintcdn.com/stackone-60/ofhWfuymbZe62HPb/images/sapsuccessfactors/background-check/sap_sf_bc_integration_center_config_fields_54.png?fit=max&auto=format&n=ofhWfuymbZe62HPb&q=85&s=c7013f8dd9c058d9c64ca4a245236784" width="727" height="154" data-path="images/sapsuccessfactors/background-check/sap_sf_bc_integration_center_config_fields_54.png" />
    </Frame>

    Click the `+` button > *Add Child Element* for the added element, then click on the inserted element to open a prompt where you can enter the name of the child element.

    <Frame>
      <img className="rounded-md" style={{ margin: '0 auto', border: '1px solid #efefef' }} alt="Select option to map child fields" src="https://mintcdn.com/stackone-60/ofhWfuymbZe62HPb/images/sapsuccessfactors/background-check/sap_sf_bc_integration_center_config_fields_53.png?fit=max&auto=format&n=ofhWfuymbZe62HPb&q=85&s=0ab5dd976a1dadb156c7911851ffece8" width="799" height="154" data-path="images/sapsuccessfactors/background-check/sap_sf_bc_integration_center_config_fields_53.png" />
    </Frame>

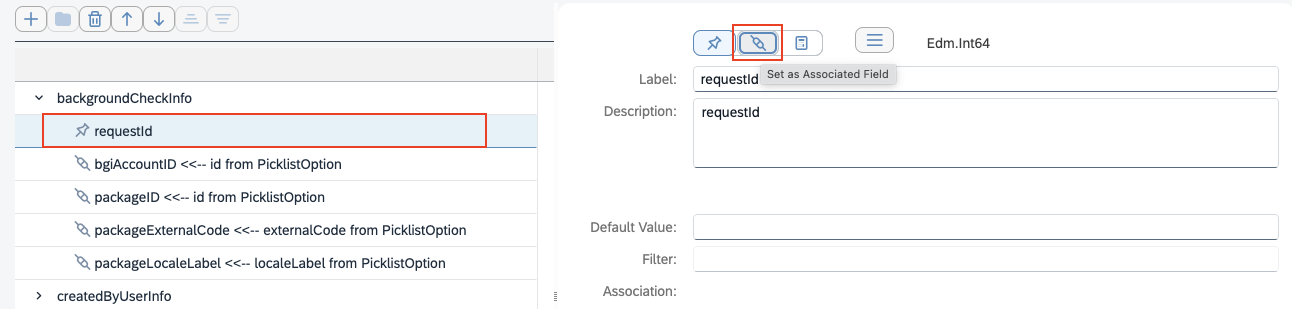
    To set the association for the added element, click on the `Set as Associated Field` icon.

    <Frame>
      <img className="rounded-md" style={{ margin: '0 auto', border: '1px solid #efefef' }} alt="Open Modal to select association" src="https://mintcdn.com/stackone-60/ofhWfuymbZe62HPb/images/sapsuccessfactors/background-check/sap_Sf_bc_integration_center_data_field_mapping_11.png?fit=max&auto=format&n=ofhWfuymbZe62HPb&q=85&s=bc937cd0e3838f711cc157b087c424df" width="1292" height="309" data-path="images/sapsuccessfactors/background-check/sap_Sf_bc_integration_center_data_field_mapping_11.png" />
    </Frame>

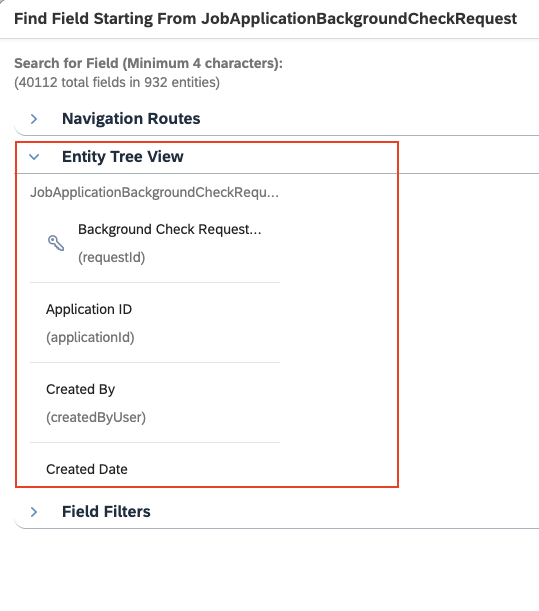
    Choose the specific fields to map, which can be found in the *Entity Tree View*.

    <Frame>
      <img className="rounded-md" style={{ margin: '0 auto', border: '1px solid #efefef' }} alt="Open Modal to select association" src="https://mintcdn.com/stackone-60/pRlim8VKjA70QbLx/images/sapsuccessfactors/background-check/sap_sf_bc_integration_center_select_entity_property_12.png?fit=max&auto=format&n=pRlim8VKjA70QbLx&q=85&s=772c0970e99382884c4c19f075afe366" width="539" height="611" data-path="images/sapsuccessfactors/background-check/sap_sf_bc_integration_center_select_entity_property_12.png" />
    </Frame>

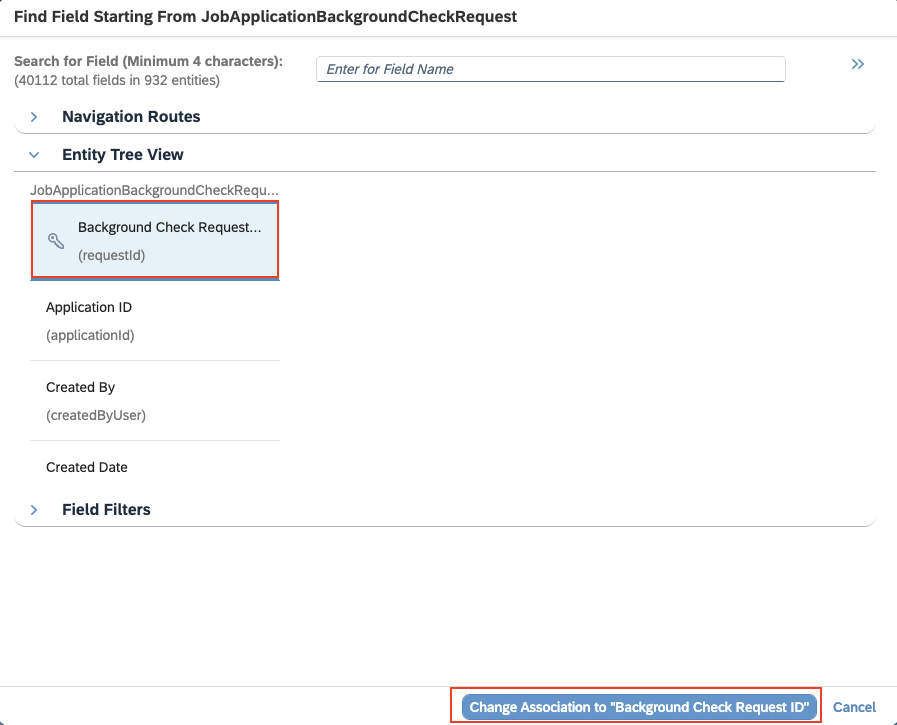
    Select the field and click on the `Change Association` button.

    <Frame>
      <img className="rounded-md" style={{ margin: '0 auto', border: '1px solid #efefef' }} alt="Click on the change association" src="https://mintcdn.com/stackone-60/pRlim8VKjA70QbLx/images/sapsuccessfactors/background-check/sap_sf_bc_integration_center_select_field_save_13.png?fit=max&auto=format&n=pRlim8VKjA70QbLx&q=85&s=49fe70e1861ef485b895e6c65bb33768" width="897" height="725" data-path="images/sapsuccessfactors/background-check/sap_sf_bc_integration_center_select_field_save_13.png" />
    </Frame>

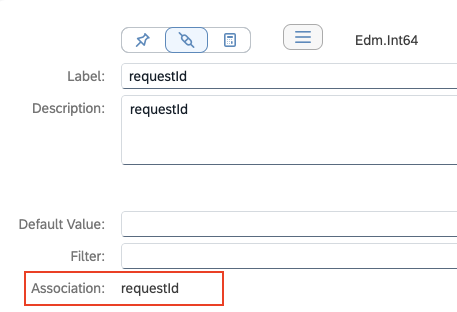
    You will notice that the association has been updated for the data field.

    <Frame>
      <img className="rounded-md" style={{ margin: '0 auto', border: '1px solid #efefef' }} alt="Updated data field association" src="https://mintcdn.com/stackone-60/ofhWfuymbZe62HPb/images/sapsuccessfactors/background-check/sap_sf_bc_integration_center_added_association_14.png?fit=max&auto=format&n=ofhWfuymbZe62HPb&q=85&s=79f23f2a058b0afa93c8b7cbdc563f98" width="457" height="312" data-path="images/sapsuccessfactors/background-check/sap_sf_bc_integration_center_added_association_14.png" />
    </Frame>

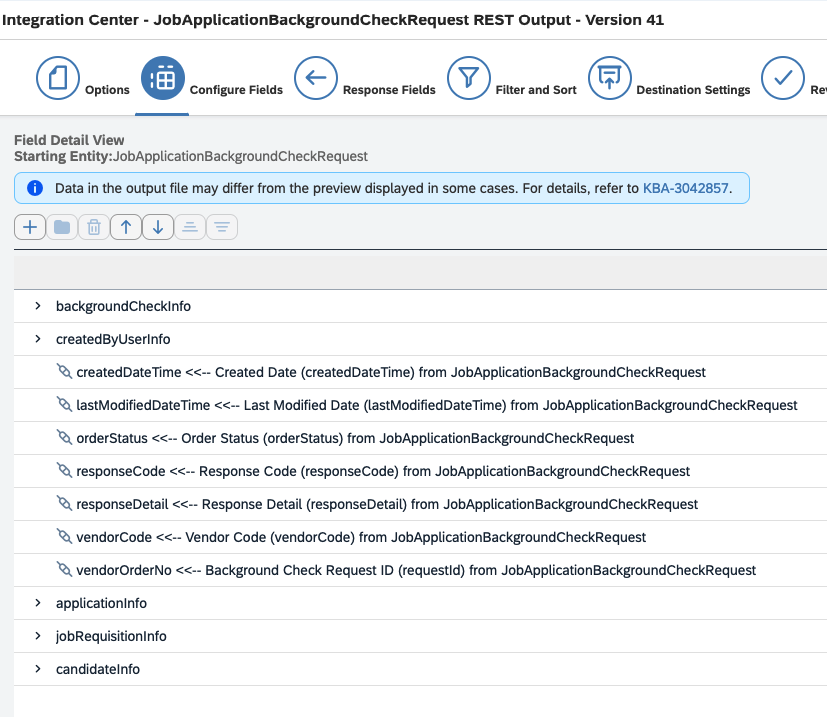
    Map the properties of the data fields to their corresponding properties in the OData API.

    <Accordion title="Please follow the mapping below to receive the correct order notification">
      | Expected properties of data fields                | To | Corresponding properties in the OData API entity                  |
      | ------------------------------------------------- | -- | ----------------------------------------------------------------- |
      | backgroundCheckInfo/requestId                     | -> | requestId                                                         |
      | backgroundCheckInfo/bgiAccountId                  | -> | jobApplication/jobRequisition/bgiAccountId/id                     |
      | backgroundCheckInfo/packageId                     | -> | jobApplication/jobRequisition/packageId/id                        |
      | backgroundCheckInfo/packageExternalCode           | -> | jobApplication/jobRequisition/packageId/externalCode              |
      | backgroundCheckInfo/packageLocaleLabel            | -> | jobApplication/jobRequisition/packageId/localeLabel               |
      | createdByUserInfo/userId                          | -> | createdByUserNav/userId                                           |
      | createdByUserInfo/firstName                       | -> | createdByUserNav/firstName                                        |
      | createdByUserInfo/lastName                        | -> | createdByUserNav/lastName                                         |
      | createdByUserInfo/email                           | -> | createdByUserNav/email                                            |
      | createdByUserInfo/jobRole                         | -> | createdByUserNav/jobRole                                          |
      | createdDateTime                                   | -> | createdDateTime                                                   |
      | lastModifiedDateTime                              | -> | lastModifiedDateTime                                              |
      | orderStatus                                       | -> | orderStatus                                                       |
      | responseCode                                      | -> | responseCode                                                      |
      | responseDetail                                    | -> | responseDetail                                                    |
      | vendorCode                                        | -> | vendorCode                                                        |
      | vendorOrderNo                                     | -> | vendorOrderNo                                                     |
      | applicationInfo/applicationId                     | -> | jobApplication/applicationId                                      |
      | applicationInfo/appStatusName                     | -> | jobApplication/jobAppStatus/appStatusName                         |
      | jobRequisitionInfo/jobReqId                       | -> | jobApplication/jobReqId                                           |
      | jobRequisitionInfo/externalTitle                  | -> | jobApplication/jobRequisition/jobReqLocale/externalTitle          |
      | jobRequisitionInfo/hiringManager/usersSysId       | -> | jobApplication/jobRequisition/hiringManager/usersSysId            |
      | jobRequisitionInfo/hiringManager/firstName        | -> | jobApplication/jobRequisition/hiringManager/userNav/firstName     |
      | jobRequisitionInfo/hiringManager/lastName         | -> | jobApplication/jobRequisition/hiringManager/userNav/lastName      |
      | jobRequisitionInfo/hiringManager/email            | -> | jobApplication/jobRequisition/hiringManager/userNav/email         |
      | jobRequisitionInfo/hiringManager/operatorRole     | -> | jobApplication/jobRequisition/hiringManager/operatorRole          |
      | jobRequisitionInfo/hiringManagerTeam/usersSysId   | -> | jobApplication/jobRequisition/hiringManagerTeam/usersSysId        |
      | jobRequisitionInfo/hiringManagerTeam/firstName    | -> | jobApplication/jobRequisition/hiringManagerTeam/userNav/firstName |
      | jobRequisitionInfo/hiringManagerTeam/lastName     | -> | jobApplication/jobRequisition/hiringManagerTeam/userNav/lastName  |
      | jobRequisitionInfo/hiringManagerTeam/email        | -> | jobApplication/jobRequisition/hiringManagerTeam/userNav/email     |
      | jobRequisitionInfo/hiringManagerTeam/operatorRole | -> | jobApplication/jobRequisition/hiringManagerTeam/operatorRole      |
      | candidateInfo/candidateId                         | -> | jobApplication/candidate/candidateId                              |
      | candidateInfo/firstName                           | -> | jobApplication/candidate/firstName                                |
      | candidateInfo/lastName                            | -> | jobApplication/candidate/lastName                                 |
      | candidateInfo/primaryEmail                        | -> | jobApplication/candidate/primaryEmail                             |
      | candidateInfo/contactEmail                        | -> | jobApplication/candidate/contactEmail                             |
    </Accordion>

    <Frame>
      <img className="rounded-md" style={{ margin: '0 auto', border: '1px solid #efefef' }} alt="After mapping will look like" src="https://mintcdn.com/stackone-60/ofhWfuymbZe62HPb/images/sapsuccessfactors/background-check/sap_sf_bc_integration_center_mapping_10.png?fit=max&auto=format&n=ofhWfuymbZe62HPb&q=85&s=8d2bdacbf2f7fa3c11a1b496dba91af9" width="827" height="717" data-path="images/sapsuccessfactors/background-check/sap_sf_bc_integration_center_mapping_10.png" />
    </Frame>
  </Step>

  <Step title="Response Fields Step">
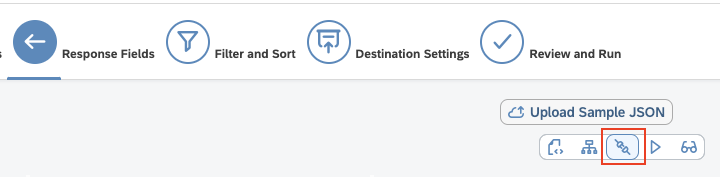
    Click on the `Switch to Field Mapping View` option,

    <Frame>
      <img className="rounded-md" style={{ margin: '0 auto', border: '1px solid #efefef' }} alt="Change the mapping view" src="https://mintcdn.com/stackone-60/pRlim8VKjA70QbLx/images/sapsuccessfactors/background-check/sap_sf_bc_integration_center_response_field_mapping_view_15.png?fit=max&auto=format&n=pRlim8VKjA70QbLx&q=85&s=a3581d41378c6598463f29870664e2f3" width="720" height="177" data-path="images/sapsuccessfactors/background-check/sap_sf_bc_integration_center_response_field_mapping_view_15.png" />
    </Frame>

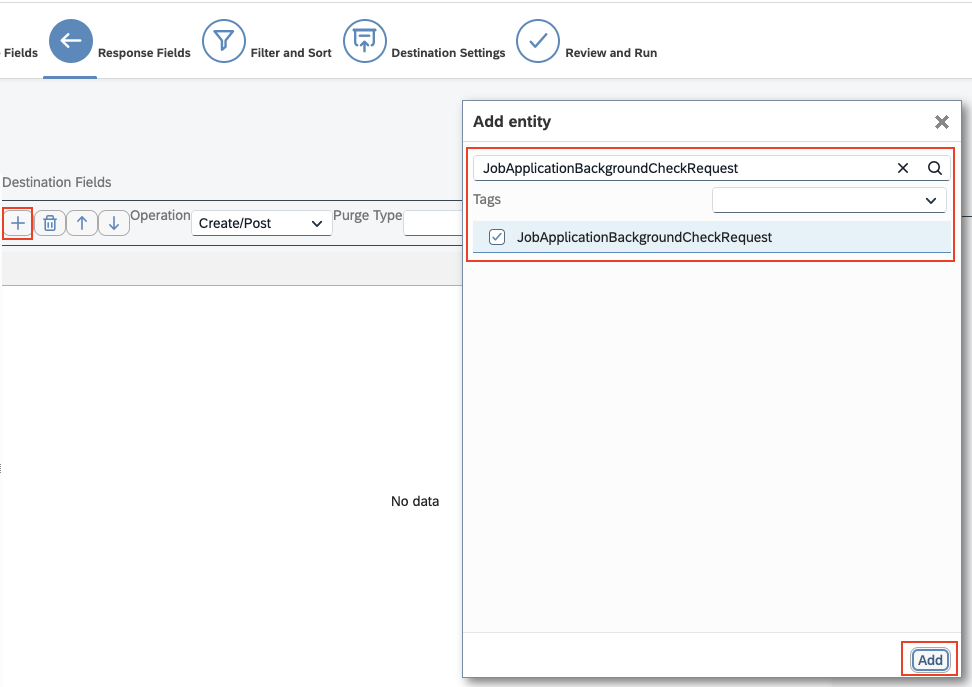
    Click the `+` button and select the `JobApplicationBackgroundCheckRequest` entity. Then click `Add` and proceed by clicking the `Next` button.

    <Frame>
      <img className="rounded-md" style={{ margin: '0 auto', border: '1px solid #efefef' }} alt="After adding will look like this response mapping" src="https://mintcdn.com/stackone-60/ofhWfuymbZe62HPb/images/sapsuccessfactors/background-check/sap_sf_bc_integration_center_response_field_add_entity_16.png?fit=max&auto=format&n=ofhWfuymbZe62HPb&q=85&s=d40fdfecd2257e98dc3846f219724359" width="972" height="687" data-path="images/sapsuccessfactors/background-check/sap_sf_bc_integration_center_response_field_add_entity_16.png" />
    </Frame>
  </Step>

  <Step title="Filter and Sort Step">
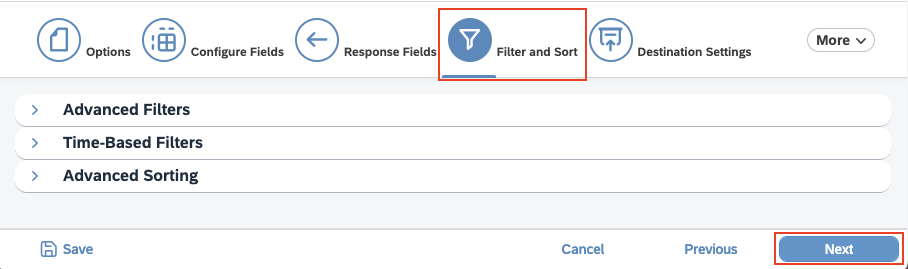
    You do not need to set anything on the Filter and Sort step. Simply click the `Next` button.

    <Frame>
      <img className="rounded-md" style={{ margin: '0 auto', border: '1px solid #efefef' }} alt="Change the mapping view" src="https://mintcdn.com/stackone-60/ofhWfuymbZe62HPb/images/sapsuccessfactors/background-check/sap_sf_bc_integration_center_filter_and_sort_18.png?fit=max&auto=format&n=ofhWfuymbZe62HPb&q=85&s=f4ed498c4578d5254738e54bec1b042f" width="908" height="269" data-path="images/sapsuccessfactors/background-check/sap_sf_bc_integration_center_filter_and_sort_18.png" />
    </Frame>
  </Step>

  <Step title="Destination Settings Step">
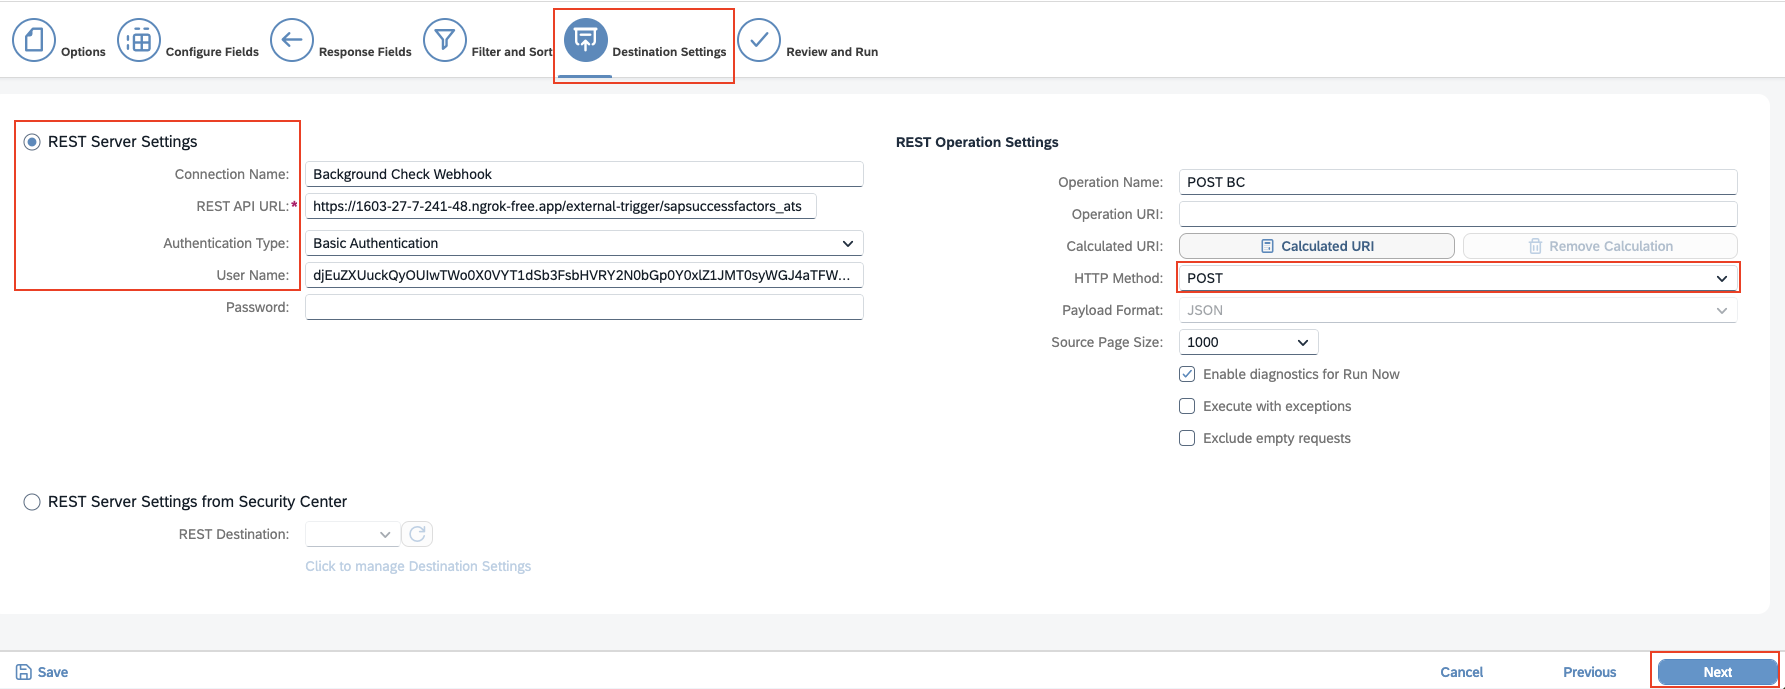
    Select the option for `REST Server Settings` and enter the following details:

    * **Connection Name:** You may choose any name you prefer.

      * **REST API URL:** This is the endpoint URL provided by StackOne, which will be used to receive background check order requests.

      ```plaintext theme={null}
      https://api.stackone.com/external-trigger/sapsuccessfactors_ats
      ```

      * **Authentication Type:** Select `Basic Authentication` from the dropdown menu.
      * **Username:** Enter the `External Trigger Token` that you will receive from the `StackOne Connector Hub` during the connection.

          <Note>
            To obtain the **External Trigger Token**, follow these steps:

            * [StackOne Configuration](#stackone-configuration)
            * [ATS User Enablement](#ats-user-enablement)
          </Note>

    * **Password:** This field can be left empty.

    * **HTTP Method:** Choose the `POST` method under REST Operation Settings.

    Click the `Next` button to proceed.

    <Frame>
      <img className="rounded-md" style={{ margin: '0 auto', border: '1px solid #efefef' }} alt="Change the mapping view" src="https://mintcdn.com/stackone-60/ofhWfuymbZe62HPb/images/sapsuccessfactors/background-check/sap_sf_bc_integration_center_destination_settings_17.png?fit=max&auto=format&n=ofhWfuymbZe62HPb&q=85&s=a85ebda412f9e3f3a7c3729a3bb4bba7" width="1785" height="689" data-path="images/sapsuccessfactors/background-check/sap_sf_bc_integration_center_destination_settings_17.png" />
    </Frame>
  </Step>

  <Step title="Review and Run Step">
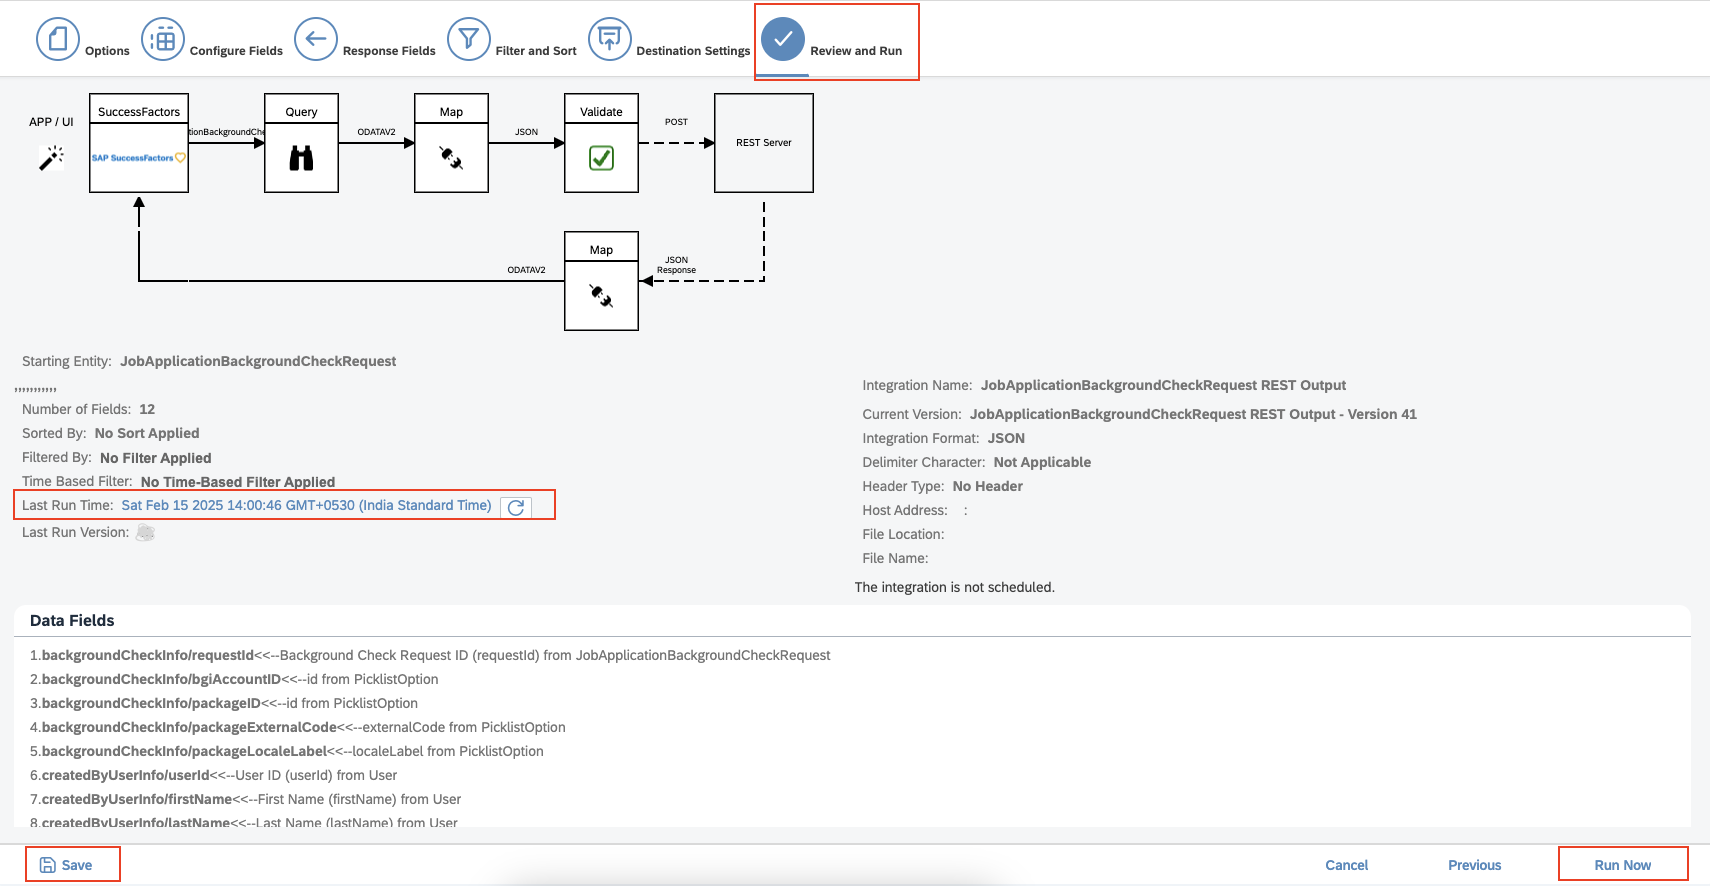
    Review the template structure in the *Review and Run* step. To save it, select the `Save` option. After creation, the template will run in the background, so there is no need to click `Run Now`.

    <Frame>
      <img className="rounded-md" style={{ margin: '0 auto', border: '1px solid #efefef' }} alt="Review and Run" src="https://mintcdn.com/stackone-60/pRlim8VKjA70QbLx/images/sapsuccessfactors/background-check/sap_sf_bc_integration_center_summary_19.png?fit=max&auto=format&n=pRlim8VKjA70QbLx&q=85&s=ea1b5260e660380e7712cb3a0758c2c2" width="1710" height="886" data-path="images/sapsuccessfactors/background-check/sap_sf_bc_integration_center_summary_19.png" />
    </Frame>

    <Info>
      You can access the logs by clicking on the `Last Run Time` link.
    </Info>

    You can confirm the integration by returning to *Integration Center* > *My Integrations*.
  </Step>
</Steps>

### Create Vendor from Recruiting External Vendor

<Steps>
  <Step title="Go to Manage Data">
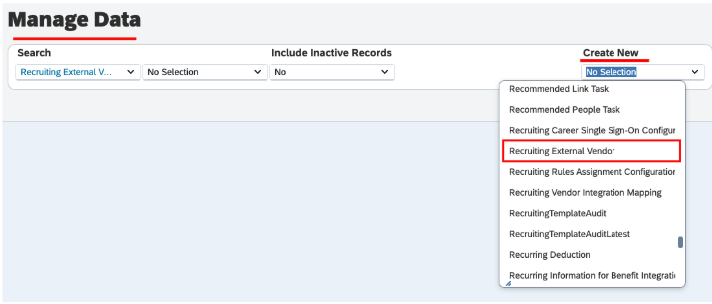
    Navigate to *Manage Data* and select `Recruiting External Vendor` from the *Create New* dropdown.

    <Frame>
      <img className="rounded-md" style={{ margin: '0 auto', border: '1px solid #efefef' }} alt="Recruiting External Vendor" src="https://mintcdn.com/stackone-60/pRlim8VKjA70QbLx/images/sapsuccessfactors/background-check/sap_sf_bc_manage_data_recruiting_externa_vendor_20.png?fit=max&auto=format&n=pRlim8VKjA70QbLx&q=85&s=ddb7240e106cdfbe32751ceb199b3b5c" width="712" height="304" data-path="images/sapsuccessfactors/background-check/sap_sf_bc_manage_data_recruiting_externa_vendor_20.png" />
    </Frame>

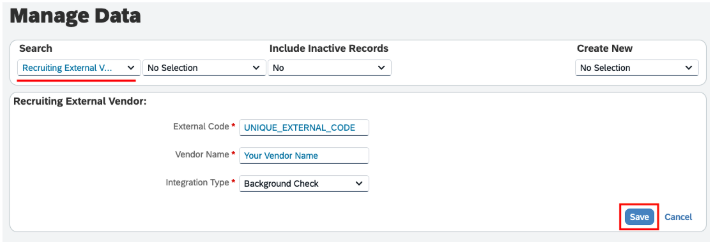
    Enter the External Code, Vendor Name, and select `Background Check` as the Integration Type from the dropdown menu. Click `Save` to create the vendor.

    <Warning>
      `External Code` refers to a text string that serves as a code for the background check vendor. The OData API entities use this value to facilitate communication between the third-party vendor and SAP SuccessFactors. If this information is not entered correctly, certain integration scenarios may fail to function properly.
    </Warning>

    <Frame>
      <img className="rounded-md" style={{ margin: '0 auto', border: '1px solid #efefef' }} alt="Enter all required details of Recruiting External Vendor" src="https://mintcdn.com/stackone-60/pRlim8VKjA70QbLx/images/sapsuccessfactors/background-check/sap_sf_bc_manage_data_fill_details_21.png?fit=max&auto=format&n=pRlim8VKjA70QbLx&q=85&s=63f5df81e0cb619f5dcc176628f1ef50" width="710" height="242" data-path="images/sapsuccessfactors/background-check/sap_sf_bc_manage_data_fill_details_21.png" />
    </Frame>
  </Step>
</Steps>

### Create Recruiting Vendor Integration Mapping

<Steps>
  <Step title="Go to the Manage Data">
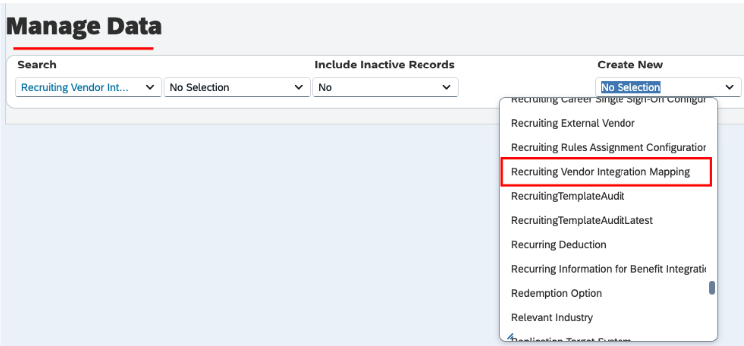
    Navigate to *Manage Data* and select `Recruiting Vendor Integration Mapping` from *Create New* dropdown

    <Frame>
      <img className="rounded-md" style={{ margin: '0 auto', border: '1px solid #efefef' }} alt="Recruiting Vendor Integration Mapping" src="https://mintcdn.com/stackone-60/pRlim8VKjA70QbLx/images/sapsuccessfactors/background-check/sap_sf_bc_manage_data_recruiting_vendor_integration_mapping_22.png?fit=max&auto=format&n=pRlim8VKjA70QbLx&q=85&s=e91f84b13a65c4de8342cf5f1bf7c842" width="744" height="346" data-path="images/sapsuccessfactors/background-check/sap_sf_bc_manage_data_recruiting_vendor_integration_mapping_22.png" />
    </Frame>

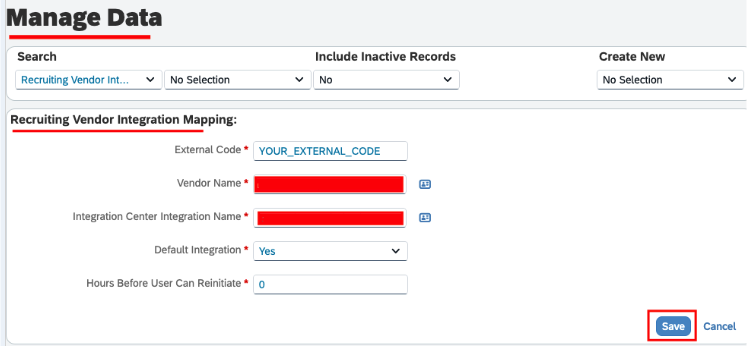
    Complete the following fields:

    * **External Code:** Enter a unique identifier code.
    * **Vendor Name:** Select your vendor name from the dropdown menu created in the previous step.
    * **Integration Name:** Choose your integration name from the dropdown menu.
    * **Default Integration:** Select `Yes`.
    * **Hours Before User Can Reinitiate:** This field currently has no functionality in SAP SuccessFactors. You may enter `0`.

          <Frame>
            <img className="rounded-md" style={{ margin: '0 auto', border: '1px solid #efefef' }} alt="Enter all required details of Recruiting Vendor Integration Mapping" src="https://mintcdn.com/stackone-60/pRlim8VKjA70QbLx/images/sapsuccessfactors/background-check/sap_sf_bc_manage_data_fill_details_23.png?fit=max&auto=format&n=pRlim8VKjA70QbLx&q=85&s=76fa32e7ad3767f8f7d6938ab03f3593" width="748" height="346" data-path="images/sapsuccessfactors/background-check/sap_sf_bc_manage_data_fill_details_23.png" />
          </Frame>

    Click `Save` to save the mapping between the vendor and the integration.

    <Info>
      Only one `Recruiting Vendor Integration Mapping` can be active at a time. To activate the selected vendor integration for the instance, choose `Yes` in the **Default Integration** field. Additionally, ensure that `No` is selected for all other Recruiting Vendors you may have created.
    </Info>
  </Step>
</Steps>

### Manage fields for the Job Requisition template

<Steps>
  <Step title="Go to Manage Templates">
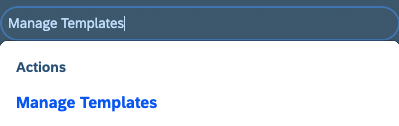
    Navigate to *Admin Center* and search for *Manage Templates*.

    <Frame>
      <img className="rounded-md" style={{ margin: '0 auto', border: '1px solid #efefef' }} alt="Navigate to Job Requisition template" src="https://mintcdn.com/stackone-60/pRlim8VKjA70QbLx/images/sapsuccessfactors/background-check/sap_sf_bc_search_manage_templates_24.png?fit=max&auto=format&n=pRlim8VKjA70QbLx&q=85&s=52e3b631e5756d190edeaa2e14e295e8" width="399" height="126" data-path="images/sapsuccessfactors/background-check/sap_sf_bc_search_manage_templates_24.png" />
    </Frame>

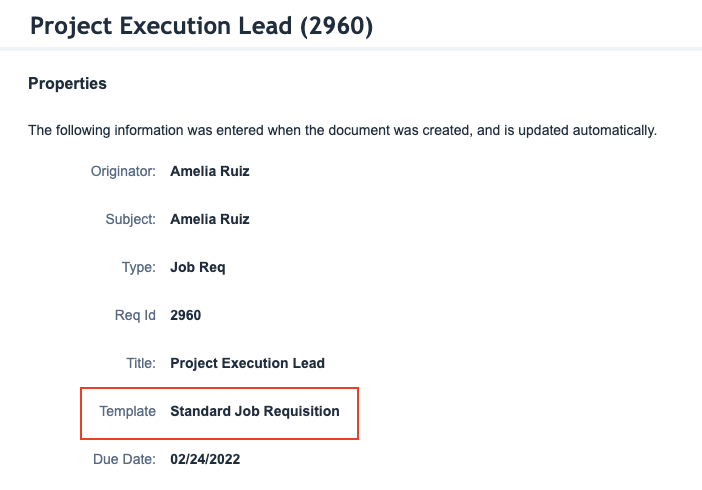
    Go to the *Recruiting Management* tab, select *Job Requisition*, and choose the template in use for the relevant job requisition, such as `Standard Job Requisition`.

    <Accordion title="How to Locate the Job Requisition Template Name">
      Go to *Recruiting* and select any specific job requisition.

      <Frame>
        <img className="rounded-md" style={{ margin: '0 auto', border: '1px solid #efefef' }} alt="Specific Job Requisition" src="https://mintcdn.com/stackone-60/pRlim8VKjA70QbLx/images/sapsuccessfactors/background-check/sap_sf_bc_recruiting_info_26.png?fit=max&auto=format&n=pRlim8VKjA70QbLx&q=85&s=91280ba012f1fc8162da7114bea9c454" width="1271" height="122" data-path="images/sapsuccessfactors/background-check/sap_sf_bc_recruiting_info_26.png" />
      </Frame>

      Click on the `i` icon to view the Job Requisition Template.

      <Frame>
        <img className="rounded-md" style={{ margin: '0 auto', border: '1px solid #efefef' }} alt="JR Info" src="https://mintcdn.com/stackone-60/pRlim8VKjA70QbLx/images/sapsuccessfactors/background-check/sap_sf_bc_recruiting_JR_info_27.png?fit=max&auto=format&n=pRlim8VKjA70QbLx&q=85&s=44a64a9f51657cf5164221c2dbb006bd" width="702" height="490" data-path="images/sapsuccessfactors/background-check/sap_sf_bc_recruiting_JR_info_27.png" />
      </Frame>
    </Accordion>

    <Frame>
      <img className="rounded-md" style={{ margin: '0 auto', border: '1px solid #efefef' }} alt="Standard Job Requisition" src="https://mintcdn.com/stackone-60/pRlim8VKjA70QbLx/images/sapsuccessfactors/background-check/sap_sf_bc_jr_specific_template_28.png?fit=max&auto=format&n=pRlim8VKjA70QbLx&q=85&s=be028be52147110094dfeb3e067b76e2" width="897" height="142" data-path="images/sapsuccessfactors/background-check/sap_sf_bc_jr_specific_template_28.png" />
    </Frame>
  </Step>

  <Step title="Add bgiAccountId & packageId fields in template">
    Add the following fields, which you will receive in the order request:

    * **bgiAccountId:** This field allows you to create multiple accounts with a single third-party background check vendor. It enables users to select which account to use.
    * **packageId:** This field allows users to choose the package they wish to associate with a specific job requisition.

          <Accordion title="You can specify the standard fields `bgiAccountId` and `packageId` using the Job Requisition XML as well.">
            <Warning>
              This approach should only be used if you have permission to upload the Job Requisition template via an XML file; otherwise, you can manually add the fields and click the `Publish` button.
            </Warning>

            ```XML theme={null}
              <field-definition id="bgiAccountId" type="picklist" required="false" custom="false"> 
                <field-label><![CDATA[Account ID]]></field-label>
                <field-description><![CDATA[Account ID]]></field-description> 
                <picklist-id>accountId</picklist-id> 
              </field-definition>

              <field-definition id="packageId" type="picklist" required="false" custom="false">
                <field-label><![CDATA[packageId]]></field-label>
                <field-description><![CDATA[package]]></field-description>
                <picklist-id>packageId</picklist-id>
              </field-definition>
            ```
          </Accordion>

          <Frame>
            <img className="rounded-md" style={{ margin: '0 auto', border: '1px solid #efefef' }} alt="Add two fields from JR field template" src="https://mintcdn.com/stackone-60/pRlim8VKjA70QbLx/images/sapsuccessfactors/background-check/sap_sf_bc_jr_template_add_fields_29.png?fit=max&auto=format&n=pRlim8VKjA70QbLx&q=85&s=8d09625dcbf6cf64f1f36fd9ed5182de" width="835" height="616" data-path="images/sapsuccessfactors/background-check/sap_sf_bc_jr_template_add_fields_29.png" />
          </Frame>

      In the next step, update the permissions to ensure the fields are visible during Job Requisition creation or updates.

          <Note>
            The fields `bgiAccountId` and `packageId` will only be accessible for Job Requisitions that utilise a specific Job Requisition template where these fields are configured.
          </Note>
  </Step>
</Steps>

### Manage the permissions for the fields added to the Job Requisition template

<Steps>
  <Step title="Go to Manage Templates">
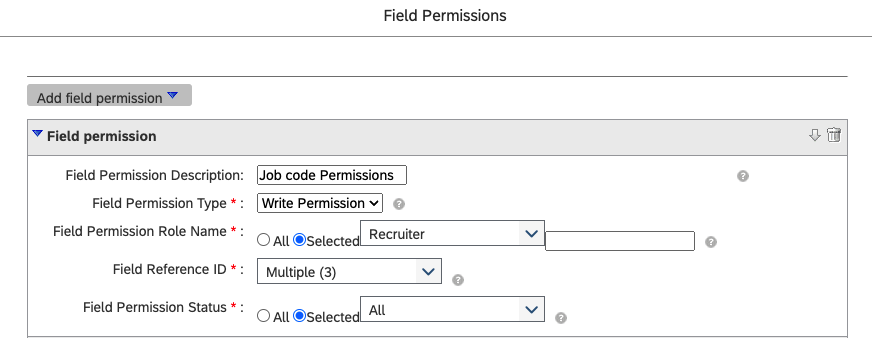
    To add or update field permissions, navigate to the relevant Job Requisition Template, select `Field Permissions Defined`, and then click `Add Field Permission` in the modal.

    * **Field Permission Description:** Enter any description.
      * **Field Permission Type:** Select `Write Permission`.
      * **Field Permission Role Name:** Select `Recruiter`.
      * **Field Reference ID:** Select the `bgiAccountId` and `packageId` fields.
      * **Field Permission Status:** Select `All` or `pre-approved` from the dropdown menu.

    After adding the fields, click `Publish` to save your changes.

    <Frame>
      <img className="rounded-md" style={{ margin: '0 auto', border: '1px solid #efefef' }} alt="Add field permissions from the JR template" src="https://mintcdn.com/stackone-60/pRlim8VKjA70QbLx/images/sapsuccessfactors/background-check/sap_sf_bc_jr_template_fields_permissisons_30.png?fit=max&auto=format&n=pRlim8VKjA70QbLx&q=85&s=e52fb768ba344f8810413c1ca4ae00d3" width="872" height="338" data-path="images/sapsuccessfactors/background-check/sap_sf_bc_jr_template_fields_permissisons_30.png" />
    </Frame>

    Once the permissions have been updated, the fields will be visible in the Job Requisition during creation or editing.
  </Step>
</Steps>

### Grant Background Check Initiate Permission

<Note>
  Recruiters must have the necessary permissions to initiate background checks.
</Note>

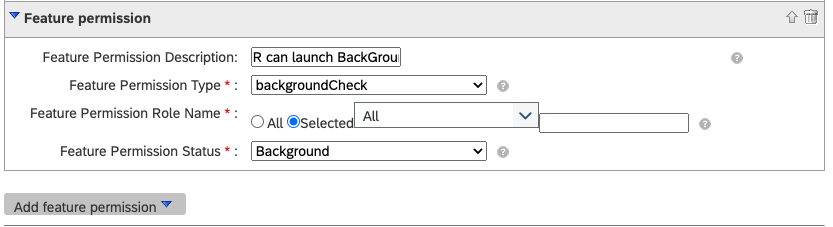
Go to the specific *Job Requisition Template* > *Template Settings* > *Application Status Configuration* and add the feature permission block for background check to the job requisition template.

<Frame>
  <img className="rounded-md" style={{ margin: '0 auto', border: '1px solid #efefef' }} alt="Apply Updates" src="https://mintcdn.com/stackone-60/pRlim8VKjA70QbLx/images/sapsuccessfactors/background-check/sap_sf_bc_jr_template_feature_permissions_for_bc_52.png?fit=max&auto=format&n=pRlim8VKjA70QbLx&q=85&s=de663704e4b660ad038a73c01edf9085" width="833" height="227" data-path="images/sapsuccessfactors/background-check/sap_sf_bc_jr_template_feature_permissions_for_bc_52.png" />
</Frame>

Alternatively, you can add permissions via the Job Requisition template XML file:

```XML theme={null}
<feature-permission type="backgroundCheck">
    <description><![CDATA[R can launch Background Check during statuses with screening category.]]></description>
    <role-name><![CDATA[T]]></role-name>
    <role-name><![CDATA[O]]></role-name>
    <role-name><![CDATA[R]]></role-name>
    <role-name><![CDATA[S]]></role-name>
    <status><![CDATA[Background Check]]></status>
</feature-permission>
```

Once the `Background Check Initiate` permission is assigned, the user will be able to execute "Application/UI" or "Event-based" integrations.

### Add background check accounts from the PickList Center

<Steps>
  <Step title="Go to background check accounts">
    <Info>
      You can create multiple accounts with a single third-party background check vendor. All accounts added in this picklist will be available for users to select as the Background Check Account under the Job Requisition details.
    </Info>

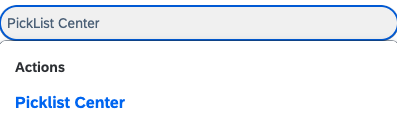
    Go to *Admin Center* and search for `PickList Center`.

    <Frame>
      <img className="rounded-md" style={{ margin: '0 auto', border: '1px solid #efefef' }} alt="Navigate to PickList Center" src="https://mintcdn.com/stackone-60/pRlim8VKjA70QbLx/images/sapsuccessfactors/background-check/sap_sf_bc_picklist_center_accountid_41.png?fit=max&auto=format&n=pRlim8VKjA70QbLx&q=85&s=1fe91cde6252a8ec0dba2abb2b6dd6a8" width="397" height="132" data-path="images/sapsuccessfactors/background-check/sap_sf_bc_picklist_center_accountid_41.png" />
    </Frame>

    Search for `bgiAccountId`.

    <Frame>
      <img className="rounded-md" style={{ margin: '0 auto', border: '1px solid #efefef' }} alt="Search for bgiAccountId" src="https://mintcdn.com/stackone-60/pRlim8VKjA70QbLx/images/sapsuccessfactors/background-check/sap_sf_bc_picklist_center_bgiaccountid_42.png?fit=max&auto=format&n=pRlim8VKjA70QbLx&q=85&s=5ecdc7e07d5ed4967969b1af34a33255" width="1226" height="216" data-path="images/sapsuccessfactors/background-check/sap_sf_bc_picklist_center_bgiaccountid_42.png" />
    </Frame>
  </Step>

  <Step title="Add New Accounts">
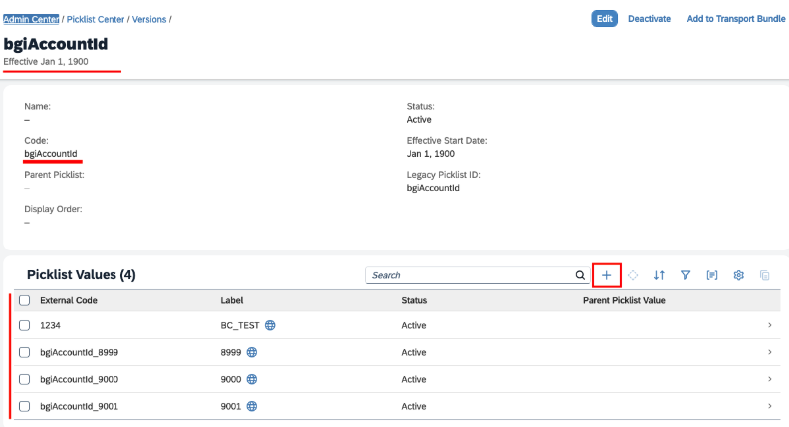
    Click on `bgiAccountId`. This will take you to the Picklist Values page, where you can add different `Background Check Accounts`.

    <Frame>
      <img className="rounded-md" style={{ margin: '0 auto', border: '1px solid #efefef' }} alt="Add new accounts for background check" src="https://mintcdn.com/stackone-60/pRlim8VKjA70QbLx/images/sapsuccessfactors/background-check/sap_sf_bc_picklist_center_bgiaccount_list_and_add_43.png?fit=max&auto=format&n=pRlim8VKjA70QbLx&q=85&s=543de0f64c7d0fe40d3311b99ffcff81" width="789" height="427" data-path="images/sapsuccessfactors/background-check/sap_sf_bc_picklist_center_bgiaccount_list_and_add_43.png" />
    </Frame>
  </Step>
</Steps>

### Add background check packages from the PickList Center

<Steps>
  <Step title="Go to the packages">
    Go to *Admin Center* and search for `PickList Center`.

    <Frame>
      <img className="rounded-md" style={{ margin: '0 auto', border: '1px solid #efefef' }} alt="navigate to Picklist center" src="https://mintcdn.com/stackone-60/pRlim8VKjA70QbLx/images/sapsuccessfactors/background-check/sap_sf_bc_picklist_center_accountid_41.png?fit=max&auto=format&n=pRlim8VKjA70QbLx&q=85&s=1fe91cde6252a8ec0dba2abb2b6dd6a8" width="397" height="132" data-path="images/sapsuccessfactors/background-check/sap_sf_bc_picklist_center_accountid_41.png" />
    </Frame>

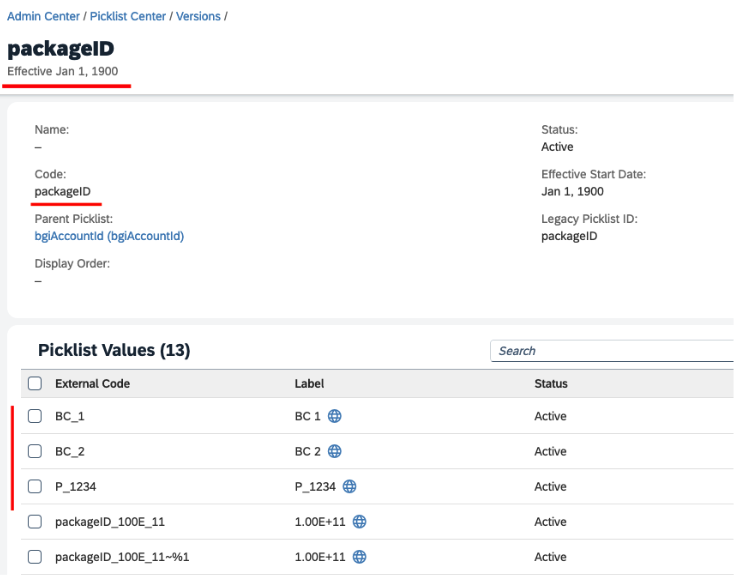
    Search for `packageId`.

    <Frame>
      <img className="rounded-md" style={{ margin: '0 auto', border: '1px solid #efefef' }} alt="Search for packageId" src="https://mintcdn.com/stackone-60/pRlim8VKjA70QbLx/images/sapsuccessfactors/background-check/sap_sf_bc_picklist_center_packages_44.png?fit=max&auto=format&n=pRlim8VKjA70QbLx&q=85&s=8754178ce4109d3b4403147ad089d4fb" width="1226" height="216" data-path="images/sapsuccessfactors/background-check/sap_sf_bc_picklist_center_packages_44.png" />
    </Frame>
  </Step>

  <Step title="Add New Packages">
    Click on `packageId` to go to the Picklist Values page, where you can add different `Background Check Packages`.

    <Frame>
      <img className="rounded-md" style={{ margin: '0 auto', border: '1px solid #efefef' }} alt="Add new Packages" src="https://mintcdn.com/stackone-60/pRlim8VKjA70QbLx/images/sapsuccessfactors/background-check/sap_sf_bc_picklist_center_packages_id_packages_45.png?fit=max&auto=format&n=pRlim8VKjA70QbLx&q=85&s=4037ba0d3ffb1d18fa5bd7cb9bd1a98a" width="738" height="575" data-path="images/sapsuccessfactors/background-check/sap_sf_bc_picklist_center_packages_id_packages_45.png" />
    </Frame>

    <Info>
      All packages added in this picklist will be available for users to select as the Background Check Package to associate with Job Requisitions.
    </Info>
  </Step>
</Steps>

### Include a Background Check stage in the Talent Pipeline

<Warning>
  You may skip this step if users already have a separate `Background Check` stage in the talent pipeline for the Job Requisition.
</Warning>

<Steps>
  <Step title="Go to Applicant Status Configuration">
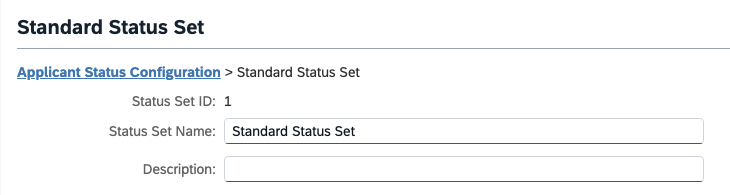
    Go to *Admin Center* and search for `Edit Applicant Status Configuration`. Select the specific Applicant Status Set currently in use for the job requisition, such as the `Standard Status Set`.

    <Frame>
      <img className="rounded-md" style={{ margin: '0 auto', border: '1px solid #efefef' }} alt="Navigate to Applicant Status Configuration" src="https://mintcdn.com/stackone-60/ofhWfuymbZe62HPb/images/sapsuccessfactors/background-check/sap_sf_bc_edit_applicant_status_config_46.png?fit=max&auto=format&n=ofhWfuymbZe62HPb&q=85&s=3226230120bf09e4b3500d48c17914c4" width="442" height="132" data-path="images/sapsuccessfactors/background-check/sap_sf_bc_edit_applicant_status_config_46.png" />
    </Frame>

    This will take you to the page for the `Standard Status Set`.

    <Frame>
      <img className="rounded-md" style={{ margin: '0 auto', border: '1px solid #efefef' }} alt="Direct to status set page" src="https://mintcdn.com/stackone-60/ofhWfuymbZe62HPb/images/sapsuccessfactors/background-check/sap_sf_bc_applicant_status_config_page_47.png?fit=max&auto=format&n=ofhWfuymbZe62HPb&q=85&s=06732df564a1fc4fa9035389d2b5853b" width="730" height="195" data-path="images/sapsuccessfactors/background-check/sap_sf_bc_applicant_status_config_page_47.png" />
    </Frame>
  </Step>

  <Step title="Edit Applicant Status Set configurations">
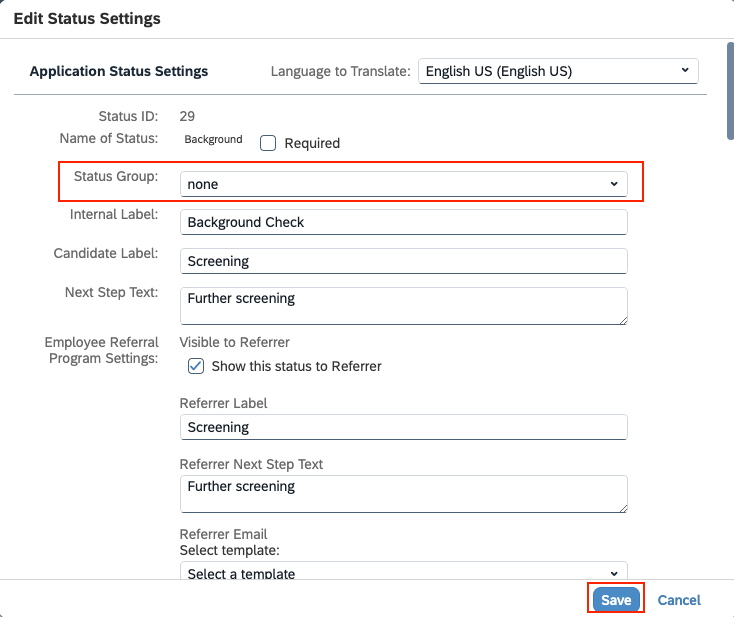
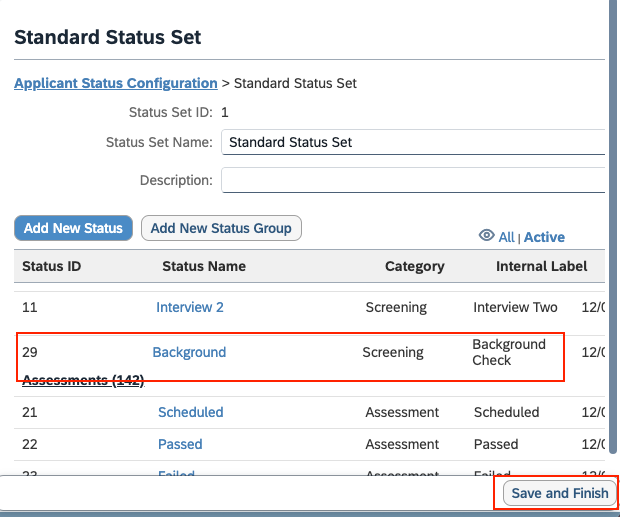
    Locate the `Background Check` stage, edit it, and select `none` from the `Status Group` dropdown. This will make the Background Check visible as a separate stage in the Job Requisition's Talent Pipeline.

    <Frame>
      <img className="rounded-md" style={{ margin: '0 auto', border: '1px solid #efefef' }} alt="Edit Applicant Status Set configurations" src="https://mintcdn.com/stackone-60/ofhWfuymbZe62HPb/images/sapsuccessfactors/background-check/sap_sf_bc_applicant_status_bc_edit_config_48.png?fit=max&auto=format&n=ofhWfuymbZe62HPb&q=85&s=ac6a1bb40eb275fbbc7c8f6dd68b5a93" width="734" height="617" data-path="images/sapsuccessfactors/background-check/sap_sf_bc_applicant_status_bc_edit_config_48.png" />
    </Frame>

    Click the `Save and Finish` button to save your changes.

    <Frame>
      <img className="rounded-md" style={{ margin: '0 auto', border: '1px solid #efefef' }} alt="Save and finish" src="https://mintcdn.com/stackone-60/ofhWfuymbZe62HPb/images/sapsuccessfactors/background-check/sap_sf_bc_applicant_status_config_bc_save_and_finish_49.png?fit=max&auto=format&n=ofhWfuymbZe62HPb&q=85&s=e7e8f7d29efd1aabc6b867c798eab03b" width="620" height="517" data-path="images/sapsuccessfactors/background-check/sap_sf_bc_applicant_status_config_bc_save_and_finish_49.png" />
    </Frame>
  </Step>

  <Step title="Where can you verify the added stage">
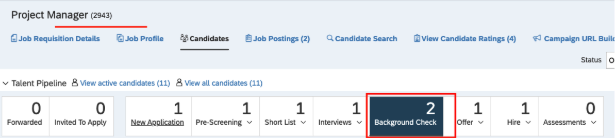
    Navigate to *Job Requisition* > *Candidates*. At the top, you will see the updated talent pipeline.

    <Frame>
      <img className="rounded-md" style={{ margin: '0 auto', border: '1px solid #efefef' }} alt="Where can you verify the added stage" src="https://mintcdn.com/stackone-60/pRlim8VKjA70QbLx/images/sapsuccessfactors/background-check/sap_sf_bc_recruiting_jr_after_51.png?fit=max&auto=format&n=pRlim8VKjA70QbLx&q=85&s=44193b17124825082b462085b6c4d7a4" width="615" height="138" data-path="images/sapsuccessfactors/background-check/sap_sf_bc_recruiting_jr_after_51.png" />
    </Frame>

    You can now move candidates to the Background Check stage.
  </Step>
</Steps>

### Background Check fields visibility under the Job Requisition

<Steps>
  <Step title="Go to Job Requisition">
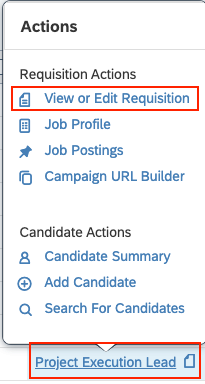
    Navigate to the relevant *Job Requisition*, hover over the requisition title to open the Actions menu, and then select `View or Edit Requisition`.

    <Frame>
      <img className="rounded-md" style={{ margin: '0 auto', border: '1px solid #efefef' }} alt="Go to Actions menu" src="https://mintcdn.com/stackone-60/pRlim8VKjA70QbLx/images/sapsuccessfactors/background-check/sap_sf_bc_recruiting_JR_hove_actions_32.png?fit=max&auto=format&n=pRlim8VKjA70QbLx&q=85&s=e8ed6bce2f4cbee73d4cd9a7227ba38d" width="205" height="384" data-path="images/sapsuccessfactors/background-check/sap_sf_bc_recruiting_JR_hove_actions_32.png" />
    </Frame>

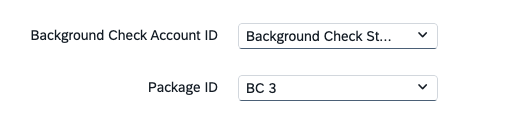
    Both *Account ID* and *Package ID* fields will be visible, allowing the user to select the account and package to associate the background check with the job.

    <Accordion title="If fields are not visible after adding fields & permissions in the above steps">
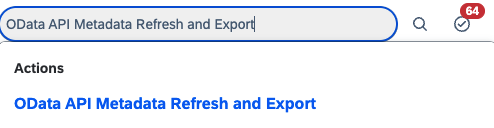
      Navigate to *Admin Center* and search for `OData API Metadata Refresh and Export`

      <Frame>
        <img className="rounded-md" style={{ margin: '0 auto', border: '1px solid #efefef' }} alt="OData API Metadata Refresh and Export" src="https://mintcdn.com/stackone-60/pRlim8VKjA70QbLx/images/sapsuccessfactors/background-check/sap_sf_bc_odata_api_search_38.png?fit=max&auto=format&n=pRlim8VKjA70QbLx&q=85&s=2a34141aef8170913cbb8cd73f4feaee" width="494" height="128" data-path="images/sapsuccessfactors/background-check/sap_sf_bc_odata_api_search_38.png" />
      </Frame>

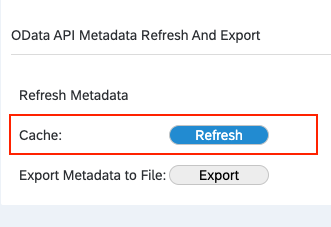
      Click the `Refresh` button next to Cache.

      <Frame>
        <img className="rounded-md" style={{ margin: '0 auto', border: '1px solid #efefef' }} alt="Refresh button" src="https://mintcdn.com/stackone-60/pRlim8VKjA70QbLx/images/sapsuccessfactors/background-check/sap_sf_bc_odata_api_cache_refresh_39.png?fit=max&auto=format&n=pRlim8VKjA70QbLx&q=85&s=7081536dccd545ff686bd85f550ead7b" width="331" height="227" data-path="images/sapsuccessfactors/background-check/sap_sf_bc_odata_api_cache_refresh_39.png" />
      </Frame>
    </Accordion>

    <Frame>
      <img className="rounded-md" style={{ margin: '0 auto', border: '1px solid #efefef' }} alt="Both fields are visible" src="https://mintcdn.com/stackone-60/pRlim8VKjA70QbLx/images/sapsuccessfactors/background-check/sap_sf_bc_job_req_bgi_package_fields_40.png?fit=max&auto=format&n=pRlim8VKjA70QbLx&q=85&s=12853abd390373a815bffd679a867677" width="523" height="131" data-path="images/sapsuccessfactors/background-check/sap_sf_bc_job_req_bgi_package_fields_40.png" />
    </Frame>
  </Step>

  <Step title="Visibility of Initiate Background Check option">
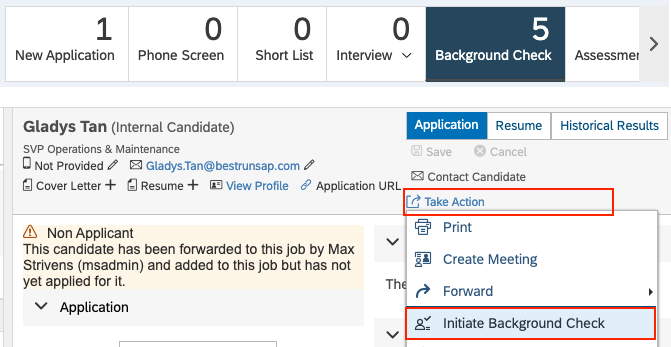
    The `Initiate Background Check` option will be visible to users under the `Take Actions` menu within the candidate's application.

    <Note>
      If the `Initiate Background Check` option is not visible, please ensure that the user has been granted the necessary permissions to initiate background checks as outlined in the previous <a href="#grant-background-check-initiate-permission">step</a>.
    </Note>

    <Frame>
      <img className="rounded-md" style={{ margin: '0 auto', border: '1px solid #efefef' }} alt="Take Actions menu" src="https://mintcdn.com/stackone-60/ofhWfuymbZe62HPb/images/sapsuccessfactors/background-check/sap_sf_bc_initiate_bc_to_send_35.png?fit=max&auto=format&n=ofhWfuymbZe62HPb&q=85&s=8c58c671240757589a7bf7abdad5abf2" width="671" height="347" data-path="images/sapsuccessfactors/background-check/sap_sf_bc_initiate_bc_to_send_35.png" />
    </Frame>
  </Step>
</Steps>

## StackOne Configuration

<Steps>
  <Step title="Enable SAP SuccessFactors in StackOne">
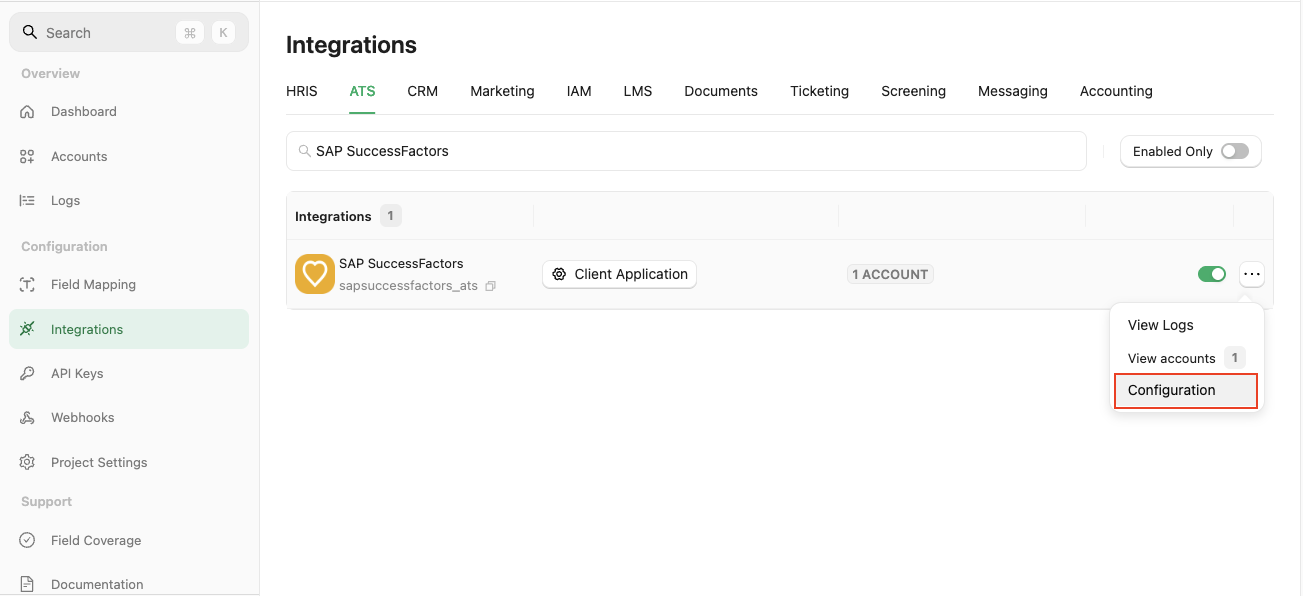
    Go to the ATS category on the *Integrations* page and enable SAP SuccessFactors.

    <Frame>
      <img className="rounded-md" style={{ margin: '0 auto', border: '1px solid #efefef' }} alt="Activate SAP SuccessFactors" src="https://mintcdn.com/stackone-60/pRlim8VKjA70QbLx/images/sapsuccessfactors/background-check/sapsuccessfactors_enable_55.png?fit=max&auto=format&n=pRlim8VKjA70QbLx&q=85&s=f4fe8ec863bc01007fa9c70ea3812651" width="1303" height="596" data-path="images/sapsuccessfactors/background-check/sapsuccessfactors_enable_55.png" />
    </Frame>
  </Step>

  <Step title="Complete the configuration form">
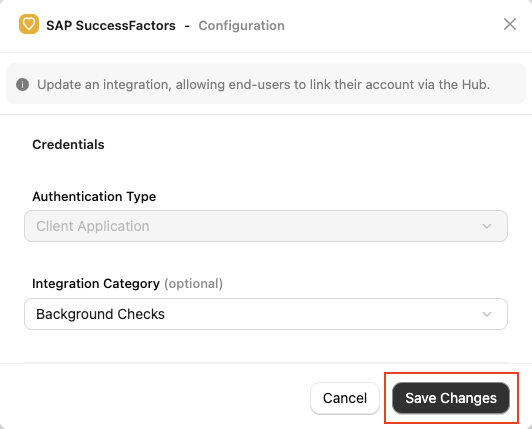
    Fill out the required fields in the **SAP SuccessFactors - Configuration** model:

    * **Authentication Type:** Select `Client Application`.
    * **Integration Category:** Select `Background Checks`.

    <Frame>
      <img className="rounded-md" style={{ margin: '0 auto', border: '1px solid #efefef' }} alt="Activate SAP SuccessFactors" src="https://mintcdn.com/stackone-60/pRlim8VKjA70QbLx/images/sapsuccessfactors/background-check/sapsuccessfactors_configure_form_56.png?fit=max&auto=format&n=pRlim8VKjA70QbLx&q=85&s=921d35383b4c4779f19449287fca6a0f" width="532" height="429" data-path="images/sapsuccessfactors/background-check/sapsuccessfactors_configure_form_56.png" />
    </Frame>

    Click `Confirm` or `Save Changes` to enable the SAP SuccessFactors integration, allowing end users to link their accounts via the StackOne Connector Hub.
  </Step>

  <Step title="Add a Webhook">
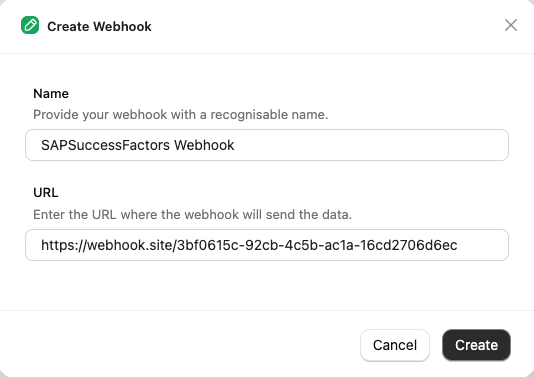
    Navigate to the *Webhooks* page, click `Add webhook`, and complete the form:

    * **Name:** Enter a recognisable name for your webhook.
    * **URL:** Enter the URL where the webhook will send notifications of enable events.

          <Frame>
            <img src="https://mintcdn.com/stackone-60/pRlim8VKjA70QbLx/images/sapsuccessfactors/background-check/sapsuccessfactors_add_webhook_form.png?fit=max&auto=format&n=pRlim8VKjA70QbLx&q=85&s=aa10f45a00e17ef8e50b41c09eb4c55f" alt="Add Webhook form" width="534" height="377" data-path="images/sapsuccessfactors/background-check/sapsuccessfactors_add_webhook_form.png" />
          </Frame>

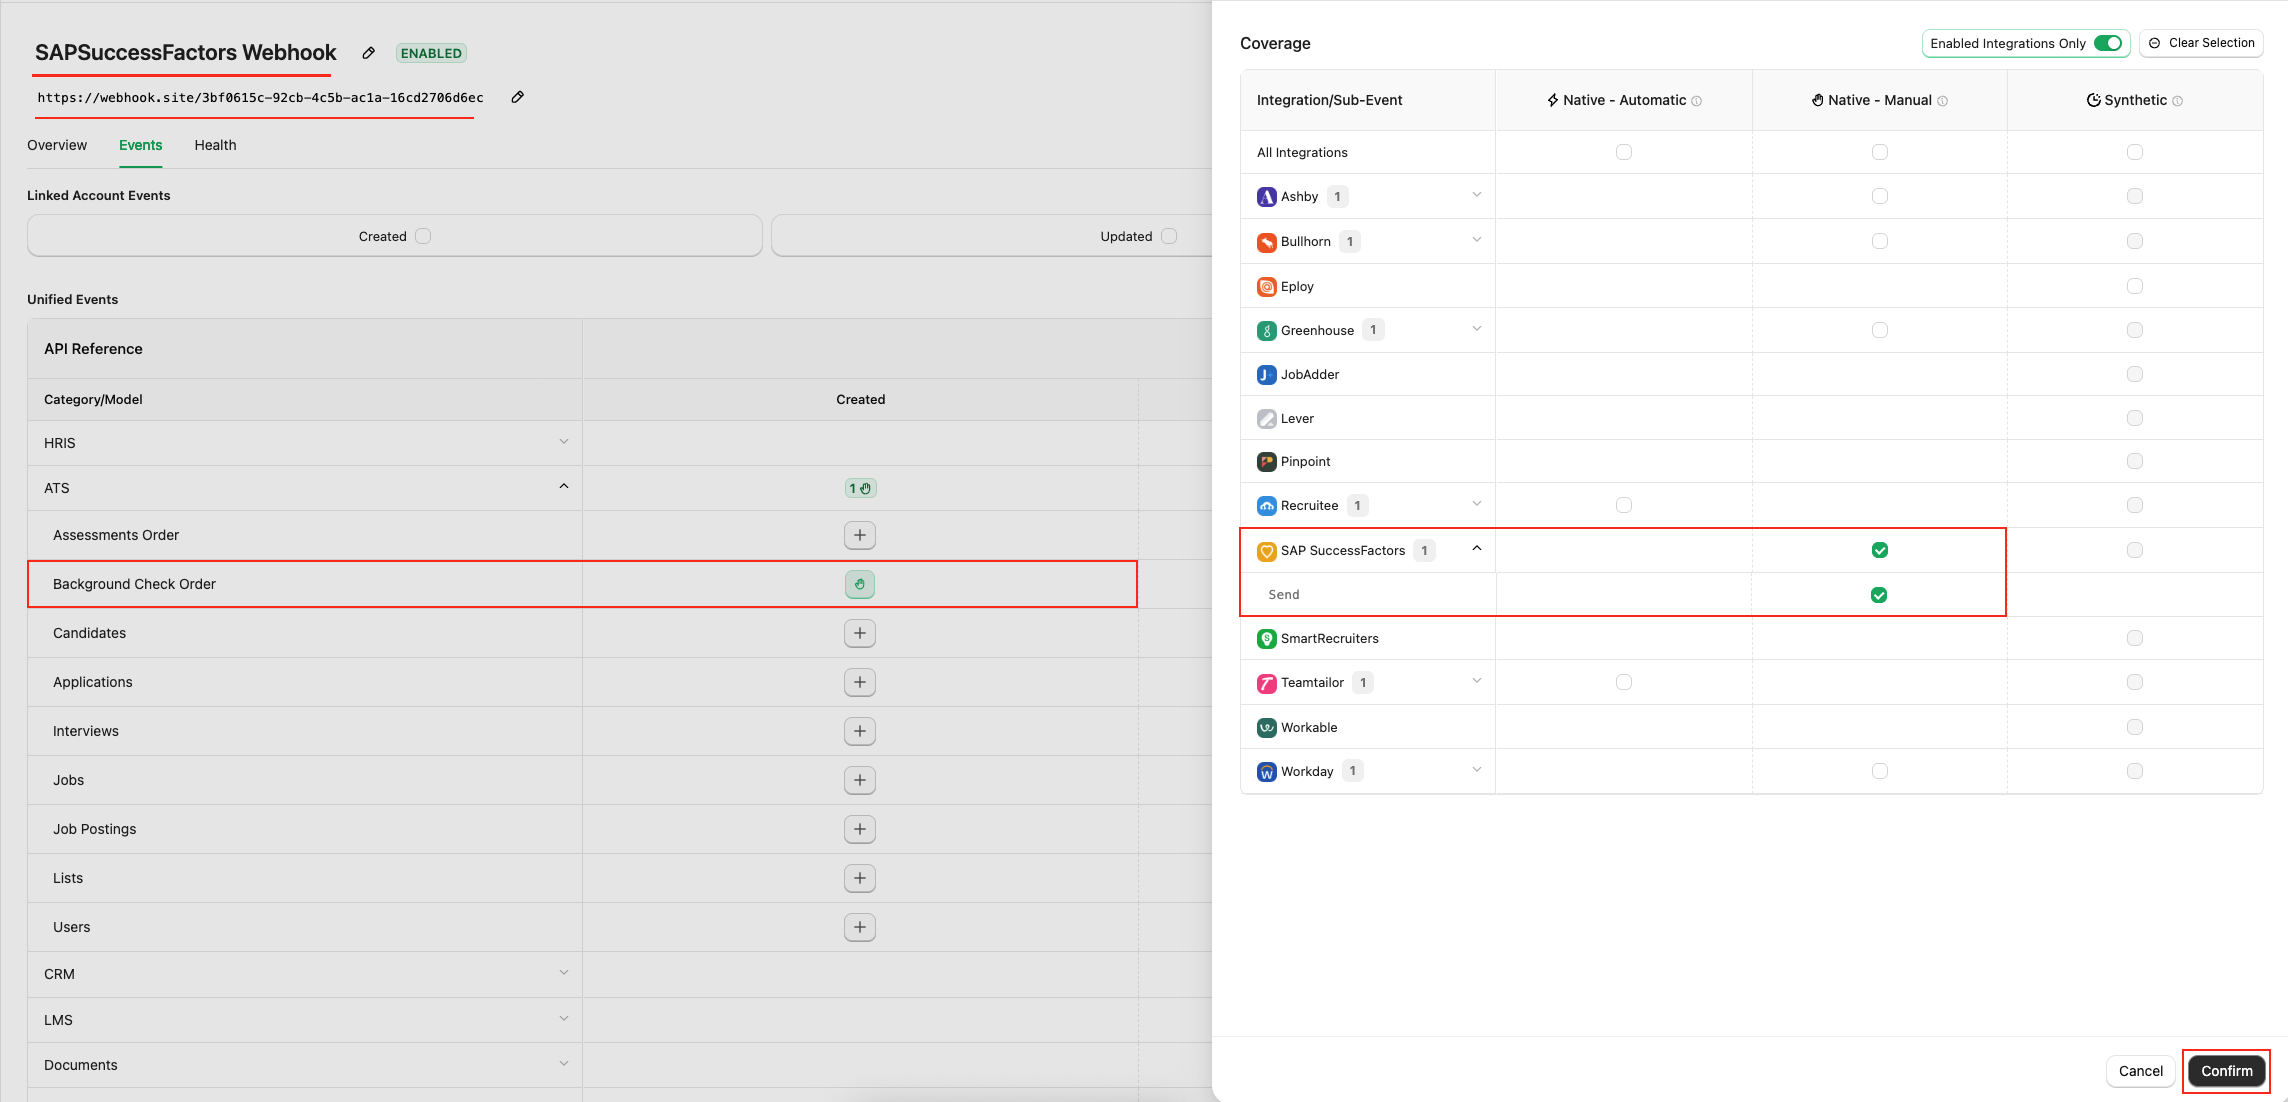
      Enable webhook events from the `Events` tab for Background Check, such as `Background Check Order`.

          <Frame>
            <img src="https://mintcdn.com/stackone-60/pRlim8VKjA70QbLx/images/sapsuccessfactors/background-check/sapsuccessfactors_add_webhook.png?fit=max&auto=format&n=pRlim8VKjA70QbLx&q=85&s=154e63ef59ce009817736617c1f06be6" alt="Select webhook events" width="2288" height="1102" data-path="images/sapsuccessfactors/background-check/sapsuccessfactors_add_webhook.png" />
          </Frame>
  </Step>
</Steps>

## ATS User Enablement

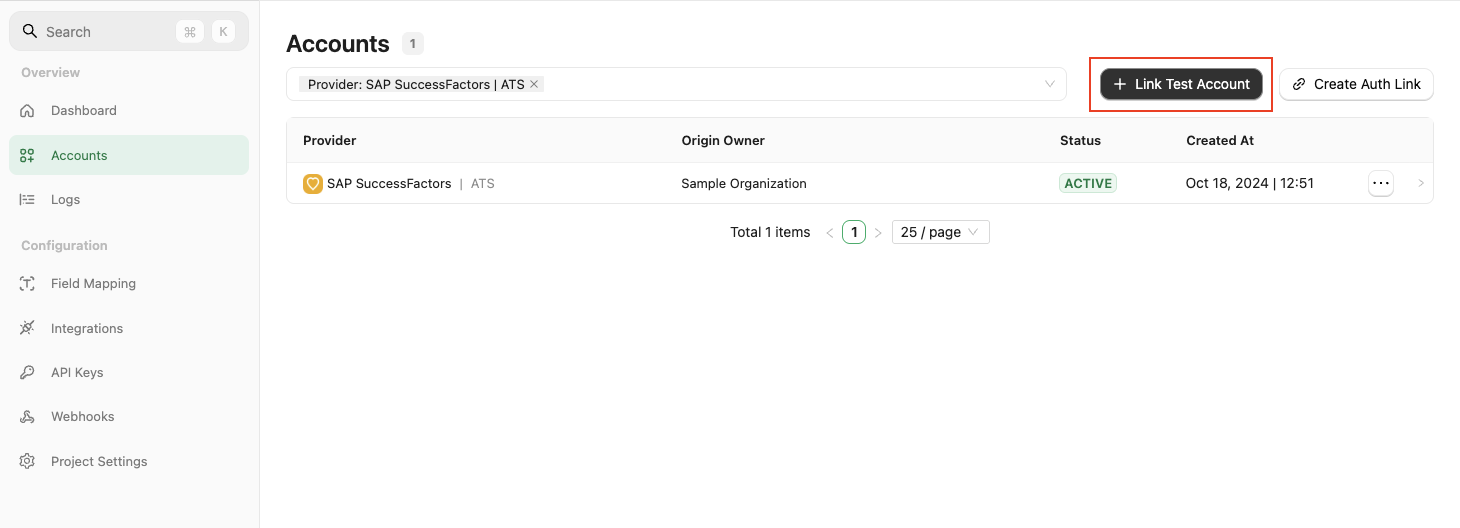
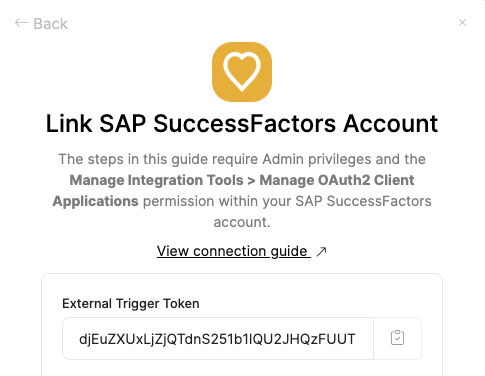
Navigate to the *Accounts* page or the StackOne Connector Hub to link your SAP SuccessFactors account with StackOne.

<Frame>
  <img className="rounded-md" style={{ margin: '0 auto', border: '1px solid #efefef' }} alt="Link SAP SuccessFactors account" src="https://mintcdn.com/stackone-60/pRlim8VKjA70QbLx/images/sapsuccessfactors/background-check/sapsuccessfactors_Link_Account_page_57.png?fit=max&auto=format&n=pRlim8VKjA70QbLx&q=85&s=f9905a266087434a7f670255c855c6b9" width="1460" height="528" data-path="images/sapsuccessfactors/background-check/sapsuccessfactors_Link_Account_page_57.png" />
</Frame>

You will receive the `External Trigger Token`, which must be entered as the username during the `Destination Settings` step under <a href="#create-and-configure-an-integration-template-for-background-checks">configure an integration template</a> in SAP SuccessFactors.

<Frame>
  <img className="rounded-md" style={{ margin: '0 auto', border: '1px solid #efefef' }} alt="External Trigger Token" src="https://mintcdn.com/stackone-60/pRlim8VKjA70QbLx/images/sapsuccessfactors/background-check/sapsuccessfactors_external_trigger_token_58.png?fit=max&auto=format&n=pRlim8VKjA70QbLx&q=85&s=607c5e42f03b4b8278443187b128a061" width="485" height="376" data-path="images/sapsuccessfactors/background-check/sapsuccessfactors_external_trigger_token_58.png" />
</Frame>

## ATS User Experience

<Steps>
  <Step title="Go to Job Requisition">
    Navigate to the relevant *Job Requisition*, hover over the requisition title to open the Actions menu, and then select `View or Edit Requisition`.

    <Frame>
      <img className="rounded-md" style={{ margin: '0 auto', border: '1px solid #efefef' }} alt="Go to Actions menu" src="https://mintcdn.com/stackone-60/pRlim8VKjA70QbLx/images/sapsuccessfactors/background-check/sap_sf_bc_recruiting_JR_hove_actions_32.png?fit=max&auto=format&n=pRlim8VKjA70QbLx&q=85&s=e8ed6bce2f4cbee73d4cd9a7227ba38d" width="205" height="384" data-path="images/sapsuccessfactors/background-check/sap_sf_bc_recruiting_JR_hove_actions_32.png" />
    </Frame>

    Select values for the *Account ID* and *Package ID* fields. Click the `Save Changes` button.

    <Accordion title="If fields are not visible after adding fields & permissions in the above steps">
      Navigate to *Admin Center* and search for `OData API Metadata Refresh and Export`.

      <Frame>
        <img className="rounded-md" style={{ margin: '0 auto', border: '1px solid #efefef' }} alt="OData API Metadata Refresh and Export" src="https://mintcdn.com/stackone-60/pRlim8VKjA70QbLx/images/sapsuccessfactors/background-check/sap_sf_bc_odata_api_search_38.png?fit=max&auto=format&n=pRlim8VKjA70QbLx&q=85&s=2a34141aef8170913cbb8cd73f4feaee" width="494" height="128" data-path="images/sapsuccessfactors/background-check/sap_sf_bc_odata_api_search_38.png" />
      </Frame>

      Click the `Refresh` button next to Cache.

      <Frame>
        <img className="rounded-md" style={{ margin: '0 auto', border: '1px solid #efefef' }} alt="Refresh button" src="https://mintcdn.com/stackone-60/pRlim8VKjA70QbLx/images/sapsuccessfactors/background-check/sap_sf_bc_odata_api_cache_refresh_39.png?fit=max&auto=format&n=pRlim8VKjA70QbLx&q=85&s=7081536dccd545ff686bd85f550ead7b" width="331" height="227" data-path="images/sapsuccessfactors/background-check/sap_sf_bc_odata_api_cache_refresh_39.png" />
      </Frame>
    </Accordion>

    <Frame>
      <img className="rounded-md" style={{ margin: '0 auto', border: '1px solid #efefef' }} alt="Both fields are visible" src="https://mintcdn.com/stackone-60/pRlim8VKjA70QbLx/images/sapsuccessfactors/background-check/sap_sf_bc_job_req_bgi_package_fields_40.png?fit=max&auto=format&n=pRlim8VKjA70QbLx&q=85&s=12853abd390373a815bffd679a867677" width="523" height="131" data-path="images/sapsuccessfactors/background-check/sap_sf_bc_job_req_bgi_package_fields_40.png" />
    </Frame>
  </Step>

  <Step title="Move candidate within the Talent Pipeline">
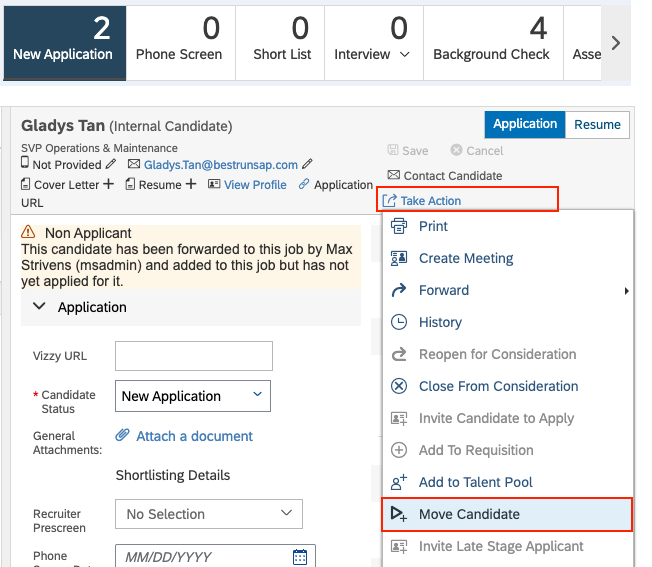
    Navigate to the *Candidates* tab. Select the candidate, then choose the `Move Candidate` option from the Take Action menu.

    <Frame>
      <img className="rounded-md" style={{ margin: '0 auto', border: '1px solid #efefef' }} alt="Go to Talent Pipeline" src="https://mintcdn.com/stackone-60/ofhWfuymbZe62HPb/images/sapsuccessfactors/background-check/sap_sf_bc_candidate_take_actions_33.png?fit=max&auto=format&n=ofhWfuymbZe62HPb&q=85&s=dcccc942a3414852ff6081080c5d2733" width="652" height="567" data-path="images/sapsuccessfactors/background-check/sap_sf_bc_candidate_take_actions_33.png" />
    </Frame>

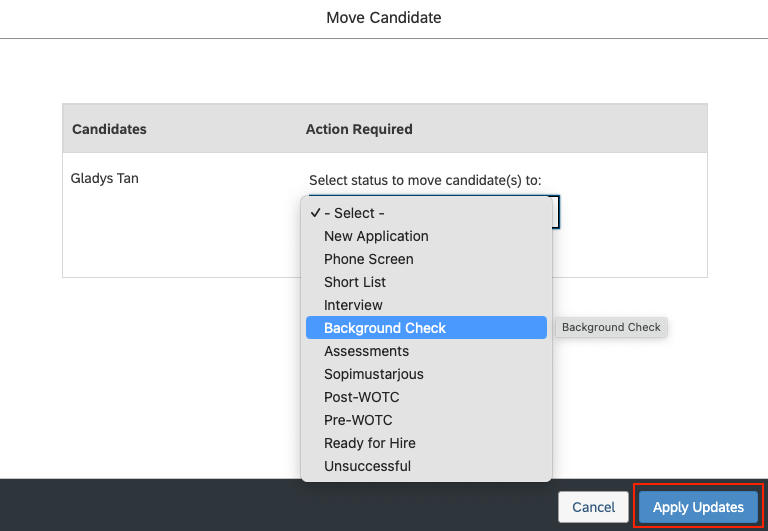
    Choose `Background Check` from the dropdown menu, then click `Apply Updates` to move the candidate forward.

    <Frame>
      <img className="rounded-md" style={{ margin: '0 auto', border: '1px solid #efefef' }} alt="Apply Updates" src="https://mintcdn.com/stackone-60/ofhWfuymbZe62HPb/images/sapsuccessfactors/background-check/sap_sf_bc_candidate_move_candidate_modal_34.png?fit=max&auto=format&n=ofhWfuymbZe62HPb&q=85&s=6b3d73211abfe30ea82d72eeec926e8e" width="768" height="531" data-path="images/sapsuccessfactors/background-check/sap_sf_bc_candidate_move_candidate_modal_34.png" />
    </Frame>
  </Step>

  <Step title="Visibility of Initiate Background Check option">
    The `Initiate Background Check` option will be visible to users under the `Take Actions` menu within the candidate's application.

    <Frame>
      <img className="rounded-md" style={{ margin: '0 auto', border: '1px solid #efefef' }} alt="Take Actions menu" src="https://mintcdn.com/stackone-60/ofhWfuymbZe62HPb/images/sapsuccessfactors/background-check/sap_sf_bc_initiate_bc_to_send_35.png?fit=max&auto=format&n=ofhWfuymbZe62HPb&q=85&s=8c58c671240757589a7bf7abdad5abf2" width="671" height="347" data-path="images/sapsuccessfactors/background-check/sap_sf_bc_initiate_bc_to_send_35.png" />
    </Frame>
  </Step>
</Steps>

### Send the test to the candidate from SAP SuccessFactors

<Frame caption="Test your integration with StackOne using your SAP SuccessFactors Sandbox">
  <video controls className="w-full aspect-video" src="https://cdn.stackone.com/public/sap_successfactors_background_check_flow.mov" />
</Frame>

<Note>
  Follow the [SAP SuccessFactors Background Check](https://hub.stackone.com/integration-configuration-concepts/ats/sapsuccessfactors-background-check) guide for instructions on how to send the test from SAP SuccessFactors.
</Note>

### User experience after the background check has been sent

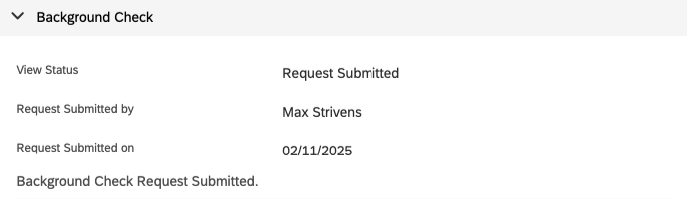
When a user sends a background check to a candidate, they will see the `Request Submitted` status along with the background check portlet in the candidate's application.

<Frame>
  <img className="rounded-md" style={{ margin: '0 auto', border: '1px solid #efefef' }} alt="Job Requisition Fields" src="https://mintcdn.com/stackone-60/ofhWfuymbZe62HPb/images/sapsuccessfactors/background-check/sap_sf_bc_bc_request_portlet_36.png?fit=max&auto=format&n=ofhWfuymbZe62HPb&q=85&s=2c8bcafc7e228eb7b974e82f9acf44fd" width="697" height="199" data-path="images/sapsuccessfactors/background-check/sap_sf_bc_bc_request_portlet_36.png" />
</Frame>

## ATS User Experience Customisation

<Steps>
  <Step title="Update the result via Unified API">
    Utilise the following endpoints to update the results:

    * [Background Check Update Result](https://docs.stackone.com/ats/api-reference/background-checks/results/update-background-check-result)

    Utilise the following endpoint to get metadata to update the result of the background check:

    * [Connector Meta Information](https://docs.stackone.com/platform/api-reference/connectors/get-connector-meta-information) with the provider key `sapsuccessfactors_ats` for model `background_checks/results.update`

    <div className="field-table-col-3">
      | Fields (when provided) | User sees in SAP SuccessFactors                                            | Comments                                      |
      | ---------------------- | -------------------------------------------------------------------------- | --------------------------------------------- |
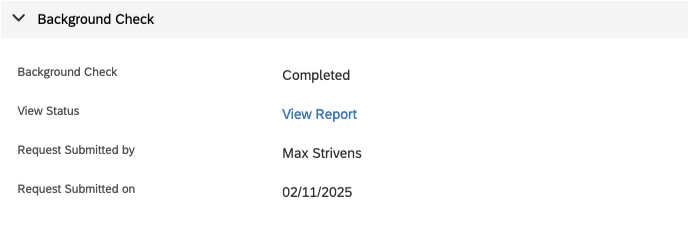
      | Result                 | Final Status will be visible corresponding to the `Background Check` label | Result enum values from Meta API result field |
      | Result Url             | Visible as a View Report link corresponding to the `View Status` label     |                                               |
    </div>
  </Step>

  <Step title="How are background check results displayed to the user in SAP SuccessFactors?">
    When a user opens a candidate's application, they will see the updated results with the background check status from the previously sent background check under the Background Check portlet.

    <Frame>
      <img className="rounded-md" style={{ margin: '0 auto', border: '1px solid #efefef' }} alt="Job Requisition Fields" src="https://mintcdn.com/stackone-60/pRlim8VKjA70QbLx/images/sapsuccessfactors/background-check/sap_sf_bc_result_updated_37.png?fit=max&auto=format&n=pRlim8VKjA70QbLx&q=85&s=7afa93f48e0ad54b30c43aba20119bfc" width="690" height="227" data-path="images/sapsuccessfactors/background-check/sap_sf_bc_result_updated_37.png" />
    </Frame>
  </Step>
</Steps>

## Testing Checklist

✅  **Provider Setup:**

* You have all the necessary permissions mentioned in the [Partner Requirements](#partner-requirements) section.
* The `Other Background Check Vendor` option is enabled from Background Check Central as mentioned in [Enable the Other Background Check Vendor option](#enable-the-other-background-check-vendor-option) step.
* A valid integration template is selected for the external background check.
* Valid configurations exist in the integration template for background checks, with a valid StackOne endpoint URL and valid External Trigger Token.
* A vendor has been created from Recruiting External Vendor with `Background Check` as the Integration Type.
* A Recruiting Vendor Integration Mapping has been created with the vendor and integration from the previous steps.
* The `bgiAccountId` and `packageId` fields have been added to the Job Requisition template with the necessary permissions.
* Accounts have been added in the `bgiAccountId` picklist and packages in the `packageId` picklist.
* A `Background Check` stage has been added to the talent pipeline for the job requisition, if not already present.
* The feature permission for `Background Check Initiate Permission` has been granted to the job requisition template.
* Account ID and Package ID fields are visible to users during creation/editing of the Job Requisition.
* The `Initiate Background Check` option is visible to users under the `Take Actions` menu within the candidate’s application, as mentioned in <a href="#grant-background-check-initiate-permission">this</a> step.

✅  **StackOne Configuration:**

* The integration category `Background Checks` is selected.

✅  **ATS User Activation:**

* A valid `External Trigger Token` is entered as the username during the `Destination Settings` step under <a href="#create-and-configure-an-integration-template-for-background-checks">configure an integration template</a>.
* A single `Recruiting Vendor Integration Mapping` is activated to use the background check integration. Please refer <a href="#create-recruiting-vendor-integration-mapping">this</a> step.

✅  **Create a Webhook:**

* A webhook for SAP SuccessFactors has been added and enabled with the `Background Check Order` event.
* A valid webhook URL has been added to receive background check notifications.

✅  **ATS User Experience:**

* The `Background Check` stage is visible in the talent pipeline for the job requisition.
* Account ID and Package ID fields are visible to users during creation/editing of the Job Requisitions.
* The `Initiate Background Check` option is visible to users under the `Take Actions` menu within the candidate’s application, as mentioned in <a href="#grant-background-check-initiate-permission">this</a> step.
* After sending the background check to a candidate, the user can see the `Request Submitted` status along with the background check portlet in the candidate's application.

✅  **Update Result:**

* A success response is received from the update result endpoint.
* Updated result details are visible in SAP SuccessFactors's UI.

## Troubleshooting

<div className="troubleshooting-table">
  | Symptom                                                                                                             | Likely cause                                                                                                                                                                                                                                               | Fix                                                                                                                                                                                                                                                                                                                                                                                                                                                                                                                                                                             |
  | ------------------------------------------------------------------------------------------------------------------- | ---------------------------------------------------------------------------------------------------------------------------------------------------------------------------------------------------------------------------------------------------------- | ------------------------------------------------------------------------------------------------------------------------------------------------------------------------------------------------------------------------------------------------------------------------------------------------------------------------------------------------------------------------------------------------------------------------------------------------------------------------------------------------------------------------------------------------------------------------------- |
  | Unable to access Integration Center.                                                                                | **•** Insufficient permissions. <br /><br /> **•** Logged-in account is not an Admin account.                                                                                                                                                              | **•** Ensure the account has the <a href="#partner-requirements">necessary permissions</a>. <br /><br /> **•** Log in with an Admin account.                                                                                                                                                                                                                                                                                                                                                                                                                                    |
  | `Account ID` and `Package ID` fields are not visible during creation/editing of the Job Requisition.                | **•** Fields are not configured in the Job Requisition template. <br /><br /> **•** Fields do not have the necessary permissions in the Job Requisition template. <br /><br /> **•** OData API cache is not refreshed after adding fields and permissions. | **•** Add `bgiAccountId` and `packageId` field configurations in the Job Requisition template. Please refer <a href="#manage-fields-for-the-job-requisition-template">this</a>. <br /><br /> **•** Add the necessary permissions for both fields. Please refer <a href="#manage-the-permissions-for-the-fields-added-to-the-job-requisition-template">this</a>. <br /><br /> **•** Refresh the OData API cache from `OData API Metadata Refresh and Export`. Please refer <a href="#if-fields-are-not-visible-after-adding-fields-and-permissions-in-the-above-steps">this</a>. |
  | **Accounts** and **Packages** are not available to select during creation/editing of the Job Requisition.           | **•** No values are added in the `bgiAccountId` and `packageId` picklists.                                                                                                                                                                                 | **•** Add values in the `bgiAccountId` and `packageId` picklists from PickList Center. <br /> Please refer following sections: <br /> - <a href="#add-background-check-accounts-from-the-picklist-center">Add background check accounts from the PickList Center</a>. <br /> - <a href="#add-background-check-packages-from-the-picklist-center">Add background check packages from the PickList Center</a>.                                                                                                                                                                    |
  | Background Check stage is not visible in the talent pipeline for the Job Requisition.                               | **•** Background Check stage is not added in the talent pipeline. <br /><br /> **•** Background Check stage is added but not configured properly.                                                                                                          | **•** Add a Background Check stage in the talent pipeline for the job requisition. Please refer <a href="#include-a-background-check-stage-in-the-talent-pipeline">this</a>. <br /><br /> **•** Ensure the correct configurations for the Background Check stage, please refer <a href="#include-a-background-check-stage-in-the-talent-pipeline">this</a>.                                                                                                                                                                                                                     |
  | `Initiate Background Check` option is not visible under the `Take Actions` menu within the candidate's application. | **•** User does not have the necessary permissions to initiate background checks. <br /><br /> **•** Background Check feature permission is not added to the Job Requisition template.                                                                     | **•** Add the Background Check feature permission to the Job Requisition template. Please refer <a href="#grant-background-check-initiate-permission">this</a>.                                                                                                                                                                                                                                                                                                                                                                                                                 |
  | Error when sending the background check.                                                                            | **•** Invalid REST API URL. <br /><br /> **•** Invalid External Trigger Token. <br /><br /> **•** Invalid configurations in the integration template for background checks.                                                                                | **•** Verify the REST API URL. <br /><br /> **•** The External Trigger Token should be valid. <br /><br /> **•** Ensure all configurations are correct for the background check integration template. Please refer <a href="#create-and-configure-an-integration-template-for-background-checks">this</a>.                                                                                                                                                                                                                                                                      |
  | Test notification is not received.                                                                                  | **•** Multiple `Recruiting Vendor Integration Mapping` records are activated for the Background Check integration. <br /><br /> **•** Invalid webhook URL. <br /><br /> **•** Incorrect webhook events are enabled.                                        | **•** Ensure only a single <a href="#create-recruiting-vendor-integration-mapping">Recruiting Vendor Integration Mapping</a> is activated for the expected Background Check integration. <br /><br /> **•** Verify the webhook URL. <br /><br /> **•** Enable the expected events as mentioned in the [StackOne Configuration](#stackone-configuration).                                                                                                                                                                                                                        |
  | Test notification data is not correct.                                                                              | Invalid mappings of fields in the integration template for background checks.                                                                                                                                                                              | Ensure all field mappings are correct for the background check integration template. Please refer <a href="#create-and-configure-an-integration-template-for-background-checks">this</a>.                                                                                                                                                                                                                                                                                                                                                                                       |
  | Unable to update result.                                                                                            | Invalid payload format.                                                                                                                                                                                                                                    | Check the [Connector Meta Information](https://docs.stackone.com/platform/api-reference/connectors/get-connector-meta-information) endpoint for the payload format.                                                                                                                                                                                                                                                                                                                                                                                                             |
  | Result URL shows an error when opened.                                                                              | The result URL may have expired or is private.                                                                                                                                                                                                             | Ensure you add public or signed URLs; verify CORS and expiry.                                                                                                                                                                                                                                                                                                                                                                                                                                                                                                                   |
</div>

For persistent issues, contact StackOne support with detailed error logs and configuration information.