> ## Documentation Index
> Fetch the complete documentation index at: https://docs.stackone.com/llms.txt
> Use this file to discover all available pages before exploring further.
# Okta SSO
> Set up SAML Single Sign-On between Okta and StackOne.
Connect Okta as your organization's SAML 2.0 identity provider so members sign in to StackOne with their Okta credentials. Once the connection is verified, anyone with an `@acme.com` address is redirected to Okta to authenticate.
Setup has four stages:
1. [Start the connection in StackOne](#start-the-connection-in-stackone) and copy the Service Provider values.
2. [Create the SAML app in Okta](#create-the-saml-app-in-okta) and collect the identity provider values.
3. [Register the provider in StackOne](#register-the-provider-in-stackone) with those values.
4. [Verify your domain](#verify-your-domain) to activate SSO.
## Before you begin
* The **Org Admin** role in your StackOne organization, since only Org Admins manage SSO.
* Administrator access to your **Okta Admin Console**.
* The ability to add a DNS TXT record for `acme.com`, which proves you own the domain.
SSO is enabled per organization. If you don't see **Organization > Security > SSO**, even as an Org Admin, contact StackOne support to turn it on.
## Start the connection in StackOne
Go to **Organization > Security > SSO** in the StackOne dashboard (app.stackone.com) and click **Get started** to open the **Set up SSO** wizard. On the first step, select **Okta** as your provider.
On the **Connection details** step, fill in both fields:
* **Connection name**: `Acme Okta`. StackOne generates the connection's unique ID from this name, for example `acme-okta`.
* **Domain**: `acme.com`. Members whose email is on this domain sign in through Okta.
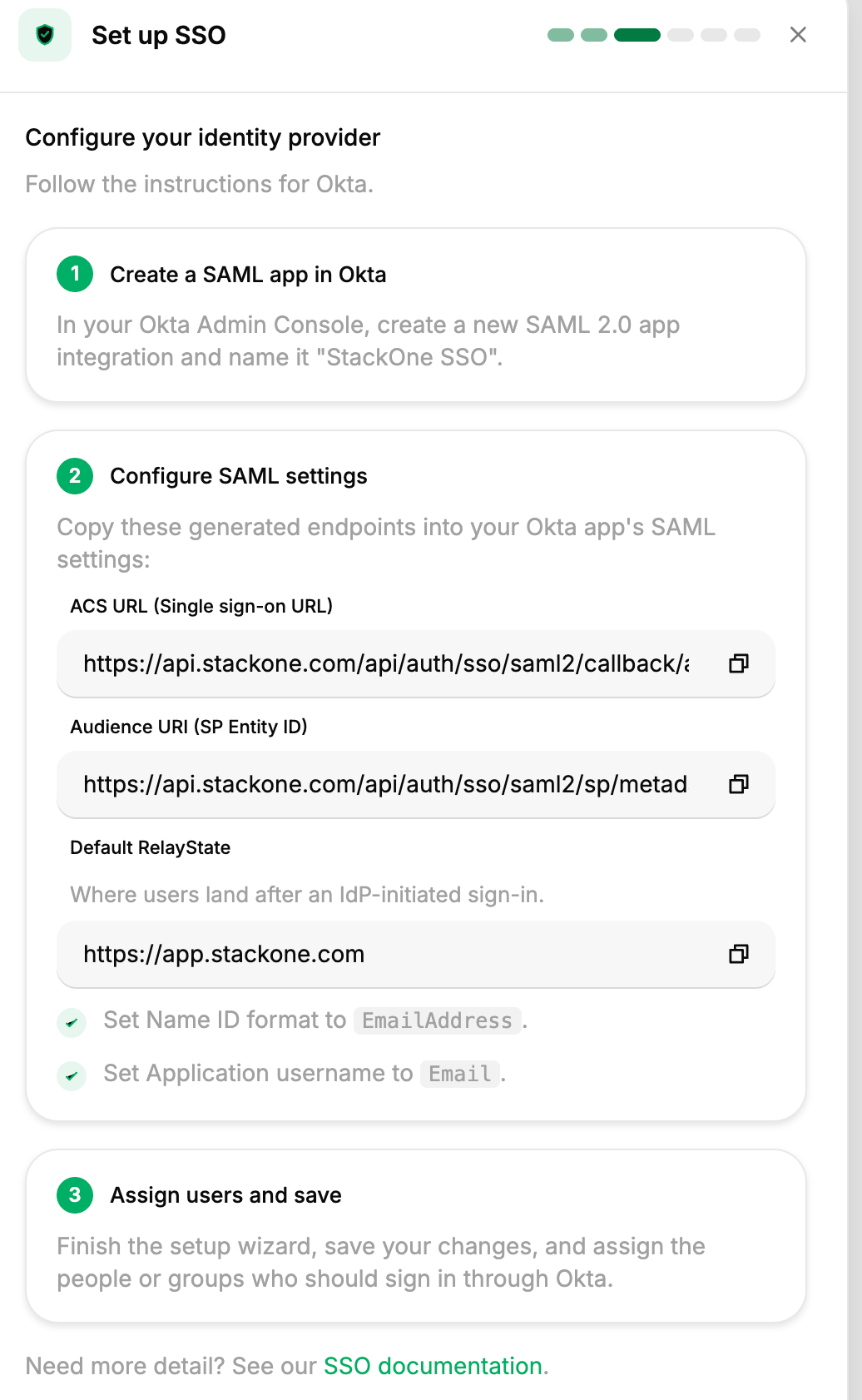
On the **Configure your identity provider** step, StackOne shows three values that tell Okta where to send the assertion and how to identify StackOne. Copy each one exactly as shown, since the connection ID inside them can pick up a random suffix (for example `acme-okta-x8k2p`) when the plain name is already taken:
* **ACS URL (Single sign-on URL)**: where Okta posts the SAML assertion.
* **Audience URI (SP Entity ID)**: identifies StackOne to Okta.
* **Default RelayState**: your dashboard URL, where an IdP-initiated sign-in lands.
 Keep this StackOne tab open. You return to the wizard to register the provider after you build the Okta app.
## Create the SAML app in Okta
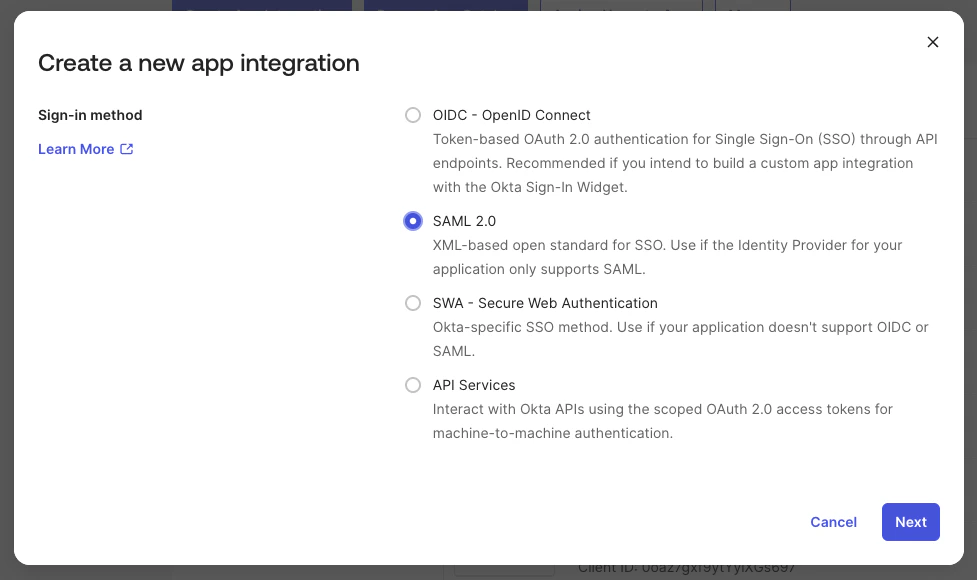
In the **Okta Admin Console**, go to **Applications > Applications** and click **Create App Integration**. Choose **SAML 2.0**, then click **Next**.
Keep this StackOne tab open. You return to the wizard to register the provider after you build the Okta app.
## Create the SAML app in Okta
In the **Okta Admin Console**, go to **Applications > Applications** and click **Create App Integration**. Choose **SAML 2.0**, then click **Next**.
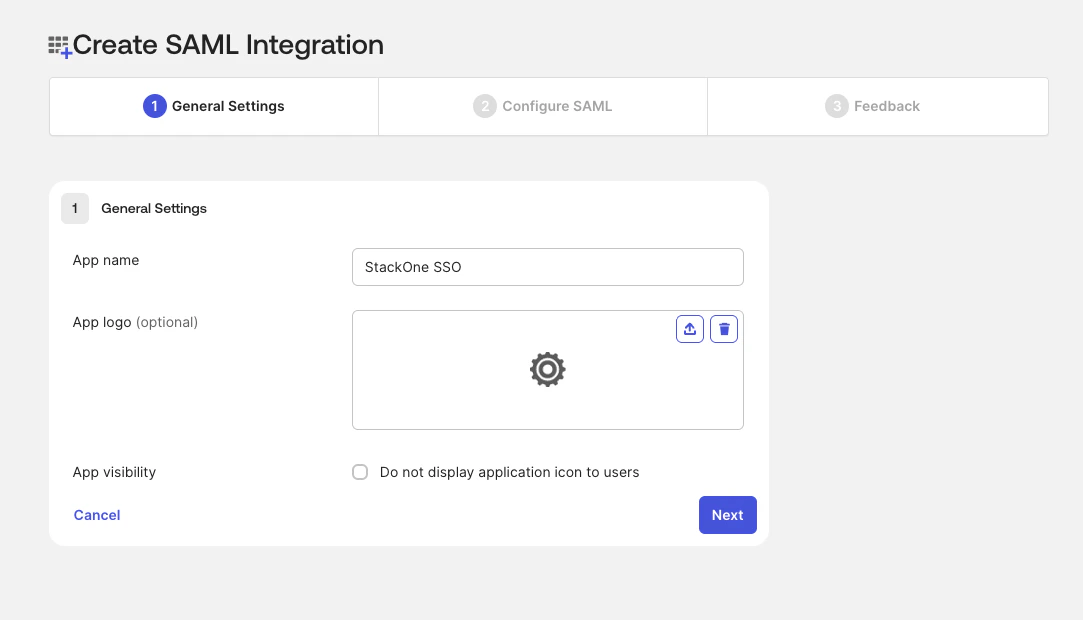
 On **General Settings**, set the **App name** to `StackOne SSO` so it's recognizable in Okta, then click **Next**.
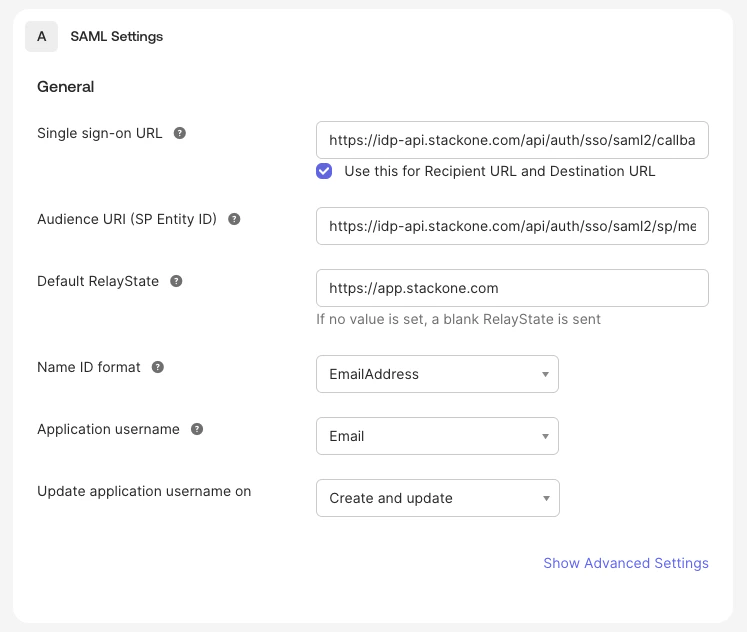
 In **Configure SAML**, paste the values you copied from StackOne:
| Okta field | Value from StackOne |
| ------------------------------- | ------------------------------------------------------ |
| **Single sign-on URL** | the ACS URL |
| **Audience URI (SP Entity ID)** | the SP Entity ID |
| **Default RelayState** | the Default RelayState you copied (your dashboard URL) |
| **Name ID format** | `EmailAddress` |
| **Application username** | `Email` |
Setting **Name ID format** to `EmailAddress` and **Application username** to `Email` makes Okta send the user's email as the SAML subject, which is how StackOne matches the user.
In **Configure SAML**, paste the values you copied from StackOne:
| Okta field | Value from StackOne |
| ------------------------------- | ------------------------------------------------------ |
| **Single sign-on URL** | the ACS URL |
| **Audience URI (SP Entity ID)** | the SP Entity ID |
| **Default RelayState** | the Default RelayState you copied (your dashboard URL) |
| **Name ID format** | `EmailAddress` |
| **Application username** | `Email` |
Setting **Name ID format** to `EmailAddress` and **Application username** to `Email` makes Okta send the user's email as the SAML subject, which is how StackOne matches the user.
 Further down the same **Configure SAML** screen, under **Attribute Statements (optional)**, add two attributes:
| Name | Name format | Value |
| ----------- | ----------- | ---------------- |
| `givenName` | Unspecified | `user.firstName` |
| `surname` | Unspecified | `user.lastName` |
StackOne reads these to set a member's display name when it creates their account on first sign-in. Without them, the assertion carries only the email subject, so new members show their email address as their name. Enter the attribute names exactly as shown.
Click **Next**, then **Finish**.
Already connected? Add the same two attribute statements to your existing StackOne SSO app in Okta — they apply to members created after the change. If the connection also uses [Directory Sync](/identity/scim/overview), display names sync from Okta profiles as well.
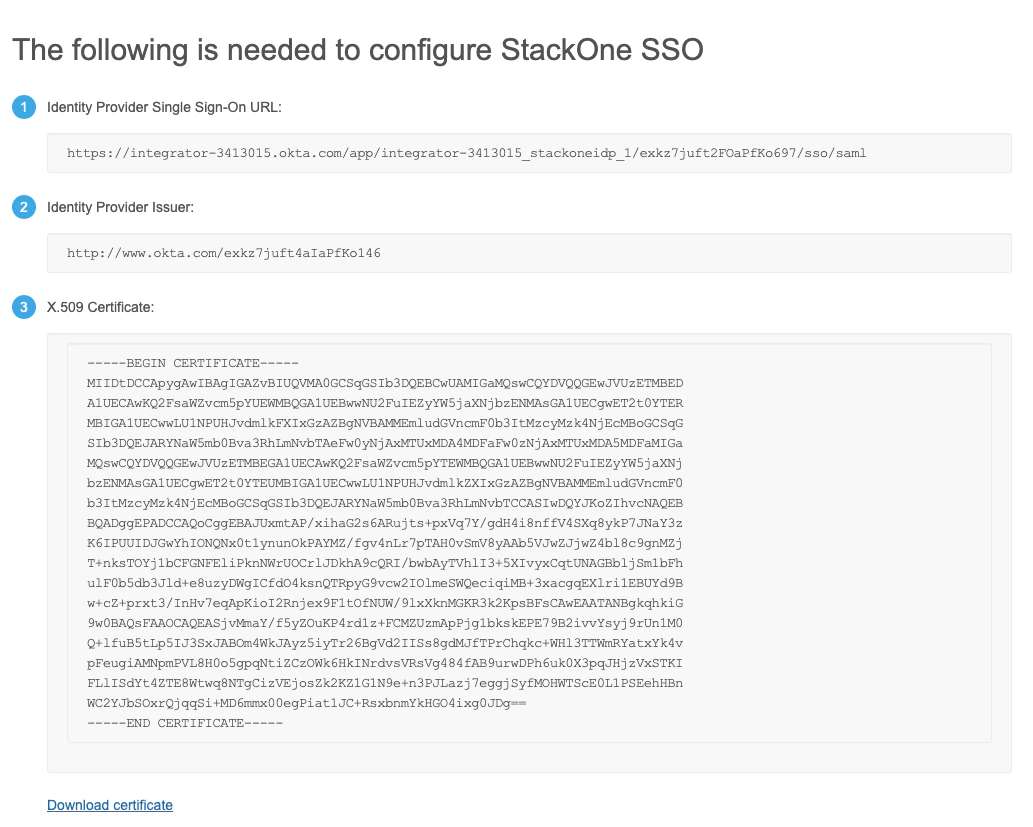
Open the app's **Sign On** tab. In the **SAML Setup** panel, click **View SAML setup instructions**, then copy:
* **Identity Provider Issuer**: the Entity ID, for example `http://www.okta.com/exk...`.
* **Identity Provider Single Sign-On URL**: Okta's login endpoint.
* **X.509 Certificate**: the signing certificate in PEM format.
To register all three at once instead, download the **Identity Provider metadata** XML from the same tab. StackOne reads the issuer, SSO URL, and certificate from it.
Okta generates a separate signing certificate for each app. If you've set up StackOne SSO before, copy the certificate from this app's setup instructions rather than reusing an earlier download.
Further down the same **Configure SAML** screen, under **Attribute Statements (optional)**, add two attributes:
| Name | Name format | Value |
| ----------- | ----------- | ---------------- |
| `givenName` | Unspecified | `user.firstName` |
| `surname` | Unspecified | `user.lastName` |
StackOne reads these to set a member's display name when it creates their account on first sign-in. Without them, the assertion carries only the email subject, so new members show their email address as their name. Enter the attribute names exactly as shown.
Click **Next**, then **Finish**.
Already connected? Add the same two attribute statements to your existing StackOne SSO app in Okta — they apply to members created after the change. If the connection also uses [Directory Sync](/identity/scim/overview), display names sync from Okta profiles as well.
Open the app's **Sign On** tab. In the **SAML Setup** panel, click **View SAML setup instructions**, then copy:
* **Identity Provider Issuer**: the Entity ID, for example `http://www.okta.com/exk...`.
* **Identity Provider Single Sign-On URL**: Okta's login endpoint.
* **X.509 Certificate**: the signing certificate in PEM format.
To register all three at once instead, download the **Identity Provider metadata** XML from the same tab. StackOne reads the issuer, SSO URL, and certificate from it.
Okta generates a separate signing certificate for each app. If you've set up StackOne SSO before, copy the certificate from this app's setup instructions rather than reusing an earlier download.
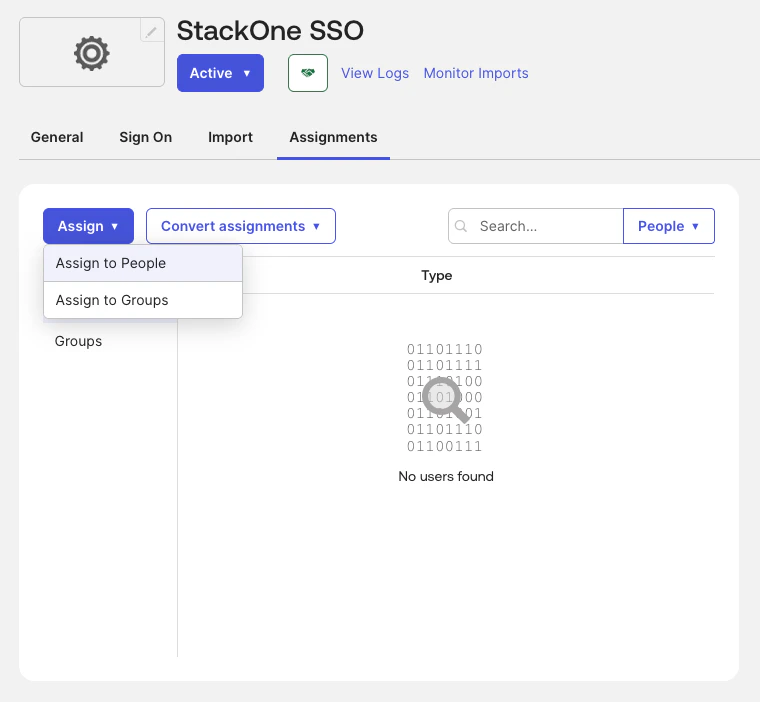
 Open the **Assignments** tab and assign the people or groups who should sign in to StackOne through Okta. Only assigned users can complete SSO.
 ## Register the provider in StackOne
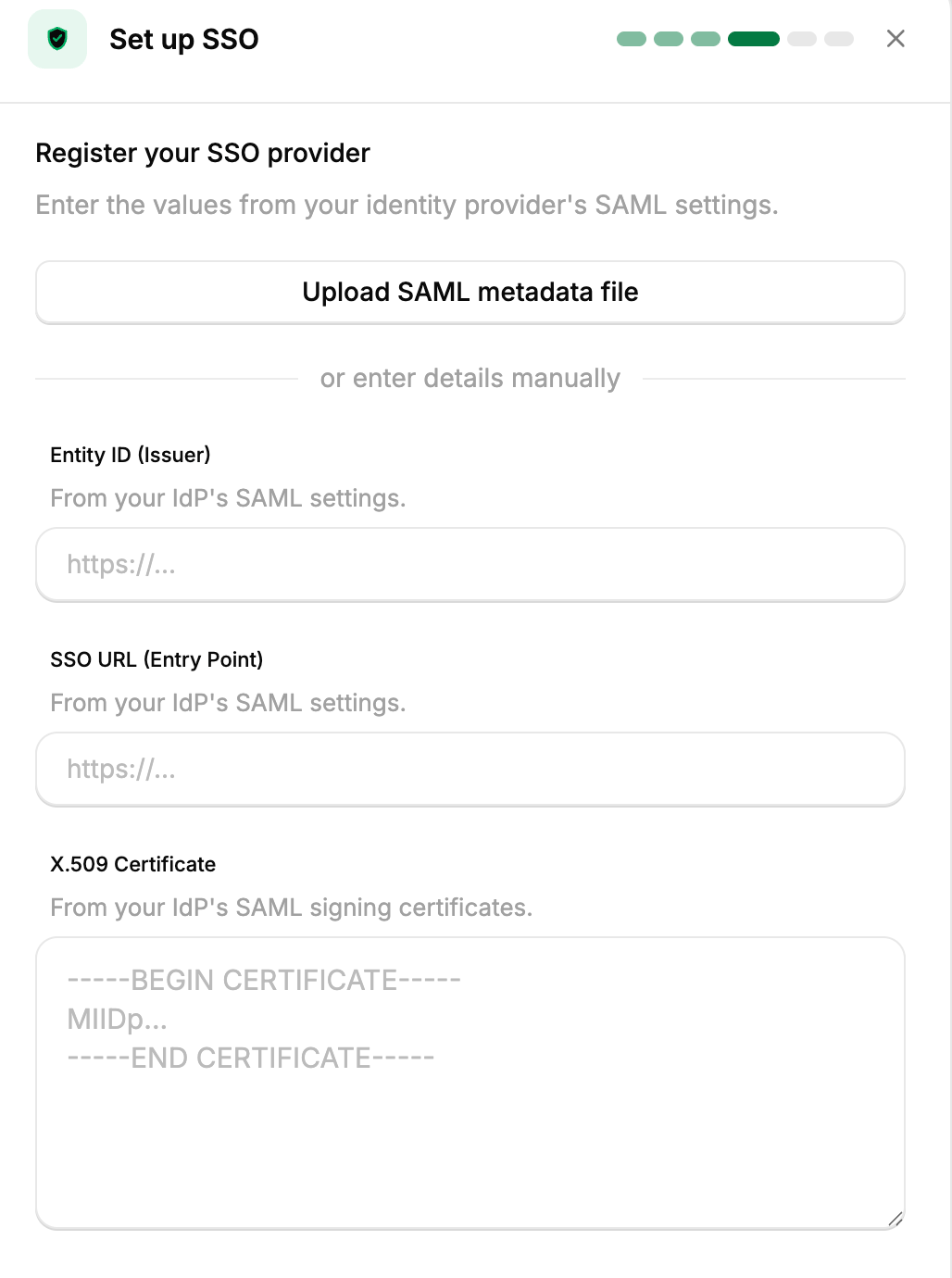
Switch back to the StackOne tab and continue to the **Register your SSO provider** step.
Supply the three values from Okta one of two ways.
Click **Upload SAML metadata file** and select the **Identity Provider metadata** XML you downloaded from Okta. StackOne fills in **Entity ID (Issuer)**, **SSO URL (Entry Point)**, and **X.509 Certificate**. Review the imported values before continuing.
## Register the provider in StackOne
Switch back to the StackOne tab and continue to the **Register your SSO provider** step.
Supply the three values from Okta one of two ways.
Click **Upload SAML metadata file** and select the **Identity Provider metadata** XML you downloaded from Okta. StackOne fills in **Entity ID (Issuer)**, **SSO URL (Entry Point)**, and **X.509 Certificate**. Review the imported values before continuing.
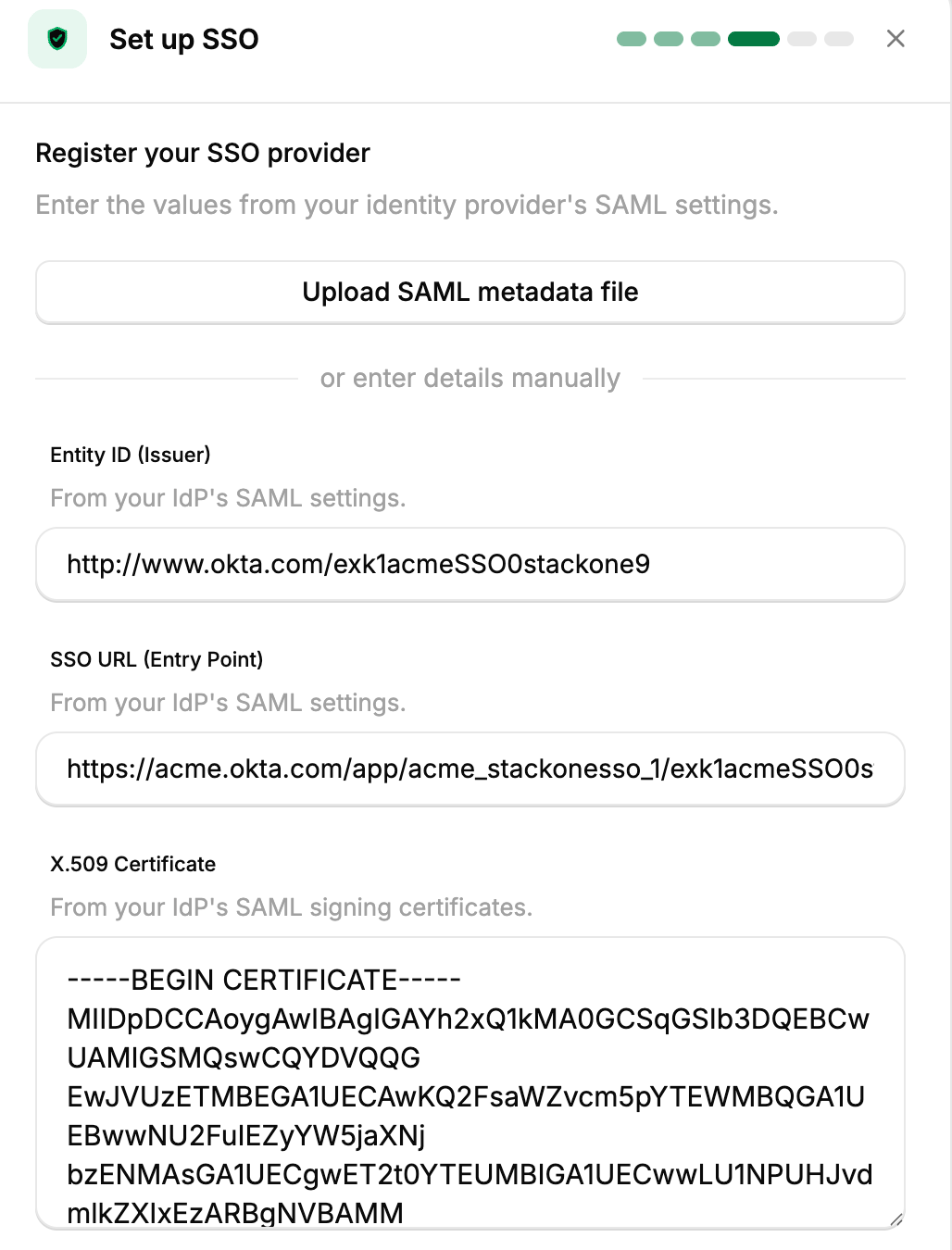
 Paste each value from Okta into the matching StackOne field:
| StackOne field | Okta value |
| ------------------------- | ------------------------------------ |
| **Entity ID (Issuer)** | Identity Provider Issuer |
| **SSO URL (Entry Point)** | Identity Provider Single Sign-On URL |
| **X.509 Certificate** | X.509 Certificate |
Paste each value from Okta into the matching StackOne field:
| StackOne field | Okta value |
| ------------------------- | ------------------------------------ |
| **Entity ID (Issuer)** | Identity Provider Issuer |
| **SSO URL (Entry Point)** | Identity Provider Single Sign-On URL |
| **X.509 Certificate** | X.509 Certificate |
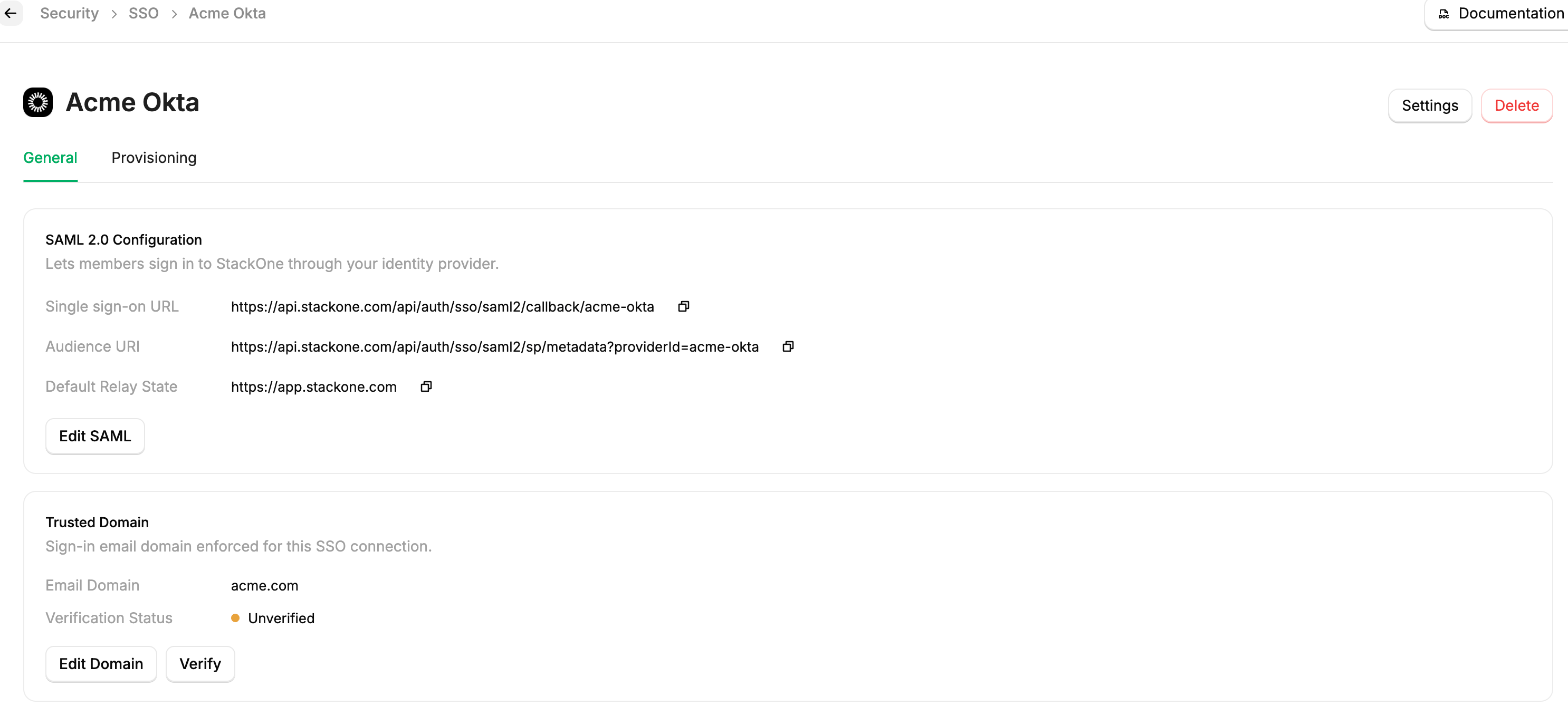
 Continue to save the connection. StackOne registers it and lists it on the **SSO** tab under **Organization > Security > SSO**. Open the connection to see its overview, where the **Trusted Domain** card tracks domain verification.
 ## Verify your domain
Verification proves you own `acme.com` and activates SSO. Until it passes, members on the domain aren't redirected to Okta.
On the wizard's **Verify your domain** step, or later from the connection's **Trusted Domain** card by clicking **Verify** to open the **Verify Domain** panel, copy the TXT record. It has this shape:
```
_stackone-sso-verification-token-acme-okta=
```
The record **Name** is your domain, `acme.com`.
## Verify your domain
Verification proves you own `acme.com` and activates SSO. Until it passes, members on the domain aren't redirected to Okta.
On the wizard's **Verify your domain** step, or later from the connection's **Trusted Domain** card by clicking **Verify** to open the **Verify Domain** panel, copy the TXT record. It has this shape:
```
_stackone-sso-verification-token-acme-okta=
```
The record **Name** is your domain, `acme.com`.
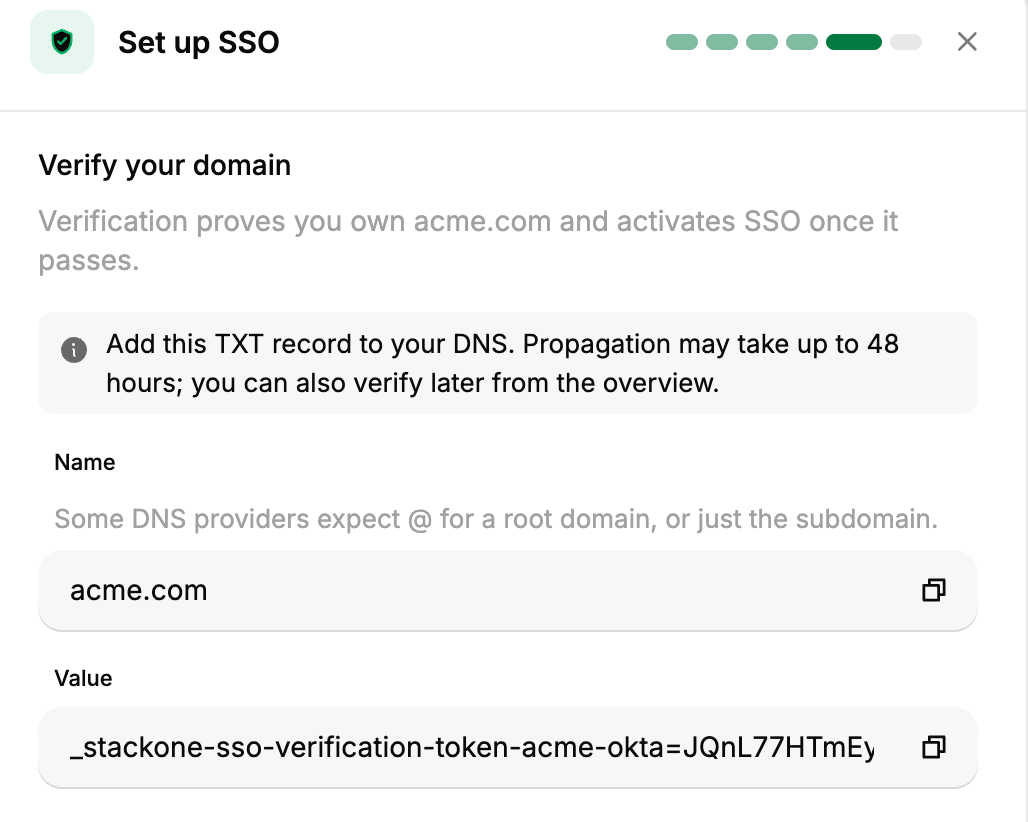 In your DNS provider's management panel, add a TXT record:
* **Name/Host**: `acme.com`. Use `@` if that's the root of your DNS zone, or the subdomain label if your email domain is a subdomain.
* **Value**: the full `_stackone-sso-verification-token-acme-okta=...` string, as its own value.
Add the `_stackone-sso-verification-token-...` string as the record's **Value**, not its Name. That leading-underscore string looks like a DNS host label (as `_dmarc` and `_domainkey` do), so it's easy to paste into the **Name/Host** field by mistake, but the Name is your domain itself (`acme.com`, or `@` at the zone root). A record on the wrong name silently fails verification, the most common cause of the failures below.
How you add the value depends on the provider. Cloudflare lets you add a separate TXT record at the same name. AWS Route 53 and Google Cloud DNS keep one TXT record set per name, so add the token as a new value on its own line rather than appending it to an existing string such as your SPF record.
DNS changes can take up to 48 hours to propagate, though they often complete within minutes. Check what's publicly visible with [Google Admin Toolbox Dig](https://toolbox.googleapps.com/apps/dig/#TXT/).
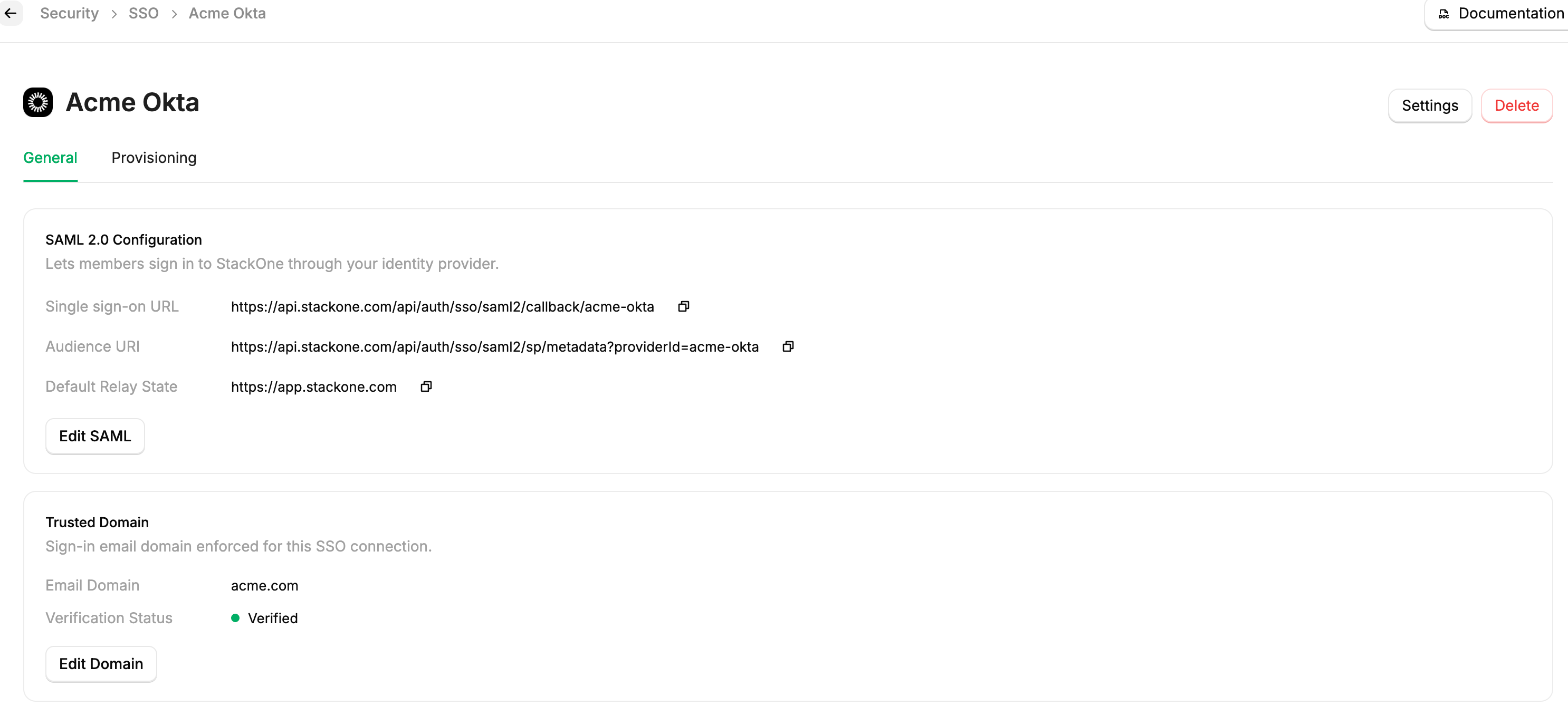
Back in StackOne, click **Verify**. Once the record is visible, the connection shows as verified and SSO is active for `acme.com`. If the check fails, wait for propagation and try again. You can also verify later from the connection's **Trusted Domain** card.
In your DNS provider's management panel, add a TXT record:
* **Name/Host**: `acme.com`. Use `@` if that's the root of your DNS zone, or the subdomain label if your email domain is a subdomain.
* **Value**: the full `_stackone-sso-verification-token-acme-okta=...` string, as its own value.
Add the `_stackone-sso-verification-token-...` string as the record's **Value**, not its Name. That leading-underscore string looks like a DNS host label (as `_dmarc` and `_domainkey` do), so it's easy to paste into the **Name/Host** field by mistake, but the Name is your domain itself (`acme.com`, or `@` at the zone root). A record on the wrong name silently fails verification, the most common cause of the failures below.
How you add the value depends on the provider. Cloudflare lets you add a separate TXT record at the same name. AWS Route 53 and Google Cloud DNS keep one TXT record set per name, so add the token as a new value on its own line rather than appending it to an existing string such as your SPF record.
DNS changes can take up to 48 hours to propagate, though they often complete within minutes. Check what's publicly visible with [Google Admin Toolbox Dig](https://toolbox.googleapps.com/apps/dig/#TXT/).
Back in StackOne, click **Verify**. Once the record is visible, the connection shows as verified and SSO is active for `acme.com`. If the check fails, wait for propagation and try again. You can also verify later from the connection's **Trusted Domain** card.
 ## Manage the connection
The connection is listed on the **SSO** tab under **Organization > Security > SSO**. Open it to see the connection overview.
## Manage the connection
The connection is listed on the **SSO** tab under **Organization > Security > SSO**. Open it to see the connection overview.
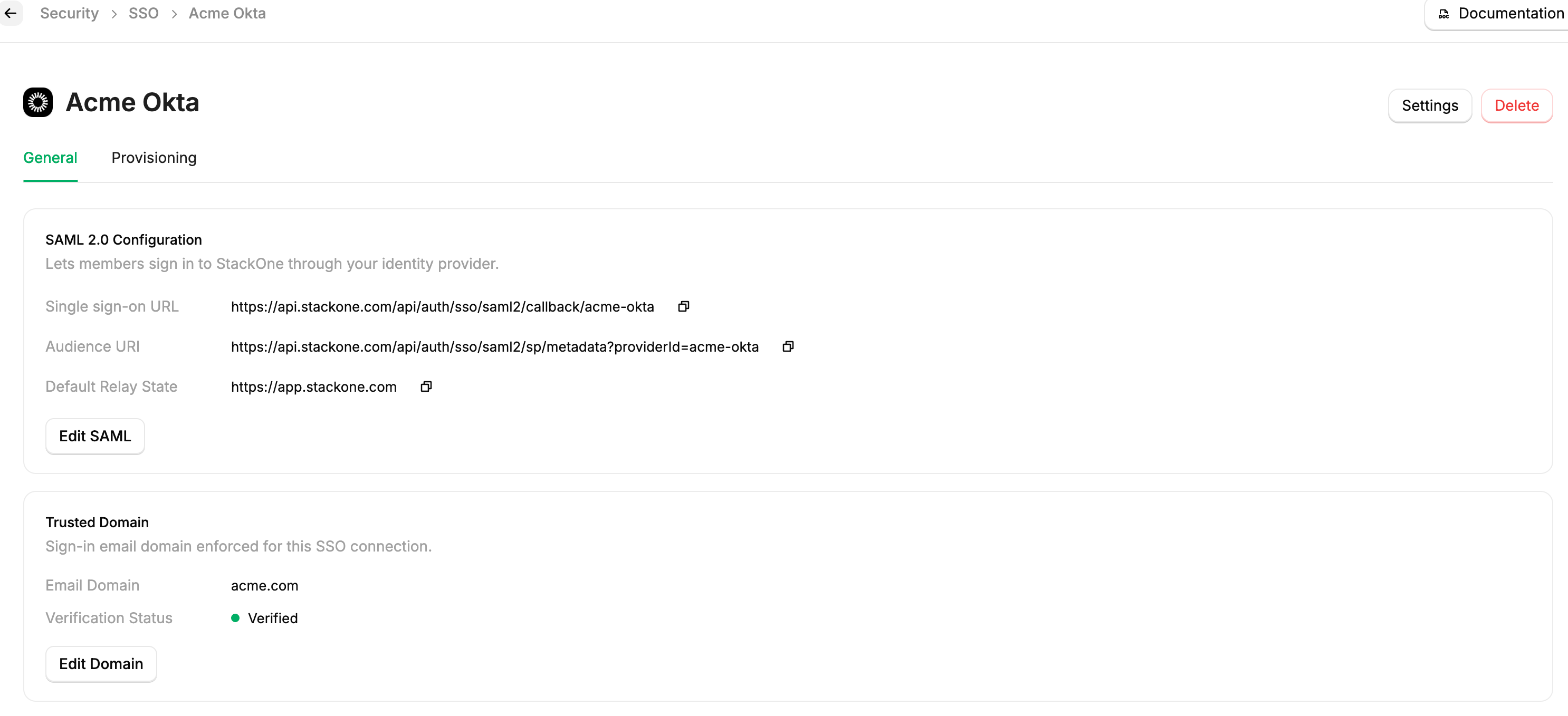 The **General** tab is where you maintain the connection after setup:
* Click **Edit SAML** to update the identity provider values, either by re-uploading the metadata XML or by editing the **Entity ID (Issuer)**, **SSO URL (Entry Point)**, and **X.509 Certificate** directly.
* Click **Edit Domain** to change the trusted domain. Changing it resets verification, so re-verify afterward.
From the connection's page header:
* **Settings** edits the **Connection name**. The **Provider ID** is generated at setup and can't be changed.
* **Delete** removes the SSO connection. It's disabled while SSO is enforced, so turn off enforcement on the **Authentication** tab first.
To require SSO, open the **Authentication** tab, and in the **Enforcement Policy** card click **Edit policy**. Add this connection's method under **Enforced methods** and save. Members can then only sign in with the selected methods, which disables email and password sign-in.
Deleting the connection sends members on `acme.com` back to email and password sign-in, so make sure they have another way in first. It also tears down **Directory Sync** if one is linked: deleting the SSO connection cascades away its Directory Sync, revoking the SCIM token so Okta's provisioning starts failing with `401` on its next cycle. Members already provisioned keep their access, but you must re-link Directory Sync and update Okta with the new token afterward. To change SAML values, use **Edit SAML** instead of deleting.
After the domain is verified, you can add **Directory Sync (SCIM)** to this connection from the **Provisioning** tab to automatically create, update, and deactivate members from Okta. It syncs members (users) only. Group sync isn't available yet. See [Directory Sync](/identity/scim/overview).
## Troubleshooting
| Symptom | Likely cause | Fix |
| ---------------------------------------------------------------------- | ------------------------------------------------------------------------------------------------------------------------------------------ | -------------------------------------------------------------------------------------------------------------------------------------------------------------------------------- |
| SSO option not visible | SSO is enabled per organization and isn't on for yours yet. | Contact StackOne support to enable it. |
| `ERROR_UNMATCH_CERTIFICATE_DECLARATION_IN_METADATA` | The registered certificate doesn't match the one Okta signs with. Okta issues a new certificate per app. | Re-copy the **X.509 Certificate** from this app's **View SAML setup instructions** and update it via **Edit SAML**. |
| `ERR_UNMATCH_ISSUER` | The **Entity ID (Issuer)** doesn't match the issuer Okta sends. | Copy the **Identity Provider Issuer** (`http://www.okta.com/exk...`) and update it via **Edit SAML**. |
| "Provider domain has not been verified" | Domain verification hasn't completed. | Finish [Verify your domain](#verify-your-domain). |
| Sign-in redirects to the wrong Okta, or a domain appears already taken | StackOne doesn't automatically reserve a domain to one organization, so another StackOne organization may have registered the same domain. | Contact StackOne support to resolve which organization should own SSO for the domain before you enforce it. |
| Verification keeps failing | The TXT record is on the wrong name, not its own value, or DNS hasn't propagated. | Use `@` for a root domain or the subdomain label otherwise, add the token as its own TXT value, and check propagation with [Dig](https://toolbox.googleapps.com/apps/dig/#TXT/). |
| Members not redirected to Okta | The domain isn't verified, or the user isn't assigned in Okta. | Verify the domain, and confirm the user is on the app's **Assignments** tab. |
| New members show their email address as their name | The app sends no name attribute statements, so the assertion carries only the email subject. | Add the `givenName` / `surname` attribute statements to the Okta app (see the setup steps above). |
| `403 Forbidden` when opening SSO | You lack the **Org Admin** role. | Ask an Org Admin to make the change or to grant you the role. |
IdP-initiated sign-in is supported. A user who clicks the StackOne tile in their Okta dashboard is signed in and lands on the StackOne dashboard.
## Next steps
How SSO, domain verification, and Directory Sync fit together.
Set up SAML SSO with Entra ID instead of Okta.
Connect any SAML 2.0 identity provider.
The **General** tab is where you maintain the connection after setup:
* Click **Edit SAML** to update the identity provider values, either by re-uploading the metadata XML or by editing the **Entity ID (Issuer)**, **SSO URL (Entry Point)**, and **X.509 Certificate** directly.
* Click **Edit Domain** to change the trusted domain. Changing it resets verification, so re-verify afterward.
From the connection's page header:
* **Settings** edits the **Connection name**. The **Provider ID** is generated at setup and can't be changed.
* **Delete** removes the SSO connection. It's disabled while SSO is enforced, so turn off enforcement on the **Authentication** tab first.
To require SSO, open the **Authentication** tab, and in the **Enforcement Policy** card click **Edit policy**. Add this connection's method under **Enforced methods** and save. Members can then only sign in with the selected methods, which disables email and password sign-in.
Deleting the connection sends members on `acme.com` back to email and password sign-in, so make sure they have another way in first. It also tears down **Directory Sync** if one is linked: deleting the SSO connection cascades away its Directory Sync, revoking the SCIM token so Okta's provisioning starts failing with `401` on its next cycle. Members already provisioned keep their access, but you must re-link Directory Sync and update Okta with the new token afterward. To change SAML values, use **Edit SAML** instead of deleting.
After the domain is verified, you can add **Directory Sync (SCIM)** to this connection from the **Provisioning** tab to automatically create, update, and deactivate members from Okta. It syncs members (users) only. Group sync isn't available yet. See [Directory Sync](/identity/scim/overview).
## Troubleshooting
| Symptom | Likely cause | Fix |
| ---------------------------------------------------------------------- | ------------------------------------------------------------------------------------------------------------------------------------------ | -------------------------------------------------------------------------------------------------------------------------------------------------------------------------------- |
| SSO option not visible | SSO is enabled per organization and isn't on for yours yet. | Contact StackOne support to enable it. |
| `ERROR_UNMATCH_CERTIFICATE_DECLARATION_IN_METADATA` | The registered certificate doesn't match the one Okta signs with. Okta issues a new certificate per app. | Re-copy the **X.509 Certificate** from this app's **View SAML setup instructions** and update it via **Edit SAML**. |
| `ERR_UNMATCH_ISSUER` | The **Entity ID (Issuer)** doesn't match the issuer Okta sends. | Copy the **Identity Provider Issuer** (`http://www.okta.com/exk...`) and update it via **Edit SAML**. |
| "Provider domain has not been verified" | Domain verification hasn't completed. | Finish [Verify your domain](#verify-your-domain). |
| Sign-in redirects to the wrong Okta, or a domain appears already taken | StackOne doesn't automatically reserve a domain to one organization, so another StackOne organization may have registered the same domain. | Contact StackOne support to resolve which organization should own SSO for the domain before you enforce it. |
| Verification keeps failing | The TXT record is on the wrong name, not its own value, or DNS hasn't propagated. | Use `@` for a root domain or the subdomain label otherwise, add the token as its own TXT value, and check propagation with [Dig](https://toolbox.googleapps.com/apps/dig/#TXT/). |
| Members not redirected to Okta | The domain isn't verified, or the user isn't assigned in Okta. | Verify the domain, and confirm the user is on the app's **Assignments** tab. |
| New members show their email address as their name | The app sends no name attribute statements, so the assertion carries only the email subject. | Add the `givenName` / `surname` attribute statements to the Okta app (see the setup steps above). |
| `403 Forbidden` when opening SSO | You lack the **Org Admin** role. | Ask an Org Admin to make the change or to grant you the role. |
IdP-initiated sign-in is supported. A user who clicks the StackOne tile in their Okta dashboard is signed in and lands on the StackOne dashboard.
## Next steps
How SSO, domain verification, and Directory Sync fit together.
Set up SAML SSO with Entra ID instead of Okta.
Connect any SAML 2.0 identity provider.