> ## Documentation Index
> Fetch the complete documentation index at: https://docs.stackone.com/llms.txt
> Use this file to discover all available pages before exploring further.
# Manage Groups
> Create groups and manage their members from the StackOne dashboard.
Create and manage groups from the **Groups** tab of **Organization > Manage Team** in the StackOne dashboard. A group bundles organization members so you can grant access to many people at once instead of one at a time.
Adding someone to a group grants no access by itself. Members inherit access only when you [assign the group](/identity/groups/assigning-access) to a project or account.
## Prerequisites
* **Org Admin** role in your StackOne organization. Groups are managed at the organization level.
The **Groups** tab is enabled per organization. If you don't see it under **Organization > Manage Team**, even as an Org Admin, contact StackOne support to turn it on.
## Create a group
Go to **Organization > Manage Team** and select the **Groups** tab. It lists every group in your organization with its member count.
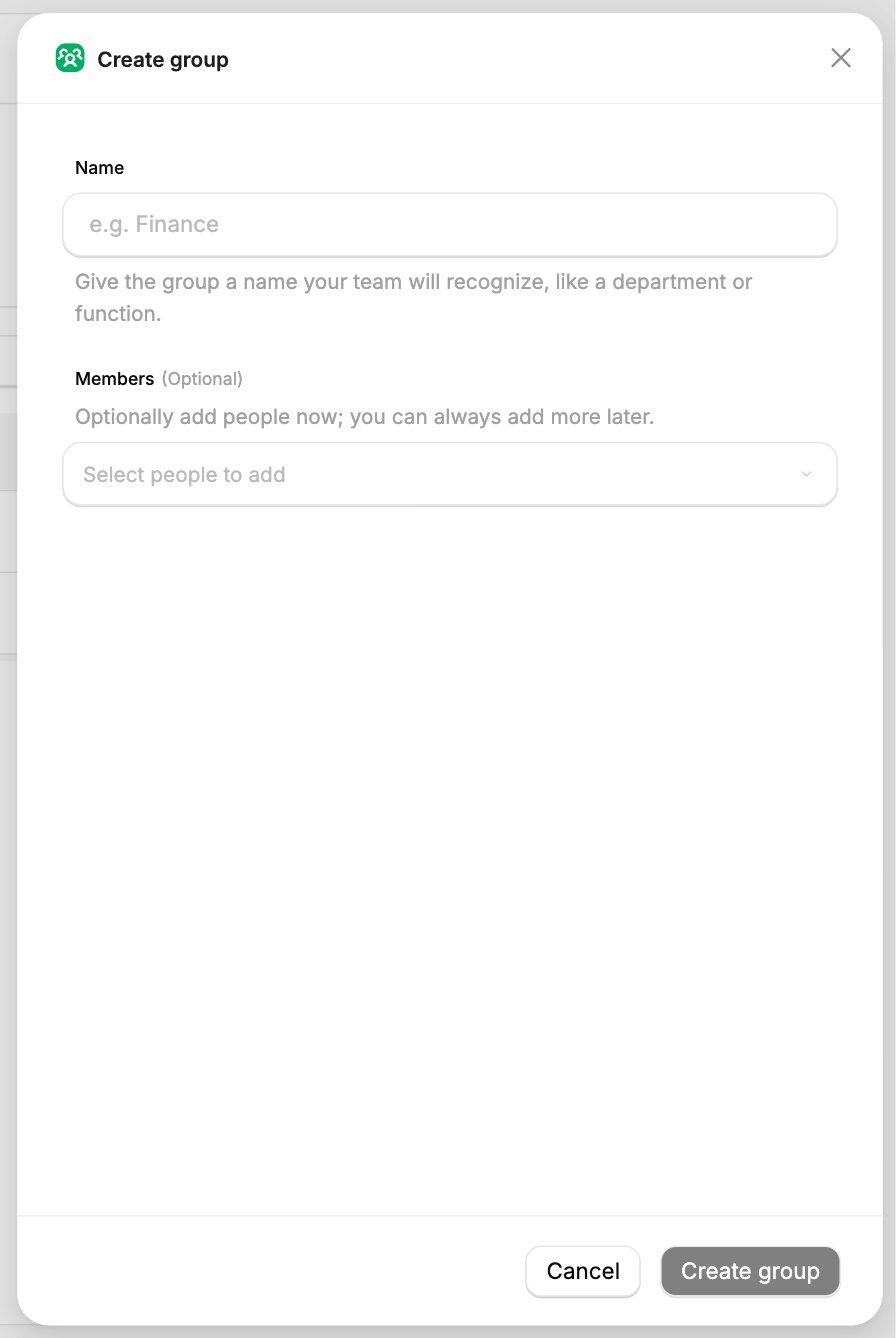
Click **Create group** to open the panel. Enter a **Name** your team will recognize. A department or function works well, like `Finance`. Optionally add **Members** from your organization now. Click **Create group** to finish. You can add more members later.
 StackOne opens the new group on its **Members** tab so you can add members. Grant the group access from its **Projects** tab, covered below.
## Add members
Everyone you add to a group inherits the access you give the group.
On the **Groups** tab, click the group's name. It opens on the **Members** tab, which lists everyone currently in the group.
StackOne opens the new group on its **Members** tab so you can add members. Grant the group access from its **Projects** tab, covered below.
## Add members
Everyone you add to a group inherits the access you give the group.
On the **Groups** tab, click the group's name. It opens on the **Members** tab, which lists everyone currently in the group.
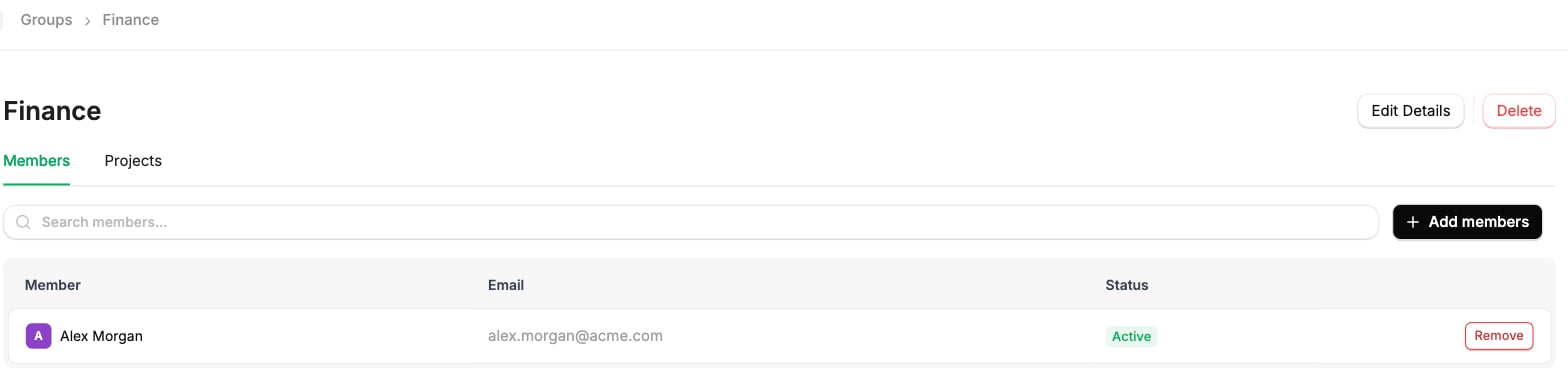 Click **Add members**, select the people to add from your organization, and confirm. Only people who aren't already in the group appear in the list.
## Remove a member
On the group's **Members** tab, find the person and click **Remove** on their row.
Confirm in the dialog. They lose any access the group grants, and you can add them back anytime.
Syncing groups from your identity provider over SCIM isn't available yet. [Directory Sync](/identity/scim/overview) provisions **users**, not groups, so create and manage your groups here in StackOne. When group sync ships, synced groups will be read-only on this tab and marked with a **Synced** tag.
## Assign the group to projects
A group grants access only when you assign it to a project and give the assignment a role. You can do that from the group itself.
Open the group and select the **Projects** tab. It lists every project the group already has access to.
Click **Add project**, select a **Project**, then choose a **Role**: **Project Admin**, **Project Member**, or **Project Viewer**. The role defaults to **Project Member**. Click **Add project** to confirm. Everyone in the group gains that role on the project. Repeat to add the group to more projects, each with its own role.
You can also assign a group from a project's own **Access** view. Assigning a group to a specific account is done from that account's **Access** tab, and only once the group is on the account's parent project. See [Assign Group Access](/identity/groups/assigning-access) for the full access model and account assignment.
## Rename or delete a group
Open a group from the **Groups** tab, then use the header actions:
* **Rename**: click **Edit Details**, change the **Name**, and click **Save**.
* **Delete**: click **Delete**, type the group's name to confirm, then click **Delete** in the dialog. This can't be undone, and the group's members lose any access it gave them.
## Next steps
What groups are and how they grant access.
Grant a group access to a project or account and set its role.
Click **Add members**, select the people to add from your organization, and confirm. Only people who aren't already in the group appear in the list.
## Remove a member
On the group's **Members** tab, find the person and click **Remove** on their row.
Confirm in the dialog. They lose any access the group grants, and you can add them back anytime.
Syncing groups from your identity provider over SCIM isn't available yet. [Directory Sync](/identity/scim/overview) provisions **users**, not groups, so create and manage your groups here in StackOne. When group sync ships, synced groups will be read-only on this tab and marked with a **Synced** tag.
## Assign the group to projects
A group grants access only when you assign it to a project and give the assignment a role. You can do that from the group itself.
Open the group and select the **Projects** tab. It lists every project the group already has access to.
Click **Add project**, select a **Project**, then choose a **Role**: **Project Admin**, **Project Member**, or **Project Viewer**. The role defaults to **Project Member**. Click **Add project** to confirm. Everyone in the group gains that role on the project. Repeat to add the group to more projects, each with its own role.
You can also assign a group from a project's own **Access** view. Assigning a group to a specific account is done from that account's **Access** tab, and only once the group is on the account's parent project. See [Assign Group Access](/identity/groups/assigning-access) for the full access model and account assignment.
## Rename or delete a group
Open a group from the **Groups** tab, then use the header actions:
* **Rename**: click **Edit Details**, change the **Name**, and click **Save**.
* **Delete**: click **Delete**, type the group's name to confirm, then click **Delete** in the dialog. This can't be undone, and the group's members lose any access it gave them.
## Next steps
What groups are and how they grant access.
Grant a group access to a project or account and set its role.