> ## Documentation Index
> Fetch the complete documentation index at: https://docs.stackone.com/llms.txt
> Use this file to discover all available pages before exploring further.
# SSO Setup
> Configure SAML 2.0 Single Sign-On (SSO) for your StackOne organization, including setup with identity providers like Okta.
## Overview
StackOne supports SAML 2.0-based Single Sign-On (SSO), allowing your organization members to authenticate through your identity provider (IdP). Once configured and verified, users with matching email domains are automatically redirected to your IdP for authentication.
This guide covers:
1. [Configuring SSO in StackOne](#configure-sso-in-stackone)
2. [Setting up a SAML application in Okta](#set-up-a-saml-application-in-okta)
3. [Completing the SSO registration](#complete-the-sso-registration-in-stackone)
4. [Verifying your domain](#verify-your-domain)
## Prerequisites
* **Org Admin** role in your StackOne organization
* Access to your identity provider's admin dashboard (e.g., Okta)
* Ability to manage DNS records for your organization's domain
## Configure SSO in StackOne
Navigate to **Organization Settings > Security > SSO** to begin the setup process. StackOne walks you through a three-step configuration flow.
The first step displays two values you'll need when configuring your identity provider:
* **ACS URL (Assertion Consumer Service URL)** — the endpoint where your IdP sends SAML assertions
* **SP Entity ID (Service Provider Entity ID)** — the metadata URL that identifies StackOne as the service provider
Enter a **Provider ID** at the bottom of this step. This is a unique identifier for your SSO configuration (e.g., `your-company-sso`). It must be lowercase and can contain letters, numbers, hyphens, and dots.
The ACS URL and SP Entity ID update automatically based on your Provider ID.
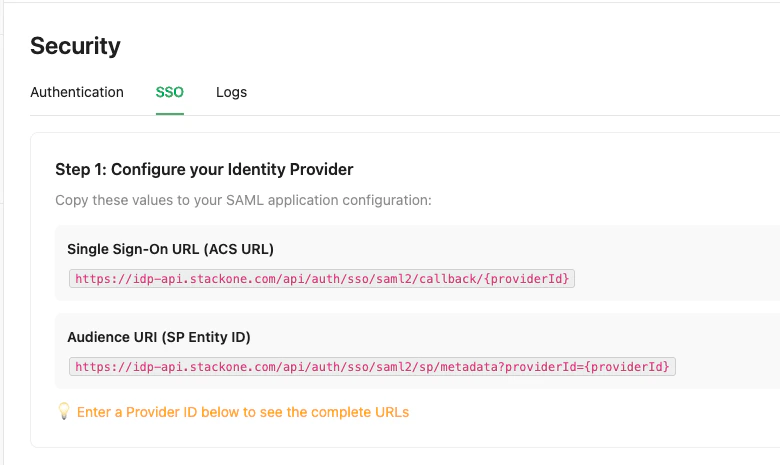 Copy both values — you'll paste them into your identity provider in the next section.
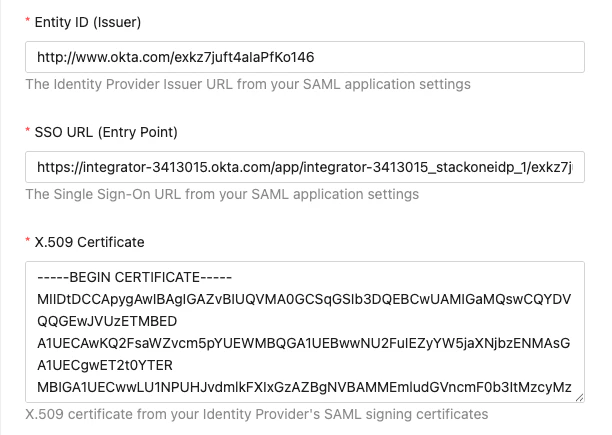
After setting up the SAML application in your IdP (see [Okta example below](#set-up-a-saml-application-in-okta)), collect these three values from the IdP:
* **Identity Provider Issuer (Entity ID)** — the IdP's unique identifier URL
* **Identity Provider Single Sign-On URL** — the IdP's login endpoint
* **X.509 Certificate** — the signing certificate in PEM format
Copy both values — you'll paste them into your identity provider in the next section.
After setting up the SAML application in your IdP (see [Okta example below](#set-up-a-saml-application-in-okta)), collect these three values from the IdP:
* **Identity Provider Issuer (Entity ID)** — the IdP's unique identifier URL
* **Identity Provider Single Sign-On URL** — the IdP's login endpoint
* **X.509 Certificate** — the signing certificate in PEM format
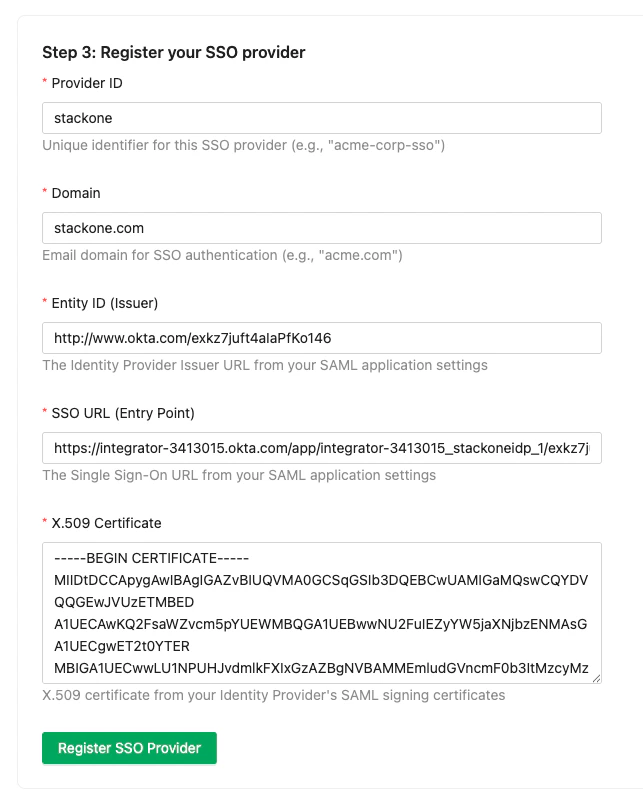
 Fill in the registration form with the values collected from your IdP:
| Field | Description | Example |
| ------------------------- | --------------------------------- | ---------------------------------------- |
| **Provider ID** | Unique identifier (set in step 1) | `acme-corp-sso` |
| **Domain** | Email domain for SSO users | `acme.com` |
| **Entity ID (Issuer)** | IdP issuer URL from step 2 | `http://www.okta.com/exk...` |
| **SSO URL (Entry Point)** | IdP login URL from step 2 | `https://acme.okta.com/app/.../sso/saml` |
| **X.509 Certificate** | Signing certificate from step 2 | `-----BEGIN CERTIFICATE-----...` |
Click **Register SSO Provider** to save the configuration.
Fill in the registration form with the values collected from your IdP:
| Field | Description | Example |
| ------------------------- | --------------------------------- | ---------------------------------------- |
| **Provider ID** | Unique identifier (set in step 1) | `acme-corp-sso` |
| **Domain** | Email domain for SSO users | `acme.com` |
| **Entity ID (Issuer)** | IdP issuer URL from step 2 | `http://www.okta.com/exk...` |
| **SSO URL (Entry Point)** | IdP login URL from step 2 | `https://acme.okta.com/app/.../sso/saml` |
| **X.509 Certificate** | Signing certificate from step 2 | `-----BEGIN CERTIFICATE-----...` |
Click **Register SSO Provider** to save the configuration.
 ## Set Up a SAML Application in Okta
This section walks through creating a SAML 2.0 application in Okta. If you use a different identity provider, the general flow is similar — you'll need to provide the ACS URL and SP Entity ID from StackOne, then retrieve the IdP issuer, SSO URL, and certificate.
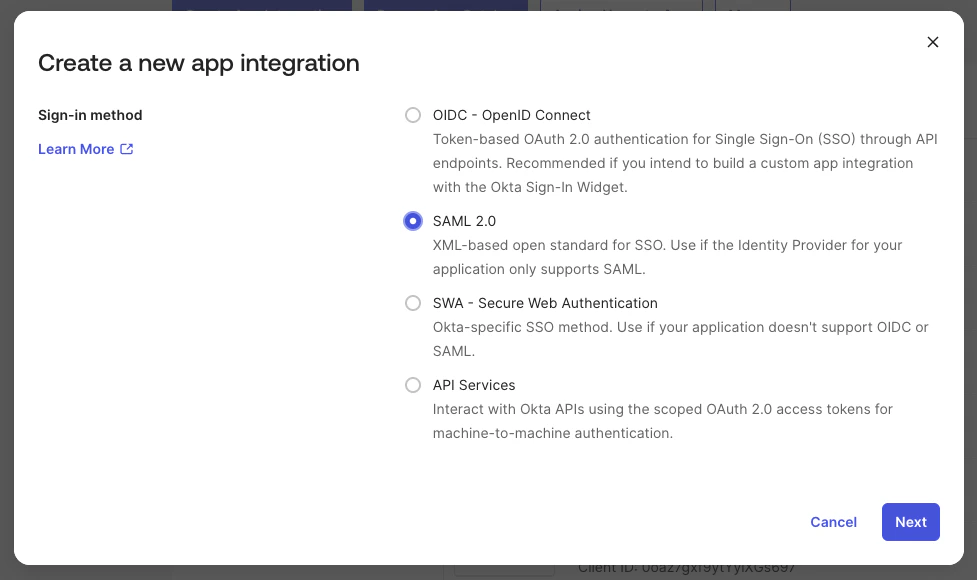
In your Okta admin dashboard, go to **Applications > Applications** and click **Create App Integration**.
Select:
* **Sign-in method**: SAML 2.0
Click **Next**.
## Set Up a SAML Application in Okta
This section walks through creating a SAML 2.0 application in Okta. If you use a different identity provider, the general flow is similar — you'll need to provide the ACS URL and SP Entity ID from StackOne, then retrieve the IdP issuer, SSO URL, and certificate.
In your Okta admin dashboard, go to **Applications > Applications** and click **Create App Integration**.
Select:
* **Sign-in method**: SAML 2.0
Click **Next**.
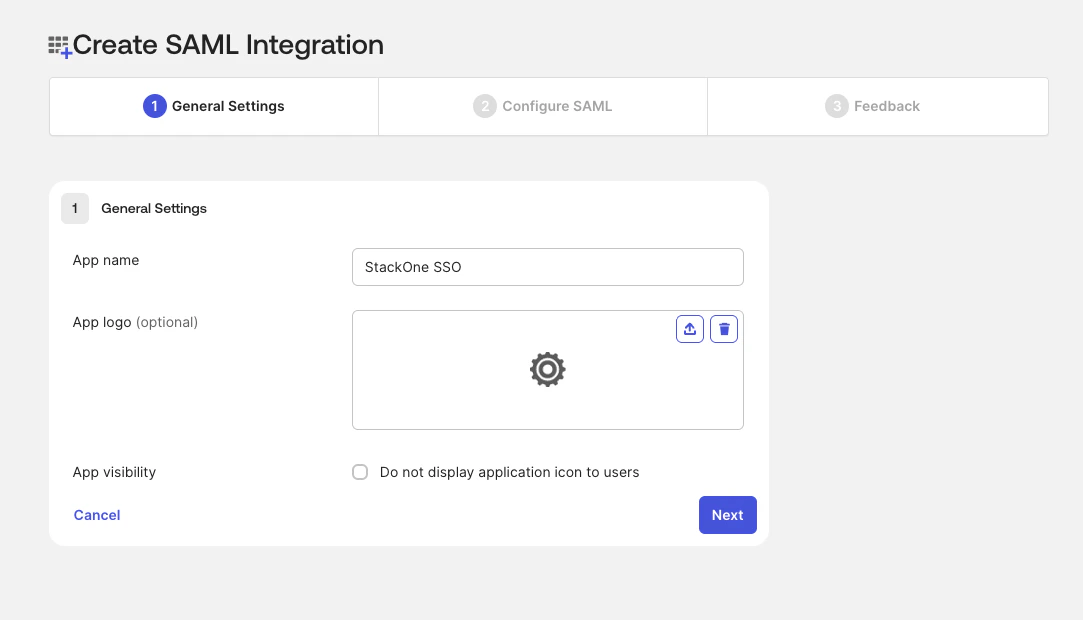
 Enter a name for the application (e.g., "StackOne SSO") and optionally upload a logo.
Click **Next**.
Enter a name for the application (e.g., "StackOne SSO") and optionally upload a logo.
Click **Next**.
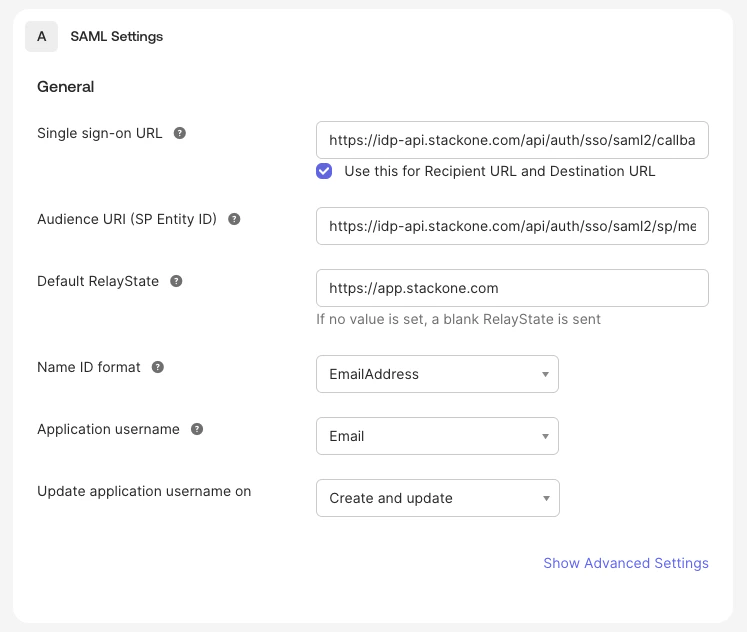
 In the **SAML Settings** section, enter the values from StackOne's SSO setup (step 1):
| Okta Field | Value from StackOne |
| ------------------------------- | -------------------------- |
| **Single sign-on URL** | ACS URL |
| **Audience URI (SP Entity ID)** | SP Entity ID |
| **Default RelayState** | `https://app.stackone.com` |
| **Name ID format** | EmailAddress |
| **Application username** | Email |
In the **SAML Settings** section, enter the values from StackOne's SSO setup (step 1):
| Okta Field | Value from StackOne |
| ------------------------------- | -------------------------- |
| **Single sign-on URL** | ACS URL |
| **Audience URI (SP Entity ID)** | SP Entity ID |
| **Default RelayState** | `https://app.stackone.com` |
| **Name ID format** | EmailAddress |
| **Application username** | Email |
 Click **Next**, then **Finish**.
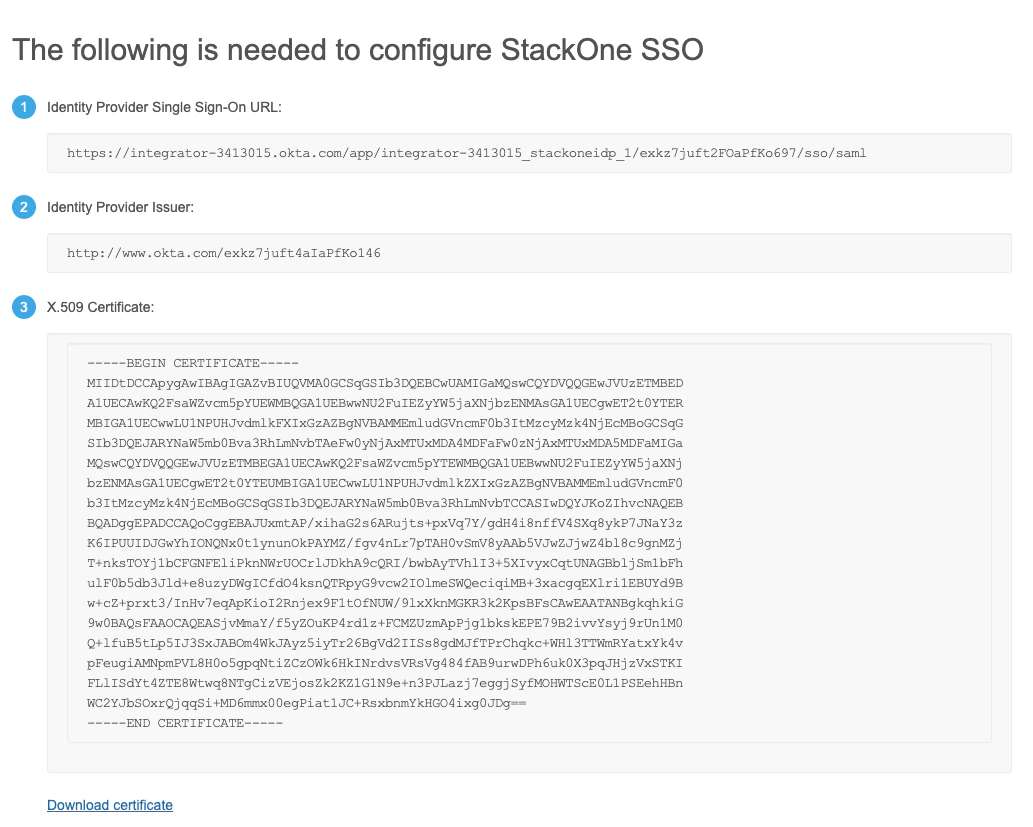
After creating the application, go to the **Sign On** tab and on the right you will find the **SAML Setup** section. Click **View SAML setup instructions**.
From here, copy:
* **Identity Provider Single Sign-On URL**
* **Identity Provider Issuer**
* **X.509 Certificate**
Okta generates a separate signing certificate for each new app. If you've set up StackOne SSO before, copy the certificate from this app's setup instructions rather than reusing an earlier download.
Click **Next**, then **Finish**.
After creating the application, go to the **Sign On** tab and on the right you will find the **SAML Setup** section. Click **View SAML setup instructions**.
From here, copy:
* **Identity Provider Single Sign-On URL**
* **Identity Provider Issuer**
* **X.509 Certificate**
Okta generates a separate signing certificate for each new app. If you've set up StackOne SSO before, copy the certificate from this app's setup instructions rather than reusing an earlier download.
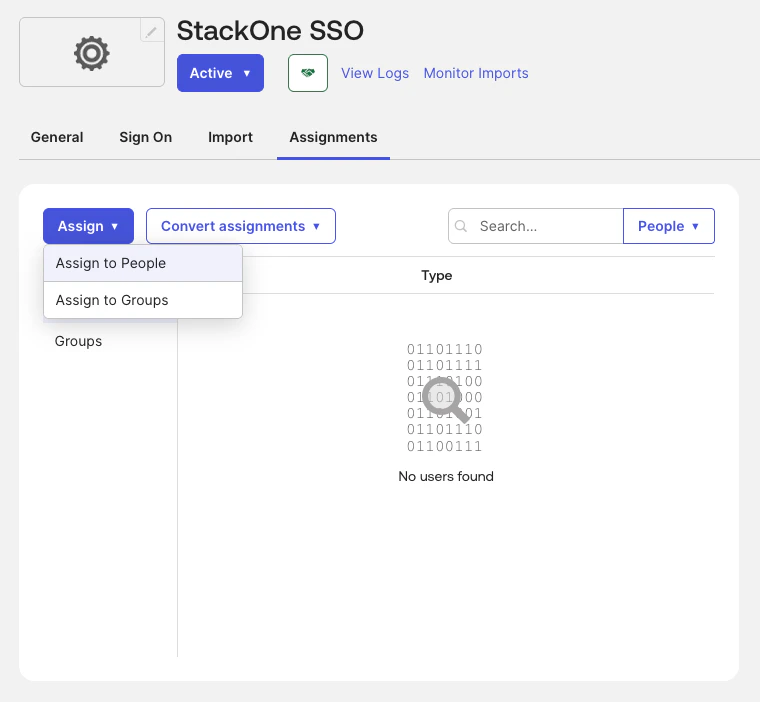
 Go to the **Assignments** tab and assign the users or groups that should have access to StackOne via SSO.
 ## Complete the SSO Registration in StackOne
Return to the StackOne SSO setup page and paste the values from Okta into the Step 2 and Step 3 fields as described in [Configure SSO in StackOne](#configure-sso-in-stackone).
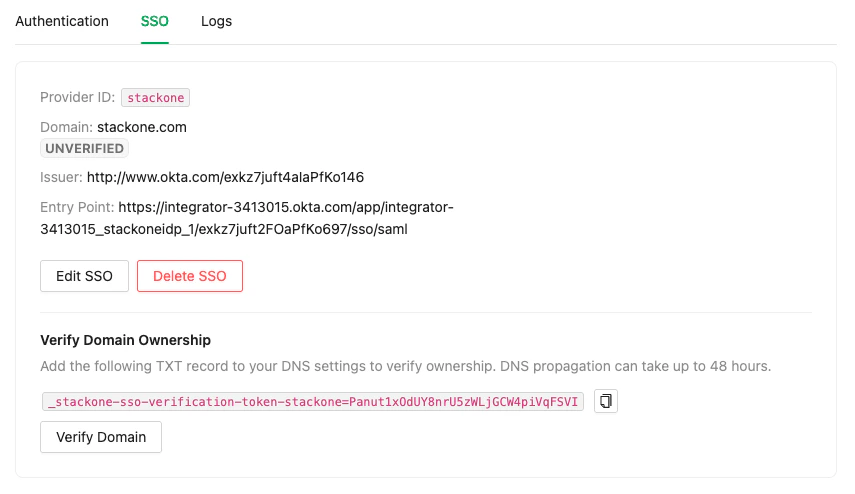
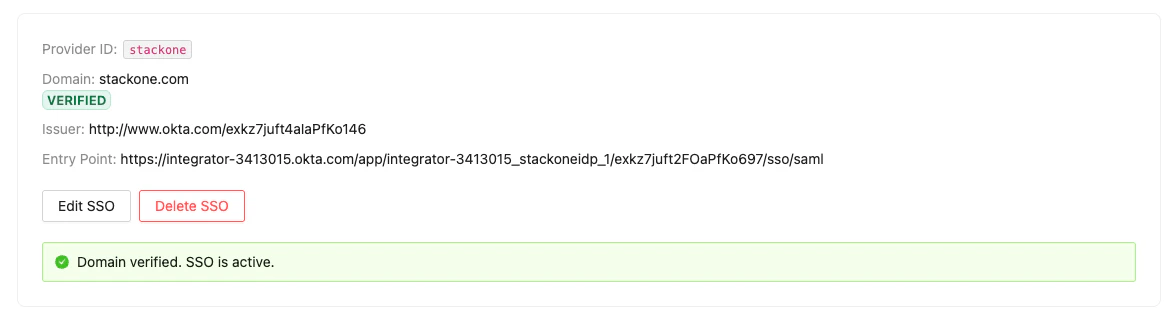
After clicking **Register SSO Provider**, you'll see a provider card with your SSO configuration details.
## Complete the SSO Registration in StackOne
Return to the StackOne SSO setup page and paste the values from Okta into the Step 2 and Step 3 fields as described in [Configure SSO in StackOne](#configure-sso-in-stackone).
After clicking **Register SSO Provider**, you'll see a provider card with your SSO configuration details.
 ## Verify Your Domain
Domain verification is required to activate SSO. This ensures your organization owns the email domain used for SSO authentication.
On the SSO provider card, find the **Domain Verification** section. It displays a DNS TXT record in this format:
```
_stackone-sso-verification-token-{providerId}={verificationToken}
```
Copy the full record value.
## Verify Your Domain
Domain verification is required to activate SSO. This ensures your organization owns the email domain used for SSO authentication.
On the SSO provider card, find the **Domain Verification** section. It displays a DNS TXT record in this format:
```
_stackone-sso-verification-token-{providerId}={verificationToken}
```
Copy the full record value.
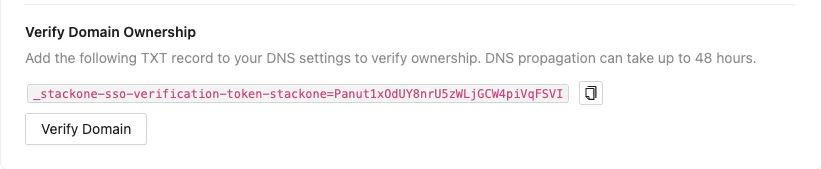 Go to your domain's DNS management panel (e.g., Cloudflare, Route 53, Google Cloud DNS) and add a TXT record:
* **Name/Host**: the email domain you registered in StackOne. That's `@` if it's the root of your DNS zone, or the subdomain label if your email domain is a subdomain (e.g., `my` for `my.example.com`).
* **Value**: the full record from the previous step, as its own value.
How you add the value depends on your provider:
* Providers like Cloudflare let you create a separate TXT record at the same name.
* Providers that keep one TXT record set per name (AWS Route 53, Google Cloud DNS) take multiple values in the same set — add the token as a new value on its own line, not appended to an existing value like your SPF string. See [Route 53's TXT record format](https://docs.aws.amazon.com/Route53/latest/DeveloperGuide/ResourceRecordTypes.html#TXTFormat) for the value-per-line syntax.
DNS propagation can take up to 48 hours, though it typically completes within minutes to a few hours. You can check what's publicly visible with [Google Admin Toolbox Dig](https://toolbox.googleapps.com/apps/dig/#TXT/).
Return to the StackOne SSO settings and click **Verify Domain**. If the DNS record has propagated, you'll see a success message confirming that SSO is active.
If verification fails, wait for DNS propagation and try again.
Go to your domain's DNS management panel (e.g., Cloudflare, Route 53, Google Cloud DNS) and add a TXT record:
* **Name/Host**: the email domain you registered in StackOne. That's `@` if it's the root of your DNS zone, or the subdomain label if your email domain is a subdomain (e.g., `my` for `my.example.com`).
* **Value**: the full record from the previous step, as its own value.
How you add the value depends on your provider:
* Providers like Cloudflare let you create a separate TXT record at the same name.
* Providers that keep one TXT record set per name (AWS Route 53, Google Cloud DNS) take multiple values in the same set — add the token as a new value on its own line, not appended to an existing value like your SPF string. See [Route 53's TXT record format](https://docs.aws.amazon.com/Route53/latest/DeveloperGuide/ResourceRecordTypes.html#TXTFormat) for the value-per-line syntax.
DNS propagation can take up to 48 hours, though it typically completes within minutes to a few hours. You can check what's publicly visible with [Google Admin Toolbox Dig](https://toolbox.googleapps.com/apps/dig/#TXT/).
Return to the StackOne SSO settings and click **Verify Domain**. If the DNS record has propagated, you'll see a success message confirming that SSO is active.
If verification fails, wait for DNS propagation and try again.
 ## Managing Your SSO Configuration
Once SSO is configured, you can:
* **Edit SSO settings** — Update the domain, issuer, entry point, or certificate by clicking **Edit SSO** on the provider card
* **Delete SSO** — Remove the SSO configuration entirely by clicking **Delete SSO**
Deleting your SSO configuration will require all organization members using SSO to sign in with email and password instead. Make sure affected users have alternative credentials before removing SSO.
## Troubleshooting
| Symptom | Likely Cause | Fix |
| ------------------------------------------------------- | ------------------------------------------------------------------------------------------------------------------------- | ------------------------------------------------------------------------------------------------------------------------------------------------------------------------------------------------------------------------------------------------- |
| SSO tab not visible | Feature not enabled for your organization | Contact StackOne support to enable SSO |
| `ERROR_UNMATCH_CERTIFICATE_DECLARATION_IN_METADATA` | The registered certificate doesn't match the one your IdP signs with — Okta generates a separate certificate for each app | Re-copy the X.509 certificate from this app's **View SAML setup instructions** and update it via **Edit SSO** |
| `ERR_UNMATCH_ISSUER` | The Entity ID (Issuer) doesn't match the issuer your IdP sends | Copy the **Identity Provider Issuer** (`http://www.okta.com/exk...`) from the setup instructions and update it via **Edit SSO** |
| "Provider domain has not been verified" | Domain verification hasn't completed | Complete the [domain verification](#verify-your-domain) step |
| "Another organization has already verified this domain" | A domain can be verified by one organization at a time | The organization holding the domain deletes its SSO provider (**Delete SSO**), which releases it. Contact StackOne support if you don't know which organization holds it |
| Domain verification keeps failing | TXT record on the wrong name, token not its own value, or DNS not propagated | The record name must be your registered email domain (`@` for a root domain, the subdomain label otherwise); add the token as its own TXT value; check propagation with [Google Admin Toolbox Dig](https://toolbox.googleapps.com/apps/dig/#TXT/) |
| Users not redirected to IdP | Domain not verified | Complete the [domain verification](#verify-your-domain) step |
| "403 Forbidden" error | User lacks Org Admin role | Ensure you have the Org Admin role to manage SSO settings |
IdP-initiated sign-in is supported: users who click the StackOne tile in their Okta dashboard are signed in and land on the StackOne dashboard.
## Managing Your SSO Configuration
Once SSO is configured, you can:
* **Edit SSO settings** — Update the domain, issuer, entry point, or certificate by clicking **Edit SSO** on the provider card
* **Delete SSO** — Remove the SSO configuration entirely by clicking **Delete SSO**
Deleting your SSO configuration will require all organization members using SSO to sign in with email and password instead. Make sure affected users have alternative credentials before removing SSO.
## Troubleshooting
| Symptom | Likely Cause | Fix |
| ------------------------------------------------------- | ------------------------------------------------------------------------------------------------------------------------- | ------------------------------------------------------------------------------------------------------------------------------------------------------------------------------------------------------------------------------------------------- |
| SSO tab not visible | Feature not enabled for your organization | Contact StackOne support to enable SSO |
| `ERROR_UNMATCH_CERTIFICATE_DECLARATION_IN_METADATA` | The registered certificate doesn't match the one your IdP signs with — Okta generates a separate certificate for each app | Re-copy the X.509 certificate from this app's **View SAML setup instructions** and update it via **Edit SSO** |
| `ERR_UNMATCH_ISSUER` | The Entity ID (Issuer) doesn't match the issuer your IdP sends | Copy the **Identity Provider Issuer** (`http://www.okta.com/exk...`) from the setup instructions and update it via **Edit SSO** |
| "Provider domain has not been verified" | Domain verification hasn't completed | Complete the [domain verification](#verify-your-domain) step |
| "Another organization has already verified this domain" | A domain can be verified by one organization at a time | The organization holding the domain deletes its SSO provider (**Delete SSO**), which releases it. Contact StackOne support if you don't know which organization holds it |
| Domain verification keeps failing | TXT record on the wrong name, token not its own value, or DNS not propagated | The record name must be your registered email domain (`@` for a root domain, the subdomain label otherwise); add the token as its own TXT value; check propagation with [Google Admin Toolbox Dig](https://toolbox.googleapps.com/apps/dig/#TXT/) |
| Users not redirected to IdP | Domain not verified | Complete the [domain verification](#verify-your-domain) step |
| "403 Forbidden" error | User lacks Org Admin role | Ensure you have the Org Admin role to manage SSO settings |
IdP-initiated sign-in is supported: users who click the StackOne tile in their Okta dashboard are signed in and land on the StackOne dashboard.