> ## Documentation Index
> Fetch the complete documentation index at: https://docs.stackone.com/llms.txt
> Use this file to discover all available pages before exploring further.

# Wrangle Slack Sign-In connector profile – StackOne setup guide

> Set up the Slack Sign-In connector profile for Wrangle in StackOne. One-time admin setup required before your users can link Wrangle accounts via Hub.

<section data-guide-section data-guide-scopes="">
  <h2>Sign in to the Slack API dashboard</h2>

  <p>The Slack app that powers Sign in with Slack is created in the Slack API dashboard. You only need to create it once per Slack workspace.</p>

  <Steps>
    <Step title="Open the Slack API dashboard">
      <div data-guide-step data-guide-scopes="" data-guide-display-scopes-list="">
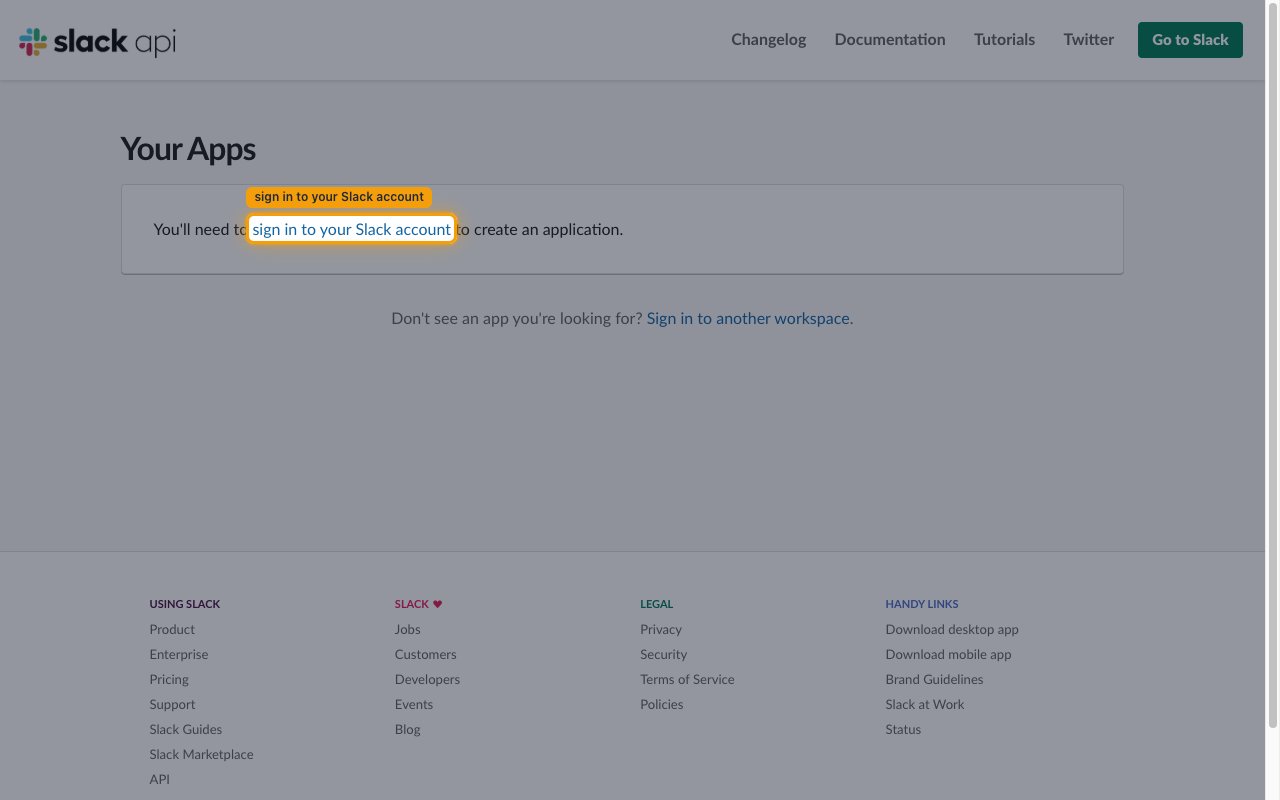
        <p>Go to the <a href="https://api.slack.com/apps" target="_blank" rel="noopener noreferrer">Slack API applications dashboard</a>. If you are not signed in, the page shows <strong>Your Apps</strong> with a prompt to sign in.</p>

        <ul>
          <li>Click <strong>sign in to your Slack account</strong> to start the Slack login.</li>
        </ul>

        <img src="https://mintcdn.com/stackone-60/r_SYSyzjK5uPlxZZ/connectors/wrangle/images/oauth2-setup-slack-sign-in.png?fit=max&auto=format&n=r_SYSyzjK5uPlxZZ&q=85&s=6259152da696853b1d8899e86c976d26" alt="The Slack API Your Apps page prompting you to sign in to your Slack account" width="1280" height="800" data-path="connectors/wrangle/images/oauth2-setup-slack-sign-in.png" />
      </div>
    </Step>

    <Step title="Choose the workspace">
      <div data-guide-step data-guide-scopes="" data-guide-display-scopes-list="">
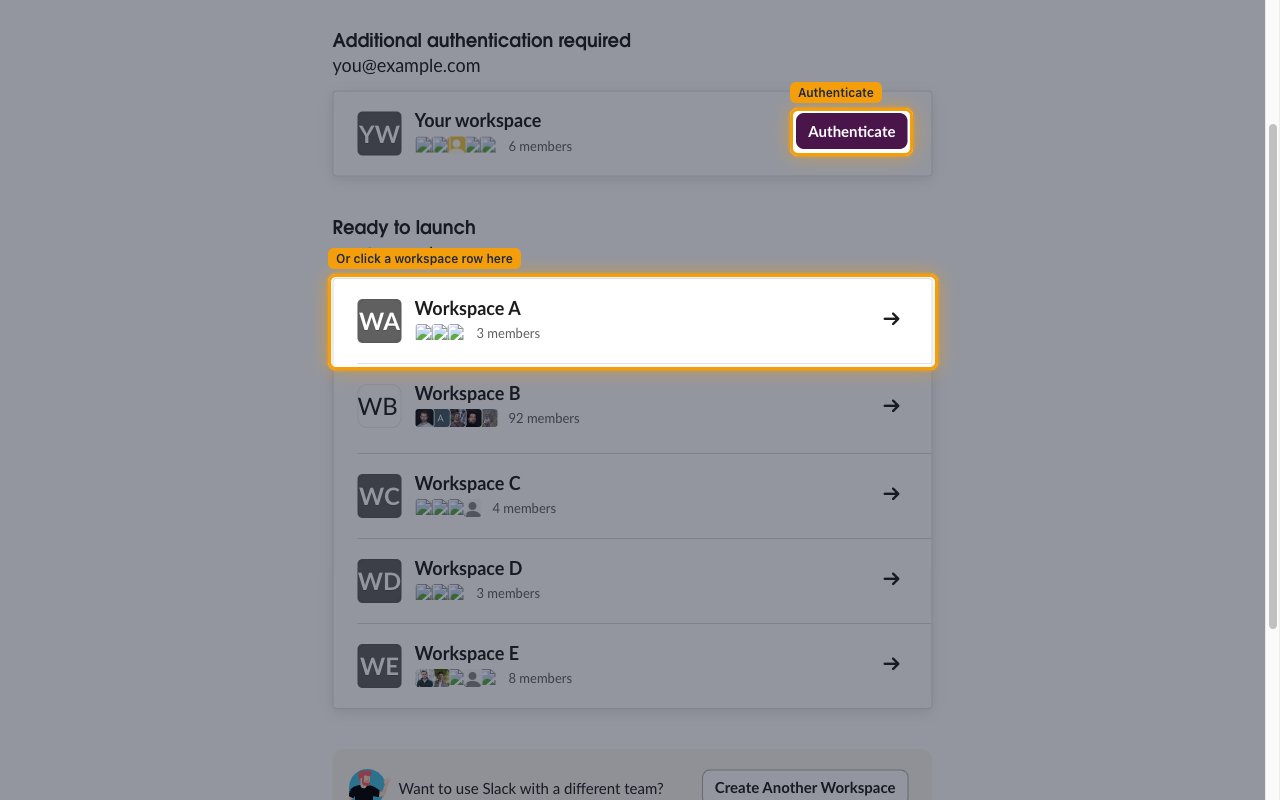
        <p>Slack lists every workspace your email belongs to, split into <strong>Additional authentication required</strong> and <strong>Ready to launch</strong>. Pick the workspace Wrangle is installed in — it can be in either group.</p>

        <ul>
          <li>If it is under <strong>Ready to launch</strong>, click its row (each row has a → arrow on the right) to open it.</li>
          <li>If it is under <strong>Additional authentication required</strong>, click <strong>Authenticate</strong> on its row and complete the extra step Slack asks for, such as SSO or a one-time code sent to your email.</li>
          <li>If the workspace is not listed, look under <strong>Pending invitations</strong> for a <strong>Join</strong> link, or use <strong>Try a different email</strong> under <strong>Not seeing your workspace?</strong>.</li>
        </ul>

        <img src="https://mintcdn.com/stackone-60/r_SYSyzjK5uPlxZZ/connectors/wrangle/images/oauth2-setup-slack-workspace.png?fit=max&auto=format&n=r_SYSyzjK5uPlxZZ&q=85&s=070964aa9805169c7c6cc28662a40fe4" alt="The Slack workspace chooser showing the Additional authentication required group with its Authenticate button and the Ready to launch group of workspace rows" width="1280" height="800" data-path="connectors/wrangle/images/oauth2-setup-slack-workspace.png" />
      </div>
    </Step>
  </Steps>
</section>

<section data-guide-section data-guide-scopes="">
  <h2>Create the Slack app</h2>

  <p>Create a blank Slack app that StackOne will use for the sign-in flow.</p>

  <Steps>
    <Step title="Create a new app">
      <div data-guide-step data-guide-scopes="" data-guide-display-scopes-list="">
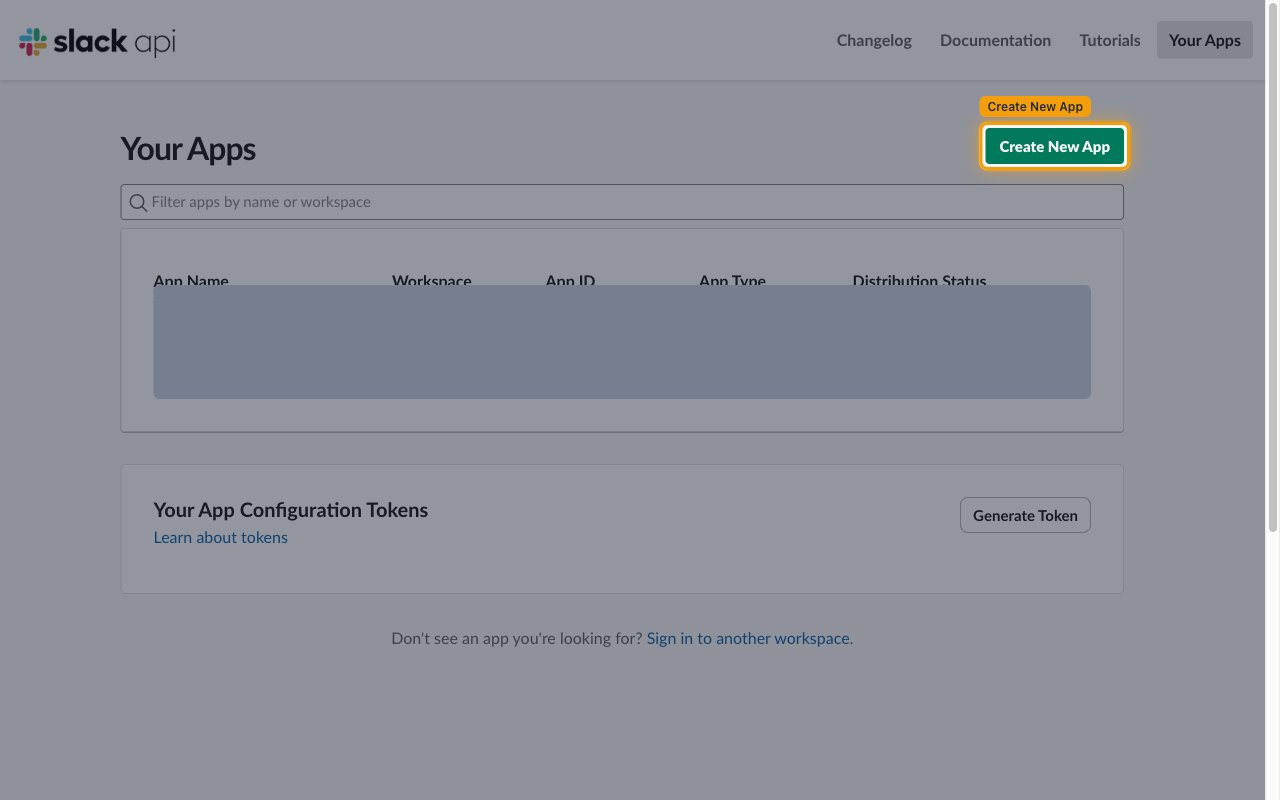
        <p>On the <strong>Your Apps</strong> page, click <strong>Create New App</strong>.</p>

        <img src="https://mintcdn.com/stackone-60/r_SYSyzjK5uPlxZZ/connectors/wrangle/images/oauth2-setup-create-new-app.png?fit=max&auto=format&n=r_SYSyzjK5uPlxZZ&q=85&s=7b80a40cb392fbcbb4000fa4f84705bb" alt="The Your Apps page with the Create New App button highlighted" width="1280" height="800" data-path="connectors/wrangle/images/oauth2-setup-create-new-app.png" />
      </div>
    </Step>

    <Step title="Choose Blank app">
      <div data-guide-step data-guide-scopes="" data-guide-display-scopes-list="">
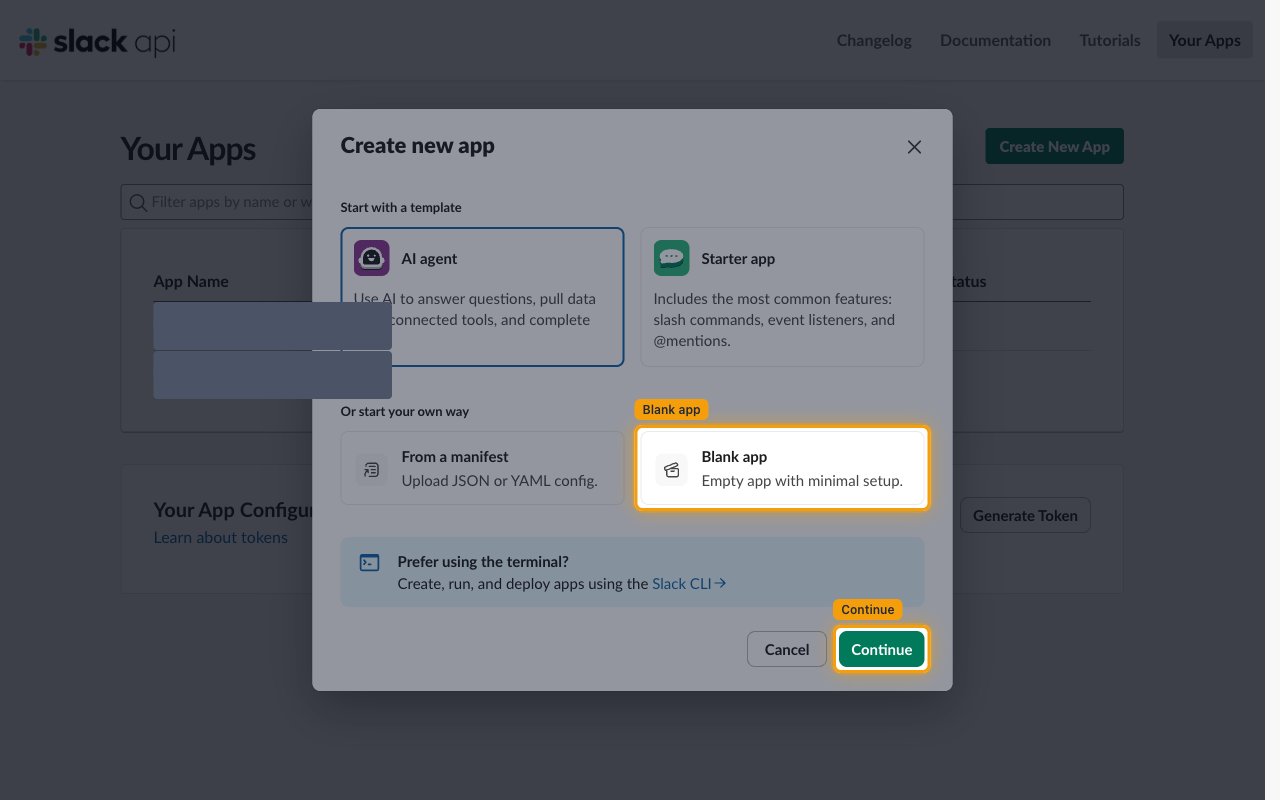
        <p>In the <strong>Create new app</strong> dialog, skip the templates and pick the blank option.</p>

        <ul>
          <li>Under <strong>Or start your own way</strong>, select <strong>Blank app</strong>.</li>
          <li>Click <strong>Continue</strong>.</li>
        </ul>

        <img src="https://mintcdn.com/stackone-60/r_SYSyzjK5uPlxZZ/connectors/wrangle/images/oauth2-setup-blank-app.png?fit=max&auto=format&n=r_SYSyzjK5uPlxZZ&q=85&s=7e75b85bbab5c4c0d6a46c6f5a8f079c" alt="The Create new app dialog with the Blank app option and Continue button highlighted" width="1280" height="800" data-path="connectors/wrangle/images/oauth2-setup-blank-app.png" />
      </div>
    </Step>

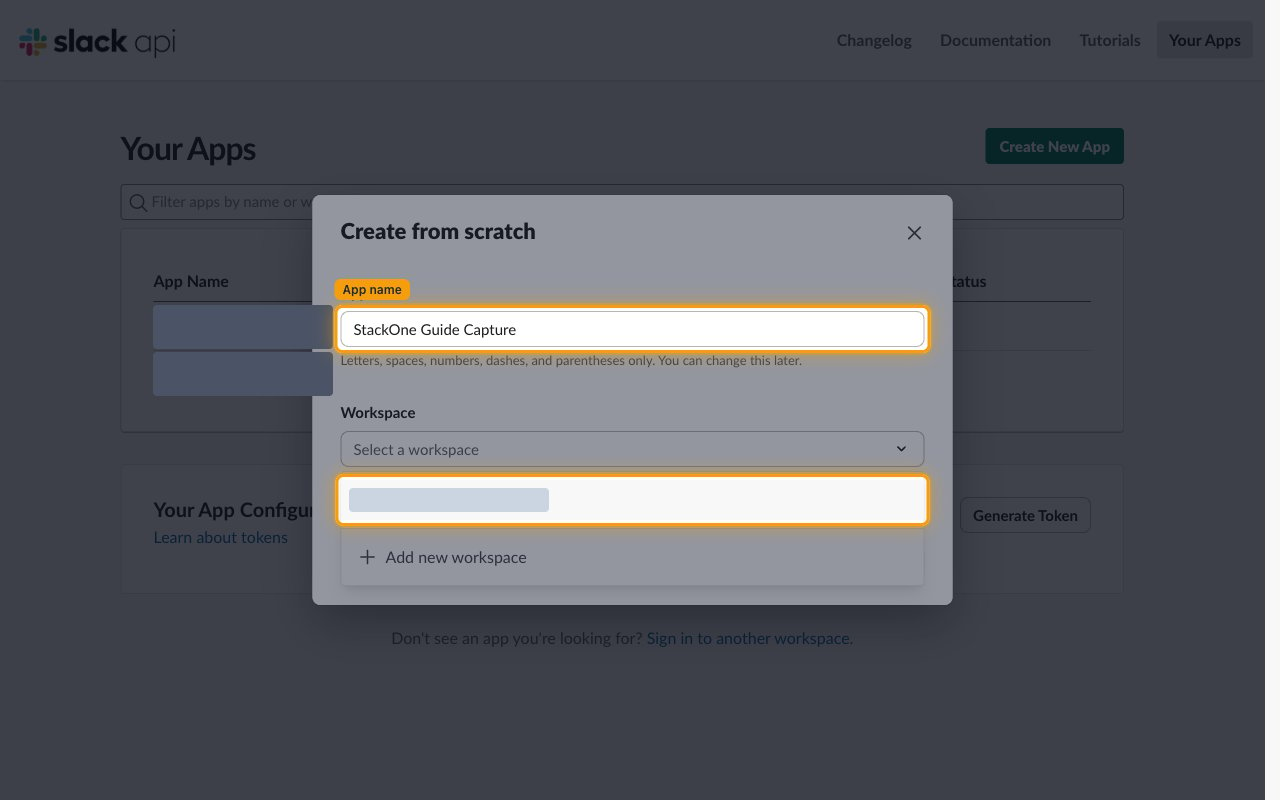
    <Step title="Enter the app name and workspace">
      <div data-guide-step data-guide-scopes="" data-guide-display-scopes-list="">
        <p>The <strong>Create from scratch</strong> dialog asks for the app name and workspace.</p>

        <ul>
          <li>Enter a name in <strong>App name</strong>, for example StackOne Wrangle Sign-In.</li>
          <li>Choose your workspace under <strong>Workspace</strong>. Slack warns that <strong>This can’t be changed later</strong>, so pick the workspace Wrangle is installed in.</li>
          <li>Click <strong>Create</strong>.</li>
        </ul>

        <img src="https://mintcdn.com/stackone-60/r_SYSyzjK5uPlxZZ/connectors/wrangle/images/oauth2-setup-app-name.png?fit=max&auto=format&n=r_SYSyzjK5uPlxZZ&q=85&s=dfe2ef19080405d0d7aea7305b6d8377" alt="The Create from scratch dialog with the App name field filled in and the Workspace dropdown open" width="1280" height="800" data-path="connectors/wrangle/images/oauth2-setup-app-name.png" />
      </div>
    </Step>
  </Steps>
</section>

<section data-guide-section data-guide-scopes="">
  <h2>Configure OAuth for the app</h2>

  <p>Add the StackOne callback URL and the three sign-in permissions to the app, on the <strong>OAuth & Permissions</strong> page.</p>

  <Steps>
    <Step title="Add the redirect URL">
      <div data-guide-step data-guide-scopes="" data-guide-display-scopes-list="">
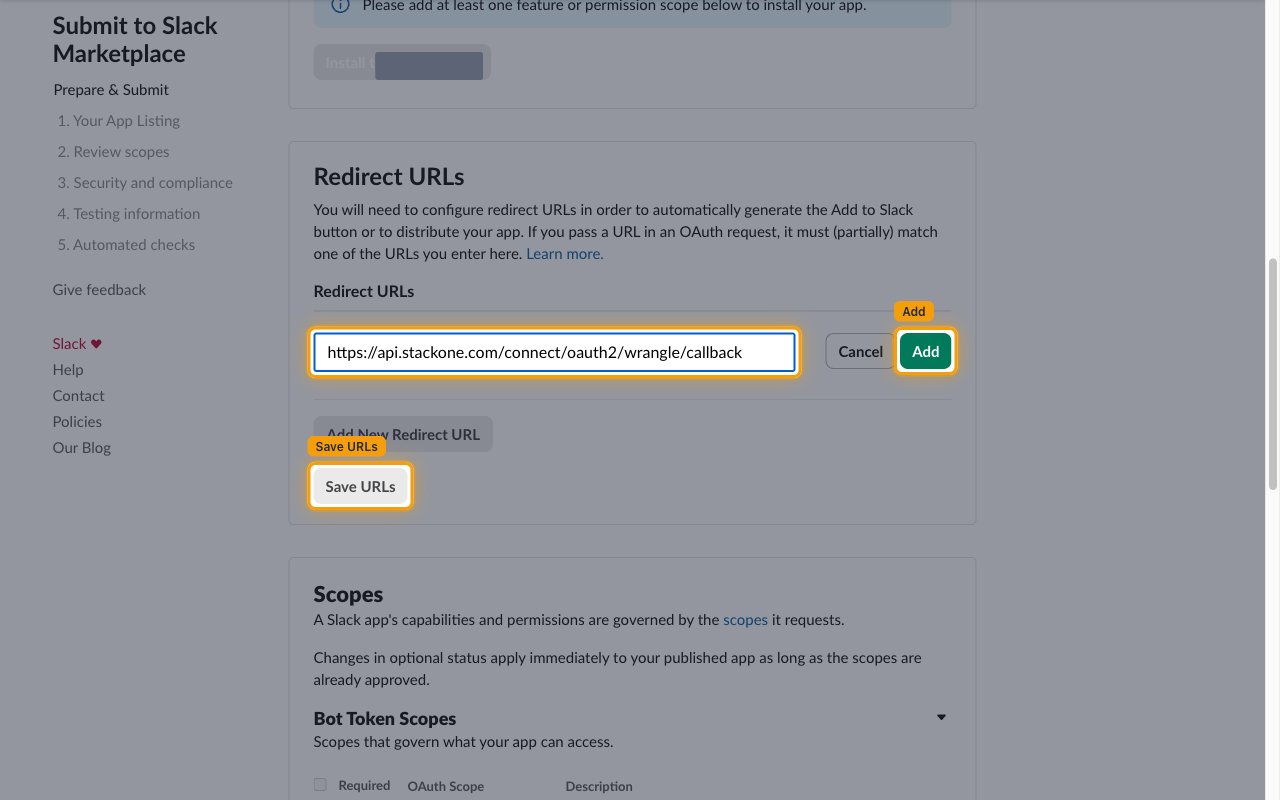
        <p>In the app's left sidebar open <strong>OAuth & Permissions</strong> and scroll to <strong>Redirect URLs</strong>.</p>

        <ul>
          <li>Click <strong>Add New Redirect URL</strong>.</li>
          <li>Paste the StackOne callback URL: `https://api.stackone.com/connect/oauth2/wrangle/callback`</li>
          <li>Click <strong>Add</strong>, then click <strong>Save URLs</strong> to store it. Both clicks are required.</li>
        </ul>

        <img src="https://mintcdn.com/stackone-60/r_SYSyzjK5uPlxZZ/connectors/wrangle/images/oauth2-setup-redirect-url.png?fit=max&auto=format&n=r_SYSyzjK5uPlxZZ&q=85&s=415386c74f6c74272fcd5ddbe4b0e5e9" alt="The Redirect URLs section with the StackOne callback URL entered and the Add and Save URLs buttons highlighted" width="1280" height="800" data-path="connectors/wrangle/images/oauth2-setup-redirect-url.png" />
      </div>
    </Step>

    <Step title="Add the User Token Scopes">
      <div data-guide-step data-guide-scopes="" data-guide-display-scopes-list="">
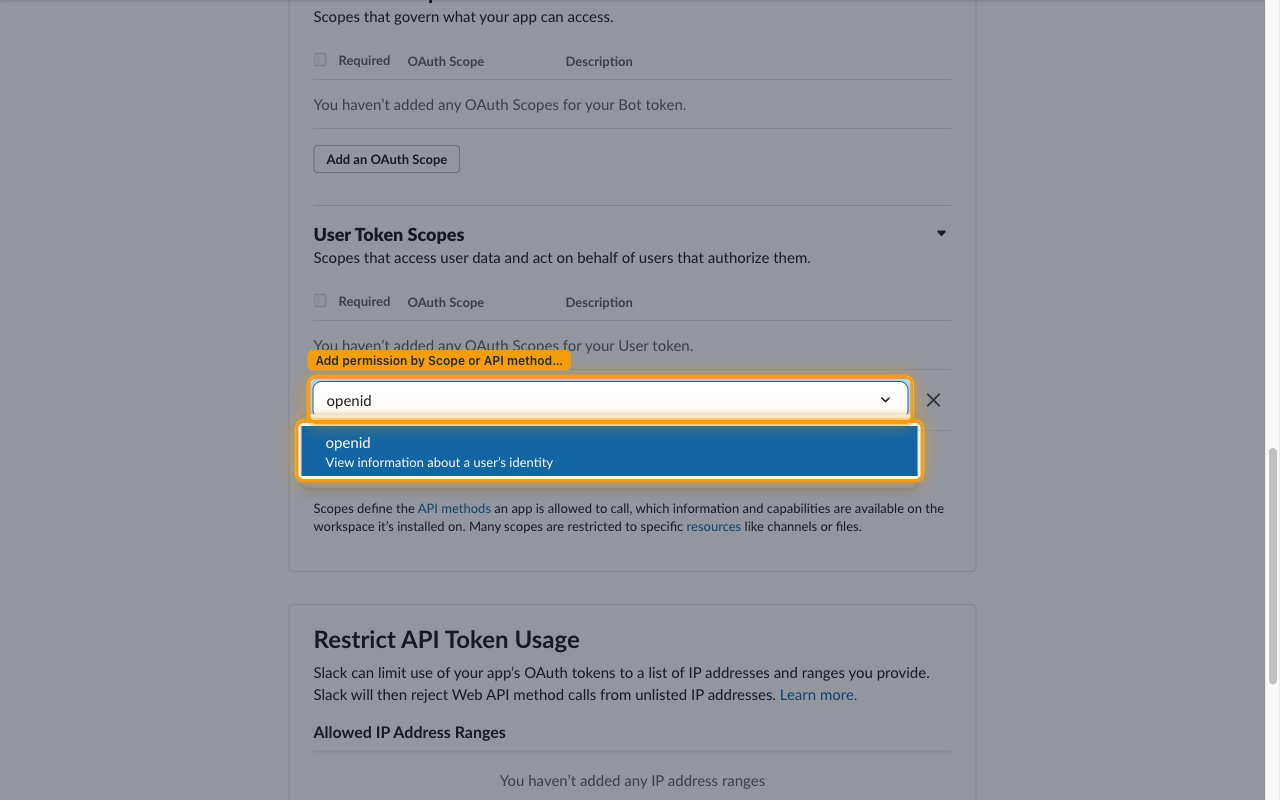
        <p>Scroll down to <strong>Scopes</strong>. The sign-in flow needs three permissions on the <strong>User Token Scopes</strong> table — not the <strong>Bot Token Scopes</strong> table.</p>

        <ul>
          <li>Under <strong>User Token Scopes</strong>, click <strong>Add an OAuth Scope</strong>.</li>
          <li>Add <strong>openid</strong> — View information about a user’s identity.</li>
          <li>Add <strong>profile</strong> — View a user’s Slack avatar and Slack workspace's basic information.</li>
          <li>Add <strong>email</strong> — View a user’s email address.</li>
        </ul>

        <img src="https://mintcdn.com/stackone-60/r_SYSyzjK5uPlxZZ/connectors/wrangle/images/oauth2-setup-user-token-scopes.png?fit=max&auto=format&n=r_SYSyzjK5uPlxZZ&q=85&s=095625ff43d470fad89d750d5cb88b62" alt="The User Token Scopes section with the scope picker open and the openid scope matched" width="1280" height="800" data-path="connectors/wrangle/images/oauth2-setup-user-token-scopes.png" />
      </div>
    </Step>
  </Steps>
</section>

<section data-guide-section data-guide-scopes="">
  <h2>Copy the Slack app credentials</h2>

  <p>The app's client credentials are on the <strong>Basic Information</strong> page.</p>

  <Steps>
    <Step title="Copy the Client ID and Client Secret">
      <div data-guide-step data-guide-scopes="" data-guide-display-scopes-list="">
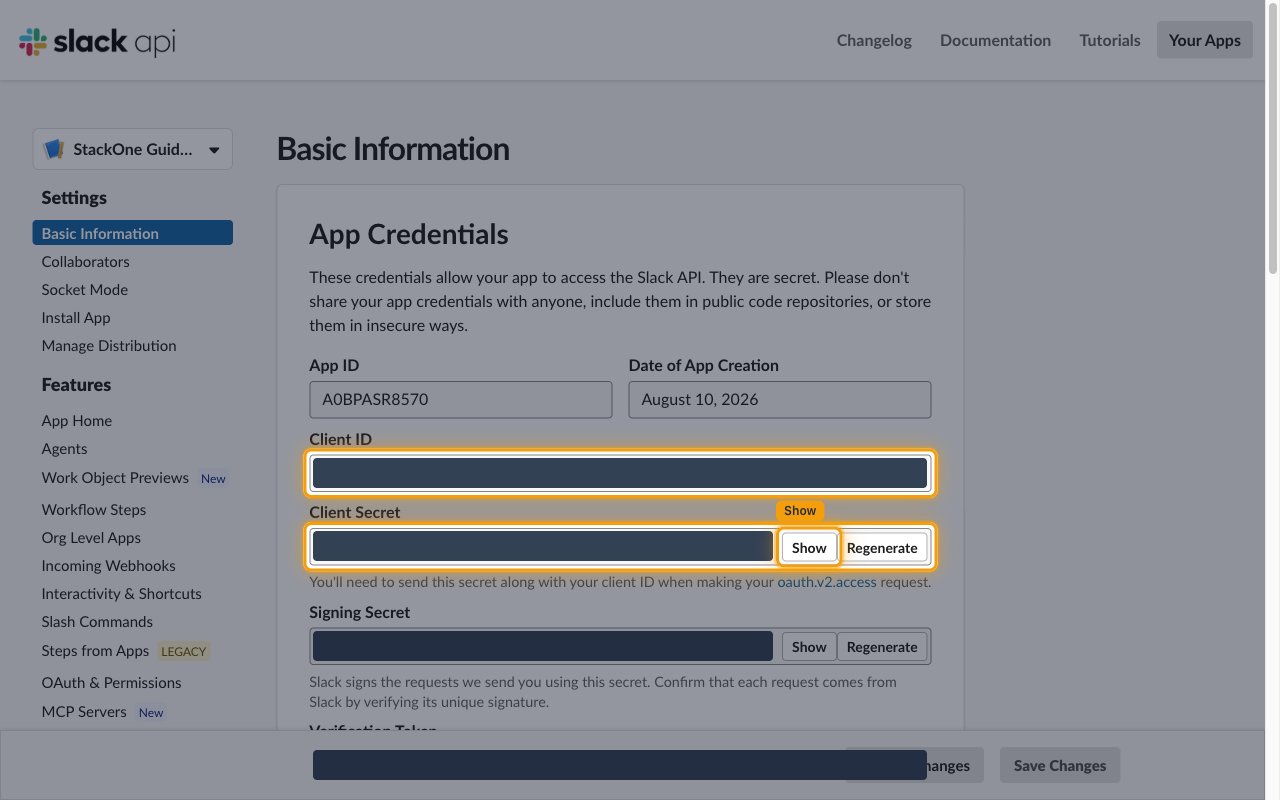
        <p>In the app's left sidebar open <strong>Basic Information</strong> and find the <strong>App Credentials</strong> section.</p>

        <ul>
          <li>Copy <strong>Client ID</strong> and paste it into the <strong>Slack App Client ID</strong> field in the StackOne Connector profile.</li>
          <li>Click <strong>Show</strong> next to <strong>Client Secret</strong> to reveal it, then copy it into the <strong>Slack App Client Secret</strong> field in the StackOne Connector profile.</li>
          <li>Slack notes that these credentials are secret — do not share them or commit them to a public repository.</li>
        </ul>

        <img src="https://mintcdn.com/stackone-60/r_SYSyzjK5uPlxZZ/connectors/wrangle/images/oauth2-setup-app-credentials.png?fit=max&auto=format&n=r_SYSyzjK5uPlxZZ&q=85&s=c80823f9a7f725f308500910f17a3166" alt="The App Credentials section on Basic Information showing the Client ID and Client Secret rows with the Show button" width="1280" height="800" data-path="connectors/wrangle/images/oauth2-setup-app-credentials.png" />
      </div>
    </Step>
  </Steps>
</section>

<section data-guide-section data-guide-scopes="">
  <h2>Copy the Wrangle API token</h2>

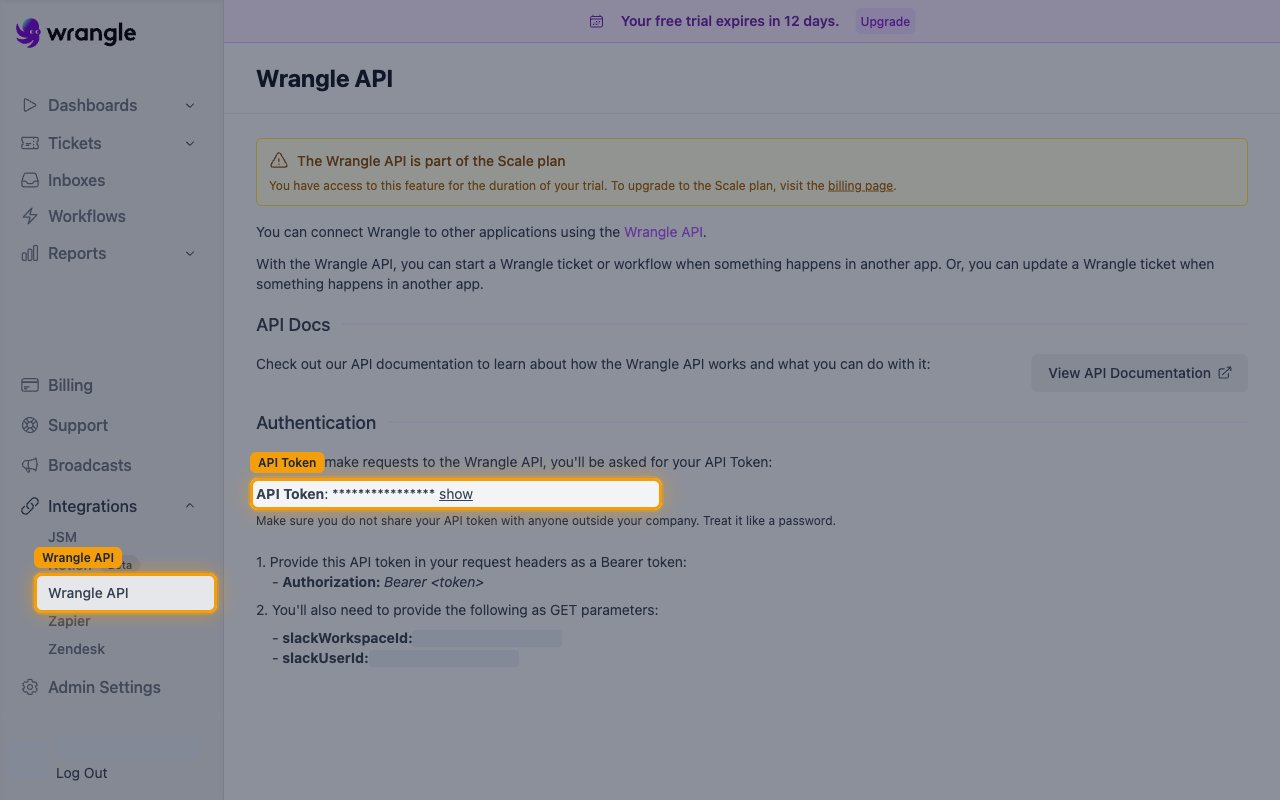
  <p>The Wrangle API token authorizes the API calls themselves and is issued in the Wrangle web app. The Wrangle API is part of the Scale plan and is also available during the free trial.</p>

  <Steps>
    <Step title="Open the Wrangle API integration page">
      <div data-guide-step data-guide-scopes="" data-guide-display-scopes-list="">
        <p>Sign in to the <a href="https://slack.wrangle.io" target="_blank" rel="noopener noreferrer">Wrangle web app</a> with <strong>Log In With Slack</strong>, then expand <strong>Integrations</strong> in the left sidebar and click <strong>Wrangle API</strong>.</p>

        <ul>
          <li>Next to <strong>API Token</strong>, click <strong>show</strong> to reveal the value.</li>
          <li>Copy the token into the <strong>Wrangle API Token</strong> field in the StackOne Connector profile. Wrangle warns to treat it like a password and not share it outside your company.</li>
          <li>Ignore the <strong>slackWorkspaceId</strong> and <strong>slackUserId</strong> values on this page — with Slack Sign-In, StackOne reads your Slack user and workspace from Slack's own response, so there is nothing to copy.</li>
        </ul>

        <img src="https://mintcdn.com/stackone-60/r_SYSyzjK5uPlxZZ/connectors/wrangle/images/oauth2-setup-wrangle-api-token.png?fit=max&auto=format&n=r_SYSyzjK5uPlxZZ&q=85&s=7c04c879148e80bfc8e27f40e378a797" alt="The Wrangle API page in the Wrangle web app with the Wrangle API sidebar link and the API Token value highlighted" width="1280" height="800" data-path="connectors/wrangle/images/oauth2-setup-wrangle-api-token.png" />
      </div>
    </Step>
  </Steps>
</section>

<section data-guide-section data-guide-scopes="">
  <h2>Connect the account</h2>

  <p>After you submit the three fields, StackOne redirects you to Slack to sign in and consent. Your Slack user ID and workspace ID are read from Slack's response automatically — there is nothing else to enter.</p>
</section>

## Creating the StackOne Connector Profile

To create the Connector Profile in StackOne for <strong>Wrangle</strong>:

<Steps>
  <Step title="Navigate to Connector Profiles">
    Login to StackOne and navigate to [Connector Profiles](https://app.stackone.com/connector_profiles)
  </Step>

  <Step title="Create New Connector Profile">
    <ul>
      <li>Click <strong>+ Connector Profile</strong></li>
      <li>Search for and select <strong>Wrangle</strong></li>
      <li>Select <strong>Type</strong> as <strong>Slack Sign-In</strong></li>

      <li>
        Fill out the fields using details retrieved from your provider:

        <ul style={{ marginLeft: '20px' }}>
          <li><strong>Wrangle API Token</strong></li>
          <li><strong>Slack App Client ID</strong></li>
          <li><strong>Slack App Client Secret</strong></li>
        </ul>
      </li>

      <li>(Optional) Select <strong>Actions</strong> to be enabled for this Connector Profile</li>
      <li>Click <strong>Create profile</strong></li>
    </ul>
  </Step>
</Steps>

Congratulations! The new Connector Profile will now show up in your project ready to be used. You can now continue to <a href="/connect/managing-connectors/linking-accounts">Link Accounts</a> for <strong>Wrangle</strong>.