> ## Documentation Index
> Fetch the complete documentation index at: https://docs.stackone.com/llms.txt
> Use this file to discover all available pages before exploring further.

# Connect Windsor.ai with API Key – StackOne Hub

> Link a Windsor.ai account in the StackOne Hub using API Key. End-user guide to authorize the integration and start using Windsor.ai actions.

<section data-guide-section data-guide-scopes="">
  <h2>Retrieve your Windsor.ai API key</h2>

  <p>Windsor.ai authenticates every request with a single <strong>API key</strong> that belongs to your Windsor.ai<br />account. It is always available from your account settings — you can reveal, copy, or reset it at<br />any time, so there is nothing to create first.</p>

  <Steps>
    <Step title="Sign in and open Settings">
      <div data-guide-step data-guide-scopes="" data-guide-display-scopes-list="">
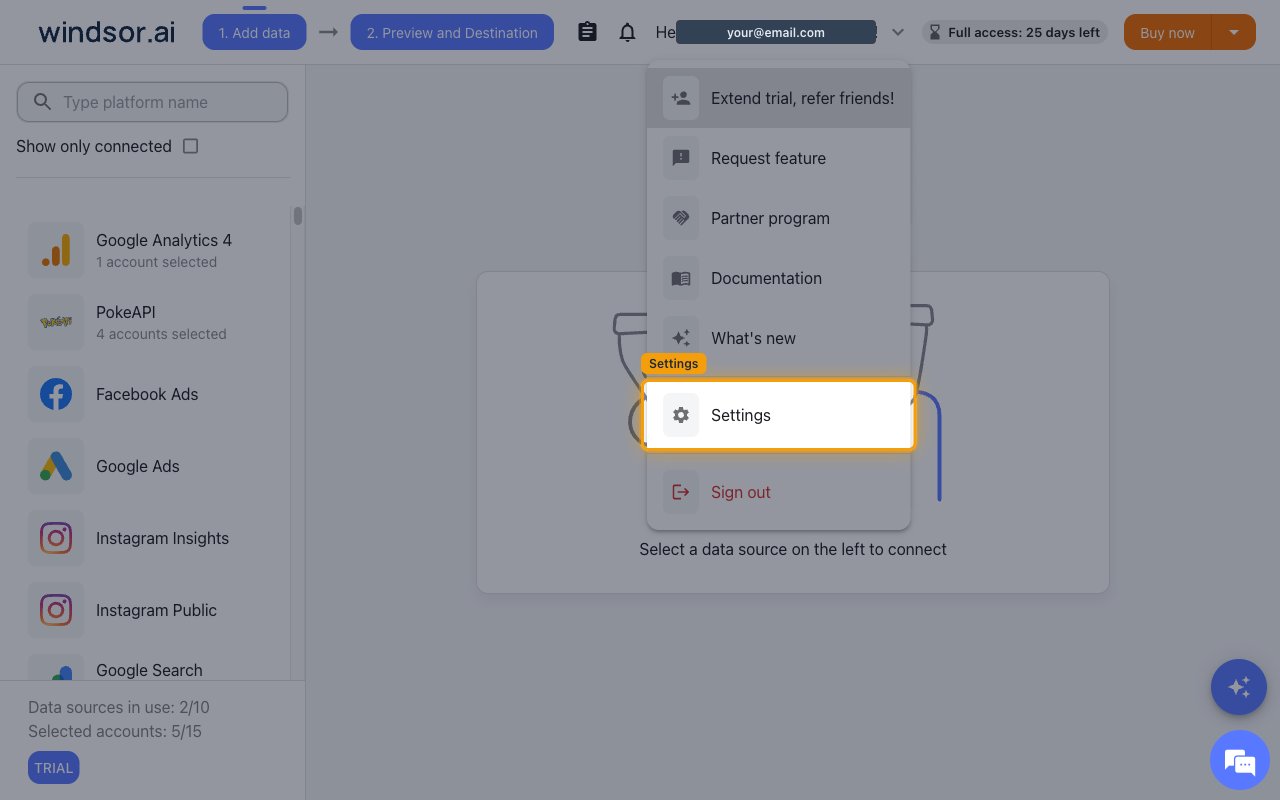
        <p>Sign in to the <a href="https://onboard.windsor.ai/" target="_blank" rel="noopener noreferrer">Windsor.ai onboarding app</a>, then click <strong>Hello \[your email]!</strong> in the top-right corner of the header to open the account menu and choose <strong>Settings</strong>.</p>

        <ul>
          <li>The account menu also contains <strong>Extend trial, refer friends!</strong>, <strong>Request feature</strong>, <strong>Partner program</strong>, <strong>Documentation</strong>, <strong>What's new</strong> and <strong>Sign out</strong> — the entry you need is <strong>Settings</strong>.</li>
        </ul>

        <img src="https://mintcdn.com/stackone-60/UqmE9yrzemqSsfXy/connectors/windsorai/images/custom-config-open-settings.png?fit=max&auto=format&n=UqmE9yrzemqSsfXy&q=85&s=c01d614d6f620d94a35b49141f1926a2" alt="The Windsor.ai account menu open in the header with the Settings entry highlighted." width="1280" height="800" data-path="connectors/windsorai/images/custom-config-open-settings.png" />
      </div>
    </Step>

    <Step title="Copy your API key">
      <div data-guide-step data-guide-scopes="" data-guide-display-scopes-list="">
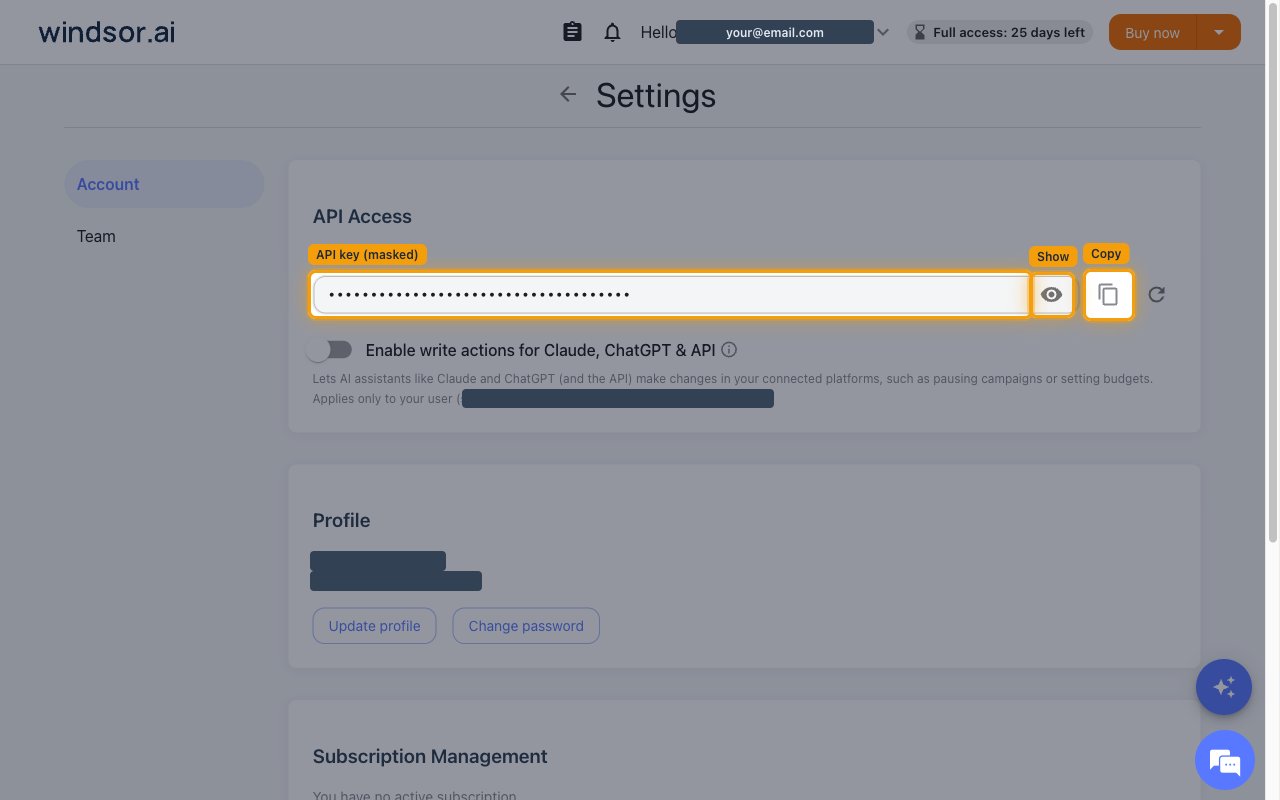
        <p>The <strong>Settings</strong> page opens on the <strong>Account</strong> tab. In the <strong>API Access</strong> section at the top, the <strong>API key:</strong> field holds your key, masked by default. Click the eye icon to reveal it, or click the copy icon beside it to copy the value straight to your clipboard.</p>

        <ul>
          <li>This is the value for the <strong>API Key</strong> field in StackOne Hub — the single credential that authenticates every Windsor.ai request.</li>
          <li>Treat the key like a password. It is not tied to a single machine, so anyone holding it can read your Windsor.ai data.</li>
          <li>The third icon resets the key. Resetting issues a new key and immediately invalidates the old one, which breaks any existing connection still using it.</li>
        </ul>

        <img src="https://mintcdn.com/stackone-60/UqmE9yrzemqSsfXy/connectors/windsorai/images/custom-config-api-key.png?fit=max&auto=format&n=UqmE9yrzemqSsfXy&q=85&s=b7a7d054e2c4166dc7aa07fcbdaac521" alt="The Settings page on the Account tab, with the API Access section showing the masked API key field and its reveal and copy buttons highlighted." width="1280" height="800" data-path="connectors/windsorai/images/custom-config-api-key.png" />
      </div>
    </Step>
  </Steps>
</section>

<section data-guide-section data-guide-scopes="">
  <h2>Optional — enable write actions</h2>

  <p>Read-only actions work as soon as the key is connected. Actions that change something on a<br />connected platform — such as pausing a campaign or setting a budget — are turned off by default<br />and must be enabled before they will run.</p>

  <Steps>
    <Step title="Turn on write actions">
      <div data-guide-step data-guide-scopes="" data-guide-display-scopes-list="">
        <p>In the same <strong>API Access</strong> section, switch on <strong>Enable write actions for Claude, ChatGPT & API</strong>. Windsor.ai describes it as <em>Lets AI assistants like Claude and ChatGPT (and the API) make changes in your connected platforms, such as pausing campaigns or setting budgets.</em></p>

        <ul>
          <li>The setting applies only to your own user, not to the rest of your team — each member enables it separately.</li>
          <li>Leave it off if you only need to read reporting data. With it off, write requests are rejected with an authorization error.</li>
        </ul>
      </div>
    </Step>
  </Steps>
</section>

<div data-whitelabel-hide>
  <h2>Linking the Account from the Hub</h2>

  <Steps>
    <Step title="Navigate to the Hub">
      Use one of the three <a href="/connect/managing-connectors/linking-accounts">Linking Account Methods</a> to access the Hub.
    </Step>

    <Step title="Fill out the fields">
      Fill out the following fields using details from your provider:

      <ul>
        <li><strong>API Key</strong></li>
      </ul>
    </Step>

    <Step title="Connect">
      <ul>
        <li>Click <strong>Connect</strong></li>
        <li>If applicable, the provider will redirect you to a sign-in or authorization page. Complete the provider's authorization flow.</li>
        <li>Once authorization is successful, you will see a confirmation popup</li>
      </ul>
    </Step>
  </Steps>

  <p>If the account linking is successful, you will see the newly linked account in your <a href="/gateway/concepts/linked-accounts">Accounts</a> page.</p>
</div>