> ## Documentation Index
> Fetch the complete documentation index at: https://docs.stackone.com/llms.txt
> Use this file to discover all available pages before exploring further.

# Connect Smartling with API Token – StackOne Hub

> Link a Smartling account in the StackOne Hub using API Token. End-user guide to authorize the integration and start using Smartling actions.

<Warning>Create the token from the Account Tokens section, not Project Tokens — an Account Token can access every project and is required for account-scoped actions. The token inherits the role and permissions of the signed-in user. The Token Secret is shown only once and cannot be retrieved after you dismiss the confirmation.</Warning>

<section data-guide-section data-guide-scopes="">
  <h2>Create an Account API Token in Smartling</h2>

  <p>A Smartling Account API Token provides the User Identifier, Token Secret, and Account UID this connector needs.</p>

  <Steps>
    <Step title="Sign in to Smartling">
      <div data-guide-step data-guide-scopes="" data-guide-display-scopes-list="">
        <p>Sign in to your <a href="https://dashboard.smartling.com/" target="_blank" rel="noopener noreferrer">Smartling account</a> with a user whose role and permissions the token should inherit.</p>

        <ul>
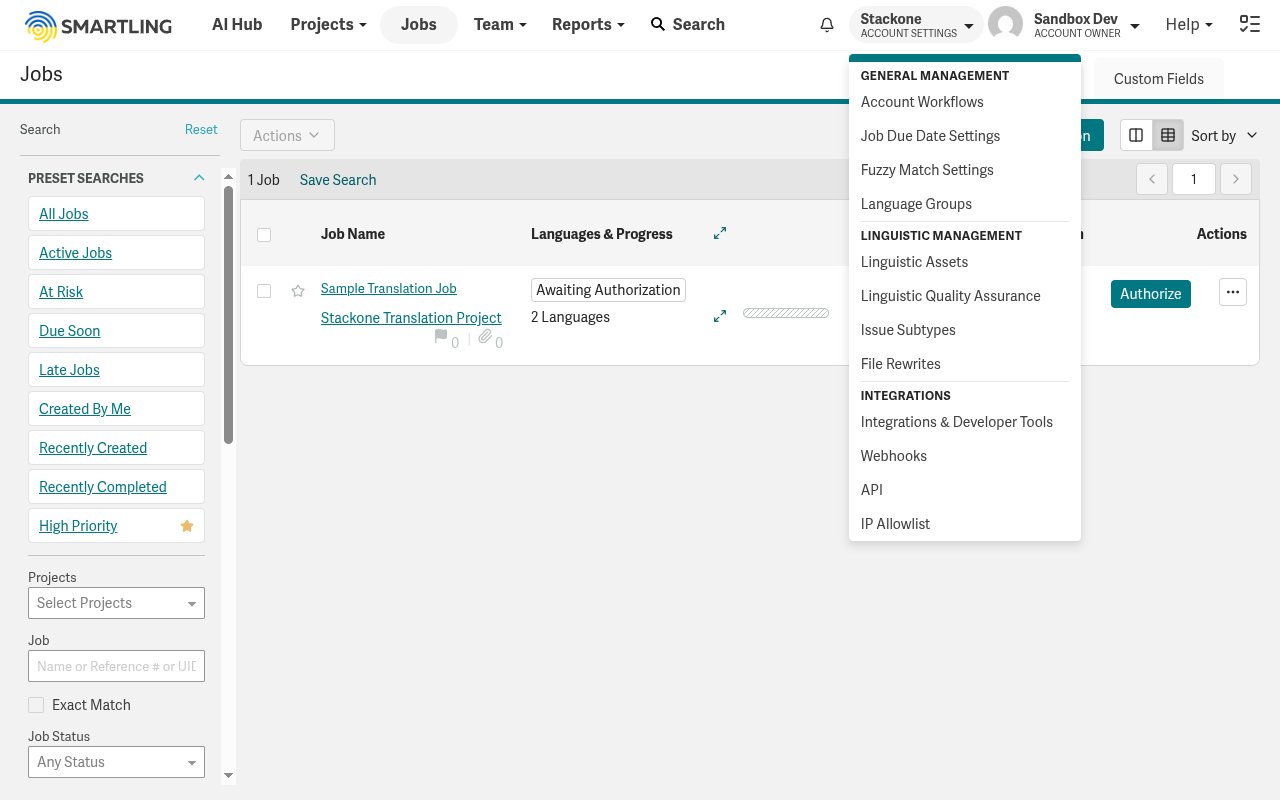
          <li>Open the <strong>Account Settings</strong> menu in the top-right corner, then under <strong>Integrations</strong> click <strong>API</strong>.</li>
        </ul>

        <img src="https://mintcdn.com/stackone-60/sYIXuFxoUU4Bcy0F/connectors/smartling/images/config-account-settings-api.png?fit=max&auto=format&n=sYIXuFxoUU4Bcy0F&q=85&s=741de27bac02587a55420afbd19ca098" alt="Smartling Account Settings menu with API highlighted under Integrations" width="1280" height="800" data-path="connectors/smartling/images/config-account-settings-api.png" />
      </div>
    </Step>

    <Step title="Open the API tokens page">
      <div data-guide-step data-guide-scopes="" data-guide-display-scopes-list="">
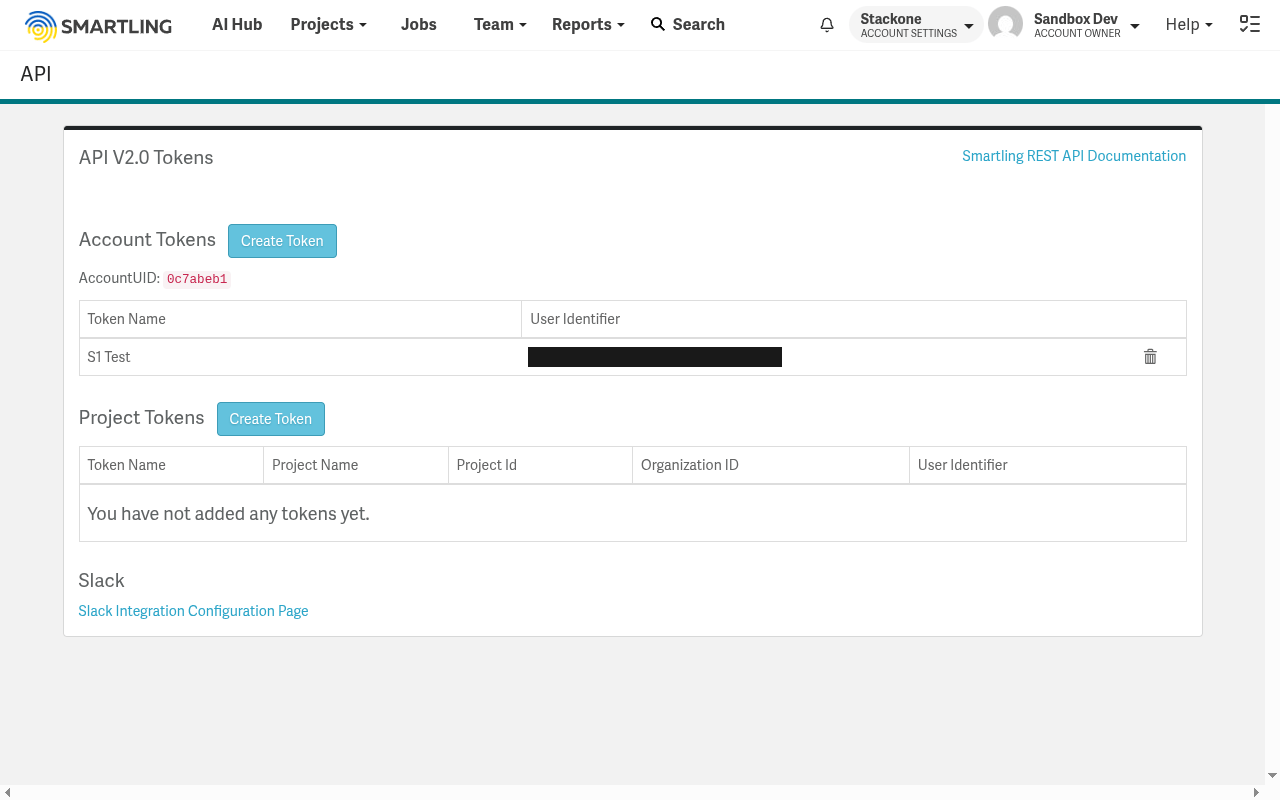
        <p>The <strong>API V2.0 Tokens</strong> page lists your Account Tokens and shows your <strong>AccountUID</strong>.</p>

        <ul>
          <li>Note the <strong>AccountUID</strong> shown under <strong>Account Tokens</strong> — you will enter it in the Account UID field.</li>
          <li>In the <strong>Account Tokens</strong> section, click <strong>Create Token</strong>.</li>
        </ul>

        <img src="https://mintcdn.com/stackone-60/sYIXuFxoUU4Bcy0F/connectors/smartling/images/config-api-tokens-page.png?fit=max&auto=format&n=sYIXuFxoUU4Bcy0F&q=85&s=a425273bd30940b02192d64cb6b6c3cd" alt="API V2.0 Tokens page showing the Account Tokens section, Create Token button, and AccountUID" width="1280" height="800" data-path="connectors/smartling/images/config-api-tokens-page.png" />
      </div>
    </Step>

    <Step title="Create an account token">
      <div data-guide-step data-guide-scopes="" data-guide-display-scopes-list="">
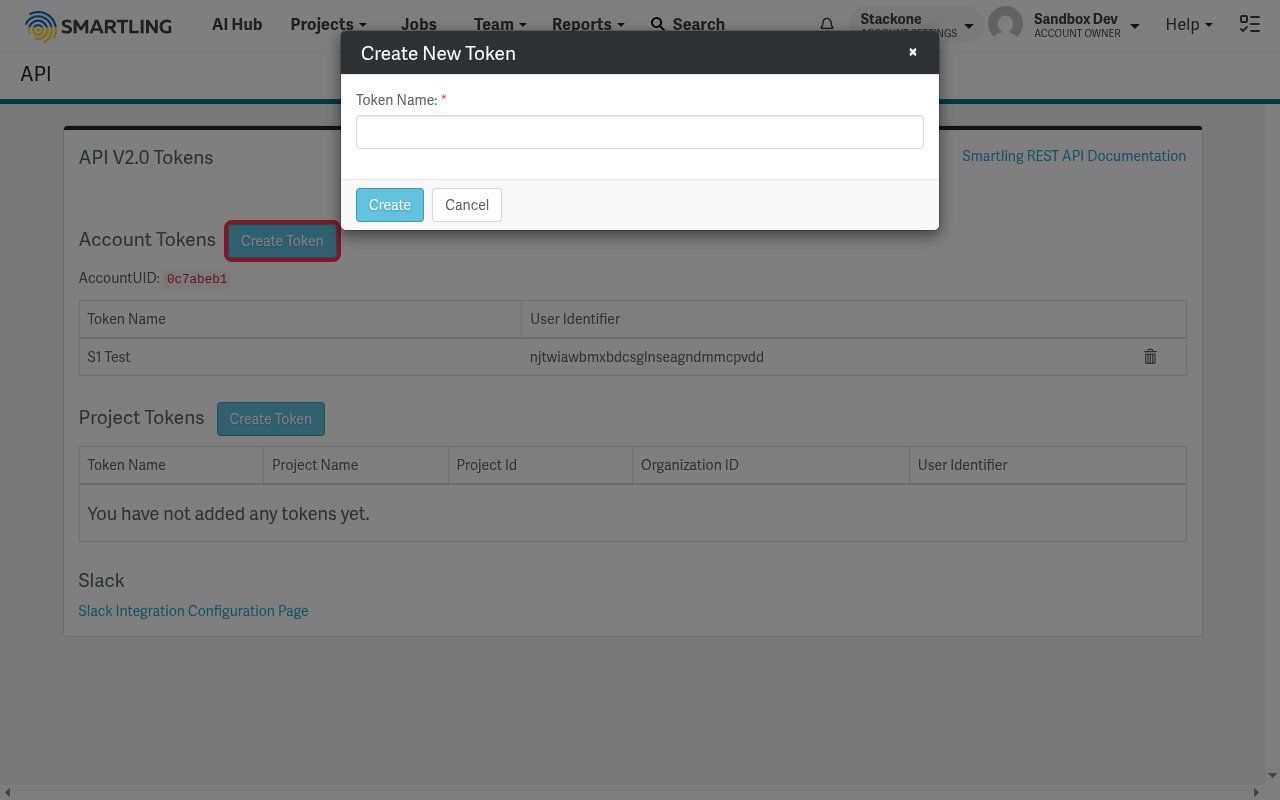
        <p>In the <strong>Create New Token</strong> dialog, enter a <strong>Token Name</strong>, then click <strong>Create</strong>.</p>

        <img src="https://mintcdn.com/stackone-60/sYIXuFxoUU4Bcy0F/connectors/smartling/images/config-create-token-dialog.png?fit=max&auto=format&n=sYIXuFxoUU4Bcy0F&q=85&s=08da7a72eb89eb02d9a6835d9041342b" alt="Create New Token dialog with the Token Name field and Create button" width="1280" height="800" data-path="connectors/smartling/images/config-create-token-dialog.png" />
      </div>
    </Step>

    <Step title="Copy your credentials">
      <div data-guide-step data-guide-scopes="" data-guide-display-scopes-list="">
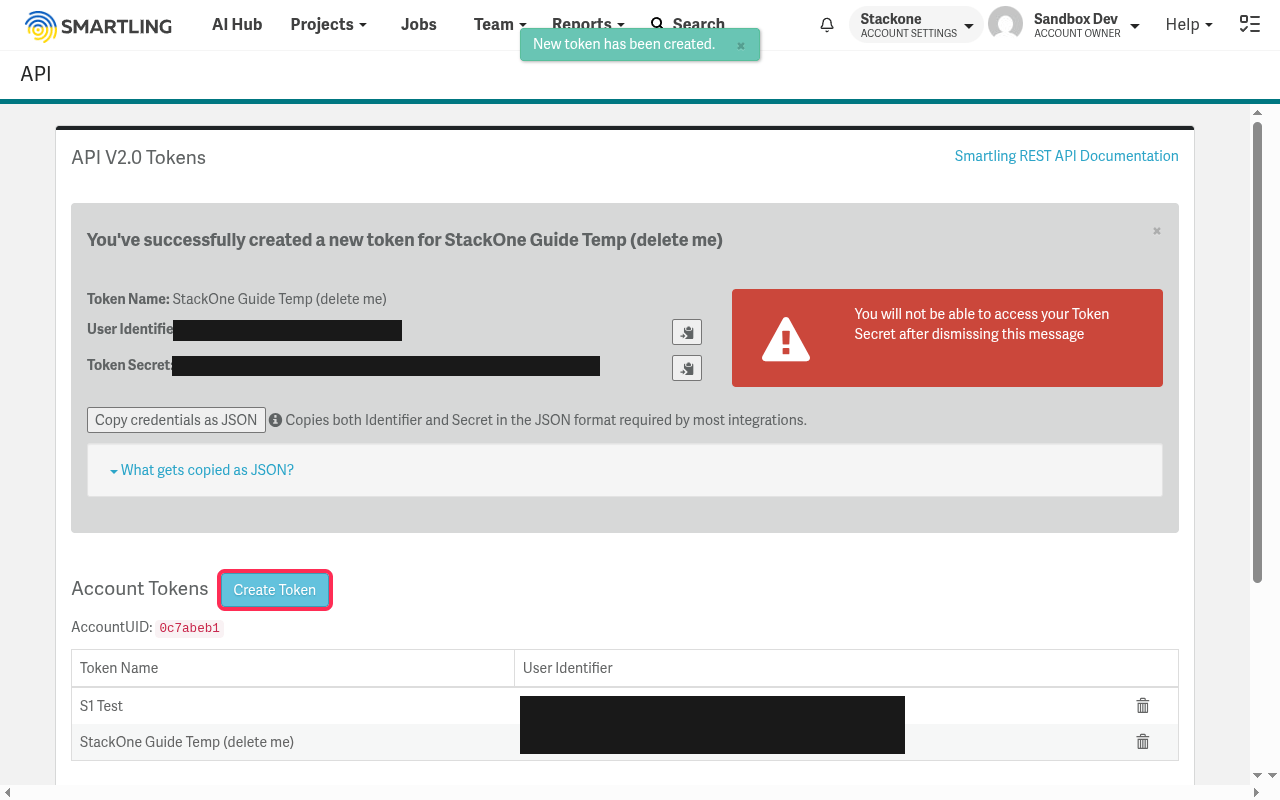
        <p>The confirmation screen displays your new token. Copy each value and store it securely before dismissing the message.</p>

        <ul>
          <li>Copy the <strong>User Identifier</strong> for the User Identifier field.</li>
          <li>Copy the <strong>Token Secret</strong> for the User Secret field. It is shown only once — you will not be able to access it after dismissing the message.</li>
          <li>Enter the <strong>AccountUID</strong> from the API tokens page in the Account UID field.</li>
        </ul>

        <img src="https://mintcdn.com/stackone-60/sYIXuFxoUU4Bcy0F/connectors/smartling/images/config-copy-credentials.png?fit=max&auto=format&n=sYIXuFxoUU4Bcy0F&q=85&s=58989a1599c94e2ab1492647e32d2199" alt="Token confirmation screen showing the User Identifier and Token Secret with copy buttons" width="1280" height="800" data-path="connectors/smartling/images/config-copy-credentials.png" />
      </div>
    </Step>
  </Steps>
</section>

<div data-whitelabel-hide>
  <h2>Linking the Account from the Hub</h2>

  <Steps>
    <Step title="Navigate to the Hub">
      Use one of the three <a href="/connect/managing-connectors/linking-accounts">Linking Account Methods</a> to access the Hub.
    </Step>

    <Step title="Fill out the fields">
      Fill out the following fields using details from your provider:

      <ul>
        <li><strong>Account UID</strong></li>
        <li><strong>User Identifier</strong></li>
        <li><strong>User Secret</strong></li>
      </ul>
    </Step>

    <Step title="Connect">
      <ul>
        <li>Click <strong>Connect</strong></li>
        <li>If applicable, the provider will redirect you to a sign-in or authorization page. Complete the provider's authorization flow.</li>
        <li>Once authorization is successful, you will see a confirmation popup</li>
      </ul>
    </Step>
  </Steps>

  <p>If the account linking is successful, you will see the newly linked account in your <a href="/gateway/concepts/linked-accounts">Accounts</a> page.</p>
</div>

## Next Steps

<Columns cols={2}>
  <Card title="Webhooks setup" href="/connectors/smartling/guides/webhook-setup">
    <p className="connector-page-auth-description connector-page-card-text">
      Configure receiving Events for Smartling into StackOne.
    </p>
  </Card>
</Columns>