> ## Documentation Index
> Fetch the complete documentation index at: https://docs.stackone.com/llms.txt
> Use this file to discover all available pages before exploring further.

# Sentry Webhook Setup Guide

> Configure Sentry to deliver events to StackOne.

## Prerequisites

The connector should already be set up, with a Connector Profile and a Linked Account. See [Getting Started](/connectors/sentry#getting-started) on the Sentry connector page.

<section data-guide-section data-guide-scopes="">
  <h2>Add the Native Webhook URL to your Custom Integration</h2>

  <p>Sentry delivers events from the Custom Internal Integration that issued your Auth Token. Paste the StackOne <strong>Native Webhook URL</strong> into that integration, then pick the resources Sentry should send.</p>

  <Steps>
    <Step title="Retrieve the StackOne Native Webhook URL">
      <div data-guide-step data-guide-scopes="" data-guide-display-scopes-list="">
        <p>The <strong>Native Webhook URL</strong> is shown on the StackOne Hub connection form while you link the account.</p>

        <ul>
          <li>Start linking the Sentry account in StackOne Hub.</li>
          <li>Copy the read-only <strong>Native Webhook URL</strong> field from the connection form.</li>
          <li>Keep the form open — you paste this URL into Sentry before completing the connection.</li>
        </ul>
      </div>
    </Step>

    <Step title="Open Custom Integrations">
      <div data-guide-step data-guide-scopes="" data-guide-display-scopes-list="">
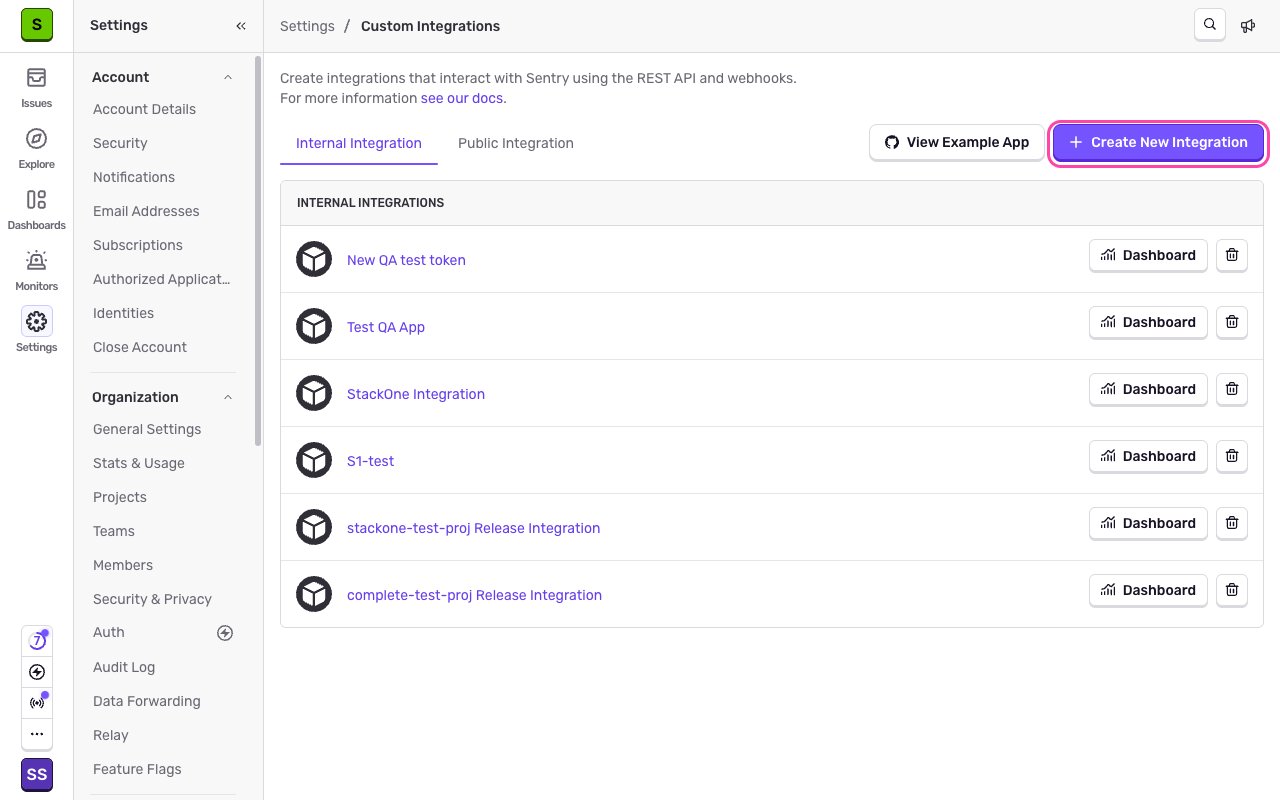
        <p>Sign in to your <a href="https://sentry.io" target="_blank" rel="noopener noreferrer">Sentry account</a> and navigate to <strong>Settings</strong> > <strong>Custom Integrations</strong>, then stay on the <strong>Internal Integration</strong> tab.</p>

        <ul>
          <li>Click the name of the integration that issued your Auth Token and skip the next step.</li>
          <li>If you have not created one yet, click <strong>Create New Integration</strong>.</li>
        </ul>

        <img src="https://mintcdn.com/stackone-60/J7GS-fOGaEoHxPig/connectors/sentry/images/events-custom-integrations.png?fit=max&auto=format&n=J7GS-fOGaEoHxPig&q=85&s=54b0cae6fa1071c518ebffedba6650e8" alt="The Custom Integrations page with the Create New Integration button highlighted" width="1280" height="800" data-path="connectors/sentry/images/events-custom-integrations.png" />
      </div>
    </Step>

    <Step title="Create the internal integration">
      <div data-guide-step data-guide-scopes="" data-guide-display-scopes-list="">
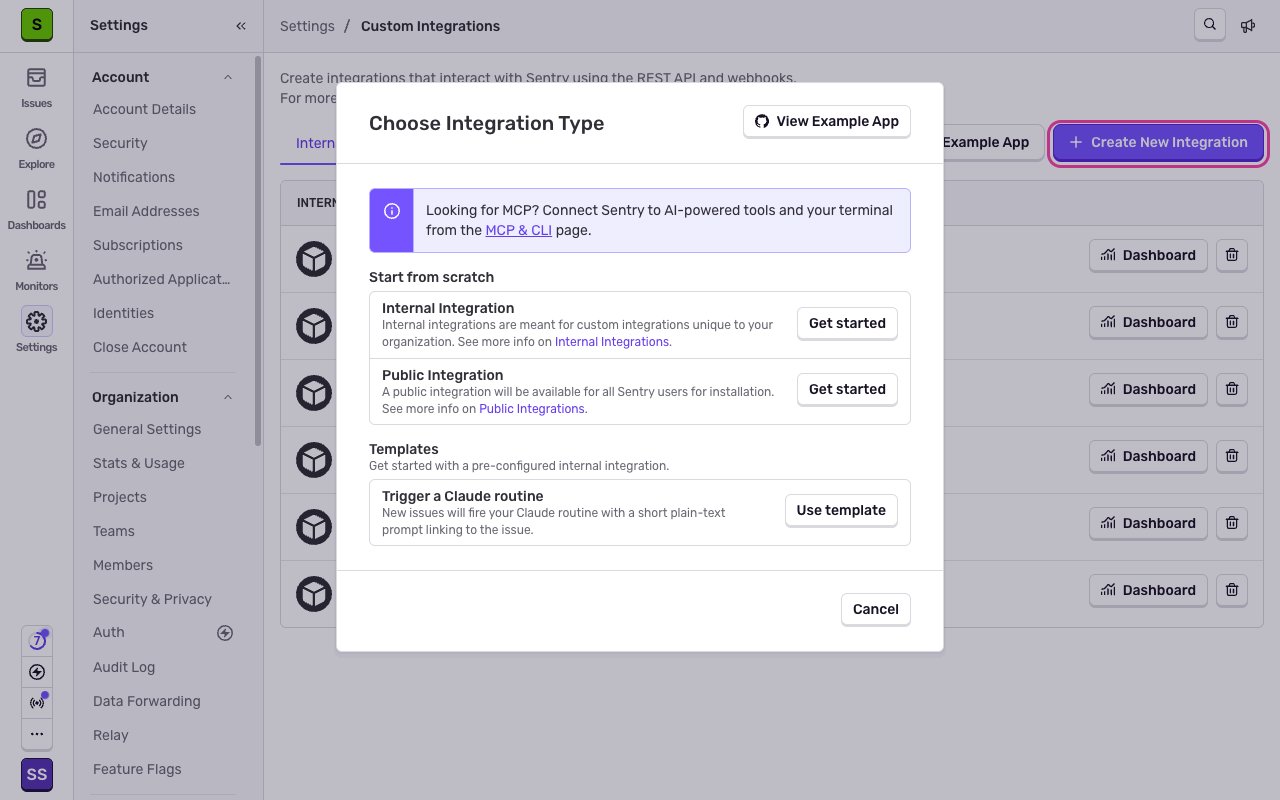
        <p>In the <strong>Choose Integration Type</strong> dialog, under <strong>Start from scratch</strong>, click <strong>Get started</strong> next to <strong>Internal Integration</strong>. Enter a descriptive <strong>Name</strong> such as `StackOne Integration`.</p>

        <img src="https://mintcdn.com/stackone-60/J7GS-fOGaEoHxPig/connectors/sentry/images/events-new-integration-dialog.png?fit=max&auto=format&n=J7GS-fOGaEoHxPig&q=85&s=b34eb5992e240ac9ef8e1fa82497b5fe" alt="The Choose Integration Type dialog with Internal Integration and its Get started button" width="1280" height="800" data-path="connectors/sentry/images/events-new-integration-dialog.png" />
      </div>
    </Step>

    <Step title="Paste the Native Webhook URL">
      <div data-guide-step data-guide-scopes="" data-guide-display-scopes-list="">
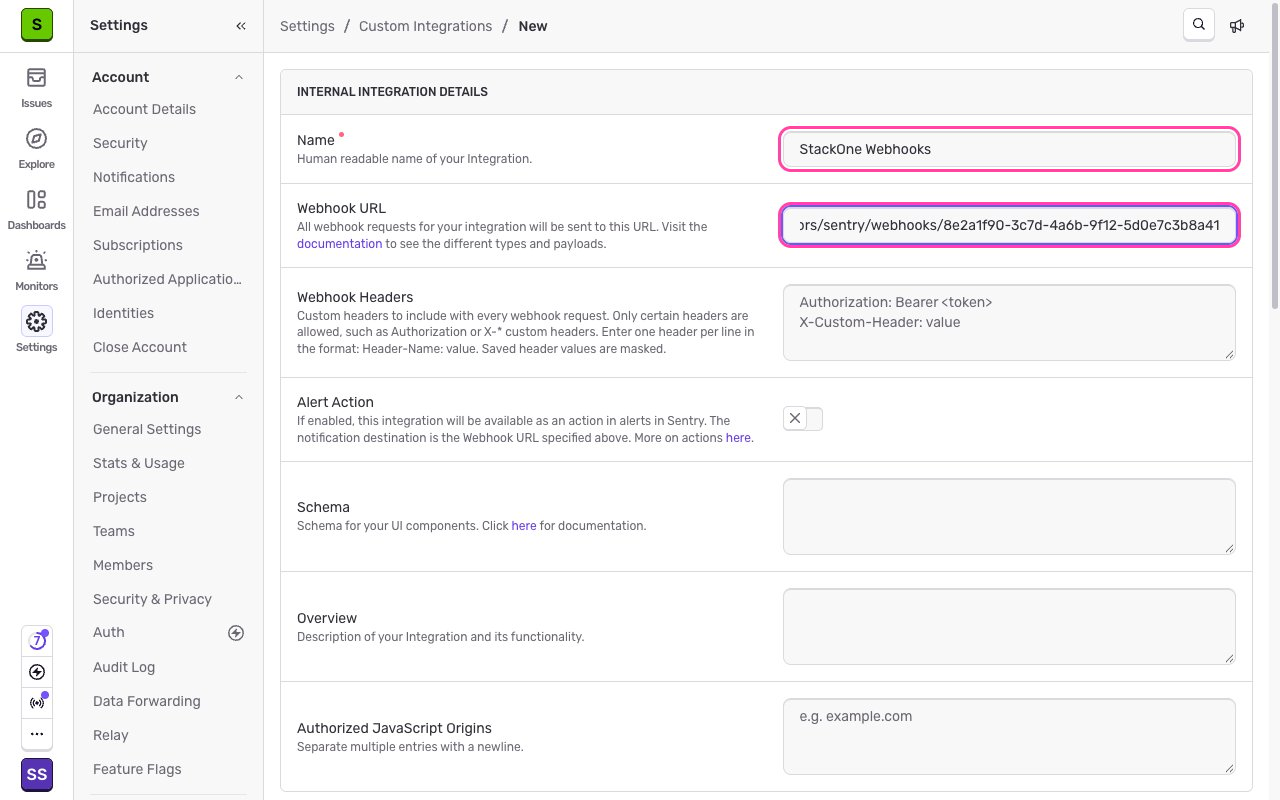
        <p>In <strong>Webhook URL</strong>, paste the StackOne Native Webhook URL. Leave <strong>Webhook Headers</strong> empty — StackOne does not require custom headers.</p>

        <img src="https://mintcdn.com/stackone-60/J7GS-fOGaEoHxPig/connectors/sentry/images/events-webhook-url.png?fit=max&auto=format&n=J7GS-fOGaEoHxPig&q=85&s=2f1ae9396c8654bfba6b96341590aefa" alt="The Internal Integration Details form with the Name and Webhook URL fields highlighted" width="1280" height="800" data-path="connectors/sentry/images/events-webhook-url.png" />
      </div>
    </Step>

    <Step title="Enable Alert Action">
      <div data-guide-step data-guide-scopes="" data-guide-display-scopes-list="">
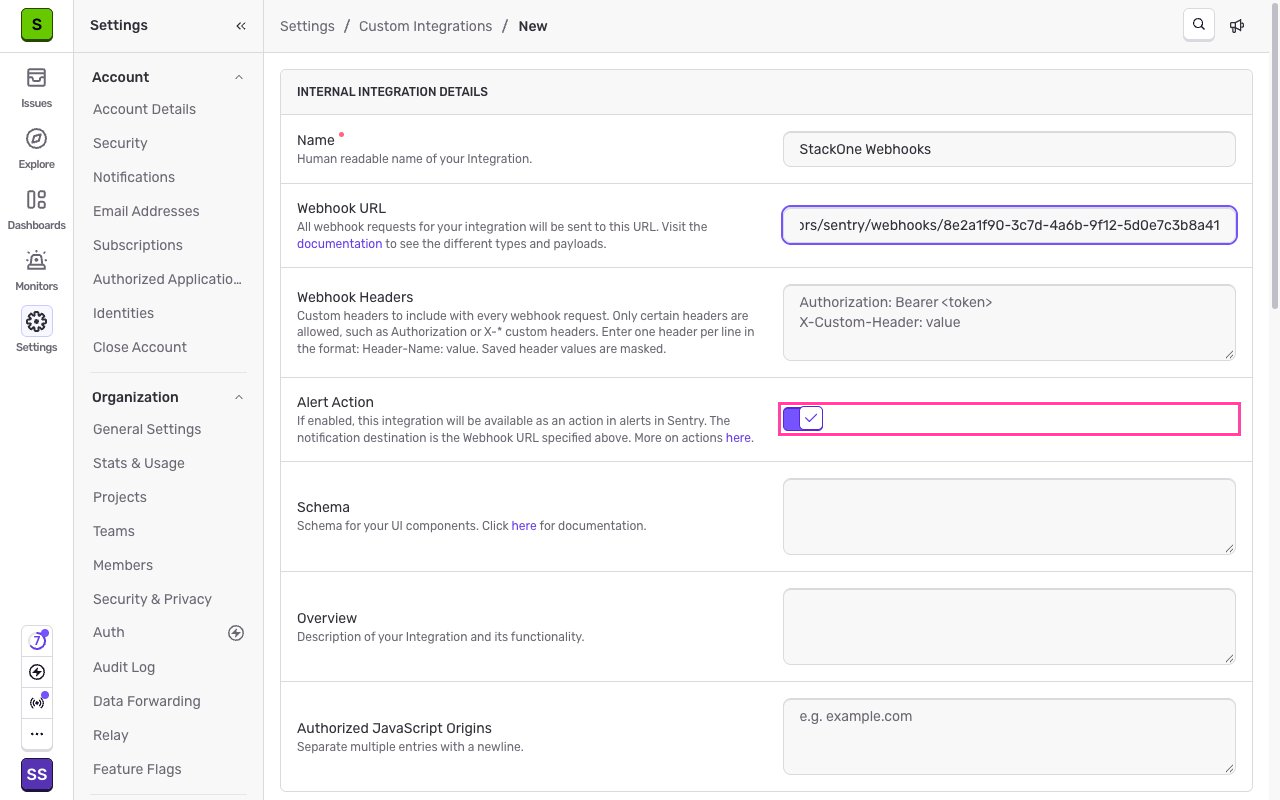
        <p>Turn on <strong>Alert Action</strong>. This makes the integration available as an action in Sentry alerts and is required for issue alert and metric alert webhooks. The toggle stays locked until a <strong>Webhook URL</strong> is filled in.</p>

        <img src="https://mintcdn.com/stackone-60/J7GS-fOGaEoHxPig/connectors/sentry/images/events-alert-action.png?fit=max&auto=format&n=J7GS-fOGaEoHxPig&q=85&s=d11c66ccebadc4cb42d49a3d67734f7b" alt="The Alert Action toggle switched on" width="1280" height="800" data-path="connectors/sentry/images/events-alert-action.png" />
      </div>
    </Step>

    <Step title="Grant read access to issues and events">
      <div data-guide-step data-guide-scopes="" data-guide-display-scopes-list="">
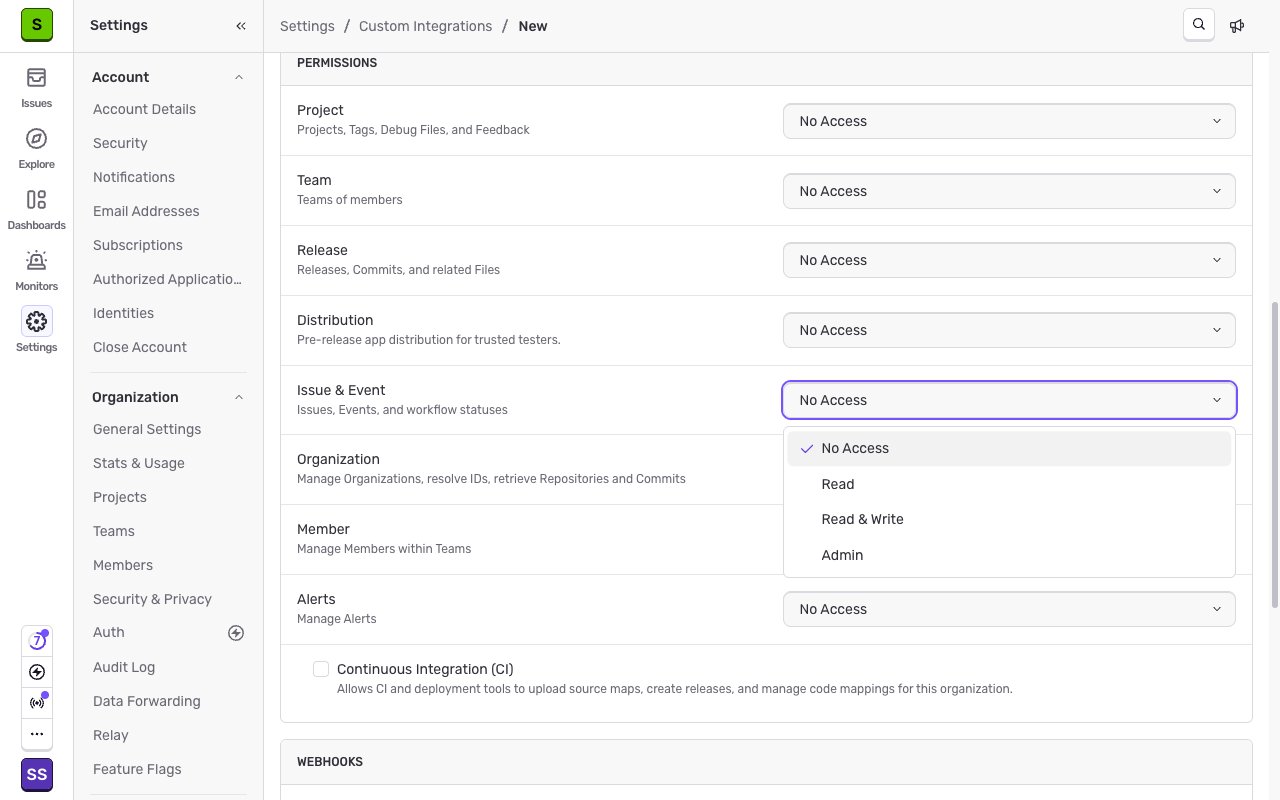
        <p>Under <strong>Permissions</strong>, set <strong>Issue & Event</strong> to at least <strong>Read</strong>. The webhook checkboxes stay greyed out until the integration has read access to the resource.</p>

        <img src="https://mintcdn.com/stackone-60/J7GS-fOGaEoHxPig/connectors/sentry/images/events-issue-event-permission.png?fit=max&auto=format&n=J7GS-fOGaEoHxPig&q=85&s=6b72784b569fd0bfebd67876b447ba96" alt="The Permissions section with the Issue and Event dropdown open on Read" width="1280" height="800" data-path="connectors/sentry/images/events-issue-event-permission.png" />
      </div>
    </Step>

    <Step title="Select the webhook events">
      <div data-guide-step data-guide-scopes="" data-guide-display-scopes-list="">
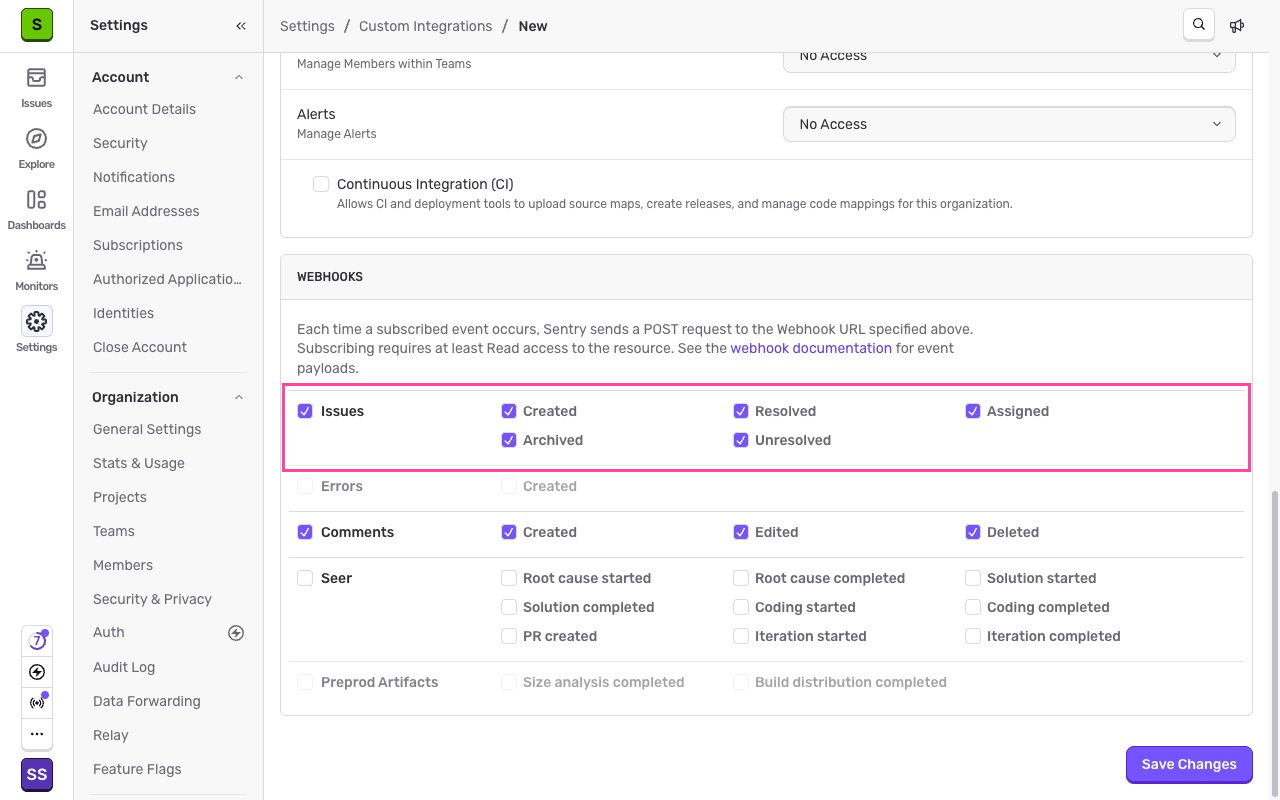
        <p>Under <strong>WEBHOOKS</strong>, tick the resources you want Sentry to send. Ticking a resource name (for example <strong>Issues</strong>) selects all of its events.</p>

        <ul>
          <li>Tick <strong>Issues</strong> for the <strong>Created</strong>, <strong>Resolved</strong>, <strong>Assigned</strong>, <strong>Archived</strong>, and <strong>Unresolved</strong> events.</li>
          <li>Tick <strong>Comments</strong> for the <strong>Created</strong>, <strong>Edited</strong>, and <strong>Deleted</strong> events.</li>
          <li><strong>Errors</strong> is only selectable on Business and Enterprise plans. It stays greyed out on other plans.</li>
        </ul>

        <img src="https://mintcdn.com/stackone-60/J7GS-fOGaEoHxPig/connectors/sentry/images/events-select-events.png?fit=max&auto=format&n=J7GS-fOGaEoHxPig&q=85&s=6e591927f4e9ab7434e3c6de6628720f" alt="The WEBHOOKS section with the Issues and Comments resources ticked" width="1280" height="800" data-path="connectors/sentry/images/events-select-events.png" />
      </div>
    </Step>

    <Step title="Save the integration">
      <div data-guide-step data-guide-scopes="" data-guide-display-scopes-list="">
        <p>Click <strong>Save Changes</strong>. Sentry confirms with a success message and sends an `installation.created` webhook to the URL straight away. If you created the integration in this guide, scroll to the <strong>Token</strong> table, click <strong>+ New Token</strong>, and use that token as the connection's <strong>Auth Token</strong> in StackOne Hub.</p>
      </div>
    </Step>
  </Steps>
</section>

<section data-guide-section data-guide-scopes="">
  <h2>Route issue alerts and metric alerts to StackOne</h2>

  <p>The `event_alert` and `metric_alert` webhooks are not sent by the webhook checkboxes. Sentry only sends them when an alert names your integration as its action, so add that action to every alert whose triggers you want to receive.</p>

  <Steps>
    <Step title="Create or edit an alert">
      <div data-guide-step data-guide-scopes="" data-guide-display-scopes-list="">
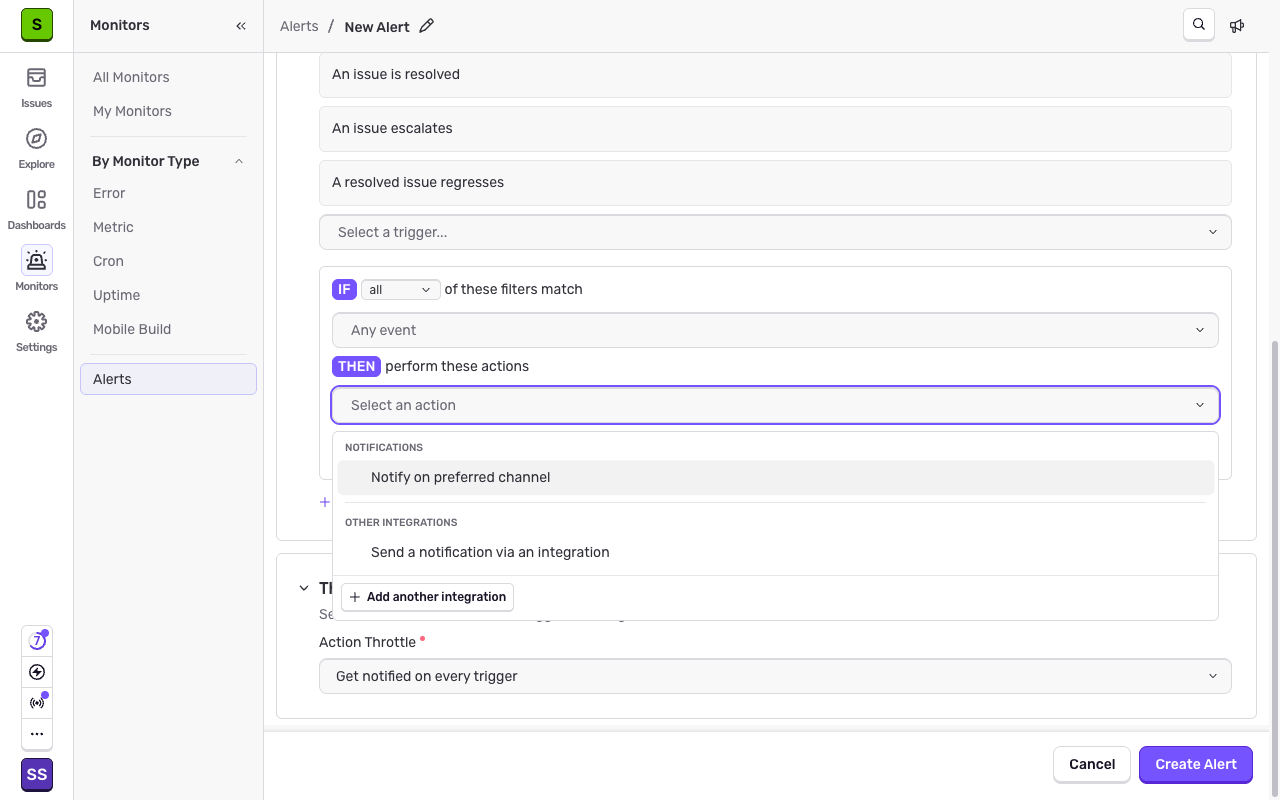
        <p>Navigate to <strong>Monitors</strong> > <strong>Alerts</strong> and open an existing alert, or create a new one. Under <strong>THEN perform these actions</strong>, open <strong>Select an action</strong> and choose <strong>Send a notification via an integration</strong> under <strong>OTHER INTEGRATIONS</strong>.</p>

        <img src="https://mintcdn.com/stackone-60/J7GS-fOGaEoHxPig/connectors/sentry/images/events-alert-rule-action.png?fit=max&auto=format&n=J7GS-fOGaEoHxPig&q=85&s=d04774693cd4e632be53dc45deec1fca" alt="The Select an action dropdown with Send a notification via an integration highlighted" width="1280" height="800" data-path="connectors/sentry/images/events-alert-rule-action.png" />
      </div>
    </Step>

    <Step title="Select your integration">
      <div data-guide-step data-guide-scopes="" data-guide-display-scopes-list="">
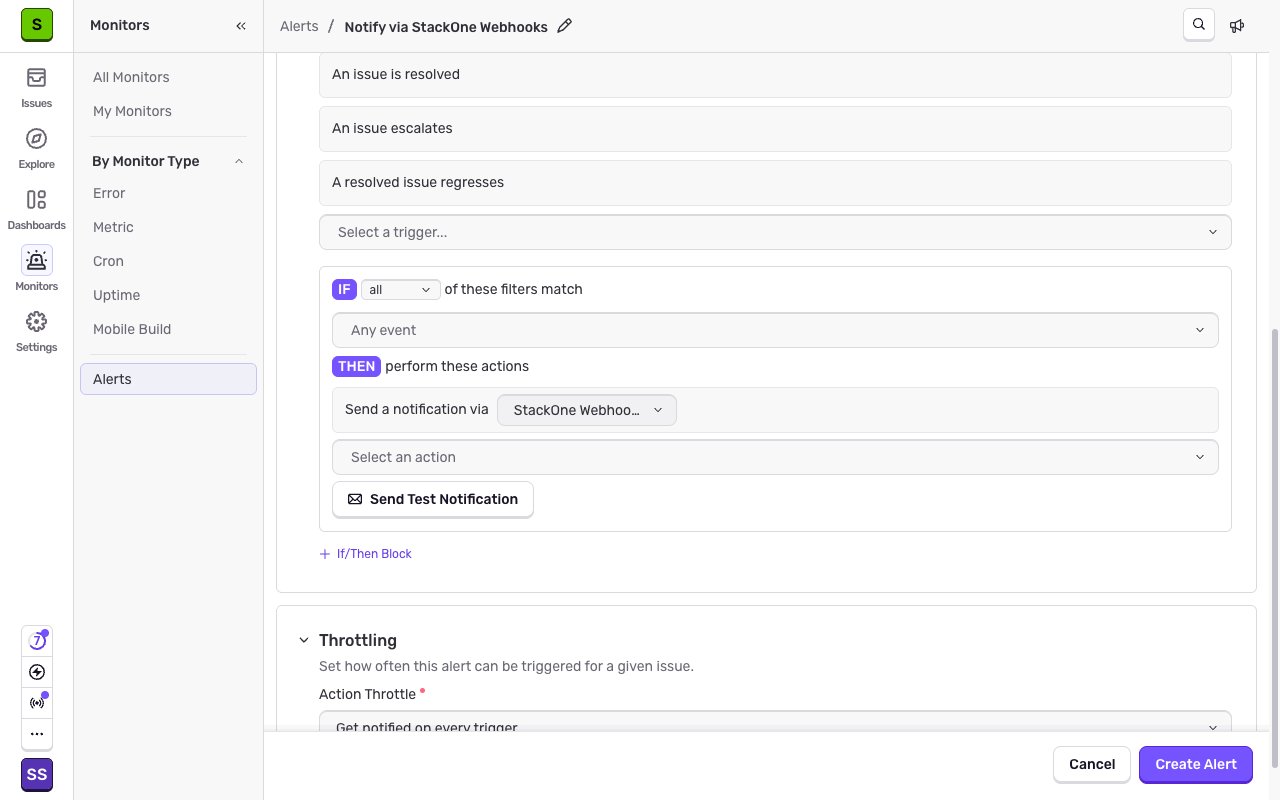
        <p>In the <strong>Send a notification via</strong> dropdown, select the integration that holds your Native Webhook URL, then click <strong>Create Alert</strong>. Each time this alert fires, Sentry posts an `event_alert.triggered` webhook to StackOne.</p>

        <img src="https://mintcdn.com/stackone-60/J7GS-fOGaEoHxPig/connectors/sentry/images/events-alert-rule-integration.png?fit=max&auto=format&n=J7GS-fOGaEoHxPig&q=85&s=6978fa347bdfc05e5027250f580d0c30" alt="The alert action set to send a notification via the StackOne Integration custom integration" width="1280" height="800" data-path="connectors/sentry/images/events-alert-rule-integration.png" />
      </div>
    </Step>

    <Step title="Cover metric monitors">
      <div data-guide-step data-guide-scopes="" data-guide-display-scopes-list="">
        <p>Metric alert webhooks come from metric monitors. Open <strong>Monitors</strong> > <strong>Metric</strong>, open or create a monitor, and under <strong>Alert</strong> use <strong>Connect Existing Alerts</strong> or <strong>Create New Alert</strong> so the monitor fires an alert that notifies your integration.</p>
      </div>
    </Step>
  </Steps>
</section>

<section data-guide-section data-guide-scopes="">
  <h2>Available webhook events</h2>

  <p>The events below can be enabled for this connection. Sentry only delivers the resources ticked on the integration (plus any alert that names it as an action), and StackOne only dispatches the events you enable in StackOne.</p>

  <Steps>
    <Step title="Installation events">
      <div data-guide-step data-guide-scopes="" data-guide-display-scopes-list="">
        <p>Sent automatically once a Webhook URL is set. No checkbox controls these.</p>

        <ul>
          <li><strong>Installation Created</strong> (`installation.created`) — Fired when the integration is installed on the organization, which happens as soon as an internal integration is saved.</li>
          <li><strong>Installation Deleted</strong> (`installation.deleted`) — Fired when the integration is removed from the organization.</li>
        </ul>
      </div>
    </Step>

    <Step title="Issue events">
      <div data-guide-step data-guide-scopes="" data-guide-display-scopes-list="">
        <p>Enable the <strong>Issues</strong> resource. Requires <strong>Issue & Event</strong> read permission.</p>

        <ul>
          <li><strong>Issue Created</strong> (`issue.created`) — Fired when a new issue is created in a project.</li>
          <li><strong>Issue Resolved</strong> (`issue.resolved`) — Fired when an issue is marked as resolved.</li>
          <li><strong>Issue Assigned</strong> (`issue.assigned`) — Fired when an issue is assigned to a user or team.</li>
          <li><strong>Issue Archived</strong> (`issue.archived`) — Fired when an issue is archived or ignored.</li>
          <li><strong>Issue Unresolved</strong> (`issue.unresolved`) — Fired when an issue is reopened, either manually or because it regressed.</li>
        </ul>
      </div>
    </Step>

    <Step title="Comment events">
      <div data-guide-step data-guide-scopes="" data-guide-display-scopes-list="">
        <p>Enable the <strong>Comments</strong> resource. Requires <strong>Issue & Event</strong> read permission.</p>

        <ul>
          <li><strong>Comment Created</strong> (`comment.created`) — Fired when a comment is added to an issue.</li>
          <li><strong>Comment Updated</strong> (`comment.updated`) — Fired when an existing comment is edited. Shown as <strong>Edited</strong> in the Sentry UI.</li>
          <li><strong>Comment Deleted</strong> (`comment.deleted`) — Fired when a comment is removed from an issue.</li>
        </ul>
      </div>
    </Step>

    <Step title="Error events">
      <div data-guide-step data-guide-scopes="" data-guide-display-scopes-list="">
        <p>Enable the <strong>Errors</strong> resource. Available on Business and Enterprise plans only, and high volume because every error event is sent.</p>

        <ul>
          <li><strong>Error Created</strong> (`error.created`) — Fired for every individual error event ingested by a project, not just the first one in an issue.</li>
        </ul>
      </div>
    </Step>

    <Step title="Alert events">
      <div data-guide-step data-guide-scopes="" data-guide-display-scopes-list="">
        <p>Not controlled by the webhook checkboxes. Sent only while <strong>Alert Action</strong> is on and an alert names the integration as its action.</p>

        <ul>
          <li><strong>Issue Alert Triggered</strong> (`event_alert.triggered`) — Fired when an issue alert that notifies the integration is triggered.</li>
          <li><strong>Metric Alert Critical</strong> (`metric_alert.critical`) — Fired when a metric alert crosses its critical threshold.</li>
          <li><strong>Metric Alert Warning</strong> (`metric_alert.warning`) — Fired when a metric alert crosses its warning threshold.</li>
          <li><strong>Metric Alert Resolved</strong> (`metric_alert.resolved`) — Fired when a metric alert returns below its thresholds.</li>
        </ul>
      </div>
    </Step>
  </Steps>
</section>

## Verify

Your Connector should now be able to receive and process events. Try triggering an event and you should see an Event appear in the Connector logs.


This documentation is built and hosted on [Mintlify](https://mintlify.com), a developer documentation platform.