> ## Documentation Index
> Fetch the complete documentation index at: https://docs.stackone.com/llms.txt
> Use this file to discover all available pages before exploring further.

# OneSignal Webhook Setup Guide

> Configure OneSignal to deliver events to StackOne.

## Prerequisites

The connector should already be set up, with a Connector Profile and a Linked Account. See [Getting Started](/connectors/onesignal#getting-started) on the OneSignal connector page.

<section data-guide-section data-guide-scopes="">
  <h2>Create the Event Stream</h2>

  <p>OneSignal delivers events through an Event Stream you configure in the dashboard. There is no API for creating one, so this is done by hand. Configure a single stream pointed at your StackOne Native Webhook URL.</p>

  <Steps>
    <Step title="Retrieve your StackOne Native Webhook URL">
      <div data-guide-step data-guide-scopes="" data-guide-display-scopes-list="">
        <p>The <strong>Native Webhook URL</strong> is generated once an account has been linked. You will paste it into OneSignal in a later step.</p>

        <ul>
          <li>Open the linked account in StackOne.</li>
          <li>Copy the value from <strong>Native Webhook URL</strong>.</li>
        </ul>
      </div>
    </Step>

    <Step title="Sign in to OneSignal">
      <div data-guide-step data-guide-scopes="" data-guide-display-scopes-list="">
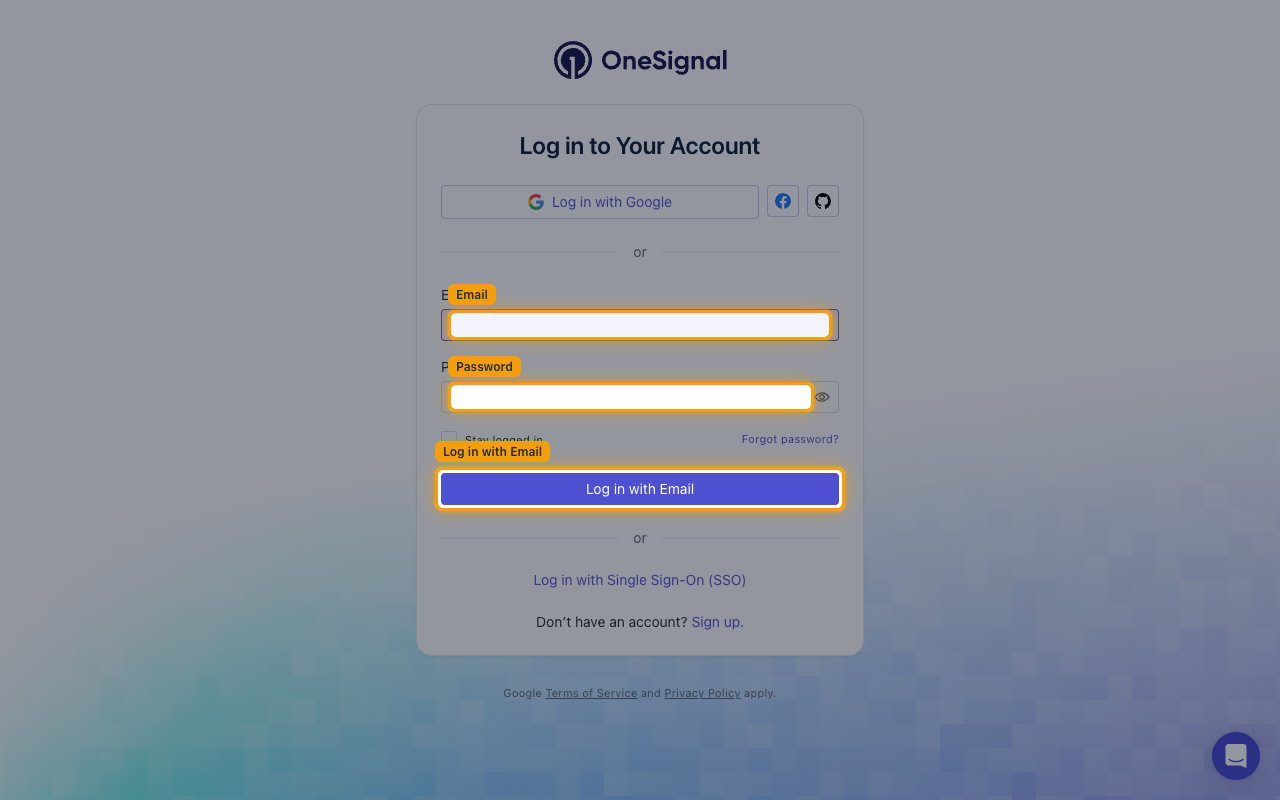
        <p>Open the <a href="https://dashboard.onesignal.com" target="_blank" rel="noopener noreferrer">OneSignal dashboard</a> and sign in with the account whose API key you connected to StackOne. Enter your <strong>Email</strong> and <strong>Password</strong> on the <strong>Log in to Your Account</strong> screen, then click <strong>Log in with Email</strong>.</p>

        <img src="https://mintcdn.com/stackone-60/C0Rin-IsMhB4bTmN/connectors/onesignal/images/events-sign-in.png?fit=max&auto=format&n=C0Rin-IsMhB4bTmN&q=85&s=16c04f4de04eb2890734549e808b3725" alt="The OneSignal Log in to Your Account screen with the Email and Password fields and the Log in with Email button highlighted." width="1280" height="800" data-path="connectors/onesignal/images/events-sign-in.png" />
      </div>
    </Step>

    <Step title="Open the Event Streams page">
      <div data-guide-step data-guide-scopes="" data-guide-display-scopes-list="">
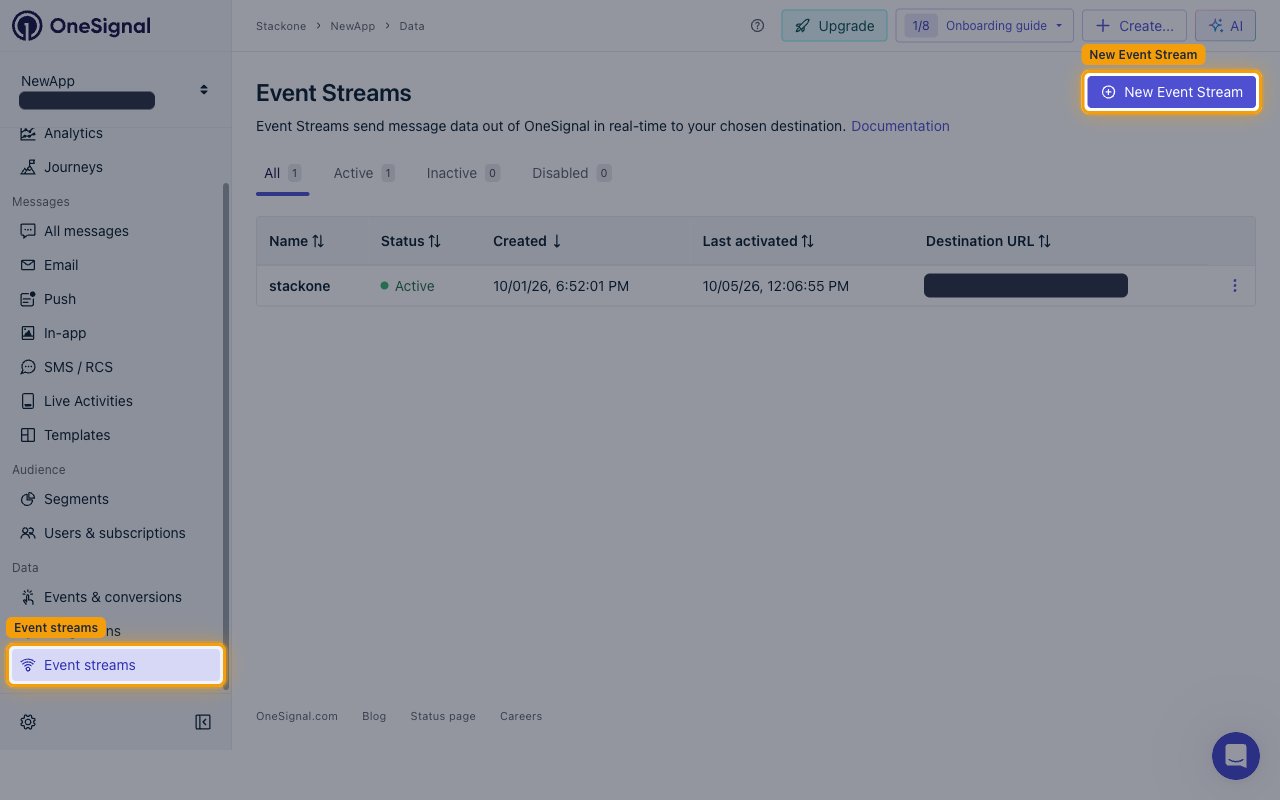
        <p>Select the app you connected to StackOne, then click <strong>Event streams</strong> under <strong>Data</strong> in the sidebar. Click <strong>New Event Stream</strong> in the top right.</p>

        <ul>
          <li>The page lists existing streams by <strong>Name</strong>, <strong>Status</strong>, <strong>Created</strong>, <strong>Last activated</strong> and <strong>Destination URL</strong>, with <strong>All</strong>, <strong>Active</strong>, <strong>Inactive</strong> and <strong>Disabled</strong> tabs above them.</li>
        </ul>

        <img src="https://mintcdn.com/stackone-60/C0Rin-IsMhB4bTmN/connectors/onesignal/images/events-open-event-streams.png?fit=max&auto=format&n=C0Rin-IsMhB4bTmN&q=85&s=f90c6223f4df4c00534ea67555a9bc57" alt="The OneSignal Event Streams page with the Event streams sidebar entry and the New Event Stream button highlighted." width="1280" height="800" data-path="connectors/onesignal/images/events-open-event-streams.png" />
      </div>
    </Step>

    <Step title="Name the stream and open the event picker">
      <div data-guide-step data-guide-scopes="" data-guide-display-scopes-list="">
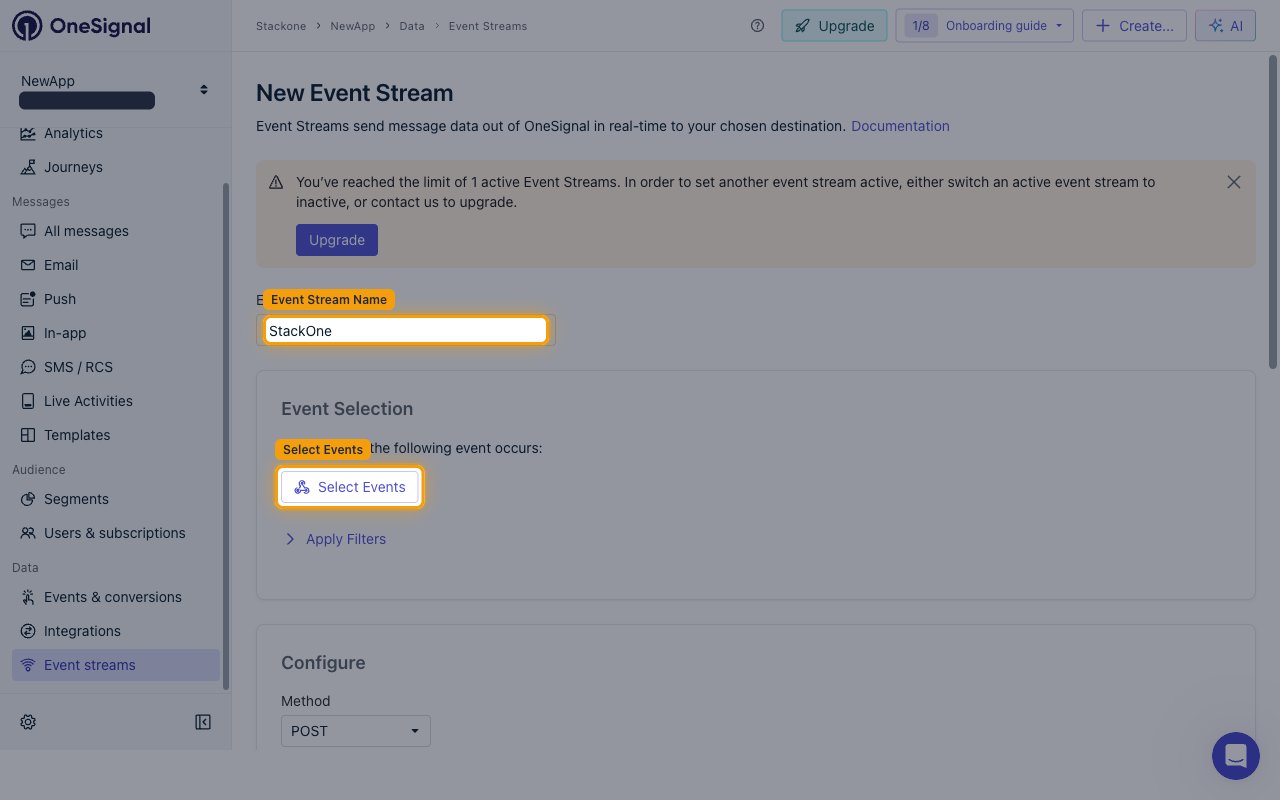
        <p>Type a name you will recognise later into <strong>Event Stream Name</strong>, for example `StackOne`. Under <strong>Event Selection</strong>, click <strong>Select Events</strong>.</p>

        <ul>
          <li>Free plans allow one active Event Stream. If you already have one, OneSignal shows <strong>You’ve reached the limit of 1 active Event Streams</strong> and you must set the existing stream inactive or upgrade before activating another.</li>
        </ul>

        <img src="https://mintcdn.com/stackone-60/C0Rin-IsMhB4bTmN/connectors/onesignal/images/events-new-stream.png?fit=max&auto=format&n=C0Rin-IsMhB4bTmN&q=85&s=21afc3cd080470b7d4185d6d6ff20a70" alt="The New Event Stream page with the Event Stream Name field filled in and the Select Events button highlighted." width="1280" height="800" data-path="connectors/onesignal/images/events-new-stream.png" />
      </div>
    </Step>

    <Step title="Select the event types">
      <div data-guide-step data-guide-scopes="" data-guide-display-scopes-list="">
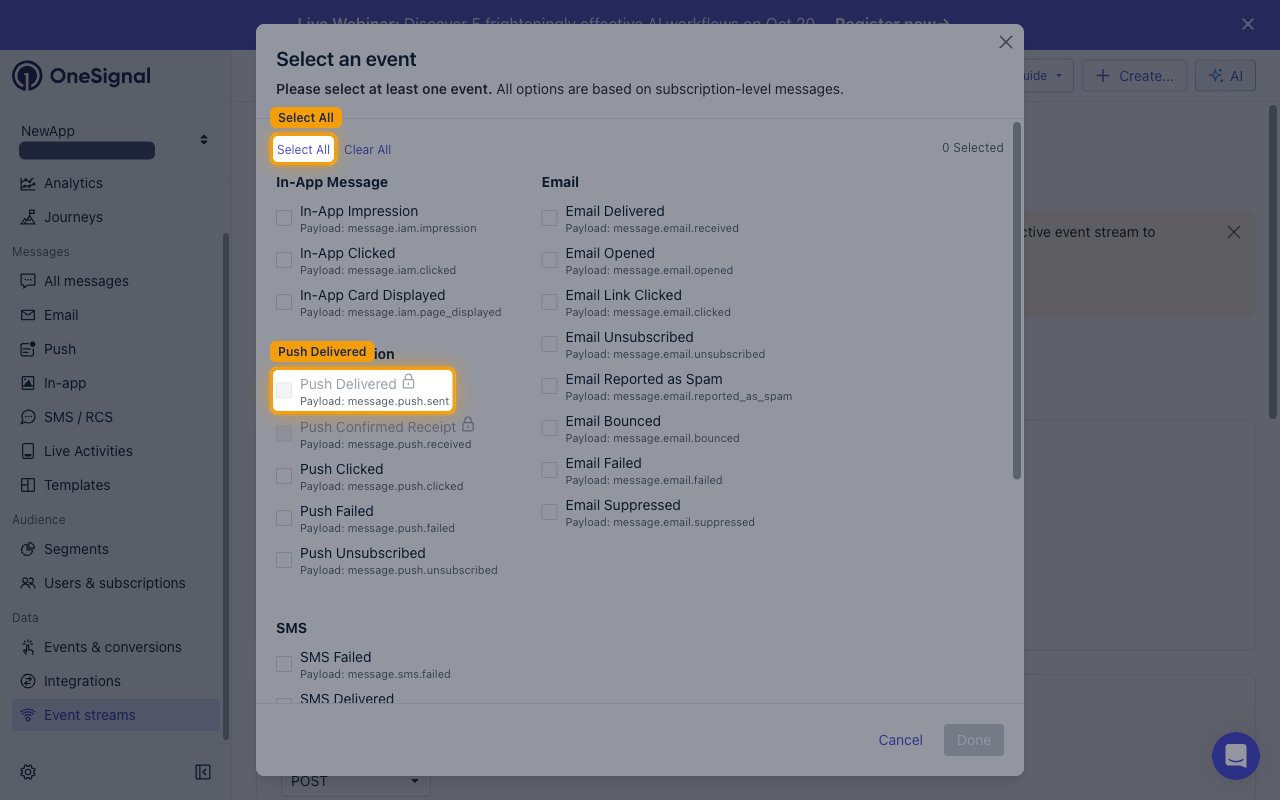
        <p>The <strong>Select an event</strong> dialog groups every event by channel — <strong>In-App Message</strong>, <strong>Push Notification</strong>, <strong>Email</strong>, <strong>SMS</strong> and <strong>Live Activity</strong> — and shows each event's payload name beneath it. Tick the events you want delivered, then click <strong>Done</strong>.</p>

        <ul>
          <li><strong>Select All</strong> ticks every event your plan allows; <strong>Clear All</strong> empties the selection.</li>
          <li>Events your plan cannot receive are greyed out with a padlock.</li>
          <li>Each event counts toward your plan's message-event volume. A single send to 100,000 users produces 100,000 delivery events on its own, so select only what you need.</li>
          <li><strong>Apply Filters</strong> on the previous screen narrows a stream to specific messages or templates instead of all traffic.</li>
        </ul>

        <img src="https://mintcdn.com/stackone-60/C0Rin-IsMhB4bTmN/connectors/onesignal/images/events-select-events.png?fit=max&auto=format&n=C0Rin-IsMhB4bTmN&q=85&s=4bdaba623974b4df0d44620d589c6cad" alt="The Select an event dialog with events grouped by channel, the Select All control and the Push Delivered option highlighted, and plan-locked events greyed out behind padlocks." width="1280" height="800" data-path="connectors/onesignal/images/events-select-events.png" />
      </div>
    </Step>

    <Step title="Set the method, URL and Content-Type header">
      <div data-guide-step data-guide-scopes="" data-guide-display-scopes-list="">
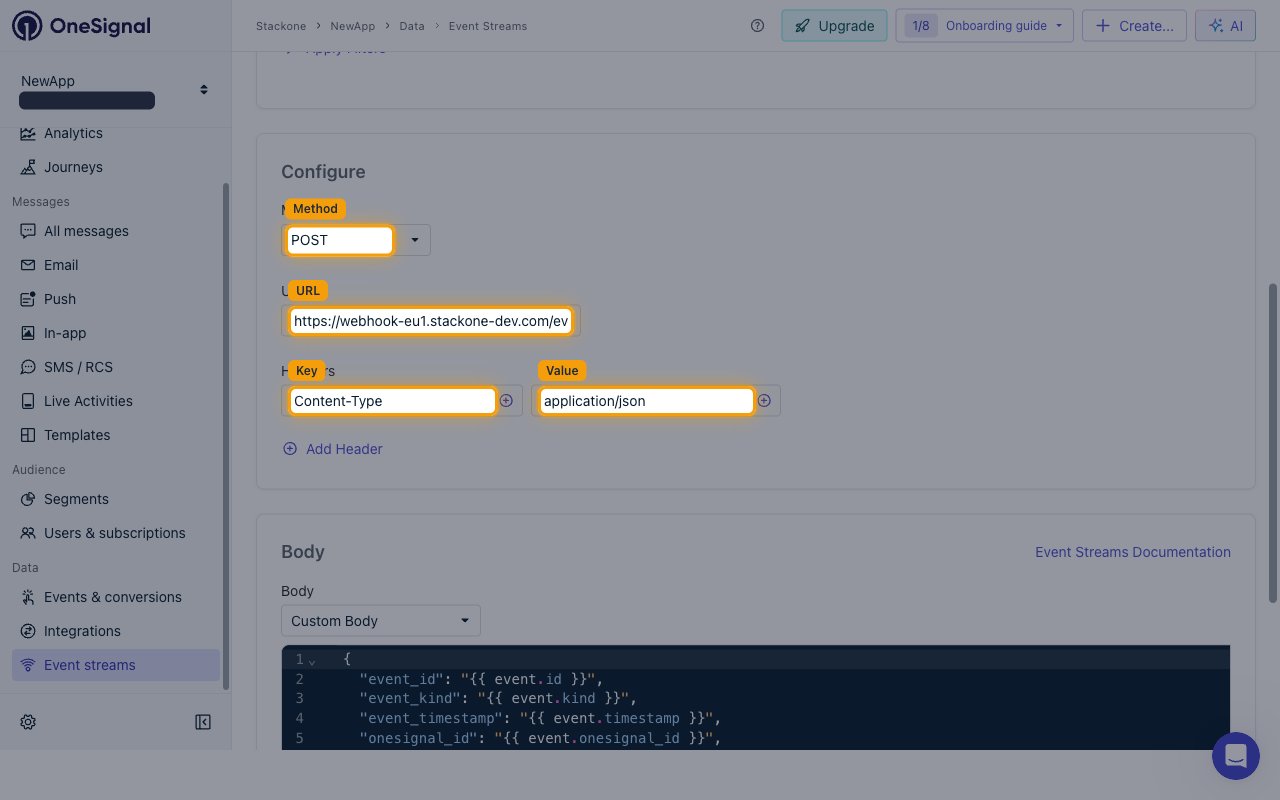
        <p>Under <strong>Configure</strong>, leave <strong>Method</strong> on `POST` and paste your <strong>Native Webhook URL</strong> into <strong>URL</strong>. Under <strong>Headers</strong>, enter `Content-Type` as the <strong>Key</strong> and `application/json` as the <strong>Value</strong>.</p>

        <ul>
          <li>The <strong>Content-Type</strong> header is required. OneSignal sends no content type of its own, and without it StackOne cannot parse the body — every delivery fails with a 500.</li>
          <li>No authentication header is needed. StackOne authenticates the delivery using the token already in the <strong>Native Webhook URL</strong>.</li>
          <li><strong>Add Header</strong> adds further rows if you need them.</li>
        </ul>

        <img src="https://mintcdn.com/stackone-60/C0Rin-IsMhB4bTmN/connectors/onesignal/images/events-configure.png?fit=max&auto=format&n=C0Rin-IsMhB4bTmN&q=85&s=06a4f628658727b5733a007b290ad074" alt="The Configure section with Method set to POST, the URL field, and the Headers row holding Content-Type and application/json, all highlighted." width="1280" height="800" data-path="connectors/onesignal/images/events-configure.png" />
      </div>
    </Step>

    <Step title="Paste the JSON body">
      <div data-guide-step data-guide-scopes="" data-guide-display-scopes-list="">
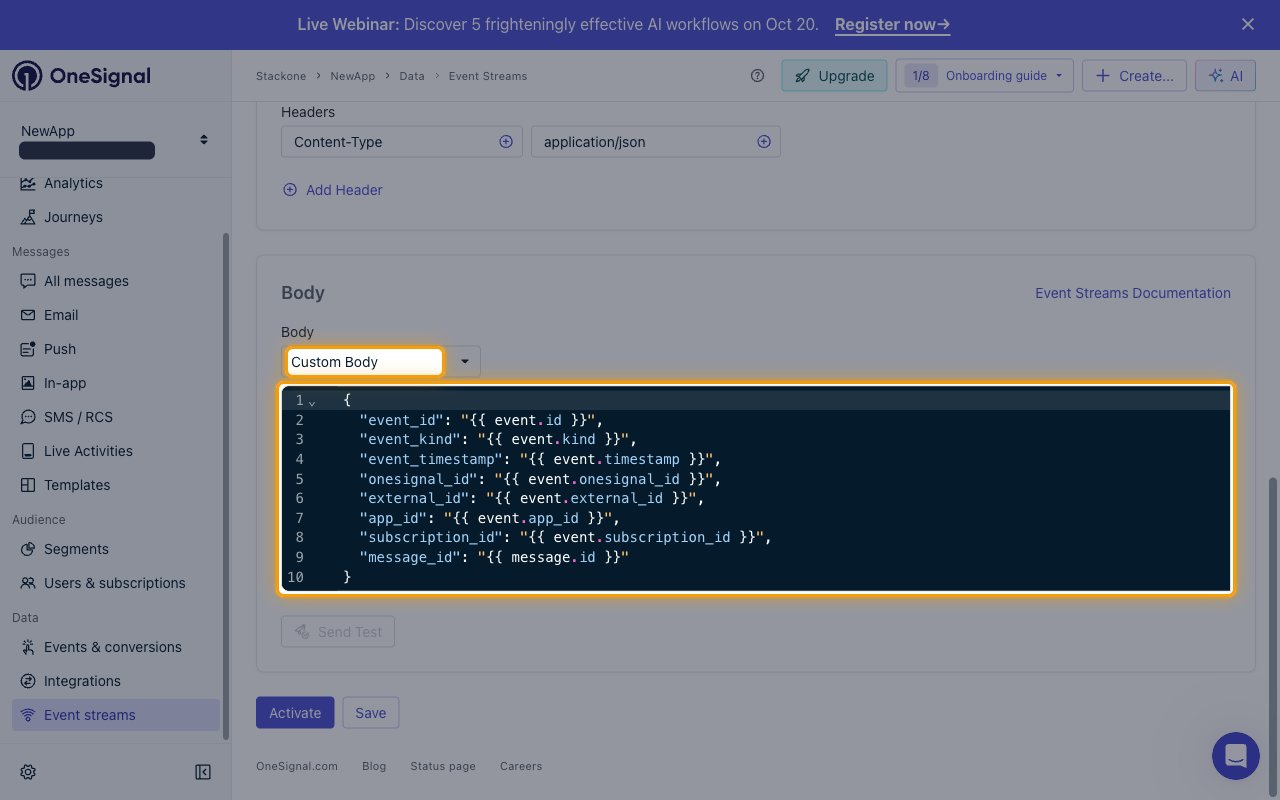
        <p>Under <strong>Body</strong>, set the dropdown to <strong>Custom Body</strong> and paste this template exactly. OneSignal fills the Liquid placeholders in at delivery time, and these key names are what the connector's event routing reads.</p>

        <ul>
          <li>Paste it as written. The keys are flat and underscored on purpose — OneSignal's documentation shows a form with dotted keys like `"event.kind"`, which cannot be routed.</li>
          <li>Adding extra fields is safe. Removing `event_kind`, `message_id` or `event_timestamp` is not — routing, record ids and event times come from those three.</li>

          <li>
            ```json theme={null}
            {
              "event_id": "{{ event.id }}",
              "event_kind": "{{ event.kind }}",
              "event_timestamp": "{{ event.timestamp }}",
              "onesignal_id": "{{ event.onesignal_id }}",
              "external_id": "{{ event.external_id }}",
              "app_id": "{{ event.app_id }}",
              "subscription_id": "{{ event.subscription_id }}",
              "message_id": "{{ message.id }}"
            }
            ```
          </li>
        </ul>

        <img src="https://mintcdn.com/stackone-60/C0Rin-IsMhB4bTmN/connectors/onesignal/images/events-custom-body.png?fit=max&auto=format&n=C0Rin-IsMhB4bTmN&q=85&s=8a4b2dcdc0e46ca488e5e6fa911b8be8" alt="The Body section set to Custom Body with the JSON template in the editor, highlighted, and the Content-Type header visible above." width="1280" height="800" data-path="connectors/onesignal/images/events-custom-body.png" />
      </div>
    </Step>

    <Step title="Save and activate the stream">
      <div data-guide-step data-guide-scopes="" data-guide-display-scopes-list="">
        <p>Click <strong>Send Test</strong> to post a sample request, then <strong>Save</strong> to keep the configuration and <strong>Activate</strong> to start delivering live events.</p>
      </div>
    </Step>
  </Steps>
</section>

<section data-guide-section data-guide-scopes="">
  <h2>Confirm events are reaching StackOne</h2>

  <p>Each stream has its own <strong>Report</strong> and <strong>Logs</strong> tabs. Use them to tell a delivery problem from a mapping one when events are not arriving.</p>

  <Steps>
    <Step title="Check the delivery statistics">
      <div data-guide-step data-guide-scopes="" data-guide-display-scopes-list="">
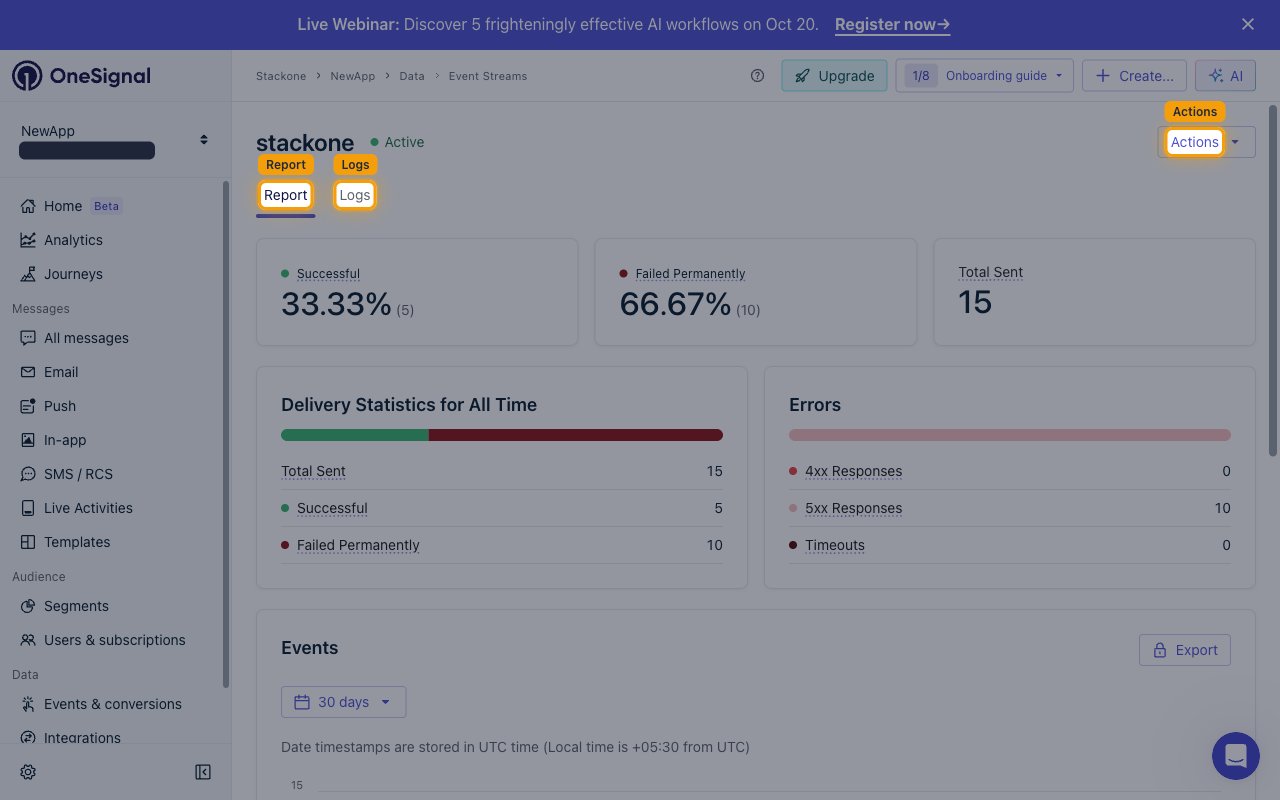
        <p>The <strong>Report</strong> tab shows <strong>Successful</strong>, <strong>Failed Permanently</strong> and <strong>Total Sent</strong> for all time, alongside an <strong>Errors</strong> panel counting <strong>4xx Responses</strong>, <strong>5xx Responses</strong> and <strong>Timeouts</strong>. The <strong>Actions</strong> menu in the top right holds the stream's own controls.</p>

        <ul>
          <li>A run of <strong>5xx Responses</strong> with no <strong>4xx Responses</strong> usually means StackOne could not read the body — check that the <strong>Content-Type</strong> header is set.</li>
        </ul>

        <img src="https://mintcdn.com/stackone-60/C0Rin-IsMhB4bTmN/connectors/onesignal/images/events-report.png?fit=max&auto=format&n=C0Rin-IsMhB4bTmN&q=85&s=928fab193c89baa37875796747a244f2" alt="The Report tab showing Successful, Failed Permanently and Total Sent figures with the Errors panel, and the Report, Logs and Actions controls highlighted." width="1280" height="800" data-path="connectors/onesignal/images/events-report.png" />
      </div>
    </Step>

    <Step title="Review individual deliveries">
      <div data-guide-step data-guide-scopes="" data-guide-display-scopes-list="">
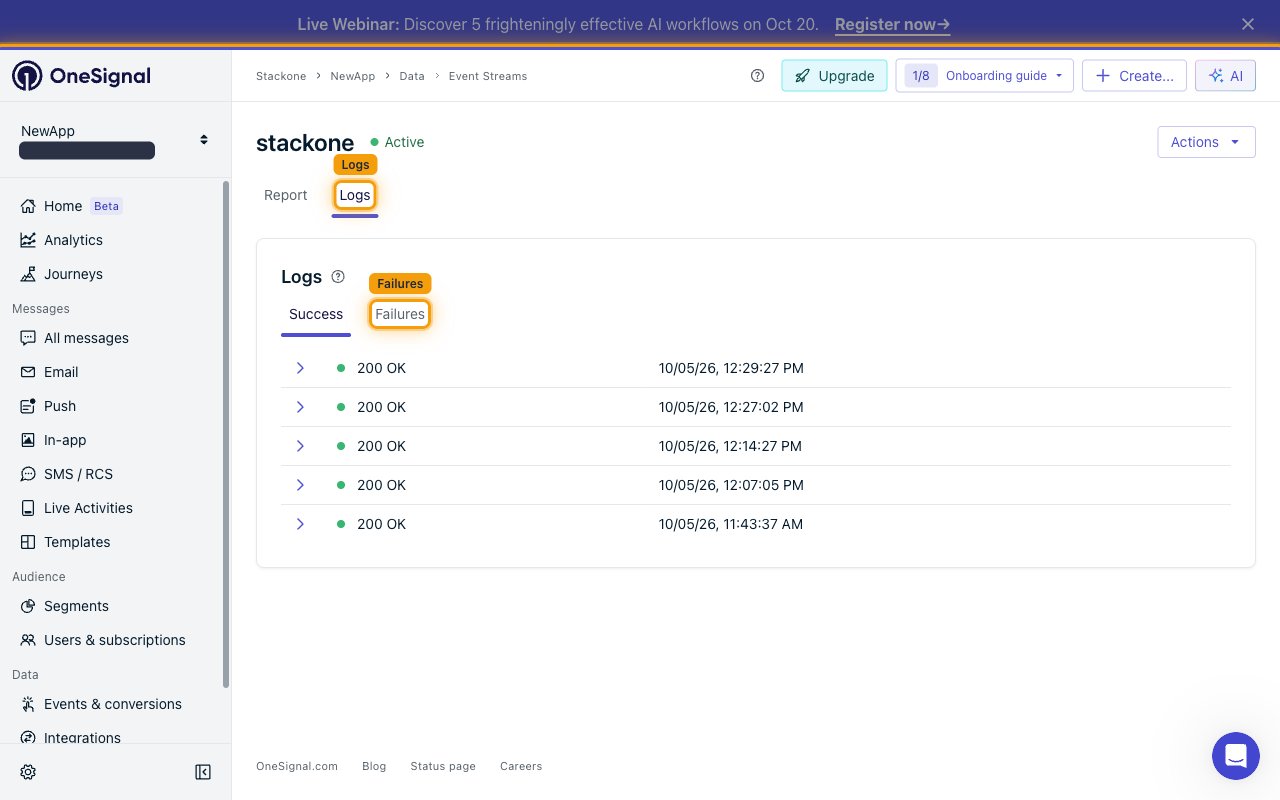
        <p>The <strong>Logs</strong> tab lists recent deliveries under <strong>Success</strong> and <strong>Failures</strong>, each with the response status and timestamp. Expand an entry to see the full request body, the headers OneSignal sent, and the response your endpoint returned.</p>

        <ul>
          <li>This is the fastest way to confirm what OneSignal actually sent — including whether the <strong>Content-Type</strong> header reached StackOne.</li>
          <li>A delivery that fails repeatedly is retried with increasing delays and then marked permanently failed. Sustained failures disable the whole stream, and admins are emailed before that happens.</li>
        </ul>

        <img src="https://mintcdn.com/stackone-60/C0Rin-IsMhB4bTmN/connectors/onesignal/images/events-logs.png?fit=max&auto=format&n=C0Rin-IsMhB4bTmN&q=85&s=044c45080f0be23933f7d6d2f4406c24" alt="The Logs tab with the Success and Failures sub-tabs and a list of deliveries returning 200 OK, with the Logs tab and Failures filter highlighted." width="1280" height="800" data-path="connectors/onesignal/images/events-logs.png" />
      </div>
    </Step>
  </Steps>
</section>

<section data-guide-section data-guide-scopes="">
  <h2>Available webhook events</h2>

  <p>The following event kinds can be selected. Only events ticked in OneSignal are delivered — nothing is sent for kinds that are not selected. The deprecated `message.email.sent` and `message.sms.sent` kinds cannot be added to new Event Streams and are not handled here; use <strong>Email Delivered</strong> and <strong>SMS Delivered</strong> instead.</p>

  <Steps>
    <Step title="Enable push notification events">
      <div data-guide-step data-guide-scopes="" data-guide-display-scopes-list="">
        <p>Events covering push notification delivery and interaction.</p>

        <ul>
          <li><strong>Push Delivered</strong> (`message.push.sent`) — Fired when a push notification is successfully delivered to the push service (FCM or APNs).</li>
          <li><strong>Push Confirmed Receipt</strong> (`message.push.received`) — Fired when a push notification is received on the device. Needs Confirmed receipt, which requires a paid plan, the OneSignal SDK on the device and a supported platform.</li>
          <li><strong>Push Clicked</strong> (`message.push.clicked`) — Fired when a user taps the push notification to open the app.</li>
          <li><strong>Push Failed</strong> (`message.push.failed`) — Fired when a push fails to be sent.</li>
          <li><strong>Push Unsubscribed</strong> (`message.push.unsubscribed`) — Fired for subscriptions that did not receive the notification because the app was uninstalled, browser data was cleared, or the user opted out. This is a reachability state detected at send time, not an opt-out triggered by this message.</li>
        </ul>
      </div>
    </Step>

    <Step title="Enable in-app message events">
      <div data-guide-step data-guide-scopes="" data-guide-display-scopes-list="">
        <p>Events covering in-app messages shown inside your app.</p>

        <ul>
          <li><strong>In-App Impression</strong> (`message.iam.impression`) — Fired when an in-app message is successfully displayed on the device.</li>
          <li><strong>In-App Clicked</strong> (`message.iam.clicked`) — Fired when a user taps an element on an in-app message.</li>
          <li><strong>In-App Card Displayed</strong> (`message.iam.page_displayed`) — Fired when an in-app message page is displayed. Useful for tracking carousels.</li>
        </ul>
      </div>
    </Step>

    <Step title="Enable email events">
      <div data-guide-step data-guide-scopes="" data-guide-display-scopes-list="">
        <p>Events covering email delivery, engagement and deliverability.</p>

        <ul>
          <li><strong>Email Delivered</strong> (`message.email.received`) — Fired when an email is received by the recipient.</li>
          <li><strong>Email Opened</strong> (`message.email.opened`) — Fired when an email is opened by the recipient.</li>
          <li><strong>Email Link Clicked</strong> (`message.email.clicked`) — Fired when a user taps a link in the email.</li>
          <li><strong>Email Unsubscribed</strong> (`message.email.unsubscribed`) — Fired when a user unsubscribes via the unsubscribe link.</li>
          <li><strong>Email Reported as Spam</strong> (`message.email.reported_as_spam`) — Fired when a user reports the email as spam. Gmail requires Google Postmaster Tools to track this.</li>
          <li><strong>Email Bounced</strong> (`message.email.bounced`) — Fired when an email is returned to sender due to a permanent error.</li>
          <li><strong>Email Failed</strong> (`message.email.failed`) — Fired when an email could not be delivered.</li>
          <li><strong>Email Suppressed</strong> (`message.email.suppressed`) — Fired when an email could not be sent because the address is on the suppression list.</li>
        </ul>
      </div>
    </Step>

    <Step title="Enable SMS events">
      <div data-guide-step data-guide-scopes="" data-guide-display-scopes-list="">
        <p>Events covering SMS delivery.</p>

        <ul>
          <li><strong>SMS Delivered</strong> (`message.sms.delivered`) — Fired when an SMS is successfully delivered.</li>
          <li><strong>SMS Failed</strong> (`message.sms.failed`) — Fired when an SMS fails to send.</li>
          <li><strong>SMS Undelivered</strong> (`message.sms.undelivered`) — Fired when an SMS could not be delivered.</li>
        </ul>
      </div>
    </Step>

    <Step title="Enable Live Activity events">
      <div data-guide-step data-guide-scopes="" data-guide-display-scopes-list="">
        <p>Events covering iOS Live Activities.</p>

        <ul>
          <li><strong>Live Activity Delivered</strong> (`message.live_activity.sent`) — Fired when a Live Activity is successfully sent to APNs.</li>
          <li><strong>Live Activity Confirmed Receipt</strong> (`message.live_activity.delivered`) — Fired when a Live Activity is received by the recipient.</li>
          <li><strong>Live Activity Clicked</strong> (`message.live_activity.clicked`) — Fired when a Live Activity is clicked by the user.</li>
          <li><strong>Live Activity Failed</strong> (`message.live_activity.failed`) — Fired when a Live Activity fails to send.</li>
          <li><strong>Live Activity Unsubscribed</strong> (`message.live_activity.unsubscribed`) — Fired when a user unsubscribes from Live Activities.</li>
        </ul>
      </div>
    </Step>
  </Steps>
</section>

## Verify

Your Connector should now be able to receive and process events. Try triggering an event and you should see an Event appear in the Connector logs.


This documentation is built and hosted on [Mintlify](https://mintlify.com), a developer documentation platform.