> ## Documentation Index
> Fetch the complete documentation index at: https://docs.stackone.com/llms.txt
> Use this file to discover all available pages before exploring further.

# Connect MongoDB Atlas with OAuth 2.0 - Service Account – StackOne Hub

> Link a MongoDB Atlas account in the StackOne Hub using OAuth 2.0 - Service Account. End-user guide to authorize the integration and start using MongoDB Atlas actions.

<Warning>You must have Organization Owner access to the MongoDB Atlas organization to create a service account.</Warning>

<section data-guide-section data-guide-scopes="">
  <h2>Create a service account</h2>

  <p>Create an organization-level service account in MongoDB Atlas to obtain OAuth 2.0 client credentials for the Atlas Administration API.</p>

  <Steps>
    <Step title="Sign in to MongoDB Atlas">
      <div data-guide-step data-guide-scopes="" data-guide-display-scopes-list="">
        <p>Sign in to your <a href="https://cloud.mongodb.com" target="_blank" rel="noopener noreferrer">MongoDB Atlas account</a>.</p>

        <ul>
          <li>Select your organization using the <strong>Organization</strong> selector at the top left.</li>
          <li>In the left sidebar, expand <strong>Identity & Access</strong> and click <strong>Applications</strong>.</li>
        </ul>
      </div>
    </Step>

    <Step title="Open the Service Accounts tab">
      <div data-guide-step data-guide-scopes="" data-guide-display-scopes-list="">
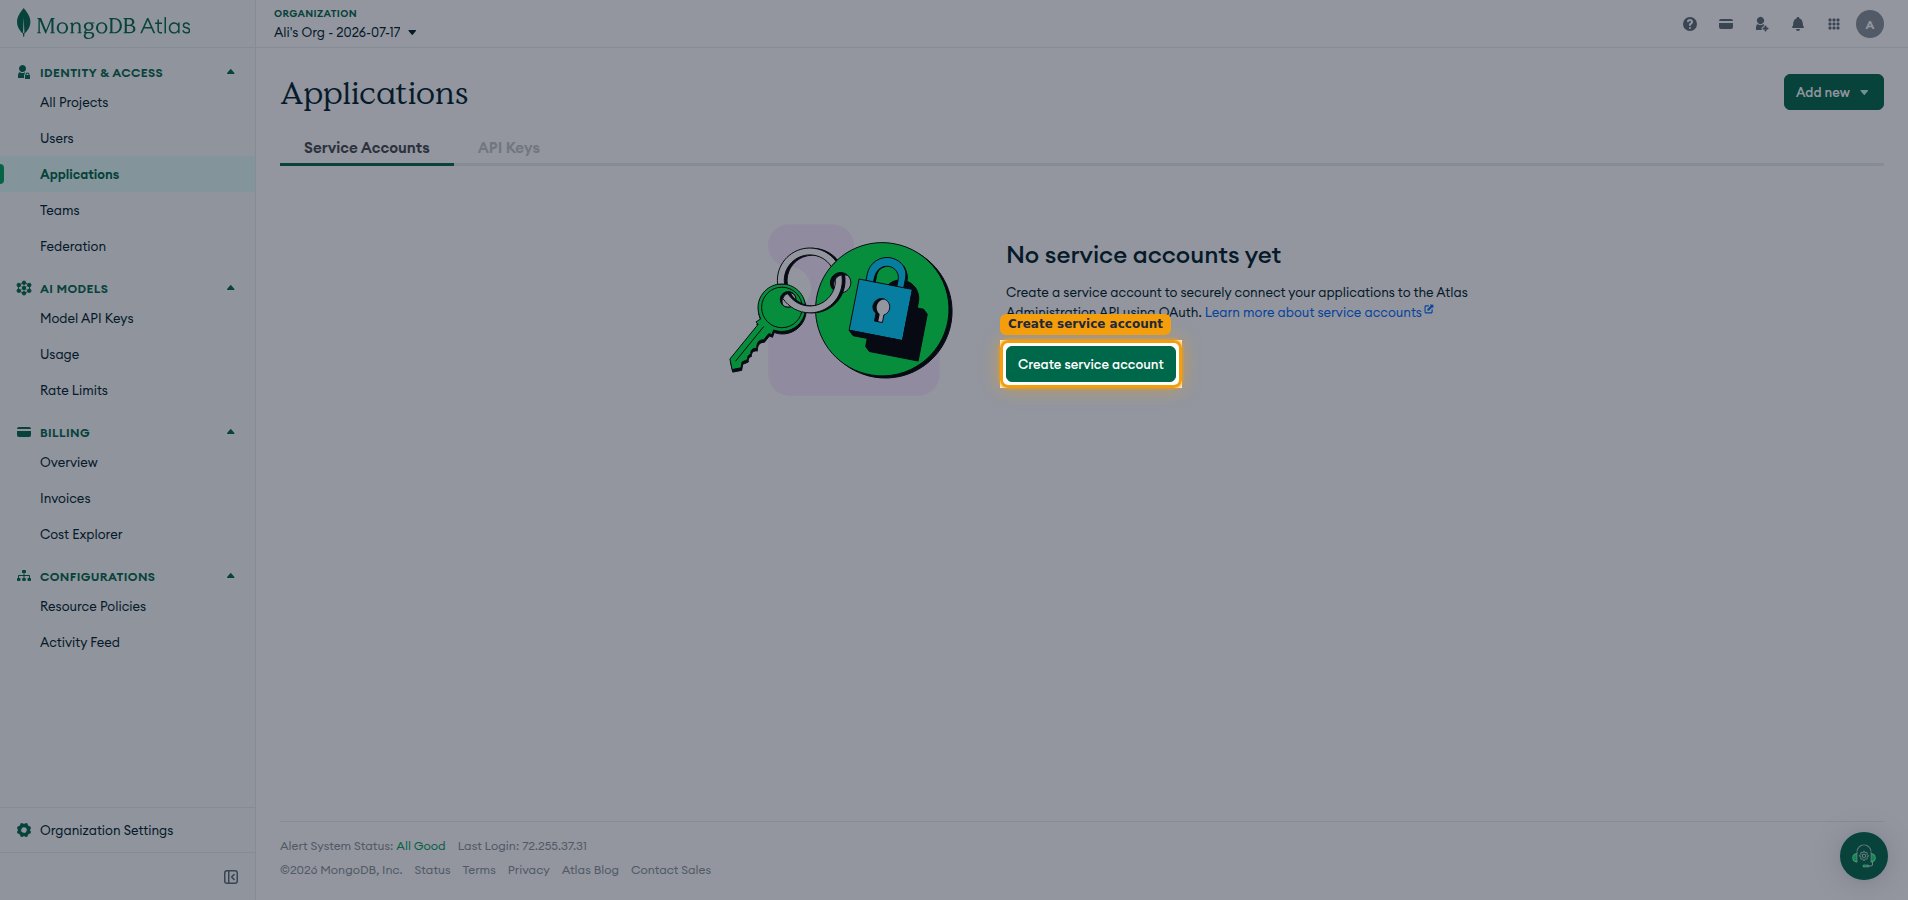
        <p>On the <strong>Applications</strong> page, select the <strong>Service Accounts</strong> tab.</p>

        <ul>
          <li>Click <strong>Create service account</strong>.</li>
        </ul>

        <img src="https://mintcdn.com/stackone-60/n4JWg_YTwGWEflTc/connectors/mongodb/images/oauth2-config-applications.png?fit=max&auto=format&n=n4JWg_YTwGWEflTc&q=85&s=4169cd693757b071980379cae78c5614" alt="The Applications page in MongoDB Atlas with the Service Accounts tab selected and the Create service account button highlighted." width="1908" height="900" data-path="connectors/mongodb/images/oauth2-config-applications.png" />
      </div>
    </Step>

    <Step title="Enter service account information">
      <div data-guide-step data-guide-scopes="" data-guide-display-scopes-list="">
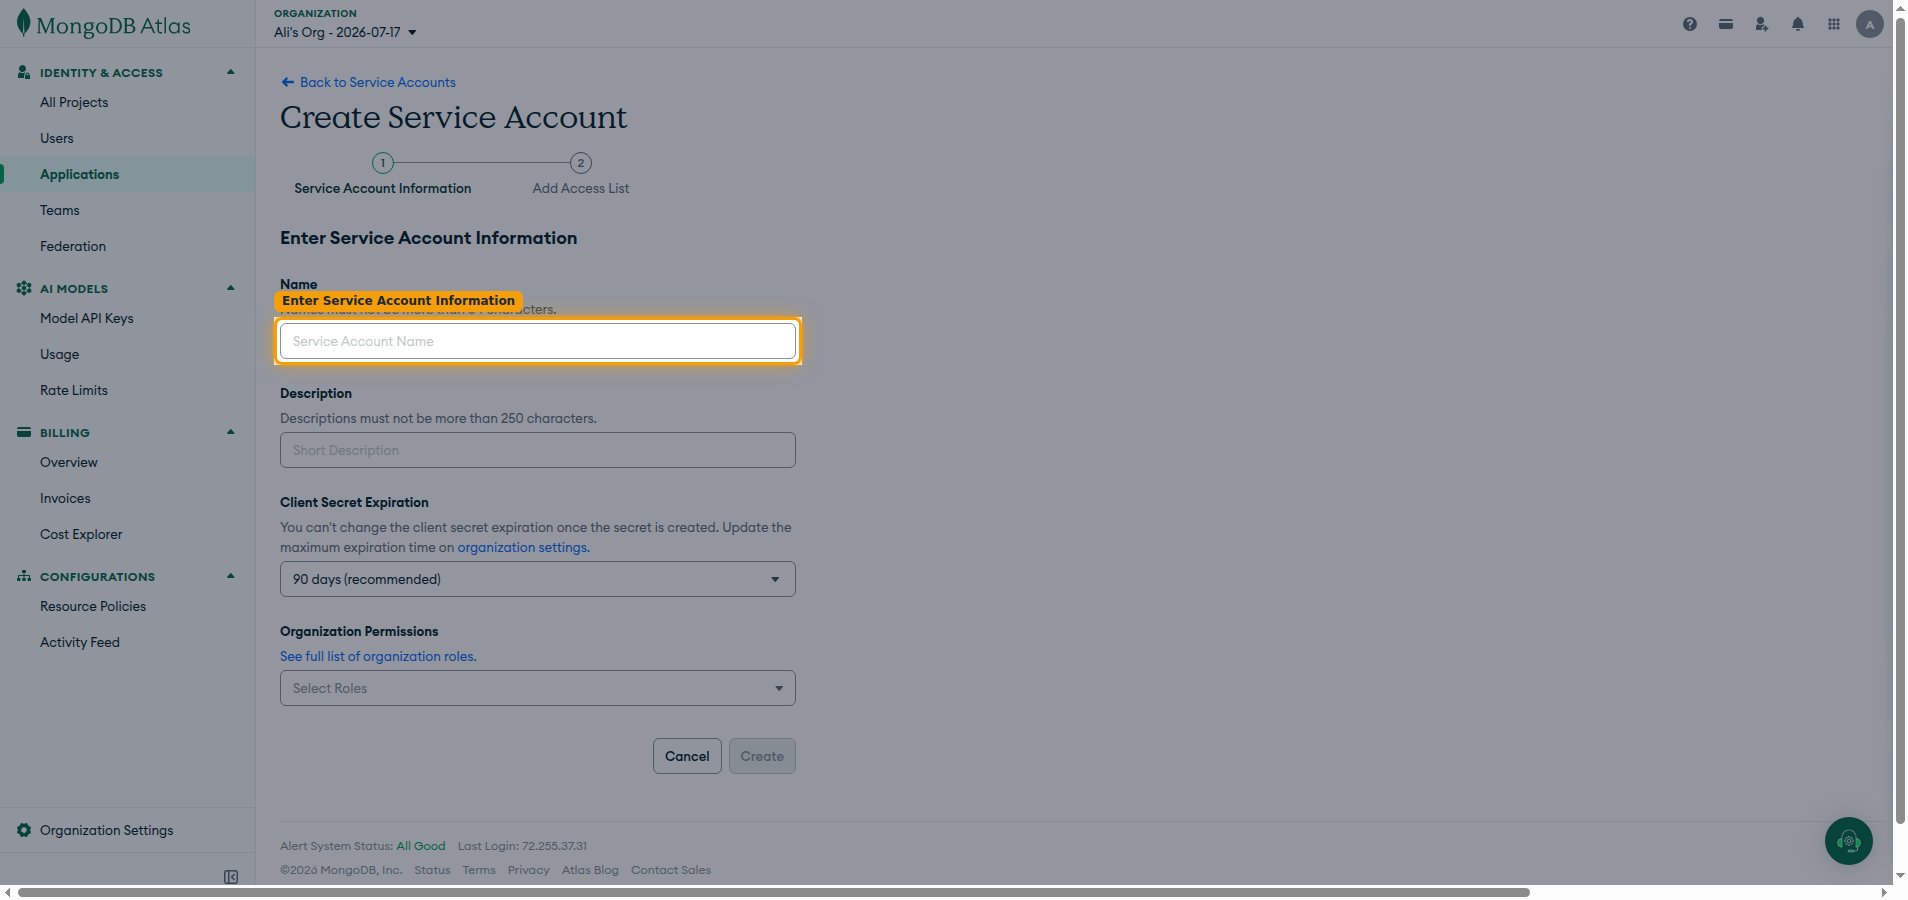
        <p>On the <strong>Create Service Account</strong> screen, under <strong>Enter Service Account Information</strong>, complete the form.</p>

        <ul>
          <li><strong>Name</strong>: enter a name such as `StackOne Integration` (must not be more than 64 characters).</li>
          <li><strong>Description</strong>: enter a description of the service account — this field is required (must not be more than 250 characters).</li>
          <li>Choose a <strong>Client Secret Expiration</strong> period (the default is <strong>90 days (recommended)</strong>). You can't change this once the secret is created.</li>
          <li>From <strong>Organization Permissions</strong>, select the roles this integration needs — for example <strong>Organization Owner</strong> for full access, or <strong>Organization Read Only</strong> for read-only access.</li>
          <li>Click <strong>Create</strong>.</li>
        </ul>

        <img src="https://mintcdn.com/stackone-60/n4JWg_YTwGWEflTc/connectors/mongodb/images/oauth2-config-create-service-account.png?fit=max&auto=format&n=n4JWg_YTwGWEflTc&q=85&s=4cd38c4b48fd4eed4ddbab5ec7748aa2" alt="The Create Service Account form in MongoDB Atlas showing the Name, Description, Client Secret Expiration, and Organization Permissions fields." width="1908" height="900" data-path="connectors/mongodb/images/oauth2-config-create-service-account.png" />
      </div>
    </Step>
  </Steps>
</section>

<section data-guide-section data-guide-scopes="">
  <h2>Copy your credentials</h2>

  <p>After the service account is created, MongoDB Atlas displays its credentials.</p>

  <Steps>
    <Step title="Copy the Client ID and Client Secret">
      <div data-guide-step data-guide-scopes="" data-guide-display-scopes-list="">
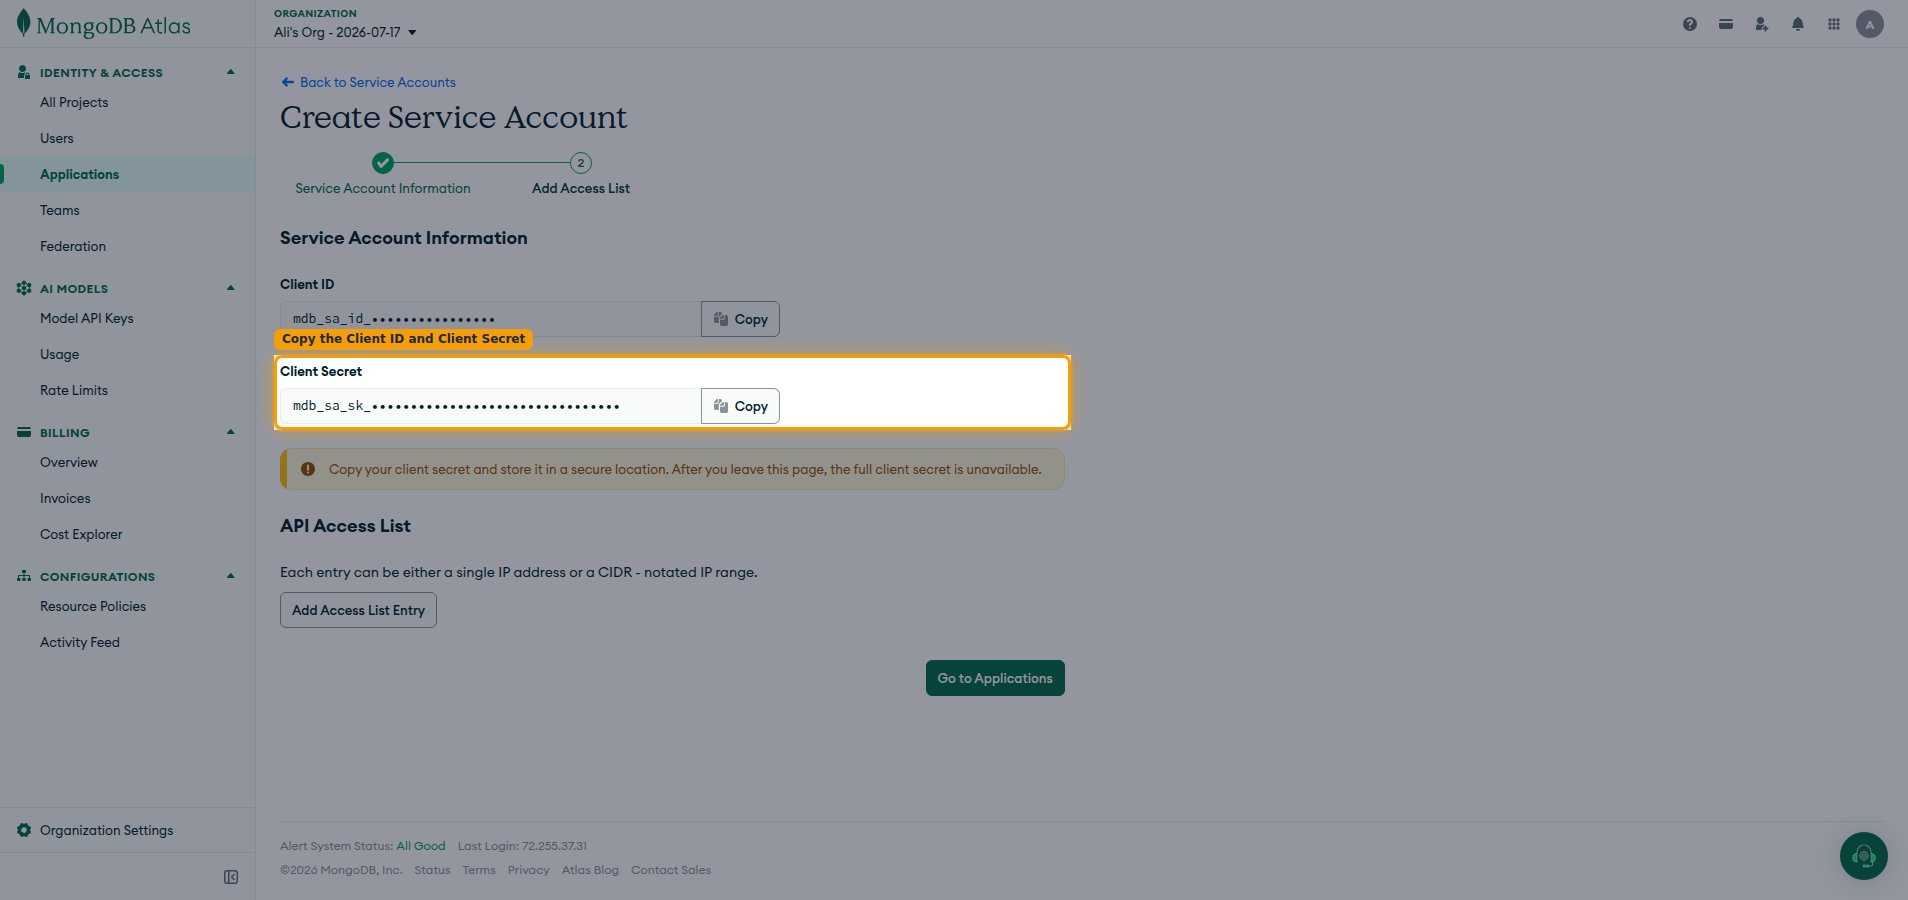
        <p>On the <strong>Service Account Information</strong> screen, copy both values and enter them in StackOne Hub.</p>

        <ul>
          <li>Click <strong>Copy</strong> next to <strong>Client ID</strong> and enter it as the <strong>Service Account Client ID</strong> in StackOne Hub.</li>
          <li>Click <strong>Copy</strong> next to <strong>Client Secret</strong> and enter it as the <strong>Service Account Client Secret</strong> in StackOne Hub.</li>
          <li>The Client Secret is only displayed once and cannot be retrieved later — after you leave this page the full client secret is unavailable, so store it securely.</li>
        </ul>

        <img src="https://mintcdn.com/stackone-60/n4JWg_YTwGWEflTc/connectors/mongodb/images/oauth2-config-credentials.png?fit=max&auto=format&n=n4JWg_YTwGWEflTc&q=85&s=4464d83f42ebbd090533be7f8bbf72ba" alt="The Service Account Information screen in MongoDB Atlas showing the Client ID and Client Secret with Copy buttons (values redacted)." width="1908" height="900" data-path="connectors/mongodb/images/oauth2-config-credentials.png" />
      </div>
    </Step>
  </Steps>
</section>

<div data-whitelabel-hide>
  <h2>Linking the Account from the Hub</h2>

  <Steps>
    <Step title="Navigate to the Hub">
      Use one of the three <a href="/guides/accounts-section#linking-accounts">Linking Account Methods</a> to access the Hub.
    </Step>

    <Step title="Fill out the fields">
      Fill out the following fields using details from your provider:

      <ul>
        <li><strong>Service Account Client ID</strong></li>
        <li><strong>Service Account Client Secret</strong></li>
      </ul>
    </Step>

    <Step title="Connect">
      <ul>
        <li>Click <strong>Connect</strong></li>
        <li>If applicable, the provider will redirect you to a sign-in or authorization page. Complete the provider's authorization flow.</li>
        <li>Once authorization is successful, you will see a confirmation popup</li>
      </ul>
    </Step>
  </Steps>

  <p>If the account linking is successful, you will see the newly linked account in your <a href="/guides/accounts-section">Accounts</a> page.</p>
</div>