> ## Documentation Index
> Fetch the complete documentation index at: https://docs.stackone.com/llms.txt
> Use this file to discover all available pages before exploring further.

# Connect Pydantic Logfire with Project API Key – StackOne Hub

> Link a Pydantic Logfire account in the StackOne Hub using Project API Key. End-user guide to authorize the integration and start using Pydantic Logfire actions.

<Warning>A project-scoped key only ever reads the project it was created in.</Warning>

<section data-guide-section data-guide-scopes="">
  <h2>Create a Project-Scoped API Key</h2>

  <p>A key scoped to a single project is created from that project's own settings. Use this key when you connect Logfire with the <strong>Project API Key</strong> authentication method — it reads only the project it was created in. Telemetry queries are available only on this <strong>Project API Key</strong> connection type — searching logs, traces and exceptions requires connecting with this method.</p>

  <Steps>
    <Step title="Open Project settings and API keys">
      <div data-guide-step data-guide-scopes="" data-guide-display-scopes-list="">
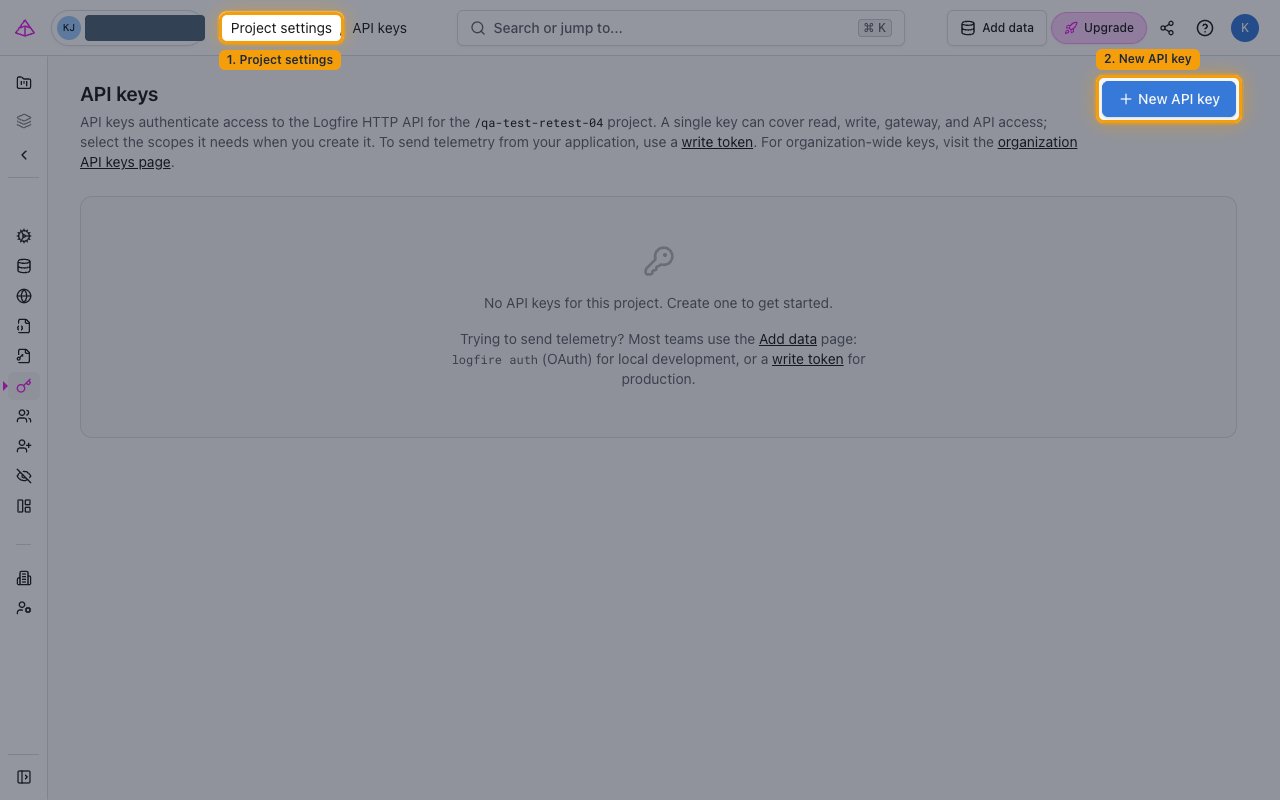
        <p>Open the project, then click <strong>Project settings</strong> in the breadcrumb and select <strong>API keys</strong> from the project settings sidebar. Click <strong>+ New API key</strong> to open the form.</p>

        <img src="https://mintcdn.com/stackone-60/3z17wQ57vLsHYlWR/connectors/logfire/images/custom-config-project-api-keys-page.png?fit=max&auto=format&n=3z17wQ57vLsHYlWR&q=85&s=0f4169ac6f30cf936cd424964076adc2" alt="Logfire project settings API keys page with the New API key button highlighted" width="1280" height="800" data-path="connectors/logfire/images/custom-config-project-api-keys-page.png" />
      </div>
    </Step>

    <Step title="Configure the project key">
      <div data-guide-step data-guide-scopes="" data-guide-display-scopes-list="">
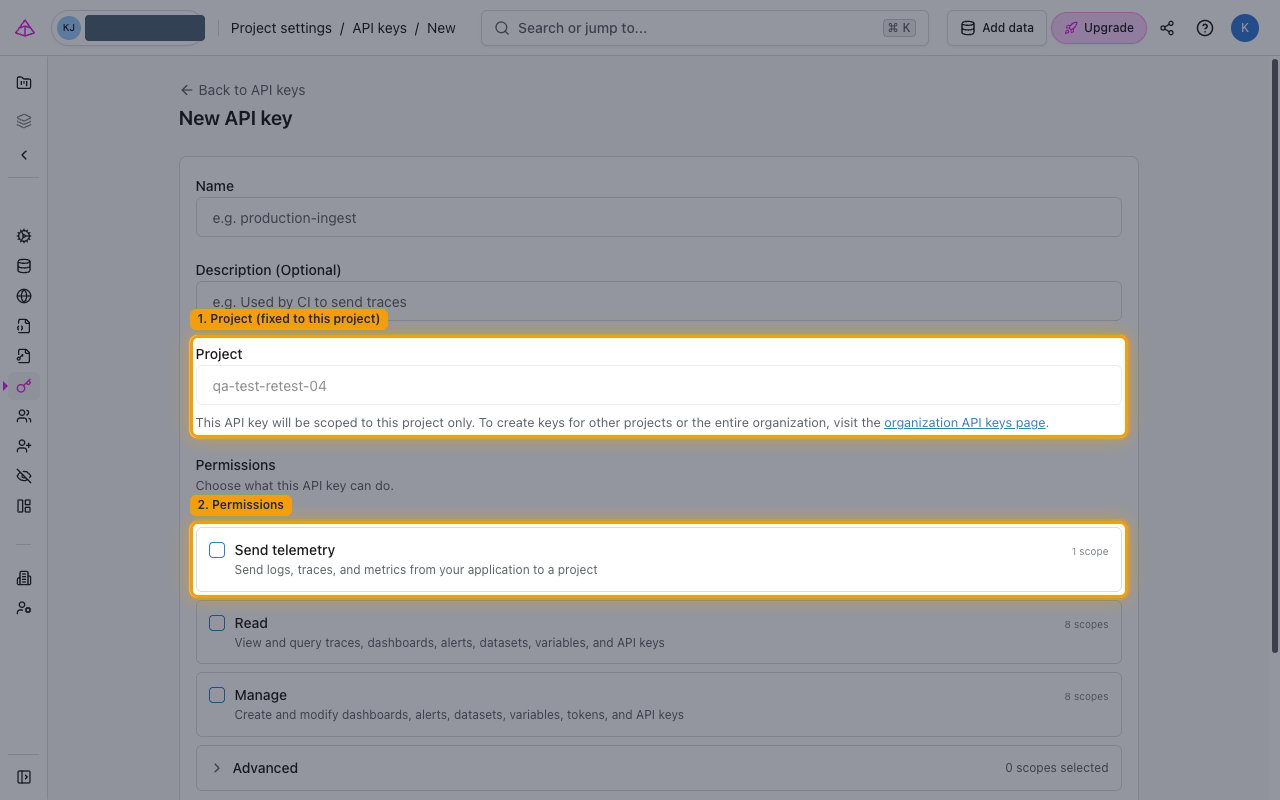
        <p>The <strong>Project</strong> field is fixed to the current project (to create keys for other projects or the whole organization, use the <strong>organization API keys page</strong> link). Under <strong>Permissions</strong>, enable the scopes the key needs — <strong>Read</strong> and <strong>Manage</strong> — or expand <strong>Advanced</strong> for individual scopes. <strong>Send telemetry</strong> (`project:write_otlp`) is only for applications that ship data into Logfire; no connector action uses it, so leave it off. Set <strong>Expiration</strong>, click <strong>Create API key</strong>, and copy the key.</p>

        <img src="https://mintcdn.com/stackone-60/3z17wQ57vLsHYlWR/connectors/logfire/images/custom-config-project-new-key-form.png?fit=max&auto=format&n=3z17wQ57vLsHYlWR&q=85&s=cb4c8f61c77d348b294aa1405b80c3c8" alt="Project-scoped New API key form showing the fixed Project field and the permission categories" width="1280" height="800" data-path="connectors/logfire/images/custom-config-project-new-key-form.png" />
      </div>
    </Step>

    <Step title="Enter it in StackOne Hub">
      <div data-guide-step data-guide-scopes="" data-guide-display-scopes-list="">
        <p>Paste the key into the <strong>API Key</strong> field in StackOne Hub, then set the <strong>API Region URL</strong> for your region. The key itself determines which project this connection reads — there is no project field.</p>

        <ul>
          <li>For querying logs, traces and metrics, enable <strong>Read</strong> under <strong>Permissions</strong>, or expand <strong>Advanced</strong> and select `project:read_otlp`.</li>
          <li>For variable types, the key needs `project:read_variables` to list and read them, plus `project:write_variables` to create them.</li>
        </ul>
      </div>
    </Step>
  </Steps>
</section>

<section data-guide-section data-guide-scopes="">
  <h2>Minimum Scope to Connect</h2>

  <p>Set the permissions when you create the key. Minimum to connect: <strong>Query telemetry</strong> (`project:read_otlp`), which the connection test uses.</p>

  <ul>
    <li><strong>Query telemetry</strong> (`project:read_otlp`) — required for searching logs, traces, exceptions and services, and for the queryable schema.</li>
    <li><strong>Variables management</strong> — required for the variable-type actions.</li>
    <li><strong>Project settings</strong>, <strong>Alerts management</strong>, <strong>Dashboards management</strong>, <strong>Write tokens management</strong> — add these to also manage projects, alerts, dashboards and write tokens.</li>
    <li>Organization-level resources (notification channels, invitations, organization settings) are not reachable with a project key — connect an Organization API Key for those.</li>
  </ul>
</section>

<section data-guide-section data-guide-scopes="">
  <h2>Determine Your API Region URL</h2>

  <p>Logfire runs in two independent data regions. StackOne Hub asks for the <strong>API Region URL</strong> — the API base URL that matches the region where your Logfire account was created.</p>

  <Steps>
    <Step title="Enter the API Region URL for your region">
      <div data-guide-step data-guide-scopes="" data-guide-display-scopes-list="">
        <p>Check the address bar while signed in to the Logfire console to identify your region, then paste the matching base URL into the <strong>API Region URL</strong> field in StackOne Hub.</p>

        <ul>
          <li>If the console URL is `logfire-eu.pydantic.dev`, you are on the <strong>EU</strong> region. Enter `https://api-eu.pydantic.dev`</li>
          <li>If the console URL is `logfire-us.pydantic.dev`, you are on the <strong>US</strong> region. Enter `https://api-us.pydantic.dev`</li>
          <li>Format: `https://{region-host}`</li>
          <li>Example: `https://api-eu.pydantic.dev`</li>
        </ul>
      </div>
    </Step>
  </Steps>
</section>

<div data-whitelabel-hide>
  <h2>Linking the Account from the Hub</h2>

  <Steps>
    <Step title="Navigate to the Hub">
      Use one of the three <a href="/connect/managing-connectors/linking-accounts">Linking Account Methods</a> to access the Hub.
    </Step>

    <Step title="Fill out the fields">
      Fill out the following fields using details from your provider:

      <ul>
        <li><strong>API Key</strong></li>
        <li><strong>API Region URL</strong></li>
      </ul>
    </Step>

    <Step title="Connect">
      <ul>
        <li>Click <strong>Connect</strong></li>
        <li>If applicable, the provider will redirect you to a sign-in or authorization page. Complete the provider's authorization flow.</li>
        <li>Once authorization is successful, you will see a confirmation popup</li>
      </ul>
    </Step>
  </Steps>

  <p>If the account linking is successful, you will see the newly linked account in your <a href="/gateway/concepts/linked-accounts">Accounts</a> page.</p>
</div>


This documentation is built and hosted on [Mintlify](https://mintlify.com), a developer documentation platform.