> ## Documentation Index
> Fetch the complete documentation index at: https://docs.stackone.com/llms.txt
> Use this file to discover all available pages before exploring further.

# Connect Lara Translate with Access Key – StackOne Hub

> Link a Lara Translate account in the StackOne Hub using Access Key. End-user guide to authorize the integration and start using Lara Translate actions.

<Warning>The Access Key Secret is <strong>shown once</strong> at creation and <strong>cannot be retrieved</strong> later. Click <strong>Download credentials</strong> immediately and store the file securely. On the Free plan (1 / 1 credentials) you must delete the existing key and create a new one to recover a lost Secret.</Warning>

<section data-guide-section data-guide-scopes="">
  <h2>Create Lara Translate API credentials</h2>

  <p>Generate an Access Key ID and Access Key Secret from the Lara Translate dashboard, then paste them into StackOne Hub. The Free plan issues one credential instantly with no credit card required.</p>

  <Steps>
    <Step title="Sign in to Lara Translate">
      <div data-guide-step data-guide-scopes="" data-guide-display-scopes-list="">
        <p>Sign in to your Lara Translate account at <a href="https://app.laratranslate.com/" target="_blank" rel="noopener noreferrer">app.laratranslate.com</a>.</p>
      </div>
    </Step>

    <Step title="Open the Profile menu">
      <div data-guide-step data-guide-scopes="" data-guide-display-scopes-list="">
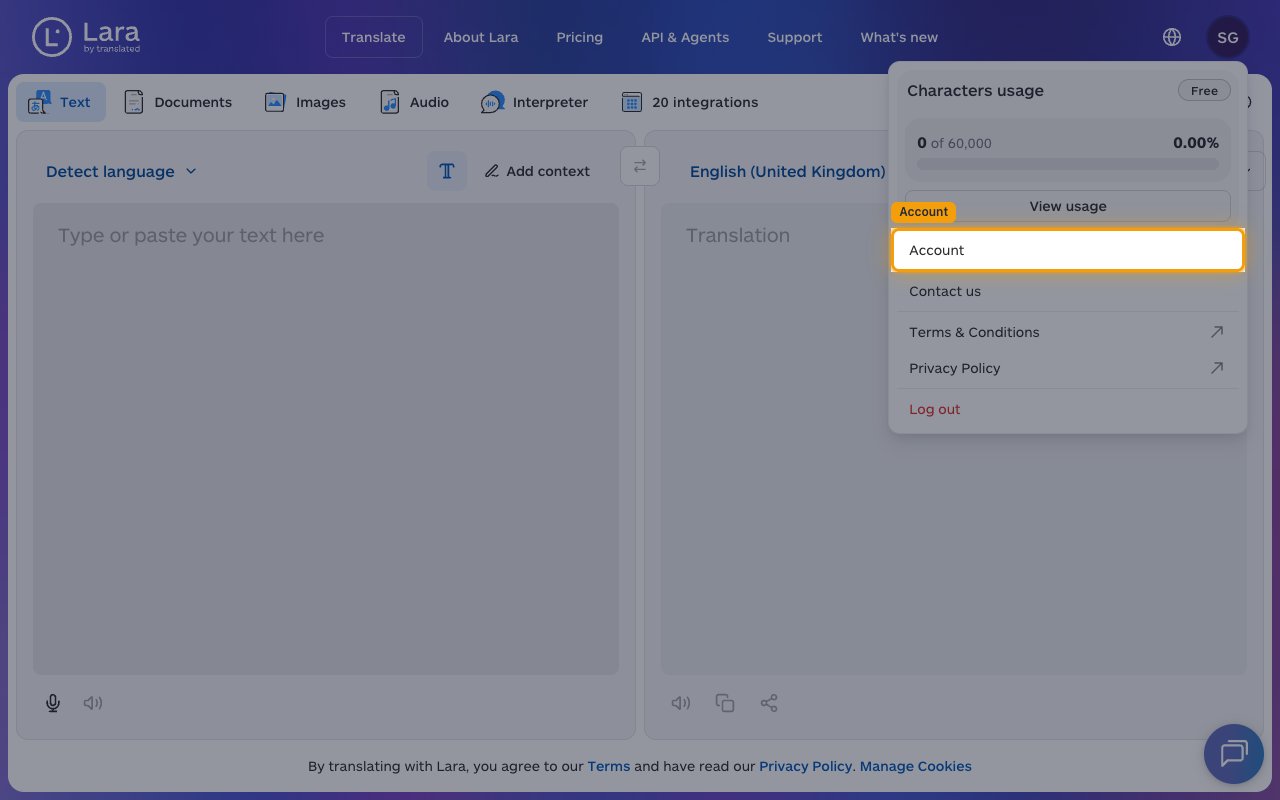
        <p>In the top-right of the dashboard, click your <strong>Profile menu</strong> (shown as your initials), then click <strong>Account</strong>.</p>

        <img src="https://mintcdn.com/stackone-60/wc3KBRpev9JIOCAA/connectors/laratranslate/images/custom-config-open-account-menu.png?fit=max&auto=format&n=wc3KBRpev9JIOCAA&q=85&s=5895afe600de5392d547236ef18bd920" alt="Lara Translate dashboard with the Profile menu open and the Account item highlighted." width="1280" height="800" data-path="connectors/laratranslate/images/custom-config-open-account-menu.png" />
      </div>
    </Step>

    <Step title="Open API Credentials">
      <div data-guide-step data-guide-scopes="" data-guide-display-scopes-list="">
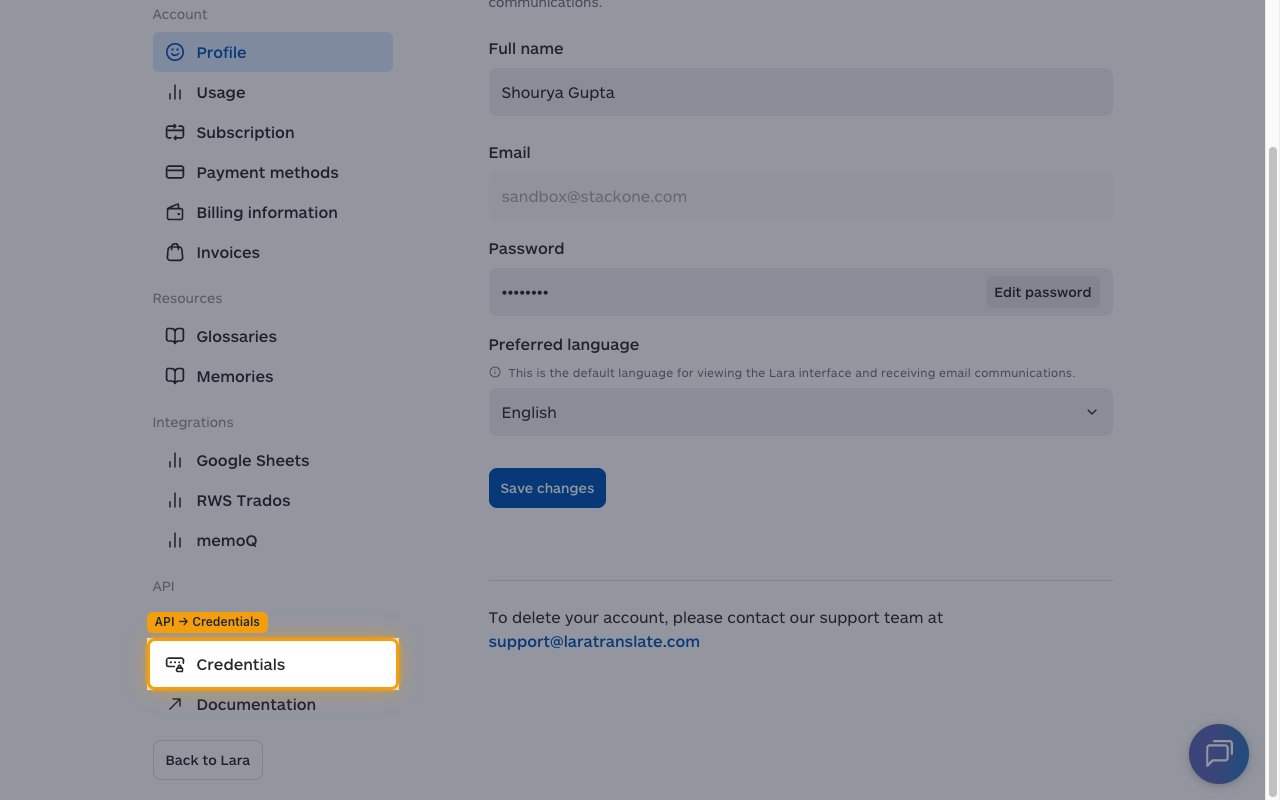
        <p>In the sidebar, under the <strong>API</strong> section, click <strong>Credentials</strong> to open the <strong>API Credentials</strong> page.</p>

        <img src="https://mintcdn.com/stackone-60/wc3KBRpev9JIOCAA/connectors/laratranslate/images/custom-config-open-credentials.png?fit=max&auto=format&n=wc3KBRpev9JIOCAA&q=85&s=c1d2f859beb53273a88b4647d6b6b135" alt="Account page sidebar with the API section expanded and Credentials highlighted." width="1280" height="800" data-path="connectors/laratranslate/images/custom-config-open-credentials.png" />
      </div>
    </Step>

    <Step title="Create new credentials">
      <div data-guide-step data-guide-scopes="" data-guide-display-scopes-list="">
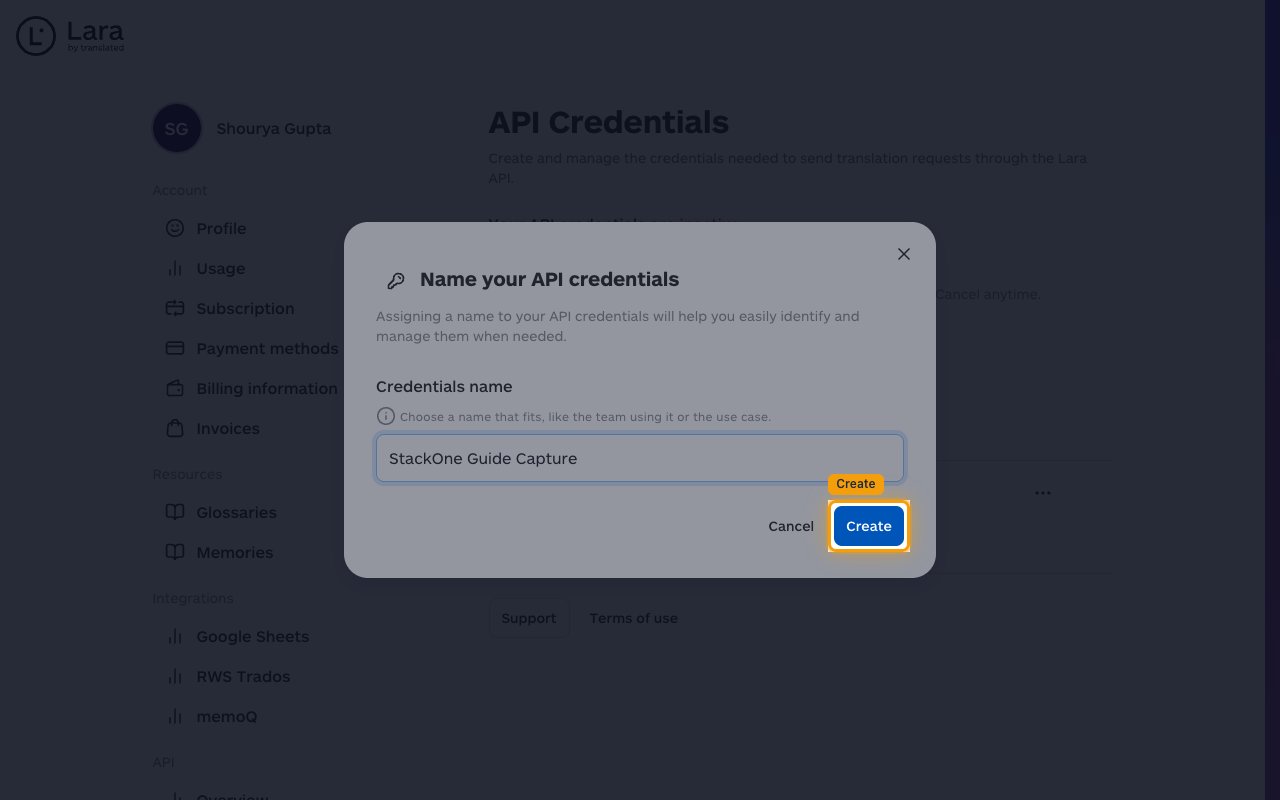
        <p>On the <strong>API Credentials</strong> page, click <strong>Create new credentials</strong>. In the <strong>Name your API credentials</strong> dialog, enter a name for the key in the <strong>Credentials name</strong> field (for example, `StackOne`), then click <strong>Create</strong>.</p>

        <ul>
          <li>The Free plan allows only <strong>1 / 1</strong> active credential — if the button is disabled, delete or replace the existing key from the <strong>Actions</strong> menu on its row first.</li>
        </ul>

        <img src="https://mintcdn.com/stackone-60/wc3KBRpev9JIOCAA/connectors/laratranslate/images/custom-config-create-credentials.png?fit=max&auto=format&n=wc3KBRpev9JIOCAA&q=85&s=647f35a73cc52290d1e23364d4c1020f" alt="Name your API credentials dialog with the Credentials name field filled and the Create button highlighted." width="1280" height="800" data-path="connectors/laratranslate/images/custom-config-create-credentials.png" />
      </div>
    </Step>

    <Step title="Save and copy your credentials">
      <div data-guide-step data-guide-scopes="" data-guide-display-scopes-list="">
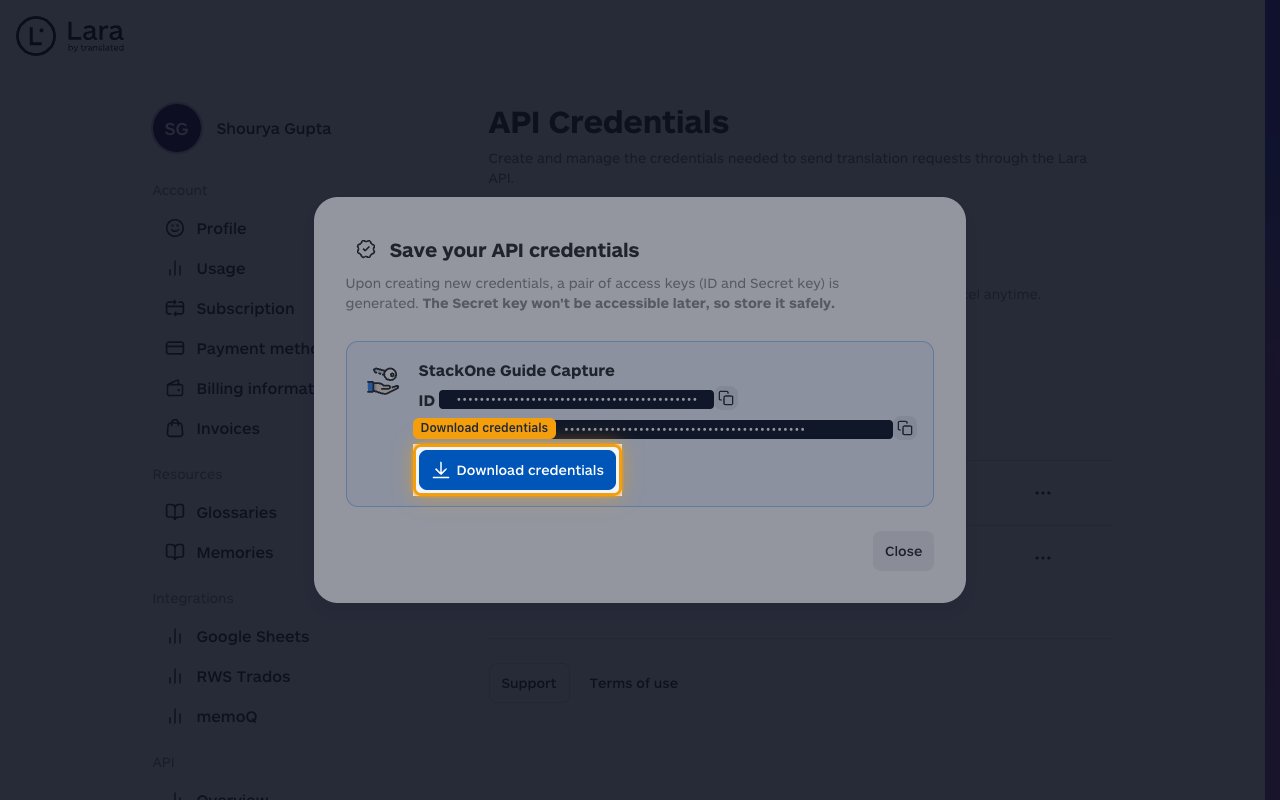
        <p>The <strong>Save your API credentials</strong> dialog shows the generated <strong>ID</strong> and <strong>Secret</strong> for the new key. Click <strong>Download credentials</strong> to save both values as a file.</p>

        <ul>
          <li>The <strong>Secret key won't be accessible later</strong> — download the file before closing the dialog.</li>
          <li>Save the downloaded file in a secure secret store; if the Secret is lost, you must delete the key and create a new one.</li>
        </ul>

        <img src="https://mintcdn.com/stackone-60/wc3KBRpev9JIOCAA/connectors/laratranslate/images/custom-config-save-credentials.png?fit=max&auto=format&n=wc3KBRpev9JIOCAA&q=85&s=5e1847a7eb465e602e8da82824f9b1f4" alt="Save your API credentials dialog showing the ID and Secret rows (values redacted) with the Download credentials button highlighted." width="1280" height="800" data-path="connectors/laratranslate/images/custom-config-save-credentials.png" />
      </div>
    </Step>

    <Step title="Paste the credentials into StackOne Hub">
      <div data-guide-step data-guide-scopes="" data-guide-display-scopes-list="">
        <p>Open the downloaded credentials file and copy each value into StackOne Hub:</p>

        <ul>
          <li><strong>Access Key ID</strong> — the public identifier shown as <strong>ID</strong> in the dialog. Paste it into the <strong>Access Key ID</strong> field in StackOne Hub.</li>
          <li><strong>Access Key Secret</strong> — the secret half shown as <strong>Secret</strong> in the dialog. Paste it into the <strong>Access Key Secret</strong> field in StackOne Hub.</li>
        </ul>
      </div>
    </Step>
  </Steps>
</section>

<div data-whitelabel-hide>
  <h2>Linking the Account from the Hub</h2>

  <Steps>
    <Step title="Navigate to the Hub">
      Use one of the three <a href="/connect/managing-connectors/linking-accounts">Linking Account Methods</a> to access the Hub.
    </Step>

    <Step title="Fill out the fields">
      Fill out the following fields using details from your provider:

      <ul>
        <li><strong>Access Key ID</strong></li>
        <li><strong>Access Key Secret</strong></li>
      </ul>
    </Step>

    <Step title="Connect">
      <ul>
        <li>Click <strong>Connect</strong></li>
        <li>If applicable, the provider will redirect you to a sign-in or authorization page. Complete the provider's authorization flow.</li>
        <li>Once authorization is successful, you will see a confirmation popup</li>
      </ul>
    </Step>
  </Steps>

  <p>If the account linking is successful, you will see the newly linked account in your <a href="/gateway/concepts/linked-accounts">Accounts</a> page.</p>
</div>