> ## Documentation Index
> Fetch the complete documentation index at: https://docs.stackone.com/llms.txt
> Use this file to discover all available pages before exploring further.

# Connect KiwiHR with API Key – StackOne Hub

> Link a KiwiHR account in the StackOne Hub using API Key. End-user guide to authorize the integration and start using KiwiHR actions.

<Warning>Admin access to your KiwiHR (Tellent HR) account is required to generate a Company API key.</Warning>

<section data-guide-section data-guide-scopes="">
  <h2>Generate a Company API key</h2>

  <p>A Company API key authenticates every request to the KiwiHR GraphQL API (sent in the `X-Api-Key` header). Requests execute on behalf of the first available Administrator, so your company must have at least one Administrator account.</p>

  <Steps>
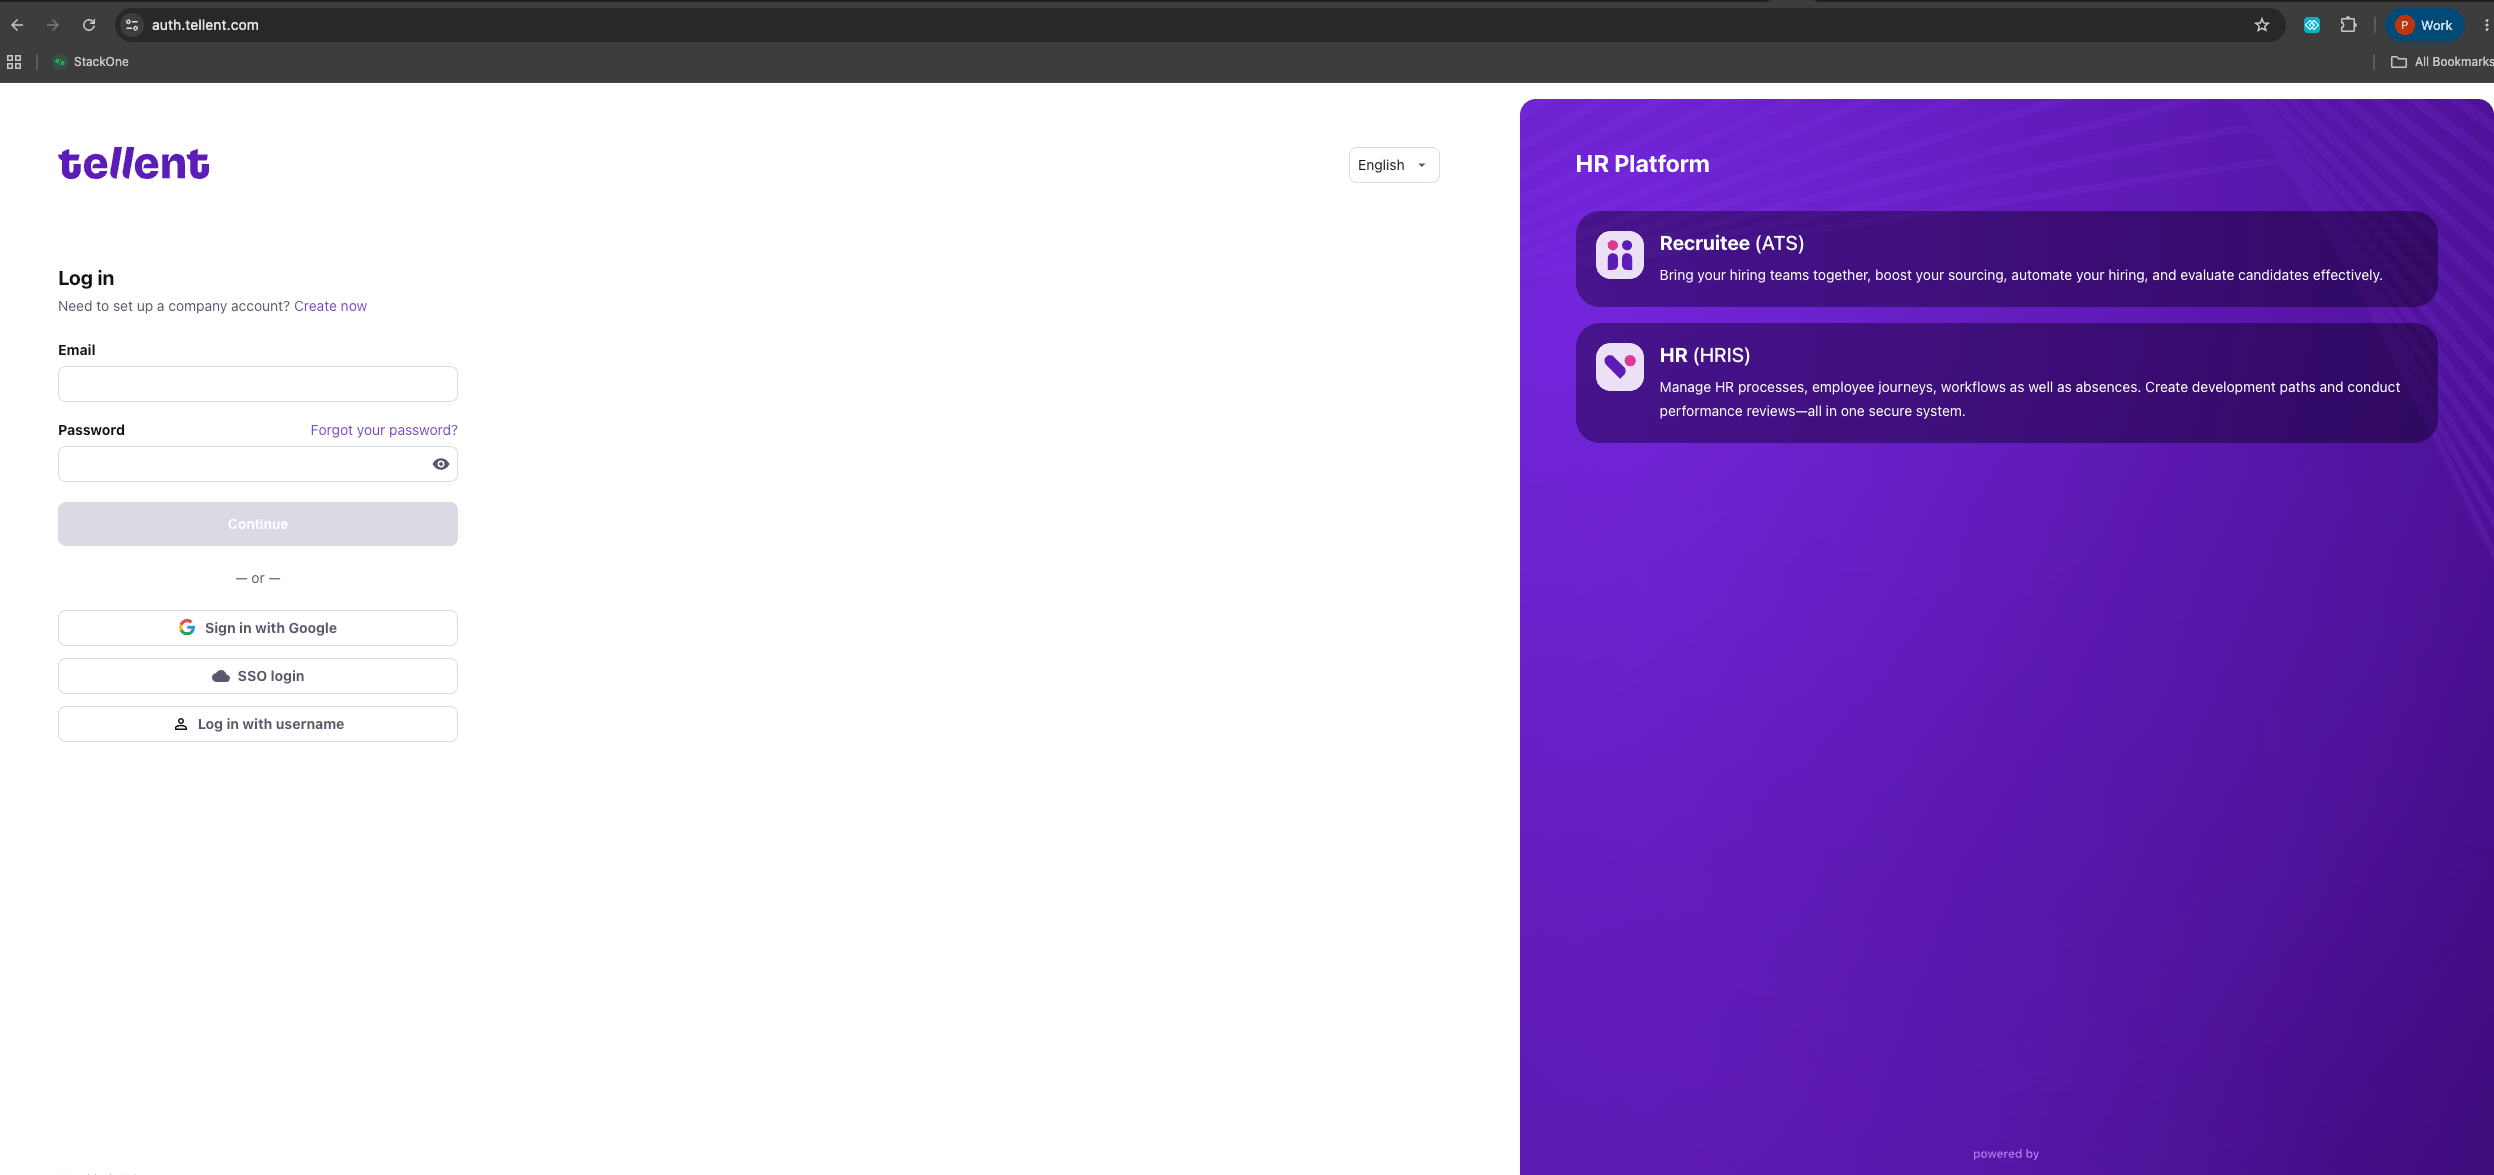
    <Step title="Log in to Tellent HR">
      <div data-guide-step data-guide-scopes="" data-guide-display-scopes-list="">
        <p>Sign in to your <a href="https://app.tellent.com" target="_blank" rel="noopener noreferrer">Tellent HR account</a> with your email and password.</p>

        <img src="https://mintcdn.com/stackone-60/TewQnuxySG5GRH-F/connectors/kiwihr/images/custom-config-login.png?fit=max&auto=format&n=TewQnuxySG5GRH-F&q=85&s=def3dab4e19433906b49196176f6a627" alt="Tellent HR Log in page" width="2494" height="1175" data-path="connectors/kiwihr/images/custom-config-login.png" />
      </div>
    </Step>

    <Step title="Open Settings">
      <div data-guide-step data-guide-scopes="" data-guide-display-scopes-list="">
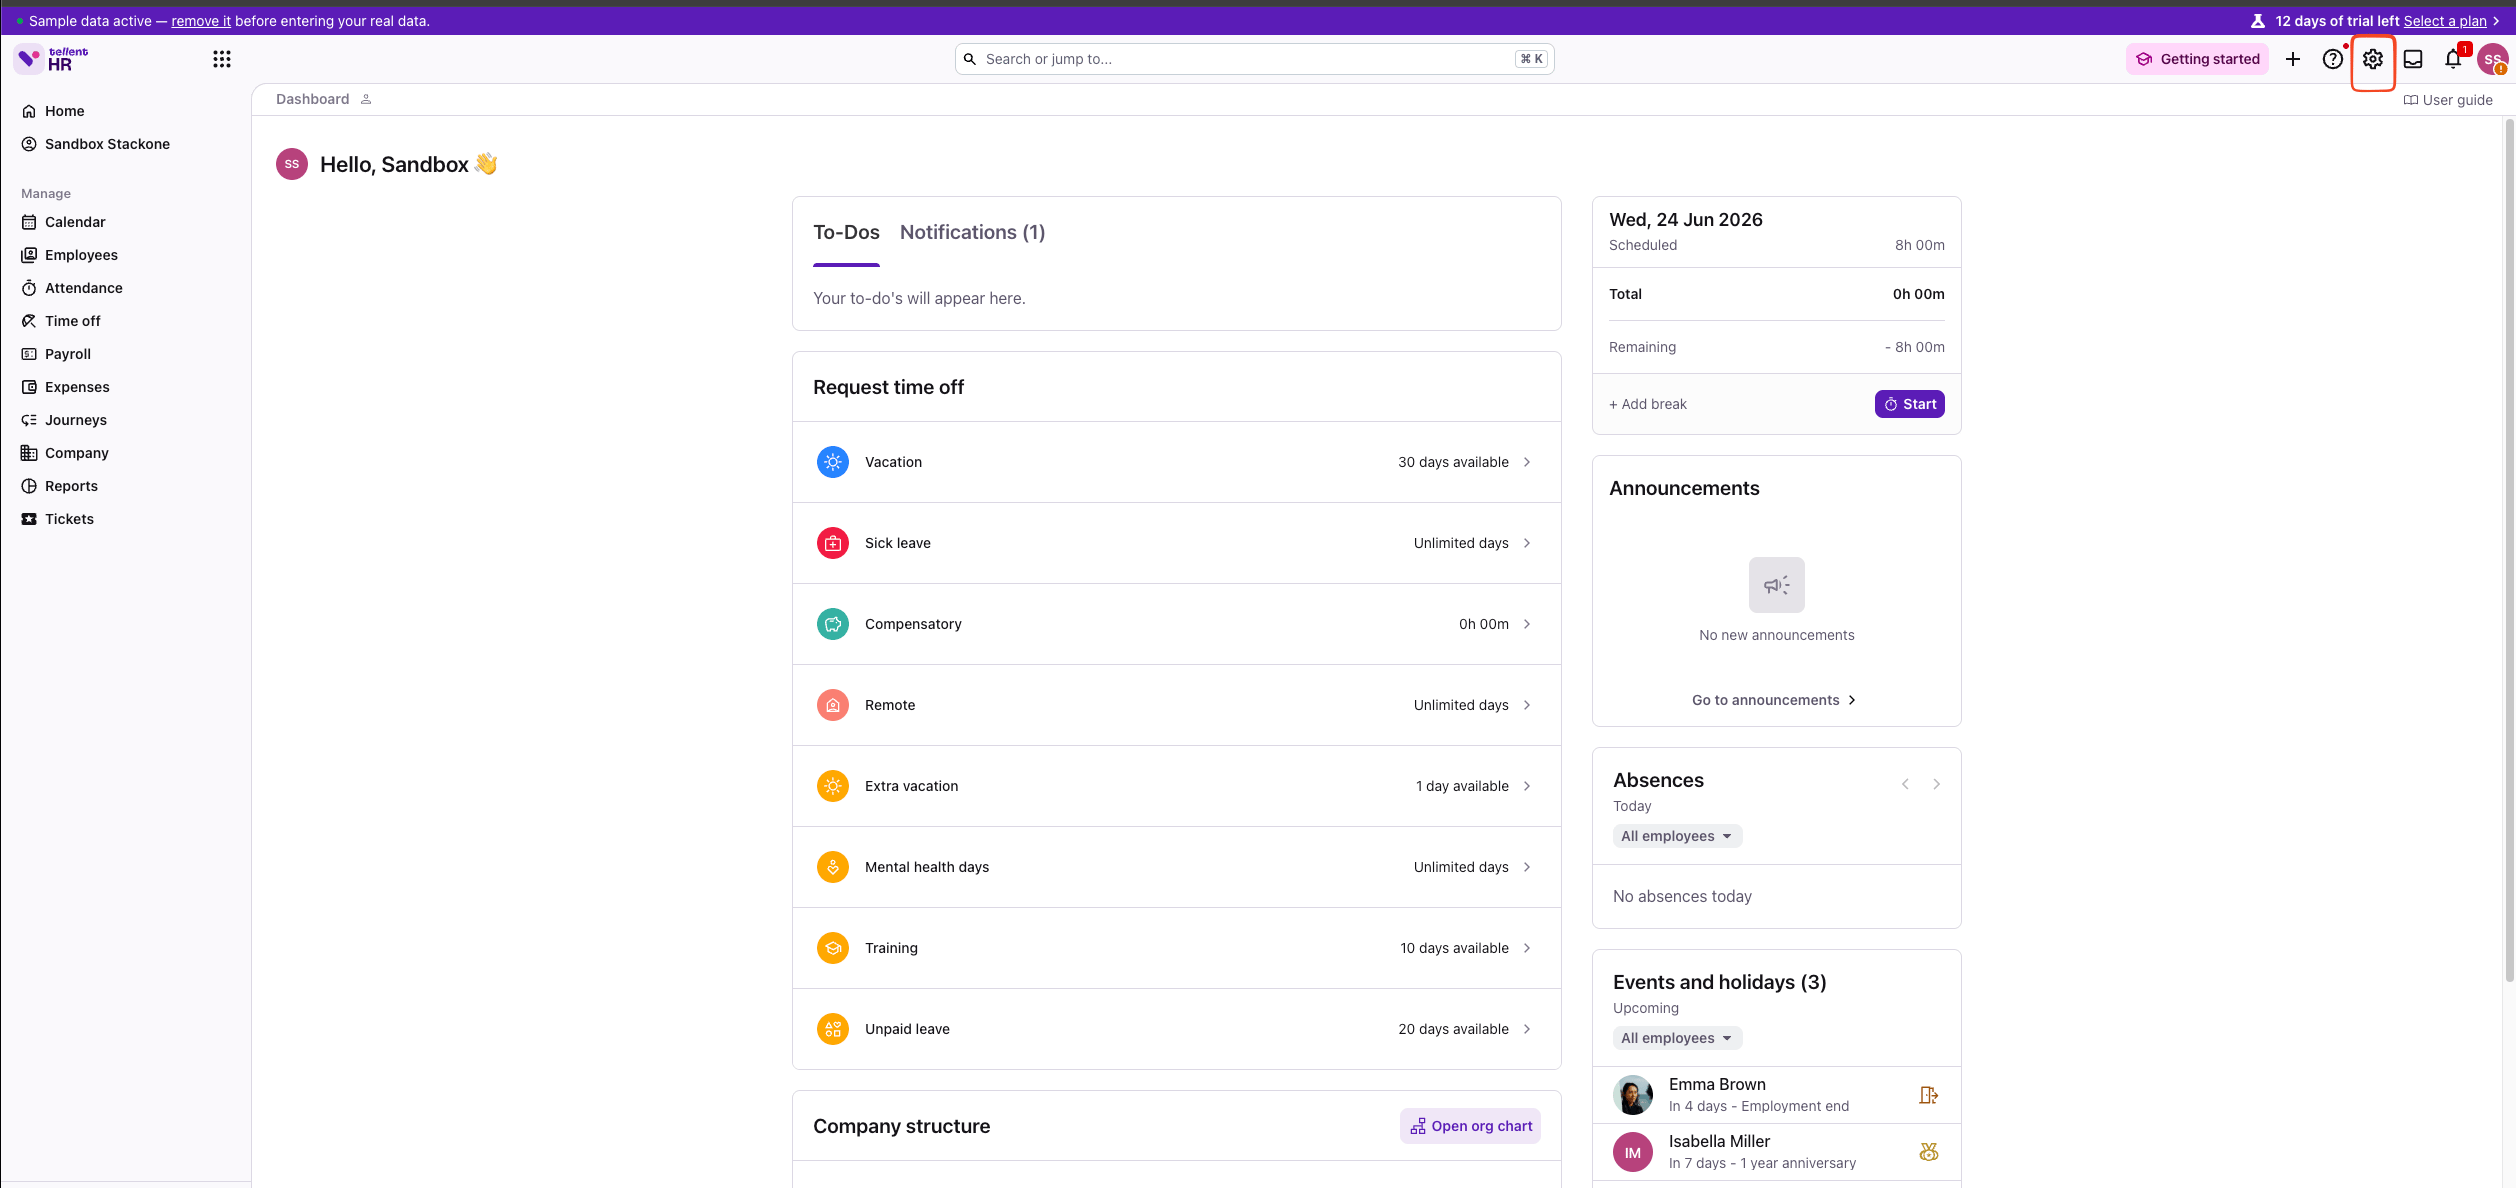
        <p>On the dashboard, click the <strong>Settings</strong> (gear) icon in the top-right corner.</p>

        <img src="https://mintcdn.com/stackone-60/TewQnuxySG5GRH-F/connectors/kiwihr/images/custom-config-main-page.png?fit=max&auto=format&n=TewQnuxySG5GRH-F&q=85&s=ee3eaf1d15539cb9b47b123163dbdbc2" alt="Tellent HR dashboard with the Settings gear icon in the top-right" width="2516" height="1188" data-path="connectors/kiwihr/images/custom-config-main-page.png" />
      </div>
    </Step>

    <Step title="Navigate to API keys">
      <div data-guide-step data-guide-scopes="" data-guide-display-scopes-list="">
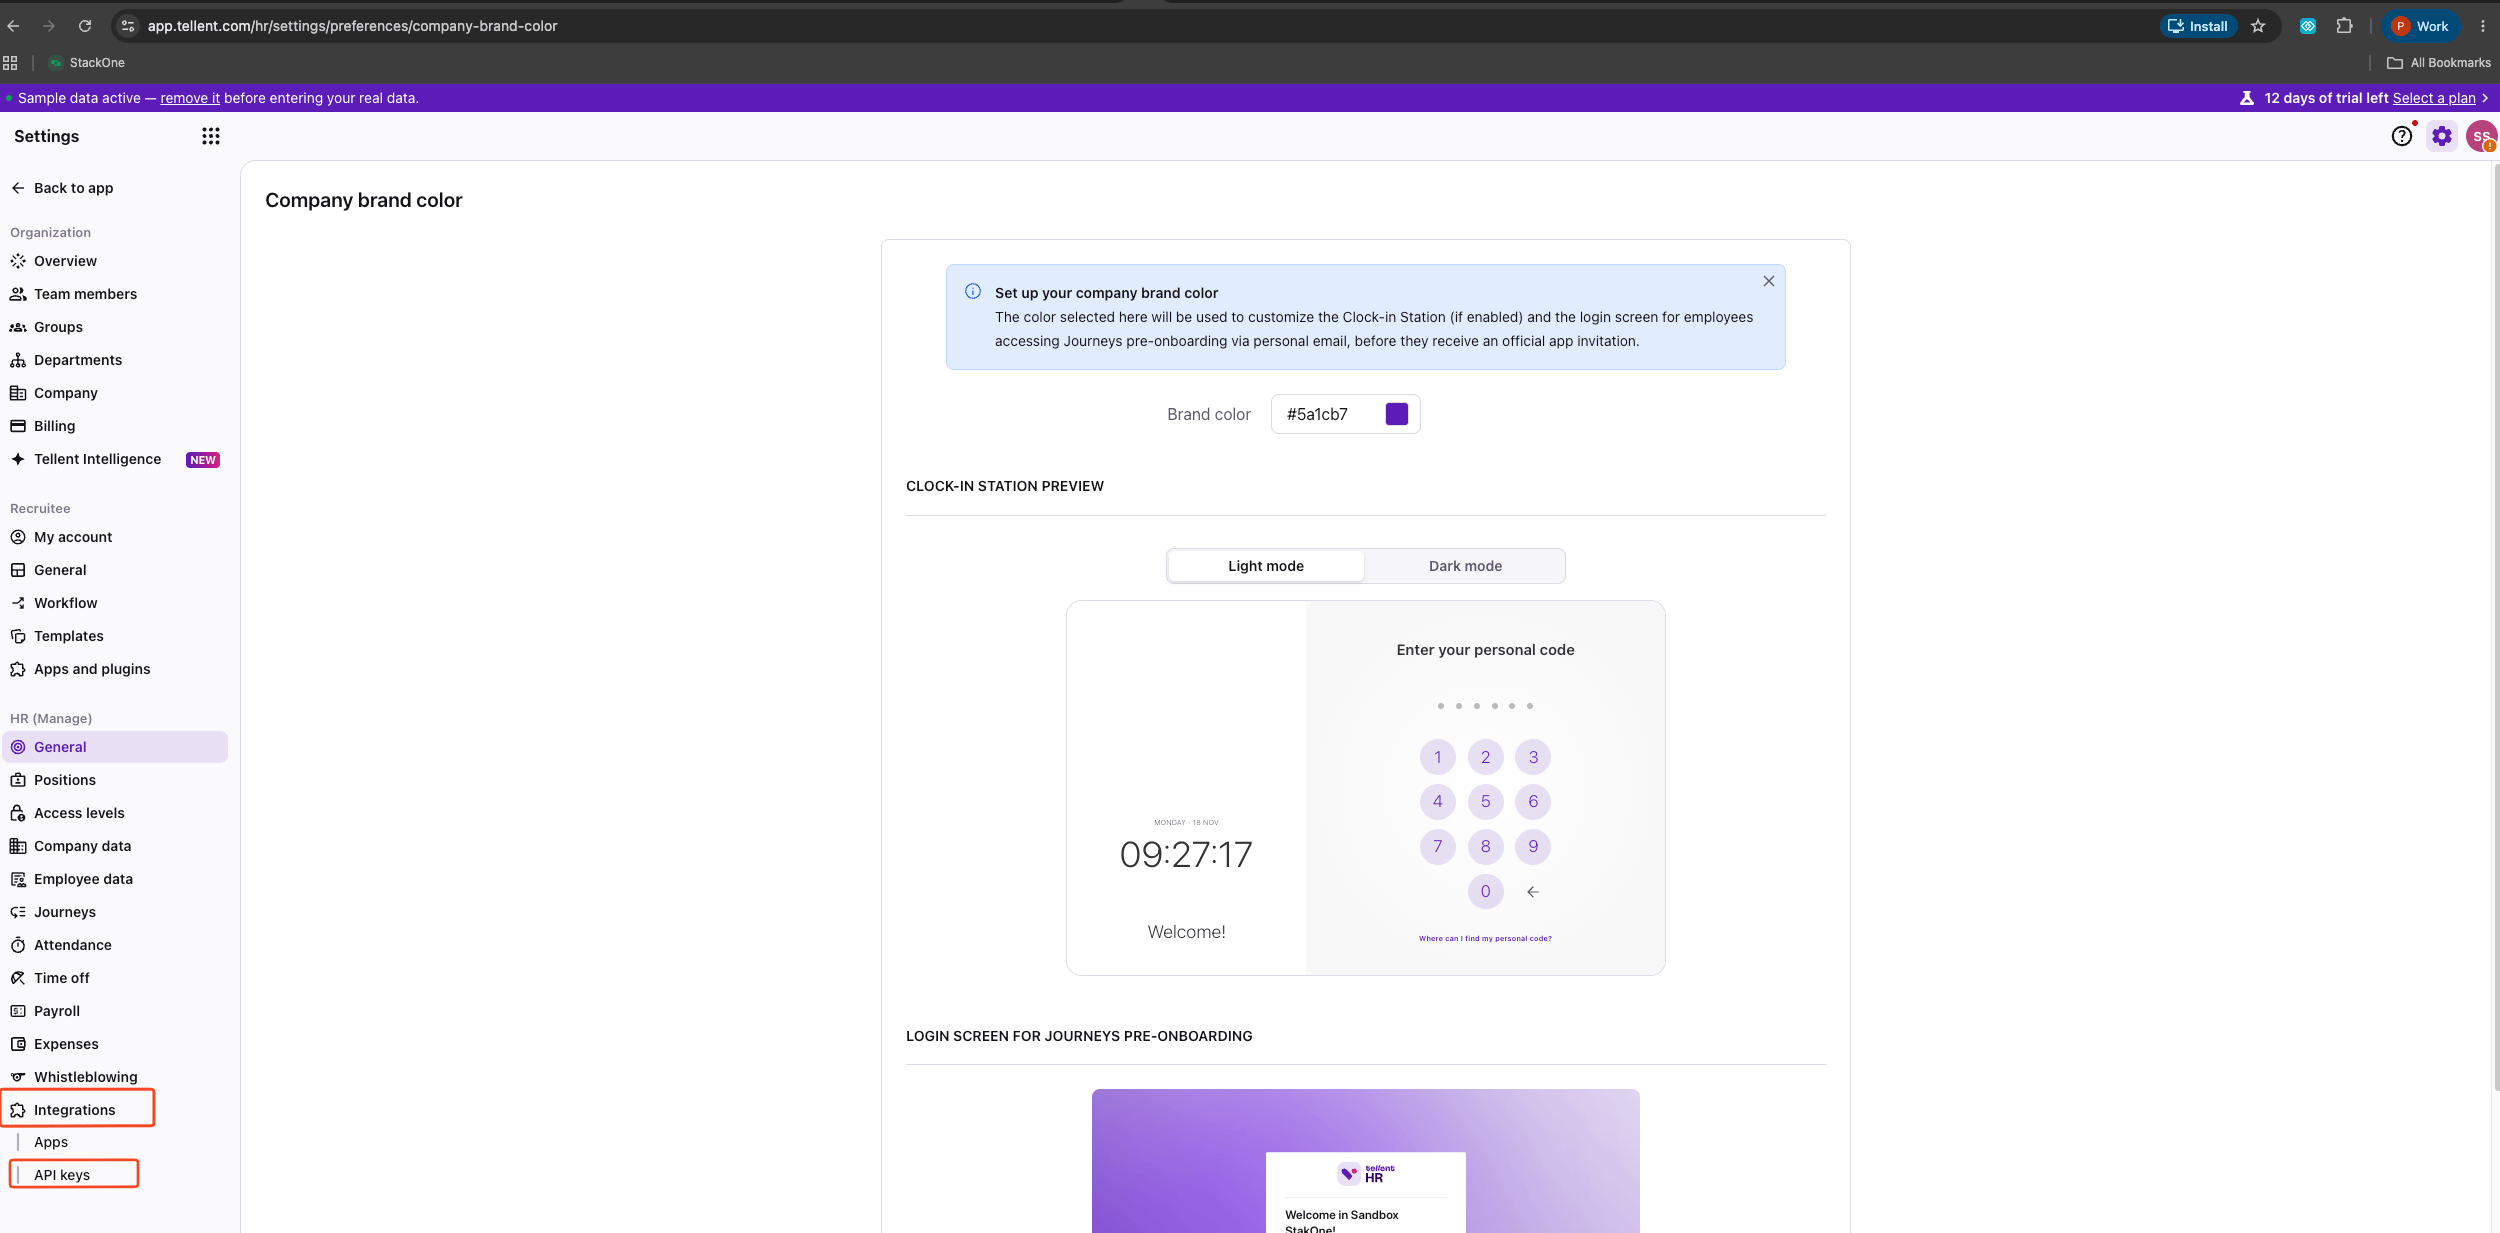
        <p>In the <strong>Settings</strong> left sidebar, scroll to <strong>Integrations</strong> and select <strong>API keys</strong>.</p>

        <img src="https://mintcdn.com/stackone-60/TewQnuxySG5GRH-F/connectors/kiwihr/images/custom-config-navigate-to-apikeys.png?fit=max&auto=format&n=TewQnuxySG5GRH-F&q=85&s=3b60f823cfb0bab782ebcd9735d4bd8e" alt="Settings sidebar with Integrations expanded showing API keys" width="2500" height="1233" data-path="connectors/kiwihr/images/custom-config-navigate-to-apikeys.png" />
      </div>
    </Step>

    <Step title="Create a new access key">
      <div data-guide-step data-guide-scopes="" data-guide-display-scopes-list="">
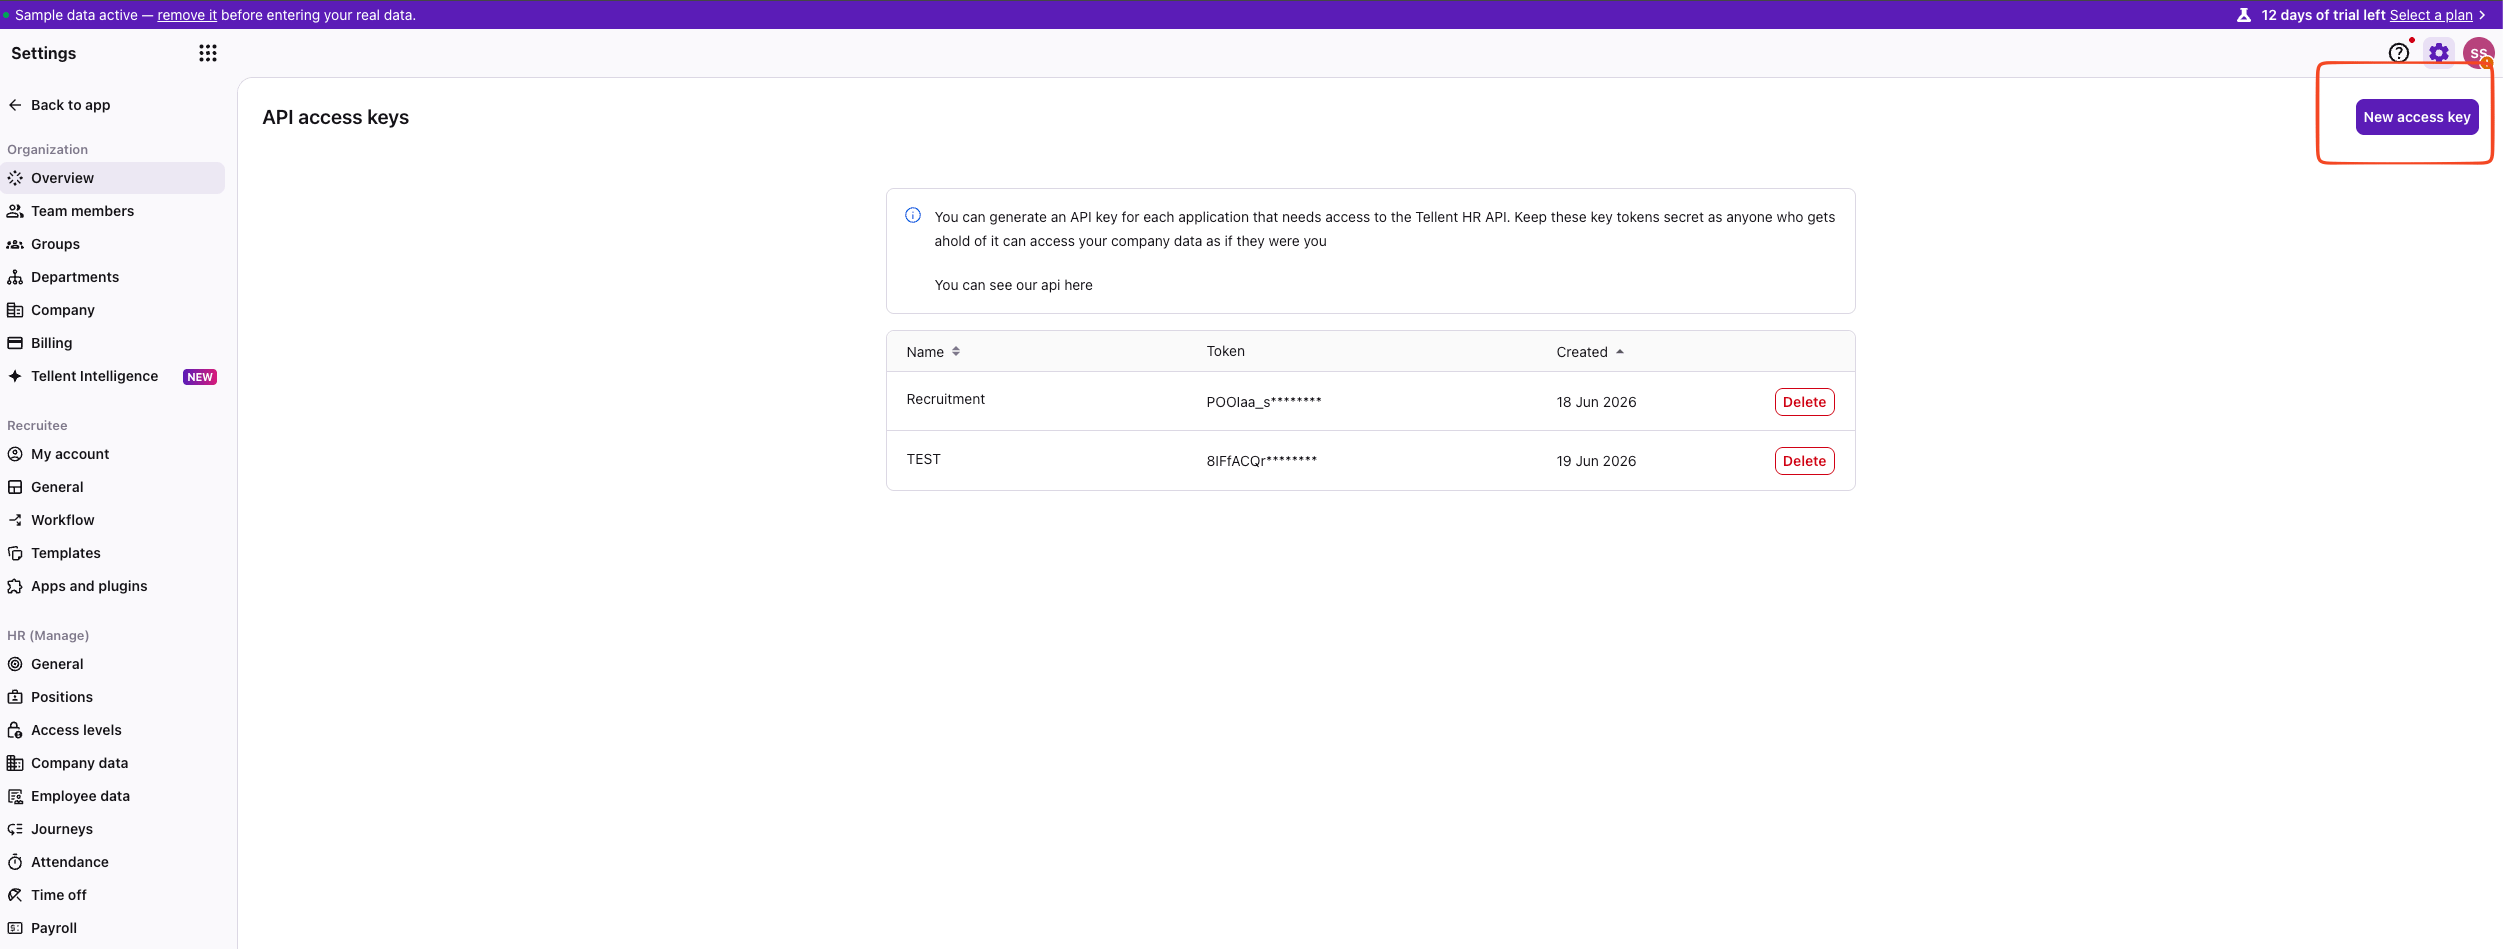
        <p>On the <strong>API access keys</strong> page, click <strong>New access key</strong> in the top-right corner.</p>

        <img src="https://mintcdn.com/stackone-60/TewQnuxySG5GRH-F/connectors/kiwihr/images/custom-config-new-access-key-button.png?fit=max&auto=format&n=TewQnuxySG5GRH-F&q=85&s=ea1b8d47510e79e414f2c33cd4560de7" alt="API access keys page with the New access key button" width="2503" height="949" data-path="connectors/kiwihr/images/custom-config-new-access-key-button.png" />
      </div>
    </Step>

    <Step title="Name and add the key">
      <div data-guide-step data-guide-scopes="" data-guide-display-scopes-list="">
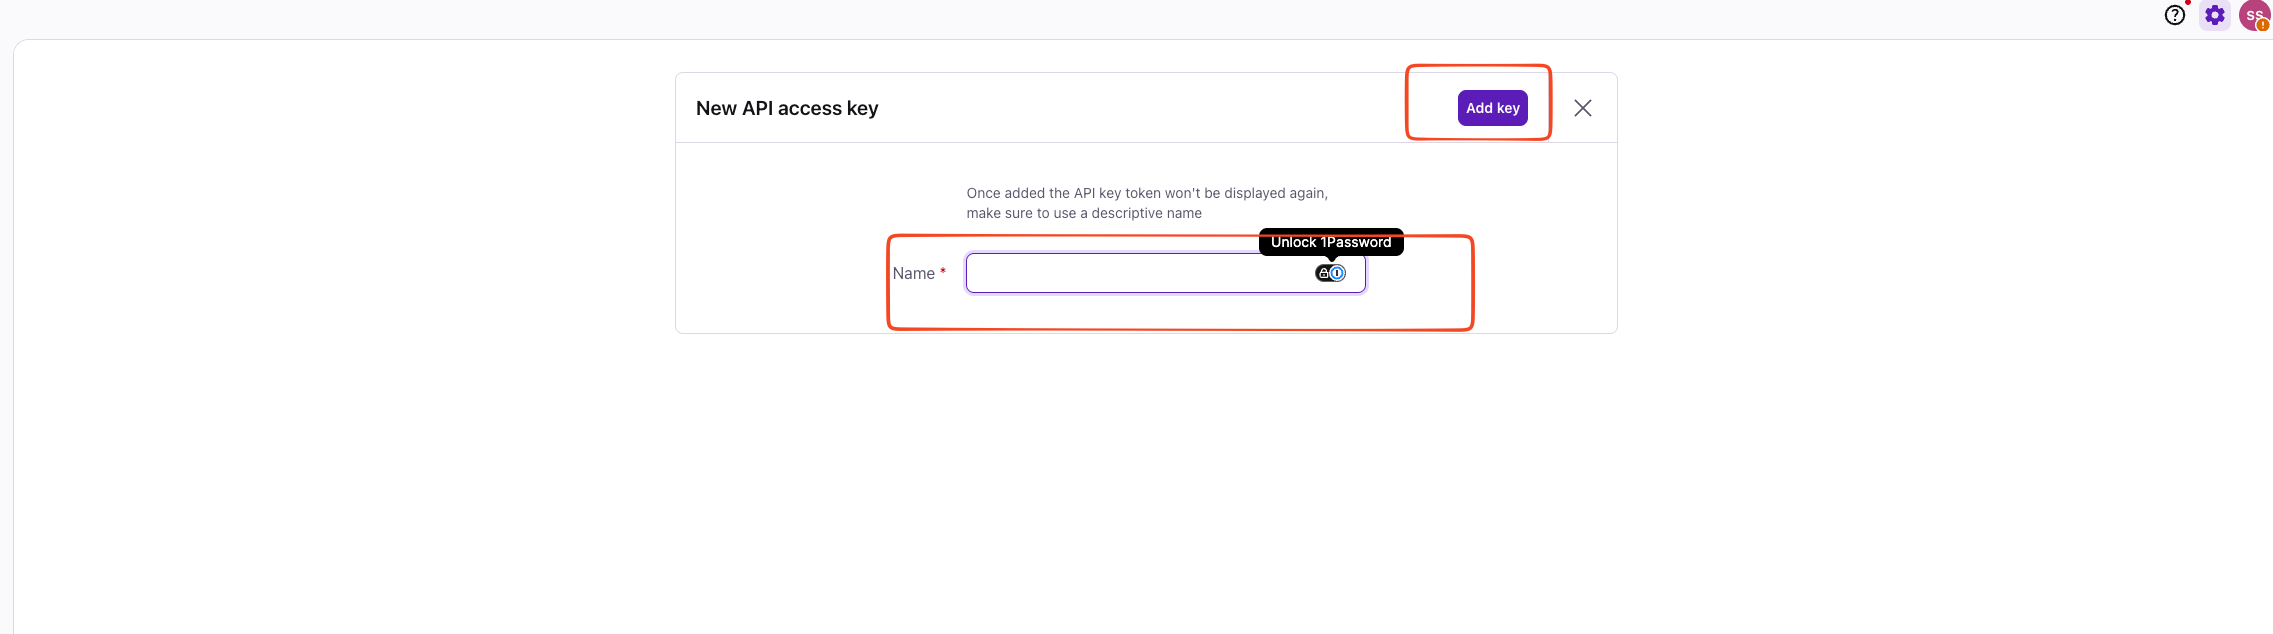
        <p>In the <strong>New API access key</strong> dialog, enter a descriptive <strong>Name</strong> (for example `StackOne`), then click <strong>Add key</strong>.</p>

        <ul>
          <li>Once added, the API key token won't be displayed again — be sure to use a descriptive name.</li>
        </ul>

        <img src="https://mintcdn.com/stackone-60/TewQnuxySG5GRH-F/connectors/kiwihr/images/custom-config-add-keys.png?fit=max&auto=format&n=TewQnuxySG5GRH-F&q=85&s=cacd0679162edb314e76d37cdec8b9bb" alt="New API access key dialog with the Name field and Add key button" width="2273" height="634" data-path="connectors/kiwihr/images/custom-config-add-keys.png" />
      </div>
    </Step>

    <Step title="Copy the API key token">
      <div data-guide-step data-guide-scopes="" data-guide-display-scopes-list="">
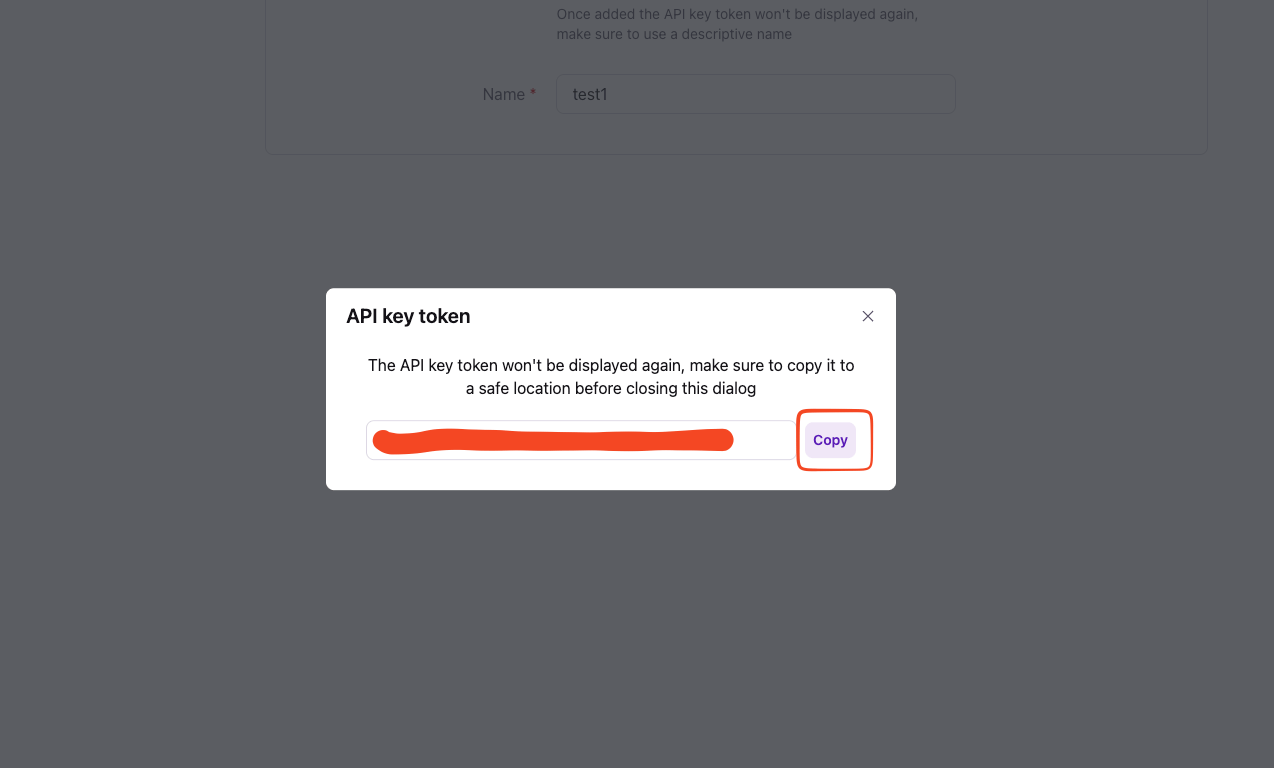
        <p>In the <strong>API key token</strong> dialog, click <strong>Copy</strong> to copy the token, then store it securely for use later.</p>

        <ul>
          <li>The token won't be displayed again — copy it to a safe location before closing the dialog.</li>
        </ul>

        <img src="https://mintcdn.com/stackone-60/TewQnuxySG5GRH-F/connectors/kiwihr/images/custom-config-copy-key.png?fit=max&auto=format&n=TewQnuxySG5GRH-F&q=85&s=d2f54bda498ff3cb7dba0278987b9b72" alt="API key token dialog with the Copy button" width="1274" height="768" data-path="connectors/kiwihr/images/custom-config-copy-key.png" />
      </div>
    </Step>
  </Steps>
</section>

<div data-whitelabel-hide>
  <h2>Linking the Account from the Hub</h2>

  <Steps>
    <Step title="Navigate to the Hub">
      Use one of the three <a href="/guides/accounts-section#linking-accounts">Linking Account Methods</a> to access the Hub.
    </Step>

    <Step title="Fill out the fields">
      Fill out the following fields using details from your provider:

      <ul>
        <li><strong>API Key</strong></li>
      </ul>
    </Step>

    <Step title="Connect">
      <ul>
        <li>Click <strong>Connect</strong></li>
        <li>If applicable, the provider will redirect you to a sign-in or authorization page. Complete the provider's authorization flow.</li>
        <li>Once authorization is successful, you will see a confirmation popup</li>
      </ul>
    </Step>
  </Steps>

  <p>If the account linking is successful, you will see the newly linked account in your <a href="/guides/accounts-section">Accounts</a> page.</p>
</div>