> ## Documentation Index
> Fetch the complete documentation index at: https://docs.stackone.com/llms.txt
> Use this file to discover all available pages before exploring further.

# Connect Jira Service Management with API Token – StackOne Hub

> Link a Jira Service Management account in the StackOne Hub using API Token. End-user guide to authorize the integration and start using Jira Service Management actions.

<Warning>Your API tokens need to be treated as securely as any other password. Tokens can be set to expire (maximum 1 year) and can be revoked at any time.</Warning>

<section data-guide-section data-guide-scopes="">
  <h2>Generate an API token</h2>

  <p>Create a new API token for authenticating with the Jira REST API.</p>

  <Steps>
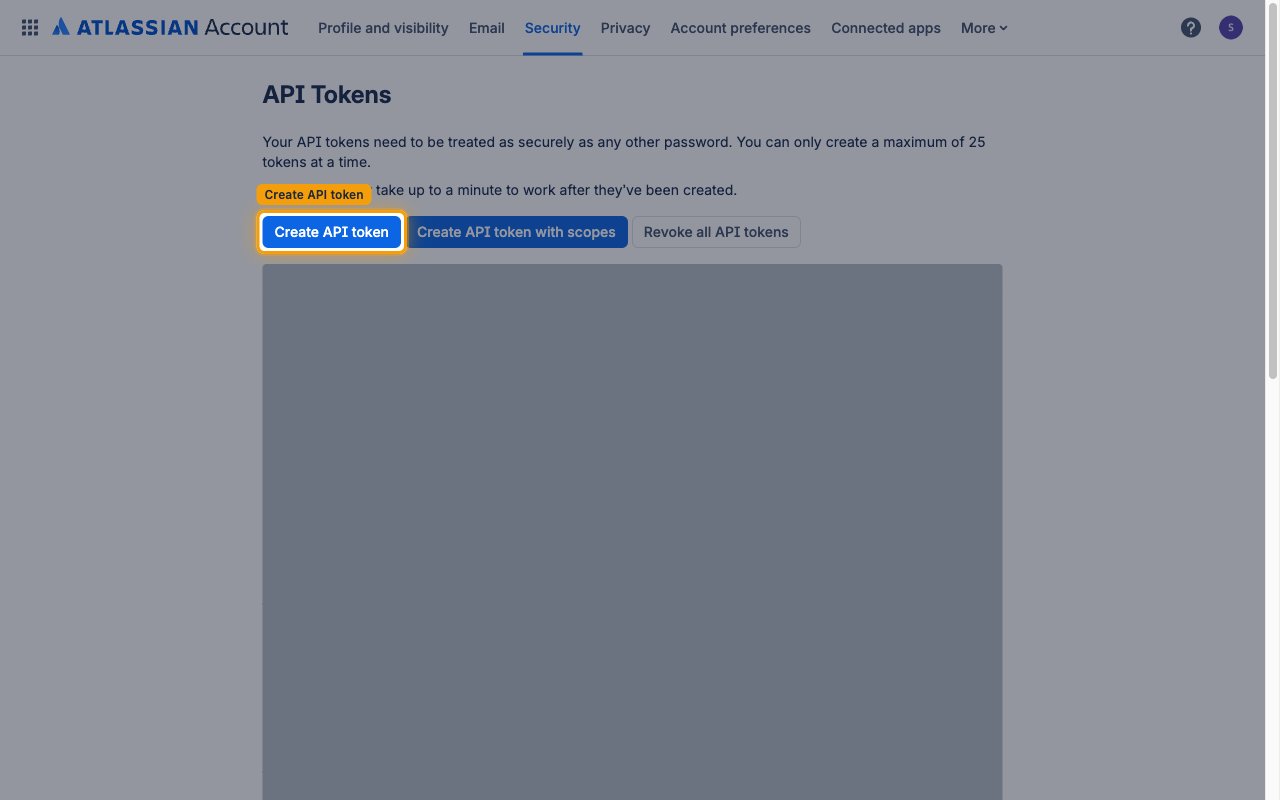
    <Step title="Open the API tokens page">
      <div data-guide-step data-guide-scopes="" data-guide-display-scopes-list="">
        <p>Go to the <a href="https://id.atlassian.com/manage-profile/security/api-tokens" target="_blank" rel="noopener noreferrer">Atlassian API tokens page</a> and click <strong>Create API token</strong>.</p>

        <ul>
          <li>Atlassian may ask you to verify your identity with a code sent to your email before showing this page.</li>
        </ul>

        <img src="https://mintcdn.com/stackone-60/CpbiH7dzg8oo-jeB/connectors/jiraservicemanagement/images/custom-config-api-tokens.png?fit=max&auto=format&n=CpbiH7dzg8oo-jeB&q=85&s=f3d251f6f1094cf70dc56068157cb4e9" alt="Atlassian account API Tokens page with the Create API token button highlighted" width="1280" height="800" data-path="connectors/jiraservicemanagement/images/custom-config-api-tokens.png" />
      </div>
    </Step>

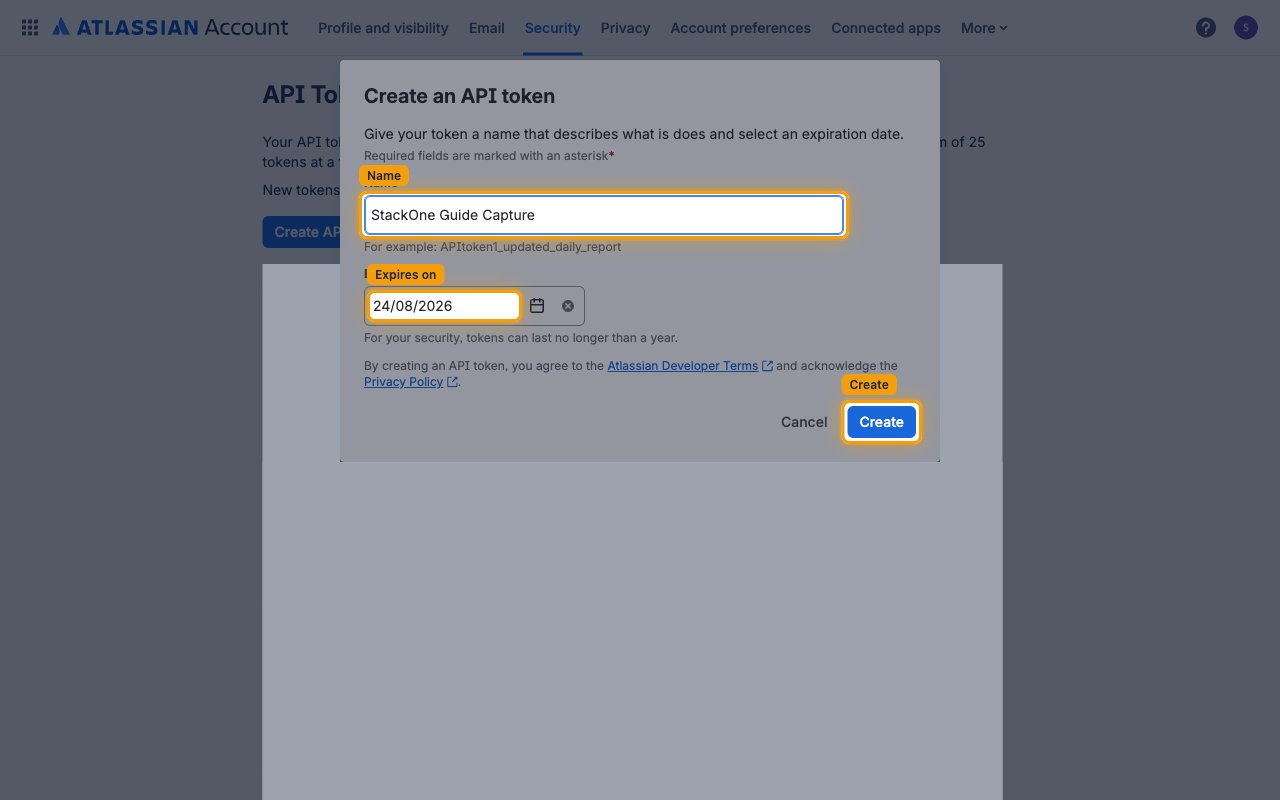
    <Step title="Create the token">
      <div data-guide-step data-guide-scopes="" data-guide-display-scopes-list="">
        <p>Fill in the <strong>Create an API token</strong> dialog.</p>

        <ul>
          <li>Enter a <strong>Name</strong> that describes the integration (e.g., "StackOne JSM Integration").</li>
          <li>Set <strong>Expires on</strong> — for your security, tokens can last no longer than a year.</li>
          <li>Click <strong>Create</strong>.</li>
        </ul>

        <img src="https://mintcdn.com/stackone-60/CpbiH7dzg8oo-jeB/connectors/jiraservicemanagement/images/custom-config-create-token.png?fit=max&auto=format&n=CpbiH7dzg8oo-jeB&q=85&s=07ca183ea77cf272a1bbe7c9b1b0424b" alt="Create an API token dialog with the Name field, Expires on date and Create button highlighted" width="1280" height="800" data-path="connectors/jiraservicemanagement/images/custom-config-create-token.png" />
      </div>
    </Step>

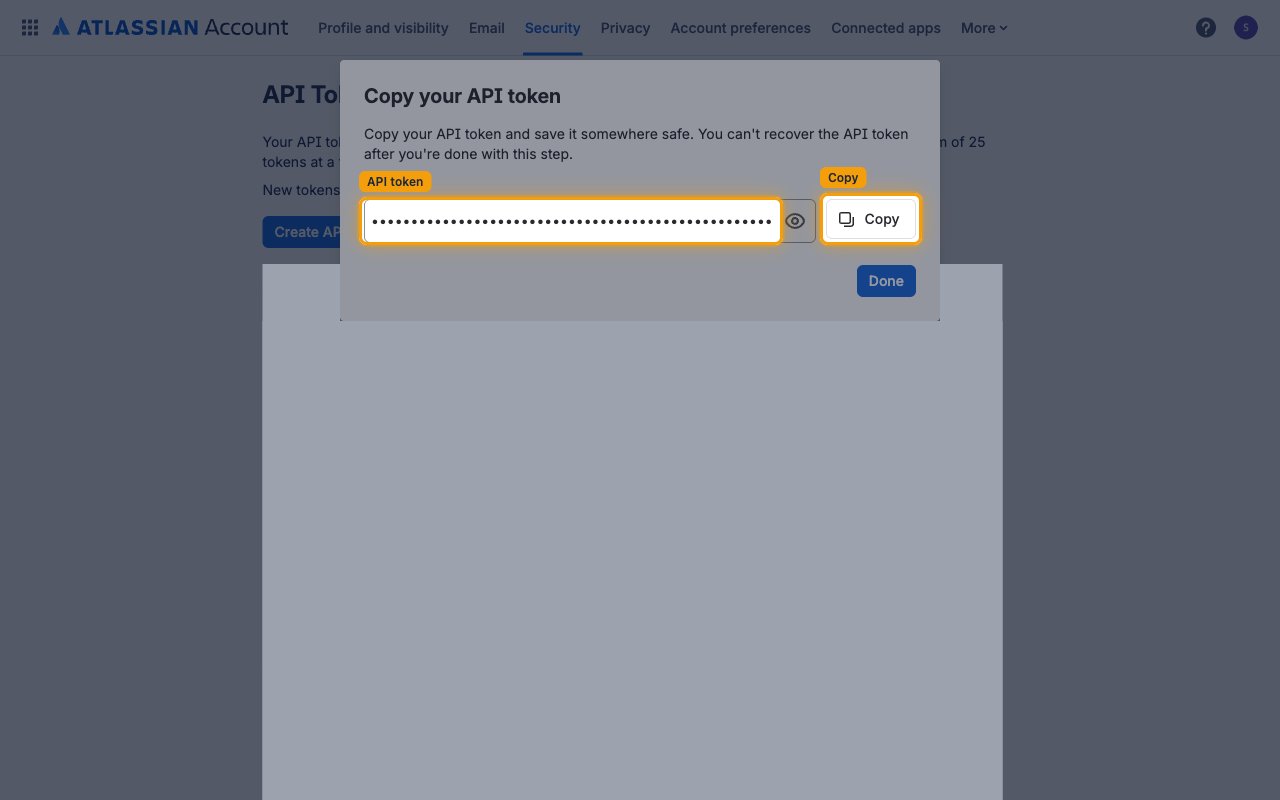
    <Step title="Copy the token">
      <div data-guide-step data-guide-scopes="" data-guide-display-scopes-list="">
        <p>In the <strong>Copy your API token</strong> dialog, click <strong>Copy</strong>, save the value somewhere safe, then click <strong>Done</strong>.</p>

        <ul>
          <li>The token is shown once and cannot be retrieved after you close this dialog.</li>
          <li>New tokens may take up to a minute to work after they have been created.</li>
          <li>Paste the token into the <strong>API Token</strong> field in StackOne Hub.</li>
        </ul>

        <img src="https://mintcdn.com/stackone-60/CpbiH7dzg8oo-jeB/connectors/jiraservicemanagement/images/custom-config-copy-token.png?fit=max&auto=format&n=CpbiH7dzg8oo-jeB&q=85&s=6e2f79a15264bbb9d2646ffb75a45de0" alt="Copy your API token dialog with the masked API token field and Copy button highlighted" width="1280" height="800" data-path="connectors/jiraservicemanagement/images/custom-config-copy-token.png" />
      </div>
    </Step>
  </Steps>
</section>

<section data-guide-section data-guide-scopes="">
  <h2>Find your email and domain</h2>

  <p>Along with the token, StackOne needs the email and domain of the Jira account the token belongs to.</p>

  <Steps>
    <Step title="Find your email">
      <div data-guide-step data-guide-scopes="" data-guide-display-scopes-list="">
        <p><strong>Email</strong> is the address you use to sign in to Jira. You can check it in your <a href="https://id.atlassian.com/manage-profile/email" target="_blank" rel="noopener noreferrer">Atlassian profile email settings</a>. Enter it in the <strong>Email</strong> field in StackOne Hub.</p>
      </div>
    </Step>

    <Step title="Find your domain">
      <div data-guide-step data-guide-scopes="" data-guide-display-scopes-list="">
        <p><strong>Domain</strong> is the part of your Jira URL before `.atlassian.net`. Check your browser address bar when signed in to Jira Service Management and enter just that part in the <strong>Domain</strong> field in StackOne Hub.</p>

        <ul>
          <li>Format: `https://{domain}.atlassian.net`</li>
          <li>Example: if your URL is `https://acme.atlassian.net`, your Domain is `acme`</li>
        </ul>
      </div>
    </Step>
  </Steps>
</section>

<div data-whitelabel-hide>
  <h2>Linking the Account from the Hub</h2>

  <Steps>
    <Step title="Navigate to the Hub">
      Use one of the three <a href="/connect/managing-connectors/linking-accounts">Linking Account Methods</a> to access the Hub.
    </Step>

    <Step title="Fill out the fields">
      Fill out the following fields using details from your provider:

      <ul>
        <li><strong>API Token</strong></li>
        <li><strong>Email</strong></li>
        <li><strong>Domain</strong></li>
      </ul>
    </Step>

    <Step title="Connect">
      <ul>
        <li>Click <strong>Connect</strong></li>
        <li>If applicable, the provider will redirect you to a sign-in or authorization page. Complete the provider's authorization flow.</li>
        <li>Once authorization is successful, you will see a confirmation popup</li>
      </ul>
    </Step>
  </Steps>

  <p>If the account linking is successful, you will see the newly linked account in your <a href="/gateway/concepts/linked-accounts">Accounts</a> page.</p>
</div>