> ## Documentation Index
> Fetch the complete documentation index at: https://docs.stackone.com/llms.txt
> Use this file to discover all available pages before exploring further.

# Google Text-to-Speech OAuth 2.0 connector profile – StackOne setup guide

> Set up the OAuth 2.0 connector profile for Google Text-to-Speech in StackOne. One-time admin setup required before your users can link Google Text-to-Speech accounts via Hub.

<Panel>
  <div className="not-prose guides-scope-selector" data-guides-scope-selector data-guide-actions-json="[{&#x22;id&#x22;:&#x22;googletexttospeech_projects_locations_synthesize_long_audio&#x22;,&#x22;label&#x22;:&#x22;Synthesize Long Audio&#x22;,&#x22;scopes&#x22;:[&#x22;https://www.googleapis.com/auth/cloud-platform&#x22;]},{&#x22;id&#x22;:&#x22;googletexttospeech_projects_locations_operations_list&#x22;,&#x22;label&#x22;:&#x22;List Operations&#x22;,&#x22;scopes&#x22;:[&#x22;https://www.googleapis.com/auth/cloud-platform&#x22;]},{&#x22;id&#x22;:&#x22;googletexttospeech_projects_locations_operations_get&#x22;,&#x22;label&#x22;:&#x22;Get Operation&#x22;,&#x22;scopes&#x22;:[&#x22;https://www.googleapis.com/auth/cloud-platform&#x22;]},{&#x22;id&#x22;:&#x22;googletexttospeech_operations_cancel&#x22;,&#x22;label&#x22;:&#x22;Cancel Operation&#x22;,&#x22;scopes&#x22;:[&#x22;https://www.googleapis.com/auth/cloud-platform&#x22;]},{&#x22;id&#x22;:&#x22;googletexttospeech_operations_delete&#x22;,&#x22;label&#x22;:&#x22;Delete Operation&#x22;,&#x22;scopes&#x22;:[&#x22;https://www.googleapis.com/auth/cloud-platform&#x22;]},{&#x22;id&#x22;:&#x22;googletexttospeech_text_synthesize&#x22;,&#x22;label&#x22;:&#x22;Synthesize Speech&#x22;,&#x22;scopes&#x22;:[&#x22;https://www.googleapis.com/auth/cloud-platform&#x22;]},{&#x22;id&#x22;:&#x22;googletexttospeech_voices_list&#x22;,&#x22;label&#x22;:&#x22;List Voices&#x22;,&#x22;scopes&#x22;:[&#x22;https://www.googleapis.com/auth/cloud-platform&#x22;]}]">
    <div className="guides-scope-selector__title">Select Actions to adjust the guide</div>
    <div className="guides-scope-selector__muted guides-scope-selector__subtitle">Some actions may require additional configuration in the provider to be accessible. Choose the actions you need and the guide will be updated.</div>

    <div className="guides-scope-selector__toolbar">
      <input type="text" placeholder="Search actions..." className="guides-scope-selector__input guides-scope-selector__search" data-guide-action-search />

      <button type="button" className="guides-scope-selector__quick-btn" data-guide-select-all>Select all</button>
      <button type="button" className="guides-scope-selector__quick-btn" data-guide-clear>Clear</button>
    </div>

    <div className="guides-scope-selector__list">
      <div className="guides-scope-selector__list-header">
        <div className="guides-scope-selector__list-header-spacer" />

        <div className="guides-scope-selector__list-header-action">Action</div>
        <div className="guides-scope-selector__list-header-scopes">Scope(s)</div>
      </div>

      <div className="guides-scope-selector__muted guides-scope-selector__status" data-guide-loading>Loading actions...</div>
      <div className="guides-scope-selector__muted guides-scope-selector__status" data-guide-no-results hidden>No actions match your search.</div>
    </div>

    <div className="guides-scope-selector__url-section">
      <div className="guides-scope-selector__muted guides-scope-selector__label">Dynamic Guide URL</div>

      <div className="guides-scope-selector__url-row">
        <input type="text" readOnly className="guides-scope-selector__input guides-scope-selector__url-input" data-guide-url />

        <button type="button" className="guides-scope-selector__copy-btn guides-scope-selector__copy-btn--end" data-guide-copy-url>Copy URL</button>
      </div>

      <div className="guides-scope-selector__scopes-section">
        <div className="guides-scope-selector__muted guides-scope-selector__label">Scopes Selected</div>

        <div className="guides-scope-selector__scopes-row">
          <pre className="guides-scope-selector__input guides-scope-selector__scopes-output" role="textbox" aria-readonly="true" tabIndex={0} data-guide-scopes-output />

          <div className="guides-scope-selector__muted guides-scope-selector__side-controls">
            <div className="guides-scope-selector__side-label">Separator</div>

            <select className="guides-scope-selector__input guides-scope-selector__delimiter" data-guide-scope-delimiter>
              <option value="space">Space</option>
              <option value="comma">Comma</option>
              <option value="semicolon">Semicolon</option>
              <option value="pipe">Pipe</option>
              <option value="newline">Newline</option>
            </select>

            <button type="button" className="guides-scope-selector__copy-btn" data-guide-copy-scopes>Copy scopes</button>
          </div>
        </div>
      </div>
    </div>
  </div>
</Panel>

<section data-guide-section data-guide-scopes="">
  <h2>Select a Google Cloud project</h2>

  <p>StackOne connects to the Cloud Text-to-Speech API through an OAuth client that lives in a Google Cloud project.</p>

  <Steps>
    <Step title="Sign in to Google Cloud">
      <div data-guide-step data-guide-scopes="" data-guide-display-scopes-list="">
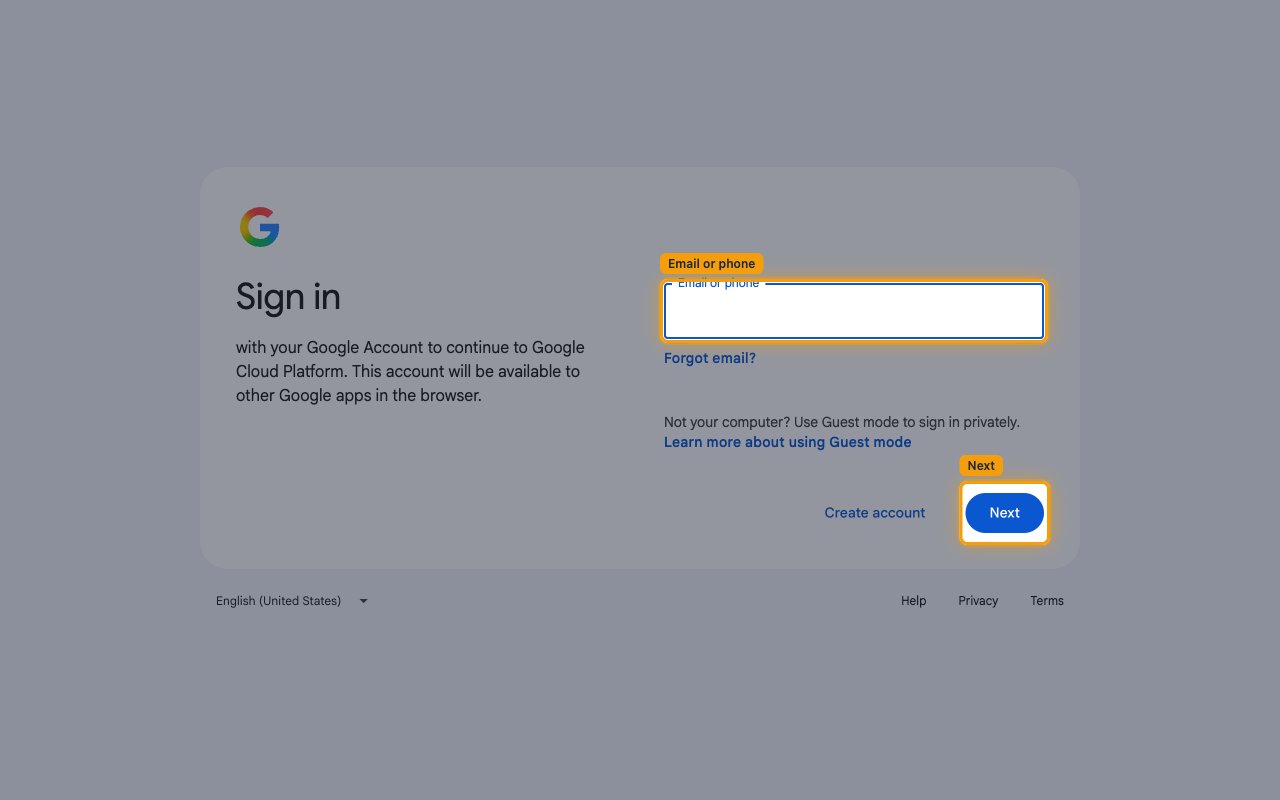
        <p>Sign in to your <a href="https://console.cloud.google.com/" target="_blank" rel="noopener noreferrer">Google Cloud account</a>.</p>

        <ul>
          <li>Enter your <strong>Email or phone</strong>, click <strong>Next</strong> and complete the sign-in.</li>
        </ul>

        <img src="https://mintcdn.com/stackone-60/egLCtGzkQpmna7BV/connectors/googletexttospeech/images/oauth2-setup-sign-in.png?fit=max&auto=format&n=egLCtGzkQpmna7BV&q=85&s=2356722531b02c5a8b59ee02f28980e9" alt="Google sign-in page with the Email or phone field and the Next button highlighted" width="1280" height="800" data-path="connectors/googletexttospeech/images/oauth2-setup-sign-in.png" />
      </div>
    </Step>

    <Step title="Select or create a project">
      <div data-guide-step data-guide-scopes="" data-guide-display-scopes-list="">
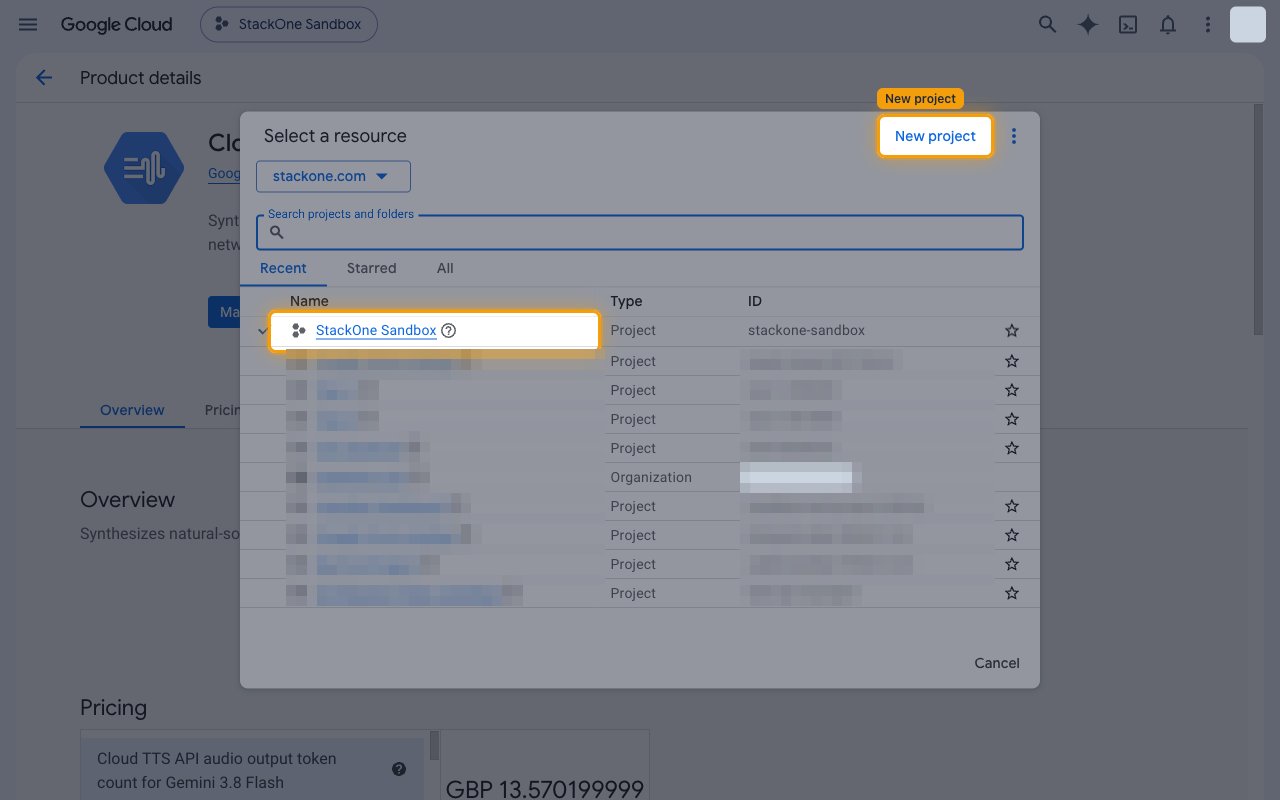
        <p>Click the project picker in the top bar to open <strong>Select a resource</strong>.</p>

        <ul>
          <li>Select the project you want to connect from the list.</li>
          <li>To use a new project, click <strong>New project</strong> and create it.</li>
        </ul>

        <img src="https://mintcdn.com/stackone-60/egLCtGzkQpmna7BV/connectors/googletexttospeech/images/oauth2-setup-select-project.png?fit=max&auto=format&n=egLCtGzkQpmna7BV&q=85&s=0ef269d33152df40aef97aebbc17f58a" alt="Select a resource dialog with the New project button and an existing project highlighted" width="1280" height="800" data-path="connectors/googletexttospeech/images/oauth2-setup-select-project.png" />
      </div>
    </Step>
  </Steps>
</section>

<section data-guide-section data-guide-scopes="">
  <h2>Enable the Cloud Text-to-Speech API</h2>

  <p>The Cloud Text-to-Speech API must be enabled in the project, and the project must have billing enabled.</p>

  <Steps>
    <Step title="Enable the API">
      <div data-guide-step data-guide-scopes="" data-guide-display-scopes-list="">
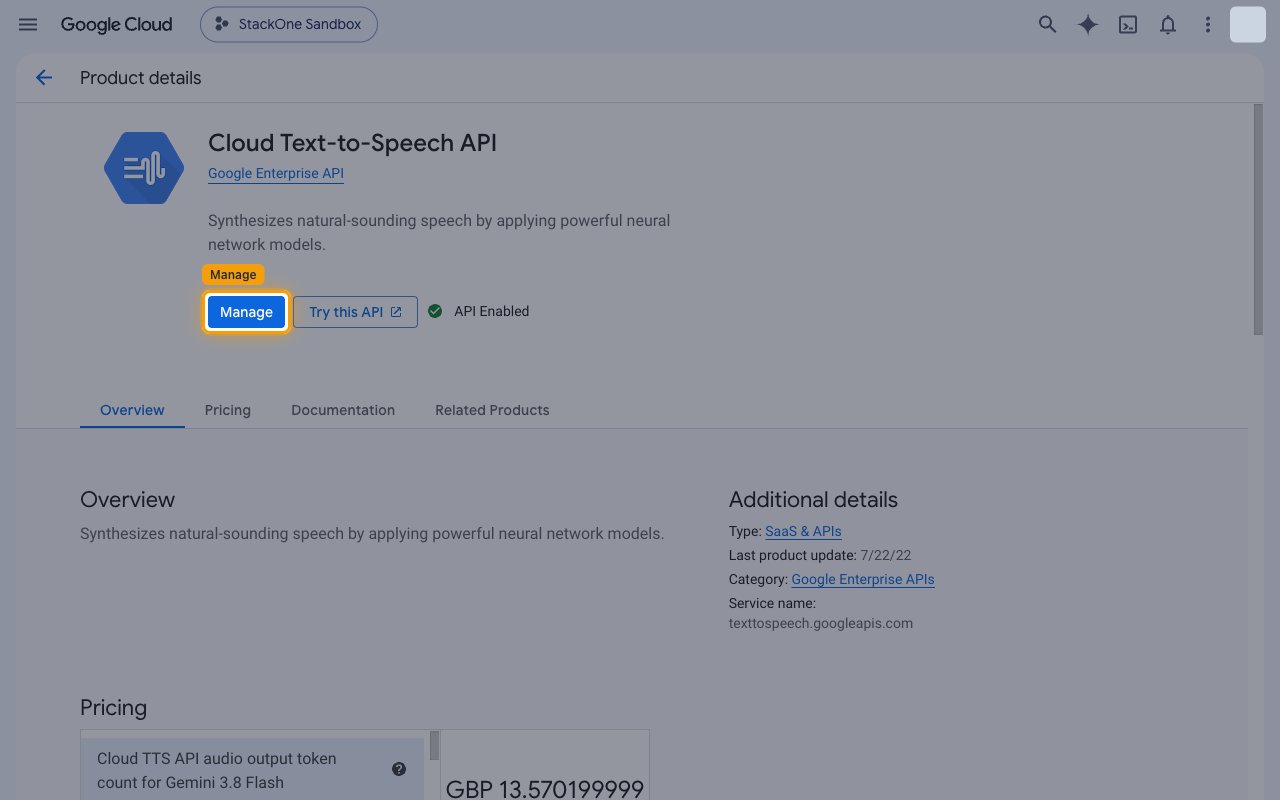
        <p>With your project selected, open the <a href="https://console.cloud.google.com/apis/library/texttospeech.googleapis.com" target="_blank" rel="noopener noreferrer">Cloud Text-to-Speech API page</a> and click <strong>Enable</strong>.</p>

        <ul>
          <li>If the API is already enabled, the page shows <strong>API Enabled</strong> and a <strong>Manage</strong> button instead, and no action is needed.</li>
        </ul>

        <img src="https://mintcdn.com/stackone-60/egLCtGzkQpmna7BV/connectors/googletexttospeech/images/oauth2-setup-enable-api.png?fit=max&auto=format&n=egLCtGzkQpmna7BV&q=85&s=9b7f90877373ca6d1d40342e600047a8" alt="Cloud Text-to-Speech API product page showing API Enabled with the Manage button highlighted" width="1280" height="800" data-path="connectors/googletexttospeech/images/oauth2-setup-enable-api.png" />
      </div>
    </Step>
  </Steps>
</section>

<section data-guide-section data-guide-scopes="">
  <h2>Configure the Google Auth Platform</h2>

  <p>Open <a href="https://console.cloud.google.com/auth/overview" target="_blank" rel="noopener noreferrer">Google Auth Platform</a> for your project. These pages control the consent screen users see when they connect.</p>

  <Steps>
    <Step title="Review the branding">
      <div data-guide-step data-guide-scopes="" data-guide-display-scopes-list="">
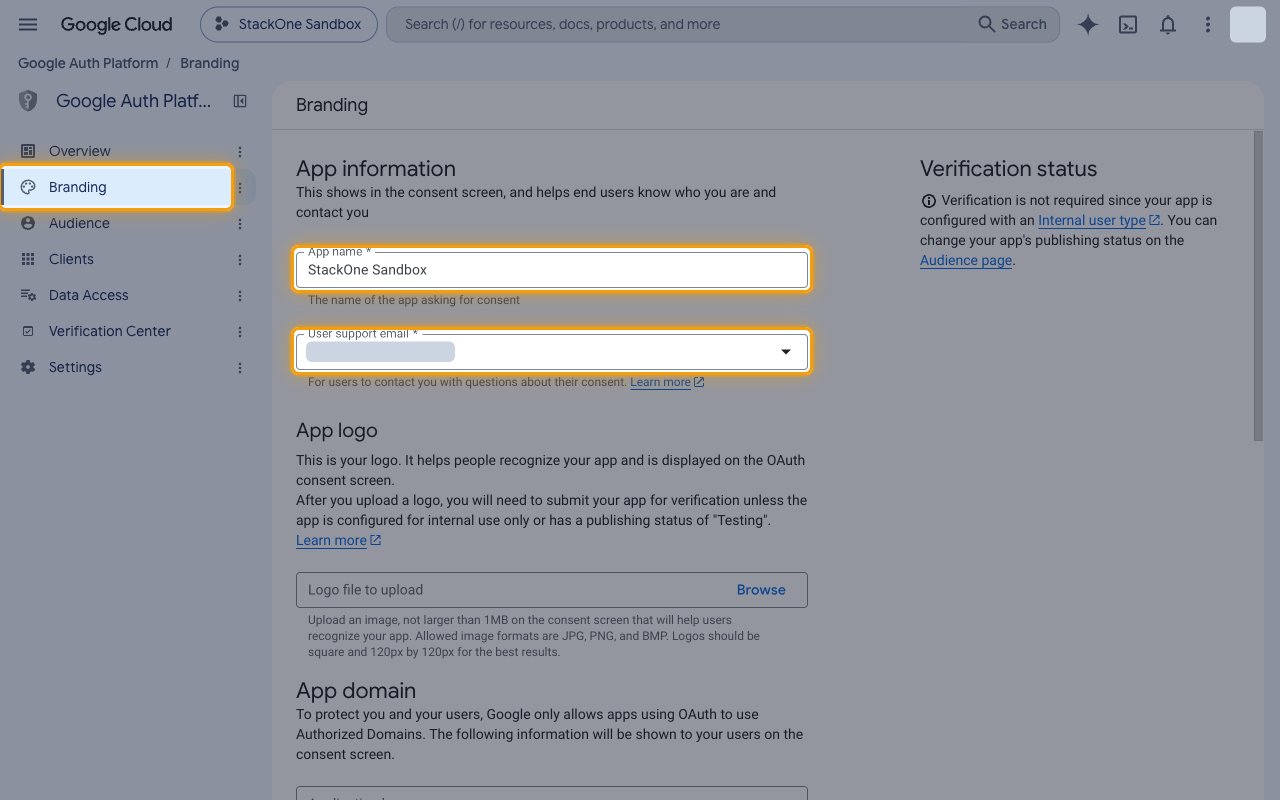
        <p>In the sidebar, click <strong>Branding</strong> and fill in the <strong>App information</strong> section.</p>

        <ul>
          <li><strong>App name</strong> — the name users see on the Google consent screen (for example, `StackOne Integration`).</li>
          <li><strong>User support email</strong> — the address users can contact with questions about their consent.</li>
          <li>Under <strong>Developer contact information</strong>, enter at least one address in <strong>Email addresses</strong>.</li>
          <li>Click <strong>Save</strong> if you changed anything.</li>
        </ul>

        <img src="https://mintcdn.com/stackone-60/egLCtGzkQpmna7BV/connectors/googletexttospeech/images/oauth2-setup-branding.png?fit=max&auto=format&n=egLCtGzkQpmna7BV&q=85&s=c01482de86f5897a34b99c4604c3ecd5" alt="Google Auth Platform Branding page with the App name and User support email fields highlighted" width="1280" height="800" data-path="connectors/googletexttospeech/images/oauth2-setup-branding.png" />
      </div>
    </Step>

    <Step title="Choose the audience">
      <div data-guide-step data-guide-scopes="" data-guide-display-scopes-list="">
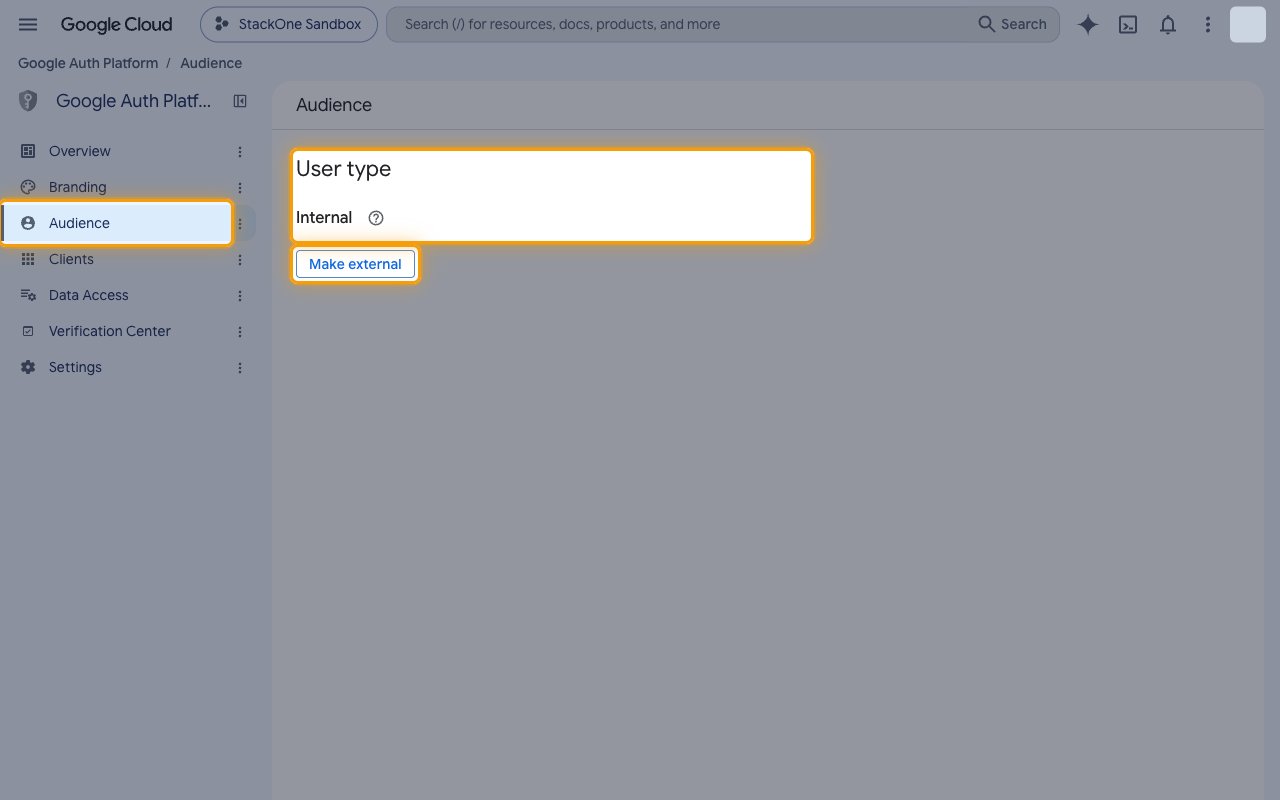
        <p>In the sidebar, click <strong>Audience</strong> and check the <strong>User type</strong>.</p>

        <ul>
          <li><strong>Internal</strong> — only users in your Google Workspace organization can authorize the app.</li>
          <li>External (switch with <strong>Make external</strong>) — any Google account can authorize the app. While an external app's publishing status is Testing, refresh tokens expire after 7 days and the connection must be re-authorized, so publish the app to production for long-lived access.</li>
        </ul>

        <img src="https://mintcdn.com/stackone-60/egLCtGzkQpmna7BV/connectors/googletexttospeech/images/oauth2-setup-audience.png?fit=max&auto=format&n=egLCtGzkQpmna7BV&q=85&s=2567a5b6b8f4f716dc406c62d505b361" alt="Google Auth Platform Audience page with the User type and the Make external button highlighted" width="1280" height="800" data-path="connectors/googletexttospeech/images/oauth2-setup-audience.png" />
      </div>
    </Step>

    <Step title="Open Data Access">
      <div data-guide-step data-guide-scopes="" data-guide-display-scopes-list="">
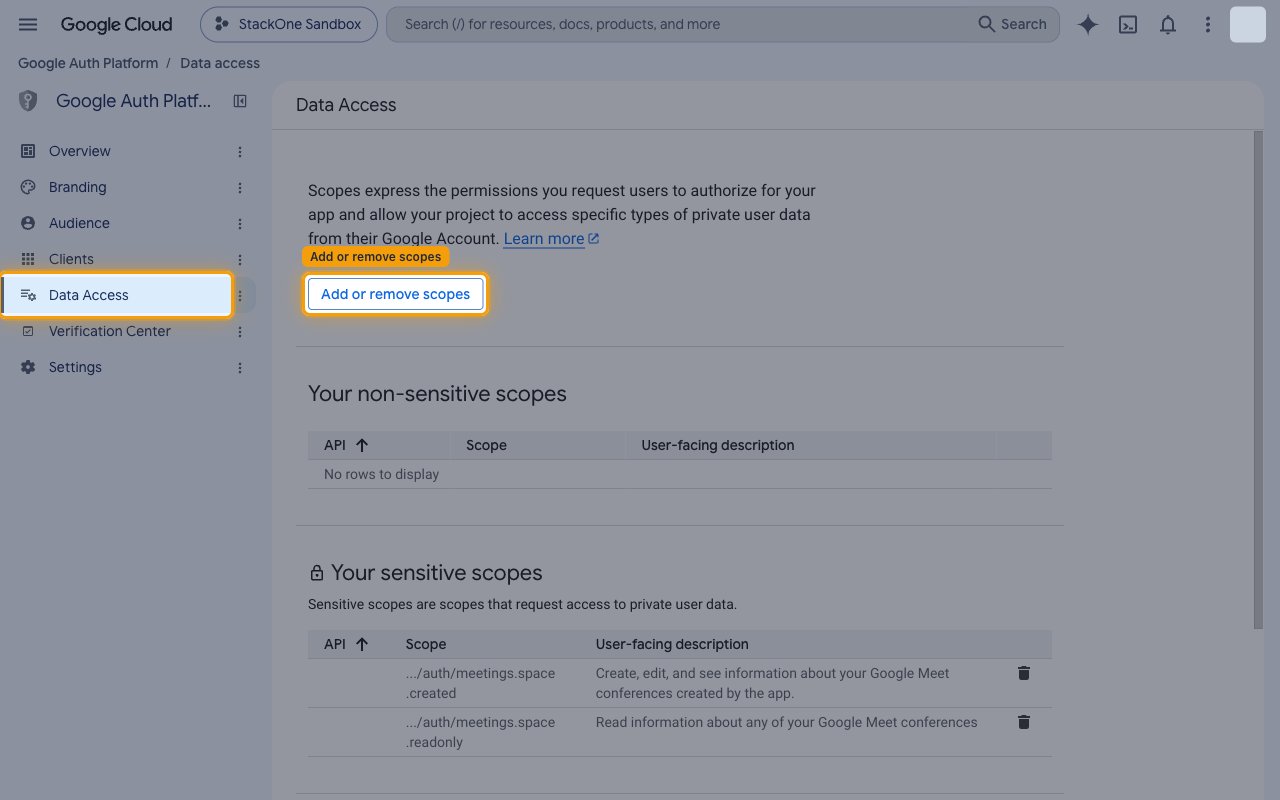
        <p>In the sidebar, click <strong>Data Access</strong>, then click <strong>Add or remove scopes</strong>.</p>

        <img src="https://mintcdn.com/stackone-60/egLCtGzkQpmna7BV/connectors/googletexttospeech/images/oauth2-setup-data-access.png?fit=max&auto=format&n=egLCtGzkQpmna7BV&q=85&s=41eb62c6d3060bf67b5841f55643803f" alt="Google Auth Platform Data Access page with the Add or remove scopes button highlighted" width="1280" height="800" data-path="connectors/googletexttospeech/images/oauth2-setup-data-access.png" />
      </div>
    </Step>

    <Step title="Add the Cloud Platform scope">
      <div data-guide-step data-guide-scopes="https://www.googleapis.com/auth/cloud-platform" data-guide-display-scopes-list="https://www.googleapis.com/auth/cloud-platform">
        <div className="connector-guide-actions-badge" data-guide-actions-badge data-guide-actions-badge-scopes="https://www.googleapis.com/auth/cloud-platform">
          <span>Enables actions: </span><span data-guide-actions-badge-labels>Cancel Operation, Delete Operation, Get Operation, List Operations, List Voices, Synthesize Long Audio, Synthesize Speech</span>
        </div>

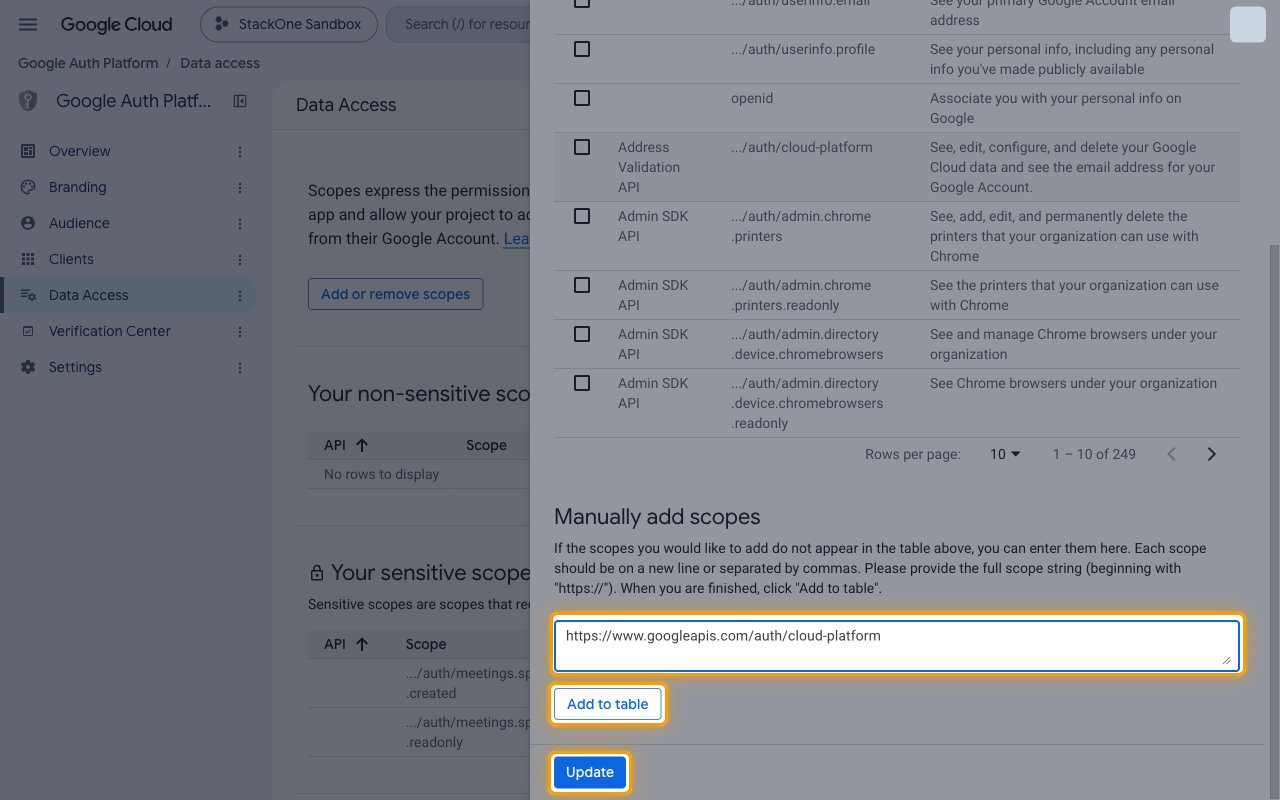
        <p>In the <strong>Update selected scopes</strong> panel, paste the scope below into the <strong>Manually add scopes</strong> box, click <strong>Add to table</strong>, then click <strong>Update</strong>. Back on <strong>Data Access</strong>, click <strong>Save</strong>. The Cloud Text-to-Speech API accepts only this scope, so leave the <strong>Scopes</strong> field in the StackOne Connector profile empty to request it by default.</p>

        <img src="https://mintcdn.com/stackone-60/egLCtGzkQpmna7BV/connectors/googletexttospeech/images/oauth2-setup-add-scope.png?fit=max&auto=format&n=egLCtGzkQpmna7BV&q=85&s=201dccc9743789ee4c48d2b4db432789" alt="Update selected scopes panel with the cloud-platform scope pasted into Manually add scopes and the Add to table and Update buttons highlighted" width="1280" height="800" data-path="connectors/googletexttospeech/images/oauth2-setup-add-scope.png" />

        <div className="connector-guide-display-scopes" data-guide-display-scopes>
          <div className="connector-guide-scopes-container">
            <ul className="not-prose connector-guide-scopes-list">
              <li data-guide-display-scope="https://www.googleapis.com/auth/cloud-platform">
                <button type="button" className="connector-guide-scope-copy" aria-label="Copy https://www.googleapis.com/auth/cloud-platform" title="Copy scope" data-copy="https://www.googleapis.com/auth/cloud-platform">
                  <span className="connector-guide-scope-copy__label">[https://www.googleapis.com/auth/cloud-platform](https://www.googleapis.com/auth/cloud-platform)</span>
                  <span className="connector-guide-scope-copy__icon" aria-hidden="true">⧉</span>
                </button>
              </li>
            </ul>
          </div>
        </div>
      </div>
    </Step>
  </Steps>
</section>

<section data-guide-section data-guide-scopes="">
  <h2>Create OAuth 2.0 client credentials</h2>

  <p>Create a web application OAuth client. StackOne uses its Client ID and Client Secret to request access on behalf of each connected account.</p>

  <Steps>
    <Step title="Open Clients">
      <div data-guide-step data-guide-scopes="" data-guide-display-scopes-list="">
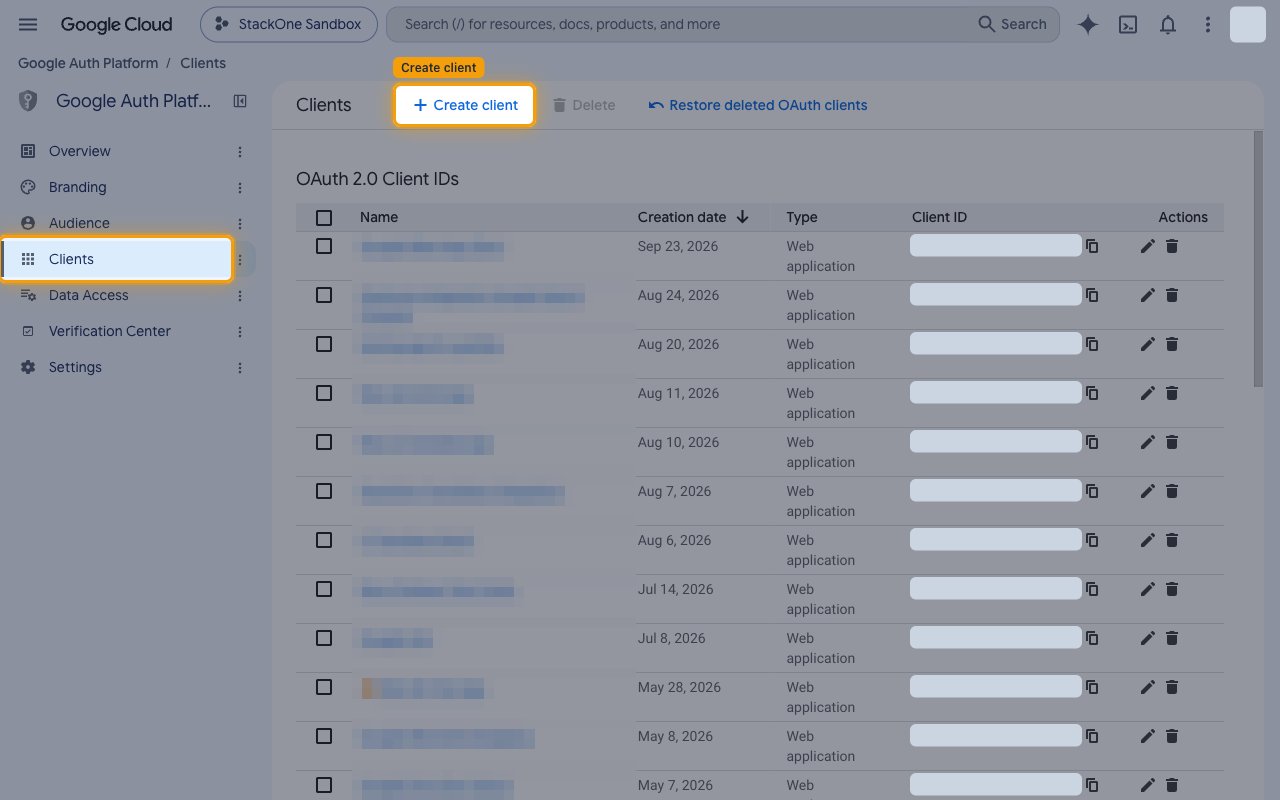
        <p>In the Google Auth Platform sidebar, click <strong>Clients</strong>, then click <strong>Create client</strong>.</p>

        <img src="https://mintcdn.com/stackone-60/egLCtGzkQpmna7BV/connectors/googletexttospeech/images/oauth2-setup-create-client.png?fit=max&auto=format&n=egLCtGzkQpmna7BV&q=85&s=7e75ff563652dc39dd907a0b8ff91772" alt="Google Auth Platform Clients page with the Create client button highlighted" width="1280" height="800" data-path="connectors/googletexttospeech/images/oauth2-setup-create-client.png" />
      </div>
    </Step>

    <Step title="Choose the application type">
      <div data-guide-step data-guide-scopes="" data-guide-display-scopes-list="">
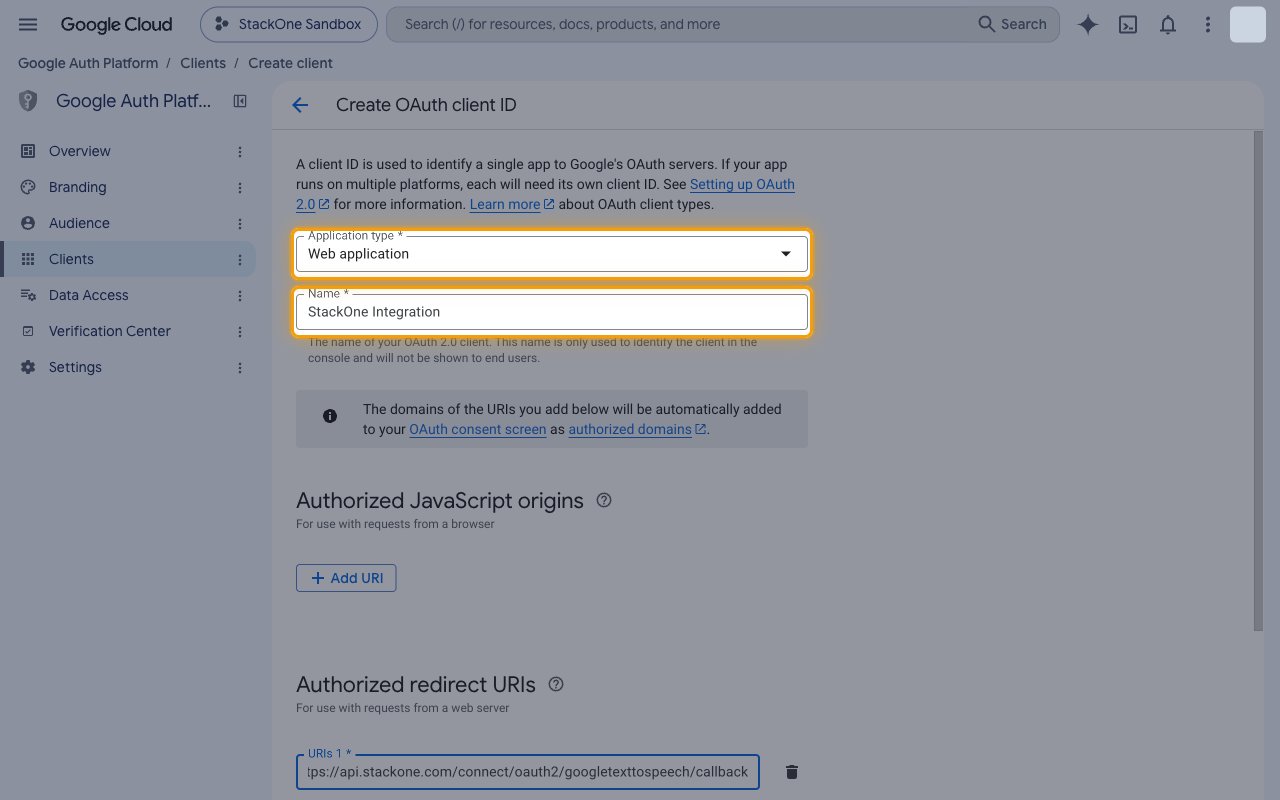
        <p>On <strong>Create OAuth client ID</strong>, set <strong>Application type</strong> to <strong>Web application</strong>.</p>

        <ul>
          <li>In <strong>Name</strong>, enter `StackOne Integration`. The name only identifies the client in the console.</li>
        </ul>

        <img src="https://mintcdn.com/stackone-60/egLCtGzkQpmna7BV/connectors/googletexttospeech/images/oauth2-setup-client-type.png?fit=max&auto=format&n=egLCtGzkQpmna7BV&q=85&s=4f41fcea43c0e9a2091ff21d2031759b" alt="Create OAuth client ID form with Application type set to Web application and the Name field highlighted" width="1280" height="800" data-path="connectors/googletexttospeech/images/oauth2-setup-client-type.png" />
      </div>
    </Step>

    <Step title="Add the redirect URI">
      <div data-guide-step data-guide-scopes="" data-guide-display-scopes-list="">
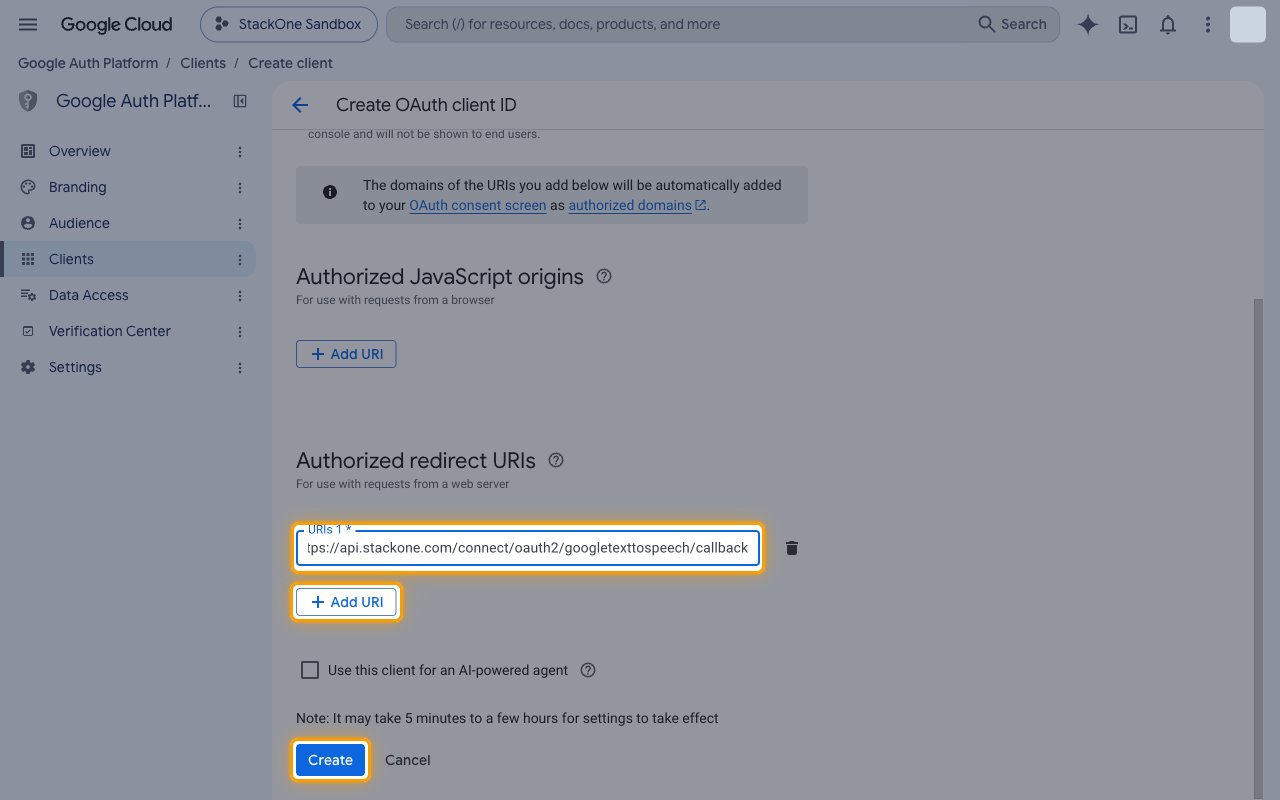
        <p>Under <strong>Authorized redirect URIs</strong>, click <strong>Add URI</strong> and enter `https://api.stackone.com/connect/oauth2/googletexttospeech/callback`.</p>

        <ul>
          <li>Click <strong>Create</strong>.</li>
          <li>Google notes that it may take 5 minutes to a few hours for new settings to take effect.</li>
        </ul>

        <img src="https://mintcdn.com/stackone-60/egLCtGzkQpmna7BV/connectors/googletexttospeech/images/oauth2-setup-redirect-uri.png?fit=max&auto=format&n=egLCtGzkQpmna7BV&q=85&s=8fc75bad1ff72d5e494c9b72289acf10" alt="Authorized redirect URIs section with the StackOne callback URL entered and the Create button highlighted" width="1280" height="800" data-path="connectors/googletexttospeech/images/oauth2-setup-redirect-uri.png" />
      </div>
    </Step>

    <Step title="Copy the client credentials">
      <div data-guide-step data-guide-scopes="" data-guide-display-scopes-list="">
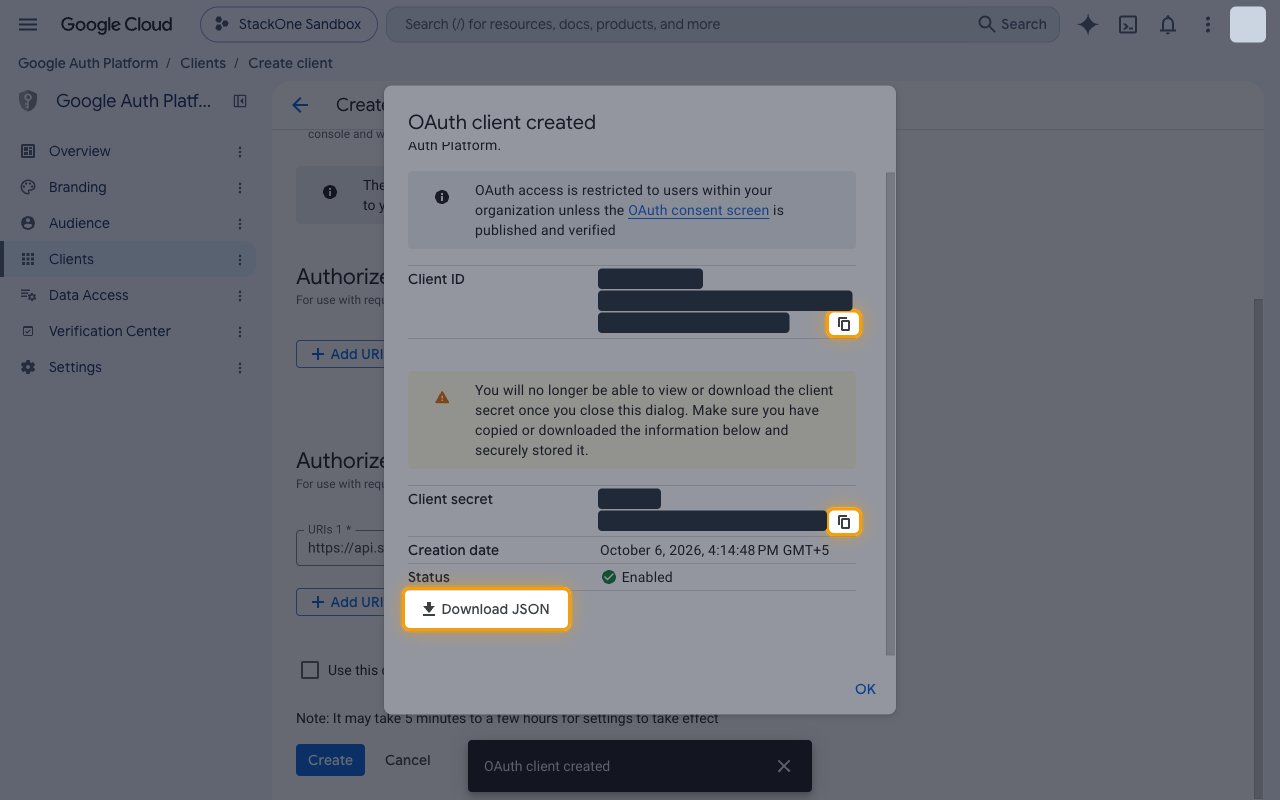
        <p>The <strong>OAuth client created</strong> dialog shows the new credentials. Copy both values now and store them securely for use later.</p>

        <ul>
          <li><strong>Client ID</strong> — the public identifier of the OAuth client. Click the copy icon next to it and paste the value into the <strong>Client ID</strong> field in the StackOne Connector profile.</li>
          <li><strong>Client secret</strong> — the private key StackOne uses to exchange and refresh tokens. Click the copy icon next to it and paste the value into the <strong>Client Secret</strong> field in the StackOne Connector profile.</li>
          <li>The Client Secret is only displayed once. You will no longer be able to view or download the client secret once you close this dialog, so click <strong>Download JSON</strong> to keep a copy.</li>
          <li>Click <strong>OK</strong> to close the dialog.</li>
        </ul>

        <img src="https://mintcdn.com/stackone-60/egLCtGzkQpmna7BV/connectors/googletexttospeech/images/oauth2-setup-client-credentials.png?fit=max&auto=format&n=egLCtGzkQpmna7BV&q=85&s=38cd88c2f225501cedbe07bd13ed6a3f" alt="OAuth client created dialog with the Client ID and Client secret values hidden and the copy icons and Download JSON button highlighted" width="1280" height="800" data-path="connectors/googletexttospeech/images/oauth2-setup-client-credentials.png" />
      </div>
    </Step>
  </Steps>
</section>

## Creating the StackOne Connector Profile

To create the Connector Profile in StackOne for <strong>Google Text-to-Speech</strong>:

<Steps>
  <Step title="Navigate to Connector Profiles">
    Login to StackOne and navigate to [Connector Profiles](https://app.stackone.com/connector_profiles)
  </Step>

  <Step title="Create New Connector Profile">
    <ul>
      <li>Click <strong>+ Connector Profile</strong></li>
      <li>Search for and select <strong>Google Text-to-Speech</strong></li>
      <li>Select <strong>Type</strong> as <strong>OAuth 2.0</strong></li>

      <li>
        Fill out the fields using details retrieved from your provider:

        <ul className="connector-guide-field-list">
          <li><strong>Client ID</strong></li>
          <li><strong>Client Secret</strong></li>
          <li><strong>Scopes</strong> (Optional)</li>
        </ul>
      </li>

      <li>(Optional) Select <strong>Actions</strong> to be enabled for this Connector Profile</li>
      <li>Click <strong>Create profile</strong></li>
    </ul>
  </Step>
</Steps>

Congratulations! The new Connector Profile will now show up in your project ready to be used. You can now continue to <a href="/connect/managing-connectors/linking-accounts">Link Accounts</a> for <strong>Google Text-to-Speech</strong>.


This documentation is built and hosted on [Mintlify](https://mintlify.com), a developer documentation platform.