> ## Documentation Index
> Fetch the complete documentation index at: https://docs.stackone.com/llms.txt
> Use this file to discover all available pages before exploring further.

# Connect Expo with Access Token – StackOne Hub

> Link a Expo account in the StackOne Hub using Access Token. End-user guide to authorize the integration and start using Expo actions.

<Warning>The access token is shown only once when it is generated and cannot be retrieved later — copy it before leaving the page. If you lose it, generate a new token.</Warning>

<section data-guide-section data-guide-scopes="">
  <h2>Create an Expo access token</h2>

  <p>StackOne connects to Expo (EAS) with an EAS access token, sent as a bearer token. The most common choice for an integration is a <strong>robot user</strong> token created on your Expo account, so the access is not tied to a personal login. Create the robot user, generate its token, and paste the token into StackOne.</p>

  <Steps>
    <Step title="Open the Access tokens page">
      <div data-guide-step data-guide-scopes="" data-guide-display-scopes-list="">
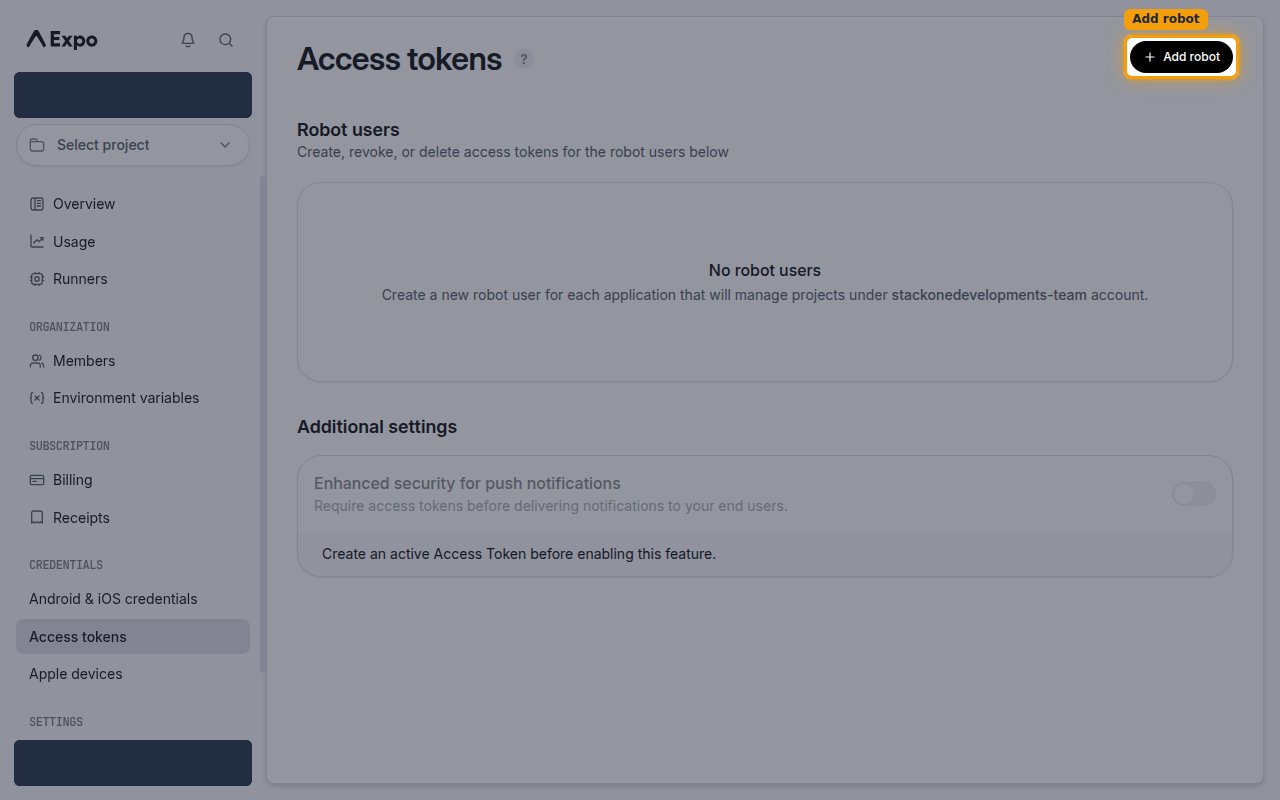
        <p>Sign in to Expo, then open your account. In the left sidebar under <strong>Credentials</strong>, click <strong>Access tokens</strong>. In the top-right, click <strong>+ Add robot</strong> to create a robot user that will own the token.</p>

        <ul>
          <li>Sign in at the <a href="https://expo.dev/login" target="_blank" rel="noopener noreferrer">Expo dashboard</a>.</li>
          <li>Open <strong>Access tokens</strong> under <strong>Credentials</strong> in the sidebar, then click <strong>+ Add robot</strong>.</li>
        </ul>

        <img src="https://mintcdn.com/stackone-60/Ae0-z_qoKYnGrHKe/connectors/expo/images/custom-config-access-tokens.png?fit=max&auto=format&n=Ae0-z_qoKYnGrHKe&q=85&s=62e9d8b1f49aa0aeb49c6981be16fe70" alt="The Expo Access tokens page with the Add robot button highlighted" width="1280" height="800" data-path="connectors/expo/images/custom-config-access-tokens.png" />
      </div>
    </Step>

    <Step title="Create a robot user">
      <div data-guide-step data-guide-scopes="" data-guide-display-scopes-list="">
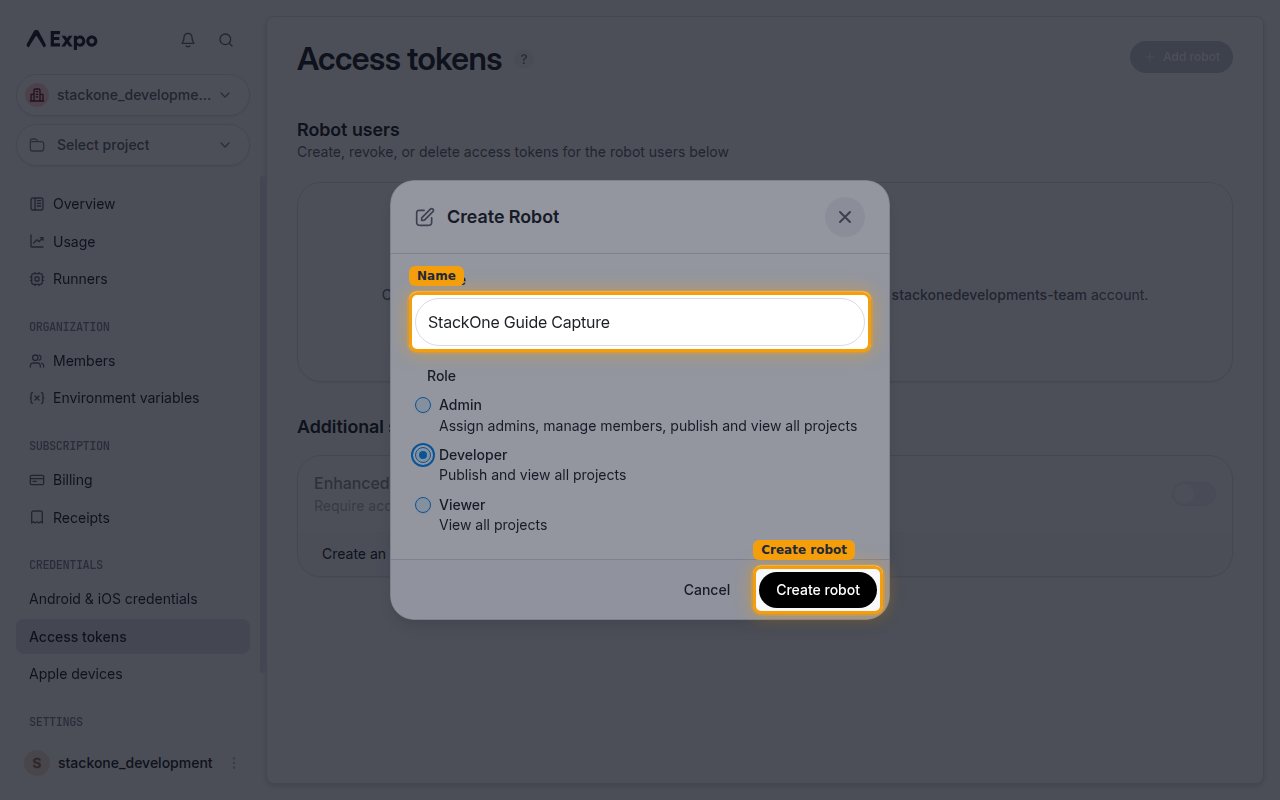
        <p>In the <strong>Create Robot</strong> dialog, enter a <strong>Name</strong> for the robot (for example, `StackOne`), choose a <strong>Role</strong>, and click <strong>Create robot</strong>. The token inherits the robot's role, so pick the level of access StackOne needs.</p>

        <ul>
          <li><strong>Admin</strong> — Assign admins, manage members, publish and view all projects.</li>
          <li><strong>Developer</strong> — Publish and view all projects (recommended for read and write access).</li>
          <li><strong>Viewer</strong> — View all projects (read-only).</li>
        </ul>

        <img src="https://mintcdn.com/stackone-60/Ae0-z_qoKYnGrHKe/connectors/expo/images/custom-config-create-robot.png?fit=max&auto=format&n=Ae0-z_qoKYnGrHKe&q=85&s=728914ed6491167c21488eb1a561eb27" alt="The Create Robot dialog showing the Name field, Role options, and Create robot button" width="1280" height="800" data-path="connectors/expo/images/custom-config-create-robot.png" />
      </div>
    </Step>

    <Step title="Create a token for the robot">
      <div data-guide-step data-guide-scopes="" data-guide-display-scopes-list="">
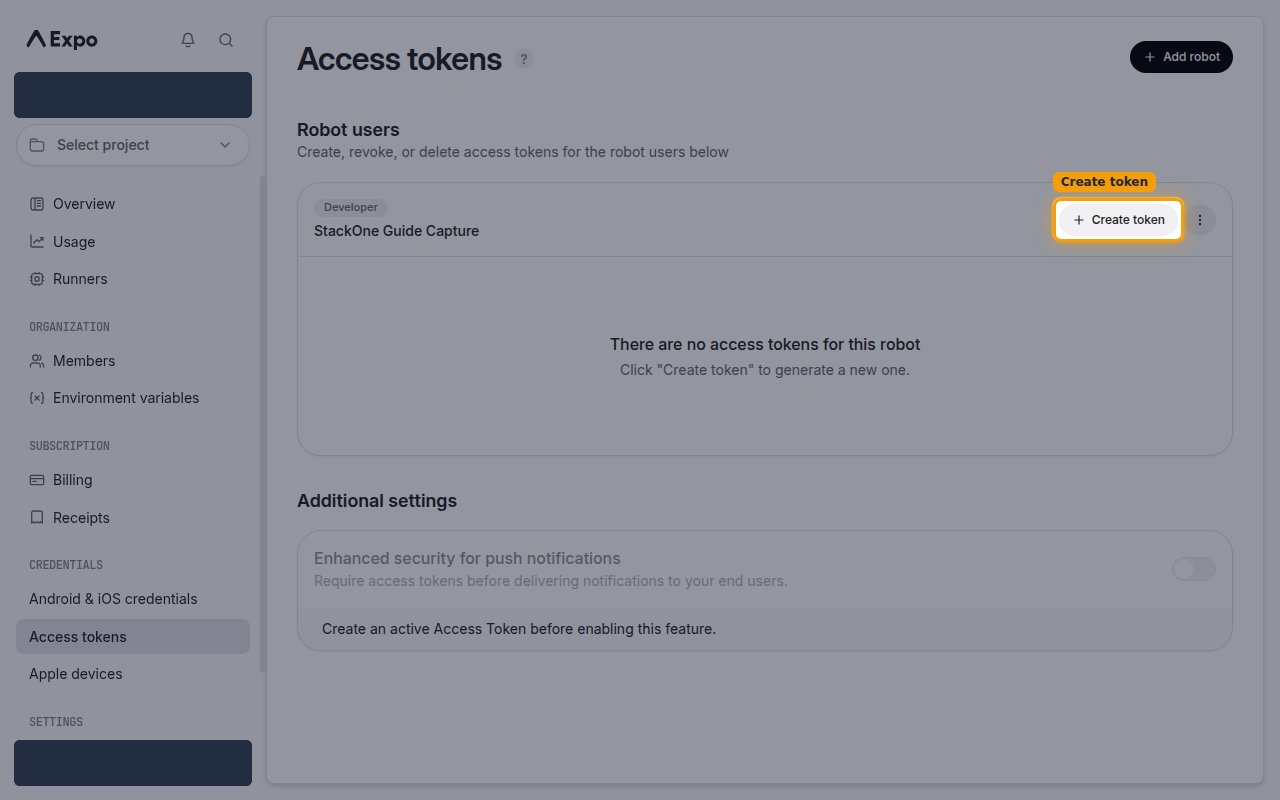
        <p>The new robot user appears under <strong>Robot users</strong>. On that robot, click <strong>+ Create token</strong> to start generating an access token.</p>

        <img src="https://mintcdn.com/stackone-60/Ae0-z_qoKYnGrHKe/connectors/expo/images/custom-config-create-token.png?fit=max&auto=format&n=Ae0-z_qoKYnGrHKe&q=85&s=03d7f80271eb014408eef0b02cf386cb" alt="The robot user row with the Create token button highlighted" width="1280" height="800" data-path="connectors/expo/images/custom-config-create-token.png" />
      </div>
    </Step>

    <Step title="Generate the token">
      <div data-guide-step data-guide-scopes="" data-guide-display-scopes-list="">
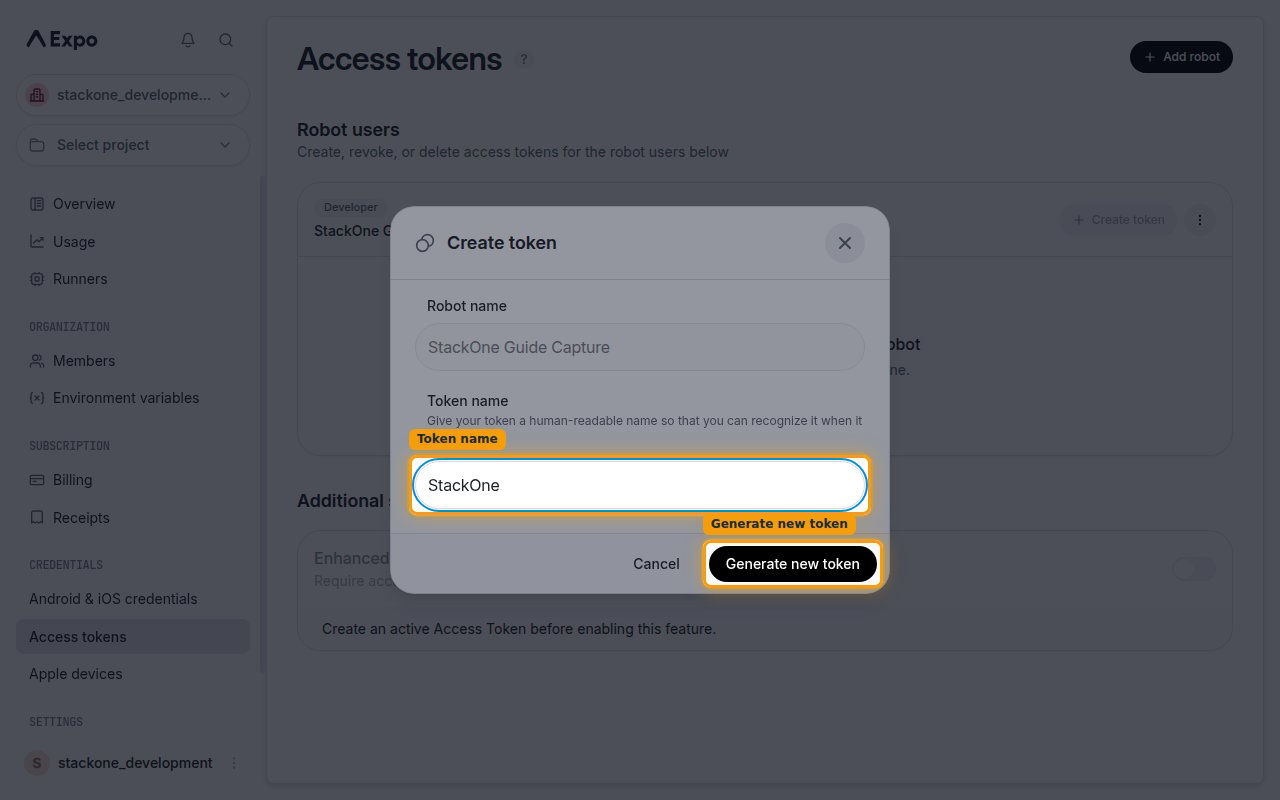
        <p>In the <strong>Create token</strong> dialog, the <strong>Robot name</strong> is pre-filled. Enter a <strong>Token name</strong> so you can recognize it later (for example, `StackOne`), then click <strong>Generate new token</strong>.</p>

        <img src="https://mintcdn.com/stackone-60/Ae0-z_qoKYnGrHKe/connectors/expo/images/custom-config-generate-token.png?fit=max&auto=format&n=Ae0-z_qoKYnGrHKe&q=85&s=53486b0b6edf921bf6244dea63401182" alt="The Create token dialog with the Token name field and Generate new token button" width="1280" height="800" data-path="connectors/expo/images/custom-config-generate-token.png" />
      </div>
    </Step>

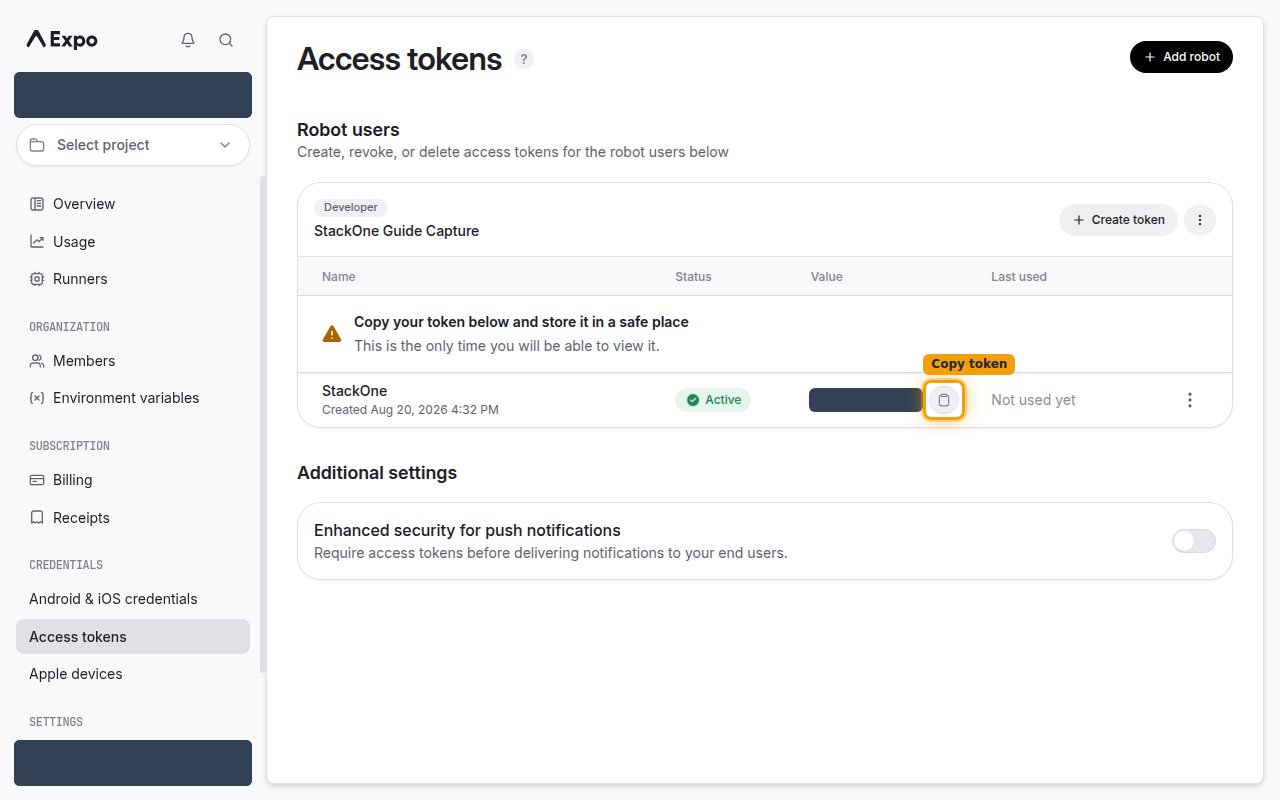
    <Step title="Copy the access token">
      <div data-guide-step data-guide-scopes="" data-guide-display-scopes-list="">
        <p>Expo shows the generated token once, next to the token name. Click the copy button to copy the value, then paste it into the <strong>Access Token</strong> field in StackOne Hub.</p>

        <ul>
          <li><strong>Copy your token below and store it in a safe place</strong> — this is the only time you will be able to view it. If you lose it, create a new token.</li>
        </ul>

        <img src="https://mintcdn.com/stackone-60/Ae0-z_qoKYnGrHKe/connectors/expo/images/custom-config-copy-token.png?fit=max&auto=format&n=Ae0-z_qoKYnGrHKe&q=85&s=fd3b67f2b51130307e2187d31c3f0a47" alt="The generated access token row with the copy button highlighted and the token value hidden" width="1280" height="800" data-path="connectors/expo/images/custom-config-copy-token.png" />
      </div>
    </Step>
  </Steps>
</section>

<div data-whitelabel-hide>
  <h2>Linking the Account from the Hub</h2>

  <Steps>
    <Step title="Navigate to the Hub">
      Use one of the three <a href="/connect/managing-connectors/linking-accounts">Linking Account Methods</a> to access the Hub.
    </Step>

    <Step title="Fill out the fields">
      Fill out the following fields using details from your provider:

      <ul>
        <li><strong>Access Token</strong></li>
      </ul>
    </Step>

    <Step title="Connect">
      <ul>
        <li>Click <strong>Connect</strong></li>
        <li>If applicable, the provider will redirect you to a sign-in or authorization page. Complete the provider's authorization flow.</li>
        <li>Once authorization is successful, you will see a confirmation popup</li>
      </ul>
    </Step>
  </Steps>

  <p>If the account linking is successful, you will see the newly linked account in your <a href="/gateway/concepts/linked-accounts">Accounts</a> page.</p>
</div>