> ## Documentation Index
> Fetch the complete documentation index at: https://docs.stackone.com/llms.txt
> Use this file to discover all available pages before exploring further.

# Connect Eka Care with Long-Lived Access Token – StackOne Hub

> Link a Eka Care account in the StackOne Hub using Long-Lived Access Token. End-user guide to authorize the integration and start using Eka Care actions.

<section data-guide-section data-guide-scopes="">
  <h2>Generating a long-lived token</h2>

  <p>A long-lived token authenticates StackOne to your Eka workspace without needing a refresh.</p>

  <Steps>
    <Step title="Sign in to Eka Console">
      <div data-guide-step data-guide-scopes="" data-guide-display-scopes-list="">
        <p>Sign in to your <a href="https://console.eka.care/" target="_blank" rel="noopener noreferrer">Eka Console account</a>.</p>

        <ul>
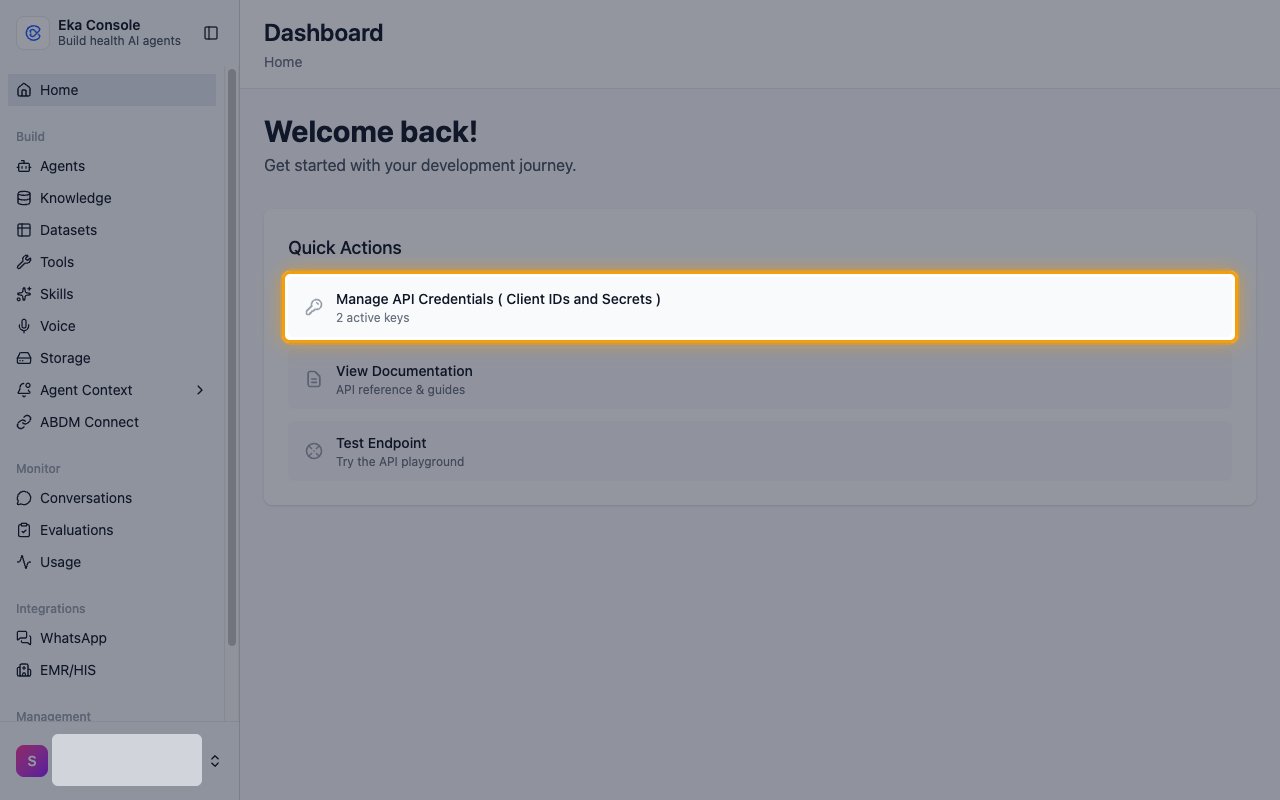
          <li>Under <strong>Quick Actions</strong>, click <strong>Manage API Credentials ( Client IDs and Secrets )</strong>.</li>
        </ul>

        <img src="https://mintcdn.com/stackone-60/2aitSsNAQhtZqow7/connectors/ekacare/images/custom-config-quick-actions.png?fit=max&auto=format&n=2aitSsNAQhtZqow7&q=85&s=c7ed0e8419de9c0f5b8677ddbc493a7e" alt="The Eka Console dashboard with Manage API Credentials highlighted under Quick Actions" width="1280" height="800" data-path="connectors/ekacare/images/custom-config-quick-actions.png" />
      </div>
    </Step>

    <Step title="Open API credentials">
      <div data-guide-step data-guide-scopes="" data-guide-display-scopes-list="">
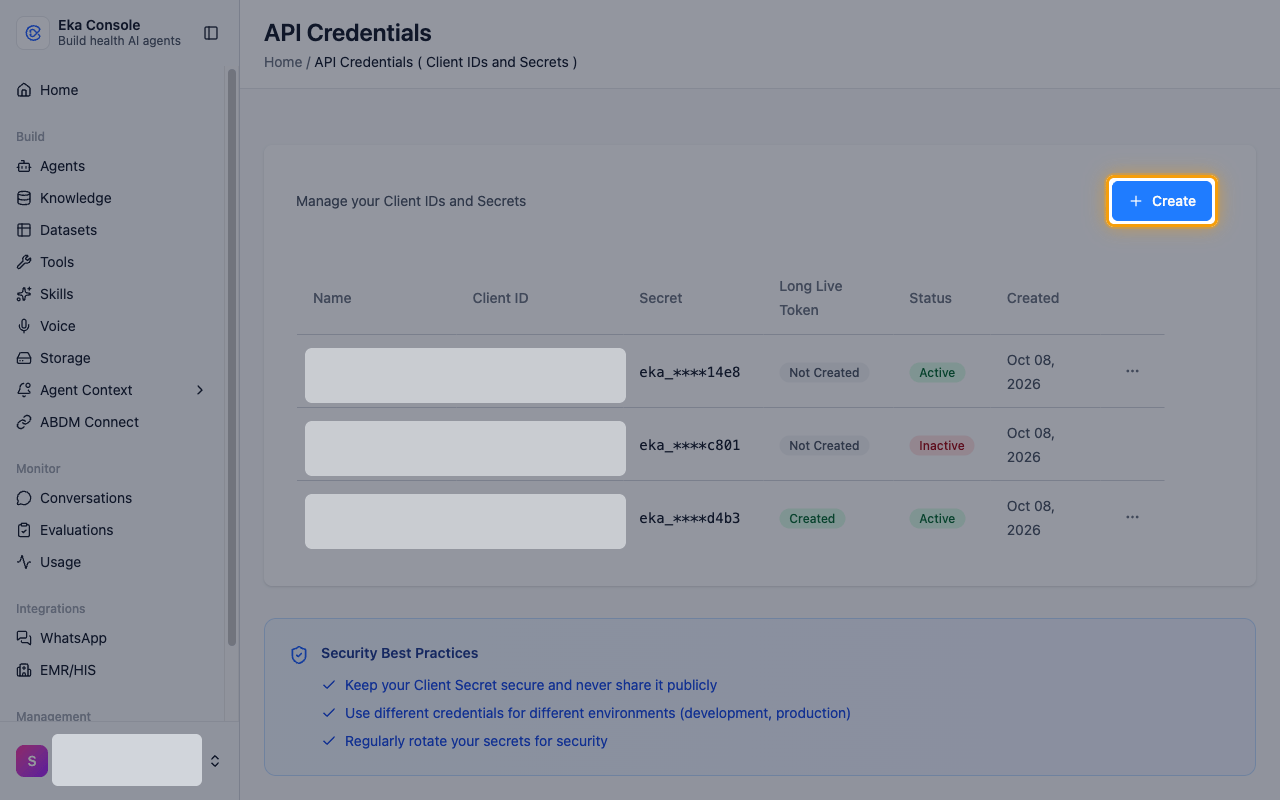
        <p>The <strong>API Credentials</strong> page lists your existing credentials. If you don't have an active one, click <strong>Create</strong>.</p>

        <img src="https://mintcdn.com/stackone-60/2aitSsNAQhtZqow7/connectors/ekacare/images/custom-config-api-credentials.png?fit=max&auto=format&n=2aitSsNAQhtZqow7&q=85&s=340d928d0028b5e292521ca213253ddf" alt="The API Credentials page with the Create button highlighted" width="1280" height="800" data-path="connectors/ekacare/images/custom-config-api-credentials.png" />
      </div>
    </Step>

    <Step title="Create a credential">
      <div data-guide-step data-guide-scopes="" data-guide-display-scopes-list="">
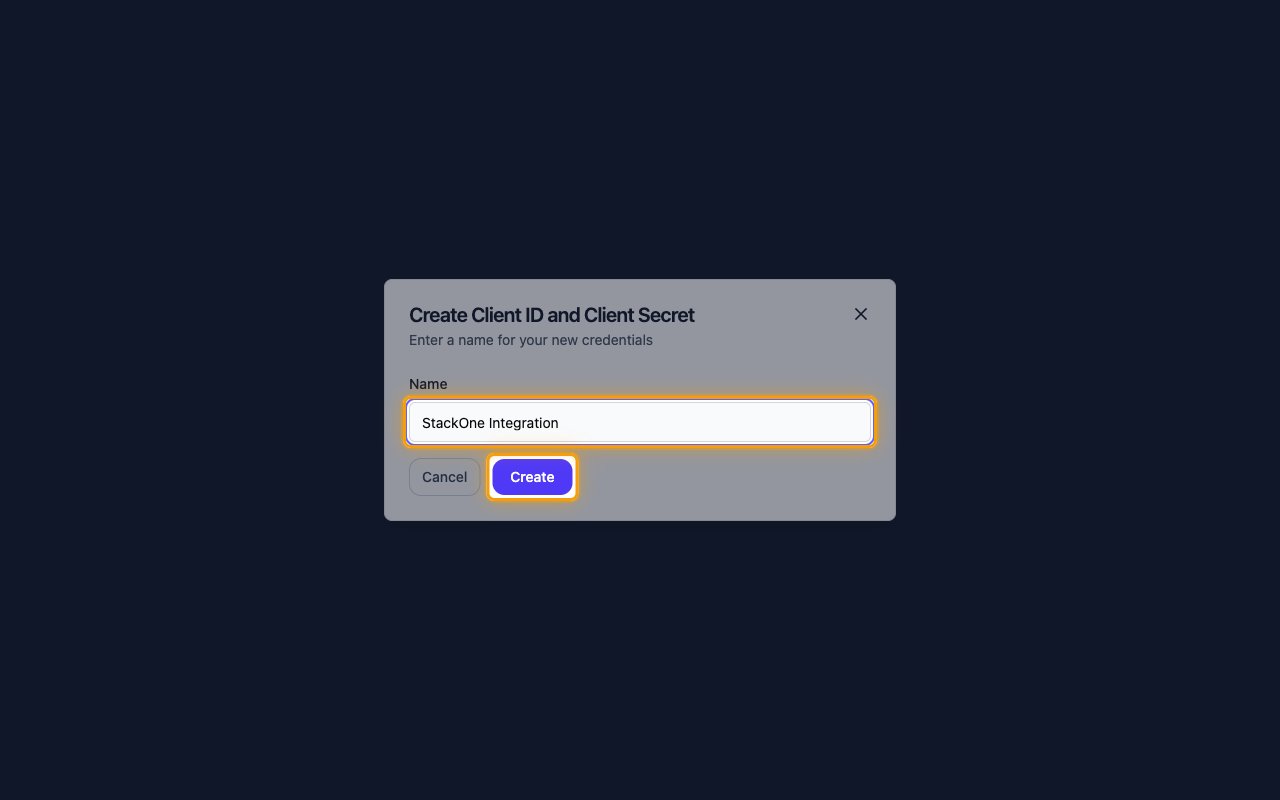
        <p>In <strong>Create Client ID and Client Secret</strong>, enter a <strong>Name</strong> and click <strong>Create</strong>.</p>

        <ul>
          <li>Name: `StackOne Integration`</li>
          <li>The long-lived token does not need the Client Secret, so click <strong>Done</strong> on the next screen.</li>
        </ul>

        <img src="https://mintcdn.com/stackone-60/2aitSsNAQhtZqow7/connectors/ekacare/images/custom-config-create-credential.png?fit=max&auto=format&n=2aitSsNAQhtZqow7&q=85&s=b1c36fc55687fef5767baaf6b214061b" alt="The Create Client ID and Client Secret form with the Name field and Create button highlighted" width="1280" height="800" data-path="connectors/ekacare/images/custom-config-create-credential.png" />
      </div>
    </Step>

    <Step title="Create the long-lived token">
      <div data-guide-step data-guide-scopes="" data-guide-display-scopes-list="">
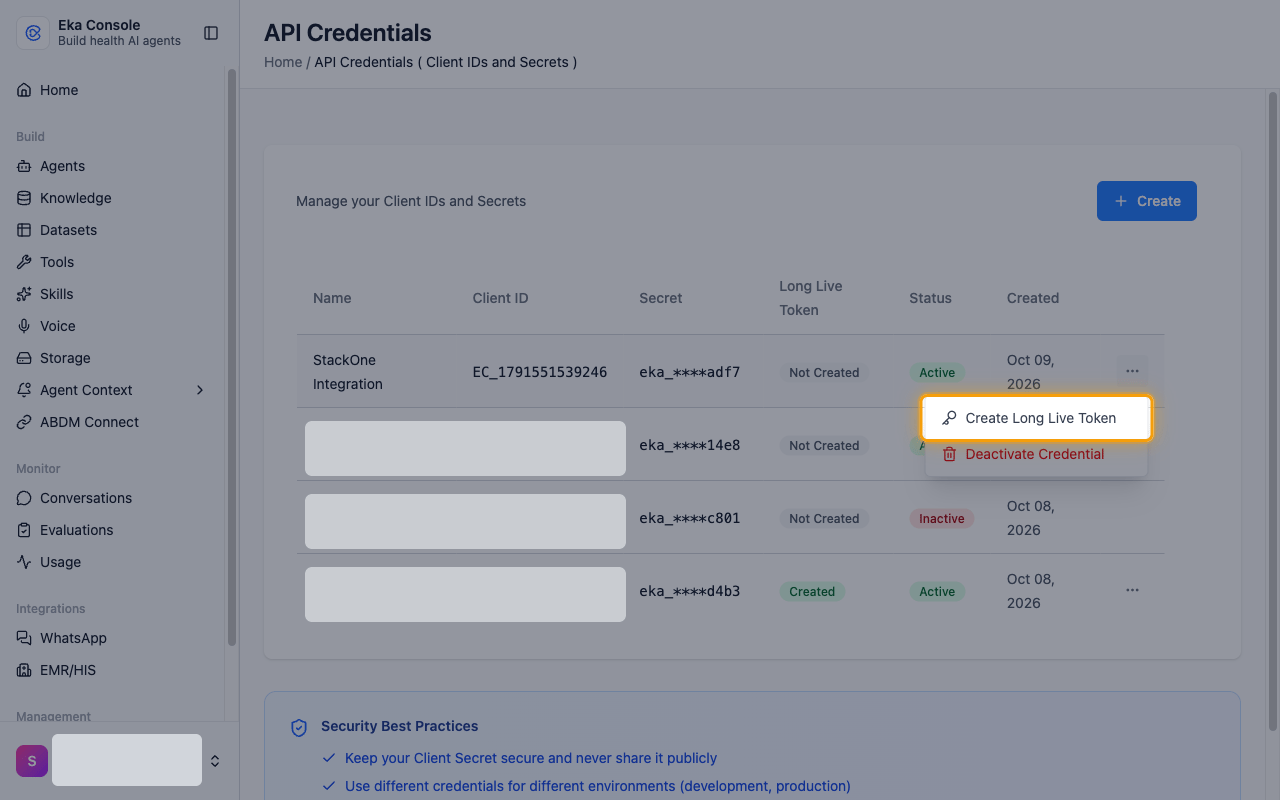
        <p>In the row of your credential, open the actions menu (⋯) and click <strong>Create Long Live Token</strong>.</p>

        <img src="https://mintcdn.com/stackone-60/2aitSsNAQhtZqow7/connectors/ekacare/images/custom-config-create-long-live-token.png?fit=max&auto=format&n=2aitSsNAQhtZqow7&q=85&s=1361ff98ab1e9dbbbf4a39d5eeeb42c5" alt="The credential actions menu with Create Long Live Token highlighted" width="1280" height="800" data-path="connectors/ekacare/images/custom-config-create-long-live-token.png" />
      </div>
    </Step>

    <Step title="Copy the token">
      <div data-guide-step data-guide-scopes="" data-guide-display-scopes-list="">
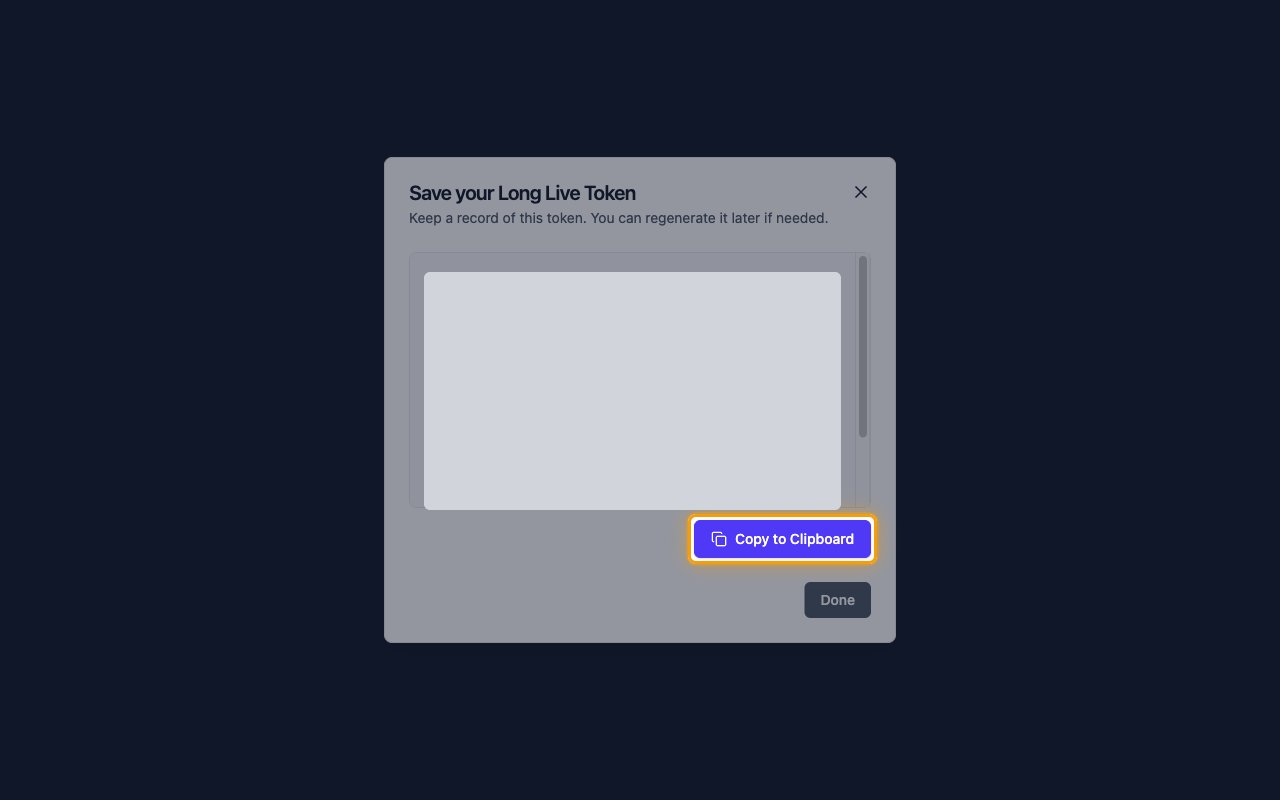
        <p>In <strong>Save your Long Live Token</strong>, click <strong>Copy to Clipboard</strong> and paste the value into the <strong>Long-Lived Access Token</strong> field in StackOne Hub.</p>

        <ul>
          <li>The token is only displayed once in this dialog. If you lose it, generate a new one from the same menu.</li>
          <li>Store the token securely for use later, then click <strong>Done</strong>.</li>
        </ul>

        <img src="https://mintcdn.com/stackone-60/2aitSsNAQhtZqow7/connectors/ekacare/images/custom-config-copy-token.png?fit=max&auto=format&n=2aitSsNAQhtZqow7&q=85&s=add276e3a4c38f54c70b80dda663df90" alt="The Save your Long Live Token dialog with the token hidden and Copy to Clipboard highlighted" width="1280" height="800" data-path="connectors/ekacare/images/custom-config-copy-token.png" />
      </div>
    </Step>
  </Steps>
</section>

<section data-guide-section data-guide-scopes="">
  <h2>Find your MedAssist agent ID (optional)</h2>

  <p>The <strong>MedAssist Agent ID</strong> identifies your MedAssist agent. Only the MedAssist actions use it; leave it empty otherwise.</p>

  <Steps>
    <Step title="Open your agent">
      <div data-guide-step data-guide-scopes="" data-guide-display-scopes-list="">
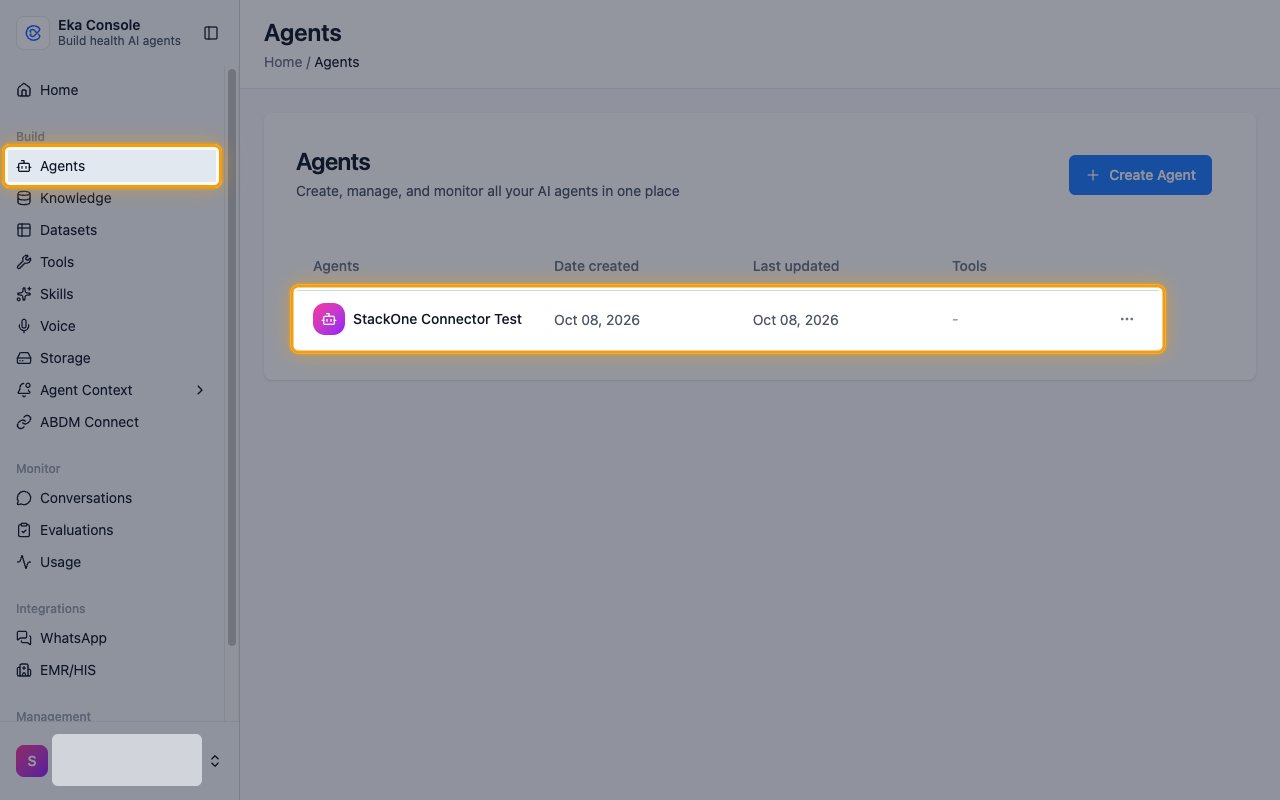
        <p>In the Eka Console sidebar, click <strong>Agents</strong>, then click your agent in the list.</p>

        <img src="https://mintcdn.com/stackone-60/2aitSsNAQhtZqow7/connectors/ekacare/images/custom-config-agents.png?fit=max&auto=format&n=2aitSsNAQhtZqow7&q=85&s=c40a95f295a4a148f11c532da5ff4fd7" alt="The Agents page with the Agents menu item and an agent row highlighted" width="1280" height="800" data-path="connectors/ekacare/images/custom-config-agents.png" />
      </div>
    </Step>

    <Step title="Copy the agent ID">
      <div data-guide-step data-guide-scopes="" data-guide-display-scopes-list="">
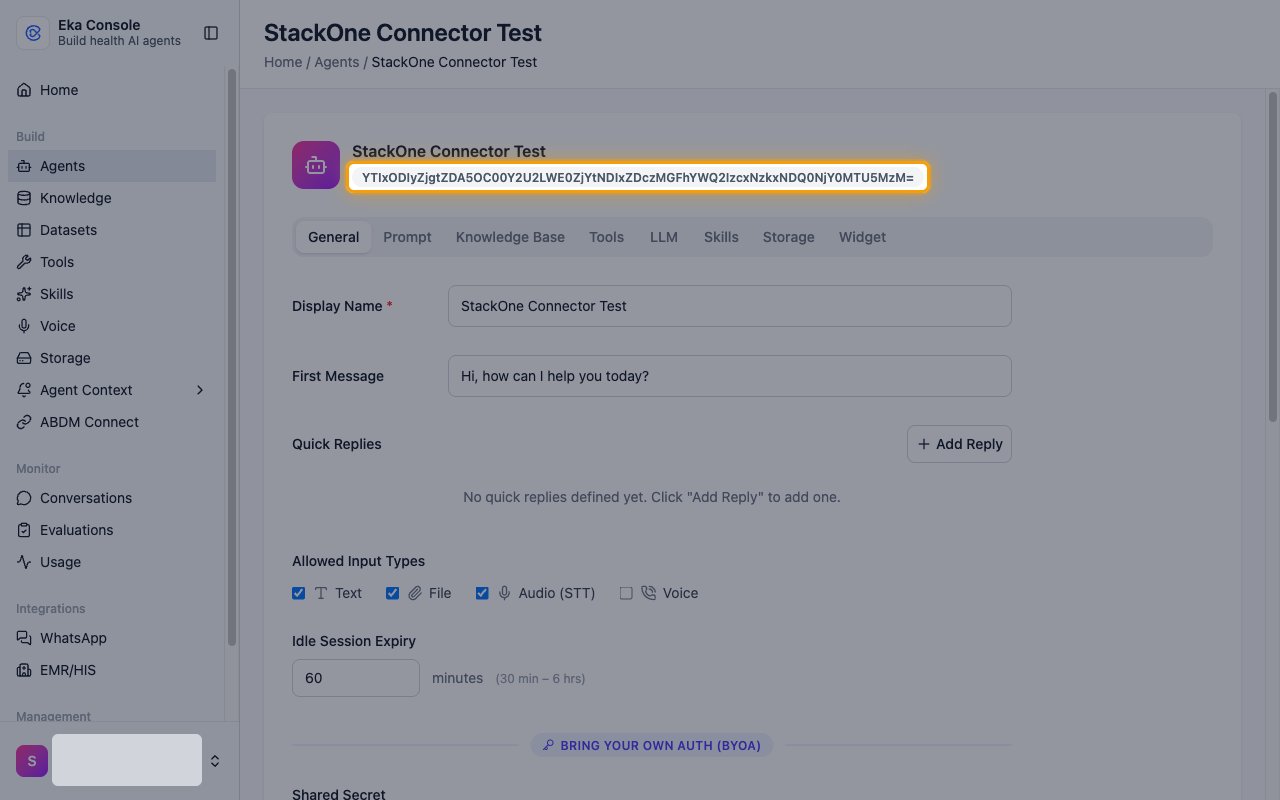
        <p>Copy the ID shown under the agent name and paste it into the <strong>MedAssist Agent ID</strong> field in StackOne Hub.</p>

        <ul>
          <li>Format: a Base64 string that ends in `=`</li>
        </ul>

        <img src="https://mintcdn.com/stackone-60/2aitSsNAQhtZqow7/connectors/ekacare/images/custom-config-agent-id.png?fit=max&auto=format&n=2aitSsNAQhtZqow7&q=85&s=3675cc29014ebc1f6eeb624d96c2e52b" alt="An agent page with the agent ID under the agent name highlighted" width="1280" height="800" data-path="connectors/ekacare/images/custom-config-agent-id.png" />
      </div>
    </Step>
  </Steps>
</section>

<div data-whitelabel-hide>
  <h2>Linking the Account from the Hub</h2>

  <Steps>
    <Step title="Navigate to the Hub">
      Use one of the three <a href="/connect/managing-connectors/linking-accounts">Linking Account Methods</a> to access the Hub.
    </Step>

    <Step title="Fill out the fields">
      Fill out the following fields using details from your provider:

      <ul>
        <li><strong>Long-Lived Access Token</strong></li>
        <li><strong>MedAssist Agent ID</strong> (Optional)</li>
      </ul>
    </Step>

    <Step title="Connect">
      <ul>
        <li>Click <strong>Connect</strong></li>
        <li>If applicable, the provider will redirect you to a sign-in or authorization page. Complete the provider's authorization flow.</li>
        <li>Once authorization is successful, you will see a confirmation popup</li>
      </ul>
    </Step>
  </Steps>

  <p>If the account linking is successful, you will see the newly linked account in your <a href="/gateway/concepts/linked-accounts">Accounts</a> page.</p>
</div>

## Next Steps

<Columns cols={2}>
  <Card title="Webhooks setup" href="/connectors/ekacare/guides/webhook-setup">
    <p className="connector-page-auth-description connector-page-card-text">
      Configure receiving Events for Eka Care into StackOne.
    </p>
  </Card>
</Columns>


This documentation is built and hosted on [Mintlify](https://mintlify.com), a developer documentation platform.