> ## Documentation Index
> Fetch the complete documentation index at: https://docs.stackone.com/llms.txt
> Use this file to discover all available pages before exploring further.

# Connect E2B with API Key – StackOne Hub

> Link a E2B account in the StackOne Hub using API Key. End-user guide to authorize the integration and start using E2B actions.

<section data-guide-section data-guide-scopes="">
  <h2>Create an E2B API key</h2>

  <p>E2B authenticates API requests with an API key that you create in the E2B console. Keys belong to a single project, so the key you create reaches only the sandboxes, templates, volumes and secrets in that project.</p>

  <Steps>
    <Step title="Sign in and select your project">
      <div data-guide-step data-guide-scopes="" data-guide-display-scopes-list="">
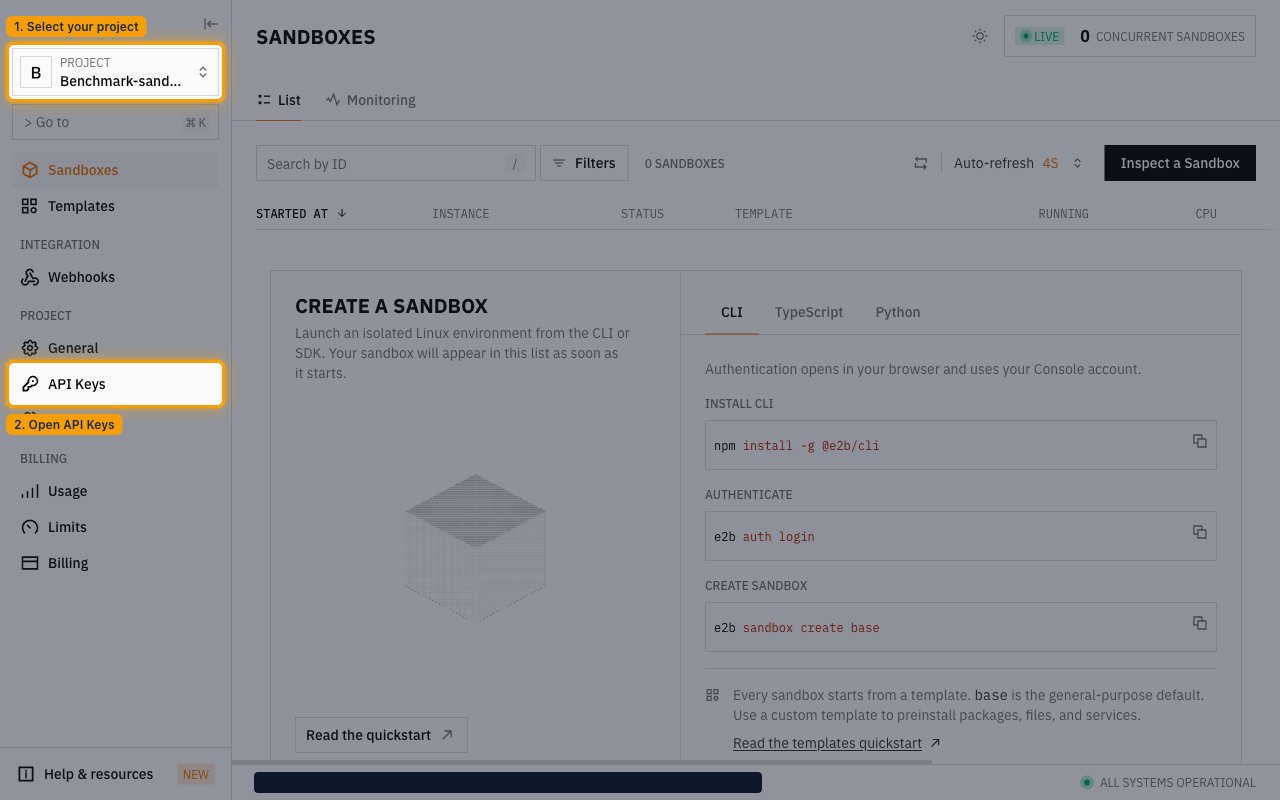
        <p>Sign in to the <a href="https://console.e2b.dev" target="_blank" rel="noopener noreferrer">E2B console</a> with the account that owns the project you want to connect. In the top-left of the sidebar, use the <strong>PROJECT</strong> switcher to select that project, then open <strong>API Keys</strong> in the sidebar under <strong>PROJECT</strong>.</p>

        <ul>
          <li>The key is scoped to the project shown in the <strong>PROJECT</strong> switcher — pick the project whose sandboxes you want StackOne to reach before creating the key.</li>
        </ul>

        <img src="https://mintcdn.com/stackone-60/Mrru2A0Ln1Hyds-Q/connectors/e2b/images/custom-config-open-api-keys.png?fit=max&auto=format&n=Mrru2A0Ln1Hyds-Q&q=85&s=4777920c6724c02b9a5a34c90cebb48c" alt="E2B console sidebar with the PROJECT switcher and the API Keys entry highlighted" width="1280" height="800" data-path="connectors/e2b/images/custom-config-open-api-keys.png" />
      </div>
    </Step>

    <Step title="Open the create key dialog">
      <div data-guide-step data-guide-scopes="" data-guide-display-scopes-list="">
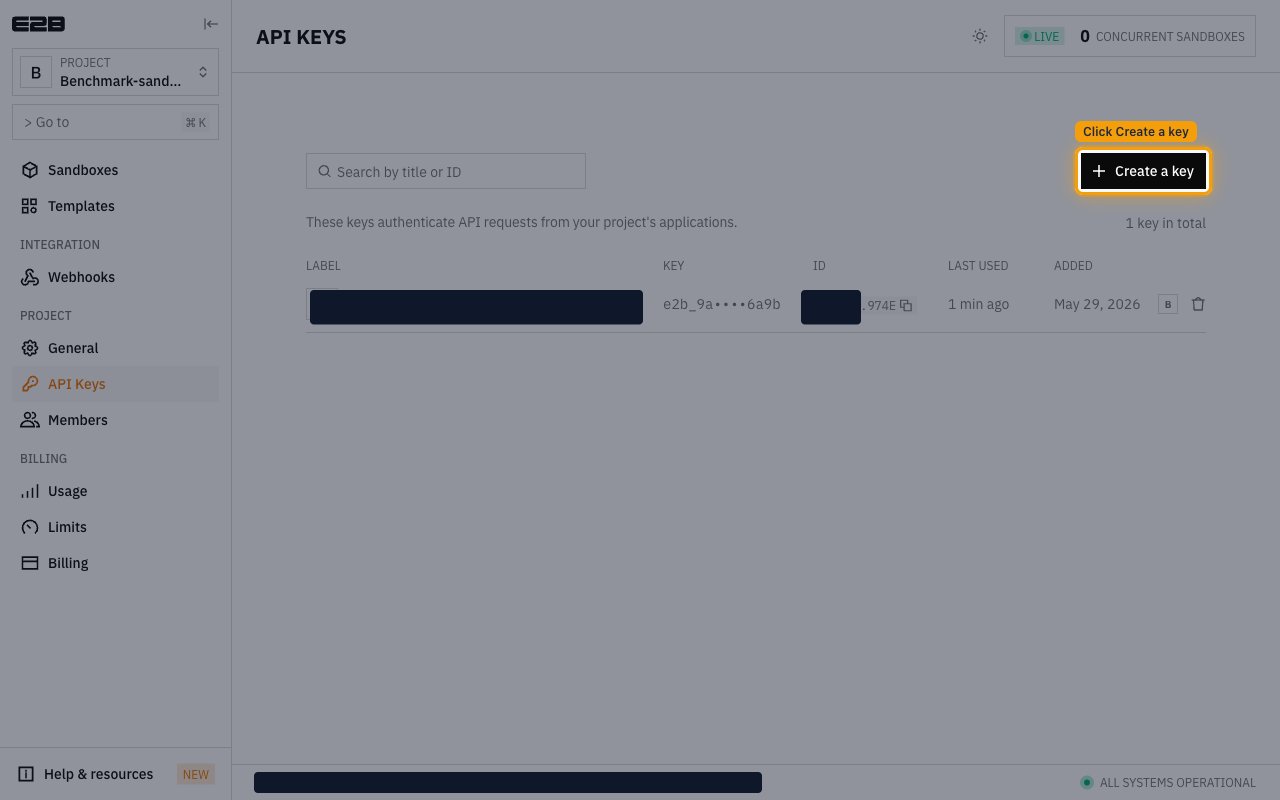
        <p>The <strong>API Keys</strong> page lists the existing keys for the project under the <strong>LABEL</strong>, <strong>KEY</strong>, <strong>ID</strong>, <strong>LAST USED</strong> and <strong>ADDED</strong> columns. Click <strong>Create a key</strong> in the top right.</p>

        <img src="https://mintcdn.com/stackone-60/Mrru2A0Ln1Hyds-Q/connectors/e2b/images/custom-config-api-keys-page.png?fit=max&auto=format&n=Mrru2A0Ln1Hyds-Q&q=85&s=bf1117d3106b780163b9a2da4592a46a" alt="E2B API Keys page with the Create a key button highlighted" width="1280" height="800" data-path="connectors/e2b/images/custom-config-api-keys-page.png" />
      </div>
    </Step>

    <Step title="Create the key">
      <div data-guide-step data-guide-scopes="" data-guide-display-scopes-list="">
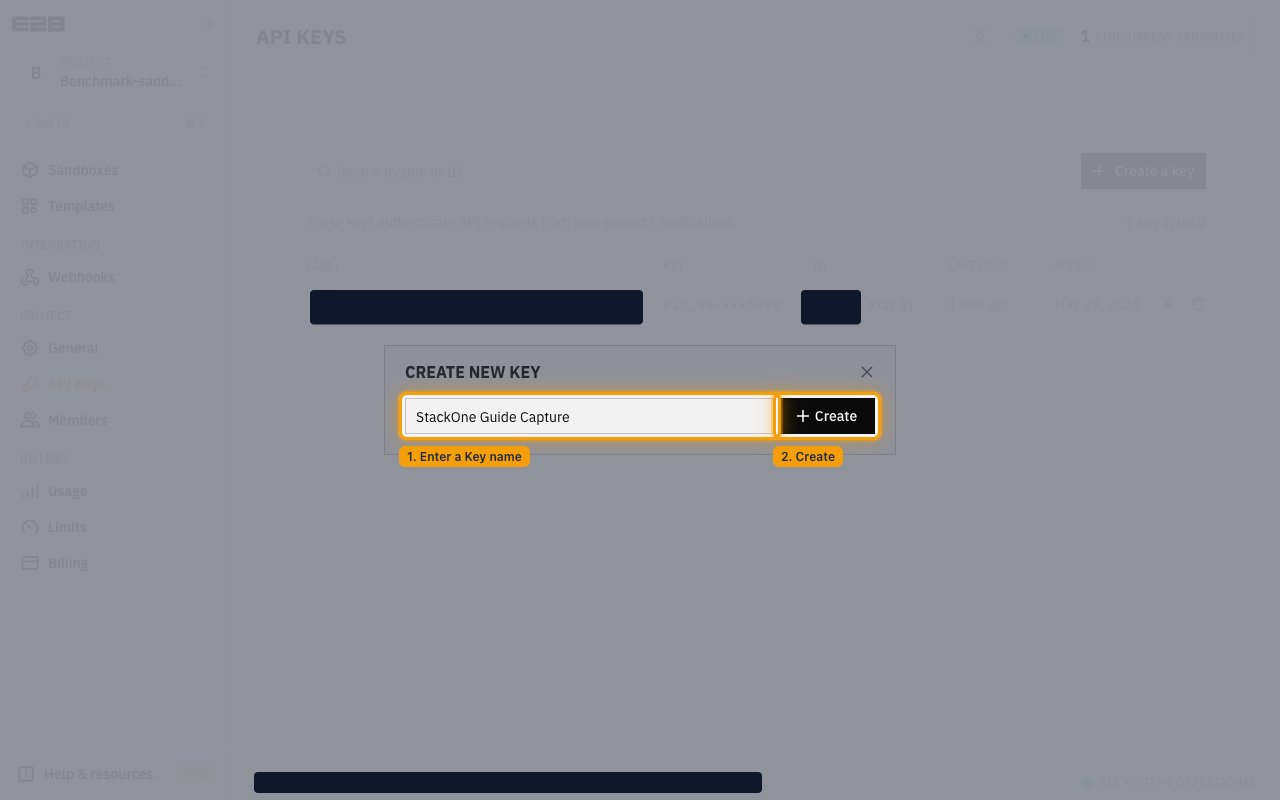
        <p>In the <strong>Create new key</strong> dialog, type a name in the <strong>Key name</strong> field — for example `StackOne` — so you can recognise the key later in the <strong>LABEL</strong> column. Click <strong>Create</strong>.</p>

        <img src="https://mintcdn.com/stackone-60/Mrru2A0Ln1Hyds-Q/connectors/e2b/images/custom-config-create-new-key.png?fit=max&auto=format&n=Mrru2A0Ln1Hyds-Q&q=85&s=dc5860cc502c7520d834e4a1a112929f" alt="E2B Create new key dialog with the Key name field filled in and the Create button highlighted" width="1280" height="800" data-path="connectors/e2b/images/custom-config-create-new-key.png" />
      </div>
    </Step>

    <Step title="Copy the key">
      <div data-guide-step data-guide-scopes="" data-guide-display-scopes-list="">
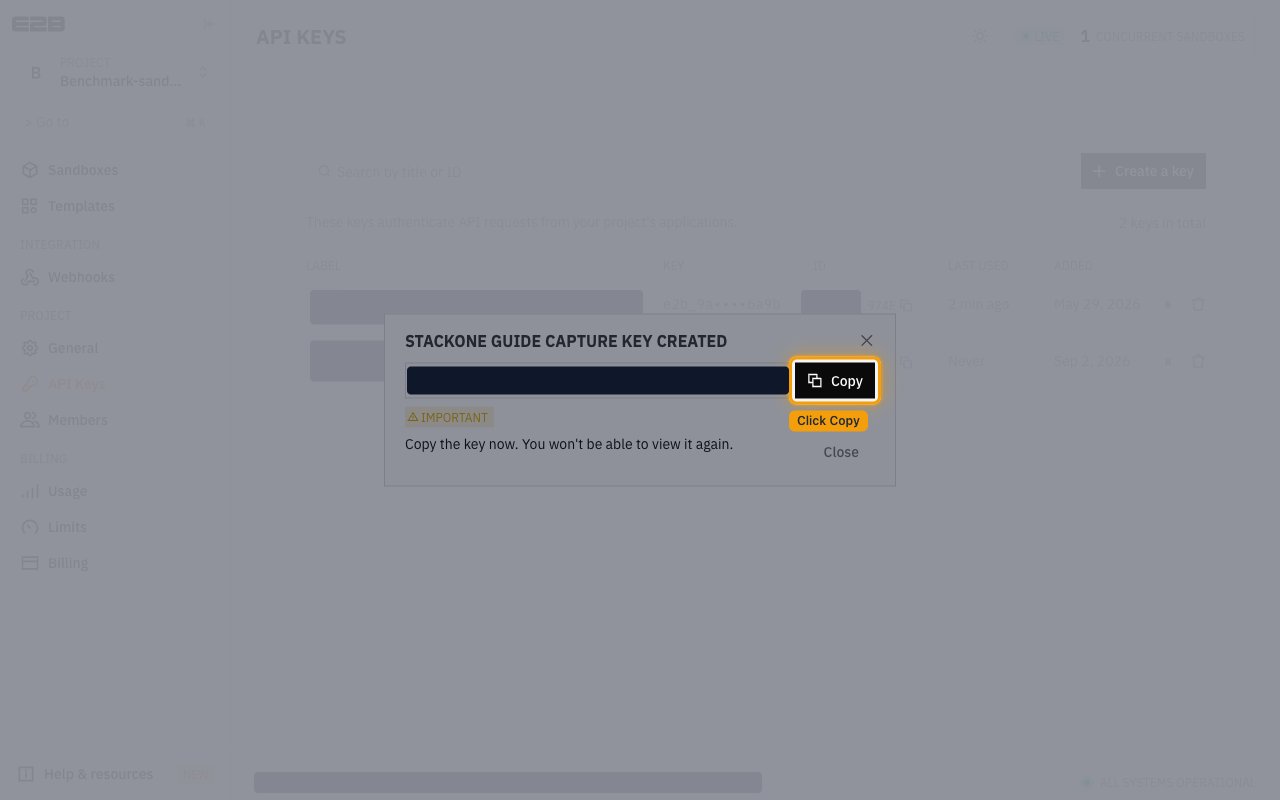
        <p>The full key is displayed once, in a read-only box in the confirmation dialog. Click <strong>Copy</strong> to copy it, then click <strong>Close</strong>.</p>

        <ul>
          <li>The dialog warns under <strong>IMPORTANT</strong> that you should <em>Copy the key now. You won't be able to view it again.</em> — once you close it, the <strong>KEY</strong> column only ever shows a masked value such as `e2b_8d••••6a47`.</li>
          <li>The key cannot be retrieved after you close the dialog. If you lose it, create a new key and delete the old row from the <strong>API Keys</strong> page.</li>
          <li>Keys do not expire, so the value you copy stays valid until you delete it.</li>
        </ul>

        <img src="https://mintcdn.com/stackone-60/Mrru2A0Ln1Hyds-Q/connectors/e2b/images/custom-config-copy-key.png?fit=max&auto=format&n=Mrru2A0Ln1Hyds-Q&q=85&s=bdd150fdec39584ebf7f173bceaf7828" alt="E2B key created dialog with the generated key redacted and the Copy button highlighted" width="1280" height="800" data-path="connectors/e2b/images/custom-config-copy-key.png" />
      </div>
    </Step>
  </Steps>
</section>

<div data-whitelabel-hide>
  <h2>Linking the Account from the Hub</h2>

  <Steps>
    <Step title="Navigate to the Hub">
      Use one of the three <a href="/connect/managing-connectors/linking-accounts">Linking Account Methods</a> to access the Hub.
    </Step>

    <Step title="Fill out the fields">
      Fill out the following fields using details from your provider:

      <ul>
        <li><strong>API Key</strong></li>
      </ul>
    </Step>

    <Step title="Connect">
      <ul>
        <li>Click <strong>Connect</strong></li>
        <li>If applicable, the provider will redirect you to a sign-in or authorization page. Complete the provider's authorization flow.</li>
        <li>Once authorization is successful, you will see a confirmation popup</li>
      </ul>
    </Step>
  </Steps>

  <p>If the account linking is successful, you will see the newly linked account in your <a href="/gateway/concepts/linked-accounts">Accounts</a> page.</p>
</div>