> ## Documentation Index
> Fetch the complete documentation index at: https://docs.stackone.com/llms.txt
> Use this file to discover all available pages before exploring further.

# Connect Bronto with API Key – StackOne Hub

> Link a Bronto account in the StackOne Hub using API Key. End-user guide to authorize the integration and start using Bronto actions.

<Warning>You need a Bronto account with a role that allows creating API keys (for example the API Key Management permissions). API keys are scoped to the roles you assign when creating them.</Warning>

<section data-guide-section data-guide-scopes="">
  <h2>Create a Bronto API key</h2>

  <p>Bronto authenticates API requests with an API key sent in the <strong>X-BRONTO-API-KEY</strong> header. Generate one from the Bronto app and paste it, along with your data region, into StackOne Hub.</p>

  <Steps>
    <Step title="Sign in to Bronto">
      <div data-guide-step data-guide-scopes="" data-guide-display-scopes-list="">
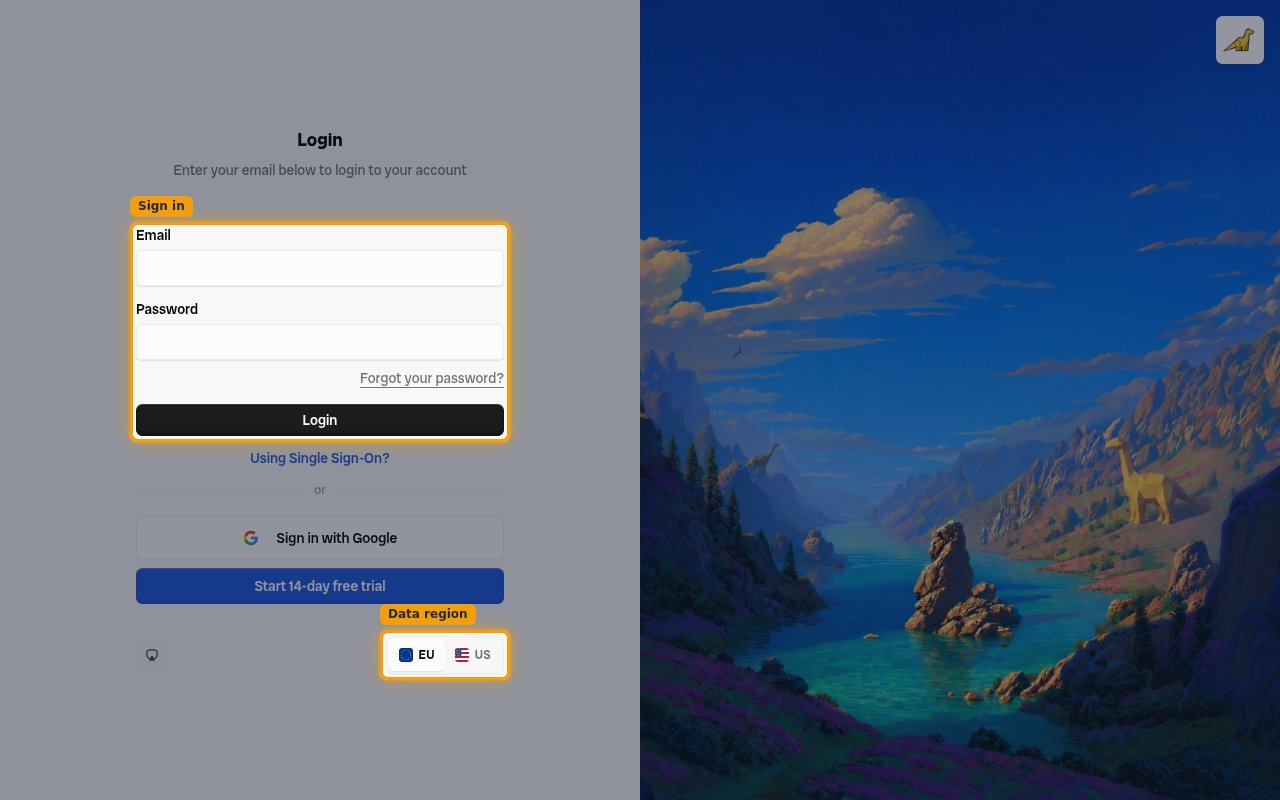
        <p>Sign in to Bronto for the data region your organisation is hosted in, then note which region you used — you will select the matching region in StackOne Hub.</p>

        <ul>
          <li><strong>EU</strong> — <a href="https://app.eu.bronto.io/login" target="_blank" rel="noopener noreferrer">Bronto EU dashboard</a></li>
          <li><strong>US</strong> — <a href="https://app.us.bronto.io/login" target="_blank" rel="noopener noreferrer">Bronto US dashboard</a></li>
          <li>On the <strong>Login</strong> screen, enter your <strong>Email</strong> and <strong>Password</strong> and click <strong>Login</strong> (or use <strong>Sign in with Google</strong> / <strong>Using Single Sign-On?</strong>).</li>
          <li>Use the <strong>Data region</strong> toggle (<strong>EU</strong> / <strong>US</strong>) at the bottom of the login form to pick the region before signing in.</li>
        </ul>

        <img src="https://mintcdn.com/stackone-60/n3U5VIRoQw_MSD1j/connectors/bronto/images/custom-config-sign-in.png?fit=max&auto=format&n=n3U5VIRoQw_MSD1j&q=85&s=2a963a99fcd53112a6e2162b32b0c9cb" alt="Bronto login screen showing the email and password form and the EU/US Data region toggle" width="1280" height="800" data-path="connectors/bronto/images/custom-config-sign-in.png" />
      </div>
    </Step>

    <Step title="Open API Keys settings">
      <div data-guide-step data-guide-scopes="" data-guide-display-scopes-list="">
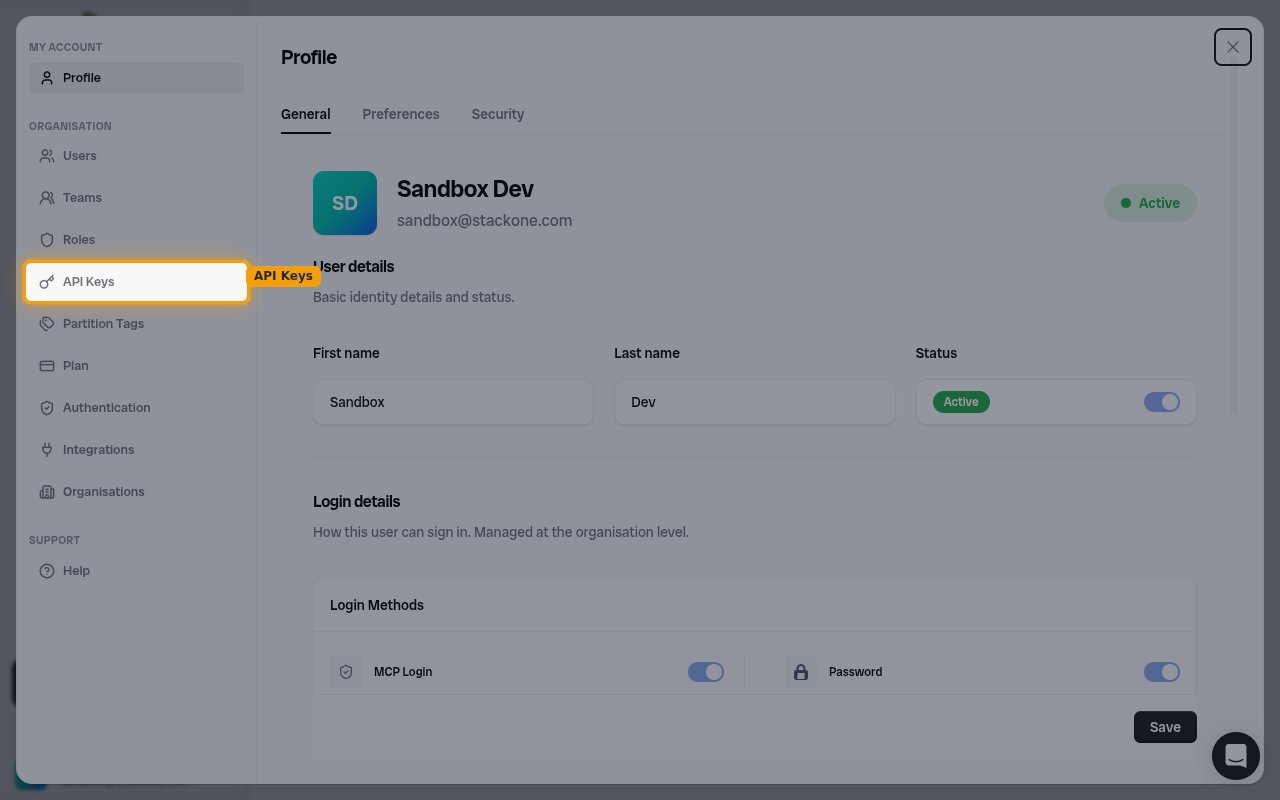
        <p>Open the API key management screen.</p>

        <ul>
          <li>In the left sidebar, open <strong>Settings</strong>.</li>
          <li>Under <strong>Organisation</strong>, click <strong>API Keys</strong>.</li>
        </ul>

        <img src="https://mintcdn.com/stackone-60/n3U5VIRoQw_MSD1j/connectors/bronto/images/custom-config-api-keys-settings.png?fit=max&auto=format&n=n3U5VIRoQw_MSD1j&q=85&s=f65525afe7bd42b5da95a6459fb9cde9" alt="Bronto Settings dialog with API Keys highlighted under the Organisation section" width="1280" height="800" data-path="connectors/bronto/images/custom-config-api-keys-settings.png" />
      </div>
    </Step>

    <Step title="Add an API key">
      <div data-guide-step data-guide-scopes="" data-guide-display-scopes-list="">
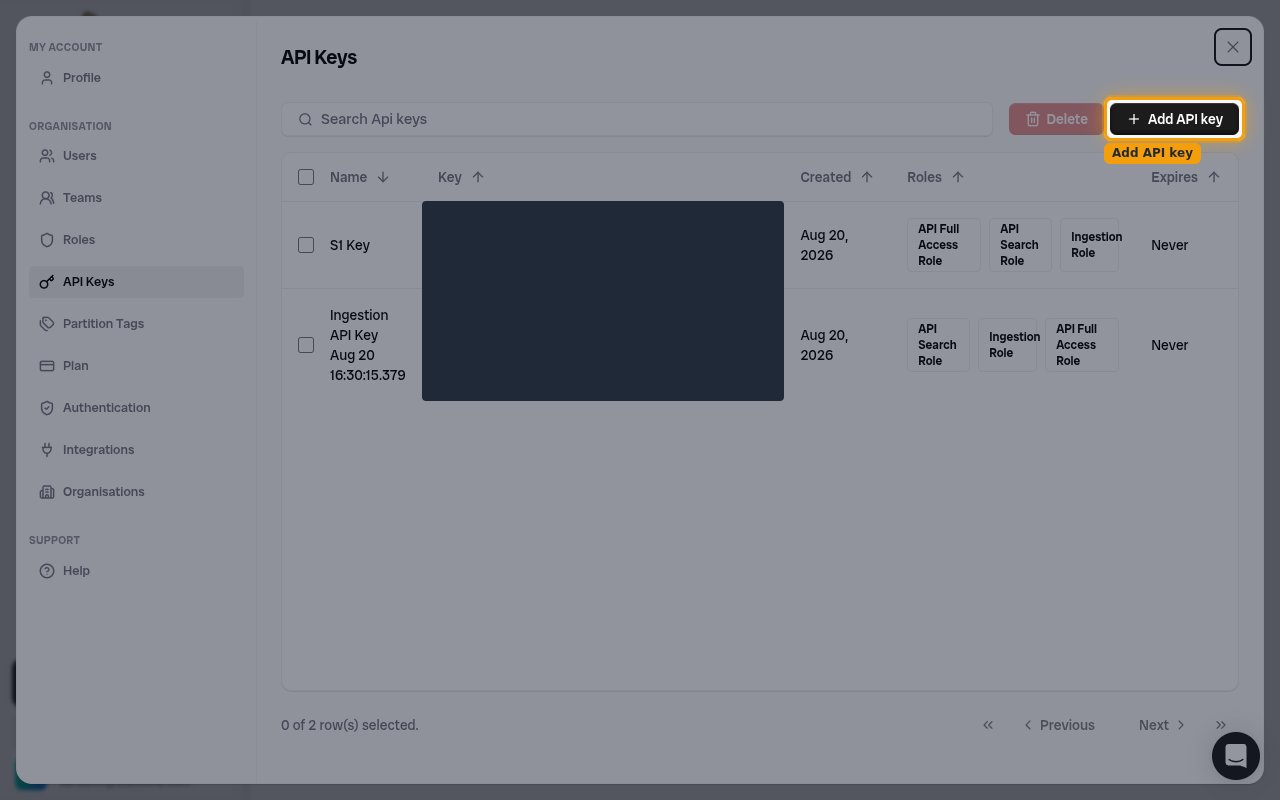
        <p>On the <strong>API Keys</strong> page, click <strong>+ Add API key</strong> in the top-right corner.</p>

        <img src="https://mintcdn.com/stackone-60/n3U5VIRoQw_MSD1j/connectors/bronto/images/custom-config-add-api-key.png?fit=max&auto=format&n=n3U5VIRoQw_MSD1j&q=85&s=13f768231a5a8f34661ecfacbf3b0c2c" alt="Bronto API Keys list with the Add API key button highlighted" width="1280" height="800" data-path="connectors/bronto/images/custom-config-add-api-key.png" />
      </div>
    </Step>

    <Step title="Configure and create the key">
      <div data-guide-step data-guide-scopes="" data-guide-display-scopes-list="">
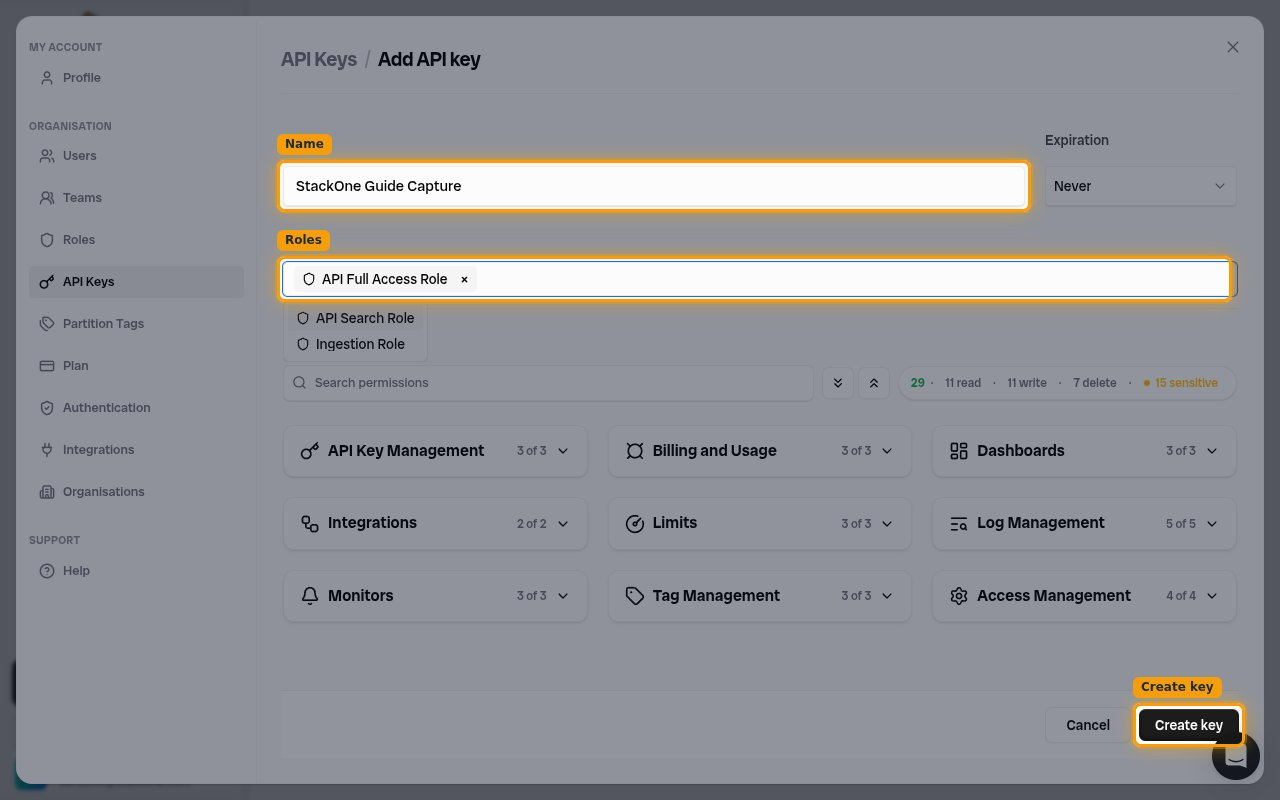
        <p>Fill in the new key details, then create it.</p>

        <ul>
          <li><strong>Name</strong> — enter a descriptive name for the key (for example `StackOne Integration`).</li>
          <li><strong>Roles</strong> — select a role that grants the access your integration needs. Choose <strong>API Full Access Role</strong> for full read, write, and delete access; <strong>API Search Role</strong> for read/search only; or <strong>Ingestion Role</strong> for sending data. Selecting a role automatically enables its <strong>Permissions</strong>.</li>
          <li><strong>Expiration</strong> — leave as <strong>Never</strong>, or choose an expiry if you want the key to expire.</li>
          <li>Click <strong>Create key</strong>.</li>
        </ul>

        <img src="https://mintcdn.com/stackone-60/n3U5VIRoQw_MSD1j/connectors/bronto/images/custom-config-create-key.png?fit=max&auto=format&n=n3U5VIRoQw_MSD1j&q=85&s=e15ddfeef75832b258890df779d4fd17" alt="Bronto Add API key form showing the Name field, Roles selector, Expiration, and Create key button" width="1280" height="800" data-path="connectors/bronto/images/custom-config-create-key.png" />
      </div>
    </Step>

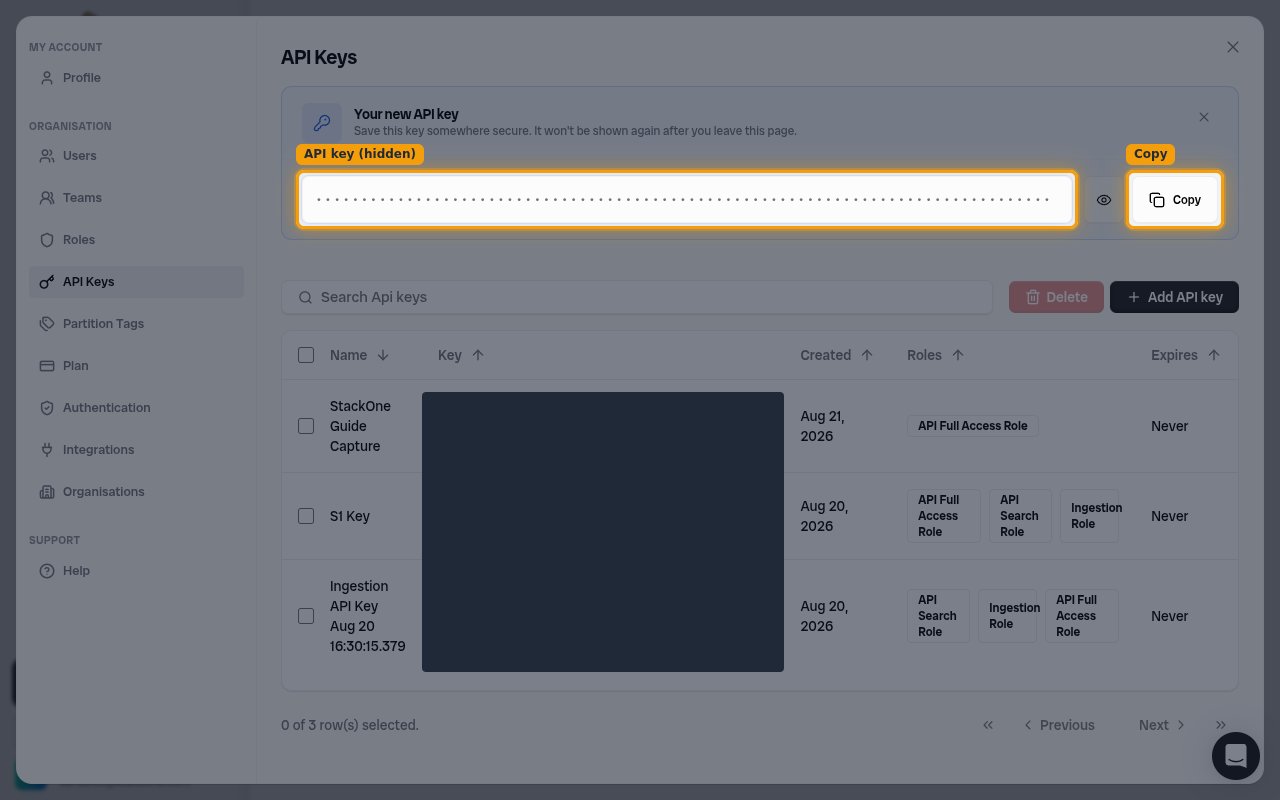
    <Step title="Copy the API key">
      <div data-guide-step data-guide-scopes="" data-guide-display-scopes-list="">
        <p>After creating the key, the <strong>Your new API key</strong> banner shows the key value.</p>

        <ul>
          <li>Click <strong>Copy</strong> to copy the key (use the eye icon to reveal it first if you want to check it).</li>
          <li>This key is only shown once — <strong>Save this key somewhere secure. It won't be shown again after you leave this page.</strong> If you lose it, delete the key and create a new one.</li>
        </ul>

        <img src="https://mintcdn.com/stackone-60/n3U5VIRoQw_MSD1j/connectors/bronto/images/custom-config-copy-key.png?fit=max&auto=format&n=n3U5VIRoQw_MSD1j&q=85&s=ab598ada0e06e16cb8b6750adfcc3790" alt="Bronto Your new API key banner with the masked key value and the Copy button highlighted" width="1280" height="800" data-path="connectors/bronto/images/custom-config-copy-key.png" />
      </div>
    </Step>
  </Steps>
</section>

<section data-guide-section data-guide-scopes="">
  <h2>Connect in StackOne Hub</h2>

  <p>Enter the values you collected into StackOne Hub to finish connecting Bronto.</p>

  <Steps>
    <Step title="Enter your credentials">
      <div data-guide-step data-guide-scopes="" data-guide-display-scopes-list="">
        <p>In StackOne Hub, complete the Bronto connection fields:</p>

        <ul>
          <li><strong>Data Region</strong> — select the region you signed in to (<strong>EU (api.eu.bronto.io)</strong> or <strong>US (api.us.bronto.io)</strong>). This must match your Bronto account's region.</li>
          <li><strong>API Key</strong> — paste the API key you copied from Bronto. It is sent as the <strong>X-BRONTO-API-KEY</strong> header on every request.</li>
        </ul>
      </div>
    </Step>
  </Steps>
</section>

<div data-whitelabel-hide>
  <h2>Linking the Account from the Hub</h2>

  <Steps>
    <Step title="Navigate to the Hub">
      Use one of the three <a href="/connect/managing-connectors/linking-accounts">Linking Account Methods</a> to access the Hub.
    </Step>

    <Step title="Fill out the fields">
      Fill out the following fields using details from your provider:

      <ul>
        <li><strong>Data Region</strong></li>
        <li><strong>API Key</strong></li>
      </ul>
    </Step>

    <Step title="Connect">
      <ul>
        <li>Click <strong>Connect</strong></li>
        <li>If applicable, the provider will redirect you to a sign-in or authorization page. Complete the provider's authorization flow.</li>
        <li>Once authorization is successful, you will see a confirmation popup</li>
      </ul>
    </Step>
  </Steps>

  <p>If the account linking is successful, you will see the newly linked account in your <a href="/gateway/concepts/linked-accounts">Accounts</a> page.</p>
</div>

## Next Steps

<Columns cols={2}>
  <Card title="Webhooks setup" href="/connectors/bronto/guides/webhook-setup">
    <p className="connector-page-auth-description connector-page-card-text">
      Configure receiving Events for Bronto into StackOne.
    </p>
  </Card>
</Columns>