> ## Documentation Index
> Fetch the complete documentation index at: https://docs.stackone.com/llms.txt
> Use this file to discover all available pages before exploring further.

# Connect AD Manager with API Key – StackOne Hub

> Link a AD Manager account in the StackOne Hub using API Key. End-user guide to authorize the integration and start using AD Manager actions.

<Warning>The authtoken acts with the permissions of the technician it belongs to, so generate it as a technician who is delegated the Active Directory actions you plan to run. Your ADManager Plus server must be reachable from StackOne over HTTPS.</Warning>

<section data-guide-section data-guide-scopes="">
  <h2>Find your Server URL</h2>

  <p>Your Server URL is the address of your self-hosted ADManager Plus web console.</p>

  <ul>
    <li>Copy it from your browser address bar while signed in to ADManager Plus, keeping only the protocol, host and port.</li>
    <li>Paste it into the <strong>Server URL</strong> field in StackOne Hub, without a trailing slash, `/api/v2` or `/RestAPI`.</li>
    <li>Format: `https://{hostname}:{port}`</li>
    <li>Example: `https://admanager.example.com:8443`</li>
    <li>The <strong>Native Webhook URL</strong> field is filled in by StackOne and is only needed if you send webhook events from ADManager Plus.</li>
  </ul>
</section>

<section data-guide-section data-guide-scopes="">
  <h2>Generating an authtoken</h2>

  <p>An authtoken lets StackOne call the ADManager Plus REST API on behalf of a technician.</p>

  <Steps>
    <Step title="Open My Account">
      <div data-guide-step data-guide-scopes="" data-guide-display-scopes-list="">
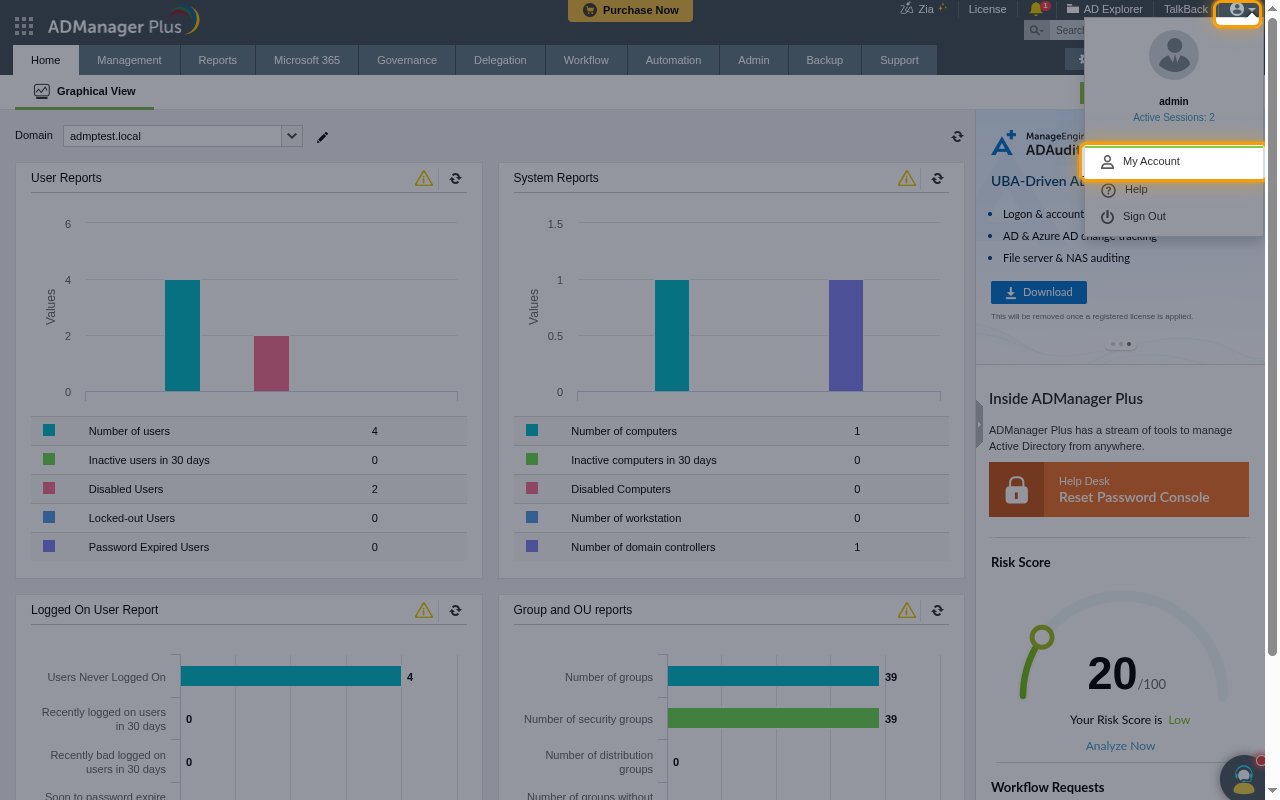
        <p>Sign in to the ADManager Plus web console at your Server URL, then click the profile icon in the top-right corner and select <strong>My Account</strong>.</p>

        <img src="https://mintcdn.com/stackone-60/hLRfDk2Cq1W-3g4N/connectors/admanager/images/custom-config-my-account-menu.png?fit=max&auto=format&n=hLRfDk2Cq1W-3g4N&q=85&s=9043e5f7cadfc20df38c39095e732ebd" alt="The ADManager Plus profile menu with the profile icon and the My Account option highlighted" width="1280" height="800" data-path="connectors/admanager/images/custom-config-my-account-menu.png" />
      </div>
    </Step>

    <Step title="Open Active Authtokens">
      <div data-guide-step data-guide-scopes="" data-guide-display-scopes-list="">
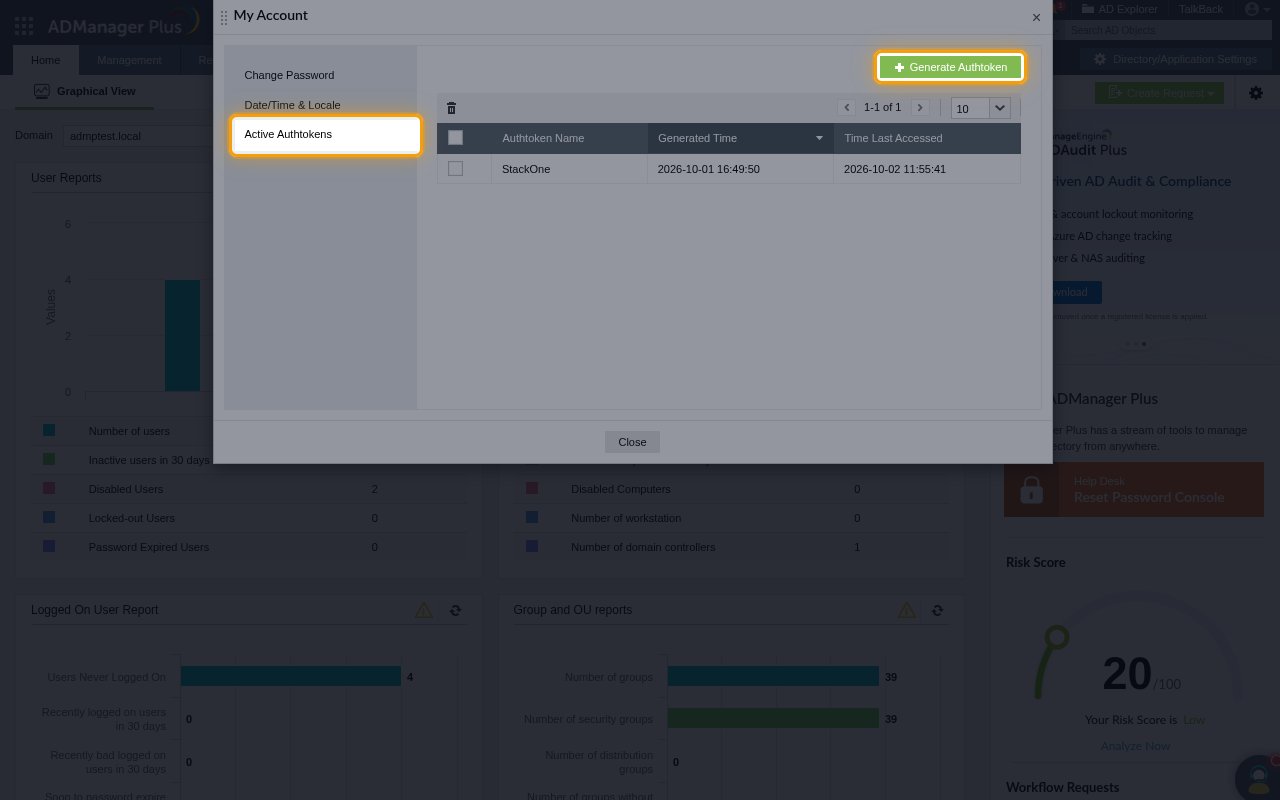
        <p>In the <strong>My Account</strong> window, open the <strong>Active Authtokens</strong> tab and click <strong>Generate Authtoken</strong>.</p>

        <img src="https://mintcdn.com/stackone-60/hLRfDk2Cq1W-3g4N/connectors/admanager/images/custom-config-active-authtokens.png?fit=max&auto=format&n=hLRfDk2Cq1W-3g4N&q=85&s=939e4a093c4a4bc28190c9afff723368" alt="The Active Authtokens tab of My Account with the Generate Authtoken button highlighted" width="1280" height="800" data-path="connectors/admanager/images/custom-config-active-authtokens.png" />
      </div>
    </Step>

    <Step title="Fill in the authtoken details">
      <div data-guide-step data-guide-scopes="" data-guide-display-scopes-list="">
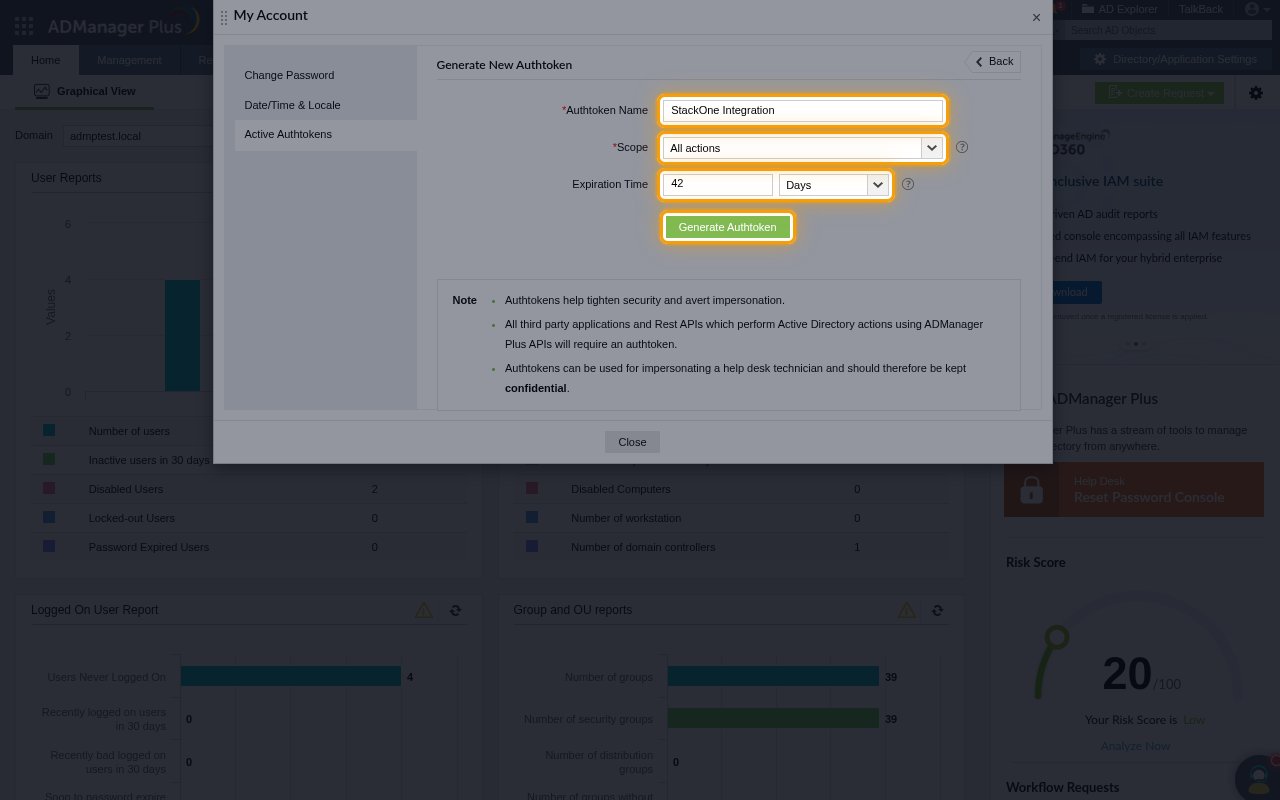
        <p>Complete the <strong>Generate New Authtoken</strong> form.</p>

        <ul>
          <li>Authtoken Name: `StackOne Integration`</li>
          <li>Leave <strong>Scope</strong> set to <strong>All actions</strong>, or choose a scope that covers every action you plan to use.</li>
          <li>Set <strong>Expiration Time</strong> to how long StackOne should keep access. When the authtoken expires, StackOne can no longer connect until you generate a new one.</li>
          <li>Click <strong>Generate Authtoken</strong>.</li>
        </ul>

        <img src="https://mintcdn.com/stackone-60/hLRfDk2Cq1W-3g4N/connectors/admanager/images/custom-config-generate-authtoken-form.png?fit=max&auto=format&n=hLRfDk2Cq1W-3g4N&q=85&s=0c5764c1c0b890f9946717851dd0e0e1" alt="The Generate New Authtoken form with the Authtoken Name, Scope, Expiration Time fields and the Generate Authtoken button highlighted" width="1280" height="800" data-path="connectors/admanager/images/custom-config-generate-authtoken-form.png" />
      </div>
    </Step>

    <Step title="Copy the authtoken">
      <div data-guide-step data-guide-scopes="" data-guide-display-scopes-list="">
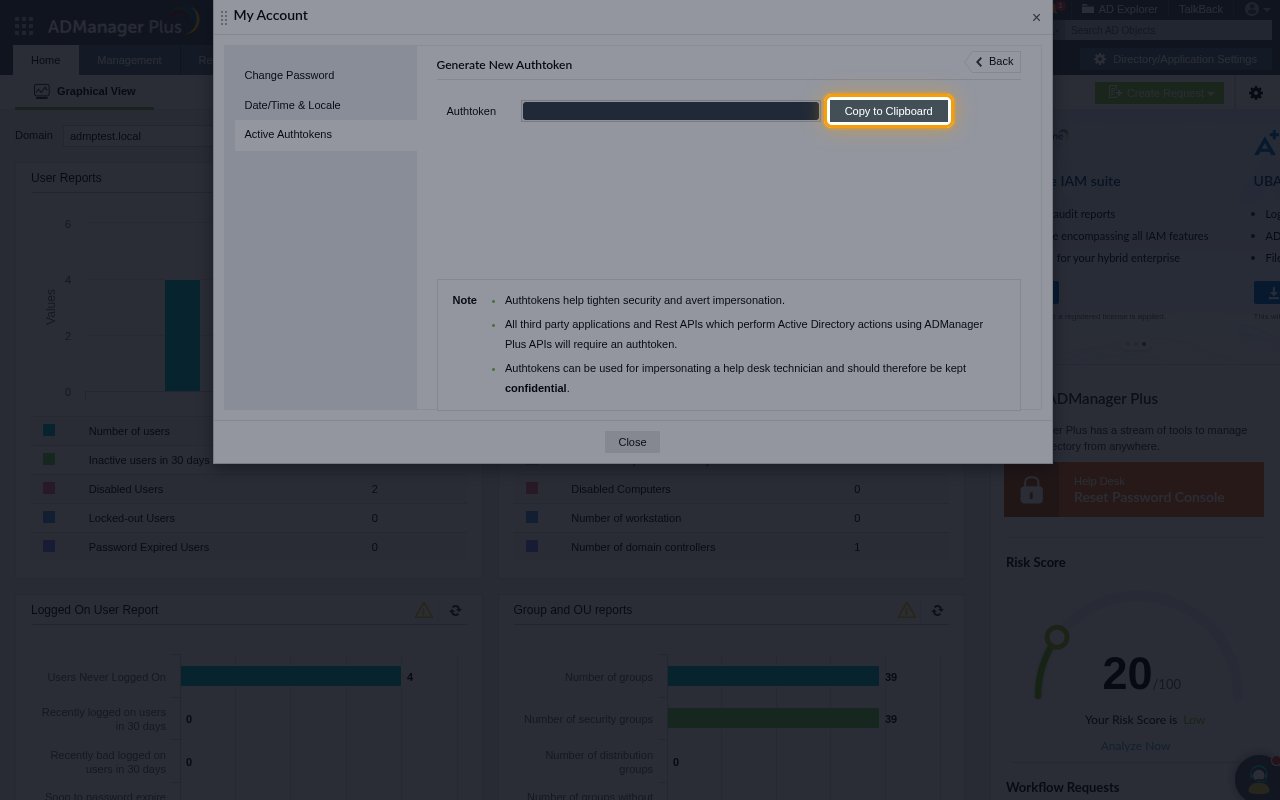
        <p>Click <strong>Copy to Clipboard</strong> and paste the value into the <strong>Authtoken</strong> field in StackOne Hub.</p>

        <ul>
          <li>Store it securely for use later. The <strong>Active Authtokens</strong> list shows only the authtoken name, not its value.</li>
          <li>Authtokens can be used for impersonating a help desk technician and should therefore be kept confidential.</li>
        </ul>

        <img src="https://mintcdn.com/stackone-60/hLRfDk2Cq1W-3g4N/connectors/admanager/images/custom-config-copy-authtoken.png?fit=max&auto=format&n=hLRfDk2Cq1W-3g4N&q=85&s=d13bf2e96f79f4684d6190f9cb2ff2f9" alt="The generated authtoken with its value hidden and the Copy to Clipboard button highlighted" width="1280" height="800" data-path="connectors/admanager/images/custom-config-copy-authtoken.png" />
      </div>
    </Step>
  </Steps>
</section>

<section data-guide-section data-guide-scopes="">
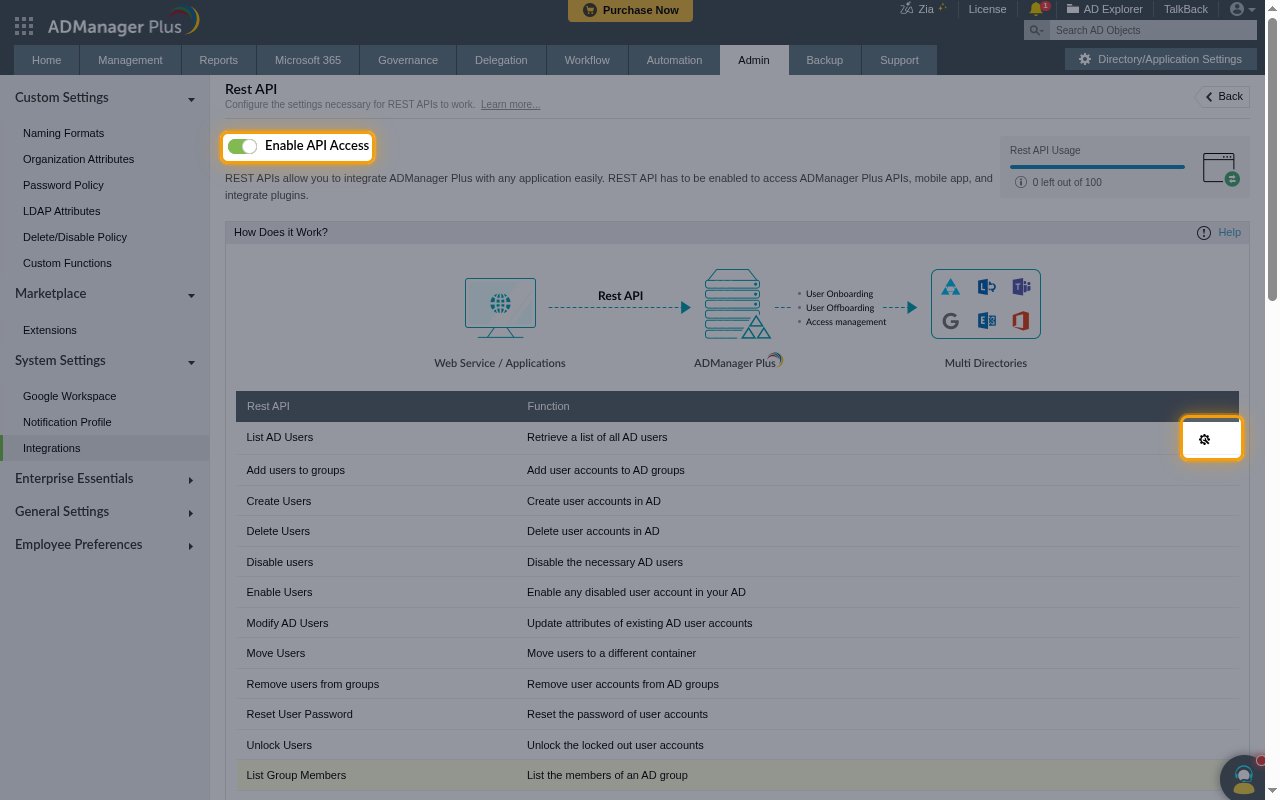
  <h2>Enabling REST API access</h2>

  <p>ADManager Plus only accepts API calls when REST API access is enabled.</p>

  <Steps>
    <Step title="Check the Rest API settings">
      <div data-guide-step data-guide-scopes="" data-guide-display-scopes-list="">
        <p>Navigate to <strong>Admin</strong> > <strong>System Settings</strong> > <strong>Integrations</strong> > <strong>Rest API</strong>.</p>

        <ul>
          <li>Make sure <strong>Enable API Access</strong> is switched on.</li>
          <li>To return or filter on more user attributes, such as logon times, click the configuration icon in the <strong>List AD Users</strong> row and enable the response and search columns you need. Repeat for the other APIs as required.</li>
          <li>The <strong>Rest API Usage</strong> counter shows how many API calls are left in the current period.</li>
        </ul>

        <img src="https://mintcdn.com/stackone-60/hLRfDk2Cq1W-3g4N/connectors/admanager/images/custom-config-rest-api-settings.png?fit=max&auto=format&n=hLRfDk2Cq1W-3g4N&q=85&s=d87eee498286ba11b8f6bb2c04a1723f" alt="The Rest API settings page with the Enable API Access toggle and the List AD Users configuration icon highlighted" width="1280" height="800" data-path="connectors/admanager/images/custom-config-rest-api-settings.png" />
      </div>
    </Step>
  </Steps>
</section>

<div data-whitelabel-hide>
  <h2>Linking the Account from the Hub</h2>

  <Steps>
    <Step title="Navigate to the Hub">
      Use one of the three <a href="/connect/managing-connectors/linking-accounts">Linking Account Methods</a> to access the Hub.
    </Step>

    <Step title="Fill out the fields">
      Fill out the following fields using details from your provider:

      <ul>
        <li><strong>Server URL</strong></li>
        <li><strong>Authtoken</strong></li>
      </ul>
    </Step>

    <Step title="Connect">
      <ul>
        <li>Click <strong>Connect</strong></li>
        <li>If applicable, the provider will redirect you to a sign-in or authorization page. Complete the provider's authorization flow.</li>
        <li>Once authorization is successful, you will see a confirmation popup</li>
      </ul>
    </Step>
  </Steps>

  <p>If the account linking is successful, you will see the newly linked account in your <a href="/gateway/concepts/linked-accounts">Accounts</a> page.</p>
</div>

## Next Steps

<Columns cols={2}>
  <Card title="Webhooks setup" href="/connectors/admanager/guides/webhook-setup">
    <p className="connector-page-auth-description connector-page-card-text">
      Configure receiving Events for AD Manager into StackOne.
    </p>
  </Card>
</Columns>


This documentation is built and hosted on [Mintlify](https://mintlify.com), a developer documentation platform.