> ## Documentation Index
> Fetch the complete documentation index at: https://docs.stackone.com/llms.txt
> Use this file to discover all available pages before exploring further.
# Glean
> Connect StackOne MCP to Glean as a vendor provided tool with OAuth, and hand the tools to Glean Chat and Agents.
## Overview
[Glean](https://www.glean.com) is an enterprise AI platform whose chat and agents work over a company's own knowledge. It connects to remote MCP servers as **vendor provided tools**, added once by an admin from the Admin console. StackOne connects to Glean with OAuth, so each user authorizes their own toolset and only reaches the [linked accounts](/gateway/concepts/linked-accounts) they have access to.
Adding an MCP server takes a Glean **Admin** or **Setup Admin** role, and agent support is in beta. Requirements and the menu labels change often, so see Glean's [Connect remote MCP servers](https://docs.glean.com/administration/tools/connect-remote-mcp-servers-to-glean) guide for the current flow.
## Prerequisites
* A StackOne [project](/gateway/concepts/organizations-and-projects) you are a member of.
* A [connector profile](/gateway/concepts/connector-profiles) in the project for each provider the client should reach, with the actions you want exposed enabled.
* (Optional) A [linked account](/gateway/concepts/linked-accounts) for each provider. Accounts can also be linked during the consent flow.
## Setup
1. Open the Glean [**Admin console**](https://app.glean.com/admin/tools).
2. On the **Tools** page, click **Add** in the top right.
 1. In the **Add tools** dialog, open the **Vendor provided tools (via MCP)** tab.
2. Click **Import tools from MCP server**.
1. In the **Add tools** dialog, open the **Vendor provided tools (via MCP)** tab.
2. Click **Import tools from MCP server**.
 On the **Configuration** tab, fill in:
* **MCP server name** (e.g. `StackOne`).
* **Description** (e.g. `MCPs powered by StackOne`).
* **MCP server URL**:
```text theme={null}
https://mcp.stackone.com/mcp
```
* **Transport type**: Streaming HTTP.
* **Authentication Method**: Dynamic Client Registration.
On the **Configuration** tab, fill in:
* **MCP server name** (e.g. `StackOne`).
* **Description** (e.g. `MCPs powered by StackOne`).
* **MCP server URL**:
```text theme={null}
https://mcp.stackone.com/mcp
```
* **Transport type**: Streaming HTTP.
* **Authentication Method**: Dynamic Client Registration.
 Click **Initiate connection**. Glean opens StackOne in your browser.
Sign in, pick the project and the [linked accounts](/gateway/concepts/linked-accounts) the connector should reach, then **Authorize**.
1. **Sign in to StackOne.** If you are already signed in to the dashboard you skip straight to the next step.
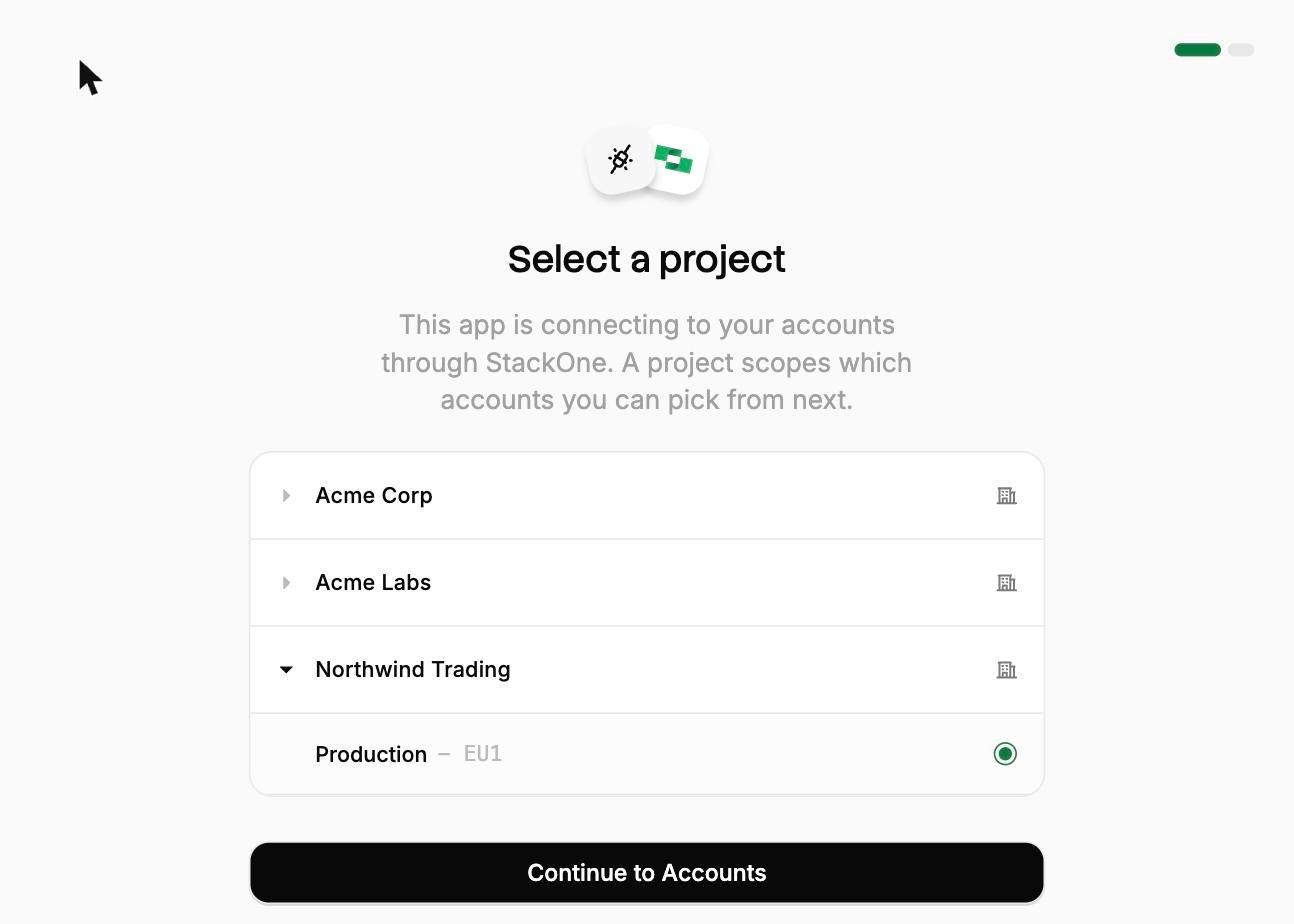
2. **Select a project.** Select the project you would like to associate the connection with.
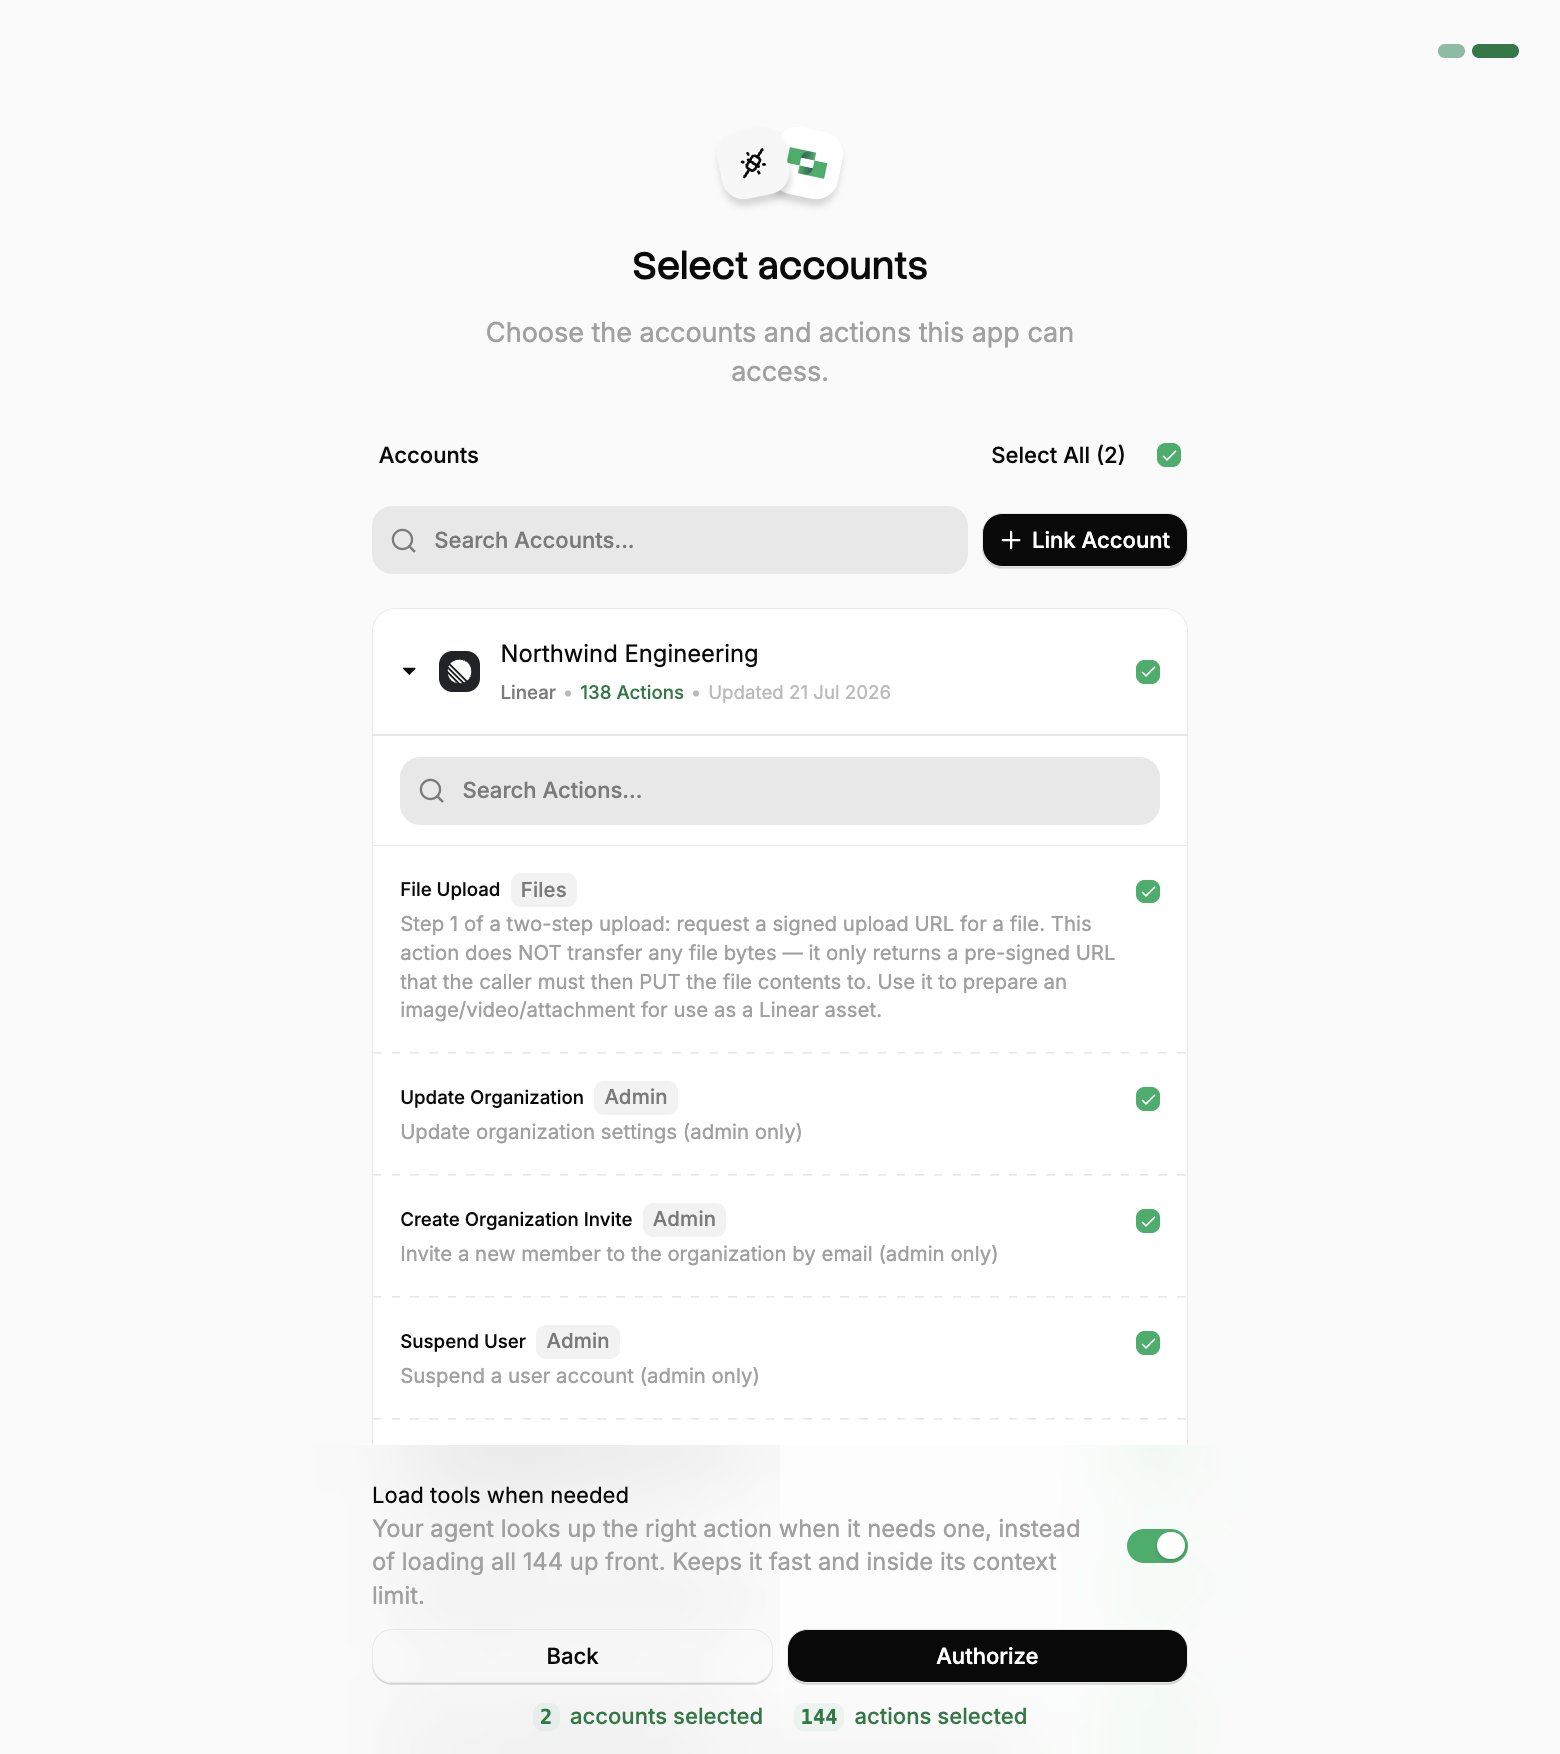
3. **Select accounts and actions.** Existing linked accounts are shown. New accounts can be linked by clicking **+ Link Account**. You can either select the whole account (all actions will be granted) or refine by toggling individual actions.
4. **(Optional) Load tools when needed.** On by default, and the toggle that puts the connection into [Advanced Tool Search](/optimize/advanced-tool-search). Leave it on for large action sets. Turn it off to hand the agent every selected action up front.
5. **Authorize.** Completes the connection; you can return to your client.
Click **Initiate connection**. Glean opens StackOne in your browser.
Sign in, pick the project and the [linked accounts](/gateway/concepts/linked-accounts) the connector should reach, then **Authorize**.
1. **Sign in to StackOne.** If you are already signed in to the dashboard you skip straight to the next step.
2. **Select a project.** Select the project you would like to associate the connection with.
3. **Select accounts and actions.** Existing linked accounts are shown. New accounts can be linked by clicking **+ Link Account**. You can either select the whole account (all actions will be granted) or refine by toggling individual actions.
4. **(Optional) Load tools when needed.** On by default, and the toggle that puts the connection into [Advanced Tool Search](/optimize/advanced-tool-search). Leave it on for large action sets. Turn it off to hand the agent every selected action up front.
5. **Authorize.** Completes the connection; you can return to your client.
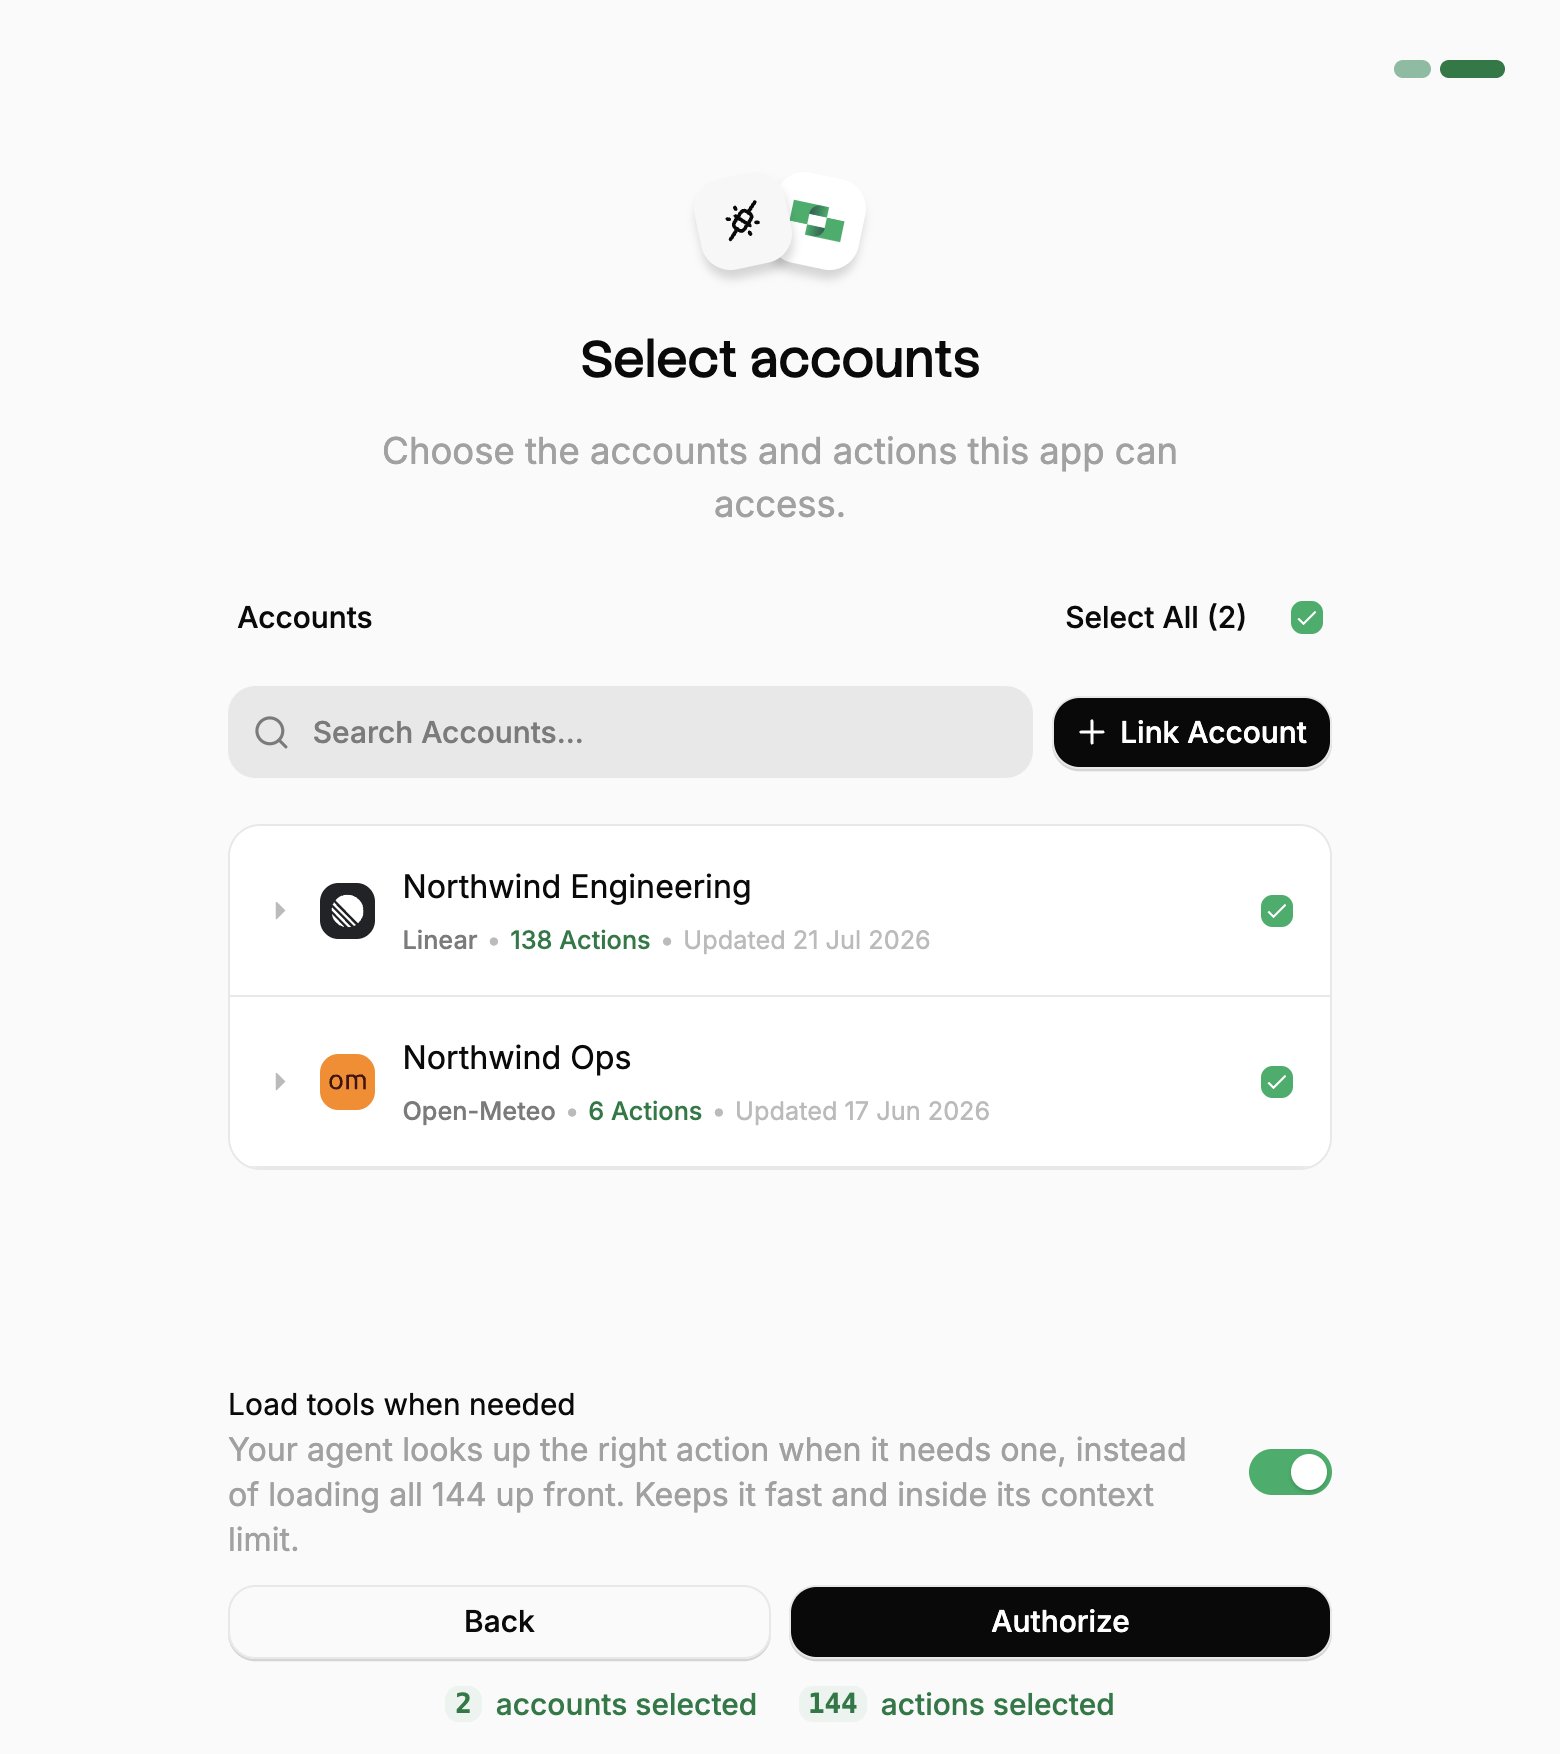
 If you see a sentence where the **Load tools when needed** toggle should be, an admin has already settled it for the whole project. See [project settings](/optimize/advanced-tool-search#setting-it-for-a-whole-project).
**Connect to server** now shows **Connected**, and the discovered tools appear on the **Tools** tab.
Your connection covers tool discovery and configuration only. Glean's [documentation](https://docs.glean.com/administration/tools/connect-remote-mcp-servers-to-glean) is explicit that it "does not authorize end users". Each teammate runs this same consent flow with their own StackOne login the first time they use a tool, so they only reach the accounts they have access to.
1. On the **Configuration** tab, under **Enable Tools** click **Edit Settings**.
2. Expand the surface you want the tools on: **Chat**, **Agents**, or **Glean MCP Server**.
3. For each tool in that surface, set:
* **Access**, the teammates who can use it. **Copy to all tools** applies one choice to the rest.
* **Run without user confirmation**, whether it runs without asking first.
4. Repeat for every surface the tools belong on, then click **Save**.
If you see a sentence where the **Load tools when needed** toggle should be, an admin has already settled it for the whole project. See [project settings](/optimize/advanced-tool-search#setting-it-for-a-whole-project).
**Connect to server** now shows **Connected**, and the discovered tools appear on the **Tools** tab.
Your connection covers tool discovery and configuration only. Glean's [documentation](https://docs.glean.com/administration/tools/connect-remote-mcp-servers-to-glean) is explicit that it "does not authorize end users". Each teammate runs this same consent flow with their own StackOne login the first time they use a tool, so they only reach the accounts they have access to.
1. On the **Configuration** tab, under **Enable Tools** click **Edit Settings**.
2. Expand the surface you want the tools on: **Chat**, **Agents**, or **Glean MCP Server**.
3. For each tool in that surface, set:
* **Access**, the teammates who can use it. **Copy to all tools** applies one choice to the rest.
* **Run without user confirmation**, whether it runs without asking first.
4. Repeat for every surface the tools belong on, then click **Save**.
 A tool must be assigned to at least one teammate or team, or Glean disables it everywhere. **Run without user confirmation** applies to Agents only. See Glean's [tool visibility](https://docs.glean.com/administration/tools/managing-tools/tools-chat-vs-agents) and [run without user confirmation](https://docs.glean.com/administration/tools/managing-tools/run-without-user-confirmation) guides.
The server appears under **Vendor Provided Tools (via MCP)** with status **Enabled**.
Try a prompt in Glean Chat (if you enabled the tools for Chat):
```text theme={null}
What StackOne tools are available?
```
Every grant belongs to the teammate who approved it, so changing which accounts or actions Glean can reach means that person running the consent flow again. To revoke one, use **Connected Apps** in the StackOne dashboard.
## Adding tools to a Glean agent
In Glean, go to the **Agents** tab and create an agent.
In the panel on the right, open **Tools**, click **+**, choose **MCP**, and select the StackOne server you added.
A tool must be assigned to at least one teammate or team, or Glean disables it everywhere. **Run without user confirmation** applies to Agents only. See Glean's [tool visibility](https://docs.glean.com/administration/tools/managing-tools/tools-chat-vs-agents) and [run without user confirmation](https://docs.glean.com/administration/tools/managing-tools/run-without-user-confirmation) guides.
The server appears under **Vendor Provided Tools (via MCP)** with status **Enabled**.
Try a prompt in Glean Chat (if you enabled the tools for Chat):
```text theme={null}
What StackOne tools are available?
```
Every grant belongs to the teammate who approved it, so changing which accounts or actions Glean can reach means that person running the consent flow again. To revoke one, use **Connected Apps** in the StackOne dashboard.
## Adding tools to a Glean agent
In Glean, go to the **Agents** tab and create an agent.
In the panel on the right, open **Tools**, click **+**, choose **MCP**, and select the StackOne server you added.
 Click **Preview** and ask the agent:
```text theme={null}
What StackOne tools are available?
```
Then **Publish** to make it available to the teammates you granted access to.
All of the server's tools are enabled on the agent automatically. Through the two [Advanced Tool Search](/optimize/advanced-tool-search) tools, Search and Execute, the agent can find and run the actions each teammate granted, against the linked accounts that teammate has access to.
Glean supports MCP tools in **Plan and execute** steps and autonomous agents, not in single-step selections. They are also unavailable in Fast mode.
A session token URL carries its own credential, so it covers the cases OAuth can't: a shared server, a scheduled job, or anywhere nobody is present to approve a consent screen. For a comparison of each connection method, see [Choosing a connection method](/connect/ai-platforms/overview#choosing-a-connection-method).
From the StackOne dashboard, go to [**Connectors**](https://app.stackone.com/connectors), open a connector, then click **Use in Agent**.
1. Pick a linked account.
2. Set the expiry (one year by default).
3. Select **HTTPS MCP** and copy the URL. It should be in the format of:
```
https://api.stackone.com/mcp?token={session_token}
```
This URL covers one linked account, and anyone holding it has that access until it expires, so treat it like a password.
To enable [Advanced Tool Search](/optimize/advanced-tool-search), add the `tool-mode` query parameter to the URL:
```
https://api.stackone.com/mcp?token={session_token}&tool-mode=search_execute
```
Follow the **Setup** steps, with two fields changed:
1. **MCP server URL**: Use the token URL.
2. **Authentication Method**: **None**.
## Optimize and secure
With your agent connected, use StackOne's platform features to optimize performance and secure every call.
Reduce context and save tokens.
Search synced records for a fraction of the tokens.
Block prompt injections before they reach your agent.
Click **Preview** and ask the agent:
```text theme={null}
What StackOne tools are available?
```
Then **Publish** to make it available to the teammates you granted access to.
All of the server's tools are enabled on the agent automatically. Through the two [Advanced Tool Search](/optimize/advanced-tool-search) tools, Search and Execute, the agent can find and run the actions each teammate granted, against the linked accounts that teammate has access to.
Glean supports MCP tools in **Plan and execute** steps and autonomous agents, not in single-step selections. They are also unavailable in Fast mode.
A session token URL carries its own credential, so it covers the cases OAuth can't: a shared server, a scheduled job, or anywhere nobody is present to approve a consent screen. For a comparison of each connection method, see [Choosing a connection method](/connect/ai-platforms/overview#choosing-a-connection-method).
From the StackOne dashboard, go to [**Connectors**](https://app.stackone.com/connectors), open a connector, then click **Use in Agent**.
1. Pick a linked account.
2. Set the expiry (one year by default).
3. Select **HTTPS MCP** and copy the URL. It should be in the format of:
```
https://api.stackone.com/mcp?token={session_token}
```
This URL covers one linked account, and anyone holding it has that access until it expires, so treat it like a password.
To enable [Advanced Tool Search](/optimize/advanced-tool-search), add the `tool-mode` query parameter to the URL:
```
https://api.stackone.com/mcp?token={session_token}&tool-mode=search_execute
```
Follow the **Setup** steps, with two fields changed:
1. **MCP server URL**: Use the token URL.
2. **Authentication Method**: **None**.
## Optimize and secure
With your agent connected, use StackOne's platform features to optimize performance and secure every call.
Reduce context and save tokens.
Search synced records for a fraction of the tokens.
Block prompt injections before they reach your agent.