> ## Documentation Index
> Fetch the complete documentation index at: https://docs.stackone.com/llms.txt
> Use this file to discover all available pages before exploring further.
# Claude Code
> Connect StackOne MCP to Claude Code with OAuth using built-in MCP commands.
## Overview
[Claude Code](https://code.claude.com/) is Anthropic's CLI for developers. It has built-in commands for managing MCP servers and runs the OAuth flow itself.
For complete Claude Code MCP documentation, see the [official MCP guide](https://code.claude.com/docs/en/mcp).
## Prerequisites
* A StackOne [project](/gateway/concepts/organizations-and-projects) you are a member of.
* A [connector profile](/gateway/concepts/connector-profiles) in the project for each provider the client should reach, with the actions you want exposed enabled.
* (Optional) A [linked account](/gateway/concepts/linked-accounts) for each provider. Accounts can also be linked during the consent flow.
## Setup
```bash theme={null}
claude mcp add --transport http stackone https://mcp.stackone.com/mcp
```
Add `--scope user` to make it available across all your projects rather than just the current directory. See [Scope options](#scope-options).
Claude Code waits for you to ask before opening a browser. Run `/mcp`, select **stackone**, then **Authenticate**.
Sign in, pick the project and the [linked accounts](/gateway/concepts/linked-accounts) the connector should reach, then **Authorize**.
1. **Sign in to StackOne.** If you are already signed in to the dashboard you skip straight to the next step.
2. **Select a project.** Select the project you would like to associate the connection with.
3. **Select accounts and actions.** Existing linked accounts are shown. New accounts can be linked by clicking **+ Link Account**. You can either select the whole account (all actions will be granted) or refine by toggling individual actions.
4. **(Optional) Load tools when needed.** On by default, and the toggle that puts the connection into [Advanced Tool Search](/optimize/advanced-tool-search). Leave it on for large action sets. Turn it off to hand the agent every selected action up front.
5. **Authorize.** Completes the connection; you can return to your client.
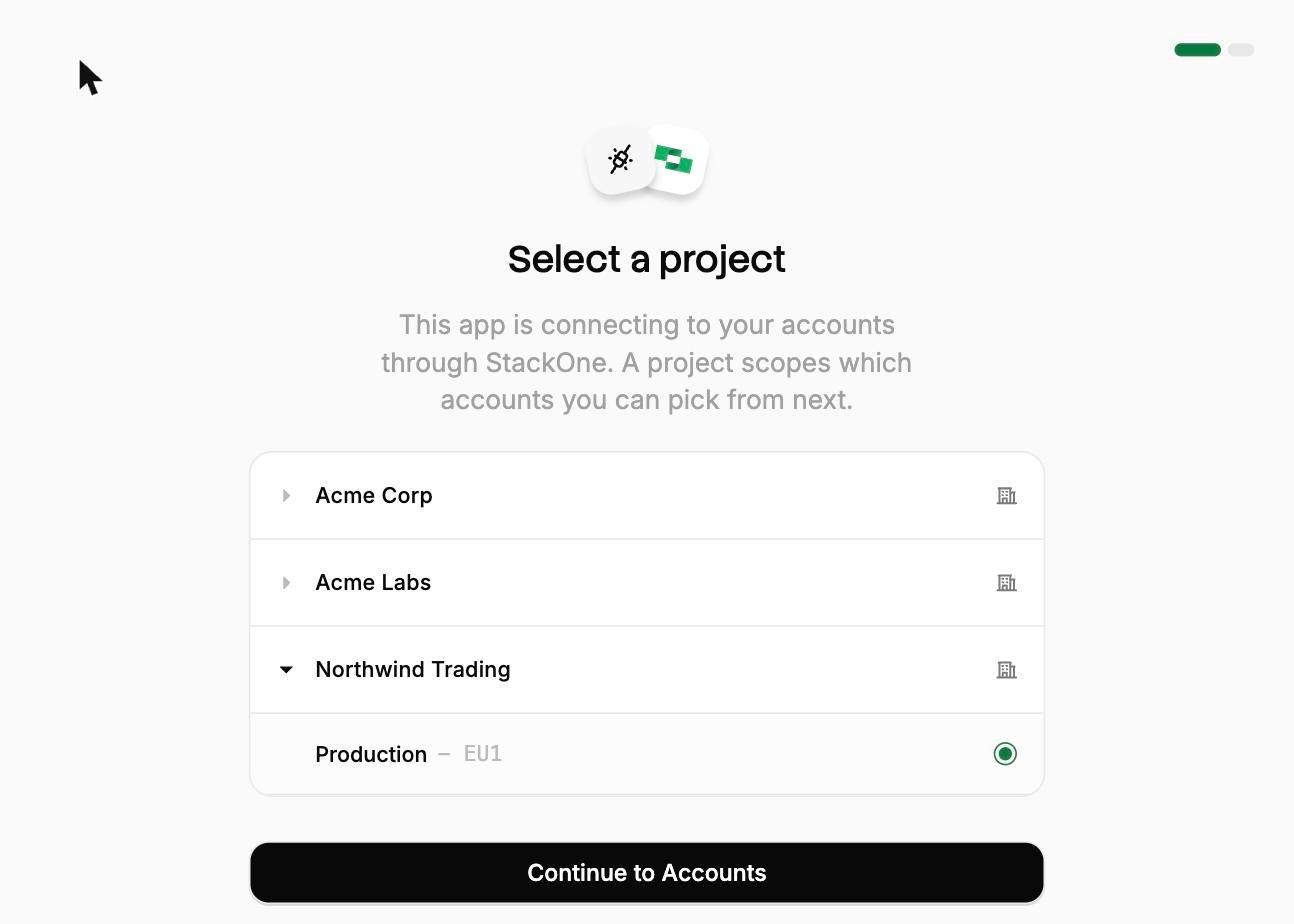
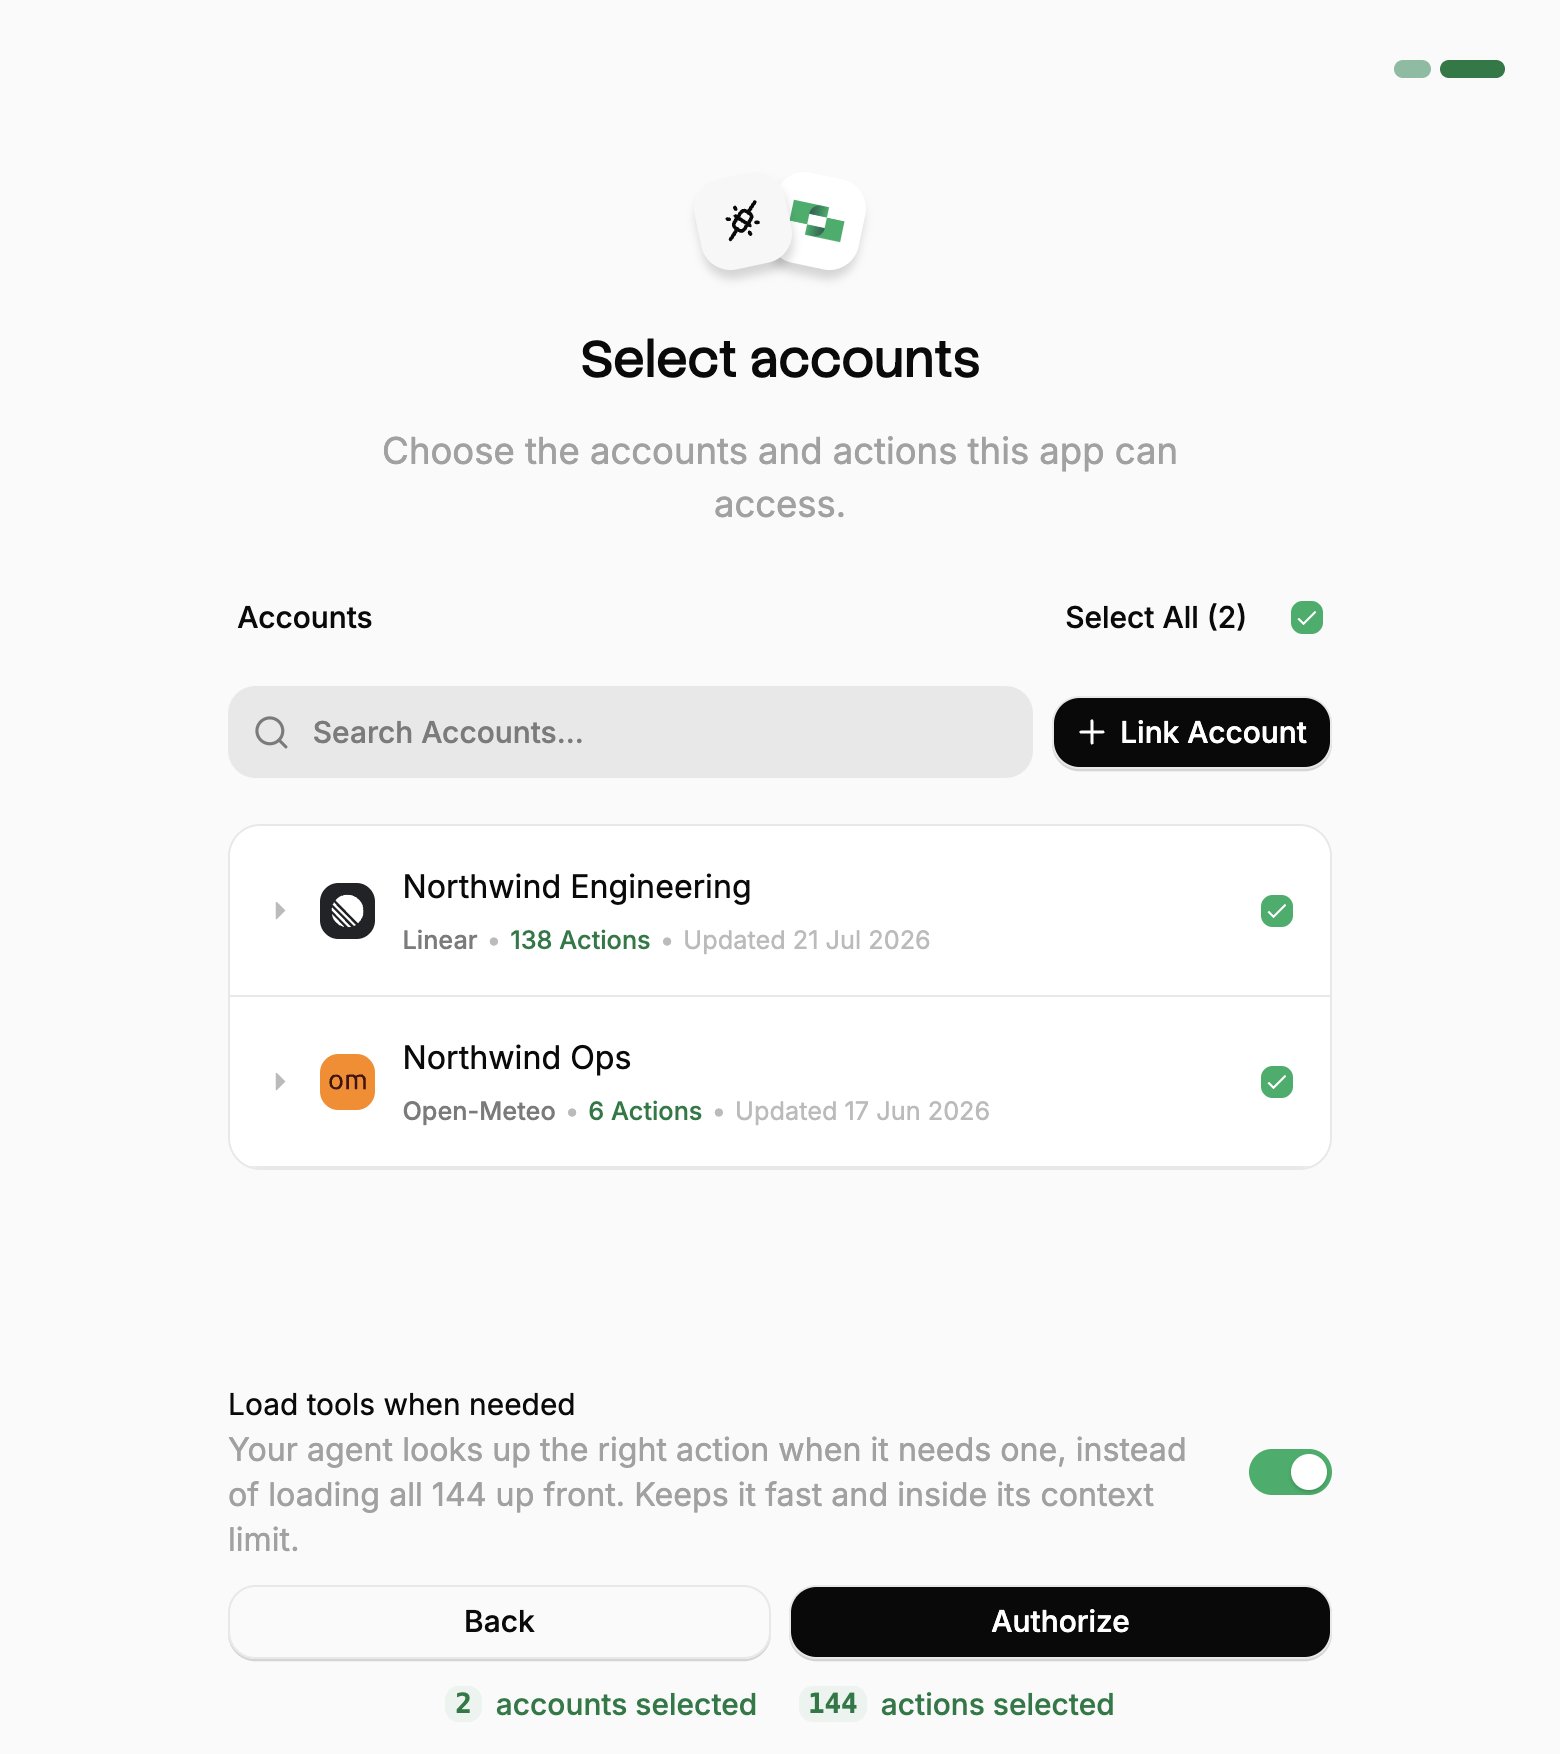
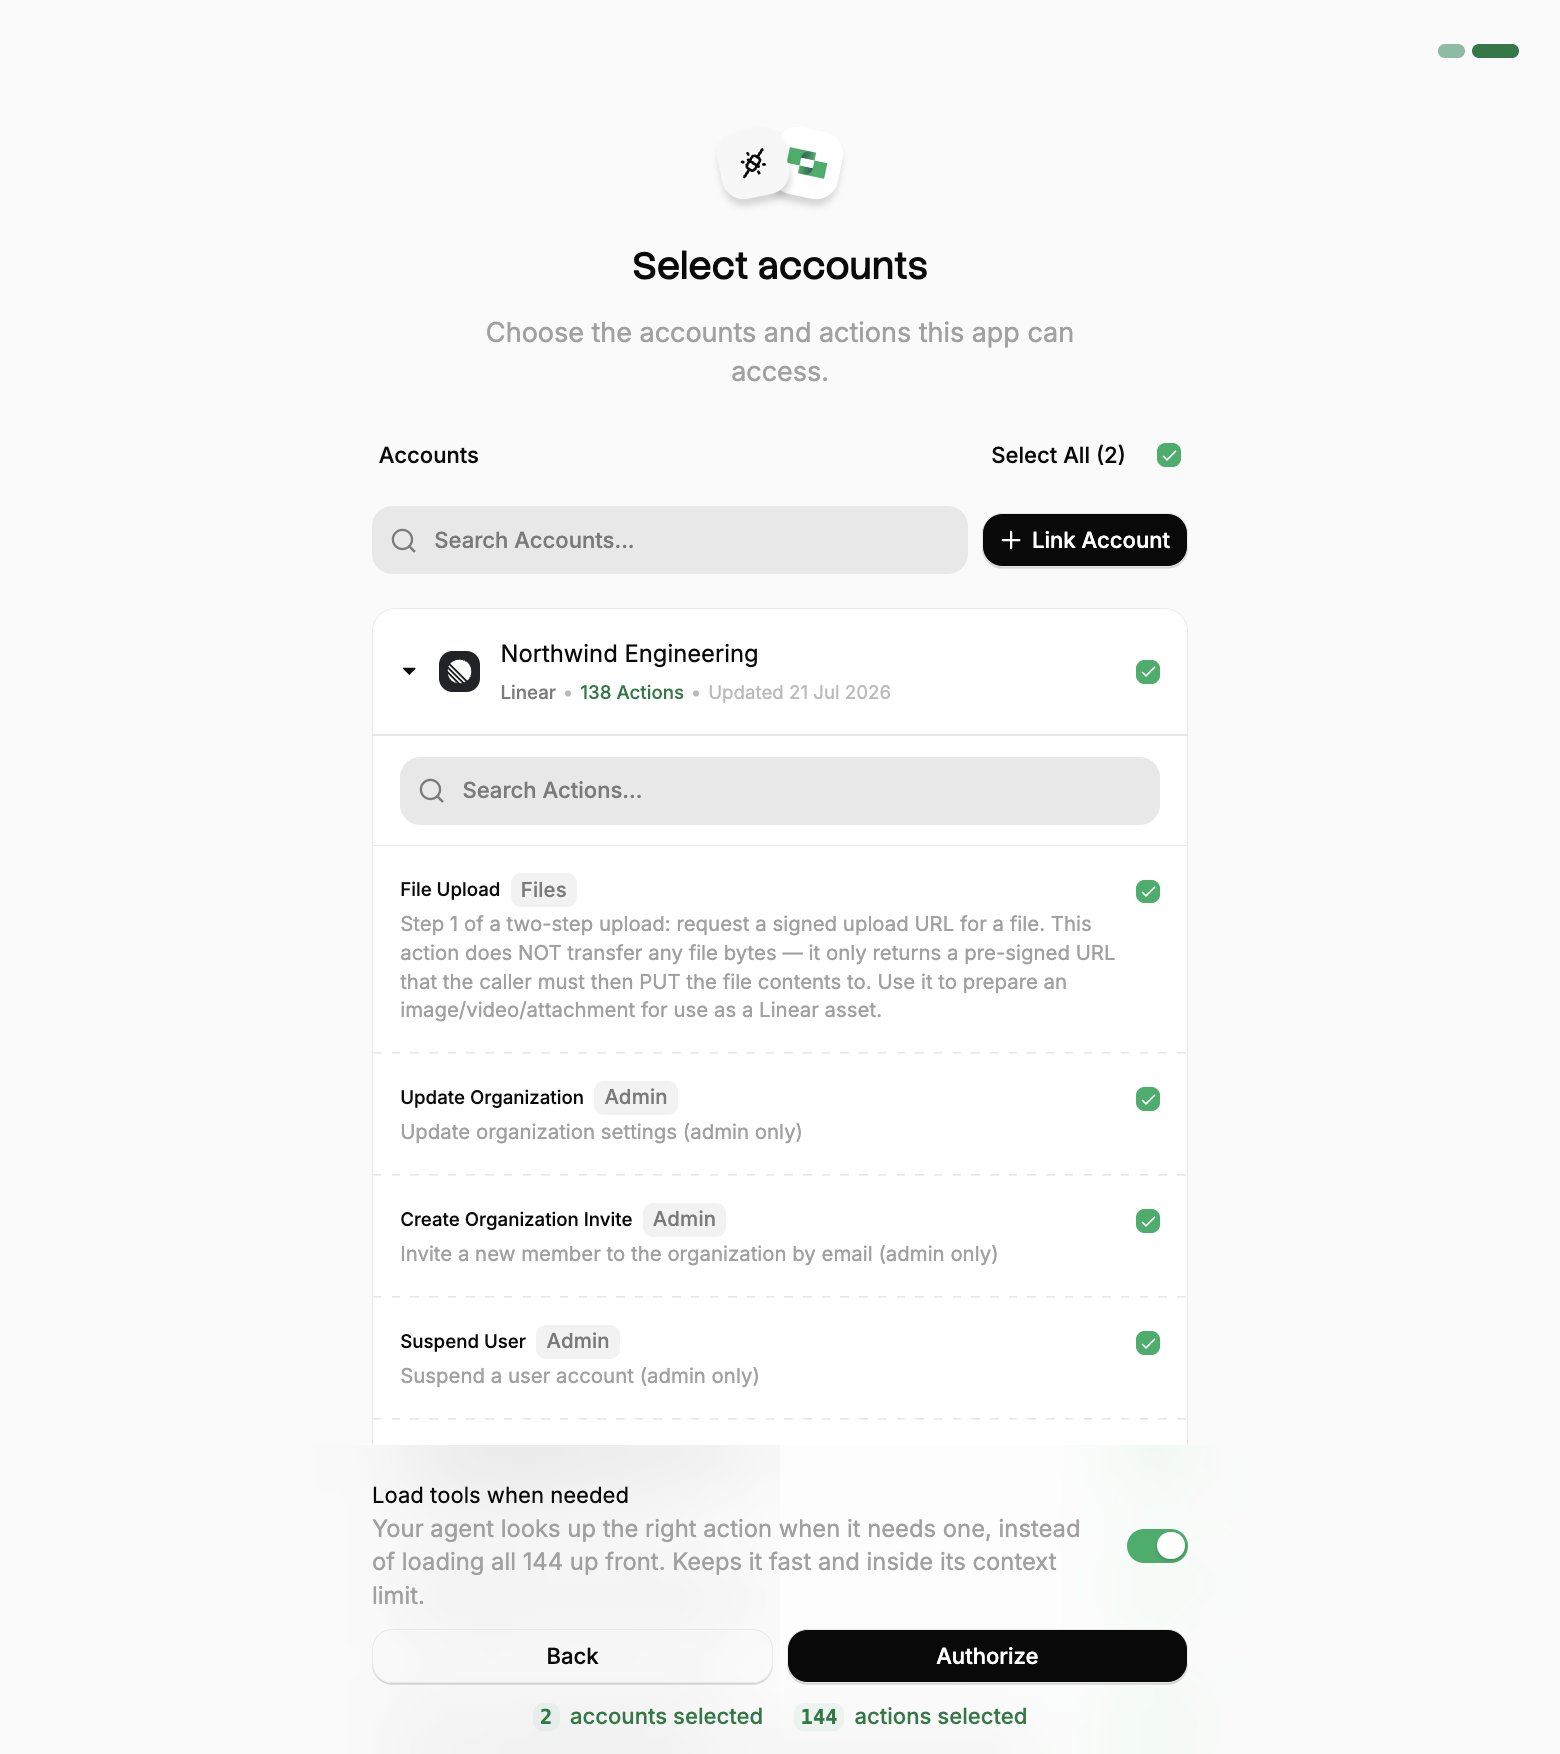 If you see a sentence where the **Load tools when needed** toggle should be, an admin has already settled it for the whole project. See [project settings](/optimize/advanced-tool-search#setting-it-for-a-whole-project).
Check the server status:
```bash theme={null}
claude mcp list
```
Within a session, use `/mcp` to view server details and available tools, then select **View tools** to browse the operations you granted.
One grant covers every account you approved, so a single `stackone` server is usually all you need. To change which accounts or actions it can reach, re-run `/mcp` and authenticate again; to revoke it, use **Connected Apps** in the StackOne dashboard.
## Scope options
Control where the configuration is stored:
| Scope | Flag | Storage location | Use case |
| ------- | ----------------- | ----------------------------------- | --------------------------------------- |
| Local | (default) | `.claude.json` in current directory | Project-specific |
| Project | `--scope project` | `.mcp.json` at project root | Team collaboration (version controlled) |
| User | `--scope user` | `~/.claude.json` | Personal tools across all projects |
**Example with user scope** (available across all projects):
```bash theme={null}
claude mcp add --transport http --scope user stackone https://mcp.stackone.com/mcp
```
A `--scope project` entry is safe to commit, because the URL carries no access of its own. Each teammate authenticates as themselves and gets their own accounts.
## Management commands
```bash theme={null}
claude mcp list # View all configured servers
claude mcp get stackone # Show details for a specific server
claude mcp remove stackone # Remove a server
```
A session token URL carries its own credential, so it covers the cases OAuth can't: a shared server, a scheduled job, or anywhere nobody is present to approve a consent screen.
Generate one from **Connectors**, open a connector, then **Use in Agent**. Pick a linked account, set the expiry (one year by default), and copy the URL:
```
https://api.stackone.com/mcp?token={session_token}
```
One URL covers one linked account, and anyone holding it has that access until it expires, so treat it like a password. See [Choosing a connection method](/connect/ai-platforms/overview#choosing-a-connection-method) for the comparison with OAuth.
There is no consent screen to set [Advanced Tool Search](/optimize/advanced-tool-search) on, so add the `tool-mode` query parameter instead:
```
https://api.stackone.com/mcp?token={session_token}&tool-mode=search_execute
```
Pass the token URL to `claude mcp add`, one server per linked account:
```bash theme={null}
claude mcp add \
--transport http \
gsheets \
"https://api.stackone.com/mcp?token={session_token}"
```
Use short names for easier CLI usage: `gsheets`, `slack`, `hubspot-sales`.
For multiple accounts, get a separate token for each and add them as distinct servers:
```bash theme={null}
claude mcp add --transport http gsheets "https://api.stackone.com/mcp?token={google_sheets_session_token}"
claude mcp add --transport http slack "https://api.stackone.com/mcp?token={slack_session_token}"
```
If you prefer to use your API key and account ID directly, set your encoded API key as an environment variable first:
```bash theme={null}
export STACKONE_AUTH_TOKEN=$(echo -n "{stackone_api_key}:" | base64)
```
```powershell theme={null}
$env:STACKONE_AUTH_TOKEN = [Convert]::ToBase64String([System.Text.Encoding]::UTF8.GetBytes("{stackone_api_key}:"))
```
Then add the server:
```bash theme={null}
claude mcp add \
--transport http \
--header "Authorization: Basic $STACKONE_AUTH_TOKEN" \
gsheets \
"https://api.stackone.com/mcp?x-account-id={account_id}"
```
## Programmatic integration
For programmatic integration with Anthropic's Claude API, see the [Anthropic SDK Framework Guide](/embed/call-actions/mcp/anthropic-sdk).
## Optimize and secure
With your agent connected, use StackOne's platform features to optimize performance and secure every call.
Reduce context and save tokens.
Search synced records for a fraction of the tokens.
Block prompt injections before they reach your agent.
If you see a sentence where the **Load tools when needed** toggle should be, an admin has already settled it for the whole project. See [project settings](/optimize/advanced-tool-search#setting-it-for-a-whole-project).
Check the server status:
```bash theme={null}
claude mcp list
```
Within a session, use `/mcp` to view server details and available tools, then select **View tools** to browse the operations you granted.
One grant covers every account you approved, so a single `stackone` server is usually all you need. To change which accounts or actions it can reach, re-run `/mcp` and authenticate again; to revoke it, use **Connected Apps** in the StackOne dashboard.
## Scope options
Control where the configuration is stored:
| Scope | Flag | Storage location | Use case |
| ------- | ----------------- | ----------------------------------- | --------------------------------------- |
| Local | (default) | `.claude.json` in current directory | Project-specific |
| Project | `--scope project` | `.mcp.json` at project root | Team collaboration (version controlled) |
| User | `--scope user` | `~/.claude.json` | Personal tools across all projects |
**Example with user scope** (available across all projects):
```bash theme={null}
claude mcp add --transport http --scope user stackone https://mcp.stackone.com/mcp
```
A `--scope project` entry is safe to commit, because the URL carries no access of its own. Each teammate authenticates as themselves and gets their own accounts.
## Management commands
```bash theme={null}
claude mcp list # View all configured servers
claude mcp get stackone # Show details for a specific server
claude mcp remove stackone # Remove a server
```
A session token URL carries its own credential, so it covers the cases OAuth can't: a shared server, a scheduled job, or anywhere nobody is present to approve a consent screen.
Generate one from **Connectors**, open a connector, then **Use in Agent**. Pick a linked account, set the expiry (one year by default), and copy the URL:
```
https://api.stackone.com/mcp?token={session_token}
```
One URL covers one linked account, and anyone holding it has that access until it expires, so treat it like a password. See [Choosing a connection method](/connect/ai-platforms/overview#choosing-a-connection-method) for the comparison with OAuth.
There is no consent screen to set [Advanced Tool Search](/optimize/advanced-tool-search) on, so add the `tool-mode` query parameter instead:
```
https://api.stackone.com/mcp?token={session_token}&tool-mode=search_execute
```
Pass the token URL to `claude mcp add`, one server per linked account:
```bash theme={null}
claude mcp add \
--transport http \
gsheets \
"https://api.stackone.com/mcp?token={session_token}"
```
Use short names for easier CLI usage: `gsheets`, `slack`, `hubspot-sales`.
For multiple accounts, get a separate token for each and add them as distinct servers:
```bash theme={null}
claude mcp add --transport http gsheets "https://api.stackone.com/mcp?token={google_sheets_session_token}"
claude mcp add --transport http slack "https://api.stackone.com/mcp?token={slack_session_token}"
```
If you prefer to use your API key and account ID directly, set your encoded API key as an environment variable first:
```bash theme={null}
export STACKONE_AUTH_TOKEN=$(echo -n "{stackone_api_key}:" | base64)
```
```powershell theme={null}
$env:STACKONE_AUTH_TOKEN = [Convert]::ToBase64String([System.Text.Encoding]::UTF8.GetBytes("{stackone_api_key}:"))
```
Then add the server:
```bash theme={null}
claude mcp add \
--transport http \
--header "Authorization: Basic $STACKONE_AUTH_TOKEN" \
gsheets \
"https://api.stackone.com/mcp?x-account-id={account_id}"
```
## Programmatic integration
For programmatic integration with Anthropic's Claude API, see the [Anthropic SDK Framework Guide](/embed/call-actions/mcp/anthropic-sdk).
## Optimize and secure
With your agent connected, use StackOne's platform features to optimize performance and secure every call.
Reduce context and save tokens.
Search synced records for a fraction of the tokens.
Block prompt injections before they reach your agent.