> ## Documentation Index
> Fetch the complete documentation index at: https://docs.stackone.com/llms.txt
> Use this file to discover all available pages before exploring further.
# ChatGPT
> Connect StackOne MCP to ChatGPT as a custom app with OAuth.
## Overview
[ChatGPT](https://chatgpt.com) connects to remote MCP servers as **custom apps**, added through Developer mode. It registers itself with StackOne and runs the OAuth flow, so the URL is the whole configuration.
Add the app in a browser at [chatgpt.com](https://chatgpt.com). Developer mode and the app creation screens are web only, so the ChatGPT desktop app cannot add one. What you create belongs to your ChatGPT workspace, and the desktop app picks it up from there once it exists.
Custom MCP apps require Developer mode and a paid ChatGPT plan (Plus, Pro, Business, Enterprise, Edu). Availability, plan requirements, and the menu labels change often, so see OpenAI's [Developer mode and MCP apps](https://help.openai.com/en/articles/12584461-developer-mode-and-mcp-apps-in-chatgpt) article for the current flow.
## Prerequisites
* A StackOne [project](/gateway/concepts/organizations-and-projects) you are a member of.
* A [connector profile](/gateway/concepts/connector-profiles) in the project for each provider the client should reach, with the actions you want exposed enabled.
* (Optional) A [linked account](/gateway/concepts/linked-accounts) for each provider. Accounts can also be linked during the consent flow.
## Setup
Who can turn it on depends on your plan.
1. Go to **Settings → Apps → Advanced Settings**.
2. Turn on **Developer mode**.
Personal accounts have no workspace admin, so there is nothing to be granted first. If you don't see the toggle there, check **Settings → Security and login**.
Only admins and owners can use Developer mode, and each one turns it on for their own account. An admin cannot enable it on behalf of another member.
1. Go to **Settings → Apps → Advanced Settings**.
2. Turn on **Developer mode**.
You can also enable it for yourself while creating the app, from **Workspace Settings → Apps → Create**. To check who holds these roles, see **Workspace Settings → Members**.
An admin grants access first, then each authorized member turns it on.
1. An admin opens **Workspace Settings → Permissions & Roles → Connected Data** and grants Developer mode access, using RBAC to pick which members get it.
2. Each granted member goes to **Settings → Apps → Advanced Settings**.
3. Turn on **Developer mode**.
**Settings → Apps → Create**. Admins can do the same from **Workspace Settings → Apps → Create**. Some workspaces label this section **Plugins**, with a **+** button in place of **Create**.
Give it a name and description, set authentication to **OAuth**, and paste the URL:
```
https://mcp.stackone.com/mcp
```
ChatGPT discovers the endpoints and registers itself, so leave the client ID and secret empty. No `mcp-remote` wrapper needed.
Click **Scan Tools**. ChatGPT opens StackOne in your browser.
Sign in, pick the project and the [linked accounts](/gateway/concepts/linked-accounts) the connector should reach, then **Authorize**.
1. **Sign in to StackOne.** If you are already signed in to the dashboard you skip straight to the next step.
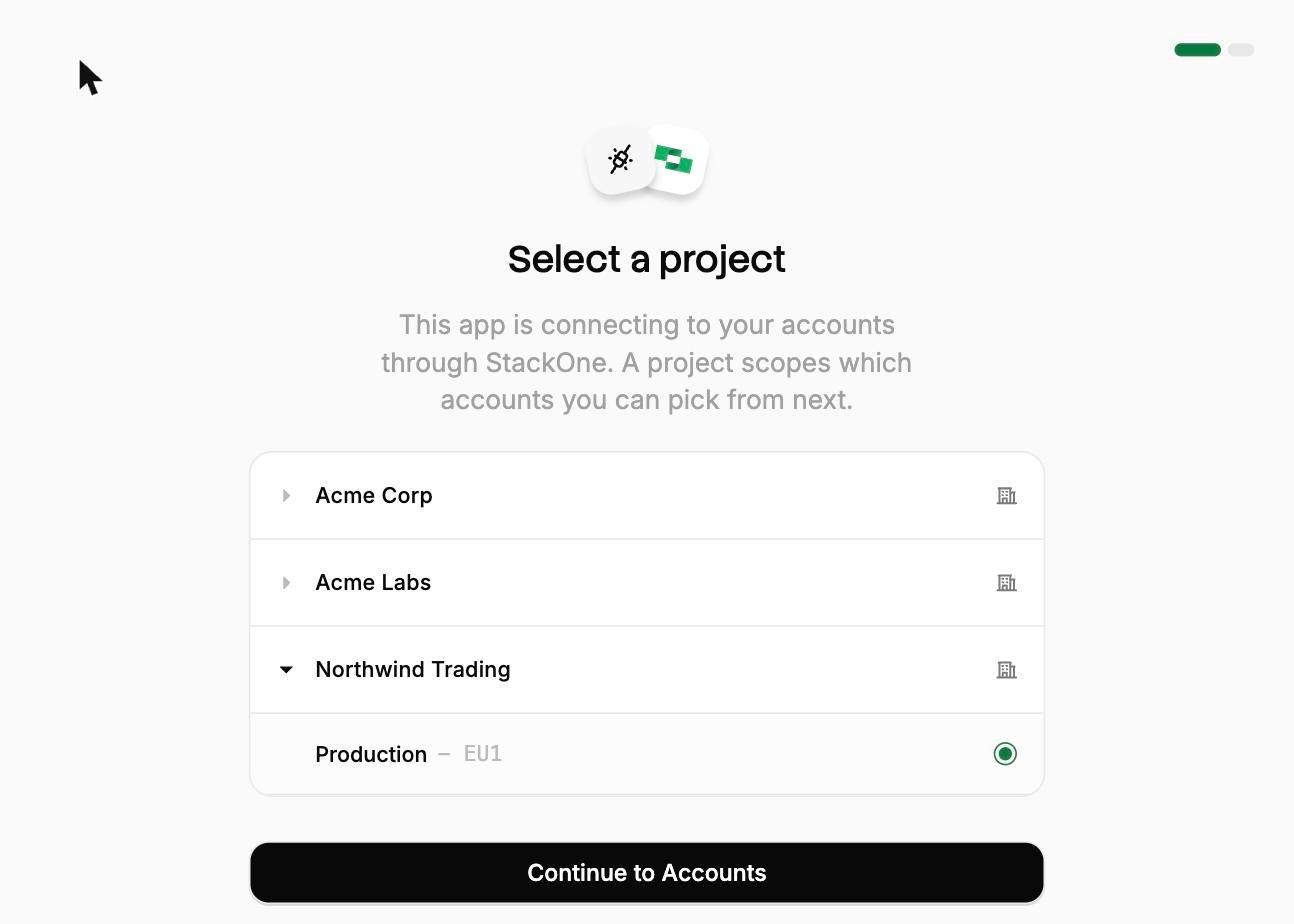
2. **Select a project.** Select the project you would like to associate the connection with.
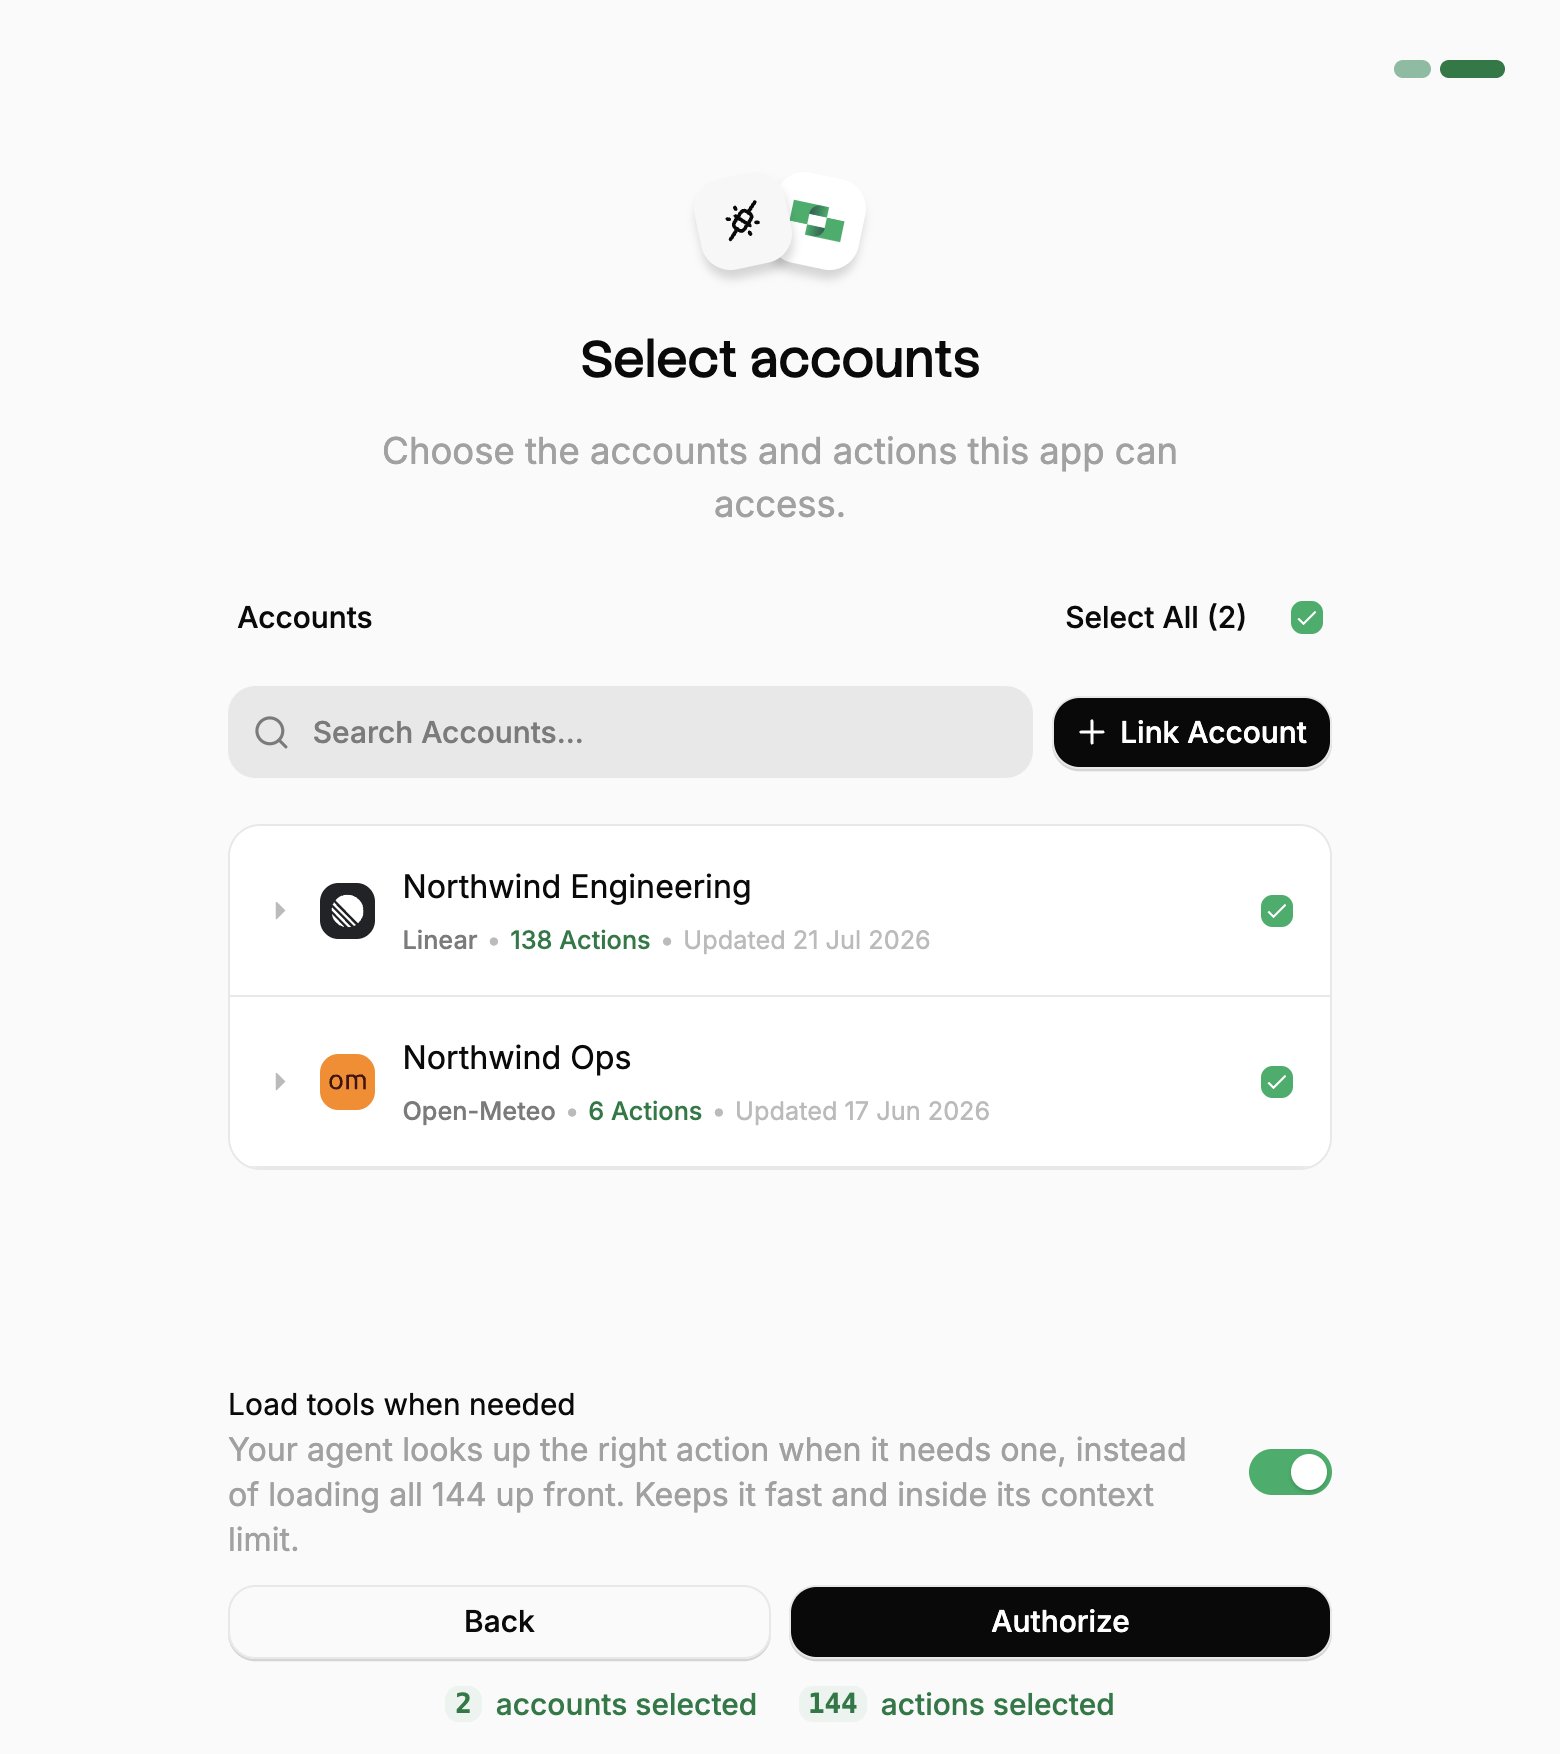
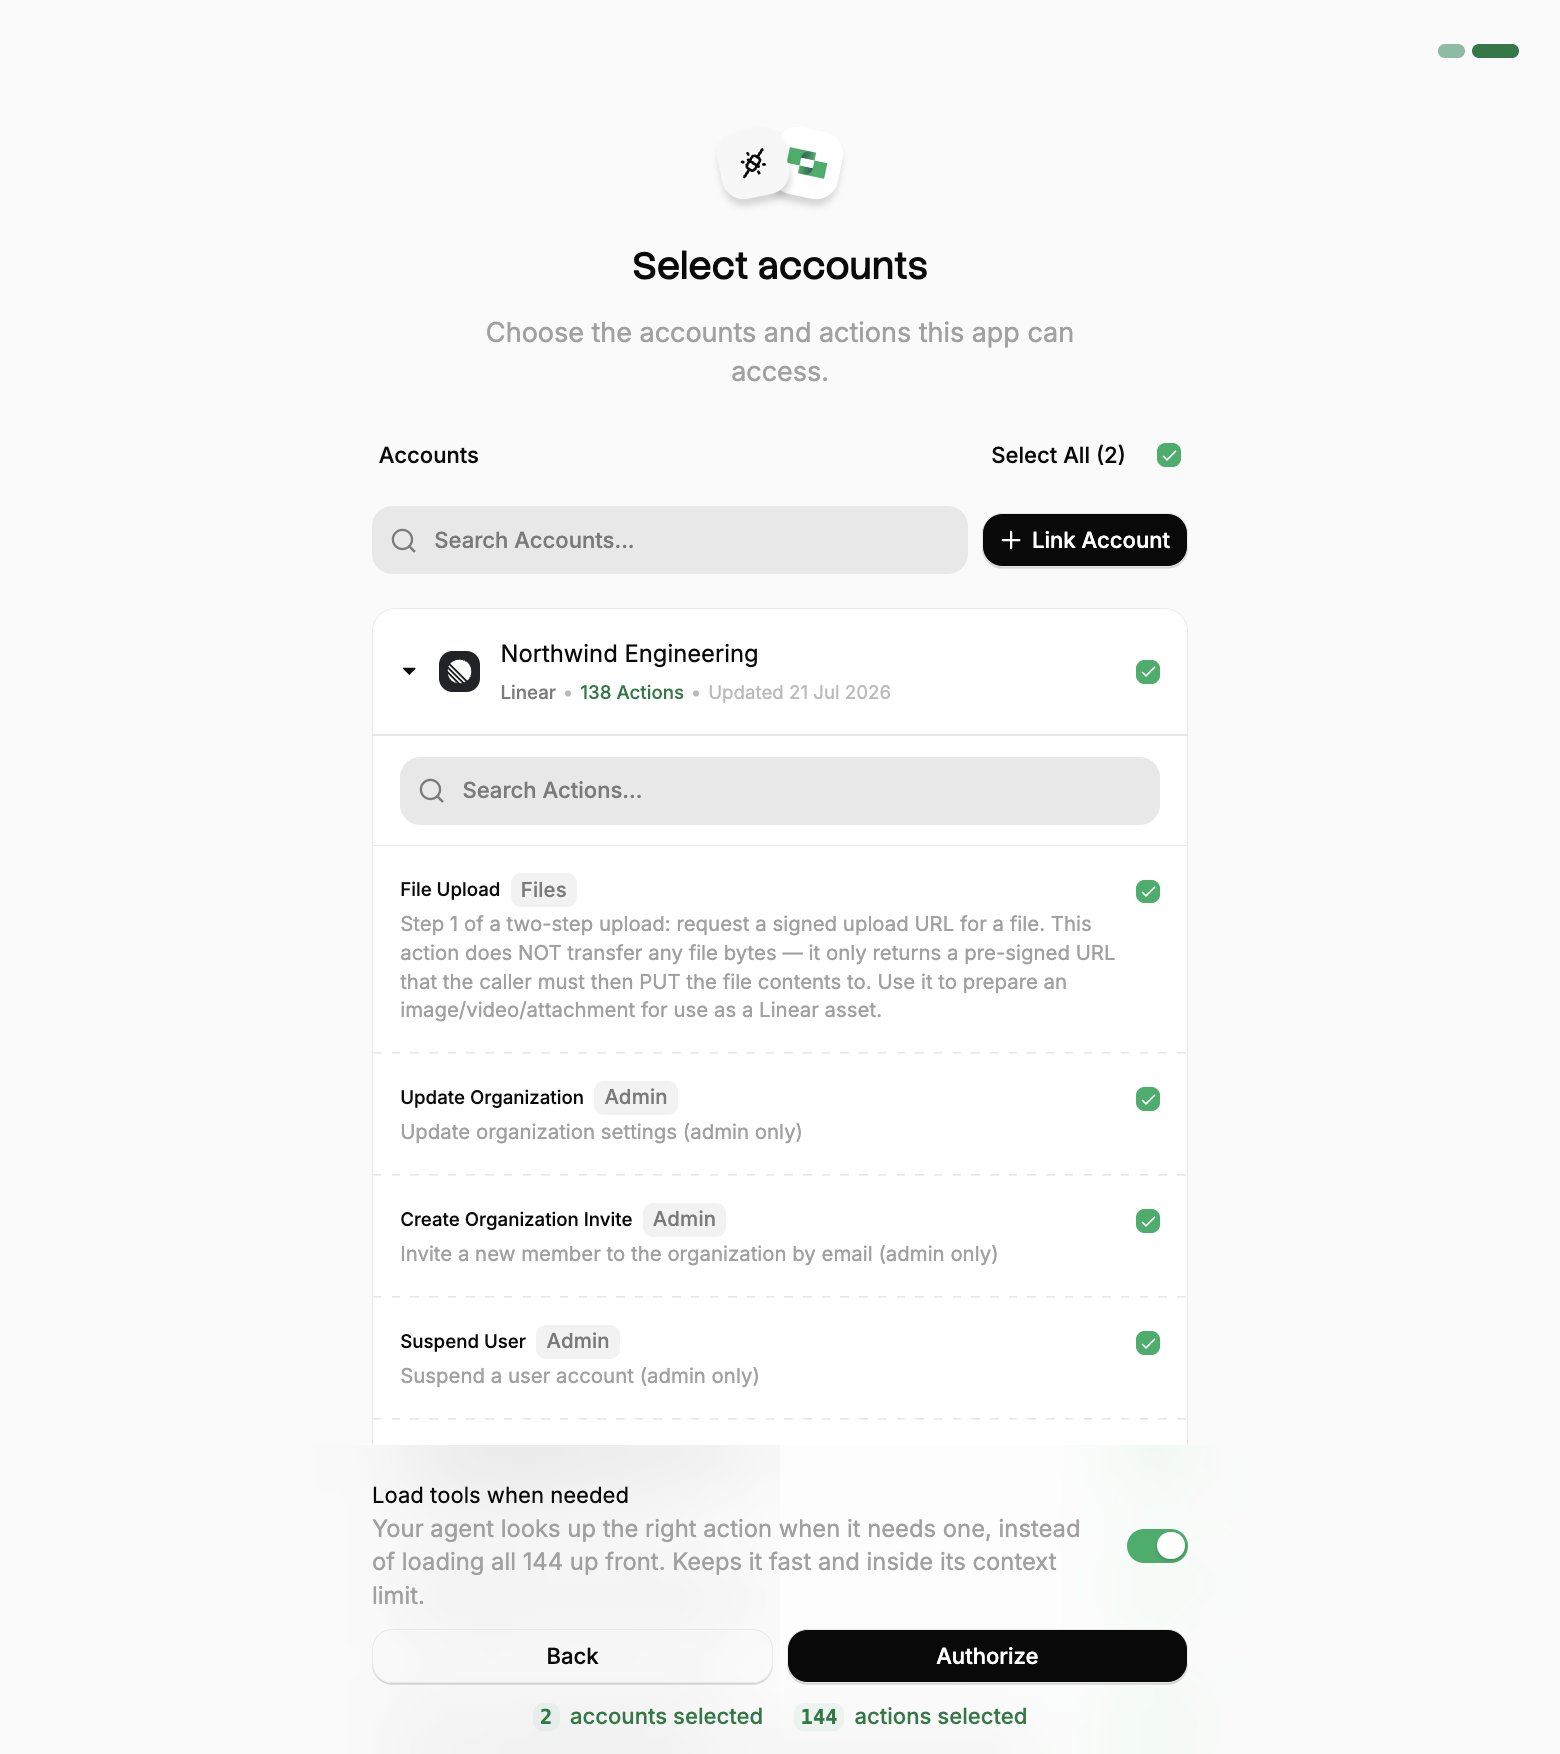
3. **Select accounts and actions.** Existing linked accounts are shown. New accounts can be linked by clicking **+ Link Account**. You can either select the whole account (all actions will be granted) or refine by toggling individual actions.
4. **(Optional) Load tools when needed.** On by default, and the toggle that puts the connection into [Advanced Tool Search](/optimize/advanced-tool-search). Leave it on for large action sets. Turn it off to hand the agent every selected action up front.
5. **Authorize.** Completes the connection; you can return to your client.
 If you see a sentence where the **Load tools when needed** toggle should be, an admin has already settled it for the whole project. See [project settings](/optimize/advanced-tool-search#setting-it-for-a-whole-project).
Back in ChatGPT, the scan finishes and lists the tools it found. Click **Create**.
The app appears in your own **Settings → Apps** with a **Dev** label, which is enough to use it yourself. Sharing it with everyone else depends on your plan.
Not applicable. A personal account has no workspace to publish to, so the app is yours as soon as it is created. Skip to the next step.
The app also lands in **Workspace Settings → Apps → Drafts**. An admin or owner opens **Drafts** and clicks **Publish**, reviewing the safety warnings for any write actions.
Published apps show in the workspace's approved connectors list, labeled **custom**. They cannot be edited afterwards, so changing the tools or metadata means creating and publishing the app again.
The app also lands in **Workspace Settings → Apps → Drafts**. An admin or owner opens **Drafts** and clicks **Publish**.
In the dialog that follows, **Configure Actions** selects which actions the app may run, and **Configure Access** limits it to specific groups. Both stay editable after publishing, from the ellipsis menu next to the app under **Workspace Settings → Apps**.
Start a new chat, select the StackOne app, and try:
```text theme={null}
What StackOne tools are available?
```
The app works in the ChatGPT desktop app as well as the browser. It is not available on mobile.
OpenAI asks you to confirm that an OAuth provider issues refresh tokens. StackOne advertises `offline_access` in its discovery metadata and issues them, so ChatGPT renews access on its own. Nothing to configure.
## Keeping the tool list current
Once an admin publishes the app, ChatGPT works from a frozen snapshot of its tools. Changing what StackOne exposes, by authorizing another linked account or enabling more actions on a [connector profile](/gateway/concepts/connector-profiles), does not reach ChatGPT until the app is refreshed. Enterprise and Edu admins refresh from the ellipsis menu next to the app under **Workspace Settings → Apps**. Business plans cannot refresh a published app, so it has to be created and published again.
[Advanced Tool Search](/optimize/advanced-tool-search) sidesteps most of this. It replaces the per-action tool list with two stable tools, Search and Execute, so the snapshot holds however the underlying grant changes.
To change which accounts or actions ChatGPT can reach, re-run the OAuth flow. To revoke it, use **Connected Apps** in the StackOne dashboard.
A session token URL carries its own credential, so it covers the cases OAuth can't: a shared server, a scheduled job, or anywhere nobody is present to approve a consent screen.
Generate one from **Connectors**, open a connector, then **Use in Agent**. Pick a linked account, set the expiry (one year by default), and copy the URL:
```
https://api.stackone.com/mcp?token={session_token}
```
One URL covers one linked account, and anyone holding it has that access until it expires, so treat it like a password. See [Choosing a connection method](/connect/ai-platforms/overview#choosing-a-connection-method) for the comparison with OAuth.
There is no consent screen to set [Advanced Tool Search](/optimize/advanced-tool-search) on, so add the `tool-mode` query parameter instead:
```
https://api.stackone.com/mcp?token={session_token}&tool-mode=search_execute
```
Paste the token URL as the app URL and leave authentication set to none. One app then covers one linked account.
## Optimize and secure
With your agent connected, use StackOne's platform features to optimize performance and secure every call.
Reduce context and save tokens.
Search synced records for a fraction of the tokens.
Block prompt injections before they reach your agent.
If you see a sentence where the **Load tools when needed** toggle should be, an admin has already settled it for the whole project. See [project settings](/optimize/advanced-tool-search#setting-it-for-a-whole-project).
Back in ChatGPT, the scan finishes and lists the tools it found. Click **Create**.
The app appears in your own **Settings → Apps** with a **Dev** label, which is enough to use it yourself. Sharing it with everyone else depends on your plan.
Not applicable. A personal account has no workspace to publish to, so the app is yours as soon as it is created. Skip to the next step.
The app also lands in **Workspace Settings → Apps → Drafts**. An admin or owner opens **Drafts** and clicks **Publish**, reviewing the safety warnings for any write actions.
Published apps show in the workspace's approved connectors list, labeled **custom**. They cannot be edited afterwards, so changing the tools or metadata means creating and publishing the app again.
The app also lands in **Workspace Settings → Apps → Drafts**. An admin or owner opens **Drafts** and clicks **Publish**.
In the dialog that follows, **Configure Actions** selects which actions the app may run, and **Configure Access** limits it to specific groups. Both stay editable after publishing, from the ellipsis menu next to the app under **Workspace Settings → Apps**.
Start a new chat, select the StackOne app, and try:
```text theme={null}
What StackOne tools are available?
```
The app works in the ChatGPT desktop app as well as the browser. It is not available on mobile.
OpenAI asks you to confirm that an OAuth provider issues refresh tokens. StackOne advertises `offline_access` in its discovery metadata and issues them, so ChatGPT renews access on its own. Nothing to configure.
## Keeping the tool list current
Once an admin publishes the app, ChatGPT works from a frozen snapshot of its tools. Changing what StackOne exposes, by authorizing another linked account or enabling more actions on a [connector profile](/gateway/concepts/connector-profiles), does not reach ChatGPT until the app is refreshed. Enterprise and Edu admins refresh from the ellipsis menu next to the app under **Workspace Settings → Apps**. Business plans cannot refresh a published app, so it has to be created and published again.
[Advanced Tool Search](/optimize/advanced-tool-search) sidesteps most of this. It replaces the per-action tool list with two stable tools, Search and Execute, so the snapshot holds however the underlying grant changes.
To change which accounts or actions ChatGPT can reach, re-run the OAuth flow. To revoke it, use **Connected Apps** in the StackOne dashboard.
A session token URL carries its own credential, so it covers the cases OAuth can't: a shared server, a scheduled job, or anywhere nobody is present to approve a consent screen.
Generate one from **Connectors**, open a connector, then **Use in Agent**. Pick a linked account, set the expiry (one year by default), and copy the URL:
```
https://api.stackone.com/mcp?token={session_token}
```
One URL covers one linked account, and anyone holding it has that access until it expires, so treat it like a password. See [Choosing a connection method](/connect/ai-platforms/overview#choosing-a-connection-method) for the comparison with OAuth.
There is no consent screen to set [Advanced Tool Search](/optimize/advanced-tool-search) on, so add the `tool-mode` query parameter instead:
```
https://api.stackone.com/mcp?token={session_token}&tool-mode=search_execute
```
Paste the token URL as the app URL and leave authentication set to none. One app then covers one linked account.
## Optimize and secure
With your agent connected, use StackOne's platform features to optimize performance and secure every call.
Reduce context and save tokens.
Search synced records for a fraction of the tokens.
Block prompt injections before they reach your agent.