> ## Documentation Index
> Fetch the complete documentation index at: https://docs.stackone.com/llms.txt
> Use this file to discover all available pages before exploring further.
# n8n Automation
> Use StackOne MCP in n8n workflows with the MCP Client Tool node for automated operations.
## Overview
[n8n](https://n8n.io/) provides MCP support through its MCP Client Tool node for workflow automation.
## Setup
1. Go to **Connectors** in the left nav and open the connector you want to use
2. Click **Use in Agent** in the top right
3. On the **Use** tab, click **MCP Server** under "Use with Agent Client"
4. Select a linked account from the dropdown
5. Choose **HTTPS MCP** as the client
6. Copy the generated URL — it looks like:
```
https://api.stackone.com/mcp?token=
```
The token encodes your account identity. No separate API key or account ID header is needed.
The token expires after one year. Regenerate it at any time using the refresh button in the MCP tile.
 1. Create a new workflow
2. Click **+** to add a node and search for "MCP Agent"
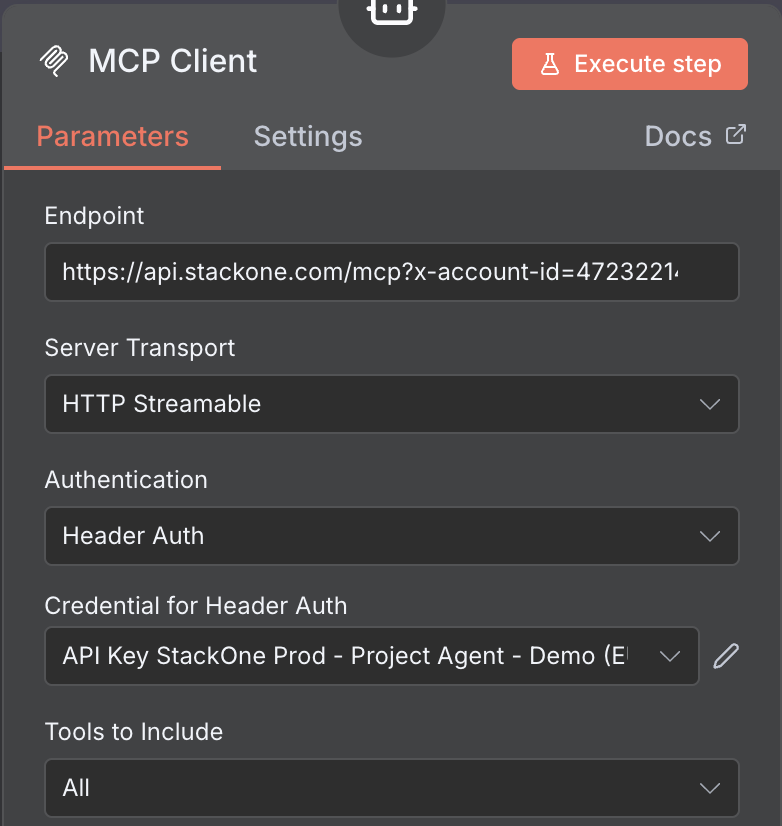
3. Under tools, click **+** and search for **MCP Client Tool**
4. Configure the node:
* **URL**: Paste the URL from the previous step
* **Authentication**: None
* Select the tools you want from the **Tools to include** dropdown
Click **Execute Step** to verify the connection and see available tools.
***
## Advanced: manual API key setup
If you prefer to authenticate with your API key and account ID directly instead of a dashboard-generated token:
1. Set the URL to `https://api.stackone.com/mcp?x-account-id=`
2. Set **Authentication** to **Header Auth** (create new credentials if needed):
* Header name: `Authorization`
* Value: `Basic ` — base64-encode your API key followed by a colon (`your_api_key:`)
See [Authentication & Security](/embed/call-actions/mcp#calling-actions) for details on obtaining your API key and account ID.
***
## Building workflows
Once configured, use the MCP Client Tool node to execute StackOne actions on the linked account you specified.
***
For detailed n8n setup instructions, see the [official n8n documentation](https://docs.n8n.io/).
## Handling large tool catalogs
If the connector exposes many actions, add the `tool-mode=search_execute` query parameter to the MCP URL in your config. The client then registers just two tools — search + execute — and the agent discovers actions at runtime, so the context footprint stays flat however large the catalog:
```
https://api.stackone.com/mcp?tool-mode=search_execute
```
For a token URL, append it as an extra parameter: `https://api.stackone.com/mcp?token=&tool-mode=search_execute`.
See [Tool Discovery](/features/tool-discovery) for how search works, its accuracy, and the other modes.
## Optimize and secure
With your agent connected, use StackOne's platform features to optimize performance and secure every call.
Reduce context and save tokens.
Reduce latency and enable semantic search.
Block prompt injections before they reach your agent.
1. Create a new workflow
2. Click **+** to add a node and search for "MCP Agent"
3. Under tools, click **+** and search for **MCP Client Tool**
4. Configure the node:
* **URL**: Paste the URL from the previous step
* **Authentication**: None
* Select the tools you want from the **Tools to include** dropdown
Click **Execute Step** to verify the connection and see available tools.
***
## Advanced: manual API key setup
If you prefer to authenticate with your API key and account ID directly instead of a dashboard-generated token:
1. Set the URL to `https://api.stackone.com/mcp?x-account-id=`
2. Set **Authentication** to **Header Auth** (create new credentials if needed):
* Header name: `Authorization`
* Value: `Basic ` — base64-encode your API key followed by a colon (`your_api_key:`)
See [Authentication & Security](/embed/call-actions/mcp#calling-actions) for details on obtaining your API key and account ID.
***
## Building workflows
Once configured, use the MCP Client Tool node to execute StackOne actions on the linked account you specified.
***
For detailed n8n setup instructions, see the [official n8n documentation](https://docs.n8n.io/).
## Handling large tool catalogs
If the connector exposes many actions, add the `tool-mode=search_execute` query parameter to the MCP URL in your config. The client then registers just two tools — search + execute — and the agent discovers actions at runtime, so the context footprint stays flat however large the catalog:
```
https://api.stackone.com/mcp?tool-mode=search_execute
```
For a token URL, append it as an extra parameter: `https://api.stackone.com/mcp?token=&tool-mode=search_execute`.
See [Tool Discovery](/features/tool-discovery) for how search works, its accuracy, and the other modes.
## Optimize and secure
With your agent connected, use StackOne's platform features to optimize performance and secure every call.
Reduce context and save tokens.
Reduce latency and enable semantic search.
Block prompt injections before they reach your agent.