> ## Documentation Index
> Fetch the complete documentation index at: https://docs.stackone.com/llms.txt
> Use this file to discover all available pages before exploring further.
# Claude Desktop
> Connect StackOne MCP to Claude Desktop using the mcp-remote package.
## Overview
[Claude Desktop](https://claude.ai/download) is Anthropic's GUI application for macOS and Windows with full MCP support for tools, resources, and prompts.
For complete Claude Desktop MCP documentation, see the [official MCP quickstart](https://modelcontextprotocol.io/quickstart/user).
## Setup
Claude Desktop requires the [`mcp-remote`](https://github.com/geelen/mcp-remote) package to connect to remote HTTP servers.
The fastest way to get your configuration is directly from the StackOne dashboard — it generates a ready-to-paste JSON block for Claude Desktop.
1. Go to **Connectors** in the left nav and open the connector you want to use
2. Click **Use in Agent** in the top right
3. On the **Use** tab, click **MCP Server** under "Use with Agent Client"
4. Select a linked account from the dropdown
5. Choose **Claude Desktop** as the client
6. Copy the generated JSON block
The config uses a single token URL — no separate API key encoding required.
The token expires after one year. Regenerate it at any time using the refresh button in the MCP tile.
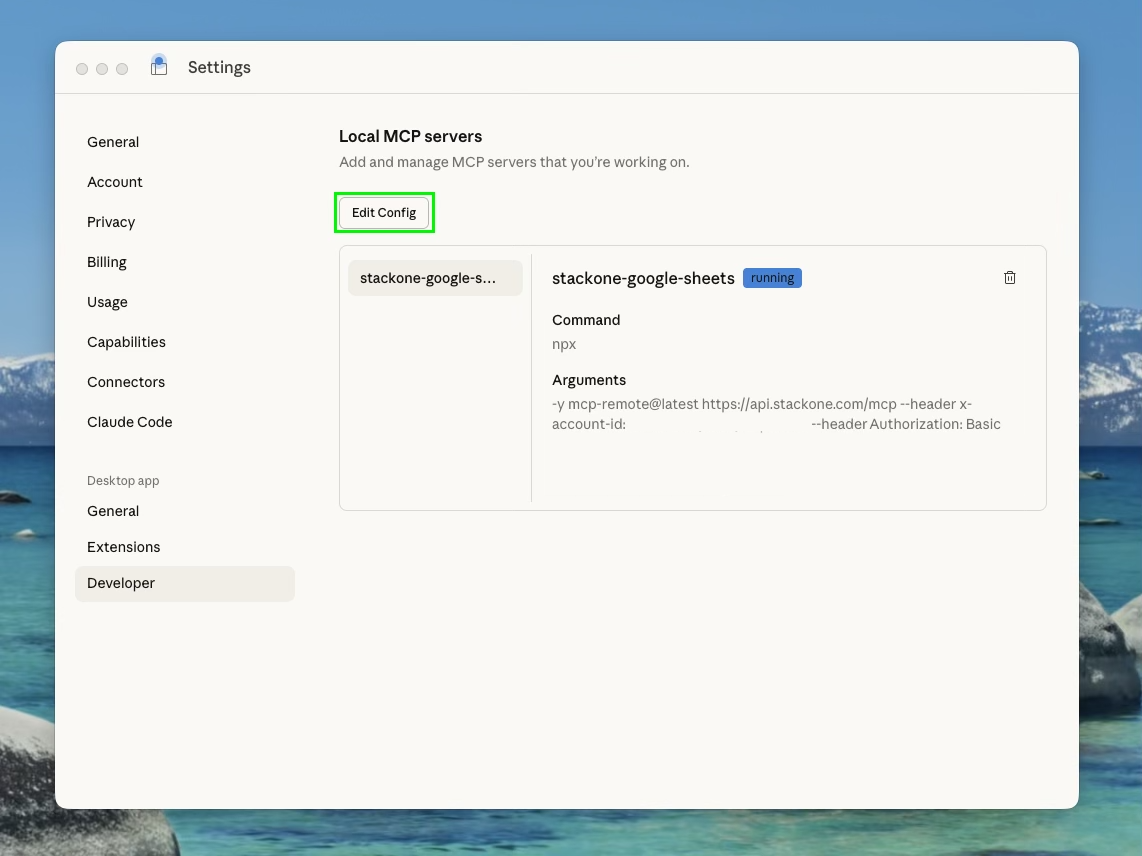
1. Open Claude Desktop
2. Navigate to **Settings** → **Developer**
3. Click **"Edit Config"** to open the configuration file in your default editor
The config file is located at:
* **macOS**: `~/Library/Application Support/Claude/claude_desktop_config.json`
* **Windows**: `%APPDATA%\Claude\claude_desktop_config.json`
 Paste the config from the dashboard into your `claude_desktop_config.json`. It looks like this:
```json theme={null}
{
"mcpServers": {
"gsheets": {
"command": "npx",
"args": [
"-y",
"mcp-remote@latest",
"https://api.stackone.com/mcp?token={session_token}"
]
}
}
}
```
Use short names for easier identification: `gsheets`, `slack`, `hubspot-sales`. You can prefix with `stackone-` or `s1-` if you have other MCP servers, but it's not required.
For multiple linked accounts, add an entry for each. Get each token from the dashboard by selecting the relevant account.
Paste the config from the dashboard into your `claude_desktop_config.json`. It looks like this:
```json theme={null}
{
"mcpServers": {
"gsheets": {
"command": "npx",
"args": [
"-y",
"mcp-remote@latest",
"https://api.stackone.com/mcp?token={session_token}"
]
}
}
}
```
Use short names for easier identification: `gsheets`, `slack`, `hubspot-sales`. You can prefix with `stackone-` or `s1-` if you have other MCP servers, but it's not required.
For multiple linked accounts, add an entry for each. Get each token from the dashboard by selecting the relevant account.
 ```json theme={null}
{
"mcpServers": {
"gsheets": {
"command": "npx",
"args": [
"-y",
"mcp-remote@latest",
"https://api.stackone.com/mcp?token={google_sheets_session_token}"
]
},
"slack": {
"command": "npx",
"args": [
"-y",
"mcp-remote@latest",
"https://api.stackone.com/mcp?token={slack_session_token}"
]
}
}
}
```
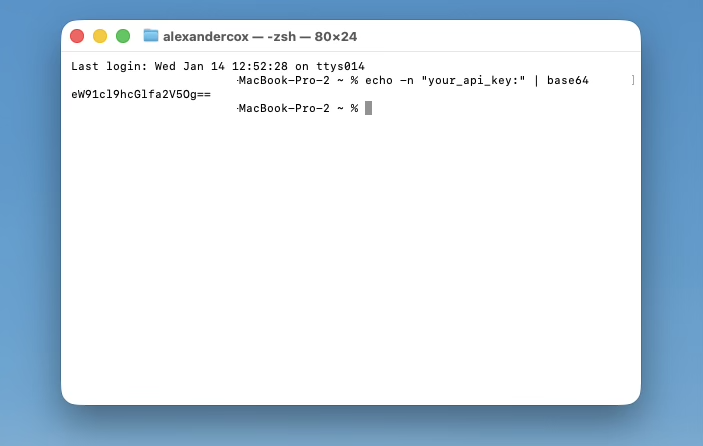
If you prefer to use your API key and account ID directly, encode your API key first:
```json theme={null}
{
"mcpServers": {
"gsheets": {
"command": "npx",
"args": [
"-y",
"mcp-remote@latest",
"https://api.stackone.com/mcp?token={google_sheets_session_token}"
]
},
"slack": {
"command": "npx",
"args": [
"-y",
"mcp-remote@latest",
"https://api.stackone.com/mcp?token={slack_session_token}"
]
}
}
}
```
If you prefer to use your API key and account ID directly, encode your API key first:
 Then add to your config:
```json theme={null}
{
"mcpServers": {
"gsheets": {
"command": "npx",
"args": [
"-y",
"mcp-remote@latest",
"https://api.stackone.com/mcp?x-account-id={account_id}",
"--header",
"Authorization: Basic {base64_encoded_api_key}"
]
}
}
}
```
Close and reopen Claude Desktop to load the new configuration.
## Verify connection
After restarting, navigate to **Settings** → **Developer** to verify your servers are configured:
Then add to your config:
```json theme={null}
{
"mcpServers": {
"gsheets": {
"command": "npx",
"args": [
"-y",
"mcp-remote@latest",
"https://api.stackone.com/mcp?x-account-id={account_id}",
"--header",
"Authorization: Basic {base64_encoded_api_key}"
]
}
}
}
```
Close and reopen Claude Desktop to load the new configuration.
## Verify connection
After restarting, navigate to **Settings** → **Developer** to verify your servers are configured:
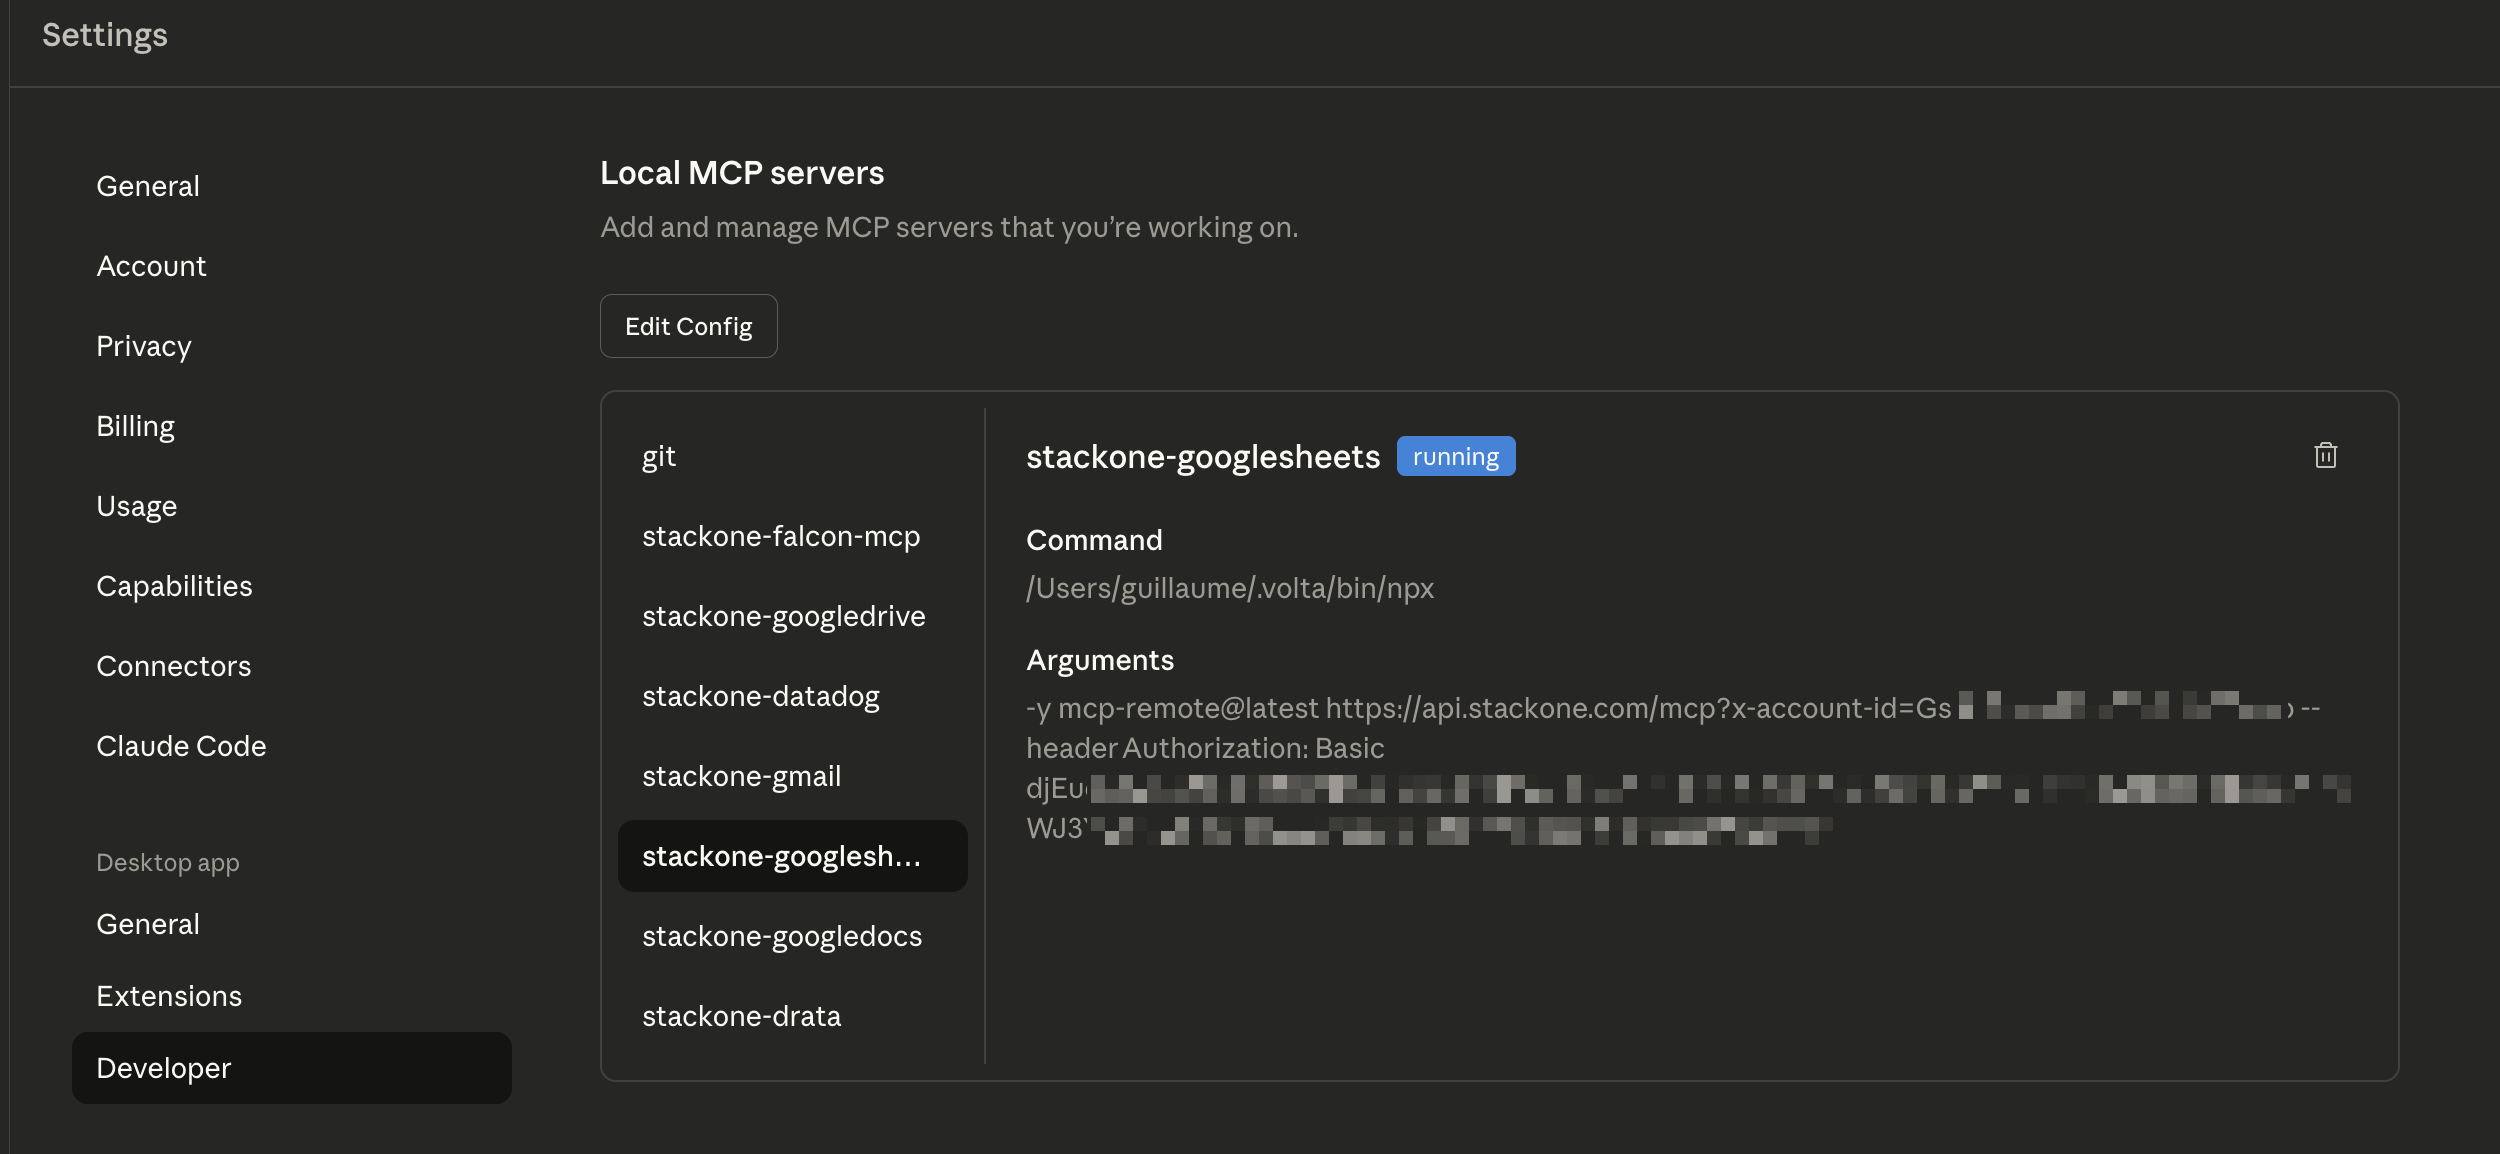 A green "running" badge indicates the server is connected. If you see "failed", click **Open Logs Folder** to troubleshoot.
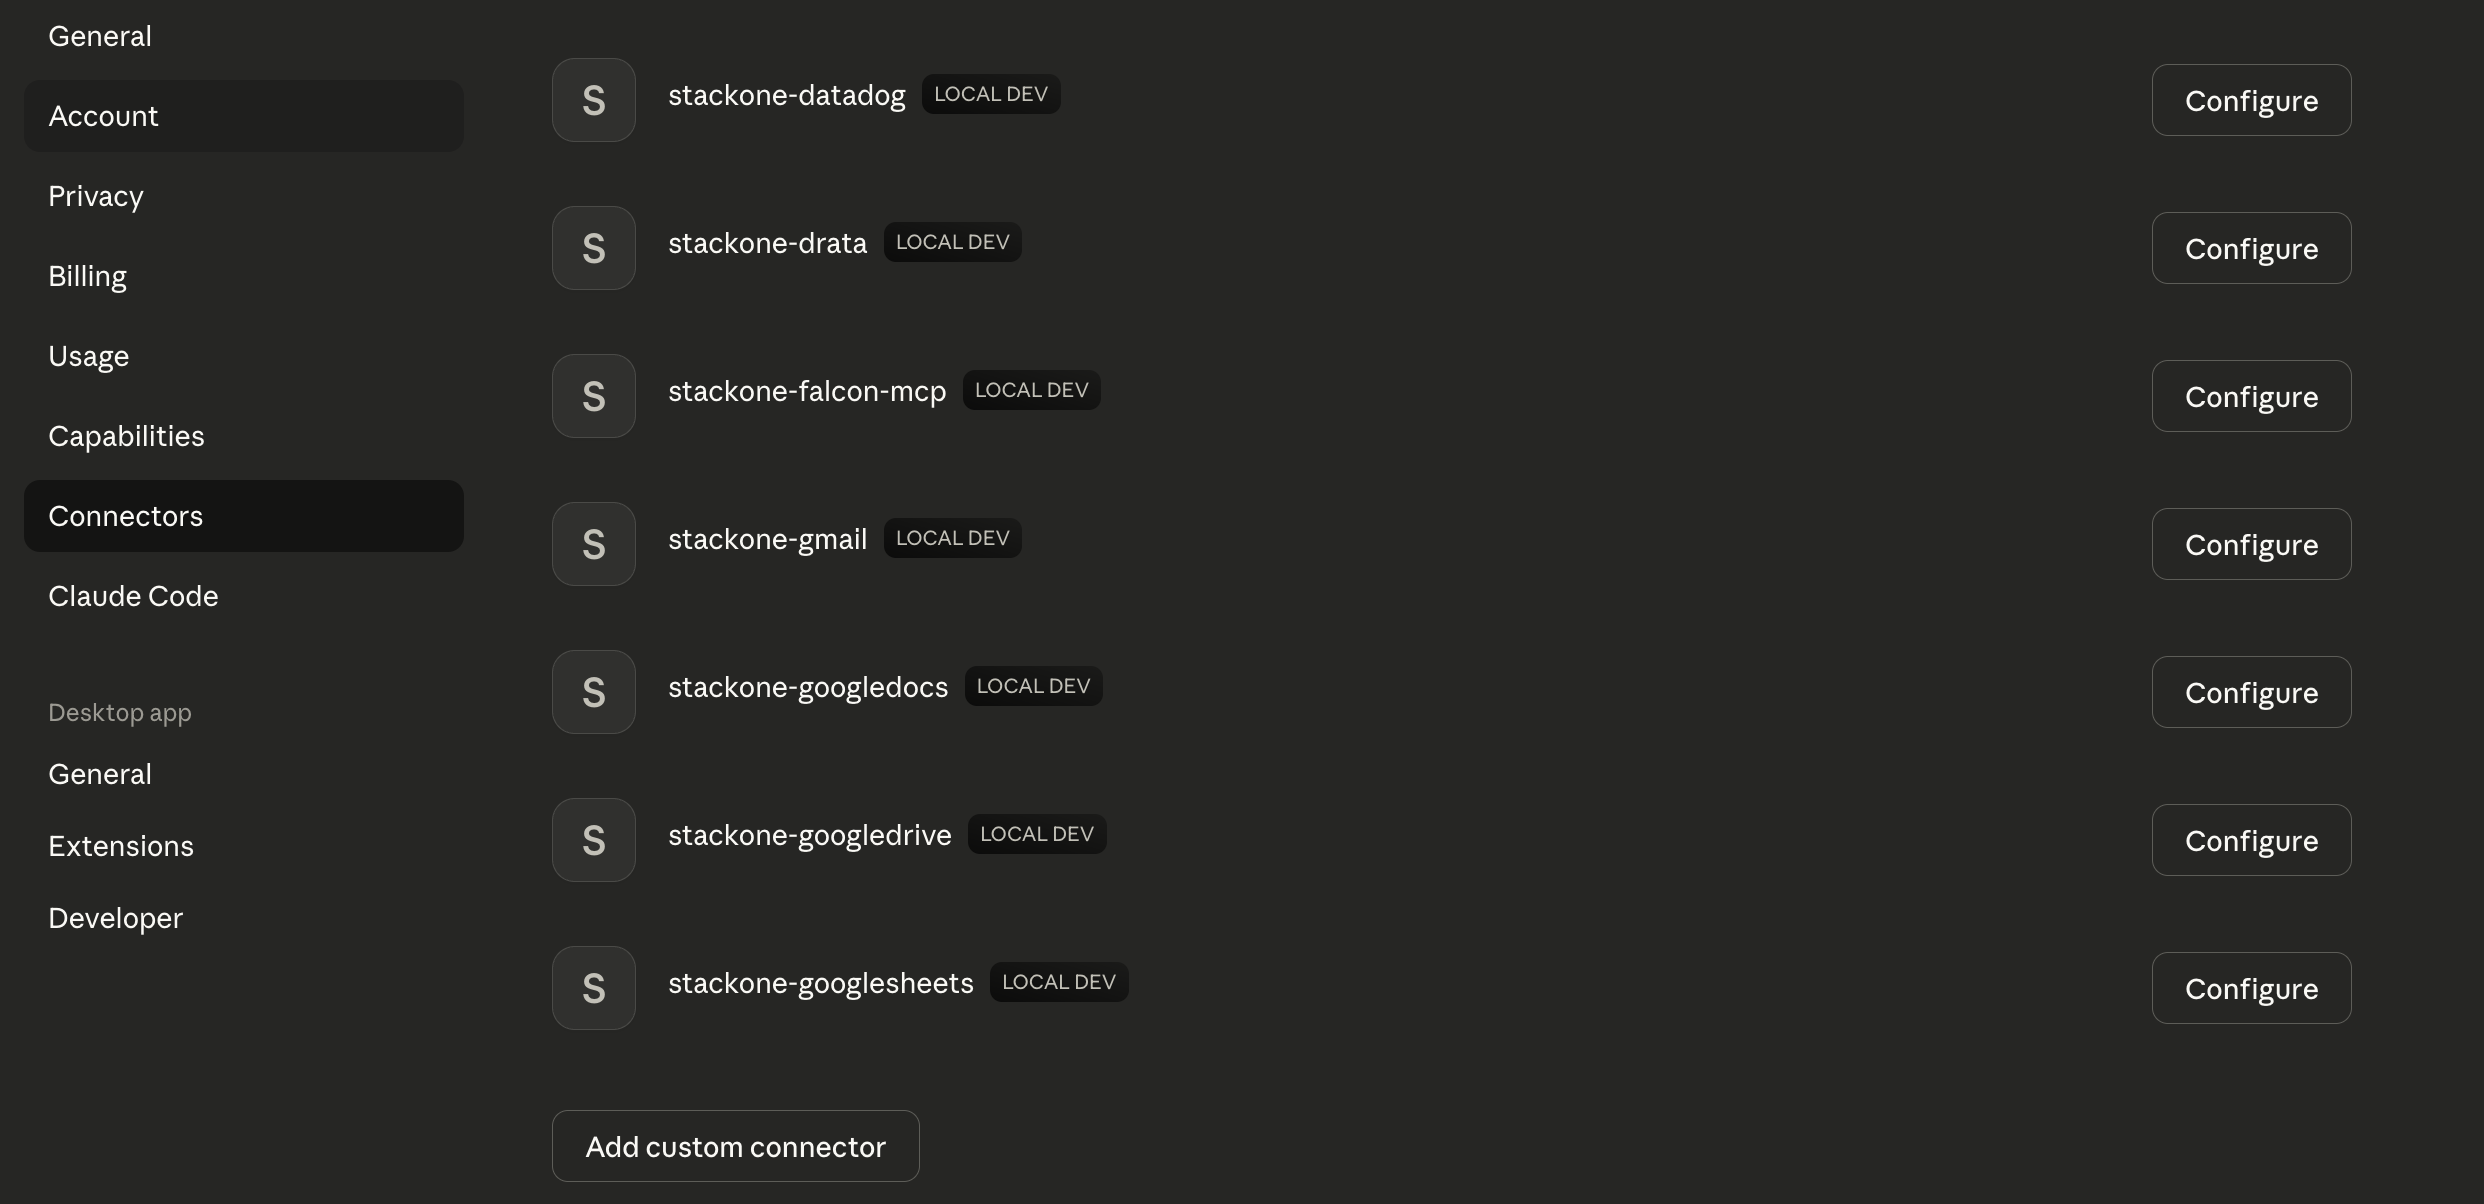
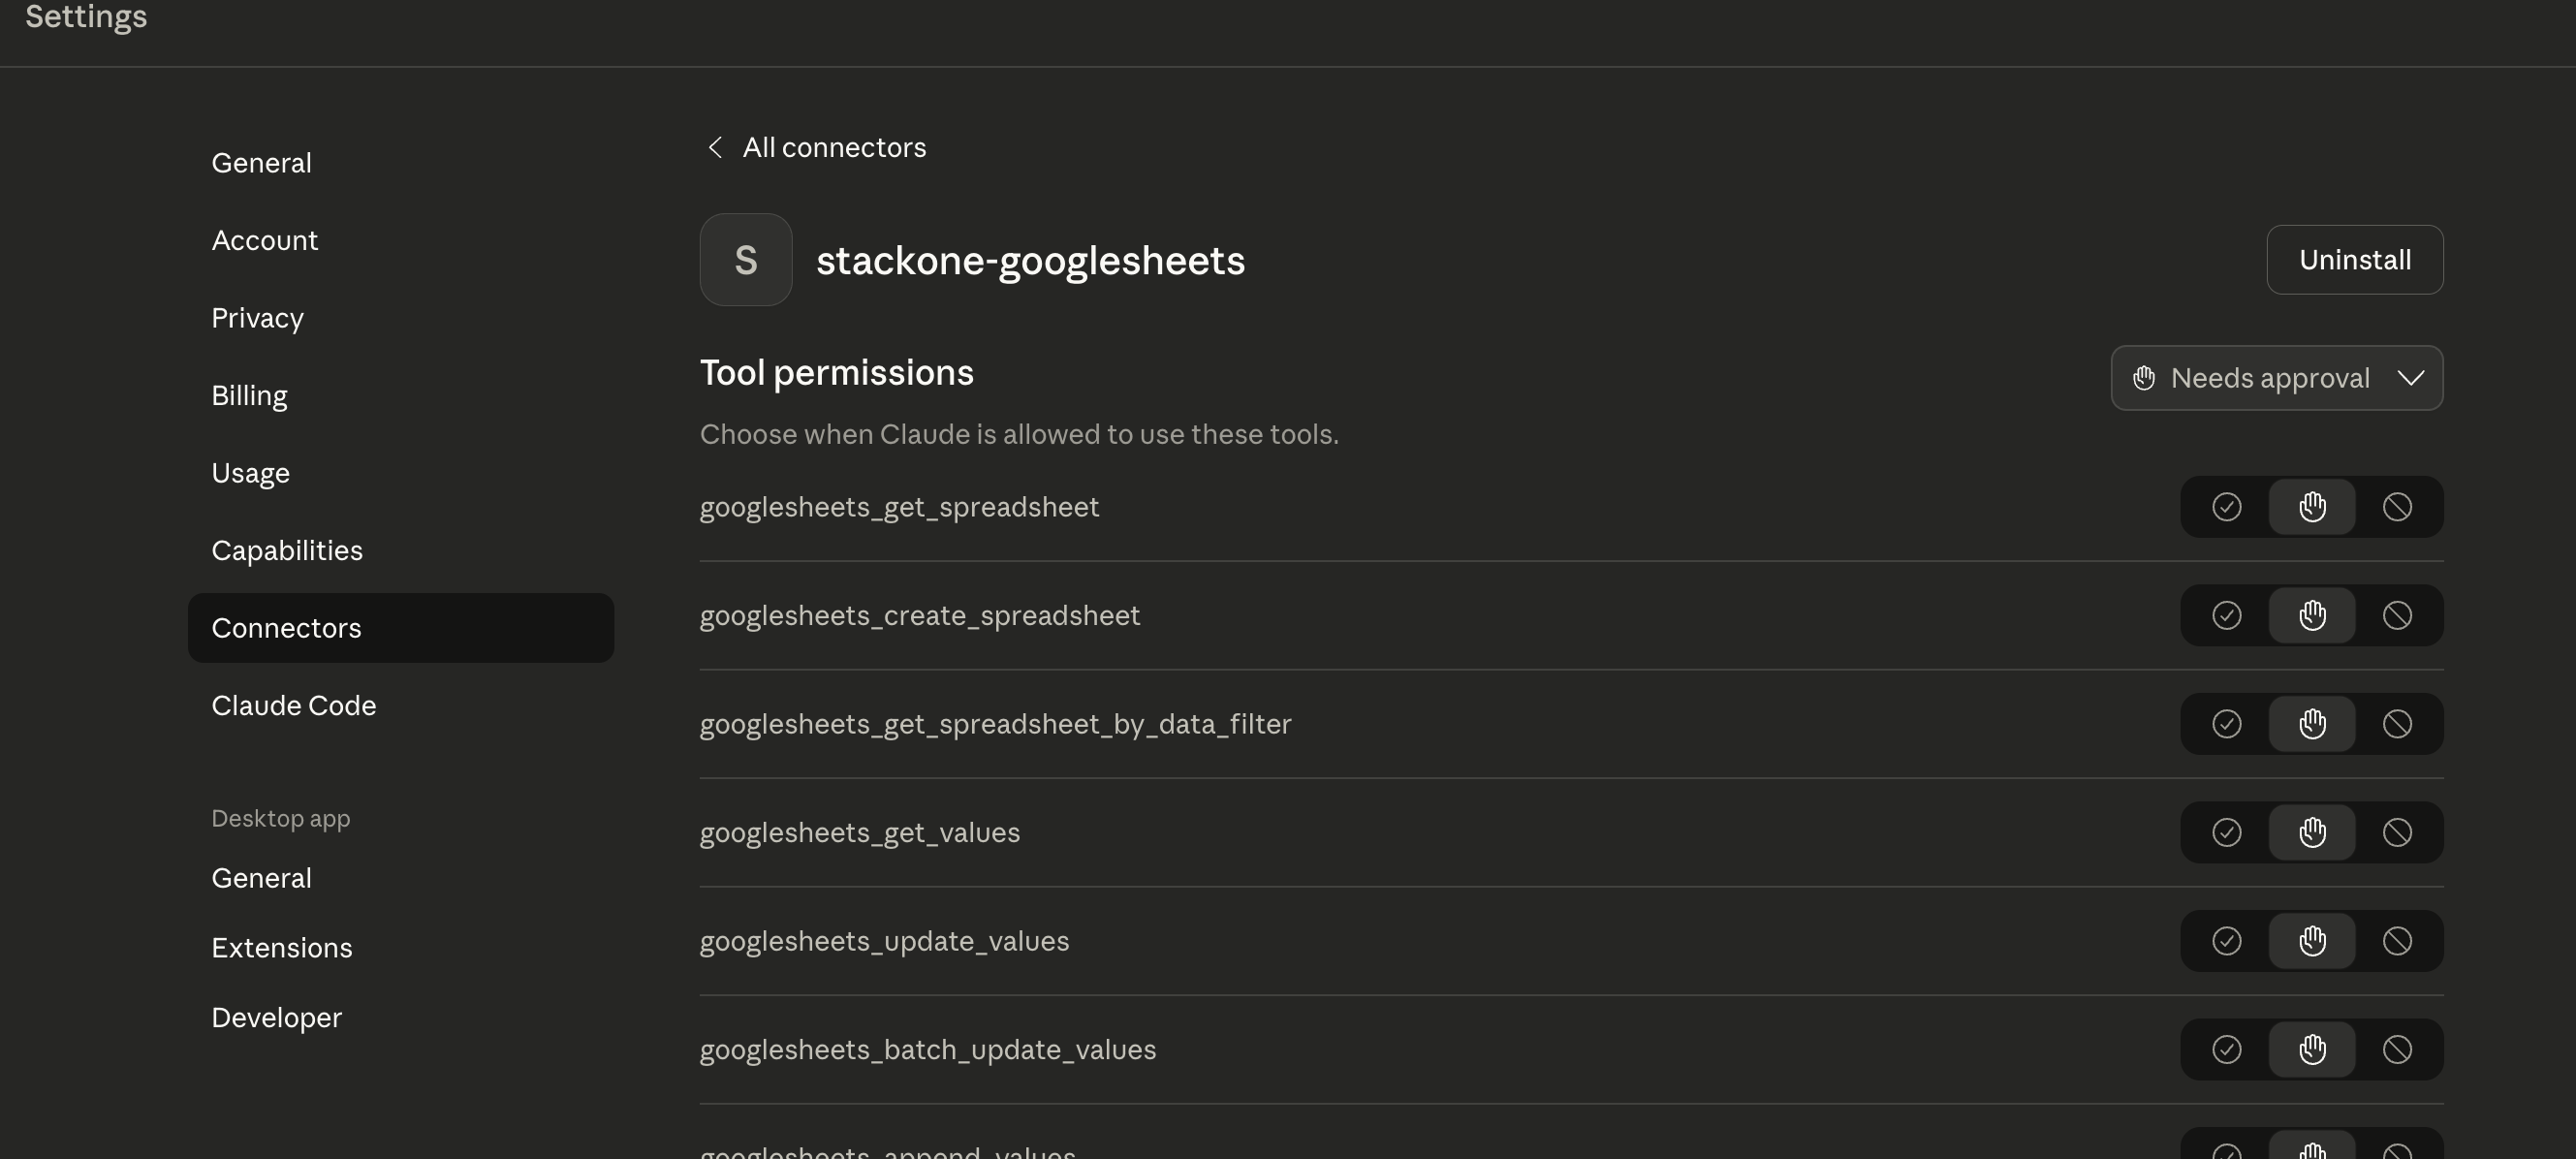
Your servers will also appear in **Settings** → **Connectors** with a "Local Dev" tag, where you can configure tool permissions:
A green "running" badge indicates the server is connected. If you see "failed", click **Open Logs Folder** to troubleshoot.
Your servers will also appear in **Settings** → **Connectors** with a "Local Dev" tag, where you can configure tool permissions:
 Once connected, try prompts like:
```text theme={null}
What StackOne tools are available?
```
```text theme={null}
Search recent calls in Gong
```
You can also ask about API schemas or documentation.
For troubleshooting, see Claude Desktop's logging capabilities in the [official MCP documentation](https://modelcontextprotocol.io/quickstart/user).
## Programmatic integration
For programmatic integration with Anthropic's Claude API, see the [Anthropic SDK Framework Guide](/embed/call-actions/mcp/anthropic-sdk).
## Handling large tool catalogs
If the connector exposes many actions, add the `tool-mode=search_execute` query parameter to the MCP URL in your config. The client then registers just two tools — search + execute — and the agent discovers actions at runtime, so the context footprint stays flat however large the catalog:
```
https://api.stackone.com/mcp?tool-mode=search_execute
```
For a token URL, append it as an extra parameter: `https://api.stackone.com/mcp?token=&tool-mode=search_execute`.
See [Tool Discovery](/features/tool-discovery) for how search works, its accuracy, and the other modes.
For example, with API-key auth:
```json theme={null}
{
"mcpServers": {
"stackone-bamboohr": {
"command": "npx",
"args": [
"-y",
"mcp-remote@latest",
"https://api.stackone.com/mcp?tool-mode=search_execute",
"--header",
"Authorization: Basic ",
"--header",
"x-account-id: "
]
}
}
}
```
## Optimize and secure
With your agent connected, use StackOne's platform features to optimize performance and secure every call.
Reduce context and save tokens.
Reduce latency and enable semantic search.
Block prompt injections before they reach your agent.
Once connected, try prompts like:
```text theme={null}
What StackOne tools are available?
```
```text theme={null}
Search recent calls in Gong
```
You can also ask about API schemas or documentation.
For troubleshooting, see Claude Desktop's logging capabilities in the [official MCP documentation](https://modelcontextprotocol.io/quickstart/user).
## Programmatic integration
For programmatic integration with Anthropic's Claude API, see the [Anthropic SDK Framework Guide](/embed/call-actions/mcp/anthropic-sdk).
## Handling large tool catalogs
If the connector exposes many actions, add the `tool-mode=search_execute` query parameter to the MCP URL in your config. The client then registers just two tools — search + execute — and the agent discovers actions at runtime, so the context footprint stays flat however large the catalog:
```
https://api.stackone.com/mcp?tool-mode=search_execute
```
For a token URL, append it as an extra parameter: `https://api.stackone.com/mcp?token=&tool-mode=search_execute`.
See [Tool Discovery](/features/tool-discovery) for how search works, its accuracy, and the other modes.
For example, with API-key auth:
```json theme={null}
{
"mcpServers": {
"stackone-bamboohr": {
"command": "npx",
"args": [
"-y",
"mcp-remote@latest",
"https://api.stackone.com/mcp?tool-mode=search_execute",
"--header",
"Authorization: Basic ",
"--header",
"x-account-id: "
]
}
}
}
```
## Optimize and secure
With your agent connected, use StackOne's platform features to optimize performance and secure every call.
Reduce context and save tokens.
Reduce latency and enable semantic search.
Block prompt injections before they reach your agent.